How to REALLY weather-seal a camera. We go deep behind the scenes at Olympus R&D headquarters
posted Friday, March 13, 2020 at 12:01 PM EDT
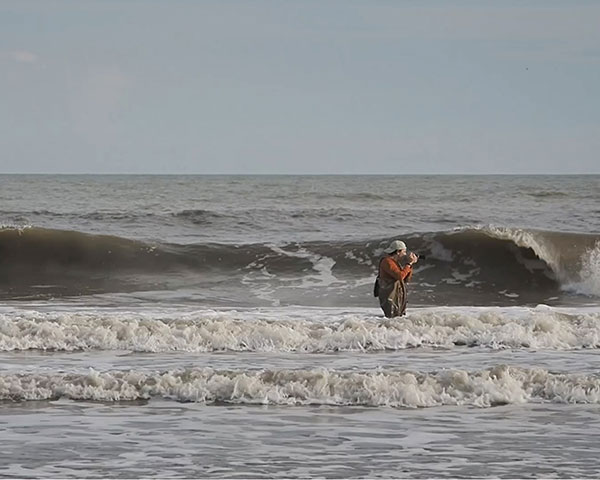
Have you ever lost a shot because you were afraid of getting your camera wet? Or perhaps you braved the conditions and got the shot, but lost your camera to the elements in the process? I've experienced the pain of both, so I know just how important good weather sealing can be. It's not just for pros, though, but for consumers as well. A hike in the woods or trip to the beach can easily put you well into "pro" weather-exposure territory.
Bottom line, good weather sealing makes a huge difference in how you can use your camera, and the kind of pictures you can get with it.
Lots of claims, not much reality
Lots of camera makers claim their products are "weather resistant", but what does that actually mean? The unfortunate fact is there's no meaningful industry standard or third-party test that can help end-users pick the right weather-resistant camera for their needs and budget.
For a long time now, I've wanted to add weather sealing to our testing here at Imaging Resource, but trying to come up with an objective and reliable test method was always a daunting task and my schedule perpetually jam-packed. When weather sealing became the tie-breaker in our annual Camera of the Year awards in 2017, though, it gave me the extra push I needed to get to work on creating a really solid, consistent basis for such a test.

That first test, pitting the Nikon D850 against the Sony A7R III, and also featuring the Canon 5D IV and Olympus E-M1 II, was high on simplicity, but not so much on repeatability. All four cameras got very similar water exposure, but there wasn't any way to reproduce the conditions in other tests.
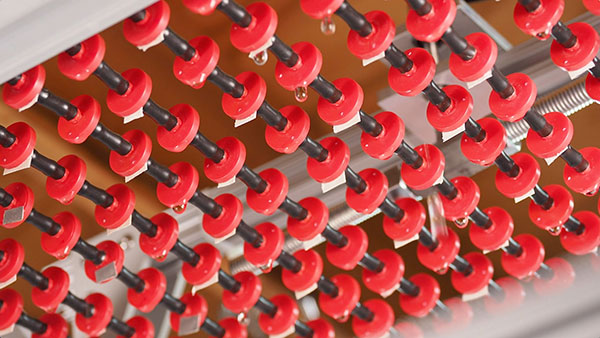
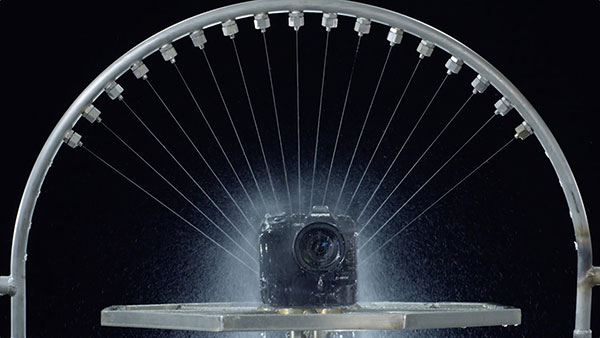
Since then, I've spent literally hundreds of hours designing and constructing a test system that would let me rigorously control all the variables, built around an array of timers, pumps, custom-made drippers (coming in what I've been calling version 1.5 of the system) and other components. It's designed to mimic natural rainfall in a very controlled way, and I've already run a dozen or so different cameras through it. (Unfortunately, I've only had time to publish detailed results for three models so far -- the Canon EOS R, Fuji X-T3, plus both the Nikon Z6 and Z7. I've tested the Olympus E-M5 III (at 5x the precipitation level we normally use), but haven't managed to publish it; stay tuned for that and other results over the next few months.)

My hope out of all this effort is twofold: First, to give manufacturers a way to meaningfully market and compete with each other on the basis weather sealing. More than just that though, I want to push them to up their game across the board, making good weather sealing more common for consumers and pros alike.
But how do you do that?
As an engineering nerd, I was naturally curious about what goes into making a camera weather-resistant, so I wanted to talk to a camera designer and learn more about what went into making a camera really weather-resistant.

The first company that came to mind to talk to was Olympus, as they have hands-down the best weather-sealing in the industry. Their best-sealed cameras can easily handle five times as much precipitation as I use in my standard tests, and the stories you might have heard about people simply rinsing off their Olympus cameras under a faucet are absolutely true.

When I invited Olympus to sponsor this article, they not only jumped at idea, but also invited me to visit their research and development headquarters in Hachiochi, Japan, so they could show me just what went into making their cameras and lenses so weather-resistance. There, I had the privilege of meeting with Takao Takasu, the Imaging Product Development manager for Olympus Corp.'s Research and Development department. He has overall responsibility for the development of Olympus' cameras and lenses, there's no better person to talk to about things like weather resistance.

Weather sealing is fundamental to Olympus' philosophy
Takasu-san told me that weather-sealing is a key feature for the company, because Olympus believes cameras should be able to be used any time, anywhere, so you can remain focused on your subject and not on the reliability of the camera itself. (Read my interview with Olympus' Aki Murata "A full-frame Olympus? Not just no: *HECK* no! (And why Olympus is better off for it)", for an explanation why this philosophy is so central to Olympus' mission and product designs.)
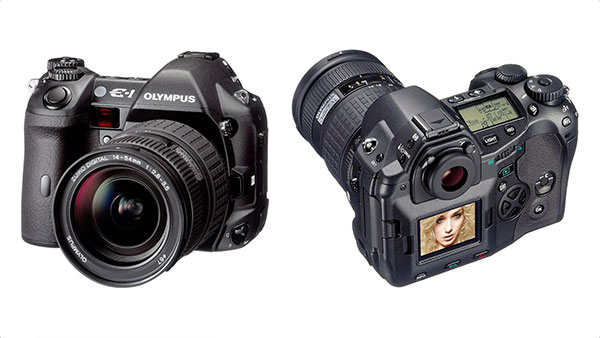
Takasu-san attributed Olympus' superb weather-sealing performance to its long experience with weather-sealed digital cameras. For interchangeable-lens models, that dates all the way back to 2003 with the company's very first E-system camera, the Olympus E-1. The story goes back still further if you consider compacts, though, and Takasu-san also noted that Olympus' development of its waterproof compacts like its current TG-series cameras gave it still more experience of what was required to keep water and dust out of its gear. The TG-series followed in the footsteps of earlier TOUGH and SW-badged waterproof digicams, and they in turn followed the Olympus Stylus 300, launched in early 2003 as the company's very first weather-sealed digital camera.
Yet that's still not the whole story! For that, we need to turn the clock all the way back to 1986, when the Olympus Infinity AF-1 was launched as the world's first weather-sealed compact camera. In all, that's 34 years of weather-sealing experience; no wonder they're now a market leader in the area!
All the ways water can get in ... and how to keep it out
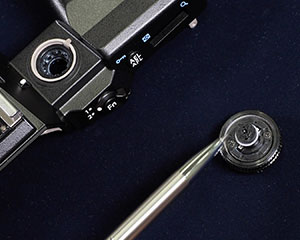
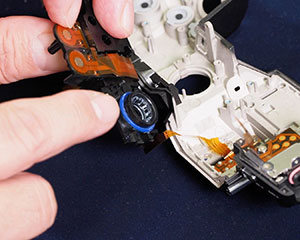
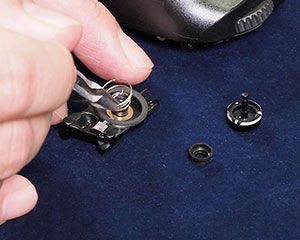
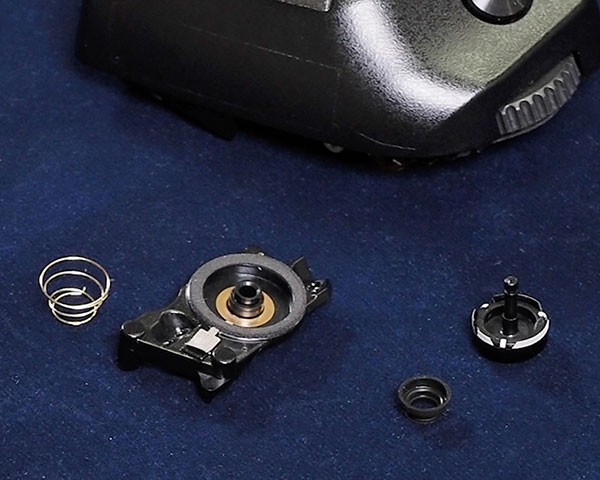
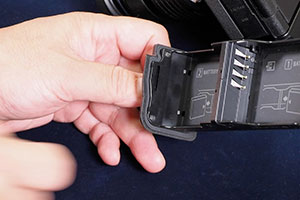
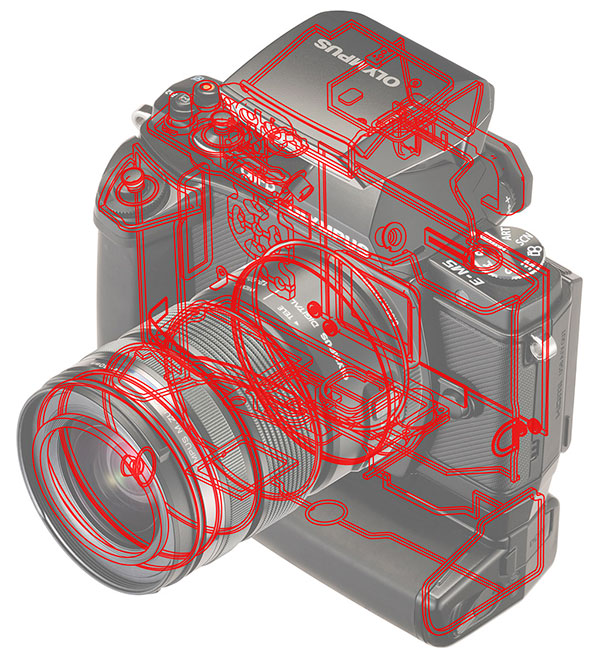
If you stop to think about it for a moment, there are a lot of different places for water to work its way into a camera body, and each has a different set of requirements for what's necessary to prevent that. You've got the seams between body panels, battery and card-compartment doors, pushbuttons and rotating knobs and dials. Every place there's a break in the continuous shell of the camera is an opportunity for water to get in. Takasu-san showed me a range of different splash-proof structures in person, personally disassembling key camera parts for me.
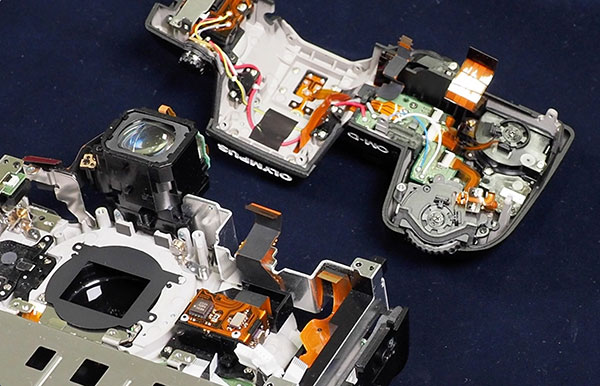
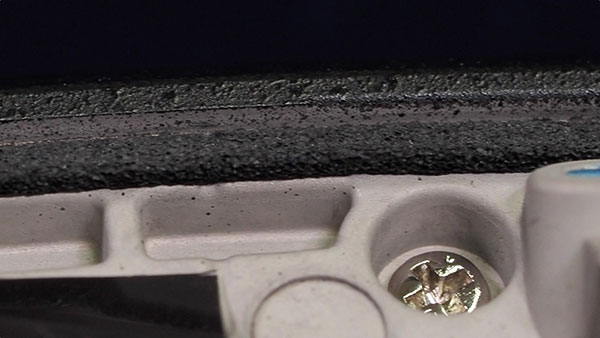
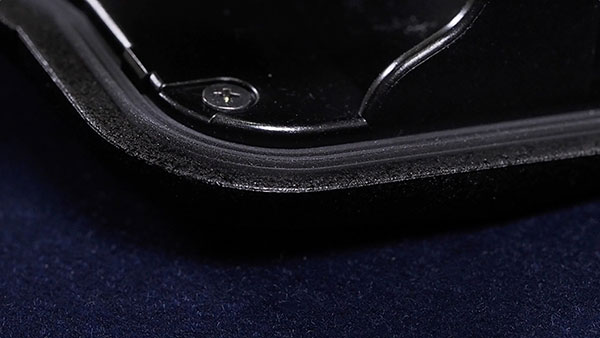
The sealing is at its most straightforward between larger parts like body panels, typically involving a foam gasket lining the edge between adjacent panels. As the camera is assembled, the chassis and external panels press against the foam, which completely fills any slight gaps between them. The foam gasket keeps any water from entering there.

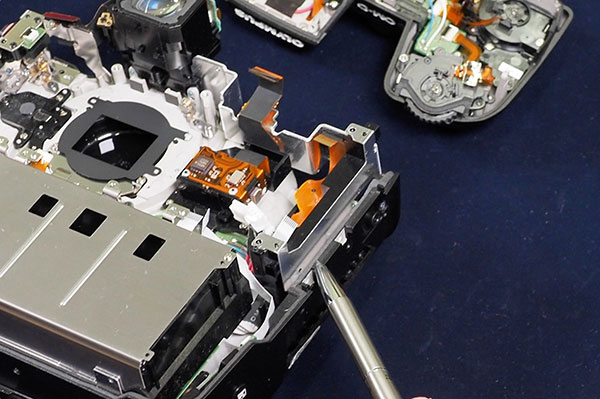
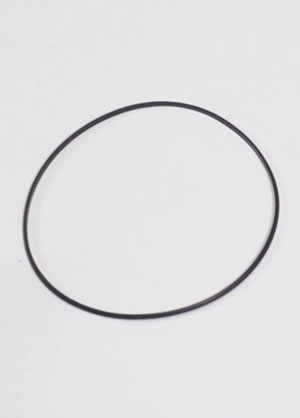
As you might expect, it's the moving parts -- switches, dials, buttons and the like -- that are the biggest challenge. Individual structures like dial or button assemblies receive foam strips and rubber gaskets or o-rings where they meet the camera body. Rubber O-rings are also typically found around the shafts that dials rotate on, where they enter the camera body. And buttons often have water seals designed into their flexible rubber bases, or sometimes within larger rubber elements which are designed to span multiple individual buttons.
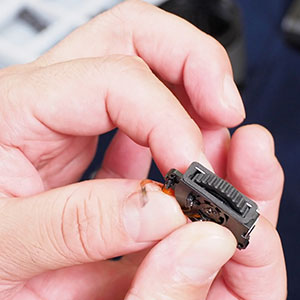
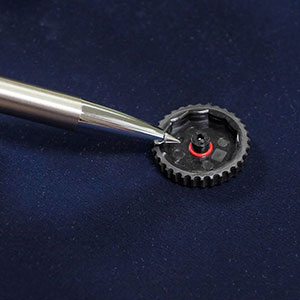


Looking at arguably the most important control of the bunch, the shutter button of the E-M1X sits atop a long plastic central shaft, with a bowl-shaped rubber element surrounding the base of that shaft which prevents water making its way back into the camera body.
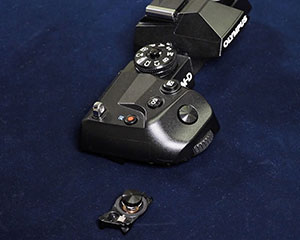
As you might expect given its flagship status, Olympus singled out the E-M1X for an even higher level of sealing on frequently-used parts. Takasu-san explained that Olympus expects that the E-M1X will be used in harsher conditions, and so demands the ultimate in sealing. A key example is its battery compartment cover. There, instead of just a soft foam gasket around the cover, there's a double-walled silicon gasket which mates with a double-walled barrier built into the adjacent body panels. Takasu-san explained that this sealing technology was developed for their TG-series cameras which are in fact completely waterproof to considerable depths. (They rate their TG-6 model as waterproof to 45 meters/147 feet :-0) The E-M1X isn't waterproof to that level, but the tech Olympus developed for their truly waterproof cameras proved valuable when it came to delivering the industry-leading sealing for their E-M1X flagship.

Even Olympus' mid-range models offer a very impressive level of weather sealing these days, though. Their most recent E-M5 III model actually carries an IPx1 rating; the first official "IP" rating on any interchangeable-lens camera. Takasu-san said that they actually test to a much higher level than what they officially claim. While the E-M5 III doesn't quite match the weather-sealing of the flagship E-M1X, I've tested it to a higher level than any other camera I've run through the IR water-soaker apparatus to date, and it handled it without complaint.
Sealing lenses: Zoom lenses are extra-tricky...
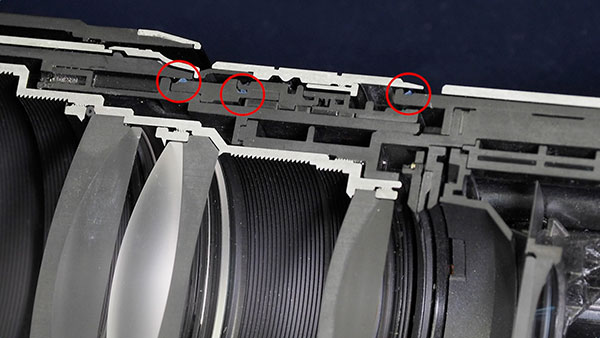

So far, we've only talked about camera bodies and fixed-lens cameras, but many of Olympus' interchangeable lenses have excellent sealing as well. Taking the company's M.Zuiko ED 300mm f4.0 IS PRO lens as an example, since it's internal focusing prime, the only moving parts to worry about are the focus ring, switches and buttons. Between the focus ring and the lens body, Olympus have installed several polymer gaskets and seals. They also have to seal the joints between separate pieces of the lens body, which takes a lot more gaskets, most of which are skinny large-diameter O-rings.
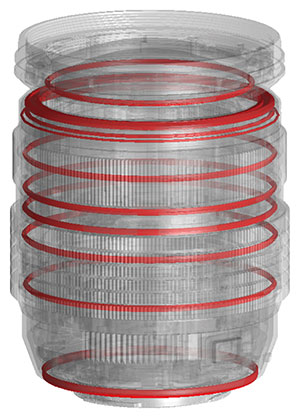
For zoom and external focusing lenses, though, things get even more complex. Because these lenses change length as they're operated, they need a way to let air move in and out freely, without letting water do the same thing.
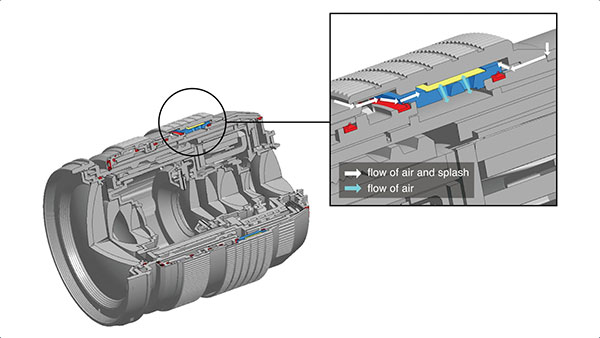
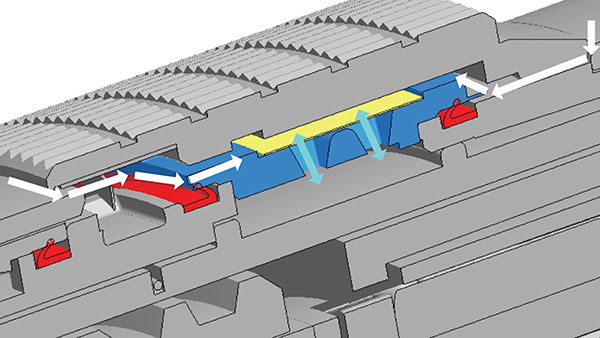
I was surprised by how Olympus manages this, using a very fine mesh made of a material similar to Gore-Tex fabric, which allows air into and out of the lens, but not water. Obviously this mesh needs protection itself, and so it's placed beneath the outer lens body, and a path is provided between the two which will allow air to make its way to the structure.

Summary
Even with all the illustrations and captions above, I've hardly done justice to the topic: Check out the video above (or here's a quick link to it on YouTube) for more details.
What do you think? Is weather-sealing something that's important to you in your own photography? What do you think of the weather-resistance testing approach I came up with? (You can read all the gory details if you'd like; be prepared for a loooong article though ;-) As noted above, you can also read the results of specific tests I've performed on a few cameras to date: Canon EOS R, Fuji X-T3, plus both the Nikon Z6 and Z7. With the recent changes here at IR, I'm looking forward to having more time to devote to weather-resistance testing and writing up the results to share with all of you.
Do you have any questions about any of the above or weather-sealing in general? Feel free to ask them in the comments below. I'll try to make a point of regularly checking in on this article for at least a couple of weeks after we publish it, so I can respond.
As is the case with my weather-testing protocol itself, my hope is that this and other articles will encourage camera and lens makers to make good weather-sealing a common feature users can count on, rather than something only found at the extreme high end of the market. With the E-M5 III, Olympus has made excellent weather resistance available at a price within reach of most enthusiast photographers. Here's hoping we'll see more of the same from other camera makers as well!