Pro perspectives on using Olympus OM-D cameras for wildlife photography: An Interview with Olympus Educators Joe & Mary Ann McDonald
posted Friday, April 16, 2021 at 3:20 PM EDT
What does it take to be a wildlife photographer? Or stepping back a bit, what does it take to enjoy and capture powerful photographs of wildlife? On the one hand, a love and passion for nature and wildlife is a key qualification, as is the ability to be patient and observant towards animal behavior. And then on the other hand, of course, the proper camera gear can make a critical difference in being successful in wildlife photography.
Although many camera manufacturers these days design and produce cameras and lenses that work very well for wildlife photography, the Olympus OM-D camera system, in particular, features several qualities, from camera size and durability to technical and performance innovations -- such as Bird AF, Pro Capture and the new M.Zuiko 150-400mm PRO lens -- that make this an excellent camera system for nature and wildlife photography. However, it's one thing to mention specs and features, but how do they actually get utilized out in the field to help capture beautiful wildlife photos? What better way to find out than to speak with a pair of full-time nature and wildlife photographers to not only get more insights into wildlife photography but also learn how they utilize Olympus OM-D cameras to create stunning nature photos.

The team here at IR recently had an opportunity to chat with Olympus Educators Joe and Mary Ann McDonald, a husband-and-wife team from Pennsylvania, who've both been wildlife photographers since the mid-1980s. Not only do they have decades of experience photographing wildlife all across the globe, but they also offer a unique perspective gear-wise making the transition from film to digital as well as switching altogether from full-frame DSLR systems over to the Olympus OM-D platform.
If you've wanted to get some cool pro perspectives on what the OM-D system is capable of for nature and wildlife photography, as well as see some stunning photos, keep on reading!
(Ed. Note: This interview has been edited slightly for clarity.)
William Brawley, Imaging Resource: To start, can you give us a little background on yourselves? How long have you each been a photographer, and what got you all interested in wildlife photography, in particular?
Joe: I've been a photographer practically my entire life, starting around age 13 or so. I was really interested in reptiles, with my plans to become a Herpetologist. At a county Cultural Center I met three other teenagers from different high schools and two wonderful adult mentors that introduced me to birds and the four of us became a competitive coop of doing field trips, birding and, for me, shooting photos too.
My first camera was a 35mm RangeFinder (Yashica Lynx 5000 – how can I forget this!), and I used a wire frame I made to get me the correct distance for proper focus with a closeup diopter screwed into the front of the lens. Then, I made the mistake of using that 50mm lens to photograph a Groundhog that was out in our yard, and I was so disappointed with the tiny speck of a rodent that I started researching cameras and soon, by my parent's indulgence, I graduated to an SLR. My dad almost killed me when I said the camera wasn't the key, it was the big telephoto I'd need! Soon, I expanded my photo interest to include birds and mammals as well. That interest never stopped, so I've been shooting for about 55 years… that is so hard to write.
Mary Ann: I loved being outside, hiking, birding, fishing... I basically grew up outside. I was a biology pre-med major in college and even though I ended up in a lab (I was in medical research for 12 years at the Hershey Medical Center), I loved wildlife and being out in the wild. I was into birding and liked photography but didn't know what I was doing. Joe came to talk to our bird club for our monthly meeting and was starting to teach photo workshops. He was doing one in the Everglades, and my parents lived in Florida so I went to visit them, took the workshop and became hooked on photography. I took out a home equity loan to buy my first serious camera gear. Took the workshop again the next year, fell in love with the instructor and the rest is history.
When I took my first workshop from Joe, it opened my eyes to the wonders of nature and I wanted to capture that on film as much as I could. It soon became apparent that I couldn't work inside anymore, that I had to be outside, documenting wildlife and natural behavior. We've now been doing this together, professionally, for 34 years.
Dave Etchells, Imaging Resource: We see some exceptional wildlife shots in our Photo of the Day contest, so it's clear that a lot of our readers are capable of professional-level work. For a lot of people, though, the path from being an excellent amateur photographer to actually making money from their work is a murky one. What did your own journey(s) look like? How did you first start earning money from your craft, and how long did it take before you managed to go full-time with it? Do you have any advice or suggested first steps for readers of ours who might want to follow in your footsteps?
Joe: When I was a sophomore in high school the National Wildlife Federation's magazine, National Wildlife, advertised that they would buy images, paying a whopping $5 or $6 a slide and giving the photographer a copy of the slides. About a year later they increased that to $11 and $12, and I began submitting images and getting checks for $60 and $100 and more, which was good money for a kid and had me already paying for my hobby/passion. As a college freshman, the magazine published an article on ducks that I didn't think was very good, and I thought I could do better with what I was then doing with Common Terns and Black Skimmers. I wrote an article and submitted pictures, and ended up with a 2 page spread and a very brief excerpt of my article. That was published in my sophomore year and I remember walking into the faculty room of two of my professors who applauded as I entered. I had more articles or photos published with NWF, and one of their editors told me about stock photo agencies, something I knew nothing about. I inquired, and eventually, as the years progressed I was represented by over 20 stock agencies around the world.
Later, I worked as a high school teacher for a couple of years before being unexpectedly laid off and wrote my first book on photography – A Practical Guide to Photographing Wildlife – which I self-published. I was now a member of several professional writers associations and contacted members about promoting the book, which gave me national exposure in several major markets. From that mailing list I later contacted buyers about photo tours I was planning on doing, and at that point things really took off.
Back in the film days, when I started, fellow pros all agreed that it took about six years of hard work, building up stock and getting it out there before one could expect to actually feel like you were successful. Later, when film was still the medium, that "make it" date was about 12 years. Now, with digital, it is anyone's guess, but selling images as the only source of income would be extremely difficult. Almost all stock photo agencies have either gone out of business or consolidated, and revenue from that has dropped by at least 75% for practically everyone.
Regarding following in my footsteps I'd say, first of all, don't quit your day job! Photograph for the fun of it, and make inquiries and hopefully begin to make sales in some niche. Doing this part-time, however, and putting in X number of hours does not mean that going full-time and putting in more hours will result in more money. I have been fortunate, but I never took photos because of a market. Instead, I shot what I liked (do what you love and the money will follow) and luckily what I did in fact generated revenue.
Mary Ann: As I said before, I was in medical research when I met Joe. Because Hershey Medical Center was part of Penn State University, when I became vested in state retirement at 10 years, I went part-time so that Joe and I could start doing this together. We would do workshops or photo tours and then I would come back and work 50-60 hours a week to get all of my research done. I have to credit the two physicians that I worked for, Dr. Marks and Dr. Berlin, for allowing me to do these crazy hours.

As our business started to pick up, I quickly realized that I couldn't do both jobs at the same time and do them both well. We decided our niche, our strengths, were in teaching and leading photo tours, in working with people, so that is where we made our mark and worked hard to become one of the best in those fields. We were pretty bad at marketing our images because we weren't home that often but that changed when we started to hire our first employees. At the peak of our business when photo sales earned most of our salary, we had 2 full-time and 1-2 part-time employees. That all changed with digital and as sales dropped due to technology, we started doing more photo tours and traveling to the extent of 32 weeks per year. Photo tours were our niche and that helped to propel us for success. It got us to incredible destinations, we were able to document amazing natural history behavior and we could share it with others. Not everybody is cut out to lead tours or teach workshops so, as Joe said, you need to find your niche, your strength, and make your mark that way.
WB: How long have you been using Olympus cameras? I understand that you both switched to the Olympus OM-D system. What caused you to switch camera systems?
Joe: We are going on our fourth year shooting Olympus. Olympus reached out to us to try an OM-D E-M1 Mark II and a couple of lenses on a two-month loan. We took the gear to Yellowstone, Kenya, and Chile, and at the end of that time decided we had to switch. This was a big thing because we literally had all we would ever need with our old system, and felt we could shoot into our twilight years without spending another dime on gear. But, the advantages of Olympus were too good to ignore, and we switched!
Mary Ann: The biggest selling point for me was the size and weight of the gear. I've had multiple joint surgeries (4 back surgeries, both knees and both hips replaced) all from osteoarthritis and abusing my body both in sports, when I was younger, and carrying 30-40 pounds of camera gear in the field for 30+ years. With Olympus, I could hike the hills of Patagonia going for puma with two camera bodies, the 12-100mm PRO lens, the 40-150mm PRO lens and the 300mm PRO lens, have that broad range of compositional freedom and still only be carrying 20 pounds (and that included my tripod). I could finally keep up with everybody else and enjoy what I loved doing without hurting so much.

WB: How is the Olympus OM-D system well-suited for your work as nature and wildlife photographers? What do you all appreciate the most about the OM-D system compared to your previous camera setup or other older camera systems you've used in the past?
Joe: In our testing period, what really impressed us was Olympus' Pro Capture shooting mode. In Kenya, when I'd be shooting with other photographers on our trip, I'd catch action that they completely missed. They said I was cheating! That has happened a lot since then, although at least 50% of the people that travel with us now have switched to Olympus.
Several features have set Olympus apart from my old system (Canon). Size is one. In Chile, as I would drive the back roads outside a national park looking for wildlife, I had my 300mm PRO lens with an MC-14 1.4x teleconverter mounted resting on my lap. That's the equivalent of 840mm, and I had the lens handy and ready to jump out of the car or just shoot out the window. That would have been impossible with my Canon 800mm lens -- it simply wouldn't fit on my lap, and then trying to pick that lens up -- forget it!
The Focus Bracket/Stacking feature I've found very, very useful as well, and when I'm shooting in dim light Live View Boost and Manual Focus assist. I have about 11 items on my Star or My Menu customized camera menu that I go to constantly, including the digital converter (if I'm using video). I really like the 'hold' feature for the Custom Mode Save Settings option, where if I make a change on a C4 to C1 setting, that change is saved.
[Ed. Note: On this last point about the "hold" feature for the Custom C1-C4 mode settings -- The Olympus E-M1 Mark III provides four customizable shooting mode slots on the Mode Dial (labeled C1-C4). This feature lets you save preset custom shooting modes of multiple settings and provides a way to quickly switch between different shooting scenarios without having to change several camera settings each time individually. For instance, C1 can be preset to Aperture Priority with Single-shot AF mode and ISO 100, while C2 could be assigned as Shutter Priority, a shutter speed of 1/1000s and ISO set to Auto. Usually, if you're in one of these custom preset modes and make any exposure changes or modify other camera settings, once you switch in and out between custom shooting modes, your current settings changes are reset back to that particular Custom Shooting Mode's recorded settings. On the E-M1 Mark III, you now have an option in the menus called "Custom Mode Save Settings," with an option to "Hold." Then, while in a Custom Shooting Mode, the camera will now automatically save any modified camera settings to that particular Custom Shooting Mode.]
WB: What is your current Olympus gear setup?
Joe: Right now I think one of my limbs has welded to the new 150-400mm PRO lens. I rarely step outside without it. However, when I'm doing a day afield I'll generally have an E-M1X, E-M1 Mark III, and an E-M1 Mark II body, with the E-M1X on the 150-400mm PRO now, but prior to getting that lens, I had the 300mm PRO attached. The E-M1 Mark III has the 40-150mm PRO, and the E-M1 Mark II has the 12-100mm PRO attached. I usually have at least 1 macro lens with me, either the 30mm or the 60mm, and the twin-flash macro system. In my bag I'll have the 7-14mm PRO.
Mary Ann: I usually have the 300mm PRO attached either to the E-M1X or the E-M1 Mark III, depending on if there is a lot of walking or hiking involved. I keep the 12-100mm PRO on another camera, either the E-M1 Mark III or E-M1 Mark II. In my bag I'll carry the 7-14mm PRO and the 60mm Macro.
[Ed. Note: The M.Zuiko 300mm f/4 IS PRO is an extraordinary lens. Back when we still did lab-based lens testing, it was one of the sharpest teles we'd ever tested, just tack-sharp from corner to corner even when wide open. It's six stops of "Sync IS" when paired with a compatible body (basically any E-M1 or any E-M5 since the Mark II model) was unprecedented at the time, and is still in the very top tier of IS performance. See our Olympus M.Zuiko 300mm f/4 IS PRO review for all the details.]
WB: Olympus' long-awaited 150-400mm f/4.5 PRO lens was finally announced and released earlier this year. Both of you have spent a lot of time with the new 150-400mm lens. How has this lens fit into your gear setup? How has it impacted your wildlife photography?
Joe: As I said, I think I'm bionic now with that lens attached. I always liked to have reach so I'd have the 300mm PRO as my primary lens, but sometimes I was compromised with compositions because of the fixed focal length. Now, with the versatility of the zoom, and the built-in tele-converter, I can get exactly what I want without compromise. I do have one complaint! I'm constantly threatened with harm from my dear wife who wants to use that lens, but I tell her it is attached. She responds by saying that she does have a saw.
DE: Olympus has really been a leader in IS technology, and the 8-stop figure of merit for the 150-400mm on an E-M1X or E-M1 Mark III body is pretty remarkable. That's a really long lens, though, especially when you switch in the built-in teleconverter. Even with the great IS, can you really handhold a 1000mm-equivalent lens for the work you do?
Joe: Yes you can, but I must confess that I usually use a tripod, probably because a lot of my work requires that I'm waiting and I can have the lens mounted and in position should something happen. However, when I'm taking a hike on an easy trail I'll either just carry the lens or have it mounted to a monopod. In those circumstances, I'm shooting on the fly and I've been very happy with the IS. Maybe I'm a bit shaky at 68, so I usually keep the [150-400mm] maxed out at 400mm unless I'm sure I can brace myself.
[Ed. note: This was an interesting note, that Joe's shooting often requires him to have his camera set up and in position for long periods of time, so a tripod is necessary then. It's impressive though, that he usually keeps the 150-400mm maxed out at 400mm and is comfortable running and gunning at an 800mm-equivalent handheld. See Dave Etchells' article on Olympus' image stabilization technology for the deep inner details on what goes into some of the best IS in the business.]
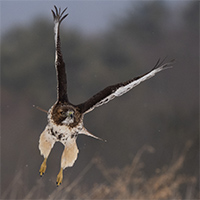
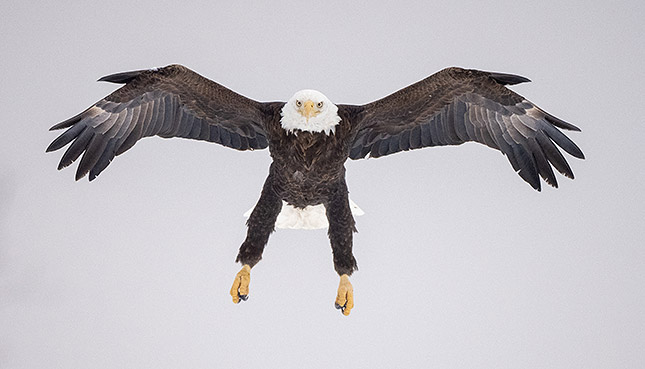
WB: One of the most unique features of the OM-D E-M1X is its Intelligent Subject tracking technology. At launch, the camera only had Planes, Trains and Automobiles/Motorsports for its Deep-Learning-based subject detection options. However, Olympus has now recently added "Birds" to this intelligent subject-detection system. Have you spent much time with this new feature? How has impacted how you capture bird photographs? Has it changed the way you approach bird photography?
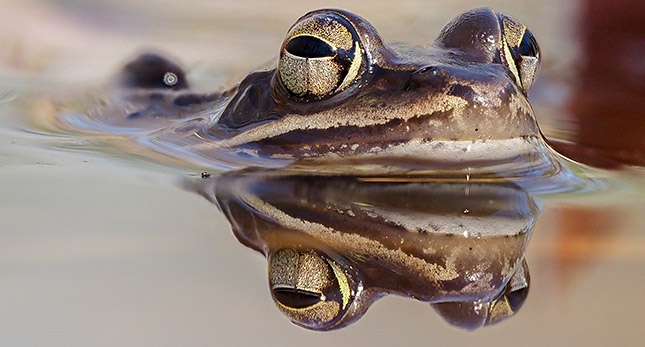
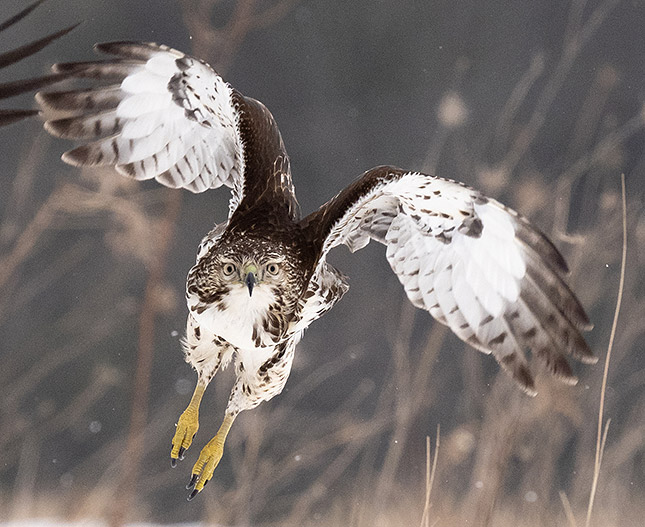
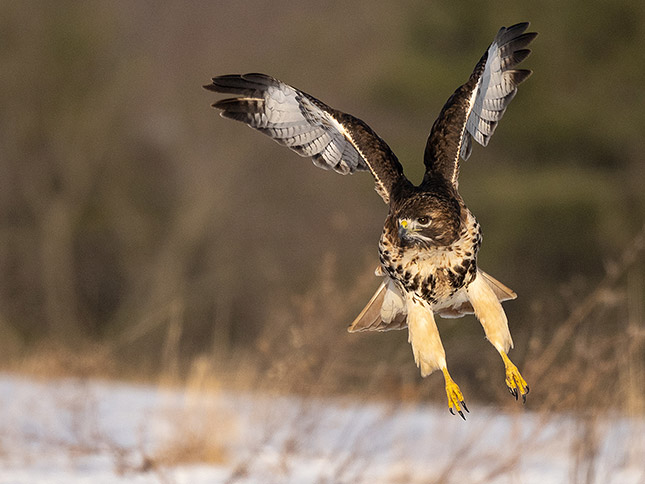
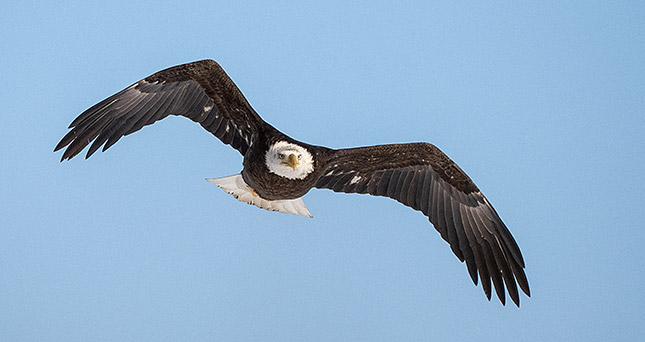
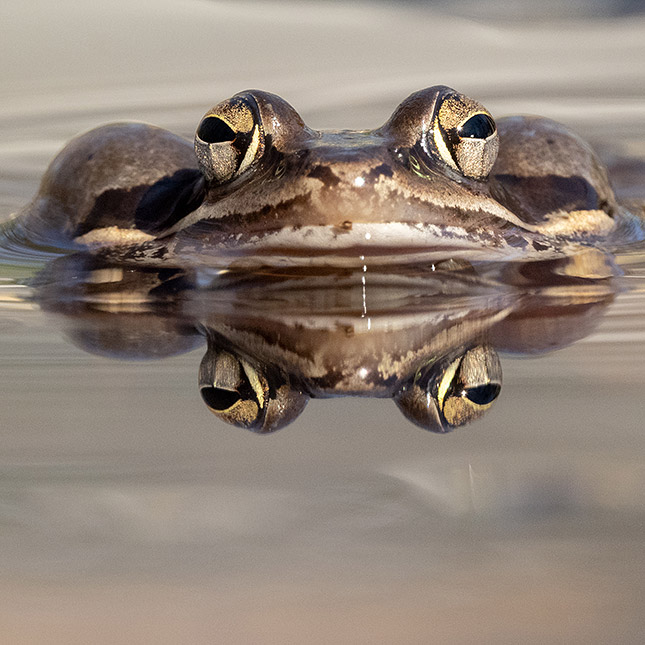
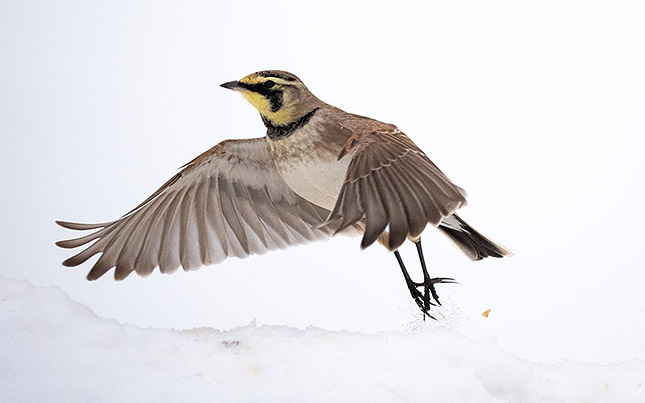
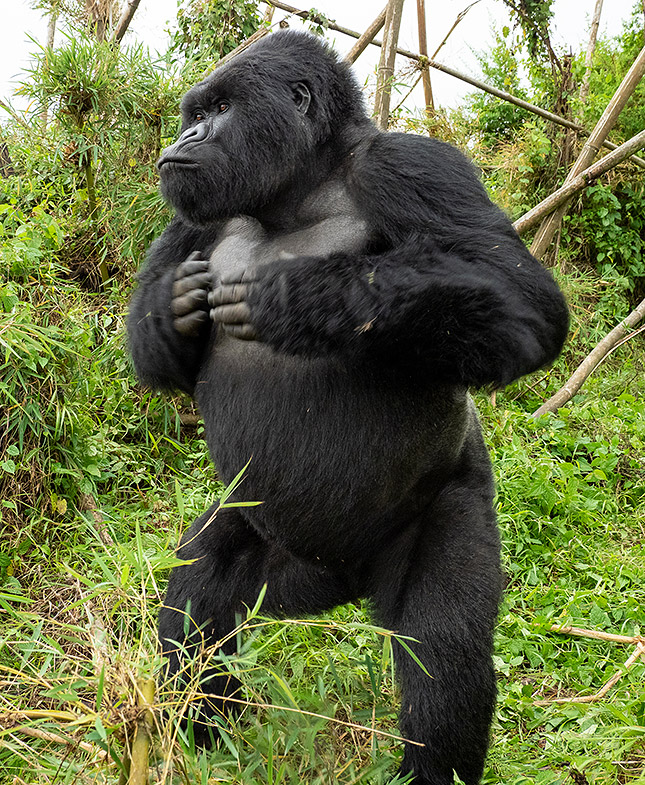
Joe: I downloaded the software upgrade immediately and used Bird Tracking on Bald Eagles the next day. I was impressed, and now I almost always use it. It also works quite well with mammals, recognizing heads and eyes, so I don't have a need to switch to another focusing mode when I'm shooting mammals, or even frogs for that matter. The only time I might switch to C-AF only is if there's a lot of brush and the tracking bounces around, sometimes on the bird, sometimes not. That said, even under those conditions it usually works, and I only switch when or if I find that it isn't performing 100 percent.
[Ed. note: Various companies are using "AI" or "deep learning" technology in their autofocus systems, but no one has taken it as far as has Olympus, with their Intelligent Subject Tracking technology. Dave Etchells interviewed the engineers behind the E-M1X's development back when it was first announced, and learned a lot about how they went about using deep learning tech for advanced autofocus algorithms. One question he had at the time was whether other subject types could be added via firmware updates, to which Olympus applied in the affirmative. It's exciting to see Olympus made good on that promise about 20 months later, with the release of firmware version 2.0 for the E-M1X. Olympus has always been a leader when it came to offering significant firmware upgrades for their previous camera models, but this is arguably the most dramatic feature extension to date.]
WB: For me, personally, I've always been wary of using a camera's automatic autofocusing modes (in other words, letting the camera pick the AF point). However, AF systems these days are getting very sophisticated, with many models now adopting powerful subject detection and tracking features that have me reassessing how I shoot. Have you experienced a similar transition or shift in how you use your camera, particularly with the E-M1X's Intelligent Subject Detection feature?
Joe: Yes, absolutely. Since I'm normally using wildlife the AF-Tracking + Birds works great. Previously I was a 'single point' guy, using generally the smallest AF sensor point and toggling that onto my subject. Now, I still use that point if my subject is perched or in brush, but I keep Tracking-Bird on as well. When I'm doing birds in flight, I usually have all the AF sensor points activated and Tracking-Bird does great.
WB: Pro Capture mode is another unique feature offered in several Olympus OM-D cameras, such as the E-M1 III and E-M1X. You mentioned Pro Capture as being one of the key features that impressed you when you first tested an OM-D camera. Do you use this feature a lot in your work, and if so, how has it impacted your nature and wildlife photography? Are you able to make images that were either very difficult or even impossible with other brands of cameras?
Joe: Yes and Yes. Pro Capture, also available on the E-M1 Mark II (which was the loaner cameras that introduced us to Olympus), was one of the main selling features. And it has also been one of the main selling points to the photographers that travel with us as they see what Mary and I capture with it that they miss.
I've used it pretty wisely, too. For example, recently I photographed Wood Frogs, the earliest frog to breed in Spring. When Wood Frog males call to attract mates they expand a vocal sack that stays inflated for less than a second and the frogs usually don't give any clue that they're about to call. So it is really difficult to time a shot. If you see it you are too late. Recognizing this... and from previous experience with my old camera system... I immediately switched to Pro Capture and caught virtually every call the frogs would make.
I used to do a lot of high-speed flash photography with camera or flash tripping devices that allowed me to catch action that my reflexes and the mechanical lag time of cameras would not. Flash provides its own set of complications, especially if I was using flash in bright ambient light. Now I very rarely use flash for this type of work as Pro Capture captures the action, and I can execute shots in minutes that may have taken a day preparing for previously.
[Ed. note: Olympus' Pro Capture mode is incredibly useful for wildlife photography. When you enable it, the camera begins continuously capturing images at its maximum frame rate (up to 60 frames/second, depending on the camera model), constantly cycling them through its buffer memory. When you press the shutter button, it stops cycling, grabbing the next few frames and then writing everything it's shot to the memory card. The net result is that the camera captured images before you pressed the shutter button, totally eliminating any delay from your reaction time or the camera's shutter lag. You can catch shots that happened even before you were aware of them! You can imagine how handy this is when it comes to capturing the critical moment just as a bird takes off, an osprey snatches a fish out of the water, two bull moose square off, etc. Beyond wildlife shooting though, it's great at home as well, for catching the perfect shot as your child blows out the candles on their birthday cake, connects with the baseball or soccer ball, or any of the other fleeting moments of life. We've used it innumerable times ourselves; it's really an incredibly useful camera feature for anyone who's shooting moving subjects.]
Jeremy Gray, Imaging Resource: Speaking of flash, you're well known for your use of remote flash and remote photography techniques. How has remote technology changed the way you work and are there specific shots that come to mind that would've been impossible if not for remote photography?
Joe: Probably among my professional peers I'm best known for this type of work. Two years ago I photographed a Barn Owl in this way, having one night to set up and get the shots. I had to do it right the first time... it was my only chance. I've applied this technology to Bats, too, and have been able to have our whole group get great Bat photos via my setup, with their cameras on long exposures. Striking Rattlesnakes also come to mind... that was nerve-wracking work. I also find the camera-trap stuff fun because composing and setting up the lighting is all speculative and creative, and you never know what you'll get overnight.
WB: What other unique technologies or features of your OM-D cameras (i.e. focus stacking, perhaps Live ND?) do you utilize for your nature and wildlife photography and in what ways?
Joe: My Menu (I call it the Star Menu) has 11 items on it and these are the features I normally use. I've found Live View Boost extremely helpful when I'm doing flash where the ambient light may be fairly dim, and MF Assist if I'm using Pro Capture High and need to be precise in my point of focus. I've often used Focus Stacking in unexpected ways, shooting mammals and birds that paused long enough to give me a reasonable chance I'd catch the entire sequence and get a great shot with plenty of depth of field. I find the Continuous L and Continuous H settings to be very helpful, as I can adjust pre-shutter frame counts or drive speeds easily. The various shutter choices, the mechanical or the electronic shutter, are great, too, and on Silent Mode I'm catching animals that would have bolted at the first sound of a shutter click.
Mary Ann: Joe forgot to mention one of the great features that we both use, and love, and that is Live Composite. The annual firefly display (lightning bugs to some) around our house at the beginning of July is spectacular and last year, since we were home, we were able to make some of the most unique images of the display in our meadow, in our yard, and could include a star trail if we wanted. I'm with the BBC's photo stock agency, Nature Picture Library, and one of these images of mine they kept as one of my top 5 images for 2020.
[Ed. note: Wow, it's odd that this hadn't occurred to us before; we have lightning bugs around IRHQ, but never thought to try Live Composite to photograph them. Live Composite is a clever mode that starts with a base exposure, and then shoots continuously (with individual exposure times ranging from 0.5 - 60 seconds). With each exposure, the camera looks for things that are brighter than in the base exposure, and adds them to the composite image it’s building up and displaying on the LCD. You can stop whenever you’re happy with the result, up to a maximum total time of three hours.
Live Composite is great for shooting things like light trails from auto traffic, fireworks displays or light painting, but it had never occurred to us to try it with lightning bugs. Normal time- or bulb-exposures don't really do them justice; we always end up with just a few random dots or streaks of light, or if we use a long enough time exposure to see more than that, the background gets so bright that the lightning bug trails get lost against it. Live Composite would be just the ticket! It's Spring here now and will be lightning bug season before we know it. We can't wait to try Live Capture for shooting them in the woods around IRHQ!]
JG: How has Olympus' excellent weather sealing impacted your wildlife photography?
Joe: The sealing has just eliminated worry. We can now concentrate on what we're after and not have to worry about the elements. We do have an Olympus filter on all our lenses, for protection, since we are often in rough country where a stick, etc., could scratch a surface.
Mary Ann: On our last trip to South Georgia [Island], we didn't have to worry about shooting in snow or rain in the Falklands. We still did protect our lenses and cameras, but if it was critical, if a situation suddenly arose that was just phenomenal, we could grab our gear and shoot. Those of us who were shooting Olympus got the shots.
[Ed. note: Olympus' weather sealing is second to none. You really can just rinse mud and sand off cameras like the E-M1X, E-M1 and later models of the E-M5 off under a faucet without worry. Olympus' head of imaging product development gave IR's Dave Etchells a full in-depth tour of Olympus weather-sealing technology at their R&D headquarters in Hachiochi, Japan in late 2019. Check that link or click here for the video.]
JG: In addition to your Olympus camera gear, what are some must-have items for your wildlife photography kit?
Joe: The only must-have item I can think of is a good tripod and head. I use Really Right Stuff gear, and usually have their FH 350 video fluid head mounted. This gives me a lot of control for stills and, of course, for video, too. I'd also suggest having a monopod with a dedicated monopod head. (This is MA: for weight issues, I use the monopod more often with the dedicated monopod head.)

JG: What are some of your top tips for photographers to get better wildlife images? Do you have any special techniques for capturing great shots of birds versus larger wildlife?
Joe: Regarding top tips, I have two or three. Number 1, Patience. My motto is it ain't over 'til it's over, and waiting and being patient usually is rewarded. Number 2, know your subject. Have a pretty good idea where to look or find your subject and have some idea what you might expect it to do. That said, I'm usually surprised and recognize opportunities -- poses, behavior, etc. -- that I wasn't anticipating simply because I stayed with a subject long enough to really see it. Number 3, have a plan. I think you'll be far more productive if you have a goal in mind. That might be photographing a particular subject or a particular behavior.
In 2021, I answered Mary's challenge to take and post one shot (or more) per day, every day through the year. As I write this I'm on Day 72, and I think my photography has improved greatly by doing this. It is pretty tough to just wander around and get a nice shot every single day. However, by planning, by having a particular goal, I've been more successful than I've ever been. Sometimes I don't get what I wanted on that day and I'll have to settle for a different subject, but I consider those failures data points. I learned something, and I'll apply that knowledge next time.
Great tips for birds? I think what I just said above applies; patience, know your subject, anticipate and plan. Pick the right lens for the job, too, and generally for birds the longer the better.

JG: Do you have a favorite shot or wildlife photography moment and what makes it special to you? You've also traveled all over the world to capture wildlife photos, and I'm sure they've all been incredible, but does any particular location stand out from the rest?
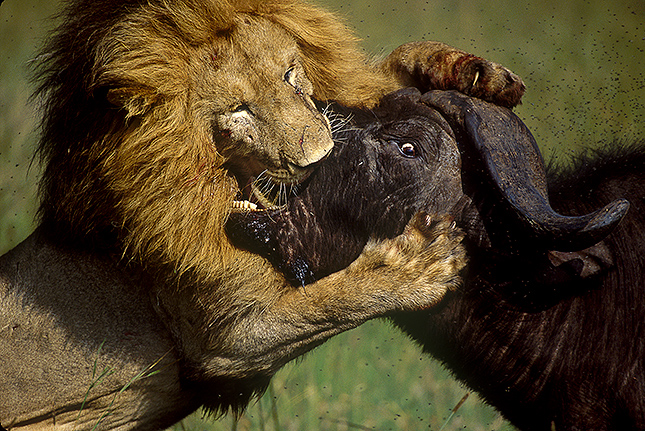
Joe: Two different answers here. My all-time favorite shot probably occurred way back in film days when we lead a safari particularly focused on getting a Lion/Buffalo hunt. We achieved this goal on the very first day, and the shot ended up being a winner both in the BBC Wildlife Photographer of the Year Competition and the Nature's Best Competition. That's not the important part... what was, was the fact that I was standing and shooting out of the safari vehicle's rooftop (normal procedure), and my legs were shaking with excitement. I've seen a lot, and I was aware of that shaking and I remember thinking that that was pretty cool, I'm really, really stoked on this!
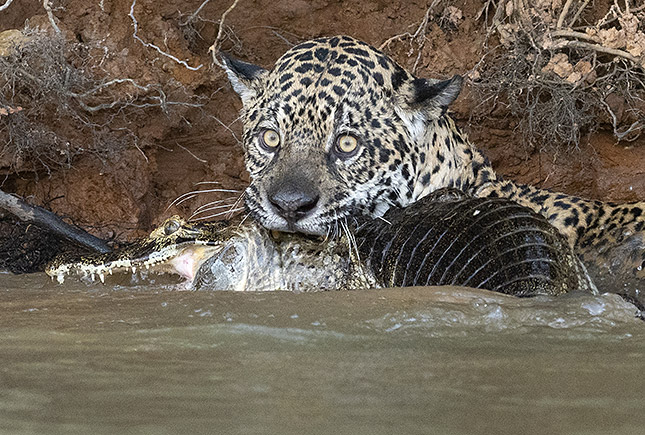
The second answer -- the Location -- is probably Brazil's Pantanal where we photograph Jaguars and a variety of other birds and mammals. Several years ago a magazine interviewed me and asked what subject I would still like or hope to shoot, and I answered Jaguars, because at that time finding a wild Jaguar was nearly impossible. One of my shots of Jaguars ended up as the first place winner in the BBC competition, by the way. Since then, as an aside, Mary and I have photographed all seven of the big cats -- Lion, Tiger, Jaguar, Puma, Leopard, Cheetah, and Snow Leopard -- four different times in a single year. I don't think any other photographer has ever done this.

Mary Ann: Oh my, there are so many favorite shots or wildlife moments that come to mind. One shot was also in the film days when I captured two great egrets flying up into the air, fighting, with the beak of one bird around the neck of the other. It was shot on manual exposure and manual focus, and won 1st place in the BBC Competition for Bird Behavior. I also love elephants, and one of my most memorable experiences was when I witnessed a family of elephants mourning the loss of an adolescent elephant. They approached the carcass, circled it, touched it with their trunks, backed up and touched it with the bottoms of their feet, and then soundlessly, walked away. It was moving and one of those experiences that will always be with you.

And for me, Africa will always be in my heart. Throughout this past year where we have been 'grounded' at home due to the Covid-19 pandemic, I missed being in the African bush the most. I missed sleeping in a tent, listening to the sounds at night, smelling the plains after a rain, standing up in a vehicle as we drove across an area, spotting a leopard or a lion or a cheetah on top of a kopje, sitting around a campfire, under the enormous African sky, and sharing a drink and stories from the day with Joe and our groups. I can't wait to get back.
• • •
The major thanks to Joe and Mary Ann for taking the time to participate in this project! To see more of Joe and Mary Ann's amazing photos as well as learn more about their wildlife photography tours, please visit their website. Additionally, for Olympus E-M1 Mark III and E-M1X owners looking for a detailed guide on menu settings and OM-D features for nature and wildlife photography, Joe McDonald has also written a super in-depth eBook guide on all of the menu settings he uses on his E-M1 Mark III and E-M1X cameras. To check that out, visit the product page here.
Sponsored content notice: This article was sponsored by OM Digital Solutions Corporation, but all questions, comments and analysis are our own.