How does light placement affect the look of your portrait subject?
posted Friday, May 28, 2021 at 2:30 PM EDT
Photographer, educator and regular contributor to the Lensrentals blog, Zach Sutton, wrote an excellent lighting guide explaining how light placement affects how your subject appears. Sutton writes, 'When teaching basic lighting principles, I break down how to light a subject into having three basic variables – Intensity of Light, Quality of Light, and Direction of Light. The intensity of light is pretty simple in its execution – how bright or dim your light is. Quality of light refers to whether it's soft or hard light and all of the principles within that category. The third topic – direction of light – is the principle that I'd like to talk more about today.'
In his article, Sutton uses a controlled studio environment for his example images. While there's no right or wrong way to place your lights, as various looks can work well in different situations, it's important to understand how light placement affects the direction of light. There are also some more standard ways to position lights, and they're standard for a good reason: They often work well.
Of all typical ways to position lights, the most common is to light your subject from above. Sutton writes, 'To the human eye, lighting someone from above feels the most natural…When you light someone from above, you most accurately display them as the world sees them.' Alternatively, lighting someone from below gives them a 'sinister' look.
Sutton created a quick video with his friend, Evonique, seen below, to illustrate how light direction changes the visible shape of the face and the overall mood of a scene. He created what is essentially a rotating ring light. Sutton writes of the video, 'You can see how drastically Evonique's features change based on light placement.'
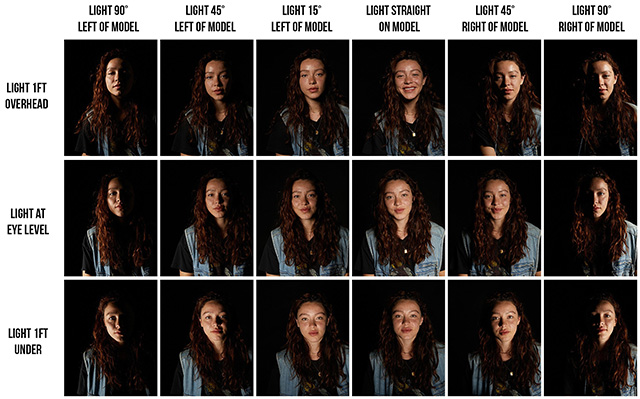
Lights are commonly placed at 45 degrees on either side of a subject. You'll see this in many behind-the-scenes videos and lighting tutorials. At 45 degrees, Sutton notes that you're closely emulating Rembrandt lighting, which is a natural-looking, flattering lighting style. By changing the direction of light either closer to straight on (0 degrees) or from the side (90 degrees), you change the highlights and shadows in your image. Sutton created a great example image, seen below, to illustrate the effect.
Sutton also introduces the concept of the 'green zone,' which is an area that he considers the most commonly lit area within portrait photography. To learn more about this concept and how you can use it to create flattering lighting setups, head over to his full article on the Lensrentals blog.
To see more of Zach Sutton's work, visit his website.
(Via Lensrentals)