 |
 |
* |
1280x960 resolution |
|
* |
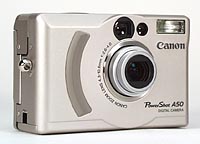
Compact, rugged case |
|
* |
2.5x Optical Zoom Lens |
|
* |
Great low-light ability (up
to ISO400) |
|
* |
Panorama support, including
2x2 matrix! |
|
|
Canon PowerShot A50 Review Index:
User Interface & Controls
As noted earlier, the PowerShot A50 is operated by a combination
of external controls and a fairly extensive LCD menu system.
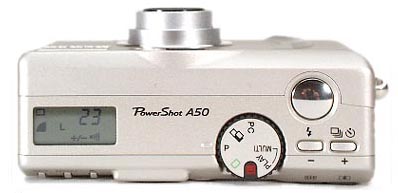
Major camera operating modes are selected via a "Mode Dial",
an increasingly common user-interface design that we like for
the simplification it brings to the menu structures. (By separating
major camera modes, the Mode Dial allows the menus for each mode
to be less complex.) In addition to the Mode Dial, there are
three buttons on the top of the camera (flash/-, self-timer/+,
and the shutter button), and a rocker toggle and four buttons
on the camera's back. The rocker toggle controls the zoom lens,
and the four back-panel buttons are respectively labeled Set,
Menu, Macro/Jump, and LCD/Video. The top-panel Flash and Self
Timer/Continuous Buttons also double as + / - buttons that you
can use to scroll through menu options on the camera's LCD Panel.
The operational buttons are well-placed and easily accessible,
and actuate cleanly with a positive "breakaway" action.
(A minor point, but the pushbutton operation, spacing, and "feel"
is about as good as we've seen anywhere: Other digicam makers
would do well to study the design!) The top of the camera includes
the Display Panel, a small icon-oriented LCD readout providing
information on camera status and control settings. Information
displayed there includes battery level, number of images remaining
on the CompactFlash (CF) card, and different icons that represent
camera settings, such as picture quality and flash modes.
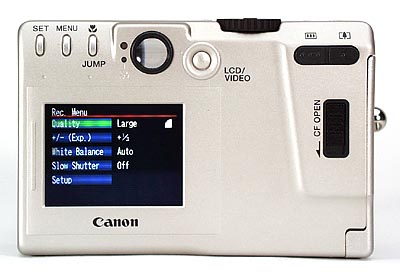
The back of the camera contains a through-the-lens (TTL) optical
viewfinder and a 2-inch LCD Panel. You turn the LCD Panel on
and off using the LCD/Video button just next to the viewfinder.
There's also an LCD menu option-one of the setup options-that
lets you adjust the LCD brightness to suit your needs. (Boosting
the brightness definitely helps readability in bright light,
but will also run your batteries down about 10% faster.) To Canon's
credit the "brightness" control actually does control
the brightness of the backlight, as opposed to merely tweaking
the LCD contrast setting.
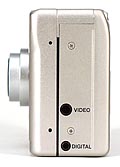 The left side of the camera contains
a Digital port for connecting to a PC, and a Video port for connecting
to a television for viewing images. The right side of the camera
houses the slot for insertion of the camera's CF card. Readers
familiar with other digicam designs will doubtless ask at this
point where the external-power socket is: There isn't one! The
optional power adapter instead uses a dummy battery with an attached
power cord that inserts into the camera's battery compartment!
- See our subsequent discussion of Power for more on this unusual
arrangement. The left side of the camera contains
a Digital port for connecting to a PC, and a Video port for connecting
to a television for viewing images. The right side of the camera
houses the slot for insertion of the camera's CF card. Readers
familiar with other digicam designs will doubtless ask at this
point where the external-power socket is: There isn't one! The
optional power adapter instead uses a dummy battery with an attached
power cord that inserts into the camera's battery compartment!
- See our subsequent discussion of Power for more on this unusual
arrangement.
Depending on which mode you select
with the Mode Dial, pressing the Menu button on the rear of the
camera displays a sequence of menu options specific to that mode.
Pressing the Set button confirms any menu selections you make.
The operating mode also affects the operation of several of the
control buttons on the camera. On the top panel, the Flash button
is only active when in Program Mode (auto flash operation is
set by default for Auto capture mode), and the Self Timer/Continuous
button only accesses the Continuous mode when in Program capture
mode. Likewise, on the camera's back, the Macro/Jump button selects
the Macro option for close-up shootinng when in either capture
mode (Auto or Program), and jumps through images in the camera
memory in groups of 9, when either playback mode (Play or Multi).
One general quibble we initially had with the user interface
of the PowerShot A50 was that it seemed awkward to erase images
from the memory card once captured. From record mode, it takes
a rotation of the mode dial and seven separate button-presses
to erase the image you've just captured(!). This proved to be
another case where reading the manual was useful though: You
can delete the current image in Play mode simply by holding down
the Set button while simultaneously pressing the "-"
button.
Control Enumeration
In this section, we'll review the functions of each of the PowerShot
A50's buttons, controls, and menu options.
Mode Dial
 Sets the mode in which you want to operate
the camera. The Mode Dial has seven positions, including Lock
(Off). The seven operating positions are: Sets the mode in which you want to operate
the camera. The Mode Dial has seven positions, including Lock
(Off). The seven operating positions are:
 Auto: Allows normal image
capture with all camera settings automatically determined Auto: Allows normal image
capture with all camera settings automatically determined
 Program: Allows normal
image capture with the ability to manually set the image size
and select the Continuous Shooting mode Program: Allows normal
image capture with the ability to manually set the image size
and select the Continuous Shooting mode
 Stitch Assist: Provides
a special exposure mode and on-screen alignment guides for capturing
multiple images to be merged in the computer into a single panoramic
image Stitch Assist: Provides
a special exposure mode and on-screen alignment guides for capturing
multiple images to be merged in the computer into a single panoramic
image
 Play: Allows viewing images
one at a time on the LCD Panel or television Play: Allows viewing images
one at a time on the LCD Panel or television
 Multi: Allows viewing images
in groups of nine on the LCD Panel or television Multi: Allows viewing images
in groups of nine on the LCD Panel or television
 PC: Enables the camera's
serial port for viewing and processing images on your computer PC: Enables the camera's
serial port for viewing and processing images on your computer
 Lock: Lock or "off"
- turns the camera off, racking-in the lens shutting the lens
cover Lock: Lock or "off"
- turns the camera off, racking-in the lens shutting the lens
cover
Shutter Button
A two-stage shutter button is positioned directly on top of the
camera. Pressing the shutter button halfway sets the focus, exposure
and white balance settings for the current capture conditions.
Fully depressing it captures the image and stores it to the CF
Card. (As with most digicams, half-pressing the shutter button
before the actual exposure drastically reduces the shutter lag
time for action shots.)
Flash/ - Button 
- In Program or Stitch-Assist mode, this button is used to
select one of four different flash options (in Auto capture mode,
the flash always fires automatically, whenever the exposure system
deems it necessary):
- Auto Mode: Fires automatically as needed depending on the
light level the camera detects
- Red-Eye Reduction: Emits a pre-flash just before the shutter
fires to minimize the red-eye effect in the subject's eyes
- Flash On: Fires with each shot regardless of the lighting
conditions
- Flash Off: Disables the flash even in dark conditions
- In Play mode or Multi mode, this button selects the stored
image prior to the one currently being displayed
- With a menu displayed on the LCD, this button moves to the
previous option in a list of available options
Continuous/Self-Timer/ + Button
- In Auto mode, enables the self-timer, providing a 10 second
delay between when you press the Shutter button and when the
camera fires
- In Program mode, this button switches between the following
picture-taking modes:
- Single-frame mode (the default): Captures a single frame
when the shutter fires
- Continuous mode: Captures up to 15 frames continuously until
the camera runs out of internal memory
- Self-Timer mode: Provides a 10 second delay between when
you press the Shutter button and the when the camera fires
- In Play mode or Multi mode, this button displays the next
stored image
- With a menu displayed on the LCD, this button moves to the
next option in a list of available options
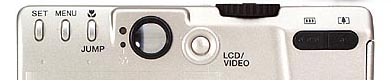
(The following controls are all arranged across
the top/rear of the camera, as seen in the figure below:)
Zoom Toggle
Allow you to zoom in and out on the subject/area being captured.
Pressing the "single-tree" side of the button zooms
in on the subject, and pressing the "three-tree" side
of the button zooms out.
LCD/Video Button
- In Auto mode or Program mode, turns the LCD Panel on and
off. The LCD Panel turns on automatically in Program and Stitch-Assist
mode
- In Play mode and Multi mode, turns the video output from
the camera on and off (for viewing images when the camera is
connected to a television set) As noted below, the video-out
signal isn't available for use as a viewfinder, in either recording
mode.
Macro/Jump Button
- In Auto, Program, or Stitch-Assist mode, this button turns
Macro mode on and off. Macro mode allows you to capture a subject
within a range of 6.7 inches to 20 inches.
- In Play or Multi mode, this button turns Jump mode on and
off. With Jump mode on:
- In Play mode, pressing the + / - buttons moves either 9 images
ahead (+), or 9 images back (-), and displays the image on the
LCD Panel
- In Play mode, pressing the + / - buttons while at the same
time holding the Set button displays the last stored image (+),
or the first stored image (-)
- In Multi mode, pressing the + / - buttons displays either
the next set of 9 images (+), or the previous set of 9 images
(-) on the LCD Panel
- In Multi mode, pressing the + / - buttons while at the same
time holding the Set button displays the first set of 9 images
(+), or the last set of 9 images (-) on the LCD Panel
Menu Button
- Displays available Menu options on the LCD Panel. The menu
options vary depending on the mode you have the camera set to:
- In Auto, Program, and Stitch-Assist modes, displays the Record
(REC) menu (see below)
- In Play and Multi modes, displays the Play menu (see below)
Set Button
Selects the menu option currently displayed on the LCD Panel.
Used in conjunction with other buttons to access options without
resorting to the menu system:
- Set and "-" together in Program-Record Mode: Enable
exposure adjustment
- Set and "-" together in Play Mode: Erases the currently-displayed
photo
|
|


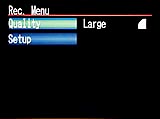 Pressing the Menu button in Auto
Mode displays the REC menu (shown at right), which offers the
following options:
Pressing the Menu button in Auto
Mode displays the REC menu (shown at right), which offers the
following options: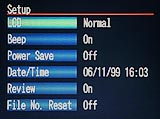 LCD: Switches the brightness
of the LCD between normal and bright settings. The Bright setting
makes the display more visible outdoors or in bright light, but
does increase battery drain, albeit only about 10%.
LCD: Switches the brightness
of the LCD between normal and bright settings. The Bright setting
makes the display more visible outdoors or in bright light, but
does increase battery drain, albeit only about 10%.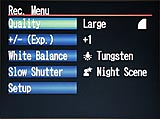 Pressing the Menu button in Program
mode also displays the REC menu, but with more options available
for selection (as shown at right):
Pressing the Menu button in Program
mode also displays the REC menu, but with more options available
for selection (as shown at right):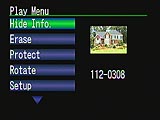 Pressing the Menu button while
in Play mode displays the Play Menu (shown at right), which contains
the following options:
Pressing the Menu button while
in Play mode displays the Play Menu (shown at right), which contains
the following options: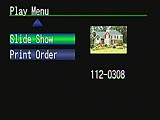 Slide Show: (This and the
next option are on a second menu screen in Playback mode, shown
at right.) Lets you view the captured images in a slideshow fashion.
You can mark specific images to include in the slide show, and
can also set the interval between successive images to 3, 5,
or 10 seconds, or opt to advance between images manually.
Slide Show: (This and the
next option are on a second menu screen in Playback mode, shown
at right.) Lets you view the captured images in a slideshow fashion.
You can mark specific images to include in the slide show, and
can also set the interval between successive images to 3, 5,
or 10 seconds, or opt to advance between images manually.  In Multi mode you can review multiple
images on the LCD Panel on or a television using the video cable
included with the camera. When you switch the camera to Multi
mode, the LCD Panel activates and displays images currently stored
on the CF Card in groups of nine. You can use the + / - button
to scroll through the images and select an image on which to
perform an operation. (View at full size, delete, or order prints
from it, as described above.)
In Multi mode you can review multiple
images on the LCD Panel on or a television using the video cable
included with the camera. When you switch the camera to Multi
mode, the LCD Panel activates and displays images currently stored
on the CF Card in groups of nine. You can use the + / - button
to scroll through the images and select an image on which to
perform an operation. (View at full size, delete, or order prints
from it, as described above.)