Back
to Full Canon EOS-5D Review
Back
to Full Canon EOS-5D ReviewGo to Canon EOS-5D Data Sheet
Go to Canon EOS-5D Pictures Page
Up to Imaging Resource Cameras Page
Use your browser's "Back" button to return to the previous page, or the links at the top and bottom of this page to navigate to related information. If you have difficulty fitting the text on this page onto your printer output, simply resize your browser window to a narrower width and print again.
Remember us when it's time to buy!
Dave here: Have our reviews been helpful to you? (Is this article you're reading right now useful?) Preparing this level of information on as many products as we do is incredibly hard work, not to mention expensive. Things on the Internet may look like they're free, but they're not. (As a lot of big dot.com companies are finding out these days.) Somewhere, somebody has to pay to produce worthwhile content. YOU can help us though, by remembering us when it comes time to make your purchase. Would you consider coming back to our site and clicking-through to one of our advertisers to make your purchase? Every dollar you spend with one of our advertisers helps us directly (in affiliate fees) or indirectly (the advertiser will keep renewing their ad contract with us). To make it easy for you to support us, here's a URL you can visit, to see all our current advertisers, with links to click on that will register your visit to them as having come from our site. It's up to you where you buy, but Mike, Mike, Kim, Yazmin, Marti and I would be really grateful if you'd help us out by choosing one of our advertisers to purchase from.
Thank you for your support!
Dave Etchells, Founder & Publisher
Visit our "Buy Now" Page:
https://www.imaging-resource.com/buynow.htm
Back
to Full Canon EOS-5D Review
Go to Canon EOS-5D
Data Sheet
Go to Canon EOS-5D
Pictures Page
Up to Imaging Resource Cameras
Page
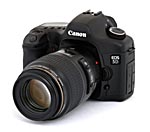
Canon EOS-5DSlightly smaller and lighter upgrade brings greater speed and ease of use along with higher res and lower image noise. Review First Posted: 04/02/2006 |
|
Field Test
By Shawn Barnett
One company has radically changed the digital camera marketplace in only five years of participation. Starting with their consumer EOS D30 in 2000, Canon quickly went pro in late September 2001, a month that was overshadowed by distracting events only days earlier. Since then Canon has shipped nine more SLRs in five years, both pro and consumer grade, and launched a new digital-specific lens line aimed at the consumer line of cameras. Today's current lineup of five shipping SLRs is the most comprehensive in the business. Taking up the middle position is the new EOS 5D, a full-frame SLR with the easy-going personality and solid build of the EOS 20D, plus what could be called the holy grail of digital SLRs: a full frame sensor, previously only available at the top of Canon's pro line. It has a 12.7 megapixel sensor with an 8.2 micrometer pixel size that Canon considers optimum for low noise images; it's the same pixel pitch as the smaller sensor on the EOS 1D Mark II.
Canon is calling the 5D "The world's first premium DSLR."
The title fits.
Categories
Each of Canon's five SLRs has served to define the category they occupy. The Rebel XT is the current consumer benchmark camera, with 8 megapixels, a tight, small package, and excellent image quality for under $1,000. The EOS 20D/30D is the next step up, with similar image size and quality statistics to its little sibling, along with a more rugged body, faster frame rate, greater buffer depth, and features that are attractive to both beginners and professionals. Its body-only price is currently between $1,200 and $1,400, attracting more affluent and dedicated photographers, and offering excellent value despite the higher price tag (given that the D30 debuted in 2000 with 3.1 megapixels at $2,500, the 30D is a comparative bargain).
The gap between the 20D/30D and the two current pro cameras, the 1Ds Mark II and the 1D Mark II N is significant, as are some of the specs. Without going deeply into detail, the 1Ds Mark II is a full-frame 16.7 megapixel camera that many say rivals medium format film. This three-and-a-half pound photographic tool goes for around $8,000. Weighing about the same, the not-quite-full-frame 1D Mark II N sports only 8.2 megapixels (less than half), but was built for speed, with the ability to zip off 60 full frame images at 8.5 frames per second. It is intended for action and news photographers, and is available for around $4,500.
That $4,500 price point represents a $3,000 gap that Canon saw as an opportunity. We at Imaging Resource watched with fascination through most of 2005 as the Canon 20D actually outsold the Rebel XT among our readers. This suggests that digital SLR buyers are willing to pay more for greater quality and control.
But I don't think price point and market readiness was the only encouragement Canon had to build the 5D. It was also the lenses. Canon's existing line of over 50 EF lenses probably saw a decline in consumer sales when the EF-S line emerged and addressed the unique needs of Digital Rebel and 20D customers better than the 35mm-tuned line of lenses, and it was time to bring the semi-pros back into the market for Canon's extensive line of expensive L-glass. The new EOS 5D does that. Its full frame sensor by definition cannot work with EF-S lenses, with their smaller image circle design; and they will not fit on the 5D or 1D bodies. That said, we've found in working with it that the 5D places demands on lenses that even some L-series lenses have a hard time meeting in the corners of the frame.
Look and feel
Regardless why it was built, the Canon 5D's very design cues tell of its place between the 20D and 1D lines. From the front, it looks like a 1D without a big battery pack beneath. From the back it's a 20D with a bigger rear LCD. The big bulge at the top resembles the 1D line as more than a genetic implication; it is bigger to house the bigger 35mm-sized pentaprism beneath and it also lacks a pop-up flash like the pro cameras (this is probably also due to space constraints). The camera draws one feature in particular from a little further down the consumer line that the 20D does not share (but the new 30D has): the Print/Share button found on the Digital Rebel XT and on nearly every Canon camera introduced since Fall 2004 (more on this later). For the lucky few who eventually own both a 20D/30D and 5D, both will be familiar enough to shoot without much thought about controls, but a few key aspects of each will make shooting with either noticeably different.
Grip
Where the grip on the 20D/30D is good mechanically, with a textured and rubberized surface that encourages a firm, steady grip, the 5D's grip is better tuned to the human hand. The 5D grip is just more comfortable while still encouraging a firm hold. There's a smooth notch borrowed from the 1D line beneath the shutter bulge where the middle finger rests, but it's wider and more comfortable than that grip as well, more like the similar indent found on the EOS Digital Rebel (but absent from the sickly grip on the Rebel XT). This is Canon's best grip to date.
Weight
The 2 pound Canon 5D is about four and a half ounces heavier than the 20D/30D. The grip really does help mitigate the extra weight, but there's no doubt the 5D is a considerable commitment to carry around. It weighs less than the big pro models, but not much, particularly when you add the big BG-E4 battery pack / vertical grip.
Expanse
Hold the 20D/30D to your eye, and you see most of the frame, though as an eyeglass wearer, I think it could have a slightly higher eyepoint. The same is true of the EOS 5D, but what you see covers a considerably greater area. Though I wish it had the higher eyepoint of the 1Ds Mark II, there's no complaining about having such a big image to frame shots. (A note from Dave: With my eyeglass prescription, I find I have to press my lenses pretty firmly against the eyecup on the 5D to see the full viewfinder frame.)
The same nine-point AF cluster from the 20D occupies the center of the screen, but it appears to have remained the same size as the 20D, covering less of the overall image area. While we're used to having those far left and right sensors out near the edge of the APS-C sensor, on the full-frame 5D they only make it halfway to the edge from the center, significantly changing their utility. Switching between the 20D and 5D is made more difficult to the photographer accustomed to using his outer AF points for emphasizing eyes in head-and-shoulders portraits, for example. According to Canon's White Paper on the 5D, the outermost points are in the same position as the outermost AF points on the full frame EOS 1Ds Mark II, so here's a place where the pros will find the 5D more familiar than 20D owners.
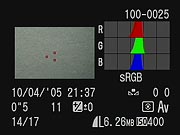 While on the subject of AF points, the 5D has six supplemental sensors in addition to the nine selectable points. Residing in the central circle in the center of the frame, they are designed to enhance subject tracking in AI SERVO AF mode. In this mode, the camera can track a moving object as it approaches or moves away from the camera. Other EOS cameras have this feature, but the 5D's 15 total AF points enhance this ability. Though you cannot select the 6 AF points, they automatically activate in AI SERVO AF mode, and when motion is detected in AI Focus AF mode (which switches between One Shot and AI SERVO mode when motion is detected). Like its professional brethren in the EOS 1D line, the 5D reports which AF points were used at the time of capture in histogram playback mode, and the six supplemental points appear if they are used. This feature is missing altogether in the EOS 20D (but exists in the new 30D, albeit without the additional 6AF points). The screenshot above right shows the AF points as small red dots against the flat grey subject.
Speed
Since the 5D captures and moves more pixels than the 20D, it does have a slower frame rate, and presumably because the mirror is so much bigger, the vertical blackout time is longer than every other current SLR except the Digital Rebel XT, at 145 milliseconds. (Vertical blackout time is how long it takes the mirror to return the full view through the viewfinder. Shorter times mean you have more time to observe your subject and frame for follow-up shots.) The 20D with its smaller mirror is 115 milliseconds, and the 1Ds Mark II, with the same full-frame mirror but a more powerful actuator, is 87 milliseconds. The 1D Mark II boasts an impressive 45 millisecond viewfinder blackout time, which really is a noticeable difference. The 5D's 145 ms is not a nuisance by any means, but it is noticeably slower than the 20D, even as the shutter speed goes up to 1/8000. Add that to the three frame per second frame rate, and the 5D emerges as a better portrait and art photography tool than an action camera, with a slight advantage going to the 20D.
AF speed seems as fast as any other EOS camera, varying depending on the lens used.
Display
There's no question that a bigger LCD is better. I don't think 20D owners should fret about their 1.8 inch display, but it is nice to check focus and framing on the Canon EOS 5D's 2.5 inch LCD. The greater viewing angle of the improved LCD is immediately apparent when you first tilt the 20D at different angles, then do the same with the 5D. Especially when viewing from above or below the camera, the 20D quickly washes out, while the 5D's LCD remains crisp, bright, and clear over a 170 degree arc, whether horizontal or vertical.
Shooting
All of the above adds up to a familiar experience for the 20D owner, but it also requires him to think and shoot very differently. 35mm lenses that you currently rely on for the 20D or Digital Rebel take on a totally different character.
My 28-135mm IS lens is a pretty good example, serving as an excellent image stabilized 45-216mm (equivalent) lens when mounted on the 20D or Rebel XT. That's a decent telephoto range that, while not quite wide enough, is very good for spanning most normal shooting conditions, from portraits to group shots. When I mount it on the 5D I find I'm disappointed. Though I've always preferred 24mm as the ideal wide angle reach, having the 28mm back is excellent; however, I find myself having to get up and move around a lot more to make up for the loss of that 216mm crop. Until you get to focal lengths as short 24mm and wider, I find the more interesting pictures are made with a tighter crop, so I end up cropping most of my 5D shots on the computer, regardless of the lens I choose.
Optical quality is also challenged with a larger sensor. Using just the central, "sweet spot" of the image circle, the 20D makes a lens like my 28-135 IS seem terrific, especially in terms of chromatic aberration, but the 5D reveals the flaws in the corners of this relatively inexpensive lens.
There's also an intangible quality to images from the 5D that I've not been able to quantify. I can't be sure if its the L glass I've tried with it, like the astonishing 24-70mm f/2.8 L, or if there really is something different about shooting with a full frame sensor. It might just be that larger canvas. Or the bigger viewfinder. It could also be those big 8.4 micron pixels that just seem to love light. I do miss the pop-up flash I've grown accustomed to, even on the Nikon D200, but the best news is that you can shoot indoors at ISO 800 without noticeable noise.
Foibles
I do find the longer vertical blackout time to be distracting. Any extension of the time that I can't see my subject doesn't help, especially when the subject is a living thing. Anticipation and synchrony with a subject are harder to achieve if they are blocked from view for too long.
The 3 frames per second limit is understandable on the 5D, given the greater number of pixels it has to move and store, as well as the larger mirror, but I'm left wondering why they added the six extra AF sensors to enhance subject tracking when this isn't a camera that is tuned for action photography. Canon has often introduced superior features in cameras as they become possible, even if they don't seem to fit into the pecking order, but the recent release of the 30D does not include these additional sensors, so the anomaly remains.
More improvements
The Canon EOS 5D has a pretty good set of other features that earn it the name "Premium." The new 100,000 cycle shutter mechanism is a nice addition. Canon doesn't specify the shutter life on the 20D/30D, but it's apparently well short of 100,000 cycles. The longer cycle life leaves me less concerned about burning up the shutter with long motor-drive sequences. Two optional focusing screens are also available for the 5D, a feature that has heretofore been confined to the EOS 1D series. One screen adds a grid, and the other allows for finer focus, intended for lenses of f/2.8 or greater. Upon changing a screen, you do need to set a Custom Function to tell the camera which screen you're using, since the metering characteristics change somewhat with each.
Folders are no longer limited to 100 per, meaning you can now have up to 9,999 images per folder name. In general, that will mean that you can have one big folder for each shoot if you like, without having to manually copy images out of multiple folders for one shoot.
A three color histogram display is another useful option not on the 20D (but now included on the 30D), allowing you to see whether a particular scene might not be properly color balanced.
Gone are the Scene modes normally found on every Canon camera from the 20D down the line, leaving the mode dial rather empty of icons. This is a pro camera. Surprisingly, though, the Green Zone mode remains for those who just want to point and shoot.
Turning on the Expanded ISO custom function gives you access to ISO 50 and ISO 3200, which opens up extremely fine resolution shots and longer exposure times when you want them, or else very low light photography.
A new PictBridge interface allows photographers to print an important tool I think many have been missing from the film days: a contact sheet. Appearing with a simulated film background, the sheets can be printed directly from the camera without a computer if you're using a late model Pixma printer (Fall 2005 or later).
Steps forward
I'm having a hard time pinpointing the obvious customer for the EOS 5D. For most serious photographers, the 20D and 30D will continue to serve very well. Those with an extensive collection of Canon L glass will dive for the 5D like a runner to home plate. Many 20D owners buying a 5D will probably keep the 20D for action shots, since the tighter crop and faster frame rate lends itself to many types of action photography, upgrading any one of their L-glass lenses to a high quality telephoto when necessary.
Canon was wise to make this camera more like the 20D than a 1D camera in function, making it a logical upgrade for a wide range of photographers who would have sought full frame L glass lenses in the first place.
Full frame sensors are the next step, so getting there sooner might make sense. But if you need a little higher speed and don't care to deal with larger file sizes (the 5D's JPEG's are about 4MB each), you might not want to step up to the 5D. It changes how you shoot, it changes the measurement of all your lenses back to true 35mm focal lengths, and frankly shooting both just might be a bit too confusing. At the same time, the optical demands of the full-frame sensor aren't to be ignored either: Lenses that look just fine on the 20D/30D can end up looking horrible with the 5D's expanded image circle.
At around or above $3,000, the 5D is still quite a chunk of cash, but it's less than half the price of the only other full frame (35mm-sized) sensor on the market, the 1Ds Mark II, and it's easier to bring along.
The 5D is the ultimate "doctor/lawyer" camera, something these folks will buy just because they want the best. When I see rich guys toting an arm-stretching 1Ds Mark II and the latest L-glass, my heart goes out to them. Seriously, I'm not a class-warfare kind of guy; so my advice is: unless you're cranking off between 200 and 1,000 shots a day as a reporter or pro photographer, or making serious cash on a lower volume, you're doing more for your biceps and back muscles than your photography when toting one of these professional 1D behemoths.
Those seeking the best will do better with the 5D, which delivers the prestige and status without all the extra weight and complexity. Portrait photographers not already invested in 1D bodies will also appreciate the lighter weight and easier controls as well.
Bottom line, like anything else Premium: You probably don't need it, but you sure as heck want it if you can get it. The Canon 5D's like that.
Another perspective
The bulk of the Imaging Resource audience for SLR reviews is composed of folks like us: Very serious amateurs who nonetheless shoot mainly for our own personal pleasure, not having to earn a living with our photography. The bulk of our readers also aren't fine-art photographers, so matters of cost and convenience easily trump subtle nuances of tonality when it comes time to pull out the checkbook. Our own background and the majority of reader interest dictates that we adopt the viewpoint of that sort of user in most of our writing.
But we're very aware that there are other viewpoints out there that deserve to be voiced and served. To help address the viewpoints of fine art and commercial/documentary photography, we've teamed with Sean Reid, a documentary photographer with 20 years in the trenches, who also served a stint as a black & white exhibition printer. As we've shared above, a 5D doesn't seem to make a lot of sense for photographers like ourselves, since we can match most of its capabilities at lower cost and in a more compact package with a 30D and an appropriate kit of lenses. For photographers like Sean though, the EOS-5D makes a world of sense, as the full-frame format and the 5D's unique "drawing" characteristics make it a bargain at it's current selling price.
You can read Sean's own very in-depth analysis in his guest review of the EOS-5D, linked here as page 13 of this review. We feel that Sean's professional/fine-art perspective on the 5D provides a valuable balance to our own advanced-amateur one, letting us serve both ends of the photographic spectrum fully, without compromising our advice to either.
Design
 Following the general design and control layout of other Canon EOS digital SLRs, the EOS 5D will be immediately familiar to photographers already accustomed to other EOS cameras, whether film or digital. At 32.1 ounces (909 grams) with battery and memory card (but minus the lens), the 5D is pretty hefty model, though not much more so than the popular EOS-20D sub-frame model, and quite a bit less so than members of the "professional" EOS-1D series. Body dimensions of the 5D are 6.0 x 4.4 x 3.0 inches (152 x 113 x 75 millimeters), just slightly larger than preceding sub-frame models.
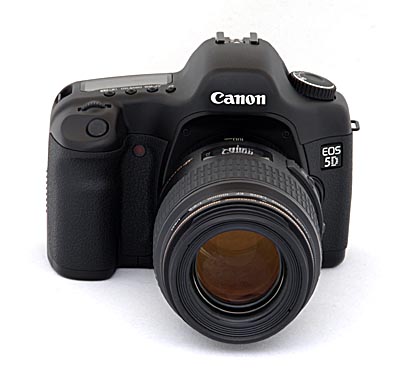
The front of the camera features a Canon EF lens mount, indicated by the presence of the red dot (standard EF, rather than EF-S) alignment mark on the inside of the lens mount. There's also the lens release button, a depth of field preview button (on the lower left of the lens mount as viewed from the rear), and the self timer lamp. Nestled in the inside bottom of the handgrip, but just about visible in this picture, is the port through which the DC coupler cord emerges, when using the dummy battery connector with the AC adapter.
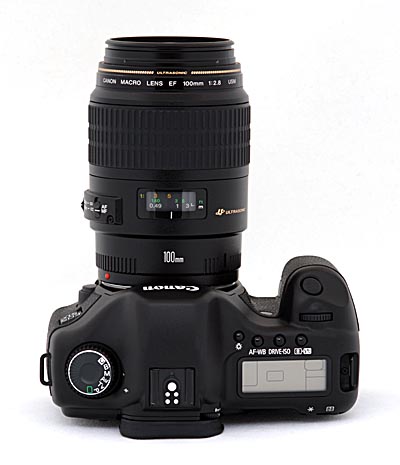
The top of the camera features the Shutter button, Mode dial and a small status display panel that reports most of the camera's settings. An LCD Illuminator button next to the status display panel backlights the display with an orange glow for better viewing in dim shooting conditions. Also on top are the Main dial and several control buttons (AF Mode / White Balance, Drive Mode / ISO Speed, and Metering Mode / Flash Exposure Compensation). The top of the camera also contains a hot shoe for mounting an external flash unit. The hot shoe has the usual trigger terminal in the center, as well as four other contacts for interfacing to Canon EX Speedlight flash units, and a hole for a locking pin to prevent rotation of the speedlight. Fixed neck strap eyelets are visible on both sides of the top panel as well.
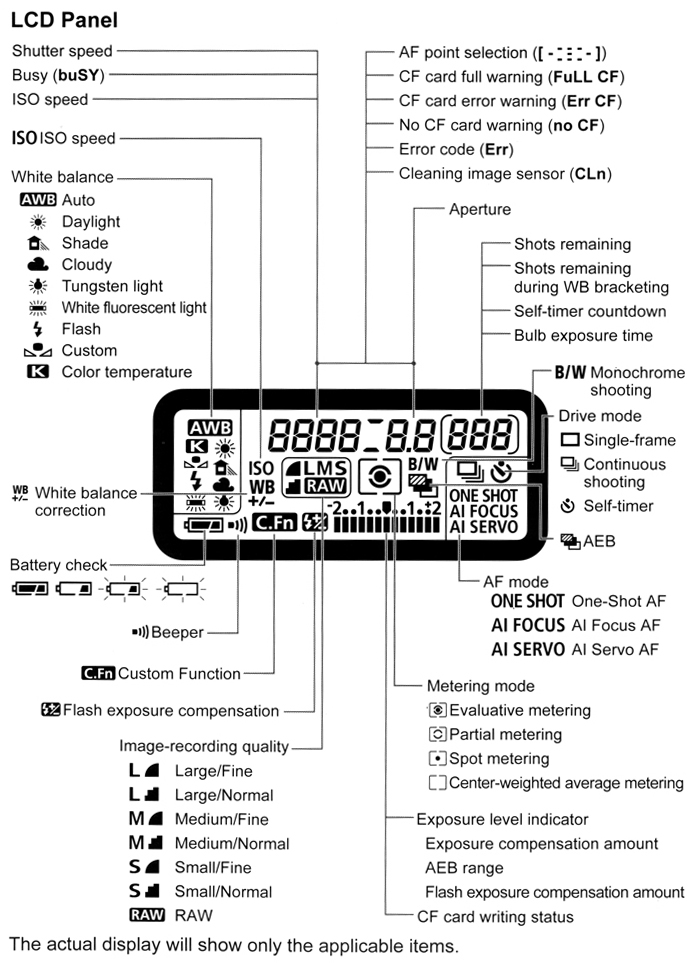
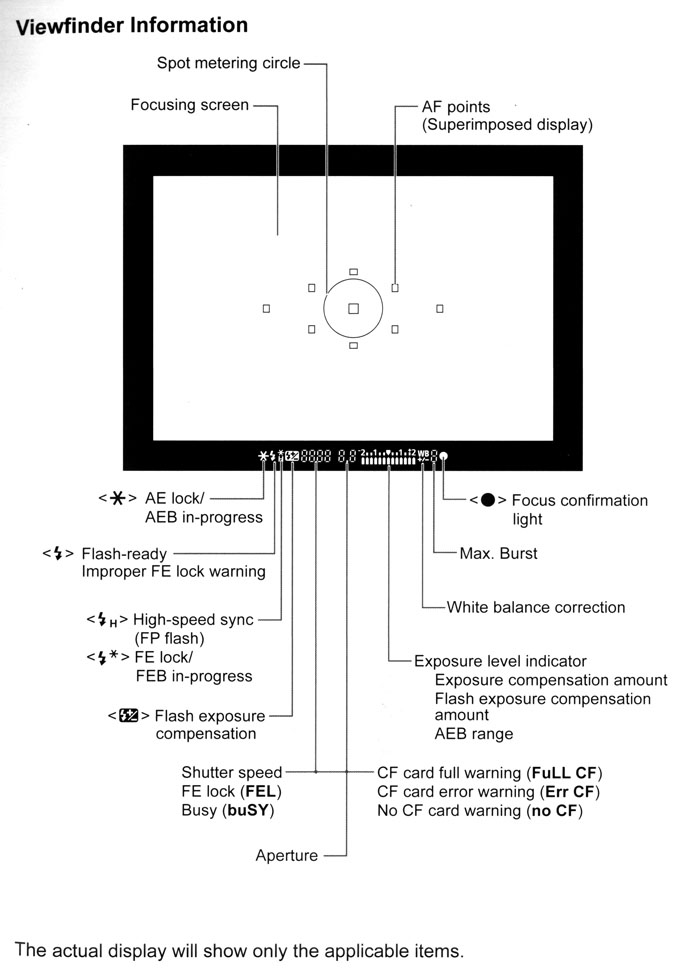
The top-panel data readout conveys a wealth of information about the current status of the camera and its settings. Here's an illustration showing all possible segments and icons and their interpretation:
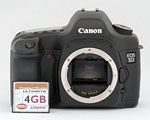
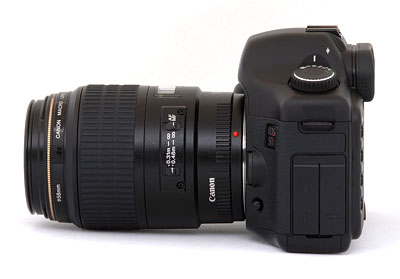
On the right side of the camera, toward the rear of the handgrip, is a large door which slides back and out to reveal the CompactFlash slot (which supports Type-I and Type-II cards, including the Hitachi MicroDrive). Inside the compartment, underneath the CompactFlash slot is a small gray eject button for removing the card.
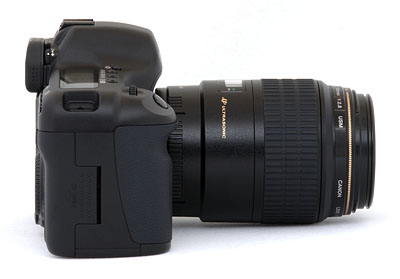
The opposite side of the camera features two hinged rubber flaps covering the digital (USB), Video Out, PC flash sync, and N3 remote control terminals. This picture also shows the Depth of Field Preview button (bottom) a little more clearly.
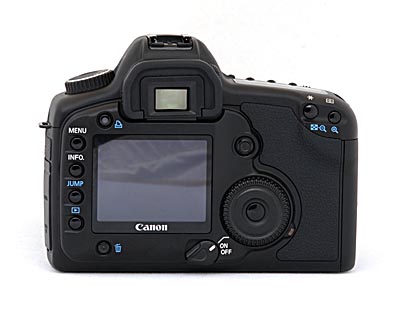
The rear panel of the EOS 5D is home to the bulk of the camera's controls, as well as the large, bright LCD screen. Beneath the LCD monitor's lower right corner is the main power on/off switch, with an additional setting that turns on the Quick Control dial. Just left of the optical viewfinder is the camera's Print button. Lining the left side of the LCD monitor are four buttons: Menu, Info, Jump, and Playback. Underneath the LCD screen is the Delete button, and to the right of the screen is the large Quick Control dial, in the center of which is the Set button. The Set button in the center of the Quick Control Dial acts as a menu selection button. At the lower right of the Quick Control Dial is the Access lamp, which indicates when the memory card is being written to. Located next to the top right corner of the LCD monitor is an eight-way "joystick"-style multi-controller that also functions as a button when pressed directly inward, used for selecting AF points, adjusting white balance, scrolling around enlarged playback displays, or moving the cropping frame in direct printing. On the top right corner of the optical viewfinder is the diopter adjustment knob, recessed slightly to prevent accidental changes, and featuring a ridged surface to give grip. Finally, the top right corner of the rear panel features the AE/FE (Auto Exposure/Flash Exposure) Lock / Index / Reduce and AF Point / Enlarge buttons.
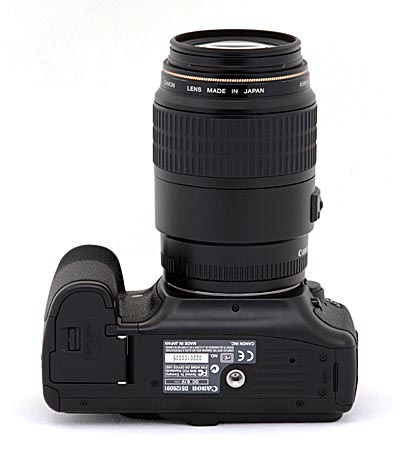
The very flat bottom of the camera reveals the metal tripod mount, as well as the cover for the BP-511 Lithium Ion and a separate CR2016 button battery chamber. The main battery compartment cover is removable, as needed when installing the optional vertical battery grip (BG-ED2) on the camera. A small latch lever at the outside edge of the battery chamber cover unlocks it so that it may be opened. The battery compartment cover is far enough from the tripod socket that you should be able to swap batteries without removing the camera from your tripod mount. The large surface area of the camera's bottom provides a stable mounting surface for use with a tripod, even with fairly large lenses attached.
Viewfinder
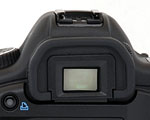 The 5D's optical viewfinder is excellent, providing a wealth of information and great accuracy. Because the 5D features nine AF points, the viewfinder shows nine focus point boxes arrayed in a diamond pattern. (Six additional AF points can be activated through the Custom menu, and appear in the spot metering area.) Lining the bottom of the display is a strip of information reporting everything from aperture and shutter speed to flash status and the maximum number of burst shots available. While I don't have a formal test for it, the "eyepoint" of the viewfinder seemed fairly high, making it usable with eyeglasses, although I had to press the lenses of my glasses up against the eyecup to see the full viewfinder area. (The full-frame viewfinder does seem to have a lower eyepoint than the viewfinders on Canon's sub-frame cameras like the EOS-20D and the Digital Rebel series.) (Illustration courtesy Canon USA, Inc.)
It's important to note in discussing the 5D's viewfinder system that the rear-panel LCD display is not usable as a viewfinder. Instead, the optical viewfinder uses a mirror to intercept the image on the way to the shutter and the sensor. Thus, when the camera isn't actively taking a picture, the light from the lens is directed only to the optical viewfinder, and so isn't available to the sensor to drive a live viewfinder display on the LCD. With the exception of the Olympus E-10 and E-20 (which used a beam-splitter prism instead of a mirror, at some cost in light sensitivity) or the new Olympus E-330 (which uses a partially silvered mirror in its Porro optics and a separate dedicated CCD for its electronic viewfinder), all digital SLRs operate in this fashion.
 While not strictly a viewfinder function, the capture-mode Info display shown on the rear-panel LCD screen also deserves mention here. The optical viewfinder carries quite a bit of information about camera status as shown above, but there's even more available on the rear panel, just by pressing the Info button. Rather than the exposure settings shown in the optical viewfinder, this display shows date/time, autoexposure bracketing amount, white balance bracketing amount, processing parameter setting, image review status, image review time, color temperature setting (if selected), ISO speed, auto rotate status, auto power off time, flash exposure compensation amount, and megabytes of remaining memory card capacity. Between this screen, the optical viewfinder display, and the LCD data readout on the camera's top, the 5D provides a lot of information.
Optics
The Canon EOS 5D accepts Canon's standard EF lenses, but is not compatible with the newer EF-S lenses, designed for cameras with smaller sensors. Key features of the Canon EF lenses are the exceptionally fast, silent "ultrasonic" focusing mechanism (a coreless motor built into the lens body itself) found on some models, and the exceptional range of optically stabilized models that permit hand-holding way beyond light levels that would normally require the use of a tripod. Unlike most digital SLRs, the sensor in the EOS 5D is about the same size as a 35mm film frame. This means that the "effective" focal length of your lenses will actually be the same as their normal values on 35mm cameras. Great news for anyone who already has a nice collection of Canon EF lenses, particularly if they favor a really wide-angle photography.
As we noted earlier though, the full-frame digital sensor imposes much more stringent requirements on lens quality than do the smaller APS-C sized sensors used in the EOS-20D and Digital Rebel cameras. Most lenses have a harder time producing crisp, distortion-free images near the edges of their image circles than they do near the center of the frame. This means that digital SLRs with sub-frame sensors use only the "sweet spot" in the center of the frame when they're paired with a lens designed for full-frame coverage, resulting in better image quality than might normally be associated with the lens. The Canon 5D has no such luxury though, as its high resolution digital sensor goes right out to the edges of the 35mm frame. The large physical size and high resolution of the 5D's digital sensor combine to create a real torture test for lenses. If a lens has the slightest tendency towards softness, chromatic aberration or distortion in the corners of the 35mm frame, the 5D's sensor is going to make the optics' shortcomings glaringly obvious. It's worth repeating: The Canon EOS-5D is not the camera to buy if you don't also have the budget necessary to acquire absolutely first-rate lenses.
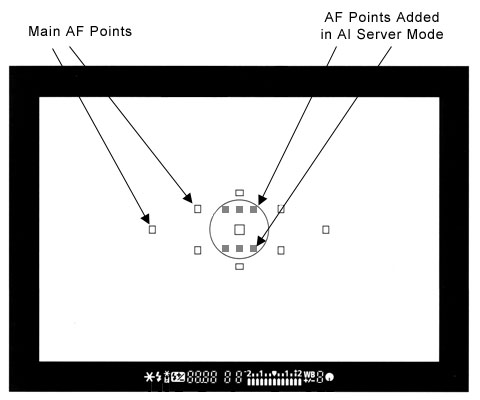
The 5D has an autofocus system with nine main sensors, arrayed in a diamond pattern in the center of the frame. You can manually select which of these you want the camera to pay attention to (handy for off-center subjects), or you can let the camera decide. When it's operating in automatic AF mode, it will use the sensor corresponding to the part of the subject closest to the camera. The 5D's AF system operates in One Shot, AI Focus, or AI Servo AF modes. One Shot mode simply sets focus for each individual shot, while AI Servo AF tracks the subject as it moves. Through the Custom settings menu, you can expand the 5D's AF point selection area for AI Servo AF mode, and add six invisible AF points within the spot metering circle. Essentially, you'll have seven AF points tracking a moving subject instead of only one, which is very useful for erratic movements. AI Focus AF automatically flips between One Shot and AI Servo AF modes, depending on the subject. The 5D also offers what Canon terms "Predictive AF," which basically calculates the rate at which a subject is approaching or receding from the camera, and then accurately focuses based on the subject's predicted position. (A feature that sports photographers will no doubt appreciate.) Manual focus is also available with any Canon EF lenses, simply by sliding the AF/MF switch on the lens barrel.
Full-frame vs APS-C: How big a difference?
We mentioned above that the full-frame sensor of the 5D (or for that matter of the 1Ds Mark II) is much more demanding of lenses used with it. This should be very much a factor in deciding between a high-performance sub-frame camera (like the Canon EOS-30D or Nikon D200) and a full-frame model like the Canon 5D. While you can certainly use any lens with a full-frame image circle on the 5D, it's going to be merciless in showing off the faults of lesser optics, particularly in the corners of the frame. If you really care about image quality (and you probably do, or you wouldn't be considering spending the amount of money a 5D commands), buying a 5D will also amount to a commitment to buying and using only the best (and therefore most expensive) lenses with it. In the Canon line, this means "L" glass, and in fact Canon themselves recommend only L-series lenses for use with their full-frame d-SLRs, the 5D included. If you plan on owning more than one or two lenses, the cost of the glass to support the 5D's capabilities will ultimately far outstrip the cost of the camera.
 |
| Canon 24-70mm f/2.8L on 20D (Click to view full results) |
 |
| Canon 24-70mm f/2.8L on 5D (Click to view full results) |
To see what we're talking about here, the images at right are links to interactive lens-sharpness viewers, as seen on our sister site, SLRgear.com. Clicking on either image will launch an interactive viewer in a separate window. Based on data from hundreds of test shots in our lab, the 3-D graphs plot lens blur across the frame, at a range of focal lengths and apertures. - You can adjust the focal length and aperture with sliders on the viewers, to see how the sharpness varies with different settings. Both viewers show the same lens (the excellent Canon 24-70mm f/2.8 L), the only difference being the camera they're being used on. The viewer on top shows results measured on an EOS-20D body, the viewer on the bottom shows the results with an EOS-5D.
This is a truly excellent lens by any measure, but on the 20D it's simply outstanding, delivering extremely sharp images across the full image area from 24-50mm, finally softening a bit its maximum focal length of 70mm. While still very good, results on the 5D aren't nearly as good in the corners of the frame, particularly at 24 and 70mm. Now keep in mind that this is a lens that's currently (early 2006) retailing for around $1,200. Typical $300-500 zooms are going to look much, much worse.
There's also the matter of bulk when considering lenses for a full-frame d-SLR. The 24-72mm f/2.8 L optic we've just been discussing is a huge, heavy hunk of glass. The reduced image circle of cameras like the 30D and Rebel series allows lenses to be made much smaller for similar optical characteristics. Canon themselves have been steadily rolling out more and more EF-S lenses over the last couple of years, and it seems very likely that they'll continue to do so. Third-party makers are also jumping on the reduced image-circle bandwagon, with Sigma being particularly aggressive in this area. - And a smaller image circle doesn't necessarily imply low-quality glass either: Canon's little 10-20mm super-wide angle EF-S lens is absolutely top-notch in its performance.
Of course, there are other advantages of the larger image sensor, namely higher resolution without paying a noise penalty for smaller sensor pixels in the process. The larger sensor also has a 1:1 crop factor, so if you currently own a number of wide-angle lenses, they'll continue to take in their full field of view on the 5D body. (Not to belabor the point though, but you could also purchase a 30D and the Canon 10-20mm EF-S super-wide zoom, for considerably less than the cost of the 5D body alone.)
Exposure
Like the rest of the EOS line of digital SLRs, the 5D provides as little or as much exposure control as you could want. Standard exposure modes include the usual Program AE (shiftable), Aperture-Priority, Shutter-Priority, and full Manual modes, as well as Bulb and Custom modes. The full Auto mode takes over all camera functions, turning the 5D into a very simple point and shoot camera, albeit a very capable one. Aperture Priority and Shutter Priority modes work much the same as on any other camera, allowing you to adjust one exposure variable while the camera selects the other for the best exposure. A Custom menu setting enables a "safety shift" option, which automatically adjusts the primary variable (aperture or shutter speed) in Av or Tv modes, if the setting you've selected won't permit a good exposure under the current lighting conditions. This could come into play if you were shooting in shutter-priority mode to achieve a motion-blur effect, but the light suddenly got brighter, pushing the required aperture value beyond what the lens could provide. In this situation, the camera would automatically boost the shutter speed the minimum amount needed to achieve a good exposure. Program mode keeps both variables under automatic control, though you can "shift" the exposure bias toward faster or slower shutter speeds or larger or smaller lens apertures by turning the Main dial. As you'd expect, Manual mode gives you control over both aperture and shutter speed simultaneously. The Bulb exposure mode continues the full manual exposure control, but allows the shutter to remain open as long as 999 seconds. Finally, Custom mode simply accesses a set of presaved camera settings, saved through the Register Camera Settings option of the record menu.
While the 5D doesn't offer the traditional preset Scene modes seen so frequently on other digital cameras, it does feature a Picture Style menu option, that accesses a series of preset shooting parameters. You can choose between Standard, Portrait, Landscape, Neutral, Faithful, and Monochrome modes, or save up to three sets of custom settings (with predetermined sharpness, contrast, color saturation, and color tone settings). Most of these are pretty self-explanatory, but the Faithful option deserves some further explanation. In Faithful mode, the camera automatically corrects color on subjects photographed under a color temperature of 5,200K. (A slightly warmer color balance than that of "standard" daylight.) In this mode then, the color balance will be referenced (more or less) to daylight, preserving the color cast of the scene illumination. (Very handy for preserving light color in shots captured at dawn or sunset, or under colored artificial lighting.) Under the Monochrome option you have access to sharpness and contrast adjustments, but Filter and Toning effect options are added. In this mode, Filter Effects offers yellow, orange, red, and green enhancements, similar to putting a colored filter over a lens when shooting black and white film. The Toning Effect lets you tone an image sepia, blue, purple, or green.
Commonplace on Canon's high-end EOS SLRs is an ISO expansion option, which increases the 5D's maximum ISO speed to 3,200 and drops the minimum speed to 50. Alternatively, you can adjust the ISO from 100 to 1,600 in one-third-stop increments, or select an Auto setting. For adjusting the exposure, the 5D's Exposure Compensation setting increases or decreases overall exposure from +/-2 EV in either one-half or one-third EV increments. The default step size is 1/2 EV, but you can set an increment of 1/3 EV via the camera's Custom menu. (Frankly, I've always found that one-third EV compensation is just about ideal for digital cameras. One-half EV steps are just too broad to set critical highlight exposures accurately.) Automatic exposure bracketing on the EOS 5D lets you set the total exposure variation (across three shots) at anywhere from +/- 1/2 or 1/3 EV all the way up to +/- 2 EV. The nice part is that the automatic variation is centered around whatever level of manual exposure compensation you have dialed in. Thus, you could set positive compensation of 0.7EV, and then have the camera give you a variation of +/- 2/3 EV around that point. Whatever EV step size is set through Custom menu also sets the bracketing step size.
I really like the amount of information the 5D gives you about its exposure, not only in terms of the settings it's using, but in the form of feedback on how pictures you've captured turned out. In capture mode, pressing the "Info" button shows the very detailed display shown at right, listing the current status of essentially all the image-related settings.
 In Playback mode, you can select an "Info" display mode when viewing captured images on the rear-panel LCD screen, which produces the display shown at right. Notable here is that you not only can see all the exposure parameters, but you get excellent feedback on the tonal range of the image itself. One form of feedback is the histogram display at upper right, which shows how the tonal values are distributed within the image. Histogram displays are useful for directly seeing how the overall exposure turned out in an image, but I've found them to be of limited usefulness for making critical judgments about highlight exposure.
 Digital cameras need to be exposed more or less like slide film, in that you need to zealously protect your highlight detail. Once you've hit the limit of what the sensor can handle, the image "clips" and all detail is lost in the highlight areas. The problem is that it's quite common for critical highlights to occupy only a very small percentage of the overall image area. Because they correspond to such a small percentage of the total image pixels, the peak at 100 percent brightness can be very hard to distinguish in the histogram display. To handle such situations, the 5D blinks any pixels that are 100 percent white on its screen, alternating them between black and white. This makes localized overexposure problems leap out at you, making it very easy to control the critical highlight exposure precisely. (The sample image shown in the display above right is a pathological example, chosen to show how the feature works. In practice, you'd probably never overexpose an image that badly.)
 A particularly nice feature of the Canon 5D's histogram display is the option to show separate red, green, and blue histograms, as shown at right. This can give you further insight into what's going on with an image's exposure, and is particularly helpful with strongly colored subjects, where you may be able to see saturation of an individual color channel that might not be discernible in the brightness-only histogram. The separate RGB curves can also help in judging overall color balance.
 Besides the above-mentioned exposure information and feedback, the 5D's playback options include a thumbnail index display, normal full-frame viewing of captured images, and a zoomed view, as shown at right. There's also a "jump" mode, activated via the Jump button on the rear panel of the camera. Jump mode lets you very quickly move through images stored on the memory card, jumping 10 shots at a time. The EOS 5D's image playback can be zoomed in very small steps anywhere from 2-10x. Once you've zoomed in at any level, you can scroll the zoomed window all around the image area, using the rear-panel multi-controller joystick.
Another feature deserving comment is the Canon 5D's separation of the autoexposure and autofocus lock functions. In consumer-level digital cameras, half-pressing the Shutter button locks exposure and focus simultaneously. You can use this to deal with an off-center subject by pointing the camera at the subject, locking exposure and focus, and then reframing the picture before finally snapping the shutter. The only problem is that you sometimes need to perform a more radical recomposition of the subject in order to determine the proper exposure. For instance, you may want to zoom in on the subject, grab an exposure setting, and then zoom back out before taking the picture. Situations like that require locking the exposure independently of the focusing, and the 5D provides for just such eventualities by way of a separate AE lock button on the back of the camera, right under your right thumb. (The "*" button.) A very handy feature indeed, for those times you need it.
The EOS 5D offers a full range of White Balance settings, including six presets, an Auto setting, Custom setting, and Kelvin temperature setting. The six presets include Daylight, Shade, Cloudy, Tungsten, Fluorescent, and Flash. The Custom setting bases color balance on a previous exposure, meaning you can snap an image of a gray card and base the color temperature on that image. The Kelvin temperature setting lets you get even more specific, and offers a range of temperatures from 2,800 to 10,000 degrees Kelvin.
 One of the 5D's more unique features is its two-dimensional White Balance Shift/Bracket control. Conventional white balance "tweak" adjustments are generally limited to adding blue or red, or perhaps just shifting a color temperature setting that's calibrated in units of degrees Kelvin. The problem is that controls of this sort treat color as if were a one-dimensional entity, when it's really three-dimensional in nature. I've often been frustrated when trying to adjust a camera's color balance, for instance wanting to shift it toward green, when the camera offers options of only blue or red.
On the 5D, Canon offers a two dimensional adjustment for tweaking white balance, as shown above right. The current color balance is represented by a white cursor floating in a grid representing color space. Moving the cursor up or down results in a shift toward green or magenta respectively, while moving it left or right produces a shift toward yellow or blue. Each adjustment step in the yellow/blue direction corresponds to five mireds worth of color conversion filter, and green/magenta steps are of a similar magnitude, although the green/magenta axis doesn't translate to the color-temperature shift units of mireds.
At first glance, you'd think that a two-dimensional color adjustment tool still wouldn't cover a three-dimensional color space, Canon's approach actually does just that. To understand the control, it's important to remember that color (hue and saturation, as opposed to brightness) in an RGB image is determined by the relative amounts of red, green, and blue present, not necessarily by the absolute values of each color channel. The 5D's color shift display lets you control the green channel with either positive (green) or negative (magenta) adjustments, and the blue channel with either positive (blue) or negative (yellow) adjustments. By adjusting two of the three color channels up or down, the relative amounts of all three channels can be controlled. I suspect that the actual operation on the file is more complex than we've been discussing, but one way of looking at it would be to consider the red channel to be fixed and the blue and green channels to be adjustable against the constant red level. Canon's color adjustment tool thus lets you dial in any white balance shift you'd like to make, even though it's only a two-axis control.
"But wait, there's more!" (To steal a line from TV infomercials.) The Bracketing aspect of the White Balance/Bracketing control comes into play when you turn the Quick Control Dial right. This expands the single cursor dot into a horizontal row of three dots, with slightly variable spacing. These represent the successive color values that will be used for a set of three shots that bracket the white balance. You can thus set whatever basic color balance you want, and then bracket with more or less red, or more or less blue, depending on where you are in the color space. Not enough? Turning the quick dial back left switches the set of three dots from a horizontal to a vertical array, letting you bracket with more or less green/magenta, rather than red or blue.
About the only possible remaining option would be the ability to rotate the set of three dots to arbitrary angles, but I guess the Canon engineers had to stop somewhere. Regardless, the EOS 5D's white balance adjustment control goes far beyond anything we've seen on any non-Canon digital cameras, regardless of price point. (The same color control first appeared on the Canon EOS-20D and is also found on the new EOS-30D.)
Low Light Capability & Image Noise Performance
The EOS 5D offers a Bulb exposure setting for very long exposures (B on the Mode dial). Normally, exposure times are limited to a maximum of 30 seconds in Aperture- or Shutter-Priority modes, but in Manual mode, you can expose for as long as 999 seconds by selecting Bulb mode and holding down the Shutter button for as long as you want the shutter to remain open. Obviously, 999-second exposures aren't a practical reality, as sensor noise will totally swamp the signal long before that point is reached, but the 5D does seem quite able to take very long exposures with very little image noise resulting.
A full discussion of image sensor noise is beyond the scope of this review, but the simple story is that the most obvious and objectionable noise you'll see in long digital camera exposures is so-called "fixed pattern" noise, caused by variations in "dark current" between sensor pixels. "Dark current" is just what it sounds like. Current (a signal) appears even when the sensor isn't being exposed to light. When you look at a long time exposure shot with a digital camera, you'll often see very bright pixels, where minor manufacturing defects have resulted in unusually high "dark current" levels. Often called "hot pixels," these flecks of color are very distracting visually.
The normal way to deal with hot pixels is to take an exposure with the camera's shutter closed, immediately after shooting the subject. If this "dark frame" is exposed for the same time as the subject was, you can largely eliminate the hot pixel problem by subtracting the dark frame information from the actual exposure. In practice, this works fairly well, but has the disadvantage that you have to wait for the dark frame exposure to be taken, requiring an appreciable amount of time in the case of long time exposures. (If you shot a one-minute exposure for the photo itself, you'll have to wait another minute for the dark frame exposure to be made.)
While most other high-end digital cameras on the market use a dark frame subtraction method to deal with image noise, previous d-SLRs using Canon's CMOS sensor technology apparently did something quite different, as there was very little delay between the end of the primary exposure and the writing of the image file to the memory card. There was clearly no "dark frame" exposure involved. I suspect that this advanced noise reduction processing was another consequence of the "active pixel" CMOS technology Canon developed internally. Having active circuitry associated with each pixel in the sensor array allows lots of fancy processing that would be impossible otherwise, and it looks like Canon's noise reduction system takes advantage of this.
In the EOS-5D though, while apparently still using the sophisticated on-chip noise reduction processing we first saw in the 10D, Canon has also included an option for conventional dark-frame subtraction as well. Accessed via Custom Function 02, the "Long exposure noise reduction" seems to operate just the same as dark-frame subtraction on other cameras we've seen it on. The difference with the 5D though, is that there's precious little image noise to be subtracted out, at least at exposure times of 30 seconds or less, where I did essentially all my low-light shooting. I can imagine the dark-frame subtraction option being useful for astronomers doing 5-minute exposures with the 5D, but it will add little to most users' image quality. (I did try a pair of 10-minute exposures with the 5D, one with long-exposure noise reduction turned on, the other with it off, and there was definitely a noticeable improvement with it enabled. It's sure a long time to wait for the camera to come back to you though, when you're waiting for a 10-minute dark-frame exposure to complete!)
Flash
The EOS 5D does not offer a built-in flash, but instead features a top-mounted hot-shoe and a PC sync terminal. The 5D uses E-TTL II control for compatible external flashes (according to Canon this includes the earlier 550EX flash, as well as the current 580EX), a new standard that promises better, more balanced exposures. Custom Function 14 turns this mode off and returns to an average metering system.
Another nice touch is the Flash Exposure Lock button, which fires the flash under manual control before the actual exposure, to determine the proper exposure setting. This struck me as very handy, akin to the more conventional autoexposure lock function for handling difficult ambient lighting conditions. A Flash Exposure Compensation feature controls the flash exposure +/- 2 stops in 1/2 or 1/3-stop increments.
Several of the more impressive features of the Canon flash system depend on the dedicated 550EX or 580EX speedlight. Among these are true FP (focal plane) flash sync, flash exposure bracketing with external flash units, flash modeling, and E-TTL II exposure control. FP sync requires a flash unit to provide uniform light output for a relatively long period of time, long enough for the focal plane shutter curtain to fully traverse the "film" plane. On the 5D, this requires a flash duration of 1/200-second. Uniform, long-duration flash pulses like this permit use of shutter speeds as high as the 1/8,000-second maximum that the 5D is capable of. This can be invaluable when you want to exclude ambient light from the exposure. (FP sync mode is referred to as "high speed" mode on the Canon 550 and 580 flash units.)
Here's the rundown on Canon Speedlights and their compatibility with the 5D:
| Speedlight Model | On-Camera Capability | E-TTL Wireless Compatibility |
| 580EX | All | Master or Slave |
| 550EX | All | Master or Slave |
| 480EG | External auto plus manual operation | None |
| 540EZ | Manual operation only | None |
| 430EZ | Manual operation only | None |
| 420EX | All | Slave Only |
| 420EZ | Manual operation only | None |
| 380EX | All | None |
| 220EX | All | None |
| 200E | Not Compatible | None |
| 160E | Not Compatible | None |
| MR-14EX Macro Ring | All | Master Only |
| MT-24EX | All | Master Only |
| ST-E2 transmitter | E-TTL, attach to camera | Master Only |
| Non-dedicated shoe-mount units | Manual operation only | n/a |
| Studio strobe packs | Manual operation only, connect via threaded PC sync socket on camera body | n/a |
You'll note the references to "E-TTL remote" capabilities in the table above. Canon's Speedlight system permits TTL flash metering with multiple remote units, and even allows you to set differential power ratios between the slaved units, over a six-stop flash exposure range.
The "Flash Modeling" feature of the 550/580EX speedlights is quite useful. With a F550/580EX connected to the 5D, pressing the camera's Depth of Field Preview button causes the speedlight to fire at 70 flashes per second for about a second. This creates the illusion of a constant light source for your eyes, letting you preview the lighting on your subject when the flash fires. VERY handy, and likely to save lots of shoot/check/reshoot time!
As alluded to above, the "X-sync" speed of the 5D is 1/200-second. (This is the maximum shutter speed that can be used on the 5D when working with a non-dedicated, FP-capable speedlight.) When used with higher-powered studio strobe systems, Canon recommends a maximum shutter speed of 1/125-second or slower, to accommodate the variable time/intensity profile of such units.
Another benefit of the dedicated Canon speedlights is that they carry powerful autofocus assist illuminators. As an example, the AF assist beam on the 550EX is rated as good to about 50 feet. (Note that the ST-E2 wireless sync transmitter can also be used for AF assist during non-flash photography, a handy trick.)
 |
20D with E-TTL II |
 |
Digital Rebel without E-TTL II |
Continuous Shooting Mode and Self-Timer
The 5D's Continuous Shooting mode is rated by Canon at about three frames per second, for a maximum of 60 large/fine files or 17 RAW ones. As usual though, note that actual frame rates and the maximum number of images in the series will depend on shutter speed, file size, and the amount of space available on the memory card.
The camera's Drive setting also accesses a Self-Timer mode, which opens the shutter 10 seconds after the Shutter button is pressed, giving you time to dash around in front of the camera.
Shutter Lag & Cycle Time Tests
When you press the shutter release on a camera, there's usually a lag time or delay before the shutter actually fires. This corresponds to the time required for the autofocus and autoexposure mechanisms time to do their work, and can amount to a fairly long delay in some situations. Since this number is rarely reported on (and even more rarely reported accurately), and can significantly affect the picture taking experience, I routinely measure both shutter delay and shot to shot cycle times for all cameras I test, using a test system I designed and built for the purpose. (Crystal-controlled, with a resolution of 0.001 second.) Here are the numbers I collected for the Canon EOS 5D:
(secs) |
||
| Power On -> First shot | Nearly instantaneous startup. |
|
| Shutdown | First time is simple shutdown, second time is worst-case buffer-clearing time.* |
|
| Play to Record, first shot | Really no delay at all, essentially just whatever shutter lag would be present in the AF mode you're shooting in. |
|
| Record to play | First time is that required to display a large/fine file immediately after capture, second time is that needed to display a large/fine file that has already been processed and stored on the memory card. Very fast. |
|
| Shutter lag, full autofocus | AF time will vary greatly, depending on the lens in use, the brightness and contrast level of the subject, and the amount of travel required of the lens optics to move to the new focus position. The number at left is essentially a best-case figure with the Canon 100mm f/2.8 macro lens already in-focus on a target. | |
| Shutter lag, prefocus | Time to capture, after half-pressing shutter button. Pretty fast, particularly considering the big full-frame mirror that has to move out of the way. |
|
| Shutter lag, manual focus | Fairly fast, but nearly twice the delay vs. prefocusing. | |
| Cycle Time, single-shot mode, JPG | 0.40 |
Times are averages. Shoots over 50 shots this fast in large/fine mode, then clears the buffer in 13 seconds.* Shoots at this rate continuously in small/basic mode, clearing the buffer after each shot, with a sufficiently fast card. |
| Cycle Time, continuous mode, JPG | 0.33 (3.02 fps) |
Times are averages. Shoots 98 shots this fast in large/fine mode, then clears the buffer in 23 seconds.* Shoots at this rate continuously in small/basic mode, clearing the buffer after each shot, with a sufficiently fast card. |
| Cycle Time, continuous mode, RAW / RAW+JPG | 0.33 (3.02 fps) |
Times are averages. Shoots 13 shots this fast in RAW+JPG mode, or 17 shots this fast in RAW mode. Buffer clears in 23 seconds.* |
| * Note: Buffer-clearing times were measured with a Lexar 80x CF memory card. Slower cards will produce longer clearing times. | ||
For a camera with such a high-resolution image sensor, the Canon EOS-5D is surprisingly sprightly. Its 3 frame/second continuous-mode speed is good if not exciting, but it can maintain that rate for anywhere from 25-60 large/fine JPEG frames (depending strongly on subject content and ISO speed), or 17 RAW-mode shots. With a fast memory card, the buffer clears quite quickly as well, taking as little as 23 seconds to write a full set of 17 RAW files. Note in the foregoing though, the observation about subject content and ISO: We found the JPEG buffer capacity of the 5D was much lower at ISO 1600 than at ISO 100, as well as with complex images with lots of fine detail, vs simple, softer-focused ones. This is purely a function of how well the camera can compress files into the JPEG format. Images with more noise or more fine detail compress less well than ones with less high-frequency content. The Canon EOS-5D did pretty well in terms of shutter lag, being able to determine focus with the 100mm f/2.8 Canon macro lens in just 0.149 second. (AF speed is of course highly dependent on the lens being used, and the amount of travel required of the optics to move from the previous focus point.) Prefocused, the camera delivered a very fast 78 millisecond shutter lag, impressive in light of the large mirror it needs to move out of the way before the shot can be captured. We don't test for it explicitly, but the viewfinder blackout in continuous mode did seem to be a bit on the long side, enough so that we found it a little distracting.
Operation & User Interface
The 5D's user interface is very similar to that of a traditional 35mm SLR film camera, and very similar to that on the EOS-30D and 20D models (with just a few changes that enhance operation somewhat). Current users of Canon EOS SLRs should immediately feel at home. I generally comment on whether or not a camera's controls permit single-handed operation, but in the case of pro-level cameras like the 5D, this is much less of a consideration, since the cameras' bulk and typical shooting scenarios generally demand the use of two hands anyway. I really appreciated the fact that the basic exposure controls are adjustable through the external camera control buttons and dials, greatly reducing your dependence on the rear-panel LCD menu system. The ability to program the Set button for quick changes of menu items such as image review, image quality, and picture style even further reduces reliance on the LCD menu. When you do venture into the menu system, all of the camera's playback and setup options are available in all shooting modes. Overall, I found the 5D's user interface very straightforward and efficient.

Power Switch: Located below the lower right corner of the LCD monitor, this switch turns the camera on or off; switching it to its third position activates the large Quick Dial above and to the right of it for more functions than just navigating the menus.
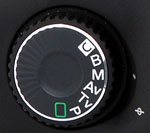
Mode Dial: Positioned on the left side of the camera's top panel, this dial sets the exposure mode. Exposure modes include Full Automatic, Program AE, Shutter Speed Priority AE, Aperture Priority AE, Manual, Bulb, and Custom modes.

Shutter Button: Located on top of the right hand grip, this button fires the shutter when fully pressed, and sets focus and exposure when halfway pressed in Automatic exposure mode. Halfway pressing this button also puts the camera into an "active" mode, which allows the rear-panel quick control dial to adjust exposure compensation. (You don't need to keep the shutter button half-pressed while working the quick control dial, but you do need to have pressed it within the preceding six seconds.) Pressing the shutter button in any state other than direct printing (for example, when in a menu or reviewing an image) will return the camera almost immediately to readiness for image capture.

Lens Release Button: Located on the front of the camera this semi-circular button located just to the left of the lens mount (as viewed from the back) unlocks the lens from the mount when pressed. The lens can then be removed by rotating it about 45 degrees right to disengage the bayonet mounting flanges.

Depth of Field Preview Button: Positioned on the side of the lens mount housing, just beneath the lens release button, this button lets you preview the depth of field by stopping down the lens aperture to the current setting. (Like most modern SLRs, the 5D normally focuses and meters with the lens wide open, stopping down to the selected aperture just as the picture is being taken.) When an external flash is connected, this button also fires a rapid series of flashes for one second, so that you can check shadows, light balance, and other effects, allowing the flash to be used as a modeling light. (This feature requires use of a Canon dedicated speedlight that supports this capability, such as the model 550EX, or the new 580EX.)
![]()
Main Dial: Resting on top of the camera on the right side (as viewed from the back), this ridged wheel adjusts some of the camera's basic settings. When used in conjunction with the appropriate control buttons on the camera's top, the Main dial controls the autofocus mode, metering mode or drive mode. In Aperture-Priority and Shutter-Priority modes, this dial sets the lens aperture or shutter speed. In Manual mode, the dial sets the shutter speed. In Program AE mode, this dial lets the user select from a small range of equivalent exposure settings.

Metering Mode / Flash Exposure Compensation Button: Just off from the top right corner of the small LCD display panel on top of the camera is the shiny black Metering Mode / Flash Exposure Compensation Button. Pressing this button while rotating the Quick Control Dial sets the flash exposure compensation from -2 to +2 in one-third EV increments, for both the built-in flash and any Speedlight EX external flash unit. (Flash exposure compensation cannot be used in Full-Auto mode.) Through the Custom Function menu, you can change the flash exposure compensation adjustment step size to one-half EV increments. Pressing this button while turning the Main dial cycles between the three metering modes: Evaluative, Partial, and Center-Weighted Averaging.

Drive / ISO Speed Button: Located to the left of the Metering Mode / Flash Exposure Compensation button, this button controls the camera's drive mode when pressed while turning the Main dial, cycling through Single Shooting, Continuous Shooting, and Self-Timer drive modes. When pressed while turning the Quick Control dial, this adjusts the ISO setting 100 to 1,600 equivalents in 1/3-stop increments. The 50 and 3,200 settings are only available when the ISO offerings have been expanded through the Custom Functions menu.

AF Mode / White Balance Button: To the left of the Drive / ISO button, this button controls the autofocus and white balance modes. Pressing the button while turning the Main dial sets the autofocus mode to One Shot, AI Focus, or AI Servo. (One Shot is for still subjects, while AI Servo is better for moving subjects, since it causes the camera to focus continuously. AI Focus automatically switches between the two modes.) Pressing this button while turning the Quick Control dial sets the white balance to Auto, Daylight, Shade, Cloudy / Twilight / Sunset, Tungsten, White Fluorescent, Flash, Custom (manual), or Kelvin mode, to match a variety of light sources. The Kelvin temperature setting is adjusted through the settings menu, with values from 2,800 to 10,000 Kelvin in 100K increments. Both functions are only available in the Creative Shooting Zone.

LCD Illuminator Button: Diagonally up and to the left of the AF Mode / White Balance button, this button illuminates the status display window with an orange backlight for six seconds.

Diopter Adjustment Dial: Located outside the top right corner of the viewfinder eyepiece, this dial adjusts the optical viewfinder's focus to accommodate eyeglass wearers, across an unusually wide range of -3 to +1 diopter. (Just barely short of accommodating my own 20:180 vision.) If this much adjustment isn't enough, one of Canon's ten different optional dioptric adjustment lenses can be purchased

Print Button: Just above the top left corner of the LCD monitor, this button enables direct printing to compatible printers.

Menu Button: Topping a column of buttons along the left side of the LCD monitor, this button accesses the 5D's LCD-based operating menu in all modes. Pressing the Menu button a second time cancels the menu display.

Info Button: Just below the Menu button, this button displays the current exposure settings on the LCD screen when pressed. In Playback mode, pressing this button switches between three different formats for the playback display. The options are Single Image Display (with Basic Info), which shows the image number, shutter speed and aperture; Shooting Information, which brings up an information screen that reports the detailed exposure settings that the picture was taken with, and also displays a small histogram which shows the number of pixels having each possible brightness value; and Single Image Display (no Shooting Info) which shows just the image with no overlay. The Info button works regardless of whether you are viewing a single image, multi-image index display, or are using the playback zoom, but the histogram view isn't available when you're zoomed in on an image.

Jump Button: Directly below the Info button, this button allows you to jump 10 frames forward or backward when viewing images in Playback mode. Once pressed, a jump bar appears in the LCD screen, and jumping is controlled by turning the Quick Control Dial forwards or backwards. The Jump button also jumps to the next group in the menu, indicated by color codes on the right side of the display.

Play Button: The final button on the left side of the back panel, this button puts the camera into Playback mode, regardless of the Mode dial setting. (Turning the Quick Control dial in this mode scrolls rapidly through captured images.) Playback mode can be canceled by hitting the Play button again, or by touching the Shutter button. (The 5D is a "shooting priority" camera. It's always ready to shoot a picture, regardless of its current mode. Simply pressing the Shutter button returns it immediately to capture mode.)

Erase Button: Resting beneath the lower right corner of the LCD monitor, this button accesses the Erase menu, which allows you to erase the current image or all images on the card (except for write-protected ones). There is also an option to cancel. The Erase function works in Playback mode and the quick review mode only.
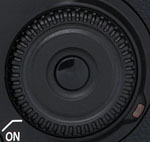
Quick Control Dial: To the right of the LCD monitor on the camera's back panel, this dial selects various camera settings and menu options when turned while pressing a control button or while in an LCD menu screen. When shooting in the Program AE, shutter- or aperture-priority modes, turning the dial within 6 seconds of halfway pressing the Shutter button sets the exposure compensation (from -2 to +2 in one-third or one-half EV increments). In Playback mode, this dial scrolls through captured images on the CompactFlash card. It also navigates the index display and scrolls around within an enlarged image. In Manual mode, the dial sets the aperture.
Set Button (see image above): Located in the center of the Quick Control dial, this button confirms menu selections and camera settings when using the LCD menu system. Through the Custom Function menu, this button can be programmed to control the image quality, parameters, or image playback in conjunction with the Quick Control dial. (The default is for it to have no function in record mode.)

Multi-Controller: Located directly above the Quick Control Dial, this joystick can be moved eight ways, or pressed directly inward, and is used to control AF Point selection and white balance correction, to pan around images when the playback zoom is in use, or to select the area to be trimmed when printing directly from the camera. It also comes into play when using the White Balance Compensation feature.
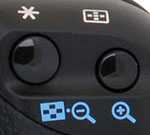
AE / FE Button: In the top right corner of the rear panel and marked with an asterisk, this button locks the exposure until the Shutter button is pressed. When pressed while the flash is activated, this button locks the flash exposure, which signals the camera to fire a small pre-flash to measure the exposure before locking it. (This decoupling of exposure lock from autofocusing is a very useful "pro" feature seldom seen on lower-end cameras.) Through the Custom menu, you can program this button to lock exposure and focus together, or only one of the variables.
AF Point Selector Button (See image above): Just beside the AE / FE button, this button allows you to choose the focus area manually or automatically in Program AE, Shutter-Priority AE, Aperture-Priority AE, or Manual Exposure modes. Pressing the button and using the Multi-Controller allows you to select either an automatic setting (by pressing in on the Multi-Controller while deflecting it toward the position of the currently selected AF point), or your choice of nine manually-selected focus areas (up, up/left, left, down/left, down, down/right, right, up/right, or the center point - the latter of which is selected by pushing inwards on the Multi-Controller). If you want, you can also use the Main Control Dial to step sequentially through the AF points, instead of the more direct-acting Multi-Controller. When the automatic setting is chosen, all nine AF points illuminate in the viewfinder. The automatic setting lets the camera select the active focus point(s) at the time of exposure, based on the position of the subject within the frame, and its proximity to the nine focusing points (shown as nine small boxes arranged in a diamond pattern in the viewfinder). Whenever you press this button, your current choice of focusing area is reflected in the top-panel LCD data readout by the position of a dash (or series of dashes) in the LCD data readout, as well as in the form of a red-illuminated box in the viewfinder.
Camera Modes and Menus
![]()
Full Automatic Mode: Indicated on the Mode dial by a green rectangular outline, this mode puts the camera in charge of all exposure decisions with the exception of image quality. Autofocus mode is set to AI Focus. (AI Focus evaluates subject movement, automatically sets either one-shot AF or AI Servo AF automatically.) Drive mode is set to Single Shot, and the metering mode is set to Evaluative.
![]()
Program AE: Next on the Mode Dial, Program AE works similarly to the Full Automatic exposure mode, but allows more control over the exposure variables. Aperture and shutter speed are automatically selected by the camera, but you can bias the exposure to larger or smaller apertures by turning the Main control dial, which will change the combination of aperture and shutter speed so as to maintain the same exposure value, but with a different choice of aperture/shutter speed. Turning the Quick Control dial in this mode adjusts the exposure compensation setting, to increase or decrease overall exposure.
![]()
Shutter-Priority AE: This mode allows you to manually set the shutter speed anywhere from 1/8,000 to 30 seconds, while the camera chooses the best corresponding aperture setting. You have control over all other exposure variables, including exposure compensation.
![]()
Aperture-Priority AE: The opposite of Shutter-Priority mode, Aperture-Priority AE allows you to set the lens aperture (with available ranges depending on the lens in use), while the camera selects the most appropriate shutter speed. Again, you have control over all other exposure variables, including exposure compensation.
![]()
Manual Exposure: This mode provides the same range of exposure control as the other Creative Zone exposure modes (except for exposure compensation), but lets you control both shutter speed and lens aperture independently. A display in the top LCD panel reports whether the camera thinks your settings will result in under, over, or correctly exposed photos.
![]()
Bulb Mode: Indicated by a "B" on the Mode dial, this mode provides complete exposure control, but allows the shutter to stay open as long as 999 seconds. (I highly recommend that you use Canon's RS-80N3 remote switch in Bulb mode, to avoid jiggling the camera with your shutter finger during the long exposure.)
![]()
Custom Mode: The final position on the Mode dial, this mode lets you recall previously saved camera settings, registered via the Register Camera Settings option of the LCD menu.
Playback Mode: This mode is entered by pressing the Play button on the back panel. Playback mode lets you erase images, protect them, or set them up for printing on DPOF/PictBridge compatible devices. You can also view images in an index display, enlarge images to 10x, view a slide show of all captured images, or rotate an image. The Info button activates an information display, which reports the exposure settings for the image and graphs the exposure values on a small histogram.
Operating Menu: This menu is available in all of the camera modes, though a few of the capture-related options are only available in the Creative Zone (P, Tv, Av, and M exposure modes). Pressing the Menu button calls up the Operating menu.
 Quality: Sets the image size and the compression ratio. Options are Large/Fine (4,368 x 2,912 pixels), Large/Normal (4,368 x 2,912 pixels), Medium/Fine (3,168 x 2,112 pixels), Medium/Normal (3,168 x 2,112 pixels), Small/Fine (2,496 x 1,664 pixels), Small/Normal (2,496 x 1,664 pixels), and RAW (4,368 x 2,912 pixels, with lossless compression). Also available are RAW + JPEG combinations for each resolution and quality setting.
 Protect: Protects the currently displayed image against accidental deletion, apart from card formatting.
 Auto Power Off: Sets power down time to between 1 and 30 minutes or to Off for no automatic shutoff.
Custom Settings Menu:
Image Storage and Interface
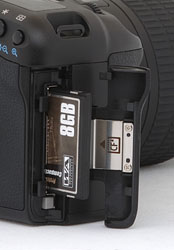 The EOS 5D utilizes CompactFlash (Type I and II) memory cards as its image storage medium, which should never be removed from the camera while in use. (Removing a card while the camera is still writing to it could cause permanent damage to the card.) The EOS 5D does not ship with a memory card, so you'll want to purchase a large capacity card right away. I'd recommend picking up at least a 1 GB card for starters, given the EOS 5D's large, 4,368 x 2,912-pixel maximum resolution. The table below shows card capacities and approximate compression ratios for the various file sizes and types, based on a 1GB memory card. The 5D is fully compatible with Hitachi MicroDrives and other Type II CompactFlash devices.
The EOS-5D supports the FAT32 directory structure. (FAT stands for File Allocation Table, and FAT32 indicates that these newer cards use a 32-bit File Allocation Table. In general, digital cameras made before 2003 supported only FAT 16.) The larger address space provided by FAT32 is necessary for managing high-capacity memory cards of 2GB or greater capacity. This wasn't an issue in the past, but CF cards with capacities greater than 2GB are quite common these days, and FAT32 is required to properly access them.
Resolution/Quality 1 GB Memory Card |
Fine | Normal | |||
| 4368 x 2912 | Images (Avg size) |
176 5.8 MB |
350 2.9 MB |
59 17.3 MB |
43 23.3 MB |
| Approx. Compression |
7:1 | 13:1 | 1.1:1 | - | |
| 3168 x 2112 | Images (Avg size) |
301 3.4 MB |
598 1.7 MB |
- | - |
| Approx. Compression |
6:1 | 12:1 | - | - | |
| 2496 x 1664 | Images (Avg size) |
424 2.4 MB |
845 1.2 MB |
- | - |
| Approx. Compression |
5:1 | 10:1 | - | - | |
The RAW mode listed above deserves some explanation. This is a format that records all the data from the sensor, exactly as it comes from the A/D conversion process. It is lossless compression, meaning that the file is reduced to a smaller size, but without losing any data in the process. It thus preserves all the original data from the sensor, but is nevertheless much more compact than an equivalent TIFF file.
Download Speed
The 5D has a USB 2.0 port for rapid file transfers to the host computer. Downloading files to my Sony desktop running Windows XP (Pentium IV, 2.4 GHz), I clocked it at 1216 KBytes/second, a respectable if not astonishing speed. (Cameras with slow USB interfaces run as low as 300 KB/s, cameras with fast v1.1 interfaces run as high as 600 KB/s. Cameras with USB v2.0 interfaces run as fast as several megabytes/second.)
Video Out
A video cable comes packaged with the 5D, allowing you to connect the camera to your television set for image playback. The video signal can be switched between NTSC and PAL timing via a menu preference, for use in the US and Japan, or most European countries. All menus, etc. appear on the external video monitor, but do note that it won't work as a viewfinder for the same reason that the rear-panel LCD won't. (The SLR optics mean that the sensor is only exposed to light when the shutter is open.)
Power
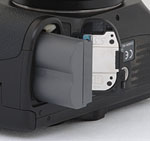 The EOS 5D uses the same BP-511A battery introduced with the Canon PowerShot Pro1, and which now appears as standard in many of Canon's cameras. These are compatible with older chargers and cameras, they're just of higher capacity. The BP-511A battery pack provides 1390 mAh at 7.4 volts. A separate charger comes in the box with the 5D. It works much like many of the recent ELPH chargers, with two flip-out prongs that plug directly into the wall. You'll need to purchase the AC adapter kit ACK-E2 if you need to run the camera from AC power. Canon's optional BG-E4 battery grip permits the use of either two BP-511A or six AA-size batteries.
Because it lacks an external power terminal, I couldn't perform my usual direct measurements of power consumption on the EOS-5D. I can attest to its excellent battery life though, as I should shoot literally for days without exhausting a fully-charged battery. Canon rates battery life at 800 shots, at 20 degrees C / 68 degrees F, or 400 shots at 0 degrees C / 32 degrees F which certainly seem like reasonable ratings given my personal experience with the camera.
Of course, regardless of how good a camera's battery life is, there's rarely an excuse to not purchase at least one extra battery to bring along as a hot spare. Plan on buying a second battery along with your 5D, it'll save you a world of grief later on when the battery that you were sure was full of juice runs out of gas in the middle of an important shoot.
Included Software
The 5D ships with a pretty complete complement of Canon-developed software on both Mac and Windows platforms, on Canon's EOS DIGITAL Solution Disk. The EOS DIGITAL Solution Disk enables image downloading and management, as well as the necessary tools to process the camera's RAW files. For the Mac platform, it includes ImageBrowser v5.5, Digital Photo Professional v2.0, EOS Capture v1.5, and PhotoStitch v3.1. For Windows computers, it offers ZoomBrowserEX v5.5, Digital Photo Professional v2.0, EOS Capture v1.5, PhotoStitch v3.1, PhotoRecord v2.2, WIA/TWAIN Driver v 5.5/5.7/5.8, and PTP WIA/TWAIN Driver v1.1.
In the Box
The EOS 5D comes with the following items in the box:
- Neck strap.
- Eye cup.
- BP-511A battery pack and charger.
- CR2025 lithium battery.
- Video cable.
- USB cable.
- Software CD.
- Software Instruction/Manual CD.
- Instruction manuals and registration information.
We ran the Canon EOS 5D through our usual battery of tests, and have summarized our findings here. To see the full set of our test images, with explanations of what to look for in them, see the Canon EOS 5D Sample Pictures page. For a complete listing of all our test and "gallery" shots, go to the Thumbnails page.
Not sure which camera to buy? Let your eyes be the ultimate judge! Visit our Comparometer(tm) to compare images from the EOS 5D with those from other cameras you may be considering. The proof is in the pictures, so let your own eyes decide which you like best!
The EOS 5D accommodates a wide range of Canon lenses with the EF mount, so lens performance will depend entirely on the lens in use.
Exposure and White Balance
Indoors, incandescent lighting
Strong warm cast with the Auto white balance setting, though good results with the Manual option. Less exposure compensation required than usual.
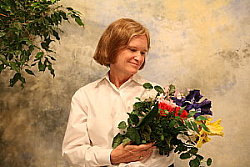 |
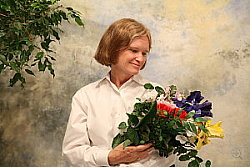 |
| Auto White Balance +0.7 EV | Tungsten WB +0.7 EV |
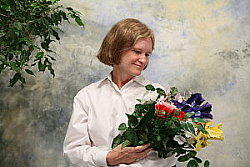 |
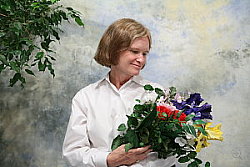 |
| 2800 Kelvin WB +0.7 EV | Manual WB +0.7 EV |
Color balance indoors under incandescent lighting was quite warm and orange in Auto white balance mode, though the Manual setting handled it quite well. The 5D only required a +0.7 EV exposure compensation boost to get a good exposure, much less than average for this shot. Overall color is quite good, though the blue flowers very dark and purplish, and the greens are a bit dark as well. (Many digital camera produce dark and purplish blues here however.) Our test lighting for this shot is a mixture of 60 and 100 watt household incandescent bulb, a pretty yellow light source, but a very common one in typical home settings here in the US.
Outdoors, daylight
Good color balance, very bright colors. Good exposure accuracy.
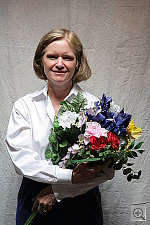 |
 |
| Auto White Balance, +0.7 EV | Auto White Balance, Auto Exposure |
Outdoor shots generally showed accurate exposure with only slightly blown out highlights. The EOS 5D required less exposure compensation than average on our "Sunlit" shot (above left), but the shadowed foliage on the left side of the frame in our Far-Field shot (above left) tricked the evaluative metering system a little, causing it to overexpose the highlights in the house. Shadow detail was very good, with clean detail and relatively little evidence of lost detail due to noise suppression. Apart from the slight overexposure in the somewhat pathological image of the house above, exposure was generally quite accurate.
See full set of test images with explanations
See thumbnails of all test and gallery images
Resolution
Very high resolution, beyond 2,000 lines of strong detail.
Our laboratory resolution chart revealed sharp, distinct line patterns down well past 2,000 lines per picture height on the main resolution target. On the half-size target, detail was good to about 2,100 lines (1,050 lines on the half-size chart), with extinction at around 2,500 (1,250 on the half-size chart). Use these numbers to compare with other cameras of similar resolution, or use them to see just what higher resolution can mean in terms of potential detail. Beware that while you might be able to make out what looks like distinct lines at numbers higher than those we've mentioned here, the camera is just doing its best to continue interpreting the lines. If you zoom in and follow them from the wider portions, you'll see the lines converge and reappear several times, so the lines you see at 3,000 and higher (1,500 on the half-size target) are really only artifacts generated by the camera's imaging system.
 |
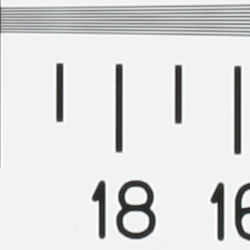 |
| Strong detail beyond 2,000 lines horizontal | Strong detail beyond 2,000 lines vertical |
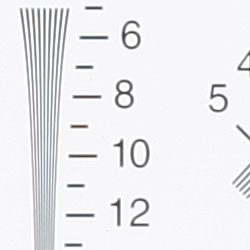 |
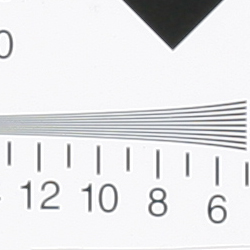 |
| Still good definition to ~2,100 lines in the half-size res target. (Resolution in this shot is 2x the indicated numbers.) |
Very good performance vertically as well. (Resolution in this shot is 2x the indicated numbers.) |
See full set of test images with explanations
See thumbnails of all test and gallery images
Sharpness & Detail
Excellent definition and very sharp details, without strong over-sharpening from the camera.
 |
 |
| Excellent definition of high-contrast elements. | Subtle detail: Hair Noise suppression tends to blur detail in areas of subtle contrast, though results are much better than average here. |
The EOS 5D's images show really excellent definition in the fine details. Some edge enhancement is visible along sharp, strongly contrasting images, but it's relatively innocuous, is largely invisible and doesn't seem to lead to loss of significant detail. (Edge enhancement creates the illusion of sharpness by enhancing colors and tones right at the edge of a rapid transition in color or tone.)
Noise-suppression systems in digital cameras tend to flatten-out detail in areas of subtle contrast. The effects can often be seen in shots of human hair, where the individual strands are lost and an almost "watercolor" look appears. The crop at far right shows this very slightly, but even the darker areas of Marti's hair show very good detail. - The EOS 5D is noticeably better than average in this regard.
ISO & Noise Performance
Low noise even at the higher sensitivity settings, though stronger noise with brighter pixels at the 1,600 and 3,200 settings.
 |
 |
 |
| ISO 50 | ISO 100 | ISO 200 |
 |
 |
 |
| ISO 400 | ISO 800 | ISO 1,600 |
 |
||
| ISO 3,200 |
The EOS 5D's performed very well with regards to image noise, producing only low to moderate noise levels even at the higher sensitivity settings. At ISOs 1,600 and 3,200, noise level definitely increases, as does blurring in the fine detail, but results are still surprisingly good, considering the high sensitivity setting. When printed, we were amazed by how good even ISO 3200 images looked, even at fairly large sizes. At 8x11, we definitely saw chroma noise when we squinted up close, but at normal viewing distances of a foot or so, the noise was all but invisible. (This will obviously be somewhat subject-dependent, of course.) ISO 1600 images would be suitable for wall display at 13x19 inches. Quite impressive!
Extremes: Sunlit and low light tests
High resolution with excellent detail. Good shadow detail and contrast as well. Excellent low-light performance, capable of capturing bright images under average city street lighting and much darker conditions.
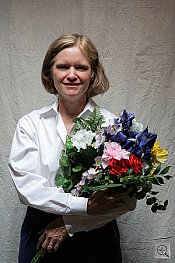 |
 |
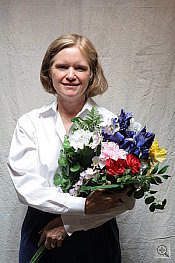 |
| +0.3 EV | +0.7 EV | +1.0 EV |
Sunlight:
Because digital cameras are more like slide film than negative film (in that they tend to have a more limited tonal range), we test them in the harshest situations to see how they handle scenes with bright highlights and dark shadows, as well as what kind of sensitivity they have in low light. The shot above is designed to mimic the very harsh, contrasty effect of direct noonday sunlight, a very tough challenge for most digital cameras. (You can read details of this test here.)
The EOS 5D performed well under the deliberately harsh lighting in the test above, producing a surprisingly good tonal range when the contrast setting was dialed down in the camera's record menu. Detail was good in the bright highlights and deep shadows, with only moderate blurring from noise suppression. (In "real life" though, be sure to use fill flash in situations like the one shown above; it's better to shoot in the shade when possible.)
| 1 fc 11 lux |
1/2 fc 5.5 lux |
1/4 fc 2.7 lux |
1/8 fc 1.3 lux |
1/16 fc 0.67 lux |
1/16fc No NR |
|
| ISO 50 |
2.5 sec f2.8 |
6 sec f2.8 |
13 sec f2.8 |
20 sec f2.8 |
30 sec f2.8 |
30 sec f2.8 |
| ISO 100 |
1.3 sec f2.8 |
3.2 sec f2.8 |
6 sec f2.8 |
13 sec f2.8 |
20 sec f2.8 |
20 sec f2.8 |
| ISO 200 |
1/1 sec f2.8 |
1.6 sec f2.8 |
2.5 sec f2.8 |
6 sec f2.8 |
10 sec f2.8 |
10 sec f2.8 |
| ISO 400 |
1/3 sec f2.8 |
1/1 sec f2.8 |
1.3 sec f2.8 |
3.2 sec f2.8 |
5 sec f2.8 |
5 sec f2.8 |
| ISO 800 |
1/6 sec f2.8 |
1/2 sec f2.8 |
1/1 sec f2.8 |
1.3 sec f2.8 |
2.5 sec f2.8 |
2.5 sec f2.8 |
| ISO 1600 |
1/13 sec f2.8 |
1/6 sec f2.8 |
1/3 sec f2.8 |
1/1 sec f2.8 |
1.3 sec f2.8 |
1.3 sec f2.8 |
| ISO 3200 |
1/25 sec f2.8 |
1/10 sec f2.8 |
1/6 sec f2.8 |
1/2 sec f2.8 |
1/1 sec f2.8 |
1/1 sec f2.8 |
Low light:
The EOS 5D is very capable at low-light shooting, as we captured bright, usable images at the lowest light level of our test, at all of the ISO settings tested. Color balance turned slightly warm and pink at the lower light levels with the Auto white balance, but was very good at the brighter light levels, and better than average everywhere. The camera's autofocus system worked well, able to focus on the subject down to the darkest light levels we test at, even with its AF-assist light turned off.
The EOS 5D's noise reduction systems are particularly effective. Like Canon's other d-SLRs with CMOS sensors, the 5D produced almost no "hot pixel" noise, even at the longest exposure times (30 seconds) we used here. Its optional dark-frame subtraction noise reduction thus shouldn't be necessary for the vast majority of shooting most people will do with the camera. We did try a couple of 10-minute exposures (of the inside of a closet, so the really weren't suited to sharing here), and were amazed by how well the camera did. There were definitely hot pixels present in the shot without the optional long-exposure noise reduction enabled, but the shots with the noise reduction on were surprisingly clean. (The wait for the camera to complete the dark-frame calibration shot seemed interminable though, since it took an additional 10 minutes after the actual 10-minute exposure itself was completed, before the camera came back to us and responded to its controls again.)
As good as the EOS 5D is in the noise department though, the EOS-1Ds Mark II still reigns supreme in this area. The 1Ds Mark II's has a higher noise magnitude, but its grain pattern is unusually fine, making it much less apparent to the eye. (Read our Imatest Results page on the 5D for more details and discussion on noise and other image attributes.)
Dynamic Range
Dynamic range is simply the range of light to dark values that can be accurately represented by the camera. We usually relegate our discussion of dynamic range to the Imatest Results page for each camera (where you'll still find the full discussion of it for the Canon 5D), but are now bringing it out to the main Test Results page because of the interest it holds for many photographers, and the range of misconceptions about it that seem to be circulating in the photo community.
Any discussion of dynamic range must take into consideration the role that noise plays in separating useful dynamic range from some discernible dynamic range. As you manipulate a digital image, boosting the shadow brightness to reach deeper into the shadows to find detail, the image noise will be boosted along with the brightness of the subject itself. At some point, the amount of noise will become objectionable. This is what we consider to be the useful dynamic range of the camera in question, and it will naturally vary from photographer to photographer and from subject to subject. For high-quality imagery though, most photographers find that noise levels somewhere between a quarter and a tenth of an f-stop generally mark the end of useful dynamic range. You may certainly be able to see image detail deeper into the shadows, but the noise levels there begin to compete seriously with the subject matter for your attention.
Recognizing the above, we display dynamic range numbers (obtained from Imatest) for noise thresholds ranging from a full f-stop to 1/10 f-stop, but rank cameras in order of their dynamic range at the most conservative, 1/10-stop noise threshold. (That said though, as we've pointed out for some time now, noise amplitude is only part of the story, the frequency or "grain size" of the noise often having a greater effect on how noticeable it is. Lacking a good heuristic for correlating noise frequency content with image quality though, we're unfortunately reduced to considering only noise amplitude in our dynamic range measurements.)
With the above as background, here are the results we obtained in our dynamic range tests of the EOS 5D. To begin, the graph below shows the test results from Imatest for the EOS 5D with a nominally-exposed density step target (Stouffer 4110), using the 5D's "Standard" Picture Style.
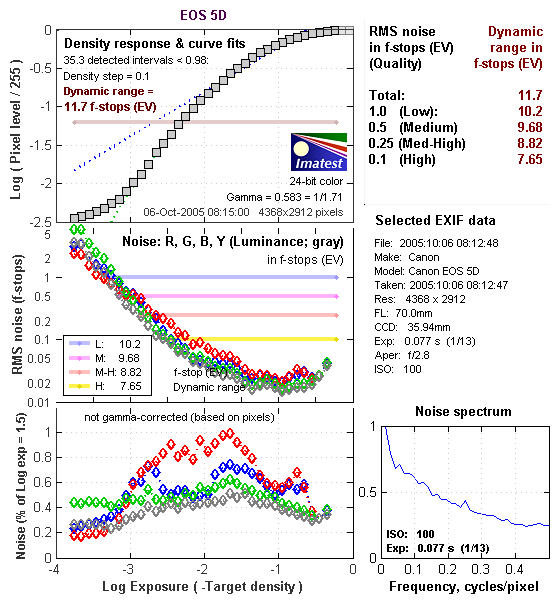
These are excellent numbers, particularly coming straight from the camera as a JPEG. What I especially like about the above data though is the very nice "S" shape to the density curve. The Canon 5D's tonal response looks very much like film in this respect, with a nice gentle tail at each end of its tone curve. On a practical basis, this means that both highlights and shadows tend to trail off gracefully, with no hard clipping or obvious tone breaks in what should be smooth tonal gradations.
Let's also look though, at how the EOS 5D's images behave when processed from the RAW format:
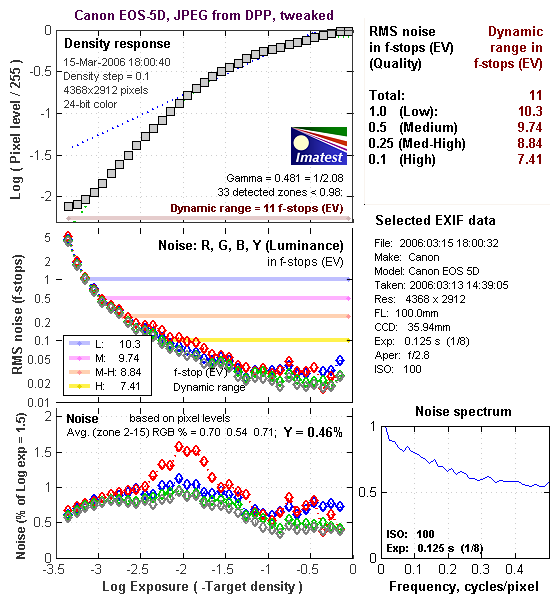
The plots above show the results of a somewhat more overexposed frame, shot to give the RAW processing software more overexposed density steps on the highlight end to play with. These steps show in the associated JPEG file as completely blown out to white, but cameras often have a little headroom for highlights in their RAW files that some RAW processing software can pull back. In contrast, the camera itself seemed to do about 0.2 stops better when the lightest step was just shy of blowing out.) The results above were obtained after processing a CR2 RAW file through Digital Photo Professional 2.0, and tweaking the controls to produce a final image that just barely revealed all the image data shown in the DPP histogram displays within the available tonal range.
Interestingly, DPP doesn't extract quite as much dynamic range from the CR2 file as the camera itself manages in the JPEG. In particular, no highlight detail appeared that wasn't already present in the original JPEG, no matter how I contorted the tone curve in DPP.
What's interesting about the above data though, is the Noise Spectrum plot in the lower right. Compare it to the same plot in the results for the camera JPEG above. See how high and relatively flat it is on the right-hand side? That's because the image noise in the DPP sample is much finer-grained than that from the camera itself. We'll look into that a bit further down.
What about Adobe Camera Raw (ACR) though?
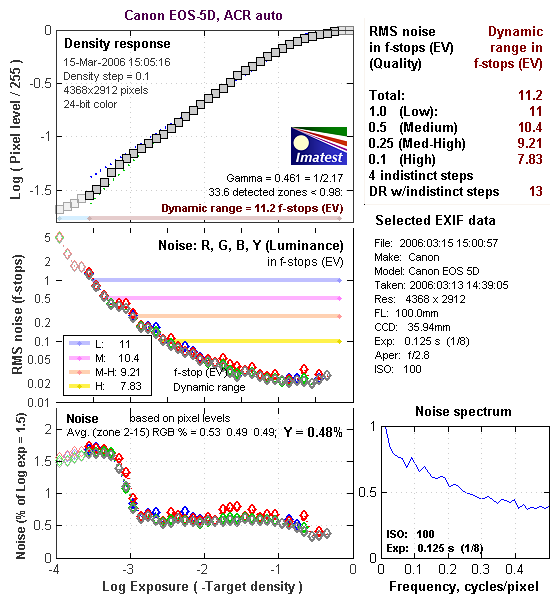
Using its automatic settings (which in my experience have generally worked best for dynamic range tests like this), ACR managed to extract about a third of a stop more dynamic range from the CR2 file at the highest quality level, but did quite well when indistinct steps in the greyscale were considered. In particular, it managed to recover upwards of a full stop more detail in highlights that were totally blown out in the Camera JPEG or DPP-derived image. I played a bit with the controls in Adobe Camera Raw, but no setting did much better than ACR did on its own. (I managed to get a bit smoother tone curve, and a bit more detail revealed in the shadows, but at the cost of a little of the data in the highlights.) Here again though, the Noise Spectrum plot reveals that the noise from ACR is a bit finer-grained than in JPEGs straight from the camera.
Let's take a look at some crops from the test images, to see what the noise patterns look like from the three sources (camera, ACR, DPP):
| From Camera | From ACR | From DPP |
 |
 |
 |
 |
 |
 |
| (Same shots as above, but brightened in Photoshop with the Levels tool, setting the highlight slider to 100) | ||
The images above show crops from the original camera JPEG, a version processed through ACR, and the one processed through DPP. What's particularly interesting is that ACR does a better job at its default noise-reduction settings of "flattening" the noise in the individual color channels than either the camera or DPP, but the image is a bit softer with the default sharpness settings. Chroma noise is considerably reduced, and the noise pattern is finer-grained than that produced by the camera, but coarser than that from DPP. DPP's noise is a bit finer-grained than that from the camera's own JPEGs, but there's arguably a bit more chroma noise, and the grain of the chroma component also seems coarser than in either of the other samples. Also interesting is that the default settings of both ACR and DPP produced more neutral grey scales than did the camera.
To get some perspective, here's a summary of the EOS 5D's dynamic range performance, and how it compares to other digital SLRs that we also have Imatest dynamic range data for. (Results are arranged in order of decreasing dynamic range at the "High" quality level.):
| Dynamic Range (in f-stops) vs Image Quality (At camera's minimum ISO) |
||||
| Model | 1.0 (Low) |
0.5 (Medium) |
0.25 (Med-High) |
0.1 (High) |
| Fujifilm S3 Pro (Adobe Camera Raw 2) |
12.1 | 11.7 | 10.7 | 9.0 |
| Canon EOS-1Ds Mark II (Adobe Camera Raw 3) |
11.2 | 10.3 | 9.4 | 8.14 |
| Fujifilm S3 Pro | -- | 9.9 | 9.4 | 7.94 |
| Canon EOS 5D (Adobe Camera Raw 3) |
11.0 | 10.4 | 9.21 | 7.83 |
| Canon EOS 5D (Camera JPEG) |
10.2 | 9.68 | 8.82 | 7.65 |
| Nikon D200 (Adobe Camera Raw 3) |
10.6 | 9.65 | 8.96 | 7.61 |
| Nikon D50 | 10.7 | 9.93 | 8.70 | 7.36 |
| Canon EOS 20D | 10.3 | 9.66 | 8.85 | 7.29 |
| Canon Digital Rebel XT | 10.3 | 9.51 | 8.61 | 7.11 |
| Nikon D200 (Camera JPEG) |
-- | 9.07 | 8.36 | 7.11 |
| Olympus EVOLT E-300 | 10.8 | 9.26 | 8.48 | 7.07 |
| Canon EOS-1Ds Mark II (Camera JPEG) |
10.3 | 9.38 | 8.6 | 7.04 |
| Canon Digital Rebel | 10.1 | 9.11 | 8.47 | 6.97 |
| Pentax *istDs | 10.2 | 10 | 8.87 | 6.9 |
| Nikon D2x | -- | 8.93 | 7.75 | 6.43 |
| Nikon D70S | 9.84 | 8.69 | 7.46 | 5.85 |
| Nikon D70 | 9.81 | 8.76 | 7.58 | 5.84 |
The results shown in the table are interesting. One of the first things that struck me when I initially looked at test data for a number of d-SLRs, was that here again, purely analytical measurements don't correlate 100% with actual photographic experience. There's no question that the Fuji S3 Pro deserves its place atop the list, as its unique "SR" technology does indeed deliver a very obvious improvement in tonal range, especially in the highlight portion of the tonal scale. I was surprised to see the analytical results place the Olympus EVOLT E-300 as highly as they did, given that our sense of that camera's images was that they were in fact noisier than those of many other d-SLRs that we've tested. In the other direction, I was quite surprised to see the Nikon D2x place as low on the listings as it did, given that we found that camera's shadow detail to be little short of amazing.
One thing that's going on here though, is that we tested each camera at its lowest ISO setting, which should produce best-case noise levels. This is in fact what many photographers will be most interested in, but it does perhaps place the Nikons at a disadvantage, as their lowest ISO setting is 200, as compared to the ISO 100 settings available on most other models.
Regardless of the positions of the other cameras though, it's clear from its images that the EOS 5D's noise levels are quite low, helped by its relatively large pixels, Canon's advanced CMOS sensor technology, and artful anti-noise processing in its Digic II processor.
As I always say though, at the end of the day, I think you have to take purely analytical tests of this sort with a grain of salt, and look at actual images with your own eyes to see what you make of each camera's tonal range and noise levels. We'll continue performing these dynamic range tests on the digital SLRs that we review, but (just as with the laboratory resolution target results), we suggest that you not rely on them exclusively for making your purchase decisions.
Saturation & Hue Accuracy
Very good overall color and hue accuracy, though a slight tendency toward darker color. Still, excellent results.
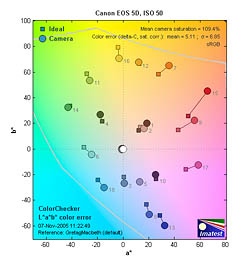 |
| In the diagram above, the squares show the original color, and the circles show the color that the camera captured. More saturated colors are located towards the periphery of the graph. Hue changes as you travel around the center. Thus, hue-accurate, highly saturated colors appear as lines radiating from the center. |
Most consumer digital cameras produce color that's more highly saturated (more intense) than found in the original subjects. This is simply because most people like their color a bit brighter than life. The Canon EOS 5D showed good color accuracy overall, but tended to get pretty carried away with strong reds. This is a fairly common response with this target (the MacBeth ColorChecker), but the 5D falls toward the upper end of the range of oversaturation of reds that we've seen in professional SLRs.
The other important part of color rendition is hue accuracy. Hue is "what color" the color is. Here, the EOS 5D also did quite well, with hue accuracy among the best we've seen though, there being only slight shifts in cyans, magentas, and oranges. Average saturation was 108.5% (oversaturated by 8.5%, almost entirely in the reds), average "delta-E" color error was 4.98. (Hue error, after correction for saturation, among the best we've seen.)
(Read our Imatest Results page on the 5D for more details and discussion on color rendering and other image attributes.)
 |
 |
 |
Coverage
A slightly tight optical viewfinder, but still good results.
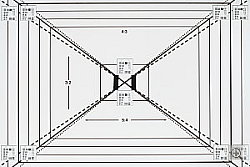 |
| Optical viewfinder |
The EOS 5D's digital SLR optical viewfinder was just a little tight, showing about 96% frame accuracy. I generally expect digital SLRs to be as close to 100% accuracy as possible, so felt that the 5D fell a little short here.
The EOS 5D does not have a built-in flash, though it does offer an external flash hot-shoe and PC sync terminal. Flash results will depend entirely on the power and coverage of the external flash unit, so the camera itself has no flash performance to report on.
Print Quality
Exceptional print quality, accurate color, great prints to 13x19 and beyond. ISO 1600 and 3200 images are surprisingly usable at large print sizes.
Testing hundreds of digital cameras, we've found that you can only tell just so much about a camera's image quality by viewing its images on-screen. Ultimately, there's no substitute for printing a lot of images and examining them closely. For this reason, we now routinely print sample images from the cameras we test on our Canon i9900 studio printer, and on the Canon iP5200 here in the office. (See the Canon i9900 review for details on that model.)
As you'd expect from a high-resolution, full-frame camera, images from the EOS 5D made excellent prints at the 13x19 inch limit of our i9900 studio printer, and would be quite usable for wall display even at much larger sizes. Large prints straight from the camera looked a bit sharper than those from the 1Ds Mark II, because the 5D applies a bit more in-camera sharpening by default than does the 1Ds Mark II.
As noted earlier, we were particularly impressed by how well the 5D's high-ISO images did when printed at relatively large sizes. ISO 1600 images showed some visible chroma noise when viewed up close, but at typical viewing distances of a foot or more, we were hard-pressed to see any noise at all. The same was true of ISO 3200 shots viewed as 8x10 inch prints. Chroma noise was very evident in these samples when squinted at up close, but was hard to make out from a foot or so away. The EOS 5D is a camera that's very usable at ISO 1600, and even at ISO 3200 for medium-size prints with no cropping.
In terms of color, prints from the EOS 5D on our i9900 printer looked bright and vibrant without appearing overdone, but strong reds did oversaturate and lose shape and detail somewhat.
All in all, a really fine performance, everything you'd expect from a dSLR in the 5D's price category.
Canon EOS 5D Timing (Summary)
Good speed for a full-frame SLR.
| Startup/Shutdown: | |
| Power On to first shot | ~0.1 second |
| Shutter response (Lag Time): | |
Full Autofocus (100mm f/2.8 EF macro) |
0.149 second |
Manual Focus |
0.133 second |
Prefocused |
0.078 second |
| Cycle time (shot to shot) | |
| Normal large/fine JPEG | 0.4 second (25-60 shots before slowing) |
| Continuous mode | 0.33 second (3 frames/sec) 98 JPEGs, 17 RAW, 13 RAW+JPEG before slowing) |
| Download speed | |
| Windows Computer, USB 2.0 | 1,216 KBytes/sec |
(Summary only, see the Power & Timing section of this review for full details.)
For a camera with such a high-resolution image sensor, the Canon EOS 5D is surprisingly sprightly. Its 3 frame/second continuous-mode speed is good if not exciting, but it can maintain that rate for anywhere from 25-60 large/fine JPEG frames (depending strongly on subject content and ISO speed), or 17 RAW-mode shots. The Canon EOS 5D did pretty well in terms of shutter lag, being able to determine focus with the 100mm f/2.8 Canon macro lens in just 0.149 second. (AF speed is of course highly dependent on the lens being used, and the amount of travel required of the optics to move from the previous focus point.) Prefocused, the camera delivered a very fast 78 millisecond shutter lag, impressive in light of the large mirror it needs to move out of the way before the shot can be captured. We don't test for it explicitly, but the viewfinder blackout in continuous mode did seem to be a bit on the long side, enough so that we found it a little distracting.
Battery
Short battery life with the LCD on, very good when LCD is switched off.
| Capture mode, 20C/68F | 800 shots |
| Capture mode, 0C/32F | 400 shots |
he EOS 5D uses the same BP-511A battery introduced with the Canon PowerShot Pro1, and which now appears as standard in many of Canon's cameras. These are compatible with older chargers and cameras, they're just of higher capacity. The BP-511A battery pack provides 1390 mAh at 7.4 volts. A separate charger comes in the box with the 5D. It works much like many of the recent ELPH chargers, with two flip-out prongs that plug directly into the wall. You'll need to purchase the AC adapter kit ACK-E2 if you need to run the camera from AC power. Canon's optional BG-E4 battery grip permits the use of either two BP-511A or six AA-size batteries.
Because it lacks an external power terminal, I couldn't perform my usual direct measurements of power consumption on the EOS 5D. I can attest to its excellent battery life though, as I should shoot literally for days without exhausting a fully-charged battery. Canon rates battery life at 800 shots, at 20 degrees C / 68 degrees F, or 400 shots at 0 degrees C / 32 degrees F which certainly seem like reasonable ratings given my personal experience with the camera.
Conclusion
| Pro: | Con: |
|---|---|
|
|
Following in the impressive footsteps laid down by earlier members of the highly-acclaimed Canon EOS line of digital SLRs, the new 5D definitely upholds its EOS lineage. While a truly excellent photographic tool though, it doesn't automatically represent a slam-dunk choice between it and a sub-frame camera -- or even between it and the much more expensive EOS-1Ds Mark II. The 5D struck us as an odd mixture of consumer and professional aesthetics, a slightly uncomfortable fit in the current world of d-SLRs. For people addicted to ultrawide angle photography with a substantial investment in full-frame wide angle lenses, it will probably be a no-brainer. But for someone not already invested in wide-angle glass, you could buy an EOS 30D and Canon's excellent little 10-22mm EF-S wide-angle lens and have more than just change to spare relative to the cost of the 5D body alone. Not only that, but the 10-22mm's performance on a 30D will be superior to that of most ultrawide full-frame lenses on the 5D. After only a little shooting with it, it became manifestly clear that this was a camera that absolutely shows up every minute flaw in a lens' performance, particularly in the corners of the frame. The sub-frame cameras also have the advantage of being markedly faster than the 5D in continuous mode, in part a consequence of the larger mirror that the 5D needs to flap back and forth between shots.
On the upper end of the scale, the massive EOS-1Ds Mark II does have some advantages relative to the 5D, namely a more rugged construction, a more long-lived shutter, perceptibly better resolution, and noticeably better noise characteristics. (The 1Ds Mark II shows higher noise amplitude, but finer "grain" structure, making it less objectionable overall.) It might be hard to argue that these advantages justify the $4,000+ price increment between the 5D and 1Ds Mark II, but if you're looking for the ultimate full-frame experience (with price no object), the 1Ds Mark II is still the way to go.
On the other hand, full-frame purists with more modest budgets or unwilling to lug around the daunting weight of a 1Ds Mark II will find an awful lot to like in the 5D. It's also a more approachable camera for the casual shooter, thanks to its Picture Styles (think of them as film types, one more suited to portraits, one more suited to landscape shots, etc) and slightly more aggressive in-camera sharpening. The bottom line is that the 5D is a better camera if you really want to use JPEGs from the camera as the final file format (without processing after the fact on a computer). Also, while we've been speaking glibly of "full-frame purists," shooters only just now making the move from traditional film-based SLRs may find that the 5D offers a much more comfortable transition than would a sub-frame model. We encountered the opposite side of this in shooting with the 5D, as we found ourselves having to really re-think framing and focal lengths after our long immersion in the sub-frame world. Moving from a film SLR to the 5D would be a relatively painless change, as all your lenses would behave exactly the same as they did on your film body. (Except you'd now see all their flaws magnified and splashed across your computer screen.)
If you're not a die-hard full-frame fan though, a Canon EOS 5D may not be the best choice for you. A 30D with the Canon EF-S 10-22mm wide-angle zoom and a good-quality intermediate zoom would actually be a more powerful picture-taking machine, and likely one costing a lot less than the 5D body alone.
We expect to see Canon continue their evolution of full-frame d-SLRs, and also work more on their L-glass lenses to bring lens performance into line with the demands of full-frame digital sensors. Our guess is that this will ultimately be the way a lot of the SLR market will go, at least in the fullness of time. For now though, it's our opinion that sub-frame digital SLRs offer a better cost/performance ratio.
In addition to all the test results and analysis, we did notice something intangible in the images coming from the Canon EOS 5D. Others have mentioned it too: greater detail in the shadows, and a finer tonal range that give the images a special glow that you don't get from a 20D or 30D. We do notice a difference in the tonal curves on the 5D, which might account for the unique flavor 5D images seem to have.
For the record, we highly recommend the Canon EOS 5D as a full-frame d-SLR option, but do counsel readers to consider their sub-frame options carefully before taking the plunge with a 5D.
 |
| Canon
5D, Canon 85/1.8 ISO 1000 F/11@
1/250 Copyright ©2006 Sean Reid |
In many respects, the Canon 5D is exactly the camera that many photographers have been asking for since the Canon D30 was first introduced in 2000. It has a full frame sensor, high resolution and a fairly light/compact body. At a street price of about $3000.00, it's far more affordable than past Canon full-frame cameras and about the same cost as the D30 was when it was first introduced. In many respects, it probably has the best price/performance ratio of any Canon DSLR introduced so far. I've been using Canon DSLRs professionally for the past five years and, to be sure, this is my favorite of those cameras. I'm currently using it primarily for two kinds of professional work, architecture and documentary wedding photography. For architecture, it�s now my primary camera. For weddings, I use it along with two Epson R-D1 digital rangefinder cameras.
In My Hands
I've mentioned in past reviews that DSLR makers such as Canon and Olympus seem to be building their cameras around the shape of the human hand and the reach of human fingers. It's as if the designers squeeze a block of clay, make note of the shape, and design accordingly. I'm six feet tall, medium build and the 5D fits my hands perfectly. Interestingly enough, it also sits well in the hands of my 5'3" wife. I still own a Canon 10D and the 5D feels very similar in my hands, a little thicker and heavier but, overall, much the same. Buttons and controls are in logical positions and owners of previous Canon cameras such as the 10D or 20D will feel at home almost immediately with this camera.
I was so sure that I would want a 5D that I didn't wait for a review copy but instead bought a camera from Peterborough Camera, an excellent camera store in New Hampshire. It was bought to replace my Canon 1Ds and the difference in weight is significant. The 1-series digital bodies are beautifully made but quite heavy. It bothers some photographers and others not at all. Having come back to using rangefinder cameras when the R-D1 was introduced, I was reminded of how much I prefer lighter and smaller, as a general rule, to heavier and larger. The 1Ds with battery weighs 56.4 oz. The 5D with battery weighs 31.2 oz. The difference of 25.2 ounces (more than a pound and a half) is very significant and I really notice it after a long day of shooting hand-held. When I'm shooting a wedding, I normally carry three cameras on my body. Two of them are on my shoulders and one is carried in my right hand with its strap wrapped around my forearm (as a tether in case I'm jostled). Having a camera in my hand with my finger poised over the shutter release allows me to react very quickly to changing events and emotions. I have spent many hours carrying a 1Ds with a 28-70L lens in my right hand and, given the choice, I'd prefer not to. The lighter a camera is, the less desire I feel to put it down.
The 1-series Canon DSLRs are specifically built as professional cameras and they are indeed, very ruggedly constructed. The 5D's build seems to me to be very much like that of the 10D. It's not as substantial as the 1-series but it seems quite solid and adequate for most professional uses. I never experienced a failure with my 10D bodies, including professional use and many miles of transporting cameras in a padded case in the trunk of a motorcycle. I think one would have to be fairly hard on a camera to run into problems with a 5D failing because of its construction. Cameras may be banged around a bit in some professional use but we don't use them to drive nails and the construction quality of the 10D, 20D and 5D is likely to be sufficient for most of us.
Until it Rains...
Construction quality is one thing but weather-sealing is another. A clear
advantage of the 1-series bodies is the presence of weather seals throughout the
body. The 5D does not have these and I do miss them. I used my 1Ds (with
sealed lenses) in heavy rain and snow without a problem. Doing the same
thing with a 5D is like playing Russian Roulette; the camera may survive or it
may not. I've heard first-hand reports both ways about the non-sealed 10D and
20D. Many people have used them in the rain without consequence. Some others
have inadvertently destroyed their cameras this way. It's not a chance that I
particularly want to take with a $3000.00 camera body that I need as a work
tool. I don't think that adding weather seals to the 5D would add all that much
weight or bulk but it might further muddy the distinction between Canon's
professional and non-professional bodies. Until recently, the only lightweight
DSLR to have weather seals was the Olympus E-1. Nikon's new D200, however, has
them and I hope competitive pressure leads Canon to follow suit. Mechanical
cameras using film could get soaked and survive - cameras with computers inside
don't necessarily fare as well.
 |
| Canon
5D, Tamron 28 - 75 @ 75mm ISO 200 F/2.8 @
1/1600 Copyright ©2006 Sean Reid |
Seeing the Subject
The finder is one of the most important components of a camera. All the file
quality in the world is of limited use if one can't clearly see his or her
subject in detail when working. All the technology inside a camera body is there
only to record an image that is usually framed and presented to the eye by the
finder. The moment of the picture is also decided by what one sees in that
finder. I prefer to work with the simple window of a rangefinder above all else
but if I'm using an SLR, I like the finder to be as large, bright and accurate
as possible. The best DSLR finder I've used so far was in the Leica R9 with DMR
back but the Canon 1Ds series cameras run a close second and the 5D finder is a
close third. It's very similar to the finder in the 1Ds except that it shows
only 96% of the actual capture. 96% isn't bad but it's not 100%. The first time
I used the camera to photograph interiors, I was quickly reminded that a mere 4
percent does indeed change where the edges of one's pictures fall. With the 5D,
one is always shooting a little "loose", the very important edges of
the picture are always a bit outside of where one planned them to be. It's not
the end of the world, but the 100% coverage Canon provides in its pro cameras
would be much appreciated on the 5D. Photographers who are precise in their
framing will notice a difference between the 5D and the 1Ds or 1Ds MkII.
Otherwise, though, I find the large and bright finder view of the 5D to be much
better to work with than those found on most other DSLRs. Photographers who've
never used a full-frame digital camera are in for a treat when they look into
this finder.
|
Seeing the Captured Image The 2.5" LCD on this camera is an absolute pleasure to use. I spent many years looking at the ground glasses of view cameras and looking at an image in a large LCD is somewhat reminiscent of that experience. The LCD screen on the 5D is much better, and thus much more useful, than the one on my 1Ds. The 1Ds LCD is small and blurry whereas the 5D screen is not only larger but much sharper. Using the camera for architectural work, I find the 5D's LCD screen to be very useful for reviewing the image after each exposure. When I'm working quickly handheld, I don't look at the LCD very often but, even then, the larger screen makes for a faster read of the histogram. When I'm working slowly on a tripod, I "chimp" constantly and this is a wonderful chimping screen. It's also fairly visible from various viewing angles, so that one doesn't need to be looking at it straight on to see it clearly. Shutter Noise |
Speed
I've made just over 6000 pictures with the 5D so far, using Sandisk Ultra II CF cards, and I've never needed to wait for the camera to do anything. It turns on instantly and always seems to be ready. The RAW buffer is a generous 17 frames which is far more than I need for my style of shooting. I almost never make a rapid set of continuous exposures but with a buffer large enough for that many RAW frames, or 60 JPEGs, I can't imagine many photographers will run into buffer delays with this camera. If they do, the 1D Mark II might be a better choice. I tend to photograph in terms of seconds between frames rather than frames per second so the 5D's ability to shoot three frames per second is more than I would ever need. If one does need a machine-gun rate of photography, the 20D or 1D Mark II may be better choices. By the numbers, the 5D has a longer shutter lag than the 1-series cameras but I never notice it. With every camera I use, I develop a rhythm that helps me know when I want to press the shutter. It's been easy to find a rhythm with this camera and the shutter trips when I want it to.
ISO Accuracy
I began testing ISO accuracy in my review of the Leica Digilux 2 for Luminous-Landscape in early 2004 because it's very difficult to talk about the ISO performance of a given camera until one knows if it's actually delivering the sensitivity that it claims to at any given setting. The Canon DSLRs I've tested have been very consistent from model to model with respect to their ISO performance. That's very useful when doing a shoot with multiple bodies, using manual exposure, because one can switch bodies without needing to make exposure changes. In fast paced work, this is very important. It's also impressive that the Canon 5D, like the bodies before it, is about 1/3 stop more sensitive than it's rated ISO. So, not only does this camera perform very well at high ISO levels (as discussed below) but those levels are actually even higher than what is indicated, as seen in the table below. The bottom line is that this is an excellent camera to choose for low-light work.
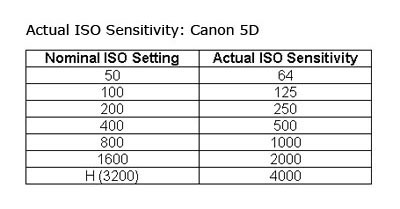
File Quality
Had I not already become familiar with the look of files from the 1Ds, I would have been astonished when I first opened files made with the 5D. Canon's full-frame cameras have exceptional file quality and a look that is unlike the output from any other DSLRs save perhaps the DMR back on the Leica R9. In an article on my Reid Reviews site, I talk about how the various digital camera formats seem to approximate the look of small, medium and large format film. To my eye, the "drawing" and tonality of files from the 5D look much like medium format film. The rendering is very precise, less sketch-like than the output I see from cameras like the 20D or R-D1. The files seem "sharper" directly from the camera and require minimal amounts of capture sharpening to recover the detail lost to the AA filter. Tonal transitions are subtle and there's little to complain about with the way this camera draws. This is a characteristic that has been shared among all three of the Canon full-frame digital cameras.
Not surprisingly, the 5D files show less noise at all ISOs than those from the 1Ds. The large files this camera produces also have a fortunate indirect affect on noise. The camera produces a 4368 x 2912 pixel file, which naturally prints at about 12" x 18" at 240 ppi. Any print smaller than that will be made from a down-sampled file and that down-sampling tends to reduce what little noise is present in the file at it's original size. The net result is that output from this camera show less noise, in final prints, than files from any other camera I've tested. High ISO performance is even better than that of the 1Ds Mark II, according to the results of tests I did for a review of the latter camera. To be specific, those tests (done in my review of the Canon 1Ds MkII) compared converted RAW files that were made using identical workflows in Phase One's C1 DSLR Pro (with both "noise suppression" and "color noise suppression" set to zero). Even when the 1Ds MkII file was downsampled to match the size of the 5D file, the latter camera had lower levels of chrominance and luminance noise at ISO 1600 and 3200. Needless to say, both cameras are very capable at high ISO.
In practice, I am willing
to use the 5D for handheld work right up to an indicated ISO 3200, which is an
actual ISO 4000. Even at ISO 4000, both the chrominance and luminance noise
levels are quite moderate. A properly exposed ISO 4000 file from this camera
might not need any filtering at all. Opening an ISO 4000 file from the 5D in
Photoshop and switching to LAB mode, I can pull most of the chrominance noise
out of the A and B channels using the dust and scratches filter set to just 7
pixels and a threshold of 0. That's almost not enough noise to be worth
bothering with. If one does bother to filter that chrominance noise, the amount
of filtering needed is also so modest that it creates little in the way of color
shifting. I rarely filter luminance noise very much from any camera and that, of
course, is the type of noise that looks like film grain. Low noise output at ISO
4000 in color....it's quite impressive and we've never had that option with
film.
I have gotten reports from photographers, whose judgment I respect, that their
copies of the 5D show some banding when used in AI servo mode at high ISO. I
don't ever use AI Servo mode myself but I did some informal testing of my camera
in that mode, using various lenses and various ISO levels, and did not ever see
banding. I tested in both single shot and continuous mode. I don't know if the
reported problem is confined to certain bodies only, certain lenses on the 5D or
what the situation might be but I have seen no banding at any ISO with my copy
of this camera.
Metering
This is the first Canon DSLR I've owned that seems to meter fairly consistently
indoors and out. Certain lighting conditions may require an EV correction in one
direction or another but the camera then meters quite consistently once that's
dialed in. With most previous Canon DSLRs I've need to watch the histogram
constantly, with the 5D, it's much less necessary. I'm not sure what they
changed but it works. The 1Ds MkII has similarly impressive metering.
Flash
I use the 5D extensively to photograph weddings, using a Canon 430EX bounced off
ceilings and walls with aperture and shutter speed set manually. The exposures were nearly always right on the money;
highlights data came right up to the edge of the histogram without going past
it. The performance was outstanding
and also very consistent. My other
tests showed similar performance. At
weddings, there's usually lots of bright white fabric that one wants to hold
detail in. It's often very difficult for a camera and flash combination to
provide as much exposure as possible for the shadows without over-exposing those
highlights so I'm quite impressed when a camera/flash setup can make that happen
again and again. Having these two
units work so well together is invaluable for weddings and other fast-paced
documentary work with flash.
Battery Life
Battery life from the Canon BP511A has been quite good so far. I seem to be able
to shoot at least a full day's work without needing to swap batteries (including
chimping as needed). I haven't
done any formal measurements but that's quite adequate for my needs.
Auto-focus
I use auto-focus as a kind of electronic rangefinder system. With all DSLRs, I
switch on just the center focus point, locate that on an area with contrast (at
the distance I need to focus), half-press the shutter and hold it
half-pressed while I recompose and then shoot. With a camera that auto focuses
accurately, this ensures that I can specify exactly what the focus distance is
going to be. The camera itself does not decide where to focus; I do. With the
1Ds, I had the option of using 45 active focus points and with that option I
never could have been certain as to which focus point(s) would decide to
dominate and choose the focus distance. In other words, the camera had as many
as 44 options for putting the focus somewhere I didn't want it to be. I can't
work well when a camera is making decisions like that for me. Using my simple
one-point method for auto focus, the 5D focuses accurately with all of my
lenses. Reportedly, it also focuses well using multiple AF points. The 5D, like
the 1 series, is able to change focus screens and a screen designed specifically
for manual focus is available. I haven't tried it yet but reports from other
photographers are that it works well. I'm glad to see that Canon decided to
provide this option for those of us who still focus manually for some work.
Manual focus even with the stock screen is easier than it was on the 10D.
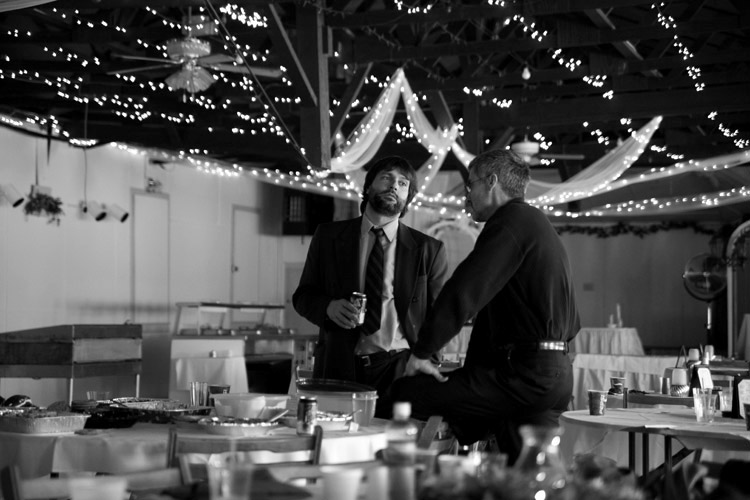 |
| Canon
5D, Tamron 28 - 75 @ 75mm ISO 1600 F/2.8 @
1/100 Copyright ©2005 Sean Reid |
Black and White
Given a choice, I usually prefer to make pictures in Black and White. It's just
my natural medium. It isn't always possible for professional work but I use it
as often as I can. When I'm making B&W pictures, I also prefer to work in a
purely B&W workflow, as I discussed in my review of the Epson R-D1. I like
to see the review image in B&W, do initial editing in B&W, etc. Working
in color with a picture that was conceived to be B&W just adds unnecessary
distraction. Fortunately, one can use the 5D for BW work exactly as one uses the
Epson R-D1. Set the picture style to monochrome and the capture mode to RAW. The
camera will then capture a RAW file (which of course contains color
information) and a BW JPEG. Opening the folder of files in an image
management program such as Breezebrowser Pro, which I use daily, displays the B&W
JPEGs which have been paired with the RAW files. These can be used for sorting
and initial editing. Then, files that will be worked into final form can be
opened in Canon's Digital Photo Professional 2 where they again
automatically display in B&W. One can then make adjustments to the files and
convert them to B&W JPEGs or TIFFs. Unless the photographer chooses
otherwise, the files appear as BW through the whole process. Best of all,
perhaps, is the flexibility this way of working creates, in at least two
respects. First, the RAW file is always available for a color conversion when
and if needed or desired. Second, one can make that color conversion from RAW
and then use his or her own favorite method for converting to B&W in
Photoshop so that different B&W looks are possible.
I've found that I very much like the BW conversion recipe Canon has come up with
for the 5D in DPP 2. It's very handsome and reminds me of more modern BW
emulsions such as T-Max 400. The overall look of the B&W files is
essentially the same whether they're captured in monochrome JPEG or converted
from RAW to JPEG in DPP2. DPP2 also allows one to tweak black and white files
using simulated colored filters (green, yellow, orange and red) just as
Epson's PhotoRAW program allows for R-D1 files. For a great discussion of
how color filters can be used well in BW photography, I highly recommend Ansel
Adam's classic book "The Camera". However one might feel about
Ansel Adams' work, there's no disputing his superb technical knowledge of B&W
photography. DPP2 also allows one to "tone" B&W conversions so
they take on a sepia look or an overall color cast. Ironically, after all the
years many of us have spent trying to banish color casts from digital B&W
prints, Canon has now given us a way to induce them *on purpose*. These same
filter and toning options are also available as settings in-camera for those who
want to work with JPEG capture. Overall, this is really a great DSLR for BW
photography. Canon clearly paid attention to the needs of BW photographers in
the design of both the camera and DPP 2. I was pleasantly surprised by these
features.
Color Settings
In addition to giving the photographer various options for BW files, the 5D also
allows one to choose from a series of "picture styles" that render
color differently by varying contrast curves, saturation and other variables.
These are available in-camera or during RAW conversion in DPP. I shoot almost
exclusively in RAW and if I'm converting in DPP 2, I prefer the
"neutral" which renders color and contrast exactly as its name
suggests. It's a rendering that's similar to what I was used to with the Canon
1Ds. If you use JPEG capture, note that the picture style settings other than
"neutral" and "faithful" boost contrast and can cause the
camera to clip highlights, shadows or both. If I were shooting JPEG and wanted
to maximize the camera's dynamic range, I'd set it to "neutral" so as
to retain as much highlight and shadow detail as possible.
|
Using the Camera for
Weddings This is the best DSLR I've ever used for weddings and I know many professionals who concur. The file quality is better than that of the 1Ds while the camera itself is much lighter. The shutter is fairly quiet, AF is accurate, metering is excellent, flash metering/control is excellent, high ISO is clean, color is beautiful, black and white is beautiful, the camera is responsive with no delays. To date, this really is the closest thing I've experienced to a perfect wedding DSLR. The lack of weather seals is a weakness though and it can be a real limitation. I'd like to see a sealed version of the 5D...a 3D? |
Using the Camera for
Architecture
Leaving aside digital backs for medium and large format cameras, the dominant
digital camera for architectural work was the Canon 1Ds and is now the Canon 1Ds
Mark II. I used the 1Ds as my primary camera for this work until recently and
was very happy with it overall. Naturally, architectural photography is usually
done with the camera on a tripod at low ISO, I normally use 100. The 5D has
turned out to be an excellent camera for architecture with even lower noise at
ISO 100 and more accurate color than the 1Ds. The extra resolution is just
barely noticeable. The large and sharp LCD screen is very noticeable however and
it lessens the need to shoot tethered to a lap top (for picture review).
As I discussed above, the 1Ds LCD leaves much to be desired. The 5D screen, on
the other hand, gives a good sense of how the final picture will look, at least
with respect to composition and the general effects of lighting. It's almost
like an electronic Polaroid back. In fact, I hope Canon can find a way to bring
it to the 1-series bodies as well.
There are three areas, however, where the 5D is lacking compared to the 1Ds for this work. First, the 96% frame coverage means that the picture edges don't quite match what one sees in the finder; that makes precise composition more difficult. Second, the camera lacks an eyepiece shutter. Most of my architectural pictures are long exposures made via a cable release with my eye not up to the finder window. The 5D uses the same system for blocking the finder window as the 10D and it's not a great solution. One removes the eye cup and slides a little plastic cover on over the eyepiece instead. With the eyecup removed, it's harder to compose without being distracted by external lighting (esp. the quite strong quartz lighting I normally use for interiors). My solution is to simply leave the eyecup on and drape a dark cloth over the top of the camera to block most of the light that could come in through the finder window during exposure. It works just fine but the eyepiece shutter on the 1Ds is a lot more convenient.
Unfortunately, as with other EOS DSLRs, mirror lock-up on the 5D requires making a selection in the LCD menu rather than simply pushing a switch on the body. This is somewhat inconvenient. When I'm doing that work, virtually every exposure is made with mirror lock-up. So I just select that setting at the beginning of the shoot and leave the camera set that way for the entire time I'm working. The self-timer also works well with mirror lock up. Select the self-timer mode using the top LCD and press the shutter release. The mirror locks in the up position and two seconds later the shutter trips. It's quite a nice design and can sometimes eliminate the need for a cable release.
The third limitation of the 5D for architectural work came as a surprise to me. The camera's mirror edge comes closer to the lens mount than it does with the 1Ds bodies. Either the mirror is larger or it mounts somewhat closer. This is not a problem for lenses that were designed for the Canon EF mount but it can be a serious problem for those of us who use other lenses on EF bodies via adapters. This requires some explanation. Architectural work places heavy technical demands on cameras and lenses. The standard camera for this work is the 4" x 5" and that sets the picture quality bar quite high, indeed. Photographing interiors requires the use of wide and super-wide angle lenses because of the need to show a given field of view within a relatively small space. Fortunately, Canon makes a very useable 24mm Tilt/Shift lens that is widely used by architectural photographers, myself included. A good copy of this lens is fairly sharp and shows little distortion; there is some CA but it's fairly easily corrected. I'll be discussing this lens in a separate article on Reid Reviews. It's a lens that has been much maligned but I have found it to be a very useful professional tool. Some photographers are also using the older Olympus 24 Shift lens (via an adapter) as an alternate.
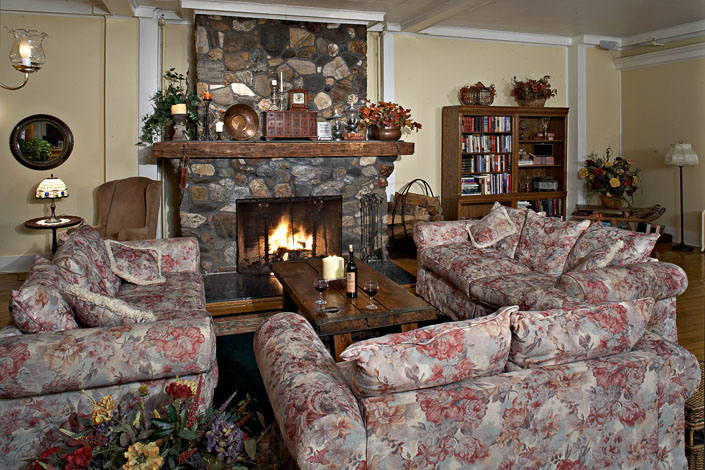 |
| Canon
5D, Canon 24/3.5 T-SE ISO 100 F/16 @ 2
seconds Copyright ©2005 Sean Reid |
Once one goes wider than 24mm, which is often necessary, there aren't many Canon lenses that show the low distortion and the other characteristics needed for a good architectural lens. I've owned both the 16-35L and 17-40L and both show too much distortion at wider focal lengths for me to use for interiors. I was also quite disappointed with the performance of the Canon 14/2.8L I tested earlier this year. An important focal length for this work is about 18-21 mm and Canon doesn't currently make a lens in that range which is well-corrected for distortion. This has lead many photographers, myself included, to experiment with other makers' lenses on the Canon digital bodies (by using adapters such as those sold by CameraQuest). Two favorites are the Contax Zeiss 21/2.8 and the Contax Zeiss 18/4. The 21 is sharper than the 18 but shows slightly more distortion. Up until recently, I did virtually all of my interiors work with the 1Ds using the Canon 24 TS and the Zeiss 18/4 almost exclusively. Unfortunately, the 5D mirror does not clear certain versions of the Zeiss 18/4 (MM and some AE) and the mirror's edge will actually graze the rear element of the lens. Some other lenses have similar problems. That is to say, they will work fine on the Canon 1Ds bodies but not on the 5D. Several of the Leica wide lenses won't clear the mirror in any of the Canon FF bodies without modification to the camera, the lens, or both. A excellent place to learn more about which alternate lenses do and do not fit the EOS bodies, which adapters work best, etc. is a forum recently created at FredMiranda.com called "Alternative Digital Systems and Lenses". Some photographers have gone so far as to physically trim the mirror in their EOS bodies to accommodate alternate lenses. You can read more about the pros and cons of that decision in that same Fred Miranda forum. As a general rule, though, the unmodified 1Ds series bodies can accept more alternative lenses than the unmodified 5D. That's certainly an advantage for architectural photographers and for any other photographers who have an interest in using non-Canon lenses on EOS bodies. Naturally, one certainly can't blame Canon for not designing their cameras to work with non-EF lenses but it would be a good idea for them to introduce some new and better wide angle lenses so the need for alternatives is not so acute. I recently finished an article for Reid Reviews where I specifically tested ultra wide-angle lenses on the1Ds MkII.
While I'm speaking about lenses, I should note that it is certainly is true that the Canon full-frame cameras place higher demands on lenses than cameras with smaller sensors. This reflects no fault in the cameras themselves but instead is simply a reflection of the fact that digital capture quality has become quite high. Some have wondered if this means that one would need to buy very expensive lenses to use with the these cameras. That's not necessarily the case. Having working professionally with Canon FF digital cameras since 2002, I can recommend the following lenses that I know, from experience, will perform well on these cameras. Some are fairly expensive, others are not: 35/1.4L, 50/1.8 (Mark I, metal mount, available only as a used lens but is normally inexpensive), 50/2.5 Macro, 85/1.8, 28 -70/2.8L, 24 - 70L, 70 - 200/2.8L (without or without IS), 70 - 200/4L. By no means is that a complete list but it reflects my own first-hand experience. Another lens that, perhaps surprisingly, does quite well on the Canon FF cameras is the fairly inexpensive Tamron 28-75/2.8. It's lightly built (although also compact and lightweight) but the optical performance of a good copy is quite impressive. Based on conversations I've had with other professional photographers, this lens (not surprisingly) doesn't hold up as well as Canon L zooms to rugged use but a good example can provide quite high performance for the money. For what it's worth, I spend a good deal of time testing and working with high-end lenses and yet the Tamron 28 - 75 has impressed me enough that I bought one.
Feedback from other
Photographers
A review, usually by definition, reflects the observations and experiences of
one writer. Beginning with the review of the Olympus E-1 that I wrote for Luminous-Landscape,
I have also been including in certain reviews a summary of observations about
the camera made by other photographers (usually professionals) so as to
provide a broader perspective. As is now the norm, I put forward a simple set of
informal survey questions about the 5D to various professional photographers.
Eighteen photographers responded and their responses are summarized here:
1. Do you Use the 5D for professional work?
"Yes" from all respondents.
2. What type of work?
Weddings, Portraits, Editorial, Commercial, Advertising, Landscape (for print sale), Theatre, Conventions, Music, Fashion
3. Is it the primary or secondary camera (or both)?
Primary: 93 percent
Secondary: 7 percent
Both (multiple 5D bodies): 33 percent
4. What did it replace?
Canon 20D: 32 percent
Canon 1Ds: 16 percent
Canon 1D MkII: 11 percent
Canon 1Ds MkII: 5 percent
Canon 1D: 5 percent
Canon 10D: 5 percent
Nikon D2X: 5 percent
Mamiya RZ: 5 percent
Didn't replace a camera: 16 percent
5. What are it's
strengths, in your experience, as a professional camera and as a system?
Several photographers called the 5D the best DSLR they've ever used, of any
brand, and called it price to performance ratio excellent. Virtually everyone
praised the camera's file quality, describing it as: �brilliant, excellent,
smooth, like medium format, amazing, film-like, low noise, amazing tonal
transitions�...the enthusiasm level for this aspect was very high. Color, and
specifically the rendering of skin tones, was praised as well and several
photographers mentioned that the files, including the in-camera JPEGs, often
needed little post-processing to look their best. The monochrome files (made
as JPEGs in camera or by conversion in DPP 2) received many enthusiastic
comments as well. High ISO performance was widely praised, with many
photographers mentioning that they are willing to work at ISO 1600 and 3200 with
this camera when needed. The high resolution of the camera and the impression of
"sharpness" its files give was often remarked upon. Several also
mentioned that the high resolution of the 5D allows for greater cropping
flexibility when needed. Well-known celebrity and fashion photographer Chris
Fortuna, who replaced a Mamiya RZ with the 5D, commented: "The main
strength of 5d is the chip, out of the box it makes amazing images, that look
and feel like film. It does not have that digital "look" at all,
colors are true to life, crisp, and beautiful. Its also easy to use, very quick,
and so far rock solid."
Next, the full-frame aspect of the camera was widely praised, both because it allows lenses to work as they do on 35mm film bodies and also because of the large, bright and very useable finder it's paired with. Boston area wedding photographer Joe Ciarcia said: "I can use my 85mm lens again and benefit from its beautiful bokeh without having to be in the next zip code from my subject."
Most photographers also liked the cameras smaller size, light weight, quiet shutter/mirror return and solid build of the body. Virtually everyone liked the large LCD, the buffer size and camera's speed in all operations. They praised the small battery and long battery life. Several found the camera's metering to be excellent and some preferred the 5D's flash performance to what they were getting from the 1-series cameras. Strong auto focus performance, and, sometimes, manual focus ease, were commented upon as well. The well-known California photojournalist, documentary wedding photographer and author of "Digital Wedding Photography", Paul Gero, summed up the camera this way: "First and foremost: full frame that is affordable. Small profile, lighter, writes quickly to the card...would love it to be just a bit faster in frame rate and just a bit faster in firing...but I could live with this camera for the next 5 years, if I had to. After shooting baseball with the D2000 in 1999, anything seems fast <G>. Since getting this camera I have shot very little film (maybe 5 rolls total)...I have never been truly happy with a digital camera -- until now. The out of camera jpeg files are amazing and the RAW files are astounding. This camera makes it very difficult for me to justifying shooting film for most of my commercial work".
6. What are its weaknesses, in your experience, as a professional camera and as a system?
Interestingly enough, there were some photographers who found that camera to have no weaknesses at all, esp. given the price. Overall, they mentioned many more strengths than weaknesses. Surprisingly, to me, the camera's large file size was listed as a weakness by several photographers. Some would like a FF camera but with *fewer* MP and smaller file sizes. On the other hand, some photographers felt that the camera's resolution was not high enough and wanted resolution closer to that of the 1DsMkII.
The next criticisms centered on frame rates and shutter lag, some saying that the camera has a slow mirror return rate and isn't as good for fast action as the Canon 1D series cameras. Several mentioned wanting weather seals and some want an even more rugged body. One mentioned the lack of an eyepiece shutter (not many architectural photographers in this survey group). One photographer felt the camera's battery life was too short and that sensor dust was a problem. Lastly, there was some criticism that the camera's auto white balance could be more accurate in tungsten and mixed lighting.
7. What ISOs do you normally work at and what do you think of the camera's noise performance at those ISOs?
The 5D's high ISO performance was widely praised, not only because of low noise levels but also because the files still seemed sharp even at high ISO. Almost all of the photographers who responded use the camera at ISO levels up to 800 and all of those were very pleased with the results. Most of them also sometimes use the 5D at ISO 1600 and 3200 and had high praise for the camera at those ISO levels, including some who felt the camera gives the best high ISO performance they've ever seen.
8. Have you encountered any specific bugs, problems or design flaws with the 5D?
Several photographers mentioned a bug with the 5D that sometimes causes it to combine multiple RAW files into one giant file that is well over 1 GB in size. Canon's Chuck Westfall looked into the problem and made the following announcement on a board of professional wedding photographers:"According to Canon Inc., a glitch in the 5D's current firmware (version 1.0.1) causes the camera to write abnormally large RAW files intermittently when the camera is held vertically and the Auto Rotate function is turned On in the camera's LCD menu. New firmware is currently being prepared, but until it is released, the problem can be eliminated by turning the Auto Rotate function Off." Canon has just released new firmware for the 5D (1.03) that reportedly fixes the large file bug. I haven't had a chance to test it yet but it can be found here.
Second, several photographers mentioned a bug in the camera's "custom" mode that was discussed by Michael Tapes on Luminous-Landscape. The poor design of the mirror lock-up function that I and several other reviewers have discussed was also mentioned.
Lastly, a couple of the photographers surveyed mentioned the banding problem I discussed above. They've reported it happening when the camera is in either AI Servo mode, continuous mode, or both. It's reportedly happening primarily at high ISOs. As I discussed above, I was not able to reproduce this problem with my own camera and various lenses, using either AI Servo mode, continuous mode, or both. Chuck Westfall says that Canon is looking into the banding issue.
Conclusion
All things considered, this is the best DSLR, for my own work, that I have ever
used. I do primarily three kinds of
photography. The first is work that
I assign myself and this often takes the form of projects that can last for
several years. The best of that
work is eventually edited, printed and used for exhibition. Unless I'm working on something where I want to be very close
to the subject (macro) or very far from the subject (telephoto) I
usually prefer to work with my R-D1 rangefinders. That is unless I need the drawing of the pictures to be more
like medium format - for that I once used the 1Ds and now use the 5D. I also now use the 5D for my personal work with subjects that are very
close or very far. If I need a
silent camera or want the kind of drawing that only a small-sensor camera can
provide, I tend to use a Leica Digilux 2.
The other work I do, professionally, is primarily made up of documentary wedding
assignments and architectural photography although I also sometimes do editorial
work for magazines. For architecture, if the question of cost is set aside, the
1Ds MkII is likely an even better choice than the 5D. The only advantage the 5D has over its larger brother for architectural
work is that large LCD screen. Otherwise,
the greater resolution, 100 percent finder view, eyepiece shutter and greater
lens flexibility of the 1Ds MkII all give it the edge for slow tripod work. That said, one can produce very satisfying and high quality
architectural photography with the 5D - work that requires no apologies or
excuses. For weddings, in my mind,
there's no comparison; the quieter shutter/mirror, lighter weight and more
compact body of the 5D make it my first choice among DSLRs for fast hand-held
work. I now use it side by side
with two R-D1 bodies.
If one works with film, it's not outrageously expensive to own three kinds of
photographic tools: a small, a medium and a large format camera. Film, paper and darkroom supplies are quite pricey but the cameras
themselves aren't so expensive in a world where the cost of digital bodies is
often measured in the thousands of dollars. Each one of those cameras could be exactly the right tool for a specific
photographic project, depending on how one wants the pictures to look as well as
how one wants to see the world and interact with a machine while making them. In digital photography it's been quite expensive to own a range of
formats. Good small-sensor cameras
are fairly affordable and good APS-C sensor DSLRs are fairly affordable, but
full frame DSLRs have not been. The
price of entry for a 1Ds in 2002, when I bought mine, was $7200 if one could
strike a good deal. Unless one planned to
earn money with it (so that it paid for itself), it required a large bank
account and an understanding spouse. One can now work with full frame digital,
and it's medium-format kind of drawing, for $3000.00. Not cheap, but access to
this kind of camera is becoming more democratic. And I'm glad to see it happen. The 5D is a lot of camera, even for $3000.00.
<<E5D Sample Images | Additional Resources and Other Links>>
Reader Comments!
Questions, comments or controversy on this product? Click
this link to see what other Imaging Resource readers have had to say about
the Canon EOS-5D, or add comments of your own!