Back
to Full Konica Minolta Maxxum 5D Review
Back
to Full Konica Minolta Maxxum 5D ReviewGo to Konica Minolta Maxxum 5D Data Sheet
Go to Konica Minolta Maxxum 5D Pictures Page
Up to Imaging Resource Cameras Page
Use your browser's "Back" button to return to the previous page, or the links at the top and bottom of this page to navigate to related information. If you have difficulty fitting the text on this page onto your printer output, simply resize your browser window to a narrower width and print again.
Remember us when it's time to buy!
Dave here: Have our reviews been helpful to you? (Is this article you're reading right now useful?) Preparing this level of information on as many products as we do is incredibly hard work, not to mention expensive. Things on the Internet may look like they're free, but they're not. (As a lot of big dot.com companies are finding out these days.) Somewhere, somebody has to pay to produce worthwhile content. YOU can help us though, by remembering us when it comes time to make your purchase. Would you consider coming back to our site and clicking-through to one of our advertisers to make your purchase? Every dollar you spend with one of our advertisers helps us directly (in affiliate fees) or indirectly (the advertiser will keep renewing their ad contract with us). To make it easy for you to support us, here's a URL you can visit, to see all our current advertisers, with links to click on that will register your visit to them as having come from our site. It's up to you where you buy, but Mike, Mike, Kim, Yazmin, Marti and I would be really grateful if you'd help us out by choosing one of our advertisers to purchase from.
Thank you for your support!
Dave Etchells, Founder & Publisher
Visit our "Buy Now" Page:
https://www.imaging-resource.com/buynow.htm
Back
to Full Konica Minolta Maxxum 5D Review
Go to Konica Minolta Maxxum 5D
Data Sheet
Go to Konica Minolta Maxxum 5D
Pictures Page
Up to Imaging Resource Cameras
Page
Konica Minolta Maxxum 5DQuickly on the heels of its first dSLR, Konica Minolta shrinks the form factor and the price without losing in-camera image stabilization. Review First Posted: 10/31/2005 |
|
 |
|
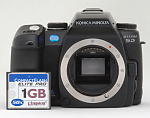
6.1-megapixel CCD delivers uninterpolated
images as large as 3,008 x 2,000 pixels. |
| |
Interchangeable lens mount hosts a wide range
of Konica Minolta lenses. |
|
| |
Advanced Konica Minolta Body-Based Anti-Shake Technology. |
|
| |
Full manual exposure control, with Scene settings, and refined control of image adjustment. |
Manufacturer Overview
| Free Photo Lessons | |
|
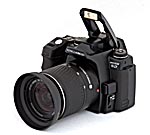
The new Maxxum 5D also shrinks the number of dials and buttons of the 7D into a simpler but still comprehensive set that many Maxxum fans will immediately recognize. The 5D offers the same 6.1-megapixel sensor as the 7D, yielding images as large as 3,008 x 2,000 pixels. Also like the 7D, the 5D incorporates technology unique to Konica Minolta cameras: anti-shake technology in its body, which does not require a special image-stabilized lens. This one feature adds tremendous value, turning all your Minolta autofocus lenses into image-stabilized lenses. With conventional anti-shake lenses typically costing hundreds of dollars more than models without anti-shake, the built-in anti-shake capability of the Konica Minolta Maxxum 5D could easily be worth thousands of dollars to anyone with a large lens collection.
The 7D's LCD does display images at a slightly higher resolution (although you really have to look at them side by side to notice). It also transfers data through its USB port a little quicker. The Maxxum 5D doesn't offer all the options of the 7D, but we didn't miss any of those rarely-used settings.
But the 5D adds a few things, too. Chief among them is what Konica Minolta calls Digital Subject Programs, more commonly called Scene exposure modes on other cameras. There are five on the Konica Minolta 5D: Portrait, Sports, Landscape, Sunset, and Night Portrait.
Other characteristics and specifications of the Konica Minolta Maxxum 5D are fairly typical for a camera of its class, with all the features you'd expect in a basic digital SLR, but wrapped in a uniquely "Minolta" package. The reduced set of external buttons and knobs are not intimidating even at first glance, and after just a short time learning the camera's interface you'll be able to set the 5D for any situation.
Highlights
Field Test
Intrigued by the in-camera image stabilization of the original 7D, I asked for an extended loan. Konica Minolta generously agreed. Along with the Maxxum 7D, they sent three autofocus zoom lenses and their 5600HS D wireless flash.
The first time I got my hands on the 7D, I thought it was a Speed Graphic. It seemed huge and unwieldy. But when I slipped a lens on it and attached the vertical grip, it seemed remarkably well balanced. And, in fact, with the grip it's no larger than a compact Nikon FM2 with motor drive.
The beauty of a dSLR is that you don't have to learn how to use it. Just find the aperture and shutter speed controls and go. Despite its numerous buttons and dials, the Maxxum 7D captured nice shots seconds after I'd flipped the power switch and found Manual mode. I took my time learning what the buttons and dials were for and found them well-placed and useful additions in short order.
Then along came the 5D.
Feel
There's no vertical grip for it, but it does share just about everything else with the Maxxum 7D including the same battery, charger, lens mount, and proprietary hot shoe. It uses the same imager and communicates with the same large LCD whose status display cleverly rotates when you rotate the camera (although at 115,000 pixels the LCD displays images with slightly less resolution than the 7D).
But some things were different.
The size, first of all. As a compact dSLR, I worried a bit about the grip. But it was nearly identical to the 7D grip. The last two bones of my index finger measure two inches and they wrap neatly around the front and inside of the molded grips of both cameras. I wasn't cramped at all. And, because the camera is lightweight, I found I didn't really miss the vertical grip. It was easy to orient in portrait mode.
In fact, light weight in a dSLR is probably around ideal weight. It's enough heft to hold steady without tiring you out on a long shoot, but light enough for a compact tripod to handle. It even mounted easily to the Parks Malibu spotting scope using a Maxxum T-ring (just turn off shutter lock so you can shoot when no lens is detected).
Controls
Having grown fond of all the controls on the Maxxum 7D, I worried I'd miss them on the Maxxum 5D. But I found the subset was a really well-conceived design, taking advantage of well-positioned controls as well as the big LCD.
 I thought I'd certainly miss the EV control on the 7D's left top dial (which, on the Maxxum 5D, only handles white balance). But hold in the 5D's EV button and the control dial shifts into EV mode. It was actually easier to use, since I didn't have to push a release button, too.
Likewise, I was sure I'd miss the Konica Minolta Maxxum 7D's second control dial, which I'd come to love in Program and Auto mode. On the 7D the front dial controls shutter speed and the back dial handles lens aperture, so you adjust by setting the shutter with your forefinger and the aperture with your thumb. I did miss that, but not as much as I thought. On the 5D, the front dial still controls shutter speed, but pressing the EV button shifts it into aperture mode.
The reduction of controls actually made the camera seem friendlier. The real question was whether or not I could find these controls as I needed them.
And here, the D5 did well. The less frequently used controls (like image size and compression, not to mention date and time) are set through the menu system. But there were controls for shooting mode, ISO, EV and white balance in addition to the exposure modes. Enough controls, in short, to keep me out of the menu system most of the time.

Despite its smaller size, the 5D seems just as well-built as the magnesium bodied 7D, though it relies on glass-fiber plastic with a reinforced steel lens mount for its rigidity. I did find a few fit-and-finish issues, however. The control dial required a lot more force to move than the 7D's. And the battery door seemed particularly vulnerable, hinged on its short side. But the hinge itself is screwed to the body, so if it breaks, it can actually be replaced (another engineering marvel).
I noticed the shutter button was occasionally stiff, too. But this turned out to be the 5D's way of telling me it was having trouble finding focus.
Innovation
In his report on the 7D, our Senior Editor Shawn Barnett spoke about the historical importance of various camera manufacturers in both the film and digital eras. Konica Minolta was in no hurry to produce a digital SLR, but when they finally unveiled the Maxxum 7D, the camera did things no other digital SLR could do. The in-camera image stabilization of that model was an important innovation. Not only did it extend the technology to nearly any autofocus Maxxum lens, it opened up new territory in hand-held natural light photography.
The company's heritage of innovation is proudly on display with its Dynax Maxxum line and should interest anyone leaning toward available light photography.
Innovation has a dark side, too. I was more than little inconvenienced by the liberties Konica Minolta takes with filenames. If you set the 5D to capture images in Adobe RGB and embed that profile with each image, the JPEGs are named with a non-standard .JPE extension. If you don't embed the profile, the JPEGs are named with a prefix of _ICT (instead of PICT). Maddening.
Reassuring, however, is the manual's careful step-by-step description of how to clean the image sensor. Interchangeable lenses are great, but when dust takes up residence on the glass protecting the image sensor, you see it in every frame. Unlike a film SLR, a dSLR doesn't start with a fresh frame for each image. Sensor cleaning is inevitable and kudos to Konica Minolta for explaining how to do it safely. (Editorial note from Dave: The 5D manual limits its advice to the (admittedly safe) method of using a blower brush. Here at IR headquarters, we've found that dust sometimes adheres too tenaciously for a blower brush to dislodge it. In such cases, we've found the "Copper Hill" wet/dry cleaning method indispensable. Visit the Copper Hill website for extraordinarily detailed instructions and very affordable kits of cleaning tools and supplies.)
Optics
In addition to their electronic connections, Konica Minolta lenses are also mechanically linked to the camera body. Unlike modern Nikons and Canons, Konica Minolta puts the focus motor in the camera rather than in the lens. Powering the camera in AF mode, the AF motor jogs the lens a bit, testing the linkage.
The wide knurled grip on the lens body invites you to set the focal length. If you focus manually, you have to find the narrow ring at the front of the lens or use the lens hood. The lens hoods attach to the front of the lens much like the lenses themselves attach to the body, but you can reverse the hoods for storage so they don't protrude when you pack up the camera.
Macro lenses designate the minimum focusing distance on the lens barrel, a helpful reminder of just how close you can get. The focal length designations, in handy 35mm equivalents, are easy to read but no hyperfocal information is portrayed.
The kit lens spans 18-70mm, a 35mm equivalent of 27-105, a comfortable range. The focal length multiplier on the Dynax Maxxum digital cameras is 1.5. Your old 100mm lens will crop the scene as if it were a 150mm lens, making your wide-angle collection closer to normal. So it's nice to see that 18mm equivalent on the kit lens, as we've seen with most consumer SLRs.
LCD
The 5D's 2.5 inch display makes Menu text easy to read. Image resolution at 115,000 pixels is a bit less than the 7D's but you really have to be told to notice. The big screen doubles as the camera's status display, rotating with the camera in portrait or landscape presentations. And when you look through the optical viewfinder, sensors below the viewfinder turn the display off to avoid any disturbing glare (a very good idea, because this display is very bright). I missed the status display when it timed out, since it displays all the vital exposure information. Once you've captured a picture, it displays here in beautiful color and you can zoom in or out.
|
Capture Menu |
Custom Menu |
 |
 |
| Play Menu | Setup Menu |
 |
 |
Nine Point AF
 The Konica Minolta Maxxum 5D has a 9-point AF sensor with sensors arrayed at different angles around the screen. A line of fine LEDs lights up at each point to indicate which point was selected for focus. So long as the scene is bright and reasonably contrasty, focus performance is fast, although in our early testing we found that it wasn't always dead-on accurate. We often found it necessary to take over manual control to get sharp focus.
Anti-Shake
 The big technology advance of the Konica Minolta Maxxum 7D was its Anti-Shake (AS) system -- and the 5D inherits the very same magic. All other companies with such technology do their shake compensation in the lens, necessitating purchase of special lenses that cost more money. Konica Minolta has moved their mechanism into the camera body. Put simply, rather than move an optical element inside the lens body, they move the imaging sensor itself inside the camera. A computer detects the motion -- from a heartbeat, nervous hands, or breathing, for example, and moves the imaging sensor to counter it.
 The difference between the two methods was immediately noticeable when we first looked through the viewfinder: it didn't seem to be working. We've grown accustomed to lens-based anti-shake systems in the other SLRs we've tested, and expected the surreal floating viewfinder experience we normally see with such systems, but our attempts at simulating a shake was not producing any visible dampening of the motion. Of course, we thought. The dampening is occurring inside the camera, and has no effect on the image coming off the mirror, so we never actually see the Anti-Shake mechanism at work. Instead, a five-step LED bargraph inside the viewfinder tells us by degree how much the Anti-Shake mechanism is being forced to work. As long as only three bars are lit, the AS will likely be able to dampen the vibration. When the bars will go up to four or five, the ability of the AS to compensate is approaching or exceeding its limit. Seems reasonable. Short of attaching the relatively heavy prism to the AS mechanism, this is the best compromise. The weight of the prism is obviously what kept them from taking this route, because there's no way a linear motor could accelerate such a relatively heavy object at so rapid a rate and be ready to counter the opposite motion without taking up a whole lot more space and battery power.
Actually though, the bargraph anti-shake indicator is more than just a compromise, it's a valuable tool in its own right. With a conventional lens-based AS system, you can tell when it's working by the viewfinder image, but you don't have any idea of how hard it's working. That is, there's no warning as to whether or not you're about to push it beyond its limits. With the Maxxum 5D, you have a very good sense of whether you're within the system's limits, or about to run out of "anti-shake gas," so to speak. Very nice, and having now seen this sort of display on both the Maxxum 7D (along the side of the viewfinder) and the 5D (on the bottom), we miss it on our own Canon and Nikon d-SLRs.
The big question of course, is how well the 5D's anti-shake works. The short answer seems to be "pretty well." We conducted some tests against a Canon IS lens (a 28-135mm f/3.5 to 5.6 IS model) on a Digital Rebel against the 7D's in-body anti-shake, and found the two fairly equal in their capabilities. (The 7D edged the Canon lens slightly at 50mm, and the two solutions were in more or less a dead heat at 135mm.) Minolta's in-body anti-shake approach does seem to be more effective at shorter focal lengths than longer ones, which is what we'd expected to see. At long focal lengths, small amounts of body movement will result in relatively large amounts of image blurring. This means that any body-based anti-shake system would have to be exceptionally sensitive to correct for image blurring with long telephoto lenses. That said though, the 7D's anti-shake did very well in our tests. (Read the "Optics" section of this review for more details.)
Recommendation
Photographers with a collection of 35mm lenses naturally want a digital camera body with a compatible mount. But if your old gear had one lens (maybe the inevitable 50mm or an inexpensive zoom), there's no reason to remain in the fold. In fact, because your widest angle lens (say a 35mm) will now approach normal range, you need new glass to see wide again anyway. And that usually means buying the kit lens (which is often a great deal anyway).
If that reflects your situation, having anti-shake in the body rather than the lens makes the Konica Minolta dSLRs very tempting. We took shots in dim room light at 1/5 and 1/10 second exposures that were still sharp. And the images weren't 'boosted' with unnatural brightness or noise. The scene appeared much as we had observed it.
The Dynax Maxxum model line has an assortment of sophisticated accessories (including the wireless flash mentioned above) and plenty of lenses. It isn't as extensive as Canon or Nikon, but it isn't skimpy either.
With the compact Maxxum 5D, Konica Minolta has delivered a compelling product for anyone interested in a dSLR.
Design
 Designed for amateur or professional photographers (and really anyone interested in a dSLR), Konica Minolta's Dynax Maxxum 5D offers exceptional exposure control and a solid build reminiscent of a high-end, compact 35mm SLR. The body accommodates a handy assortment of control buttons, switches, and dials, but a much reduced set from the larger 7D. The smaller set is nevertheless ergonomically laid out and thoughtfully designed. So much so that we didn't really miss any of the 7D's buttons, switches, or dials. When shooting, your attention is directed primarily to the back panel and sometimes to the top, but not to either side as is the case with many prosumer digital cameras. The 5D features the same 6.1-megapixel CCD as the 7D and has a Konica Minolta standard lens mount that accommodates a wide range of Konica Minolta AF lenses.
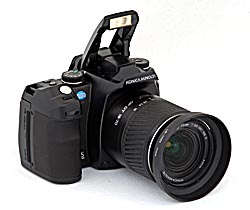
The 5D's all-black and compact body measures 5.1 x 5.6 x 3.7 inches (131 x 142 x 96 millimeters) with the 18-70mm lens, and weighs 24.3 ounces (690 grams) with the lens, battery, and memory card. The Maxxum 5D isn't small enough to fit a pocket or purse, but is light enough to carry on vacation. You'll want a camera bag for the 5D, but the positions of the eyelets for the included neck strap at least let the camera hang level with the standard lens.

The camera's front panel houses the Konica Minolta A-type bayonet lens mount, lens release button, Depth of Field Preview button, Self-Timer lamp, and the front of the pop-up flash compartment. Also visible from the front of the camera are the Shutter button and Front Control dial, located at the top of the hand grip. An indentation near the top of the hand grip comfortably cradles your middle finger as it curls around the grip.
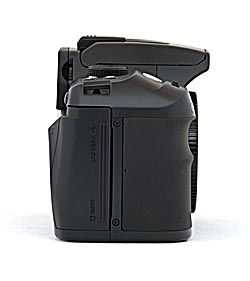
The right side of the camera holds the CompactFlash memory card slot, covered by a hinged plastic door. The 5D accommodates Type I or II CF memory cards, including Microdrives. Nestled inside the compartment door is the shared-use A/V Out / USB 2.0 jack for direct connection to a computer or television set. At the very top of the right panel is one of the two neck strap attachment eyelets.
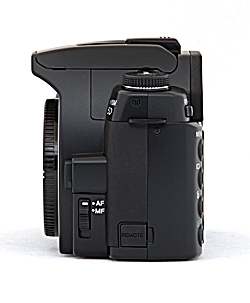
The left side of the camera has a remote control jack at the very bottom and the Manual / Auto focus switch just below the lens release button housing. At the top is the other neck strap attachment eyelet.
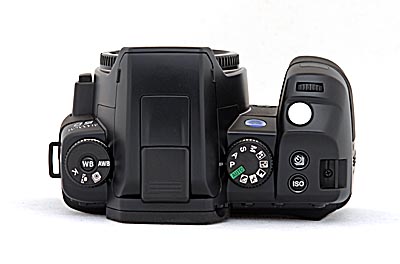
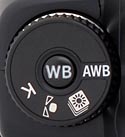
The top panel accommodates the manually-activated pop-up flash compartment and external flash hot shoe; the latter is protected by a sliding plastic cover that is completely removable from the camera body. The hot shoe employs a proprietary electrode setup and mounting bracket for Konica Minolta accessory flash units which isn't compatible with generic hot-shoe flashes. The pop-up flash has two small tabs on either side that allow you to raise it into its upright position (it does not automatically pop up). In addition, there are a number of controls that access various camera functions, including the White Balance button and dial, Exposure Mode Dial (which unlike the 7D does not have a release button), Drive Mode button, ISO button, front Control dial, and Shutter Release button. The CCD focal plane is not indicated on the top panel.
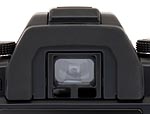
The remaining controls are on the camera's rear panel, along with the optical viewfinder and LCD monitor. The 5D's optical viewfinder is surrounded by a flexible, removable arch, and features two sensors below it that detect when your eye is next to the camera. (You can enable these sensors through the Custom menu to automatically detect your eye in front of the viewfinder and disable the information display on the LCD monitor, cutting out any distracting glare.) A diopter adjustment dial on the right side of the eyepiece adjusts the view for eyeglass wearers. Controls on the left side of the rear panel include the Power switch, and the Menu, Display, Delete, and Playback buttons. On the other side of the LCD monitor are the four-way Controller with a Spot-AF button / OK button at its center, the DC In jack, and the Anti-Shake switch. On top and to the right of the optical viewfinder are three buttons. The Function button (which also zooms out in Playback), the Exposure Compensation button (Zoom In) and the AE lock button, which also enables Slow Sync flash mode.
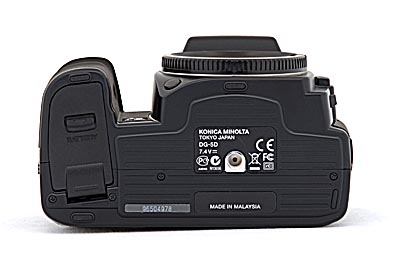
The camera's bottom panel is fairly flat, with a grooved grip pad surrounding the metal tripod mount. Also on the bottom panel is the camera's battery compartment, which features a locking, hinged door. The battery compartment is far from the metal tripod mount, allowing quick battery changes when mounted on a tripod, something I always look for in a digicam, given the amount of studio shooting I do.
Worth noting are the absence of the focal plane indicator and a flash sync terminal. An illustration on page 110 of the manual gives an approximate location of the focal plane.
Viewfinder
 The 5D features a digital SLR design, so the optical viewfinder offers a true, through-the-lens (TTL) display. A dioptric adjustment dial accommodates eyeglass wearers, letting them adjust the viewfinder optics across a range of -2.5 to +1.0 diopters, a little short of the 7D's -3.0. The viewfinder eyepiece has a reasonably high eyepoint, but I still ended up with the rubber eyecup touching my eyeglasses if I wanted to see the whole frame. (Overall, a passing grade in eyeglass-friendliness, but not the best I've seen.)
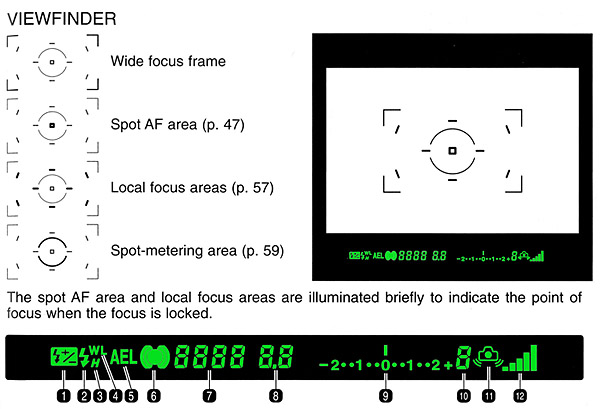
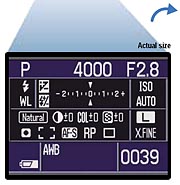
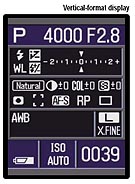
Its extensive information display features a series of focus and exposure target marks in the center of the view that highlight briefly when the AF system is activated. Camera information appears beneath the image area in a small strip, and reports all of the major camera settings, such as shutter speed, aperture, flash mode, EV compensation, etc. At the far right side of the strip is the Anti-Shake scale, indicating the degree of stabilization whenever Anti-Shake mode is activated. The information readout in the viewfinder activates whenever you half-press the Shutter button, and remains active for a few seconds afterward.
A pair of horizontal infrared sensors just below the viewfinder detects your eye as it approaches the viewfinder, and deactivates the LCD information display if you have the auto-display option enabled. A Diopter Control dial adjusts the viewfinder to accommodate eyeglass wearers.
The rear-panel, 2.5-inch, TFT color LCD monitor is for image review, status display, and menu display (which rotates to match the orientation of the camera).
In any capture mode, pressing the Display button on the rear panel reports camera settings in the LCD display. You can choose between full or basic display modes, which essentially control how detailed the camera information is. A third press of the Display button disables the information readout entirely. By default the LCD reports the full status information screen whenever the camera is powered on or a control is activated. As mentioned above, the Auto Display option of the Custom menu disables the LCD display whenever your eye is detected by the sensors beneath the optical viewfinder. If this function is set to Manual, you must press the Display button to disable the display.
 In Playback mode, the LCD monitor's default mode shows the most recently captured image, with a limited information overlay reporting the resolution and quality, date and time, folder, file number, frame number, and the total number of images. Pressing the up arrow key on the Multi-controller enables a histogram display, which also shows expanded exposure information for the image. Just above the histogram is what Konica Minolta calls the Luminance Limit display, which alternately flashes any under and over-exposed areas in the frame. (This function can sometimes be more helpful than the histogram, in that you can directly see what parts of the image are too dark or light.) Pressing the down arrow in this mode also rotates the display, first counter-clockwise, then clockwise, then back to normal.
You can zoom in on captured images in Playback mode, by pressing the button with the magnifying-glass icon adjacent to the right side of the optical viewfinder. When zoomed in, the rear control dial changes the zoom amount, and pressing the center button of the multi-controller toggles between the magnified view and a full-frame view with the current magnified area outlined in red.
Playback mode also supports, with the press of the Display button, Image Only display and Index Playback. Index Playback relies on the controller to highlight an image from a set of four, nine or sixteen whose basic data is displayed on the bottom line of the LCD monitor. A press of the Display button displays that image full screen.
Optics
| Free Photo Lessons | |
|
 The 5D features a standard Konica Minolta A-type bayonet lens mount, which accommodates a wide range of Konica Minolta lenses. (According to the manual, essentially all Konica Minolta AF lenses can be used, though MD and MC series manual focus lenses are not compatible. Additionally, the AF Macro 3x - 1x f/1.7-2.8 lens cannot be used with Anti-Shake, nor does Anti-Shake work with any lens with a macro release.)
A small button on the front of the camera releases the lens from its mount, so it can be turned and removed. The 5D's CCD is smaller than a 35mm frame, so the angle of view at any given focal length will not be the same as on a 35mm camera. To find the approximate 35mm equivalent focal length, multiply the focal length of the lens by 1.5. (Thus, a 100mm lens will provide about the same view as a 150mm lens on a 35mm camera.)
The 5D provides both manual and automatic focus control modes, set by the Focus Mode switch on the left side of the camera. You can select between Auto and Manual focus modes. But the Function button provides access to additional Auto Focus Area and Auto Focus Mode options.
Auto Focus Area has three options: Wide Focus Area, Spot AF Area, and Focus Area Selection. The default option is a nine-point Wide Focus area, indicated by an array of dashes inset within four widely-spaced brackets in the viewfinder image. By pressing and holding down the Spot AF / OK button in the center of the Multi-controller, you can switch between Wide Area and Spot Point autofocusing modes (the latter indicated by a target box in the center of the viewfinder). Wide Area AF bases its focus on the most prominent subject detail in the portion of the image that falls within the AF brackets. Spot Focus bases its focus on the very center of the frame, where the square target resides. The Focus Area Selection lets you manually set the main AF point by using the Multi-controller to highlight one of the nine AF points. The active AF area is briefly illuminated in the viewfinder. Interestingly, though the Multi-controller appears to be a four-way, it is effectively used as an eight-way controller in order to reach all eight outer AF sensors. Pressing between the up and right arrows actuates both the up and right controls, indicating that you want to go (diagonally) to the upper right sensor. The reason we know it's not an actual eight-way control is that if you press up and then right, you go to the right sensor, not the upper right sensor. Rather, pressing and holding the up button and then pressing the right button takes you to the upper right sensor. Once you've set the AF area, sliding the switch to the Focus Area Lock position locks the AF point.
Auto Focus Mode offers four options: Single Shot AF, Automatic AF, Continuous AF, and Direct Manual Focus. Single Shot AF is a general purpose autofocusing mode that sets focus when you half press the shutter button. Automatic AF automatically switches between single and continuous AF depending on the subject's motion. Continuous AF is designed for subjects in motion, continuously focusing on the subject even when the shutter button is half-pressed. Direct Manual Focus operates like Automatic AF, but after focus is automatically found, it can be adjusted manually. The focus signal in the viewfinder tells you when you can manually adjust focus.
In shooting with the camera, its autofocus generally worked very well: We didn't find as much of the "hunting" that the Maxxum 7D seemed to do. On the other hand though, the 5D's AF system only worked down to a light level a little darker than 1/4 foot-candle without its AF assist light, about a full stop brighter than what the 7D could manage. (Note though, that this is still less than 1/4 as bright as typical city street lighting at night, a pretty good performance.)
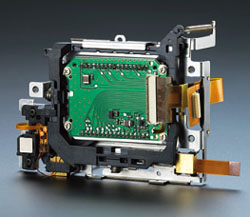
The Maxxum 5D also employs Konica Minolta's Anti-Shake technology, which uses a highly sensitive angular rotation sensor and Smooth Impact Drive Mechanism (SIDM) to move the CCD assembly itself to counteract camera movement, rather than the more common approach of moving an optical element inside the lens. (The shot above shows a rear view of the anti-shake module, removed from the camera.) This has the huge benefit of offering Anti-Shake with essentially any lens that works on the camera (subject to the few restrictions mentioned earlier). When Anti-Shake is activated, the Anti-Shake scale on the right side of the viewfinder display indicates the degree of stabilization. A downside to Minolta's body-based Anti-Shake approach though, is that while you can see the results of stabilization on competing lens-based designs, you have only this scale to tell you how the 5D's Anti-Shake mechanism is doing. Anti-Shake minimizes the effect of blurring caused by slight camera movement, which is more noticeable at long focal lengths.
Testing such shake-compensating mechanisms presents several problems, and each manufacturer's method seems to work better in some conditions than in others. But we do an informal test by lashing two competing models together and averaging the results of each camera under different conditions. (See my comments in our review of the Panasonic FZ15 for a more complete description of our approach.) I call it informal because the variables are such that we can't accurately set a benchmark. Every photographer shakes a little more or less, and the differing focal lengths of the various cameras combined with the shutter lag and AF factors make only an informal test practical. Developing a shake table that would adequately simulate the various types of acceleration, rotation, pitch and yaw that a camera experiences in the hands of a human being would be prohibitively expensive. Further, given the various mechanisms used, any kind of structured test could favor one design over another, necessitating costly redesign of the system. So testing will stay informal for now.
In this case, we lashed up a Canon EOS Digital Rebel with a 28-135mm IS (Image Stabilized) lens to the Konica Minolta Maxxum 7D. (We're assuming here that the 5D will work at least as well as the Maxxum 7D did in our testing.) On the 7D, we used a 28-70mm f/2.8 lens for testing at shorter focal lengths and a 100-300mm f/4.5-5.6 lens for testing at 135mm. Both cameras have about the same size sensor (6 megapixels), and we tried to match the focal length of the lenses in our tests as closely as possible. (As it happened, we got them nearly dead on at 135mm, but had the Rebel zoomed in about 7% more at the ~50mm setting). We adjusted the exposure parameters on both cameras manually, so they'd both be set at the same shutter speed (1/15 second for the 50mm shots, 1/25 second for the ones at 135mm). Holding the assembly in our hands, we pressed the two shutter buttons as near to simultaneously as we could manage. It's likely that there was a slight offset between the firing of each camera's shutter, but the two shots in each pair were almost certainly captured within a tenth of a second of each other, so the shake seen by each camera should have been nearly identical.
The results were interesting. As usual, there was a lot of variation from shot to shot, and on any given shot, one camera or the other might have a bit easier time of it, depending on where within their range of travel their anti-shake elements happened to be at the moment the shutter button was pressed. Nevertheless, we ended up with a pretty clear idea of how well the 7D's anti-shake worked relative to that of the Canon 28-135mm IS lens. Bottom line, at the 50mm focal length, the 7D slightly edged the performance of the Canon system, although the amount of difference was fairly slight. At 135mm, the two cameras came out in nearly a dead heat numerically (we scored successive pairs of images between the two cameras, and averaged the results to come up with a relative numerical score). But, we found the results with the Canon system to be more consistent. (That is, there were fewer extremely sharp or extremely blurry images.) At the end of the day, at 50mm and 1/15 second, 8 out of 10 of the 7D's images were what we'd consider usable, vs 7 out of 10 of the Rebel's (with another three of the Rebel's shots being somewhat marginal), while at 135mm 8 out of 10 of the Rebel's images were acceptable (with one marginal), vs 6 out of 10 of the 7D's (with one marginal).
So Konica Minolta's anti-shake system does indeed seem to work pretty well, at least at the 135mm-and-below focal lengths where we did a direct comparison with Canon's lens-based IS system. At longer focal lengths it seemed to become less effective, but still delivered pretty dramatic improvements in sharpness relative to unaided handheld shots.
| Typical Results at 50mm, 1/15 second | |
| With Anti-Shake | Without Anti-Shake |
 |
 |
| Typical Results at 135mm, 1/25 second | |
| With Anti-Shake | Without Anti-Shake |
 |
 |
Amidst the hair-splitting involved in ranking one anti-shake system against another, it's important to step back and look at what the actual impact of the system in question is. To that end, check out the images above. These were captured with the dual-camera lashup described above, with the 7D's anti-shake system turned on, and the IS on the Canon system turned off to provide the samples without anti-shake. Here again, there was a fair bit of variation from shot to shot, but the examples shown are pretty representative of the general run of results. These images show how dramatically the 7D's anti-shake system reduces image blurring due to camera shake at reasonable shutter speeds. There's a rule of thumb that says to use a shutter speed at least the inverse of the focal length you're shooting at (that is, 1/50 second for shots at 50mm, and 1/135 second for shots at 135mm). Some people with very steady hands and good technique can do a lot better than this, others a bit worse, but it's a useful guideline. For my own part, I find that if I'm really careful, I can maybe get about a factor of two better than the guideline, but at those speeds I'm likely to end up with a fair number of blurry shots. The shots above were captured a good two f-stops slower than the recommended shutter speeds, and the results pretty well speak for themselves. Bottom line, it's hard to overstate the value of a good anti-shake system for handheld photography in low light.
Sensor Cleaning!
Everyone understands that lenses sometimes get dust on them and need to be cleaned, and there are a lot of lens-cleaning cloths, solutions and other accessories on the market that work well. BUT, what do you do when your sensor gets dusty? Dust specks on the sensor tend to show up when shooting at very small apertures, appearing as dark blobs on your images. They're distracting at best, a terrible nuisance at worst, if you end up having to retouch every image to rid of them.
Most of us are naturally leery about the idea of poking around inside the delicate innards of our d-SLRs to wrestle with recalcitrant dust specks. Gently blowing the sensor surface (actually, the surface of the anti-aliasing filter) with compressed air gets rid of some dust, but there's invariably a lot that just stays stuck, no matter what. So what do you do?
If you've got dust specks on your sensor (and sooner or later you will), you're going to need to clean it. There are a lot of products out there intended to address this need, but a distressing number of them work poorly (if at all), and many are grossly overpriced. Advertising hype is rampant, with bogus pseudo-scientific jargon and absurd product claims run rampant. And prices - Did I mention prices? How about $100 for a simple synthetic-bristle brush?
So how do you know what product to use?
We don't pretend to have used everything currently on the market, but can tell you about one solution that worked very well for us. The "Copper Hill" cleaning method is straightforward and safe, and in our routine usage here at Imaging Resource, highly effective. Better yet, the products sold by Copper Hill Imaging are very reasonably priced. Best of all, Nicholas R (proprietor of Copper Hill) has put together an amazingly detailed tutorial on sensor cleaning, free for all.
Sensor cleaning is one of the last things people think about when buying a dSLR, but it's vital to capturing the best possible images. Take our advice and order a cleaning kit from Copper Hill right along with your dSLR, so you'll have it close at hand when you need it: You'll be glad you did!
(Other than a few backlinks on their site, we receive no promotional consideration from Copper Hill. We just think their sensor cleaning products are among the best on the market, and like their way of doing business. - We think you will too. Check them out.)
Exposure
| Free Photo Lessons | |
|
In straight Auto mode, the camera controls everything about the exposure, except for flash, zoom, and focus. Program AE mode keeps the camera in charge of the exposure, while you have control over all other exposure options. While in Program AE mode, you can rotate the control dial with or without holding the Exposure Compensation button to scroll through a range of equivalent exposure settings. Thus, you can bias your exposure toward a faster shutter speed or greater depth of field as circumstances dictate. Aperture Priority mode lets you select the lens aperture setting, while the camera selects the most appropriate corresponding shutter speed. In Shutter Priority mode, the user selects the shutter speed, from 1/4,000 to 30 seconds, while the camera chooses the best corresponding aperture setting. Switching to Manual mode gives you control over both shutter speed and aperture, with a Bulb setting available for longer exposures. Exposure time in Bulb mode is determined by how long you hold down the Shutter button. There doesn't appear to be any limit to the duration of Bulb exposures, but it appears that the dark-frame subtraction will only compensate for exposures up to 30 seconds long. (I strongly recommend use of the optional wired remote in Bulb mode, as the pressure of your finger on the Shutter button is bound to jiggle the camera somewhat, blurring the image.)
The five Scene modes, which Konica Minolta calls"Digital Subject Programs" are Portrait, Sports Action, Landscape, Sunset, and Night Portrait. Each optimizes the camera's exposure, white balance, and image processing systems for the particular program.
Portrait biases toward wider apertures to defocus the background while capturing warm, soft skin tones. Sports Action maximizes shutter speeds with Continuous Autofocus and Continuous Advance Drive modes. Landscape produces sharp, colorful shots of outdoor scenery. Sunset handles the rich warm palettes of sunsets. Night Portrait balances ambient light with flash.
A Depth of Field Preview button on the front of the camera lets you view a scene through the viewfinder with the aperture stopped down, previewing the depth of field before actually capturing the image.
The 5D offers three metering modes: Multi-segment, Center-Weighted and Spot. The default metering mode is a 14-segment honeycomb pattern system, which takes readings throughout the image to determine exposure. Center-Weighted gives precedence to the center of the image while reading the whole frame. Spot metering options are also available via the Metering Mode dial on the rear panel. Spot metering, useful for high-contrast subjects, bases the exposure reading on the very center of the image, letting you set the exposure based on a small portion of your subject. You can also lock an exposure reading by pressing the AE Lock button on the back panel. Halfway pressing the Shutter button also locks exposure and focus, but only in autofocus mode.
The 5D's light sensitivity can be set to ISO equivalents of 100, 200, 400, 800, 1,600, or 3,200 setting, or left in Auto mode for the camera to adjust as it sees fit. A Noise Reduction option is available for longer exposures and higher ISO settings, and greatly reduces the amount of image noise that would otherwise result. Exposure compensation is adjustable from -2 to +2 exposure equivalents (EV) in one-third-step increments by turning the Control dial while pressing the Exposure Compensation button, which displays the scale and setting on the LCD monitor. There is no EV dial. An Auto Exposure Bracketing option can snap three shots in rapid succession, varying the exposure between each in steps of 0.3 or 0.7 EV units. You can also bracket the exposures using the flash. The 5D's Drive mode dial offers Auto Exposure Bracketing for either Single Advance or Continuous Advance drive settings.
The 5D offers convenient control over white balance, color rendition, and tonal range. You adjust white balance by first turning the White Balance dial to one of its four options: Auto, Preset, Custom, or Color Temperature. Auto lets the camera choose the white balance itself. Preset lets you set the white balance to a specific light source. Options include Daylight, Shade, Cloudy, Tungsten, Fluorescent, and Flash. Custom allows you to calibrate the camera to a specific lighting situation by pointing to a white or neutral object. Color Temperature lets you select a specific color temperature in degrees Kelvin.
The Digital Effects Control, available when you press the Function button in a recording mode, offers control over image contrast, saturation, and sharpness in five steps from -2 to +2 arbitrary units. The Color Mode option of the Digital Effects Control, available in P, A, S, and M exposure modes, sRGB color space options of Natural (faithful color reproduction), Natural Plus (increased contrast and sharpness), Portrait (optimized skin tones), Landscape (optimized daytime outdoor scenery), Sunset (optimized landscapes at dusk or dawn), Night view (optimized for nighttime scenery without flash), Night Portrait (nighttime scenery with flash), and Black & White (monochrome). Two non-sRGB options are also available: Adobe RGB and Embedded Adobe RGB (in which the color space is embedded in the image data). Adobe RGB has a larger color gamut than sRGB. Embedded Adobe RGB files are written to the CompactFlash card with a .JPE extension. Adobe RGB images without an embedded profile are written with a file prefix of _ICT rather than the normal PICT.
Drive Modes
The Maxxum 5D's Drive Mode button on the top panel accesses a range of shooting modes, including Single Frame Advance, Continuous Advance, 10-second Self-timer, Two-second Self-timer modes, Single Frame Bracketing, and Continuous Advance Bracketing. Both of the bracketing modes access the camera's Auto Exposure Bracketing system. In Continuous Advance mode, the 5D captures a rapid series of images, with a maximum frame rate of three frames per second. Actual frame rates will vary, depending on the image size and quality settings, as will the total number of images in the series, due to the amount of memory card space.
The two Self-Timer modes lock the mirror up, then fire the shutter a short delay after the Shutter button is pressed. The shorter, two-second delay is very handy when you need to prop the camera on something to take a photo in dim lighting, and don't want the pressure of your finger on the shutter button to jiggle the camera. The 10-second delay is long enough that you can run around to get into the photo yourself. An LED lamp on the front of the Maxxum 5D blinks and the camera beeps as the 10-second Self-Timer is counting down, the blink and beeps becoming faster in the last few seconds. (No indication is given for the shorter countdown.) As with many other functions on the 7D, I liked being able to choose between the 2- and 10-second delay settings without having to delve into a menu screen.
Flash
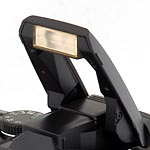 The 5D features a built-in, swing-up flash, which operates in either Fill-Flash, Red-Eye Reduction, Rear Flash sync, or Wireless modes. (I call it a swing-up flash because it doesn't pop up automatically when needed, and also doesn't manually pop up at the press of a button under spring pressure, which would be more convenient when you're in a hurry.) To release the flash from its compartment, pull on the two small tabs on either side of the casing to lift up the flash head. Close it again by simply pushing the flash head back down. The Flash mode is changed through the Record settings menu. In Fill-Flash mode, the flash fires with every exposure, regardless of lighting conditions. Red-Eye Reduction fires a series of small pre-flashes before firing the flash at full power for the exposure itself. This makes your subjects' pupils contract and reduces the occurrence of the Red-Eye effect. The Rear Flash Sync mode fires the flash at the end of the shutter time, rather than the beginning. If you have moving objects in a relatively brightly lit environment, this will produce a sharp image of your subject, with a "motion trail" following behind it. The flash is in the Off position when it's closed. The Wireless mode lets the camera work with wireless remote flash units, with four channels available through the settings menu, so different camera/flash setups working in the same area won't interfere with each other. (Konica Minolta makes two flash units that support the 7D's wireless capability, the Program/Maxxum 5600HS [D] and 3600HS [D].)
In Program AE, Full Auto, and Aperture Priority exposure modes, pressing and holding the AE Lock button activates a Slow-Sync mode setting, which balances the flash exposure with the ambient lighting. The exposure is based on the ambient light, and the flash power is based on the aperture setting. Results with indoor and outdoor shots that include light fixtures can be dramatic and pleasing.
The 5D offers two methods of flash metering. Its default mode is called ADI, which stands for Advanced Distance Integration. In this mode, it bases its flash exposure on the lens aperture and distance feedback from the autofocus system, as well as on the light reflected back from a pre-flash. By determining how far away the target subject is, the camera knows how much flash power is required to illuminate it, and so is less likely to be fooled by subjects that are unusually light or dark overall. Alternatively, the Pre-Flash TTL (through the lens) method bases the exposure determination solely on a small metering flash before the main exposure. Used in conjunction with the spot autofocus option mentioned earlier, the ADI flash metering should be more accurate with small subjects against a different colored background than the pre-flash method.
The 5D also has a top-mounted hot shoe for attaching an external flash unit. The shoe design and contact arrangement are set up for Konica Minolta's own dedicated flash units, but I imagine that compatible models are available from the major third-party flash manufacturers (Sunpak et. al.). Konica Minolta's own Maxxum/Program Flash models 2500(D), 3600HS(D), and 5600HS(D) work with the 5D, and two macro flashes (Macro Twin Flash 2400 and Macro Ring Flash 1200) will work with an accessory macro flash controller. The 5D is compatible with the High Speed Sync (HSS) function of the Maxxum/Program Flash 5600HS(D) and 3600HS(D) units, meaning the camera can use its full range of shutter speeds up to 1/4,000 second.
There is no external flash sync terminal (the so-called "PC" style connector) for third-party flash units. Nor can the flash be throttled down, as on the 7D.
Shutter Lag/Cycle Times
When you press the shutter release on a digital camera, there's a delay or lag time before the shutter actually fires. This time allows the autofocus and autoexposure mechanisms to do their work and can amount to a significant delay in some situations. Likewise, the delay from shot to shot can vary greatly, and is also important to the picture-taking experience. Since these numbers are rarely reported by manufacturers or reviewers (and even more rarely, reported accurately), I routinely measure both shutter lag and cycle times using an electronic test setup I designed and built for the purpose. (Crystal-controlled timing, with a resolution of 0.001 second.) Here are the numbers I collected for the 5D:
| |
||
| |
(secs) |
|
| Power On -> First shot | |
Lens AF
syncs, card is accessed. Fairly fast, not amazingly so for a digital
SLR though. |
| Shutdown | |
Noticeably faster than 7D was (but smaller buffer memory). Longest time corresponds to clearing five RAW-mode files from the buffer memory. |
| Play to Record, first shot | |
Very fast. |
| Record to play | |
First time is that required to display a large/fine file immediately after capture, second time is that needed to display a large/fine file that has already been processed and stored on the memory card. Both times are fairly fast. |
| Shutter lag, full autofocus | |
First time is at full wide-angle, second is full telephoto. Quite fast. |
| Shutter lag, continuous autofocus | |
Little or no benefit to
continuous AF with stationary subjects, but no penalty either. |
| Shutter lag, manual focus | |
Not especially fast for
a digital SLR. |
| Shutter lag, prefocus | |
Time to capture, after half-pressing
shutter button. Fairly comparable speed to its competition. |
| Cycle Time, max/min resolution |
0.59 |
Shoots at about the same rate for large/fine images or "TV" mode (640x480) images. Times are averages. In large/fine mode, shoots 14 frames this fast, then slows to about 4.5 seconds per shot. In TV mode, maintains this rate indefinitely. Buffer clears in 46 seconds in large/fine mode, but only 2 seconds in TV mode. Average speed for a digital SLR of its class, good buffer capacity. (Times measured with a Lexar 80x CF card.) |
| Cycle Time, RAW |
0.65 |
Times are averages. Shoots 9 frames this fast, then slows to about 7.3 seconds per shot. Buffer clears in 60 seconds. Average speed for this level dSLR, rather slow buffer-clearing time. (Times measured with a Lexar 80x CF card.) |
| Cycle Time, continuous mode, max/min resolution | 0.36 (2.75 fps) |
Shoots at about the same rate for large/fine images or "TV" mode (640x480) images. Times are averages. In large/fine mode, shoots 15 frames this fast, then slows to about 3.1 seconds per shot. In TV mode, shoots 65 shots this fast, then slows only slightly. Buffer clears in 47 seconds in large/fine mode, 11 seconds in TV mode. Again, average speed for its class. (Times measured with Lexar 80x CF card.) |
|
Cycle Time, continuous RAW |
0.36 |
Times are averages. Shoots 9 frames this fast, then slows to about 7.4 seconds per shot. Buffer clears in 85 seconds. Average speed for its class. |
Like the 7D, the word that comes to mind when thinking about the Maxxum 5D's speed is "average." But that's not a bad thing, given the field it's playing in. Full-autofocus shutter lag is actually faster than most d-SLRs, at about 0.29 second, although its manual focus lag is only slightly better. At 0.59 second, shot-to-shot cycle times are decent and its 9-shot JPEG buffer capacity should be enough for most users. At 2.75 frames/second, continuous-mode shooting speed is also right on par with its primary competitors. Overall, a very workmanlike performance.
Operation & User Interface
The Maxxum 5D's user interface is certainly less intimidating that the 7D's comprehensive set of buttons, switches and dials. Spend a little time with the camera and you'll find the controls very intuitive and well-placed. Unlike most of its competitors, the 5D's external dials and buttons access essentially all of the main camera settings, reserving the LCD menu system for less commonly-used functions. The front Control dial with the Exposure Compensation button functioning as a shift key quickly accesses shutter speed and aperture settings, in addition to a wide range of functions when used with other control buttons. Most of the camera adjustments are made by rotating a dial, pressing a button, and turning one of the control dials. External mechanical controls like these much faster to navigate than LCD menu options. With a little practice, the experienced photographer can develop a muscle-memory map of the camera and actuate some controls by feel alone.
As in all d-SLRs, the LCD monitor doesn't act as a viewfinder but does offer a control panel of sorts, showing you the main camera settings and presenting adjustment screens for some of the control buttons. (You can disable the LCD display entirely using the Display button, or activate the full or basic information readouts.) You can also see the main exposure settings through the viewfinder.
While you can quickly feel comfortable using the camera, getting to know everything it can do can take a little time, given the large number of custom settings and setup options -- and the interface itself will take a little getting used to if you hadn't previously used a Maxxum film SLR. However, once you get the hang of it, the control layout and overall feel of the camera are quite natural. Right out of the box, you could probably snap a few images with just a cursory look at the manual, but plan on investing more time to get better acquainted with all of the camera's controls and settings. The manual is extensive and goes in greater depth than most manuals we've seen.
Control Enumeration

Depth of Field Preview Button: Tucked away on the right bottom corner of the lens mount, this button stops down the lens to the selected aperture, so you can get an idea of the depth of field when looking through the viewfinder.

Lens Release Button: On the left side of the lens mount, this button unlocks the lens so that it can be removed from the camera.

Focus Mode Switch: In the bottom right corner of the front panel, this dial controls the main focus mode:

Front Control Dial: This ridged wheel sits in front of the Shutter button on top of the handgrip, conveniently under your index finger. All of the most commonly used camera settings are adjusted by using this wheel in conjunction with one of the function dials or control buttons on the camera. It also controls aperture and shutter speed in Aperture Priority and Shutter Priority exposure modes and shutter speed in Manual mode.

Shutter Button: Just behind the Front Control dial, this button sets exposure and focus (in autofocus mode) when half-pressed, and trips the shutter when fully pressed.
White Balance Dial and Button: This control combination is located on the far right side of the camera's top panel, and controls the white balance settings. The dial offers four main positions:
The central WB button selects white balance settings, and registers the white balance in Custom mode.

ISO Button: Next to the Drive Mode button, this button accesses the camera's sensitivity menu. Using the left and right arrow keys or the Front or Rear Control dials, you can set the ISO equivalent to Auto, 100, 200, 400, 800, 1,600, or 3,200. Lo 80 and Hi 200 Zone Matching options record low-key or high-key images, respectively.

Drive Mode Button: This mode button on the top panel accesses the camera's drive settings, which include Single Frame Advance, Continuous Advance, the 10 and Two-second Self-timer modes, Exposure Bracketing, and White Balance Bracketing.
Exposure Mode Dial: Next to the Drive Mode button, this dial selects the camera's exposure mode. Options are Auto, Program AE, Aperture Priority, Shutter Priority, Manual, and five "Digital Subject Programs" or Scene modes. The Scene modes include Portrait, Sports Action, Landscape, Sunset, and Night Portrait.

Power Switch: Located in the top left corner of the rear panel, this sliding switch turns the camera on or off.

Menu Button: The top button in a series lining the left side of the LCD monitor, this button calls up the menu system. Pressing it a second time returns to the LCD's information screen.

Display Button: Directly below the Menu button, this button controls the LCD information display in Record and Playback modes. Though the LCD monitor does not provide any image preview, it does report the camera's exposure settings. Pressing this button cycles between the full information display, basic display, and no display (disables the LCD entirely). In Playback mode, this button cycles between an information overlay, no information, and the index display.

Delete Button: Right below the Display button, the Delete button prompts the camera to ask if you want to delete a displayed image.

Playback Button: The final button in the series on the left side of the LCD monitor, this button accesses the camera's Playback mode, so that you can review any captured images. Once in Playback mode, a second press of the Playback button returns to Record mode. (You can also press the Shutter button.)

Diopter Control Dial: Practically hidden on the right side of the optical viewfinder, this tiny dial adjusts the viewfinder display to accommodate eyeglass wearers.

Function Button: The first of three buttons at the top right of the back panel, this button sets AF area, focus mode, metering mode, flash compensation, color mode and Digital Effects Control. In Playback mode, it zooms out.

Exposure Compensation Button: The second of three buttons at the top right of the back panel, this button shifts the control dial to set exposure compensation in Auto, P, A and S exposure modes or any Scene mode. In Playback mode, it zooms in.

AE Lock Button: The third of three buttons at the top right of the back panel, this button locks the exposure. When using the flash in Program, Aperture Priority, or Full Auto exposure modes, this button accesses the Slow-Sync flash function. Pressing and holding the button locks the exposure, and the flash output is based on the locked reading.

Multi-controller and Spot AF / OK Button: Right of the LCD monitor, this rocker control steps through selections within the LCD menu system and interacts with various status messages or requests for confirmation that appear on the LCD screen. You navigate the menus by pressing one of the four arrows around the control's periphery, and confirm selections by pressing the Spot AF / OK button in the center of the control. When selecting an AF area, the rocker actually moves in eight directions, giving you more flexibility in moving the AF point. In Playback mode, the right and left arrows scroll through captured images on the memory card, while the up arrow activates a histogram display. In Record mode, when the AF Area mode is set to Wide, pressing and holding the center of the control switches the camera to Spot autofocus mode. Once in Spot AF, rocking the control moves the Spot indicator around the frame to the nine available focus points.

Anti-Shake Switch: In the lower right corner of the rear panel, this switch turns the camera's Anti-Shake System on and off.
Battery Compartment Latch: Located in the center of the battery compartment door on the bottom of the camera, this latch unlocks and opens the battery compartment cover.
Camera Modes and Menus
 Capture Mode: When powered on, the camera is automatically placed
into Record mode. The Exposure Mode dial on top of the camera sets the main
shooting mode, with the following options:
Capture Mode: When powered on, the camera is automatically placed
into Record mode. The Exposure Mode dial on top of the camera sets the main
shooting mode, with the following options:
Playback Mode: The Playback button on the rear panel accesses Playback mode, where you can review captured images. The left and right arrow keys scroll through the images on the card, and the up arrow displays a histogram and information display and the down arrow rotates the image. You can enlarge captured images or display them in an index format for quick viewing.
Camera Menus
Pressing the Menu button provides access to the camera's full menu system. The following options are available in most camera modes as menu tabs at the top of the display:
 Image
Size: Sets the pixel dimensions of captured still images. Choices
are 3,008 x 2,000 pixels (Large); 2,256 x 1,496 (Medium); and 1,504 x 1,000
(Small).
Image
Size: Sets the pixel dimensions of captured still images. Choices
are 3,008 x 2,000 pixels (Large); 2,256 x 1,496 (Medium); and 1,504 x 1,000
(Small).
 Flash
Mode: Choose from Fill-Flash, Red-Eye Reduction, Rear Flash Sync,
and Wireless. Rear Flash Sync is a slow-sync option that combines slower
shutter speeds with the flash. The "Rear Flash" refers to what
is commonly known as rear-curtain sync, in which the flash fires just before
the shutter closes, rather than just after it opens. With rapidly moving
subjects, this produces motion blurs that trail the sharp, flash-exposed
image, rather than preceding it. The Wireless setting allows the flash to
work with wireless and remote slave units, with four available channels.
Wireless operation with Konica Minolta's excellent 5600HS[D] flash unit is very smooth.
Flash
Mode: Choose from Fill-Flash, Red-Eye Reduction, Rear Flash Sync,
and Wireless. Rear Flash Sync is a slow-sync option that combines slower
shutter speeds with the flash. The "Rear Flash" refers to what
is commonly known as rear-curtain sync, in which the flash fires just before
the shutter closes, rather than just after it opens. With rapidly moving
subjects, this produces motion blurs that trail the sharp, flash-exposed
image, rather than preceding it. The Wireless setting allows the flash to
work with wireless and remote slave units, with four available channels.
Wireless operation with Konica Minolta's excellent 5600HS[D] flash unit is very smooth. Delete:
Lets you delete the current photo, all photos in a folder or on the card, or only marked photos.
Delete:
Lets you delete the current photo, all photos in a folder or on the card, or only marked photos. Slide
Show: Initiates a slide show of photos on the memory card.
Slide
Show: Initiates a slide show of photos on the memory card.
Custom Menu Options:
The following menu options are available in any exposure mode, and are accessed through the Custom tab at the top of any menu screen.
 AF
/ Shutter Release Priority Setup: Designates the priority of
the Shutter button as AF or Release. The AF option will not release the
shutter unless focus is set, while the Release setting trips the shutter
even if AF is not established.
AF
/ Shutter Release Priority Setup: Designates the priority of
the Shutter button as AF or Release. The AF option will not release the
shutter unless focus is set, while the Release setting trips the shutter
even if AF is not established. Shutter Lock (no card): If enabled, this lock prevents the shutter from opening when a card is not inserted in the camera.
Setup Menu Options:
Like the Custom menu, the following menu options are available in any exposure mode, and are accessed through the Setup tab at the top of any menu screen.
 LCD
Brightness: Adjusts the brightness of the LCD display to one of
11 levels.
LCD
Brightness: Adjusts the brightness of the LCD display to one of
11 levels.
 File#
Memory: Chooses whether or not to number images sequentially
across memory cards. If set to "yes," the 5D will remember the
last number used to name a file, even if a different card is inserted.
File#
Memory: Chooses whether or not to number images sequentially
across memory cards. If set to "yes," the 5D will remember the
last number used to name a file, even if a different card is inserted.
 LCD
Backlight: Specifies the period of time before the LCD backlight
turns off to conserve power. Times are 5, 10, 30, or 60 seconds.
LCD
Backlight: Specifies the period of time before the LCD backlight
turns off to conserve power. Times are 5, 10, 30, or 60 seconds.
Image Storage and Interface
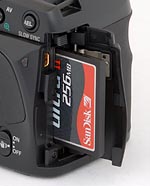 The 5D uses CompactFlash Type I or Type II memory cards, or the IBM Microdrive for image storage. The camera ships without a memory card, so you'll want to purchase one at the same time. The CompactFlash slot is on the right side of the camera, covered by a hinged plastic door that slides opens easily and snaps shut crisply. The card inserts with the connector edge going in first, and the rear of the card facing the back of the camera. A small button beside the slot ejects the card by popping it up slightly, letting you pull the card the rest of the way out.
Although individual CompactFlash cards cannot be write-protected or locked against erasure or manipulation, the 5D lets you lock individual images or groups of images through the Playback menu. Once protected, images cannot be erased or manipulated in any way, except through card formatting. The Playback menu also lets you delete images shown in the LCD display, change the number of images in the Index display, create a custom slide show, and set images up for printing on DPOF compliant printers.
Three image resolution settings are available: 3,008 x 2,000; 2,256 x 1,496; and 1,504 x 1,000 pixels. Files may be saved in any one of three JPEG compression levels, as well as a compact RAW format. (By its nature, the RAW format only saves the full-resolution image size.) The 5D also allows you to simultaneously save images in both RAW and JPEG formats, allowing you to have the convenience of JPEG files but the security of a RAW copy of your images should you desire the maximum quality later.
The table below summarizes the compression ratios and number of images that can be stored on a 256 MB memory card (a common size that should probably be considered a minimum for use with the camera), with each Resolution / Quality (JPEG Compression) combination.
| Resolution/Quality 256 MB Memory Card |
Fine | Normal | |
|
|
| 3008 x 2000 | Images (Avg size) |
41 6.1 MB |
82 3.1 MB |
139 1.8 MB |
27 9.5 MB |
| Approx. Compression |
3:1 | 6:1 | 10:1 | 2:1 | |
| 2256
x 1496 |
Images (Avg size) |
73 3.5 MB |
142 1.8 MB |
237 1.1 MB |
- |
| Approx. Compression |
3:1 | 6:1 | 9:1 | - | |
| 1504
x 1000 |
Images (Avg size) |
158 1.6 MB |
294 869 KB |
466 549 KB |
- |
| Approx. Compression |
3:1 | 5:1 | 8:1 |
- | |
A USB 2.0 High Speed cable and interface accompanies the Maxxum 5D for quick connection and image downloading to a PC or Macintosh computer. By default, it appears as a "storage class" USB device, meaning that no driver software is needed for Mac OS versions 8.6 or later or for Windows Me, 2000, and XP. The Konica Minolta Maxxum 5D connects to a host computer via a USB interface. Downloading files to my Sony VAIO desktop running Windows XP (Pentium IV, 2.4 GHz), I clocked it at 815 KBytes/second, on the low end of USB 2.0 High Speed transfers and certainly lower than the 7D's excellent 1182 KBytes/second. (Cameras with slow USB interfaces run as low as 300 KB/s, cameras with fast v1.1 interfaces run as high as 600 KB/s. Cameras with USB v2.0 interfaces run as fast as several megabytes/second.)
When its USB interface is set to PTP mode, the 5D supports direct printing (no computer required) to PictBridge compatible photo printers. The extent of PictBridge support varies greatly between cameras, and the 5D's support is more robust than many. Provided that it's connected to a printer that offers an equivalent level of support and control, you can select batch printing or an index print, paper size, layout (bordered or borderless prints), print quality, and date and filename imprint options directly from the camera's menu system. (Very slick.) Printing via PictBridge to our Canon i9900 studio printer though, we found it to be rather slow in formatting and preparing the data to send to the printer. (It took 3 minutes and 50 seconds to print a 4x6 photo at best quality.)
Recommended Software: Rescue your Photos!
Since we're talking about connectivity and memory cards, this would be a good
place to mention recovering images from damaged memory cards: Just as important
as an extra memory card is a tool to rescue your images when one of your cards
fails at some point in the future. I get a lot of email from readers who've
lost photos due to a corrupted memory card. Memory card corruption can happen
with any card type and any camera manufacturer, nobody's immune. A surprising
number of "lost" images can be recovered with an inexpensive, easy
to use piece of software though. Given the amount of email I've gotten on the
topic, I now include this paragraph in all my digicam reviews. The program you
need is called PhotoRescue, by DataRescue SA. Read our review
of it if you'd like, but download the program now, so you'll have it.
It doesn't cost a penny until you need it, and even then it's only $29, with
a money back guarantee. So download PhotoRescue
for Windows or PhotoRescue
for Mac while you're thinking of it. (While you're at it, download the
PDF manual
and quickstart
guide as well.) Stash the file in a safe place and it'll be there when you need
it. Trust me, needing this is not a matter of if, but when... PhotoRescue
is about the best and easiest tool for recovering digital photos I've seen.
(Disclosure: IR gets a small commission from sales of the product, but I'd highly
recommend the program even if we didn't.) OK, now back to our regularly
scheduled review...
Video Out
The 7D provides a video output jack with an accompanying video cable. The signal timing can be set to NTSC or PAL via the Setup menu. The Video output duplicates the contents of the LCD in all modes, permitting it to be used as an auxiliary viewfinder.
Power
 The 5D uses an NP-400 rechargeable lithium-ion battery pack for power, or the optional AC adapter. The camera comes with a battery and charger and shows excellent battery life, but I highly recommend picking up a spare and keeping it freshly charged at all times.
Here are the power-consumption numbers I measured for the 5D in the lab, along with estimated run times, based on a single lithium-ion cell:
| |
(@6 volts on the external power terminal) |
(7.4v 1500mAh LiIon cell) |
| Capture Mode, w/LCD | |
|
| Capture Mode, no LCD | |
|
| Half-pressed shutter w/LCD | |
|
| Half-pressed w/o LCD | |
|
| Memory Write (transient) | |
|
| Flash Recharge (transient) | |
|
| Image Playback | |
|
Like most digital SLRs, the 5D's battery life is excellent, largely because it doesn't have to keep the CCD and LCD clocking away to frame its shots. With run times of over 6 hours in record mode (with the LCD off) and 2.5 hours in playback, a fully charged NP-400 battery will last most photographers all day. If you plan lots of shooting in continuous mode though, I'd suggest picking up an extra battery pack. (Oddly, the 5D's power consumption appears to be a little higher than that of the 7D. Battery life is still very good, just a little less than that of the 7D.)
In the Box
The 5D ships with the following items:
Recommended Accessories
Test Results
To see a complete listing of all our test shots and do your own analysis, go to the Thumbnails page.
Zoom
The kit lens ranges from 18-70mm (35mm equivalent), generous at the wide angle end, with macro focusing as close as 1.3 feet (0.38m).
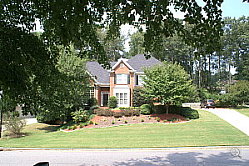 |
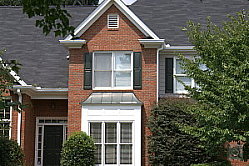 |
|
18mm
|
70mm
|
Macro
Focusing as close as 1.3 feet (0.38m), the minimum capture size is 2x3 inches.
 |
 |
|
Standard Macro
|
Macro with Flash
|
Distortion
Average pincushion distortion, no pincushion at all.
|
Barrel distortion at 18mm (27 mm equiv) is 0.85%
|
 |
|
Very little pincushion at 70mm (105mm equiv), 0.13%.
|
 |
Chromatic aberration
Very low chromatic aberration across the focal length range.
 |
 |
|
Slight to Moderate CA, wide angle
(200% magnification) |
Very little, telephoto
(200% magnification) |
Corner Sharpness
Very slight softening in the corners, worse at telephoto.
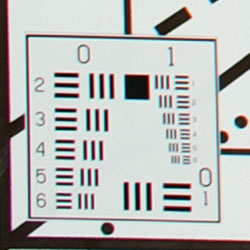 |
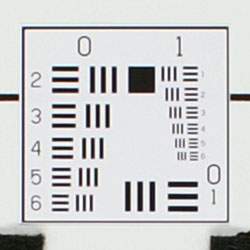 |
|
Lower left corner, wide angle
|
Center at wide angle (for comparison).
|
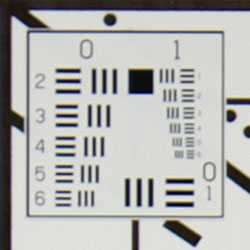 |
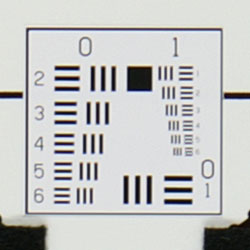 |
| Upper right corner, telephoto | Center at telephoto (for comparison) |
Exposure and White Balance
Indoors, incandescent lighting
Auto white balance had a hard time with household incandescent lighting, but the Manual option did very well. Non-flash shots required a bit less than average exposure compensation.
 |
 |
|
Auto White Balance (+0.7 EV)
|
Manual WB (+0.7 EV)
|
Color balance indoors under incandescent was very warm in Auto mode, with the blue flowers appearing a very dark purple. The Incandescent setting produced better results, but was still warmer than I'd personally prefer. The Manual white balance setting did very well though, producing a nice white balance with just a hint of warmth and very natural colors throughout. The shot required a +0.7 EV exposure compensation boost to get a good exposure, a bit less than average. Our test lighting for this shot is a mixture of 60 and 100 watt household incandescent bulbs. This is a pretty yellow light source, but a very common one in typical home settings here in the US.
Outdoors, daylight
 |
 |
 |
 |
The 5D held both shadows and highlights well in bright sun and captured the nuances of high key overcast scenes. Color was not oversaturated. And it didn't suffer from too much contrast. A slight under or overexposure was all it took to get the shot we expected to capture.
This was even true of our low-light indoor shots, which relied on the 5D's image stabilization to record sharp images at shutter speeds as low as 1/5 second.
See the full set of test images on our thumbnail index page.
See our collection of "Gallery" images for the Konica Minolta Maxxum 5D.
Resolution
Very high resolution, 1,350 lines of strong detail horizontally, 1,300 vertically.
Our laboratory resolution chart reveals sharp, distinct line patterns down to about 1,350 lines per picture height horizontally (1,300 lines vertically), with extinction not occurring until somewhere past 1,600 lines. In the crops below, artifacts begin to swamp the chart details at the resolutions stated above: Line width begins varying significantly, color artifacts become dominant, etc. Hence, attributing higher resolution figures to the camera doesn't accurately represent what the camera is actually resolving, vs. introducing as self-generated artifacts.
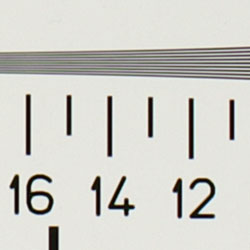 |
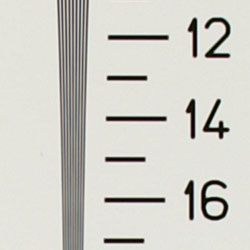 |
|
Strong detail to 1,300 lines vertically
|
Strong detail to 1,350 lines horizontally
|
Sharpness & Detail
Good detail, but fine details are rendered a little coarsely at the default sharpening setting.
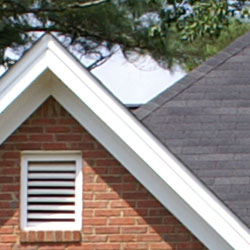 |
 |
|
Plenty of detail here, but just a little soft. (Takes unsharp masking in Photoshop(tm) very well though.)
|
Subtle detail: Hair
At ISO 100, there's good definition of hair, though there's still a sense of overall softness. |
 |
 |
|
ISO 80
|
ISO 100
|
 |
 |
|
ISO 200
|
ISO 400
|
 |
 |
|
ISO 800
|
ISO 1600
|
 |
|
|
ISO 3200
|
|
The Konica Minolta Maxxum 5D offers ISOs ranging as high as 3200, but the highest that I'd count as truly useful is ISO 800. Shots at ISO 1600 are usable for prints 8x10 inches and smaller, but are still a little rough, and the noise pixels shift the color slightly. At ISO 3200, the noise is not terrible, but the softness resulting from noise processing is distracting, and shows up even in very small prints.
For more analytical detail on the Konica Minolta 5D's imaging behavior, including noise characteristics, read our Imatest results page.
Extremes: Sunlit and low light tests |
 |
 |
|
+0.3EV
|
+0.7EV
|
+0.7EV
"High Key" exposure setting |
The Konica Minolta Maxxum 5D did fairly well here, but did tend to lose a fair amount of highlight detail at exposures that left the midtones an acceptable brightness. Shadow detail was quite good, albeit with rather high noise levels in the blue channel. (No doubt due to how dark the shadows were, as a result of the contrasty tone curve.)
While we suspect it would have had a greater effect on a subject that was predominantly white or light in color, the 5D's "High Key" exposure option did seem to do a slightly better job of holding onto highlights, while keeping the midtones a little lighter.
| 1 fc 11 lux |
1/2 fc 5.5 lux |
1/4 fc 2.7 lux |
1/8 fc 1.3 lux |
1/16 fc 0.67 lux |
1/16fc No NR |
|
| ISO 100 |
2 sec f3.5 |
4 sec f3.5 |
10 sec f3.5 |
15 sec f3.5 |
25 sec f3.5 |
25 sec f3.5 |
| ISO 200 |
1 sec f3.5 |
2.5 sec f3.5 |
5 sec f3.5 |
8 sec f3.5 |
13 sec f3.5 |
15 sec f3.5 |
| ISO 400 |
1/2 sec f3.5 |
1.3 sec f3.5 |
3.2 sec f3.5 |
5 sec f3.5 |
8 sec f3.5 |
6 sec f3.5 |
| ISO 800 |
1/4 sec f3.5 |
1/1 sec f3.5 |
1.6 sec f3.5 |
2.5 sec f3.5 |
4 sec f3.5 |
4 sec f3.5 |
| ISO 1600 |
1/5 sec f3.5 |
1/2 sec f3.5 |
1/1 sec f3.5 |
1.6 sec f3.5 |
2 sec f3.5 |
2 sec f3.5 |
| ISO 3200 |
1/13 sec f3.5 |
1/5 sec f3.5 |
1/2 sec f3.5 |
1/1 sec f3.5 |
1 sec f3.5 |
1 sec f3.5 |
The Konica Minolta Maxxum 5D did very well in our low light shooting test, capturing very bright images down to the lowest limit of our test. (About 1/16th the brightness of typical city street lighting at night, four f-stops down from typical urban light levels after dark.) Even at ISO 400, the shots at the lowest light levels were surprisingly clean, with relatively low image noise. The 5D's autofocus system works down to about 1/3 foot-candle with the AF-assist light turned off, and in total darkness (on nearby objects) with the AF assist enabled.
Saturation & Hue Accuracy
Very appealing color: Oversaturates reds, greens, and blues somewhat, but leaves other colors (and skin tones) alone.
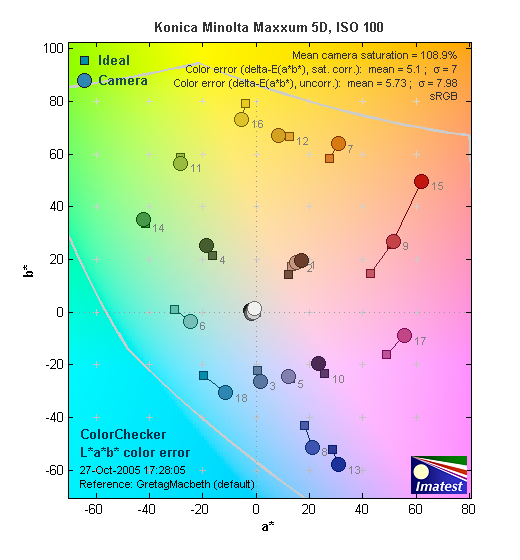 |
| In the diagram above, the squares show the original color, and the circles show the color that the camera captured. More saturated colors are located towards the periphery of the graph. Hue changes as you travel around the center. Thus, hue-accurate, highly saturated colors appear as lines radiating from the center. |
The other important part of color rendition is hue accuracy. Hue is "what color" the color is. On this score, the Konica Minolta 5D did much better than average, producing very hue-accurate color. It does shift cyans towards pure blues slightly, a common tactic by which digital cameras produce better-looking sky colors. Other than that though, the 5D has more accurate color than that of most cameras we test.
 |
 |
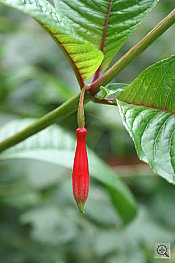 |
 |
For "real world" results, see our Konica Minolta Maxxum 5D Photo Gallery for more shots taken with the camera.
For more analytical detail on the Konica Minolta 5D's imaging characteristics, read our Imatest results page.
Coverage
The optical viewfinder is very slightly tight, but more accurate than those of most d-SLRs.
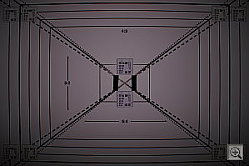 |
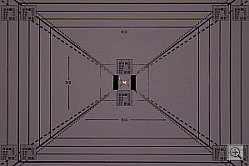 |
|
18mm optical viewfinder
|
70mm optical viewfinder
|
Coverage and Range
The Konica Minolta Maxxum 5D's flash offers average illumination, but still effective out to about the 14 foot limit.
|
|
|
18mm
|
70mm
|
 |
 |
| Normal Flash +1.0 |
Slow-Sync Mode +0.7
|
| (Relatively strong incandescent room lighting) | |
The flash on the Konica Minolta 5D showed fairly typical exposure characteristics, requiring +1.0 EV exposure compensation on the Indoor Portrait shots shown above, a pretty typical amount for that subject. In normal mode, the flash overpowers the incandescent lights as expected, but balances the two in Slow-sync mode.
| 8 ft | 9 ft | 10 ft | 11 ft | 12 ft | 13 ft | 14 ft |
1/125 sec f5.6 ISO 100 |
1/125 sec f5.6 ISO 100 |
1/125 sec f5.6 ISO 100 |
1/125 sec f5.6 ISO 100 |
1/125 sec f5.6 ISO 100 |
1/125 sec f5.6 ISO 100 |
1/125 sec f5.6 ISO 100 |
In our low light flash range test (above) the Maxxum 5D's flash did pretty well, with no falloff in brightness until somewhere a bit past 12 feet, even with the relatively "slow" f/5.6 kit lens.
Print Quality
Good print quality, good color, good-looking prints to 11x14 inches, and 13x19s are entirely suitable for wall display. ISO 1600 images are rough at 8x10, good at 5x7. ISO 3200 images are only acceptable at 4x6.
Testing hundreds of digital cameras, we've found that you can only tell just so much about a camera's image quality by viewing its images on-screen. Ultimately, there's no substitute for printing a lot of images and examining them closely. For this reason, we now routinely print sample images from the cameras we test on our Canon i9900 studio printer, and on the Canon iP5200 here in the office. (See the Canon i9900 review for details on that model.)
The Konica Minolta 5D's low ISO shots printed up very nicely on both the iP5200 and i9900, with good contrast, sharpness and very natural-looking color. Its images hold together well as you enlarge them. They make very sharp-looking 8x10 inch prints, and acceptable 11x14 inch ones. At 13x19 inches, they look soft up close, but perfectly fine at normal viewing distances, hung on a wall.
Turning to the 5D's high-ISO shots, its ISO 800 images looked surprisingly good at large sizes, and were quite acceptable when printed at 8x10. ISO 1600 shots looked rough at 8x10, but would probably be OK hanging on a wall where they wouldn't be scrutinized too closely. At 5x7, the ISO 1600 shots looked pretty decent, and just fine at 4x6. At ISO 3200 though, things fell apart a bit, really only looking acceptable at 4x6 inches, and even there, color and saturation suffered. Color-wise, the Konica Minolta 5D's images looked great when printed on the iP5200, with bright, vibrant color, and beautiful tonality.
Konica Minolta Maxxum 5D Timing
Only average performance in most parameters
| Startup/Shutdown: | |
| Power On to first shot | 1.4 seconds |
| Shutter response (Lag Time): | |
|
Full Autofocus Wide
|
0.30 second
|
|
Full Autofocus Tele
|
0.29 second
|
|
Prefocused
|
0.12 second
|
| Cycle time (shot to shot) | |
| Normal large/fine JPEG | 1.28 seconds (0.59 with Instant Review mode off) |
| Flash recycling | 1.31 seconds |
| Continuous mode | 0.36 second 2.79 frames/second (6 large/fine frames) |
| Download speed | |
| Windows Computer, USB 2.0 | 815 KBytes/sec |
On the timing front, the Konica Minolta 5D scored about average in our test results, though the AF system seemed to be pretty quick, comparable to the fastest digital SLR systems. USB 2.0 transfer speed was on the low side of the "high speed" spec, but still fast enough that most users should find no need of a standalone card reader.
Konica Minolta Maxxum 5D Battery Life
Really excellent battery life.
The Konica Minolta Maxxum 5D uses an NP-400 rechargeable lithium-ion battery pack for power, or the optional AC adapter. The camera comes with a battery and charger and shows excellent battery life, but I highly recommend picking up a spare and keeping it freshly charged at all times.
Here are the estimated run times, based on a single lithium-ion cell:
|
|
(Minutes) |
| Capture Mode, LCD |
|
| Image Playback, LCD |
|
Like most digital SLRs, the 5D's battery life is excellent, largely because it doesn't have to keep the CCD and LCD clocking away to frame its shots. With run times of over 6 hours in record mode (with the LCD off) and 2.5 hours in playback, a fully charged NP-400 battery will last most photographers all day. If you plan lots of shooting in continuous mode though, I'd suggest picking up an extra battery pack.
The Bottom Line
| Pro: | Con: |
|---|---|
|
|
Conclusion
| Free Photo Lessons | |
|
<<Maxxum 5D Test Images | Additional Resources and Other Links>>
Reader Comments!
Questions, comments or controversy on this product? Click
this link to see what other Imaging Resource readers have had to say about
the Konica Minolta Maxxum 5D, or add comments of your own!