Back
to Full Toshiba PDR-M71 Review
Back
to Full Toshiba PDR-M71 ReviewGo to Toshiba PDR-M71 Data Sheet
Go to Toshiba PDR-M71 Pictures Page
Up to Imaging Resource Cameras Page
Use your browser's "Back" button to return to the previous page, or the links at the top and bottom of this page to navigate to related information. If you have difficulty fitting the text on this page onto your printer output, simply resize your browser window to a narrower width and print again.
Remember us when it's time to buy!
Dave here: Have our reviews been helpful to you? (Is this article you're reading right now useful?) Preparing this level of information on as many products as we do is incredibly hard work, not to mention expensive. Things on the Internet may look like they're free, but they're not. (As a lot of big dot.com companies are finding out these days.) Somewhere, somebody has to pay to produce worthwhile content. YOU can help us though, by remembering us when it comes time to make your purchase. Would you consider coming back to our site and clicking-through to one of our advertisers to make your purchase? Every dollar you spend with one of our advertisers helps us directly (in affiliate fees) or indirectly (the advertiser will keep renewing their ad contract with us). To make it easy for you to support us, here's a URL you can visit, to see all our current advertisers, with links to click on that will register your visit to them as having come from our site. It's up to you where you buy, but Mike, Mike, Kim, Yazmin, Marti and I would be really grateful if you'd help us out by choosing one of our advertisers to purchase from.
Thank you for your support!
Dave Etchells, Founder & Publisher
Visit our "Buy Now" Page:
https://www.imaging-resource.com/buynow.htm
Back
to Full Toshiba PDR-M71 Review
Go to Toshiba PDR-M71
Data Sheet
Go to Toshiba PDR-M71
Pictures Page
Up to Imaging Resource Cameras
Page
Toshiba PDR-M71Toshiba introduces a feature-packed, value-priced 3 megapixel model! Review First Posted: 08/24/2001 |
|
 |
|
3.2-megapixel CCD for files as large as 2,048 x 1,536 pixels |
|
|
2.8x optical zoom lens (equivalent to a 35-98mm lens) | |
|
|
Very flexible exposure controls | |
|
|
Fast USB port for computer connection |
Manufacturer's Overview
A true leader in the digital imaging industry, Toshiba America introduced its first digital still camera in 1996. The PDR-2 revolutionized consumer digital photography by offering the first PC Card interface, a low-power CMOS chip for image capture, and an interface specifically designed for use with Toshiba's popular laptop computers. The company is also known for inventing the SmartMedia flash memory card, one of the most popular in-camera storage formats in the digicam industry, and the FlashPath card adapter, which enables users to read SmartMedia cards directly from a computer's 3.5-inch floppy drive.
Since 1996, Toshiba has introduced a full line of digital cameras, all priced for the beginning and advanced photo enthusiast ($400 to $1,000). Its current crop (October 2001) includes eight models, which range from the entry level 2.1-megapixel PDR-M21, to the 4.2-megapixel PDR-M81 (introduced in July), to the latest 3.2-megapixel PDR-M71 model. The M71 replaces the 3.37-megapixel M70 model and offers a broad range of auto and manual exposure features, making it suitable for all levels of users, from novice to advanced amateurs. (Although its lack of an external flash connection may deter some enthusiasts.)
High Points
Executive Overview
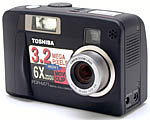
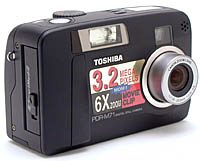
Neatly housed in an jet-black all-plastic body, the 3.2-megapixel PDR-M71 is a companion model to the 4.2-megapixel PDR-M81 introduced in July (2001). It has most of the features we enjoyed in the previous PDR-M70, but with some expanded user controls, including a full manual exposure mode. Absent from this latest design though, is any provision for an external flash unit. The PDR-M71 is compact, measuring 4.2 x 2.8 x 1.8 inches (107 x 71 x 47mm), and should fit easily into a large coat pocket or purse. It's also lightweight, approximately 12 ounces (340 grams) with the batteries and media card installed, and comes with a small carrying case and wrist strap.
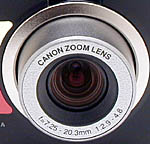
The PDR-M71 offers a real-image optical viewfinder that zooms along with the telephoto lens, and a 1.5-inch color LCD monitor for composing images. The LCD monitor's detailed information display includes exposure information, camera settings, battery power, and even a small histogram (in shooting mode) for double checking your exposure. A Canon 2.8x zoom lens is built into the camera, with a focal length extending from 7.25 to 20.3mm (equivalent to a 35-98mm lens on a 35mm camera). Focus is automatically controlled from 2.7 feet (80cm) to infinity in normal mode, and from 4 inches to 2.62 feet (10 to 80cm) in Macro mode. Three fixed-focus settings are available via the Focus button (which also accesses the Macro mode). They include 1 meter, 3 meters, and Infinity settings. A digital zoom function increases the camera's zoom range by 2.2x (but remember that digital zoom generally decreases image quality).
When it comes to exposure, the PDR-M71 provides as much or as little control as you need. In the Automatic record mode, you can choose fully automatic exposure, or select from a handful of Scene exposure modes (Portrait, Landscape, Sports, Night, and Multi-Shot). Portrait, Landscape, Sports, and Night modes deal with specific shooting situations, adjusting the aperture and shutter speed to best capture these subjects. Multi-Shot mode captures a series of 16 small (600 x 400-pixel) images at intervals of approximately 0.13 seconds (7.5 frames per second), which are saved as a single 2,400 x 1,600-pixel image (good for stop-action sequences of moving subjects). This mode would be useful in any situation where you need to capture fast-changing action, or where speed is more important than resolution.
Under the Manual record mode, you have the greatest exposure control. Here, you can choose from Program AE, Aperture Priority (Av), Shutter Priority (Tv), or Manual exposure modes. In Program AE, the camera maintains control over aperture and shutter speed, while the user controls other variables such as ISO, White Balance, etc. In Aperture and Shutter Priority modes, the user controls aperture and shutter speed (respectively), while the camera selects the most appropriate corresponding exposure variable. Manual mode gives the user complete control over both aperture and shutter speed, plus all other exposure controls except Exposure Compensation. Apertures are adjustable from f/2.9 to f/8, and shutter speeds range from 1/1,000 to 15 seconds.
By default, the camera determines exposure using the Multi metering system, which measures light across the entire frame and averages the readings to determine aperture and shutter speed settings. A Spot metering option is also available, which confines the reading to the very center of the viewfinder. Sensitivity is adjustable in ISO equivalents from 100, to 200, and 400. You can lighten or darken exposures by adjusting the Exposure Compensation from -2 to +2 exposure values (EV) in one-half-step increments. White Balance is also manually adjustable, with six settings to match a variety of light sources. In addition, the PDR-M71 provides Color, Contrast, and Sharpness adjustments.
An Autoexposure Bracketing mode captures three images at three different exposures (-0.5, 0.0, and -0.5 EV), allowing you to choose the best exposure from the set. In Burst Photography mode, the PDR-M71 captures three images in quick succession (at approximately 0.8-second intervals), from which you can choose one image, or keep all three. (Actual frame rates vary with image size, image quality, shutter speed, and the amount of image information being recorded.) For self-portraits, the PDR-M71 offers 2- and 10-second Self-Timer modes, controlled by a button on top of the camera. There's also a Movie mode that captures moving images with sound at 320 x 240- or 160 x 120-pixel resolution sizes.
The PDR-M71 saves images in one of three resolutions (2,048 x 1,536; 1,024 x 768; 640 x 480 pixels), with three JPEG compression levels available for each (Fine, Normal, and Basic). Images are saved to SmartMedia cards, and an 8MB card is included with the camera. A software CD accompanying the camera contains USB drivers and interface software for downloading images, and a USB cable is provided for connecting the camera to a PC or Macintosh computer. An AV cable (NTSC for US and Japanese models, PAL for European models) connects the PDR-M71 to a television set, which can be used for image composition or playback. The camera is powered by four AA alkaline, NiMH, or lithium batteries (four alkaline batteries are supplied with the camera), or an optional AC adapter, which is available as an accessory.
The PDR-M71 ships with Sierra Imaging's Image Expert (for both Mac and Windows platforms) as well as Toshiba USB drivers and Apple QuickTime software. These programs enable you to import images via the USB port, edit and print still images, play imported movies, and save imported images or movies to your computer hard drive.
The PDR-M71's updated user interface and fully manual exposure control are welcome enhancements to the PDR digicam line, but we sorely regret the deletion of the external flash connector of the M70. The M71 could make a great camera for novice users though, who want to learn more about digital photography by incrementally increasing the amount of user control, and it has enough features to keep more advanced consumers interested.
Design
The PDR-M71 digital camera has a relatively compact, lightweight body with a solid black finish and slightly textured, all-plastic, molded outer shell. At 4.2 x 2.8 x 1.8 inches (107 x 71 x 47mm) and only 12 ounces (340 grams) with the batteries and SmartMedia card installed, the Toshiba PDR-M71 should fit comfortably into most any coat pocket or bag, and its accompanying soft case and wrist strap will keep it well protected and easy to carry on trips and family outings. It has a pleasant heft, and doesn't feel "cheap" as some low-cost cameras tend to.

At the front of the camera is the 2.8x Canon lens, which telescopes outward when the camera is powered on, and retracts into a small recessed casing whenever the camera is powered off or left inactive for a set period of time. A small, plastic lens cap fits into this recessed area to protect the lens when not in use, and attaches to the camera body via a tiny strap, which prevents it from being accidentally lost. Also on the front of the camera is a small microphone, the optical viewfinder window, built-in flash, and self-timer light. The PDR-M71 doesn't offer much of a hand grip, though a sculpted plastic strip on the front panel provides a resting place for your fingers when they grip the camera.
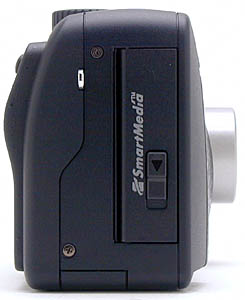
The right side of the camera (when looking at the back panel) houses the SmartMedia compartment and wrist strap attachment eyelet. A sliding switch releases the compartment door, revealing the memory card slot.
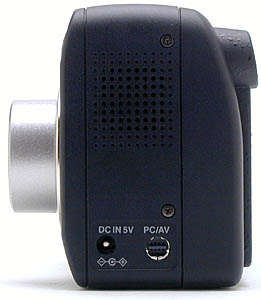
On the opposite side of the camera are the input jacks (DC In and PC/AV) and a built-in speaker.
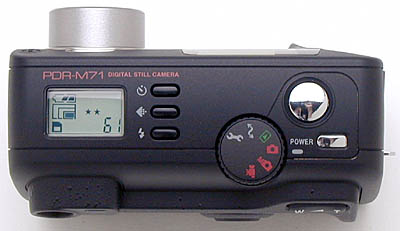
A variety of camera controls are on the camera's top panel, including the Self-Timer, Image Quality, Flash, Shutter, and Power buttons, as well as the Mode dial, which includes six settings: Setup, PC Connect, Playback, Auto Photography, Manual Photography, and Movie modes. A small status display panel reports a variety of camera information, such as Flash mode, Image Quality, and battery power.

The remaining camera controls are all located on the back panel, along with the LCD monitor and optical viewfinder eyepiece. Controls include the Four Way Arrow pad, Zoom control, and Menu, Focus, Folder, Erase, and Display / Info buttons. A small LED lamp next to the optical viewfinder eyepiece indicates various status codes, such as when focus and exposure are set or the flash is charging.
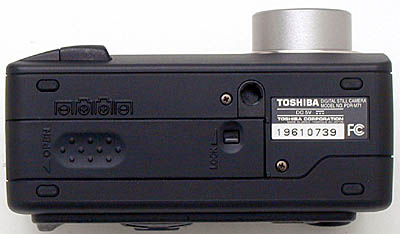
The PDR-M71 has a very flat bottom panel, with a plastic, threaded tripod mount and battery compartment door. The battery compartment door features a sliding lock switch, and slides out before popping open. The battery compartment and tripod mount are much too close to allow for quick battery changes while working on a tripod. However, we do appreciate the side access to the DC-In jack, which is very useful when operating the camera on a tripod in the studio. We also liked a minor design touch we hadn't seen before on a digicam (or at least had never been aware of) -- Four small rubber feet on the bottom of the camera provide a more secure grip when you set it on a desk or table. This is very handy when connecting to the computer for image downloads, as it reduces the risk of the camera being pulled off the table by the USB cable. Nice.
 Viewfinder
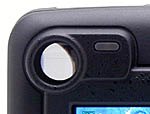
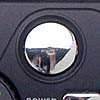
The PDR-M71 is equipped with a real-image optical viewfinder and a color LCD monitor for composing images. The optical viewfinder zooms along with the lens, but it does not show digital enlargement, which requires the LCD monitor. An autofocus target crosshair in the center of the viewfinder indicates the camera's central focus area. While there is no diopter adjustment, the optical viewfinder does have a fairly high eyepoint, which should accommodate most eyeglass wearers, and an LED lamp on the right side of the eyepiece to report camera status. The LED lamp reports a broad range of messages. For example, if the lamp lights green, focus and exposure are set. A flashing green light indicates that the autofocus or autoexposure systems are having trouble taking a reading. A glowing orange light indicates that the flash is charging, and a red light appears when the camera is writing information to the memory card. If the LED lamp flashes red, the camera has an error and an error message should appear on the LCD screen.
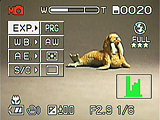
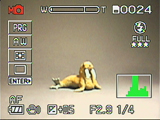 The 1.5-inch, wide-view, low-temperature polysilicon TFT LCD monitor has approximately 117,600 pixels. The LCD displays an abundance of camera information, including exposure mode, battery power, exposure settings (in Manual modes only), the number of available shots, flash mode, file size and quality, the zoom setting, a histogram (also in Manual modes only), and any exposure adjustment settings, such as Exposure Compensation or White Balance. The Display button below the LCD monitor controls the information and image display, cycling through the following options: Image with information display, image only, and no display. In addition to the LCD-based menu system, the LCD also displays direct menu options along the left side of the screen. These menu options are accessed by pressing the "Enter" button in the center of the Four Way Arrow pad. (We have to admit that we found this a little tricky at first, although we soon found it a faster way to change exposure settings than going through the main menu system.)
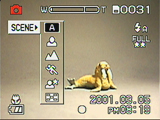
 In Playback mode, the PDR-M71 besides the usual index display mode that shows as many as nine thumbnail images on the screen at once, you can also enlarge captured images on the LCD screen to check fine details, rotate the image, bring up an expanded information display, or display an enlarged histogram to check distribution of image tones.
In our tests, the M71's optical viewfinder was rather tight, showing only 83 percent (wide-angle) to 81 percent (telephoto) of the final frame area. The LCD viewfinder did somewhat better, showing 90 percent of the final image. We like to see optical viewfinders showing 90 percent or more of the final image area, and LCD viewfinders showing as close to 100 percent as possible. On that basis, we'd rate both the M71's optical and LCD viewfinders with poor marks.
 Optics
A Canon 2.8x, 7.25-20.3mm zoom lens is built into the PDR-M71, the equivalent of a 35-98mm lens on a 35mm camera. Aperture can be manually or automatically adjusted from f/2.9 to f/8. The PDR-M71 employs a contrast-detection autofocus mechanism, with a focal range from 2.7 feet (80cm) to infinity in normal mode, and from 4 inches (10cm) to infinity in Macro mode. A Focus button on the back panel accesses the Macro mode, as well as three fixed-focus settings (1 meter, 3 meters, and Infinity). Though the PDR-M71 does not feature a focus lock button, you can manually lock focus by pointing the center of the frame at a specific part of the subject and depressing the Shutter button halfway, then reframing the subject while keeping the Shutter button halfway depressed. This locks focus and exposure until the Shutter button is either fully depressed or released.
In addition to the PDR-M71's 2.8x optical zoom, the camera also features 2.2x Digital Zoom, which is enabled through the Recording menu. Once activated, Digital Zoom is controlled with the Zoom rocker button on the back panel. Digital zoom is accessed by zooming past the normal telephoto range, which is indicated on the LCD monitor by a progress bar (the digital zoom portion is displayed in red). We always remind our readers that digital zoom is merely enlarging the center portion of the CCD, which decreases the overall image quality with excess noise and / or lower resolution.
Optical distortion on the PDR-M71 is a bit better than average at the wide-angle end, where we measured an approximate 0.65 percent barrel distortion. The telephoto end fared much better, as we found only one pixel of barrel distortion (about 0.05 percent). Chromatic aberration is a bit higher than average, showing about 3-4 pixels of red coloration and 5-6 pixels of green coloration along the target lines. (This distortion is visible as a very slight colored fringe around the objects at the edges of the field of view on the resolution target.) Overall, we'd say that the PDR-M71 has a fairly good lens, but it's plagued by excessive chromatic aberration and some softness in the corners.
Exposure
The PDR-M71 offers a great deal of exposure control, with a range of shooting modes that give you as little or as much control as you want. The Mode dial on top of the camera controls the basic recording mode, offering Auto Select, Manual, or Movie modes. Within these selections are a variety of options from which to choose.
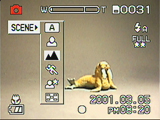 When in Auto Select, you can choose from Automatic, Portrait, Landscape, Sports, Night, and 16-Frame Multi exposure modes, which are all accessed via an on-screen, pulldown menu (activated by pressing the Enter button). In Automatic mode, the camera makes all of the exposure decisions, with the exception of Flash mode and File Size settings. Portrait mode uses a large aperture (decreasing the depth of field) so the subject is in focus and the background is slightly blurred. Landscape mode adjusts the camera for distant scenes and landscapes, by setting the focus for infinity and using a smaller aperture for greater depth of field, so objects in the foreground and background remain in focus. In Sports mode, the camera increases the shutter speed to "freeze" fast-paced action. Night mode allows you to photograph people against dark backgrounds, such as cityscapes, without losing the background color or detail. (The flash is automatically fixed in a Slow-Synchro mode and a long shutter speed records more ambient light.) Finally, the 16-Frame Multi mode takes 16 consecutive shots at intervals of approximately 0.13 seconds (7.5 frames per second), which are then saved as a single 2,048 x 1,536-pixel image. This is a good mode for recording moving subjects, as the resulting image appears like a series of stop-action frames.
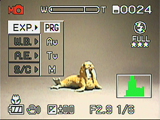 When the Mode dial is set to the Manual position, you have a choice of Program AE, Aperture Priority, Shutter Priority, or Manual exposure modes (also accessed via a pulldown menu). In Program AE mode, the camera continues to select the shutter speed and aperture settings, while you have control over all other exposure variables. Aperture Priority and Shutter Priority modes give you control over either aperture or shutter speed, while the camera selects the best corresponding setting. Available aperture settings range from f/2.9 to f/8, and shutter speeds range from 1/1,000 to 15 seconds. In both modes, the adjustable value is changed by pressing the up and down arrows on the Four-Way Arrow Pad. In all three of the abovementioned modes, the left and right arrows adjust Exposure Compensation from -2 to +2 exposure values (EV) in one-half-step increments. Finally, Manual exposure mode provides full control over both shutter speed and aperture, with the up and down arrows controlling aperture, and the left and right arrows controlling shutter speed.
In Aperture Priority, Shutter Priority, or Manual exposure modes, the adjustable variable is displayed in red if the camera's metering system disagrees with the setting, but the camera will still take the picture. In all four Manual modes, the camera's on-screen histogram (displayed in the lower right corner of the LCD monitor) shows tonal distribution, and the surrounding frame turns red if the meter determines that the Exposure Compensation, Aperture, or Shutter speed is incorrect. (The User Guide also notes that in Manual mode, if the aperture is set to f/2.9, the 1/1,000-second shutter speed is not available.) There are three additional exposure adjustments in the Manual mode pulldown menu, including: White Balance, Metering, and Single / Continuous (S/C) capture, which includes Auto Bracketing Exposure.
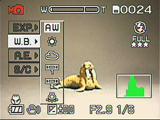 The PDR-M71 offers six White Balance settings, including Auto, Daylight, Cloudy, Blue Fluorescent, Red Fluorescent, and Incandescent. (One thing we'd like to point out here is that with as much manual control as the PDR-M71 provides, a manual White Balance setting would have been very welcome.) By default, the camera employs a Multi Metering system that reads light from the entire frame and calculates the best overall exposure. An optional Spot metering mode reads the exposure from the very center of the frame, which is useful for high-contrast subjects. The Single capture mode records one image at a time. Continuous or Burst Photography mode records up to three consecutive images with a single press of the Shutter button (see below); and Auto Exposure Bracketing (AEB) mode takes three consecutive images at -0.5, 0.0, and +0.5 EV settings, allowing you to choose the best overall exposure.
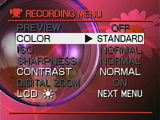
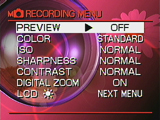 Manual mode also offers an on-screen Recording menu with additional exposure options: Color, ISO, Sharpness, and Contrast. The Color control includes Standard, Vivid, Monochrome, and Sepia settings. ISO, or light sensitivity, is adjustable in 100, 200, and 400 ISO equivalents (options are presented as Normal, 2x, and 4x). Sharpness can be set to Normal, Soft, or Hard. Contrast options include Normal, Strong, and Soft.
A Self-Timer button on top of the camera cycles between the 2- and 10-second Self-Timer modes, which provide a short delay between the time the Shutter button is pressed and the moment the shutter actually releases. The Self-Timer light on the front of the camera blinks to indicate the countdown, and a numeric countdown also appears in the LCD monitor.
 Flash
Flash
The PDR-M71's built-in flash operates in one of four modes: Auto, Red-Eye Forced Flash, Forced Flash, and Off. (A Slow-Synchro mode is only available in the Night photography mode, and is automatically enabled.) The Flash button on top of the camera controls the flash mode. Auto mode places the camera in charge of when to fire the flash, based on the existing light conditions. (Auto mode is not available in the Manual record mode.) Alternately, Redeye Forced Flash mode fires the flash with every exposure, regardless of light level. A small pre-flash is fired before the full flash, to reduce the occurrence of red-eye effect. The Forced Flash mode works in a similar manner, only without the redeye pre-flash. Finally, Suppressed mode simply disables the flash, so that it does not fire at all. Toshiba estimates that the PDR-M71's flash is effective from 2.6 to 9.8 feet (0.8 to 3.0 meters) with the lens at full wide angle. (We conduct our flash tests with the cameras' lenses set at their telephoto position, which reduces the effective range somewhat, giving more of a worst-case indication of performance.) In the PDR-M71 testing, we found that flash intensity was acceptable only at the minimum 8-foot distance (where we begin measurements), and steadily decreased from that point on. Therefore, we rate the M71's flash range at only 8 feet, an inadequate performance overall for a camera with its otherwise strong feature set. As we mentioned earlier, one of the features we missed the most on the M71 was the external flash connector the M70 had. For a camera with so many obviously "enthusiast" features, leaving off the flash sync connector is hard to justify, particularly in light of the very limited range of the internal flash unit.
Burst Photography Mode
Burst Photography mode captures a maximum of three images at approximately 1.1-second intervals. (Toshiba claims 0.8 seconds, but our own tests showed 1.1 seconds between frames.) The actual frame rate depends on the shutter speed, file size and quality settings, and the amount of image information to be recorded. Images are temporarily stored in a buffer memory, which allows you to pick which frames are actually stored on the SmartMedia card. After the series is captured, the LCD monitor is automatically enabled (if previously turned off) and a set of options appears on the screen. You can either save or delete images independently, save all images, or delete all images in the series. The green LED lamp next to the optical viewfinder eyepiece flashes until you make a decision.
Movie Mode
The PDR-M71 also offers a Movie recording mode, which is entered by turning the Mode dial to the Movie camera position. A full press of the Shutter button starts and stops recording. Movies are recorded with sound for varying amounts of time, depending on the size / quality setting chosen, and the amount of available space on the memory card. The recording microphone is on the front of the camera, just over the lens. Two resolution sizes are available -- 320 x 240- and 160 x 120-pixels -- with three compression levels available at each image size. Recording times vary from 30 seconds at the highest quality 320 x 240-pixel option, to three minutes in the lowest quality 160 x 120-pixel resolution. You can set the M71's optical zoom lens to whatever position you choose before recording begins, but during recording you only have access to the 2.2x digital zoom. This is a bit of the best of both worlds, in that you still retain much of the usefulness of the optical zoom lens, even though you're not able to change its setting during the exposure. Flash is not available in Movie mode.
Shutter Lag/Cycle Times
When you press the shutter release on a camera, there's usually a lag time before the shutter actually fires. This time allows the autofocus and autoexposure mechanisms time to do their work and can amount to a fairly long delay in some situations. Since this number is almost never reported on, and can significantly affect the picture taking experience, we now routinely measure it using an Imaging Resource proprietary test system.
|
|
||
|
|
(secs) |
|
| Power On -> First shot |
|
A little slow.
|
| Shutdown |
|
Pretty fast. (This is time to retract lens. Allow longer if file being saved to card, before card can be removed.)
|
| Play to Record, first shot |
|
A little slow.
|
| Record to play (max/min res) |
|
Shortest time is for quick review via "erase"key, second time is for switch to play from record with camera idle, longest time is for switch to record immediately after a large/fine image capture.
|
| Shutter lag, full autofocus |
|
First time is for wide angle, second for telephoto. A good bit slower than average. |
| Shutter lag, manual focus |
|
About average |
| Shutter lag, prefocus |
|
A fair bit faster than average. (Average is about 0.3) |
| Cycle time, large/fine files |
|
Quite fast for a three megapixel camera. At least 8 shots this fast. (Fast without buffer?) |
| Cycle time, small/basic files |
|
Also pretty fast. |
| Continuous mode cycle time |
|
Pretty fast, but stops after 3 shots, forces you to confirm saving them. |
Overall, the PDR-M71 is a pretty fast camera. Shot to shot cycle times are excellent, particularly considering that the camera appears to be writing directly to the memory card, so there's no slowdown after a few shots due to a buffer memory getting full. Shutter lag is about average for higher-end digicams, and switching from record to play and back again is quite fast as well. About the only aspect of the camera's performance that's lacking in the speed department is the startup time, which is rather leisurely.
Operation and User Interface
The PDR-M71 has a slightly different user interface than what we've become accustomed to in many other digicams. Overall, the user interface is fairly straightforward, though it took a quick read of the manual to understand how to activate the on-screen pulldown menus. The camera is very dependent on its LCD menu system, especially when in one of the four Manual exposure modes. You can activate the Self-Timer, change the Flash mode, and set the File Size and Quality externally, but you must still access an on-screen menu to alter exposure modes such as Exposure Compensation, White Balance, and Metering. Fortunately, the on-screen pulldown menu where these options reside is very quick to access and implement changes, and the Recording menu system is relatively uncomplicated, with all available options confined to one page. The small status display panel on top of the camera is also quite helpful, as it reports a fairly extensive amount of camera information, allowing you to operate the camera in most modes without the LCD monitor (although no exposure settings are reported).
Control Enumeration
Shutter Button: Positioned on the far right side of the top panel, this silver button sets focus and exposure when pressed halfway, and fires the shutter when fully depressed.
![]()
Power Button: Just behind the Shutter button, this button turns the camera on or off.
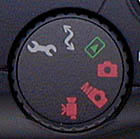
Mode Dial: Located diagonally to the left of the Shutter button, this notched dial controls the camera's main operating mode. Options are Movie, Manual Photography, Auto Photography, Playback, PC, and Setup modes.
![]()
Self-Timer Button: The first button in a row lining the status display panel on top of the camera, this button cycles through the 2- and 10-second Self-Timer modes, as well as the normal record mode, when pressed repeatedly.
![]()
Image Quality Button: Directly behind the Self-Timer button, this button cycles through three file size and quality combinations (which are established through the Setup menu).
![]()
Flash Button: The final button in the series lining the status display panel, this button controls the flash operating mode, cycling through Auto, Redeye Forced Flash, Forced Flash, and Suppressed Flash.
![]()
Zoom Rocker Button: Positioned in the top right corner of the back panel, this rocker button controls the optical and digital zoom in any record mode. In Playback mode, the button controls the Playback Zoom.

Four Way Arrow Pad: Adjacent to the LCD monitor on the right side, this button has four arrows, one in each direction (up, down, left, right). The center of the button acts as the "Enter" key, which confirms menu selections. In any record mode, the Enter button activates the on-screen pulldown menu. The arrow keys navigate through settings menus in any camera mode. In Manual record mode, the left and right arrows control Exposure Compensation (except in Manual exposure mode, where they control shutter speed). In Aperture and Shutter Priority modes, the up and down arrows control the designated exposure variable (in Manual exposure mode, they control the aperture setting).
In Playback mode, the right and left arrows scroll through captured images. When an image has been enlarged, all four arrows pan the view. The up and down arrows rotate the image 90 degrees clockwise or counterclockwise. The Enter button activates the nine-image Index Display mode.

Menu Button: Just below the Four Way Arrow pad, this button calls up the settings menu in any camera mode.

Focus Button: In any record mode, this button cycles through a variety of focus settings when pressed repeatedly. Choices are Autofocus (AF), Macro (flower symbol), One Meter (1m), Three Meters (3m), and Infinity (infinity symbol).

Folder Button: Directly below the Menu button, this button allows you to select a specific folder for image playback. In any record mode, pressing this button creates a new folder.

Erase Button: Located below the Focus button, this button pulls up the Erase menu in Playback mode or any record mode.

Display / Information Button: Situated just below the bottom left corner of the LCD menu, this button controls the LCD display in any record mode. In Playback mode, this button displays an information page about the current image, reporting exposure information and camera settings. Pressed a second time, it displays a histogram for checking the exposure.

SmartMedia Compartment Release Switch: Protruding slightly from the compartment door on the right side of the camera, this switch unlocks and releases the compartment door, revealing the SmartMedia slot.
Battery Lock Switch: Recessed in the battery compartment door, this sliding switch unlocks the door so that it can be slid open.
Camera Modes and Menus
 Movie Mode: Noted on the Mode dial with a movie camera icon, this mode allows the user to record movies with sound, for as long as the memory card has available space. Pressing the Menu button pulls up the Record menu, with the following options available:
Manual Record Mode: Marked on the Mode dial with an "M" next to a camera icon, this mode captures still images and provides very flexible exposure control. The following menus are available:
 On-Screen Menu:
Record Menu:
Automatic Record Mode: A single camera icon designates this mode on the Mode dial. Here, the camera controls all exposure decisions, with the exception of Flash mode. A variety of preset shooting modes are also available.
 On-Screen Menu:
Record Menu (No Screen Shot: Same menu as in Manual record mode):
Playback Mode: The traditional green playback symbol indicates this mode on the Mode dial. In Playback mode, captured images and movies can be reviewed, and images can be deleted, resized, protected, set up for printing, or played back in a slide show. The following menu options are available in the Playback settings menu:
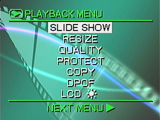 Playback Menu:
PC Mode: Designated on the Mode dial by a crooked arrow icon, this mode allows you to connect the camera to a computer and download images. The LCD is disabled in this mode, and no menu options are available.
Setup Mode: A wrench icon indicates this mode on the Mode dial. Here, you can change basic camera settings. The following menu appears on the LCD screen upon entering the mode:
 Setup Menu:
 Image Storage and Interface
The PDR-M71 stores image files on a SmartMedia card and an 8MB card is supplied with the camera. Larger capacity cards are available separately (as large as 128MB). SmartMedia is easily protected by placing a write-protection sticker over the designated area on the card. Likewise, removing the sticker disables the write-protection. (The stickers can only be used once and write-protection may fail if the sticker gets dirty.) You can also protect individual images from accidental erasure (except through card formatting by activating the write-protection option in the Playback settings menu. Protected images are denoted by a key symbol beneath the image. Protection can be removed through the same process.
The PDR-M71 organizes captured images into storage folders. When the SmartMedia card is formatted, it automatically creates a folder entitled 100TOSHI. You can create a new folder by pressing the Folder button in any record mode. Movies are recorded to a separate folder indicated by a movie camera symbol. Once the image number reaches 9999, a new folder (101TOSHI) is automatically created. When there are two or more xxxTOSHI folders, the playback folder default is the folder assigned the largest xxx value. You can change the playback folder by pressing the Folder button in Playback mode, and selecting a folder from the list.
Three resolution sizes are available on the PDR-M71: 2,048 x 1,536; 1,024 x 768; 640 x 480 pixels. Images can also be saved at one of three JPEG compression levels: Fine, Normal, and Basic.
Reducing image size saves memory and allows you to continue taking more pictures. Low-resolution images (640 x 480 pixels), taken in the 16-Frame Multi mode, protected images, and images from another camera cannot be resized. While in Playback mode you have the option of selecting which images you want to resize and are given the option to reconsider before executing the command. Also through the Playback menu, you can compress images, except those already stored in Basic quality, images from another camera, and protected images (including those on write-protected SmartMedia). The quality setting will be noted under each image by the number of stars (three for Fine, two for Normal, one for Basic).
The PDR-M71 allows you to copy an image from one SmartMedia card to another through the Playback menu. Select the image (or images) to copy and press Enter (you can cancel a selection here as well). If you execute the copy, a Change Card message will appear, allowing you to remove the old SmartMedia card and replace it with a new one. Follow the menu prompts and select OK when finished. Don't remove the SmartMedia card (except when indicated) or turn the camera off during the copying procedure to avoid damaging the card.
You can erase images in either Playback or record modes. When in Playback mode, use the arrow buttons to select the image and hit the Erase button on the back panel. You'll be asked to confirm this decision. Protected images cannot be erased, nor can images on write-protected SmartMedia. When in a record mode, hit the Erase button and it selects the last image taken. Again, you are asked to confirm this decision. The Erase menu also allows you to erase folders and format the SmartMedia card.
The table below shows the number of still images and their compression ratios for an 8MB card:
|
Resolution/Quality 16MB Memory Card |
|
|
|
|
| Full Resolution 2048x1536 | Images (Avg size) |
6 1.2 MB |
0.8 MB |
0.4 MB |
| Approx. Compression |
5:1 |
|
|
|
| XGA Resolution 1024x768 | Images (Avg size) |
0.30 MB |
0.20 MB |
0.10 MB |
| Approx. Compression |
|
|
|
|
|
|
Images (Avg size) |
0.20 MB |
0.10 MB |
0.06 MB |
| Approx. Compression |
|
|
|
|
The PDR-M71 is accompanied by a USB cable and interface software for connecting to a computer. It appears on the USB bus as a "storage class" device, meaning that no driver software is needed for Mac OS 8.6 or greater, or for Windows Me or 2000. We clocked the PDR-M71's download speed at 614 KBytes/second on our G4 PowerMac. This is very fast, at the top end of USB-connected cameras we've tested. A caution though, for those readers interested in using a card reader with the M71: There appears to be something strange about the formatting Toshiba uses on SmartMedia cards. We couldn't read cards from the M71 with card readers attached to our Windows machines, but they read fine on our Macs. Given that the camera's own USB connection is so fast, this may not be an issue, but we thought it was important to note anyway.
Video Out
US versions of the PDR-M71 are packaged with an NTSC AV cable (PAL for European models) for connection to a television set. The PDR-M71 can play back captured images or movie files as well as use the television set as an enhanced LCD monitor for composing images. The camera can be set to handle either NTSC or PAL timings through the Video Out option under the Setup menu.
 Power
Power
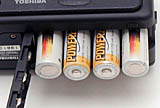
The PDR-M71 is powered by four AA alkaline, NiMH, or lithium batteries (a set of four single-use alkaline batteries come with the camera). We really don't recommend standard alkaline cells for any digicam, as the amount of battery life is significantly shorter than that of rechargeable batteries. An AC adapter is available as a separate accessory, which we recommend purchasing to save battery power when downloading images, or playing back captured images and movies. The PDR-M71 reports the available battery power on the LCD monitor as well as on the smaller status display panel. The camera also features a power saving Auto-Off feature, which lets you set the amount of inactive time before the camera shuts off (one, two, or three minutes).
The table below shows the amount of power used for each of the camera's operating modes.
|
|
(@ 5.0 v) |
(1600 mAh AAs) |
| Capture Mode, w/LCD |
|
|
| Capture Mode, no LCD |
|
|
| Half-pressed shutter w/LCD |
|
|
| Half-pressed w/o LCD |
|
|
| Memory Write (transient) |
|
|
| Flash Recharge (transient) |
|
|
| Image Playback |
|
|
The PDR-M71 has fairly typical power consumption, but battery life suffers somewhat from the fact that turning off the LCD doesn't appreciably reduce the power drain. Thus, you'll need to turn the camera completely off between picture-taking opportunities in order to get more than a couple of hours of life from a set of high-capacity NiMH rechargeable AA cells. - Definitely a camera you'll want a couple of sets of high-quality NiMH cells and a charger for.
 About Batteries
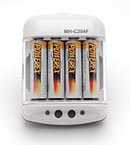
We've gotten so many emails about power issues for digicams, that we're now inserting this standard notice in the reviews of all AA-powered cameras on our site: Don't even *think* about using alkaline AA batteries in a digicam! Despite their being packed in the box with many cameras, they simply don't have the juice to handle typical digicam demands. (Even the "high power" ones the battery manufacturers say are designed for devices like digital cameras.) Spend the $35-40 or so it takes to get a set (or two) of high-capacity NiMH rechargeable batteries and a good charger! The few dollars up front will save you literally hundreds of dollars in the long run, not to mention the hassle of wimpy batteries running out in the middle of the action. We suggest you buy two sets of batteries, so one can always be in the charger, ready to go, and so have two sets available for longer excursions. Good brands of batteries include Maha (our favorite), GP, Kodak, and Nexcell. Also, buy the highest capacity AAs the manufacturer makes, the few extra dollars for the extra capacity is usually well worth it. Getting a good charger is critical though, almost more so than buying good batteries. We recommend the Maha C-204F (see the photo at right), the charger we use the most in our own studio. - Read our review of it for all the details. Or, just click here to buy one, you won't regret it. (Be sure to buy an extra set of batteries to accompany it though, you'll want them with the M71.)
Included Software
The PDR-M71 ships with Sierra Imaging's Image Expert (for both Mac and Windows platforms) as well as Toshiba USB drivers and Apple QuickTime software. These programs enable you to import images via the USB port, edit and print still images, play imported movies, and save imported images or movies to your computer hard drive.
In the Box
Included in the box with the PDR-M71 are the following items:
Optional Accessories
Test Results
In keeping with our standard policy, our comments here are rather condensed, summarizing our key findings. For a full commentary on each of the test images, see the PDR-M71's "pictures" page.
As with all Imaging Resource camera tests, we encourage you to let your own eyes be the judge of how well the devices performed. Explore the images on the pictures page, to see how well the PDR-M71 performed, and how its images compare to other cameras you may be considering buying.
Throughout out testing, the PDR-M71 produced good color and image quality. The camera's White Balance system handled our test lighting well in most cases, with the Auto and Daylight settings often producing similar results. Both the Auto and Incandescent white balance settings produced good results under the very tough incandescent lighting of our no-flash Indoor Portrait test, though we noticed slight color casts with both settings. Color balance also looked good on our Davebox target, where the PDR-M71 distinguished the tough tonal variations of the Q60 target well, and reproduced the large color blocks with good saturation. Skin tones had a slight magenta tint in our Outdoor and Indoor portraits, and the blue flowers appeared purple in our Outdoor and Indoor shots. Still, overall color was good and the PDR-M71 handled our test subjects well.
The PDR-M71 performed well on our "laboratory" resolution test chart. It started showing artifacts in the test patterns at resolutions as low as 500-600 lines per picture height, in both horizontal and vertical directions. We found "strong detail" out to roughly 950 lines. "Extinction" of the target patterns didn't occur until about 1,200 lines. Overall, good resolution, although the artifacts extended to lower resolution levels on the test target than we like to see.
Optical distortion on the PDR-M71 was moderate at the wide-angle end, where we measured an approximate 0.65 percent barrel distortion. The telephoto end fared much better, as we found only one pixel of barrel distortion. Chromatic aberration showed about two or three green pixels of coloration and about five or six red pixels of coloration. The color due to the aberration was fairly strong though, so the effect was more pronounced than the simple extent of the color would indicate. (We noticed quite a bit of chromatic aberration on our Far Field test outdoors.)
The full manual exposure control available on the PDR-M71 allowed the camera to capture bright images at very low light levels. In our testing, we obtained bright, usable images down to about 1/16 foot-candle (or 0.67 lux) at the 200 and 400 ISO settings. At ISO 100, images were usable down to about 1/8 foot-candle (1.3 lux), though the target was still quite visible at 1/16 foot-candle. Color looked good in the brighter exposures, but the Auto white balance setting had trouble at light levels lower than one foot-candle, and produced a magenta cast. The PDR-M71 automatically employed a noise reduction system at longer exposures, which did a decent job of controlling the image noise, although there was still quite a bit of noise present in the photos shot with the longest exposures.
The PDR-M71's optical viewfinder was a little tight, showing approximately 83 percent frame accuracy at wide angle, and approximately 81 percent accuracy at telephoto. The LCD monitor produced more accurate results, showing about 90 percent at wide angle and telephoto. Given that we generally prefer LCD monitors to be as close to 100 percent accuracy as possible, the PDR-M71 has some room for improvement here.
The PDR-M71 performed about average in the macro category, and captured a minimum area of 4.1 x 3.07 inches (104.04 x 78.03 millimeters). Color, resolution, and detail were all good, though the gray background had a strong magenta tint. The PDR-M71's flash had some difficulty throttling down for the macro area, and overexposed the image a fair amount. Still, details were crisp and well defined, on the brooch as well as the dollar bill.
Overall, we were pleased with the PDR-M71's performance throughout our testing. Color and image quality were good, with the camera handling most of our tests well. Color in particular was much better than we've seen in the past from Toshiba cameras. Though low-light shooting was good, we'd like to see better color at the lower light levels. We also felt that the flash could stand a little more power. Still, with its full manual control and versatile shooting options, the PDR-M71 should handle a variety of situations well.
Conclusion
Based on our testing, the PDR-M71 looks like an "almost" home run.
- It has most of the controls and features that would make it a good fit for
an "enthusiast" user of any skill level, but seems lacking in a few
key characteristics. We noted and commented on the combination of an underpowered
internal flash and the lack of any external flash sync connector. The result
is that its flash capabilities are severely limited. The M71's lens also showed
more chromatic aberration than we like to see. On a positive note, Toshiba's
made great strides in their color rendering with this camera, as it produces
very bright, saturated colors, a marked improvement from earlier Toshiba models.
Photos captured by the PDR-M71 have bright, attractive color that we think most
users will find very appealing. Overall, if most of your photography occurs
outdoors, or indoors with only short-range flash needs, and if the level of
chromatic aberration visible in our sample photos doesn't bother you, the PDR-M71
represents an excellent value in a three megapixel camera. If you're looking
for a genuine bargain price on a camera offering a wide range of exposure controls,
it could be the camera for you. On the other hand, if flash photography represents
a large part of your shooting, or if chromatic aberration is a pet peeve of
yours, you'll want to weigh any purchase decision carefully.
<<PDR-M71 Sample Images | Additional Resources and Other Links>>
Reader Comments!
Questions, comments or controversy on this product? Click
this link to see what other Imaging Resource readers have had to say about
the Toshiba PDR-M71, or add comments of your own!