Back
to Full Epson Stylus Photo 785EPX Review
Back
to Full Epson Stylus Photo 785EPX ReviewUp to Imaging Resource Printers Page
Use your browser's "Back" button to return to the previous page, or the links at the top and bottom of this page to navigate to related information. If you have difficulty fitting the text on this page onto your printer output, simply resize your browser window to a narrower width and print again.
Remember us when it's time to buy!
Dave here: Have our reviews been helpful to you? (Is this article you're reading right now useful?) Preparing this level of information on as many products as we do is incredibly hard work, not to mention expensive. Things on the Internet may look like they're free, but they're not. (As a lot of big dot.com companies are finding out these days.) Somewhere, somebody has to pay to produce worthwhile content. YOU can help us though, by remembering us when it comes time to make your purchase. Would you consider coming back to our site and clicking-through to one of our advertisers to make your purchase? Every dollar you spend with one of our advertisers helps us directly (in affiliate fees) or indirectly (the advertiser will keep renewing their ad contract with us). To make it easy for you to support us, here's a URL you can visit, to see all our current advertisers, with links to click on that will register your visit to them as having come from our site. It's up to you where you buy, but Mike, Mike, Kim, Yazmin, Marti and I would be really grateful if you'd help us out by choosing one of our advertisers to purchase from.
Thank you for your support!
Dave Etchells, Founder & Publisher
Visit our "Buy Now" Page:
https://www.imaging-resource.com/buynow.htm
Back
to Full Epson Stylus Photo 785EPX Review
Up to Imaging Resource Printers
Page
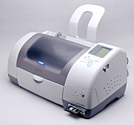
Epson Stylus Photo 785EPXEpson combines 2880 dpi, PRINT Image Matching, and standalone operation for a real winner of a photo printer! Review First Posted: 7/18/2001 |
|
 |
|
Improved lightfastness, up to 25 years for framed prints on Epson Heavyweight Matte Paper. |
|
|
Incorporates Epson's new PRINT Image Matching to automatically color correct prints. | |
|
|
BorderFree photo printing up to 8.5 x 11 inches. | |
|
|
True 6-color photo printer with near-invisible 4 picoliter droplets. | |
Manufacturer Overview
Epson America Inc. has been at the forefront of inkjet printer technology for many years. Best known for its MicroPiezo technology, which played a big role in the launch of photo-quality inkjet printing, Epson has introduced many more innovations in its race to be the number one printer manufacturer. Earlier this year (2001), Epson introduced three Stylus Photo printers: the Photo 780, 890, and 1280 inkjet printers. Ranging in price from $199 to $499, these were targeted at three distinct markets, from amateur to prosumer, at very competitive prices.
Specifically designed for the growing legions of amateur and prosumer digital photographers, the Epson 785EPX features the same print engine as its hugely popular 780 model, but with the added capability for standalone operation. A built-in PC card slot enables you to take a memory card from your camera, insert it into the 785EPX, and automatically print any digital image file that's been pre-selected using the Digital Print Order Format (DPOF) option (supported by most popular digicams). Even if your camera doesn't have DPOF capabilities, you can use the printer's built-in control panel to select size, layout, and print images from the card. (An optional LCD monitor plugs into the top of the printer, enabling you to quickly preview images on-screen, or you can output an index print to review the card's contents and make your selections from the index.)
This is Epson's first printer to incorporate the company's revolutionary new PRINT Image Matching technology, announced last February, at the PMA 2001 conference in Orlando. PRINT Image Matching starts with the camera, where ideal print information is stored in the image data file, and read by the printer, reportedly to create optimum print quality for compatible digital cameras and the files they produce. Our take? PRINT Image Matching worked very well in our tests with the Epson 3100Z digital camera, with particularly noticeable improvements in skin tones and certain bright blues and greens. Given that many other digicam makers have chosen to support the PRINT Image Matching technology, it's a feature any avid photo enthusiast should seek out in a photo printer.
High Points
Overview
The Stylus Photo 785EPX is a high-quality color inkjet printer targeted for the new generation of digital photographers who want to control every aspect of their digital print production -- from capture to output -- with minimum technical knowledge and great results. The 785EPX incorporates the industry standard Digital Print Order Format (DPOF), which reads printing instructions right off the memory card, and Epson's new PRINT Image Matching technology, a process that enables it to print perfectly matched color images (when made from PRINT-enabled cameras), without the need for computer processing or image editing software. It does this by reading detailed printing parameters (gamma level, color balance, highlights and shadows, etc.) written to the image file, and applying this information to produce optimum print quality. (Of course, the 785EPX also accepts cards from all DPOF cameras, but without the advantages of Epson's Image Matching technology.)
The 785EPX joins the growing market of standalone, photo-quality printers that use DPOF technology to make images directly from flash media storage cards, competing with models made by Hewlett-Packard, Canon USA, and Eastman Kodak / Lexmark Corp. (HP's three PhotoSmart printers -- ranging in price from $200 to $500 -- and Canon's S800, priced at $299, all deliver 2400 x 1200 dpi prints, while the $200 Kodak Personal Picture Maker 200 delivers lower-resolution 1200 x 1200 dpi prints.) Though DPOF-compatible printers are more expensive than models lacking standalone capability (due to the added intelligence needed to print from memory cards), their ability to work with or without a computer makes them highly versatile, and good all-around photo printers. The Stylus Photo 785EPX falls midrange in the cost category, with a list price of $249.
Measuring 18.4 x 10.1 x 8.4 inches (467 x 255.1 x 212.1mm) and weighing 11.6 lb (5.25 kg), the 785EPX has a medium-size footprint that extends to 23 inches (58.4cm) deep with the output tray extended (letter-size paper) and to 13 inches (33cm) high to accommodate the paper feed.
Using Epson's new BorderFree photo printing technology, the 785EPX can make borderless prints in standard photographic sizes, including 4 x 6-, 5 x 7-, and 8 x 10-inch, up to 8.5 x 11 inches. It accepts single sheets of paper up to 8.5 x 14 inches, in varying weights and sizes, plus envelopes, cards, transparencies, film, self-adhesive sheets, and stickers.
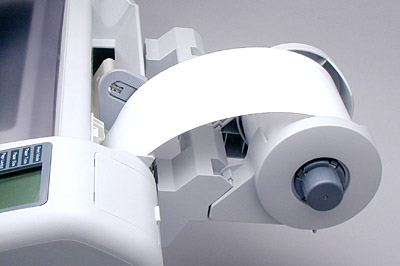
The 785EPX also comes with a roll paper holder that feeds Epson's special bulk photo paper for making large color banners, or for continuous printing of standard 4 x 6- or 8 x 10-inch prints.
Epson is well known for its continuing innovation in MicroPiezo inkjet technology, which forces the ink through the print heads with pressure rather than heat (thermal inkjet). The 785EPX uses *very* small 4-picoliter droplets, plus variable droplet sizes, to produce continuous-tone printing that's virtually indiscernible from conventional photographic prints. Each color is distributed with a 48-nozzle print head (the large number of nozzles helps increase printing speed), for a total of 48 black and 240 color (48 x 5 colors) nozzles.
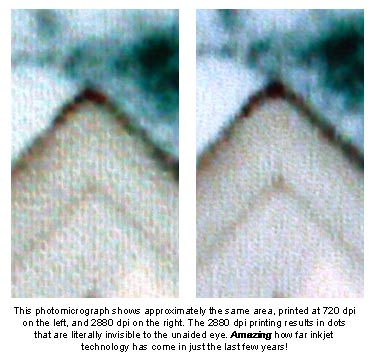
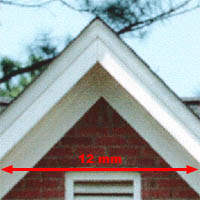
If you haven't looked closely at a top-end inkjet photo print in the last few years, you're in for a surprise. The dots have gotten so tiny, and so close together that they're literally invisible to the naked eye. Epson has really pushed this technology farther than anybody, with the results you see at right. The area shown in the photomicrographs is only 4-5 millimeters across. It's a shame we don't have a comparable photo to show you, from an older-generation inkjet printer. - This one created by comparing prints from the 785EPX at 720 and 2880 dpi.
In practice, we didn't feel there was much difference between prints output at 1440 and 2880 dpi. Both looked exceptional, the 2880 ones just took longer. We'd therefore recommend the 1440 dpi printing mode for most routine jobs.
The printer's USB interface provides fast, direct connection to Macintosh or Windows computers, and the internal PC card slot accepts adapters for CompactFlash, SmartMedia, Memory Stick, IBM Microdrive, and Secure Digital storage. Although the 785EPX ships with a CompactFlash card adapter, Epson provides free mail-in exchange for the other adapters, a nice bonus, since many standalone printers provide only one or two memory card options. Additional accessories supplied in the box include Black and Color ink cartridges, a power cord, roll paper adapter, User Manual, Quick Start Guide, and a CD-ROM with bundled software, including Epson drivers for Windows 95, 98, 2000, Me, NT 4.0, and Macintosh operating systems; Epson Film Factory for Windows; and both Mac and Windows versions of ArcSoft's PhotoImpression 3.0 and QBeo's PhotoGenetics 2.0 (trial version). A USB printer cable is not included (not unusual for most current printer models).
 The
785EPX's six-color printing requires two ink cartridges: one Black and one Color
(cyan, magenta, yellow, light cyan, and light magenta), which sell for $22.46
and $17.96, respectively, through Epson's online store. (These prices are comparable,
if not a little less costly, than its competitors.) Of course, the "street"
prices of the cartridges will be less if you shop around, possibly quite a bit
less if you get lucky on the internet. Like all Epson's other most recent printer
designs, the 785EPX uses "smart" cartridges, with chips in them that
keep track of how much ink has been used. The advantage of this is that you
can take cartridges in and out of the printer, and it won't get confused about
how much ink is left. This is handy if you're planning an unusually long print
run, and want to load up a fresh cartridge to prevent running out in the middle.
The downside is that the chip prevents the cartridges from being refilled, since
the cartridge "knows" when it's empty. (There are apparently ways
around this, involving toggling the printer power at strategic times, but we'll
leave it to those interested to track down the information for themselves: Having
personally ruined two printers with third-party inks, we're not too keen on
the concept of refilling cartridges, and don't want to be responsible for anyone
else venturing down that woe-filled path.)
The
785EPX's six-color printing requires two ink cartridges: one Black and one Color
(cyan, magenta, yellow, light cyan, and light magenta), which sell for $22.46
and $17.96, respectively, through Epson's online store. (These prices are comparable,
if not a little less costly, than its competitors.) Of course, the "street"
prices of the cartridges will be less if you shop around, possibly quite a bit
less if you get lucky on the internet. Like all Epson's other most recent printer
designs, the 785EPX uses "smart" cartridges, with chips in them that
keep track of how much ink has been used. The advantage of this is that you
can take cartridges in and out of the printer, and it won't get confused about
how much ink is left. This is handy if you're planning an unusually long print
run, and want to load up a fresh cartridge to prevent running out in the middle.
The downside is that the chip prevents the cartridges from being refilled, since
the cartridge "knows" when it's empty. (There are apparently ways
around this, involving toggling the printer power at strategic times, but we'll
leave it to those interested to track down the information for themselves: Having
personally ruined two printers with third-party inks, we're not too keen on
the concept of refilling cartridges, and don't want to be responsible for anyone
else venturing down that woe-filled path.)
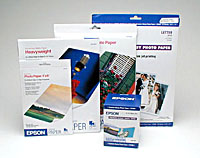 Epson
has also provided a very wide range of paper options, from basic clay-coated
inkjet paper to premium photo glossy, including a very nice Matte Heavyweight
paper that has an estimated print life of 25 years when mounted under glass.
(Print life may vary depending on lighting, humidity, and Ozone levels -- all
of which can significantly reduce longevity.)
Epson
has also provided a very wide range of paper options, from basic clay-coated
inkjet paper to premium photo glossy, including a very nice Matte Heavyweight
paper that has an estimated print life of 25 years when mounted under glass.
(Print life may vary depending on lighting, humidity, and Ozone levels -- all
of which can significantly reduce longevity.)
We didn't get to test it, but an optional 1.6-inch color Preview Monitor is also available as an accessory for $99. When operating in standalone mode, this little color LCD lets you see the contents of the memory cards you're printing from , without first printing an index print of the images. Very handy, if you plan to use the printer in standalone mode a lot.
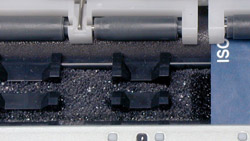 As
mentioned above, Epson is the first manufacturer to offer edge-to-edge printing
for several standard photo paper sizes (4 x 6, 5 x 7, 8 x 10, and 8.5 x 11 inches),
a significant improvement over previous border-free options, which required
that images be printed on oversized perforated papers, and then trimmed to size
-- an expensive use of printing material. To avoid the print-and-trim process,
the 785EPX uses special ink-catching, foam-lined cavities positioned to align
with the edges of the various supported paper sizes, ensuring that the ink stays
on the paper without bleeding over onto the printer rollers. BorderFree printing
does have its limitations, however, as it slows the output process a fair bit,
and is not available at the printer's highest print resolution of 2,880 x 720
dpi. With both draft and photo-quality black-only printing modes, 785EPX can
double as a business printer, though it is slower than non-photo SOHO printers.
As
mentioned above, Epson is the first manufacturer to offer edge-to-edge printing
for several standard photo paper sizes (4 x 6, 5 x 7, 8 x 10, and 8.5 x 11 inches),
a significant improvement over previous border-free options, which required
that images be printed on oversized perforated papers, and then trimmed to size
-- an expensive use of printing material. To avoid the print-and-trim process,
the 785EPX uses special ink-catching, foam-lined cavities positioned to align
with the edges of the various supported paper sizes, ensuring that the ink stays
on the paper without bleeding over onto the printer rollers. BorderFree printing
does have its limitations, however, as it slows the output process a fair bit,
and is not available at the printer's highest print resolution of 2,880 x 720
dpi. With both draft and photo-quality black-only printing modes, 785EPX can
double as a business printer, though it is slower than non-photo SOHO printers.
The 785EPX offers six printing modes when connected to a Macintosh or Windows computer running Epson's driver software. Economy mode is for speedy printing of draft text documents; Normal mode is for Web pages, business documents with text and graphics, and similar everyday printing needs (default mode); Fine mode combines speed with quality to create 360 x 720 dpi images; plus three Photo modes for printing photo-quality images at 720-, 1,440-, or 2,880-dpi resolution. Print speeds vary from 8 pages per minute (ppm) for Normal draft text mode, to 7 minutes 21 seconds in high-quality (1,440-dpi) Photo mode, to 18 minutes for letter-size photos at the maximum Photo quality setting (2,880-dpi). When printing from a memory card, the 785EPX has only two print quality modes -- Normal (360 x 360 dpi) and High (360 x 720 dpi) -- which require additional time for file processing. (See Test Results for more timing data.)
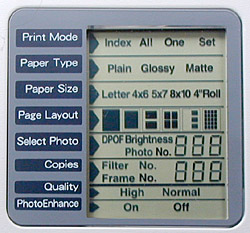 The
printer control panel has eight menus available when printing directly from
a memory card: Print mode selects between printing index sheets, all photos
on the card, or printing one or more specified images; Paper Type includes selections
for plain, glossy, or matte papers; Paper Size offers four print sizes -- 4
x 6, 5 x 7, 8 x 10, 8.5 x 11-inch sheets, or 4-inch roll paper; Page Layout
is used to select borderless prints or multiple images per page; Select Photo
enables you to choose images by photo number; Copies determines the number of
copies to be printed; and PhotoEnhance turns the printer's automatic print enhancement
function On or Off. (PhotoEnhance adjusts for common digicam shortcomings, and
enables PRINT Image Matching when printing images from cameras that support
that Epson-driven technology.)
The
printer control panel has eight menus available when printing directly from
a memory card: Print mode selects between printing index sheets, all photos
on the card, or printing one or more specified images; Paper Type includes selections
for plain, glossy, or matte papers; Paper Size offers four print sizes -- 4
x 6, 5 x 7, 8 x 10, 8.5 x 11-inch sheets, or 4-inch roll paper; Page Layout
is used to select borderless prints or multiple images per page; Select Photo
enables you to choose images by photo number; Copies determines the number of
copies to be printed; and PhotoEnhance turns the printer's automatic print enhancement
function On or Off. (PhotoEnhance adjusts for common digicam shortcomings, and
enables PRINT Image Matching when printing images from cameras that support
that Epson-driven technology.)
Design, Functions and Controls
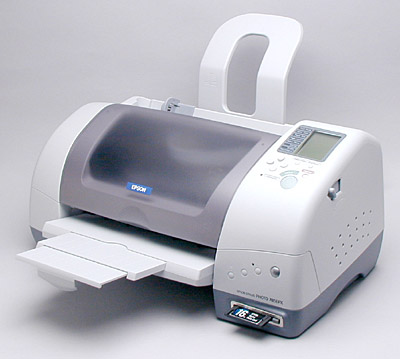
The 785EPX measures 18.4 x 10.1 x 8.4 inches (467 x 255.1 x 212.1mm) without the paper trays extended, and weighs 11.6 pounds (5.25 kg), making it about average in size, but fairly lightweight when compared to similar models. The 785EPX is extremely versatile in terms of paper delivery, with a top-mounted paper support that handles sheets up to 8.5 x 14 inches, and a roll paper adapter that attaches to the back panel. The lower paper output tray stores inside the printer, and pulls out when the printer is in use. Together, they increase the overall size to 23 x 13 x 8.4 inches (584 x 330 x 212.1mm) when fully extended.
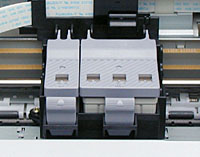 Similar
in design to the Kodak / Lexmark PPM 200, the 785EPX has a dust cover on the
front that lifts up to provide access to the two printer cartridges: one Black
and one Color (cyan, magenta, yellow, light cyan, and light magenta). The cartridges
are easy to install, and when in place, are automatically calibrated by pressing
the Ink Replacement button on the bottom of the Printer Control Panel. The ink
cartridges feed into a series of MicroPiezo print heads, with 48 nozzles per
color, and the entire assembly travels back and forth across the paper on a
small metal rod. Ink is deposited by applying pressure to the ink chambers,
forcing the ink out through the nozzles. Epson claims that this process is more
precise and consistent than competitors' "thermal ink printing" process
(heating the ink to force it out of the print head), and based on the positive
market response, seems to have developed a very successful formula. An automatic
cleaning mechanism periodically initiates a three- to five-minute cleaning,
which can be repeated several times for deeper cleaning whenever necessary,
and an automatic Ink Low / Ink Out detection system lets you keep up with ink
levels for each cartridge.
Similar
in design to the Kodak / Lexmark PPM 200, the 785EPX has a dust cover on the
front that lifts up to provide access to the two printer cartridges: one Black
and one Color (cyan, magenta, yellow, light cyan, and light magenta). The cartridges
are easy to install, and when in place, are automatically calibrated by pressing
the Ink Replacement button on the bottom of the Printer Control Panel. The ink
cartridges feed into a series of MicroPiezo print heads, with 48 nozzles per
color, and the entire assembly travels back and forth across the paper on a
small metal rod. Ink is deposited by applying pressure to the ink chambers,
forcing the ink out through the nozzles. Epson claims that this process is more
precise and consistent than competitors' "thermal ink printing" process
(heating the ink to force it out of the print head), and based on the positive
market response, seems to have developed a very successful formula. An automatic
cleaning mechanism periodically initiates a three- to five-minute cleaning,
which can be repeated several times for deeper cleaning whenever necessary,
and an automatic Ink Low / Ink Out detection system lets you keep up with ink
levels for each cartridge.
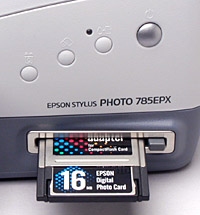
 On
the right side of the printer face is the Printer Control Panel, which extends
from the top, where the Display panel resides, to the bottom, where the PC card
slot accepts various adapters to read digital camera memory cards. The Display
panel and the buttons that are located directly below it, are only used when
the printer is in standalone mode (i.e.: printing without a computer). The four
remaining buttons, at the bottom of the front panel, are used when the printer
is connected to a computer.
On
the right side of the printer face is the Printer Control Panel, which extends
from the top, where the Display panel resides, to the bottom, where the PC card
slot accepts various adapters to read digital camera memory cards. The Display
panel and the buttons that are located directly below it, are only used when
the printer is in standalone mode (i.e.: printing without a computer). The four
remaining buttons, at the bottom of the front panel, are used when the printer
is connected to a computer.
The Display panel provides access to basic printer settings when printing directly from a memory card, such as Print Mode, Paper Type, Paper Size, and Page Layout menus, plus menu options for choosing which image you want to print (by photo number), the number of copies, and the image quality (which is limited to 360 or 720 dpi in standalone mode). Below the Display panel is a set of four-way Arrow buttons, which is used to scroll through menus and select menu settings. The Select Photo button to the right of the Arrows is used to set the photo number when choosing which image you want to print. (The numbers are provided on an Index sheet, which you will need to print first if your images are not preformatted for DPOF printing.)
A Brightness button (next to the Select button) is provided to access the brightness setting mode on the Display Panel. By holding this button down for several seconds, you can also access the Filter menu, which provides nine options for image adjustment (see "Standalone Printing"). Below the Brightness button is a Cancel button, which interrupts the print operations, or exits from a menu selection. The large green Print button starts printing, once all of your menu selections have been made. The final control on the top part of the panel is the Processing light, which glows when the printer is ready to print, and flashes while processing data.
 At
the bottom of the Control Panel, above the PC Card slot, is a series of four
buttons that are used when the printer is connected to a printer. They are identified
by icons, and their functions, from right to left are: 1) Power button to turn
the power On or Off; 2) Maintenance button, which takes care of several operations,
including loading or ejecting paper; resuming printing after a printing error
is resolved; performing print head cleaning; and moving the print head to the
ink cartridge replacement position. (The LED lamp next to this button lights
when an ink cartridge is empty.) 3) Roll Paper button loads and ejects roll
paper, reverses the roll paper feed, and clears the Maintenance error light
if roll paper is removed. Finally, 4) Ink Cartridge Replacement button moves
the print head to the ink cartridge replacement position and initiates a calibration
procedure when new ink cartridges are installed.
At
the bottom of the Control Panel, above the PC Card slot, is a series of four
buttons that are used when the printer is connected to a printer. They are identified
by icons, and their functions, from right to left are: 1) Power button to turn
the power On or Off; 2) Maintenance button, which takes care of several operations,
including loading or ejecting paper; resuming printing after a printing error
is resolved; performing print head cleaning; and moving the print head to the
ink cartridge replacement position. (The LED lamp next to this button lights
when an ink cartridge is empty.) 3) Roll Paper button loads and ejects roll
paper, reverses the roll paper feed, and clears the Maintenance error light
if roll paper is removed. Finally, 4) Ink Cartridge Replacement button moves
the print head to the ink cartridge replacement position and initiates a calibration
procedure when new ink cartridges are installed.
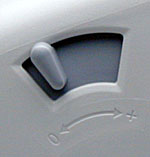 The
right side of the printer has an Adjust lever, which can be set to the "+"
position when you use thick paper or envelopes, to help prevent ink smearing.
The
right side of the printer has an Adjust lever, which can be set to the "+"
position when you use thick paper or envelopes, to help prevent ink smearing.
The left side of the printer is clear, with no printer controls.
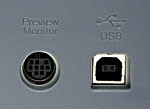 The
top left corner of the back side of the printer houses a Preview Monitor slot,
covered by a plastic door, which enables you to attach the optional 1.6-inch
Preview monitor for viewing color images. Below the slot, at the bottom of the
printer, are the USB connector for connecting the printer to a computer and
a Preview Monitor cable connector. The Roll Paper holder, which comes standard
with the unit, is attached below the top paper feed by sliding it into two slots
on either side of the paper support.
The
top left corner of the back side of the printer houses a Preview Monitor slot,
covered by a plastic door, which enables you to attach the optional 1.6-inch
Preview monitor for viewing color images. Below the slot, at the bottom of the
printer, are the USB connector for connecting the printer to a computer and
a Preview Monitor cable connector. The Roll Paper holder, which comes standard
with the unit, is attached below the top paper feed by sliding it into two slots
on either side of the paper support.
Operation
Standalone Printing
The 785EPX features a built-in 32-bit RISC-CPU, with 143MHz processing power, and a simplified printer driver for printing images directly from a digital camera's memory card. The PC card reader slot, located on the bottom right side of the printer's front panel, accepts PC card adapters for SmartMedia, CompactFlash, and Memory Stick storage media, with an Eject button directly adjacent to it for quick removal.
Before you begin printing images from the memory card, it's important to familiarize yourself with the image quality guidelines provided in the chart below. According to Epson, you'll achieve best results for 4 x 6-inch prints from a two-megapixel digicam, with an image resolution of 1,600 x 1,200 pixels or greater.
At least 150 dpi
150 to 240 dpi
240 to 300 dpi
Once the printer is powered on, you can select from a variety of printing menu options listed in the small status display panel at the top of the Printer Control panel. Operating in standalone mode limits the image adjustment capabilities, allowing you to specify only the basic parameters such as which image to print, the paper size, number of copies, etc. A set of arrow keys located under the display panel navigates through the settings menus and selects menu options.
The
image above illustrates all the available options on the standalone control
panel. The following settings are available:
Many of these menu items will already be set if the memory card has been preformatted in a DPOF-compliant digicam. Images are marked while still in the camera -- identifying which prints to process, the desired print sizes, and the number of copies from each file. This can significantly reduce setup time, especially if you don't have to output an index print to identify which images you want to print. Another helpful feature is the optional preview monitor, available from Epson for $99. This accessory enables you to view the images on-screen, in full color, and more easily review image enhancements.
In addition to brightness adjustments, depressing the Brightness Button for several seconds provides access the printer's nine effects filters, which are identified by number:
Once you've made your printing choices, you simply press the green Print button to begin printing. The Processing light blinks to indicate that it's processing the data. Print speeds will vary depending on the size of the image file. For example, a 3-megapixel file (approximately 1MB) will take longer to print than a 2-megapixel file (approximately 500KB). The Cancel button stops the print job, signaling the printer to eject the paper if a portion of the image has already been printed.
Though the 785EPX offers limited controls for adjusting image quality in standalone mode, we highly recommend printing images from the computer, as it increases print speed and image resolution, and offers significantly more control over color, layout, and other printing preferences.
We do think that there are a lot of users who will prefer the simplicity of standalone printing though, and for those people, the 785EPX is a great solution. In working with it, we developed the impression that the preferred approach is really to mark the photos for printing in your camera, then just use the 785 to output them. While it's entirely feasible to use the on-printer control panel to select and print individual photos, we really felt that marking the photos in the camera first was the easiest/fastest, and made the most sense. Overall, a nice implementation of a standalone user interface, easy to understand, capable, and very quick to navigate.
Printing from a PC
The 785EPX works like any other printer when connected to a PC, with printer drivers and utility software for both Windows and Macintosh platforms that provide a diverse selection of quality and speed settings, image editing functions, color management, and page layout controls. The following is a list of the four basic printing modes and Epson's recommendations for the use of each mode:
The printer driver has a full array of image enhancement controls, including Automatic or Advanced printing with Saturation, Brightness, and Contrast settings. It also provides Tone, Detail, Smooth Edges, and Color controls, with options for using Epson's automatic PhotoEnhance mode, No Color Adjustment, or sRGB or ICM color spaces. Within the Sharpness setting, are several special effects, including Soft Focus, Canvas, and Parchment.
The more standard controls include paper size options, paper types, BorderFree printing, page layout, and the Utilities section, which controls print head functions like nozzle cleaning, alignment and ink level checks. You can also create and apply a watermark to your images, with suggested templates for "Confidential," "Draft," "Urgent," and "Priority."
For more detailed explanation of the menus and options available in the PC Printing mode, see the "Computer Drivers" section below.
Performance
The Stylus Photo 785 EPX shows market-leading characteristics in virtually every respect... excepting print speed, where it's about average. While we like immediate gratification as well as the next person, we've generally been pretty tolerant of slow print speeds in photo-quality inkjet printers. Our usual approach is to just queue the prints up and walk away to do something else while the printer grinds them out. As a result, we're almost never in a situation where we're waiting for the prints to spool out so we can grab them and dash off someplace, hence our rather relaxed approach to photo-quality print times.
Problems on our main Windows workstation while we were testing the 785EPX prevented us from conducting timing tests on that platform. As a result, all our timing tests on the 785 were done on our 500 MHz G4 PowerMac, although print times should be pretty equivalent, as the pacing factor in print speed seems to be the print mechanism itself, not the computer or USB connection. As with other printers we've tested, source image size seemed to affect spooling time, but not print speed. (Spooling time for a 15 megabyte file on the Mac was about 30 seconds, very much in line with what we've found for other inkjet printers. Accordingly, the times we report below are only for the printing process itself, once the printer has grabbed the paper from the input tray.
|
|
(Minutes:Seconds) |
|
720 dpi, High Speed
|
3:36
|
|
720 dpi, no High Speed
|
5:50
|
|
1440 dpi, High Speed
|
6:41
|
|
1440 dpi, no High Speed
|
9:30
|
|
2880 dpi
|
18:06
|
|
Text Page: "Economy" 360
|
0:13 (!)
|
|
Text Page: "Normal" 360
|
0:34
|
|
Text Page: "Fine" 360
|
1:18
|
|
Text Page: Photo 720
|
2:27
|
|
Text Page: Photo 1440
|
7:49
|
We've included text-mode print times in this review, and intend to do so in the future. Many people need to buy a single printer to cover multiple uses, so text printing on photo printers is important. Photo printers will be *much* slower than so-called SOHO (Small Office/Home Office) multipurpose printers when printing text, but they can do it, and do it fairly well, if the 785EPX is any indication. Text-mode printing is quite rough in the Economy mode, but very fast, suitable for quick drafts. Printing in 720dpi mode though, the text is razor-sharp and beautiful, if not a little sluggish in spooling out. For occasional use though, the 785EPX is capable of excellent text output.
Media Cost
The 785EXP's six-color printing requires two ink cartridges: one Black and one Color (cyan, magenta, yellow, light cyan, and light magenta), which sell for $22.46 and $17.96, respectively, through Epson's online store. These prices are reduced from the original list price and are very comparable to, if not a little less costly than, its competitors. Epson has also provided a wide range of paper options, from basic clay-coated inkjet paper to premium photo glossy, and a Matte Heavyweight paper (see "Print Longevity & Durability").
Working almost exclusively in 2880 dpi mode, we were able to print about 23 7.6 x 9.5-inch prints on 8.5 x 11-inch paper on our 785 test unit before running out of color ink. At that point, the black cartridge was still about 80% full. Running the numbers, we come out with a per-print cost of about $1.13 per print for the ink, based on Epson's selling prices for the ink on their site. (Checking the internet, we found the color cartridge was available from multiple sources for $15 or less. This makes the ink cost only 80 cents per page.) Epson's premium glossy photo paper runs about $0.50 a sheet on the internet, while their standard photo paper is about $0.35 per sheet, again on the internet. The overall price per letter-size print is thus somewhere around $1.30 on premium glossy and $1.15 on standard photo paper.
As noted, we did essentially all our printing at 2880 dpi, since we were testing for maximum quality. We've heard that the 785's 1440 dpi mode uses significantly less ink, but did not have an opportunity to evaluate that in our testing.
Overall printing costs on the 785EPX are about in line with other inkjet printers we've tested.
Print Longevity & Durability
When used with Epson Inks, the Matte Paper - Heavyweight has an estimated print life of more than 20 years, based on accelerated testing of prints displayed indoors, mounted under glass. (Print life may vary depending on lighting, humidity, and Ozone levels -- all of which can significantly reduce longevity.)
Epson describes its inks as "water resistant," a big plus in the durability category. We don't have any formal test for water-fastness, but were quite surprised by how well the 785's prints held up to splashes of water. We tried dribbling a few drops of water on a print, waiting about 10-15 seconds, and then wiping it off. We were amazed that none of the color came off on the tissue we used to wipe the print with. The paper did absorb a fair bit of water, wrinkling its surface a bit. Pressing it inside a pad of paper (to absorb the moisture), under the weight of a book flattened it out pretty well again, although the surface of the print still showed a water mark. Overall, this is quite a bit more water-resistant than we were aware of inkjet prints being. (We confess though, that we haven't routinely performed this test, so other printers may well be as waterproof these days.)
User Interface
Control Enumeration
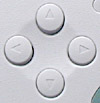 Four
Way Arrow Pad: These four buttons are arranged in a circle under the display
panel, with one button for each direction (up, down, left, and right). The up
and down arrow buttons select settings menus, while the right and left arrow
buttons select menu options.
Four
Way Arrow Pad: These four buttons are arranged in a circle under the display
panel, with one button for each direction (up, down, left, and right). The up
and down arrow buttons select settings menus, while the right and left arrow
buttons select menu options.
![]() Select
Photo Button: Directly to the right of the Four Way Arrow pad, this button
designates the image number on the PC card to be printed when the printer is
in One or Set mode.
Select
Photo Button: Directly to the right of the Four Way Arrow pad, this button
designates the image number on the PC card to be printed when the printer is
in One or Set mode.
![]() Brightness
Button: Just adjacent to the Select Photo button, this button accesses the
brightness setting. Holding the button for three seconds accesses the filter
setting modes, which are listed by number:
Brightness
Button: Just adjacent to the Select Photo button, this button accesses the
brightness setting. Holding the button for three seconds accesses the filter
setting modes, which are listed by number:
 Cancel
Button: Beneath the Brightness button, this button cancels the current print
job or backs out of menu selections.
Cancel
Button: Beneath the Brightness button, this button cancels the current print
job or backs out of menu selections.
 Start
Print Button: A large button below the Cancel button, this button activates
the printing process.
Start
Print Button: A large button below the Cancel button, this button activates
the printing process.
![]() Power Button: Positioned as the first button in a series on the front of the printer, this button turns the printer on and off. If pressed twice quickly while the printer is powered on, this button clears the buffer memory.
Power Button: Positioned as the first button in a series on the front of the printer, this button turns the printer on and off. If pressed twice quickly while the printer is powered on, this button clears the buffer memory.
![]() Maintenance Button: To the left of the Power button, this button loads or ejects paper if pressed and quickly released within two seconds. If pressed after an output error has been corrected, this button resumes printing. Holding down this button for three seconds cleans the print head (if error light is off). When an ink cartridge is out, pressing this button moves the print head to the ink cartridge replacement position.
Maintenance Button: To the left of the Power button, this button loads or ejects paper if pressed and quickly released within two seconds. If pressed after an output error has been corrected, this button resumes printing. Holding down this button for three seconds cleans the print head (if error light is off). When an ink cartridge is out, pressing this button moves the print head to the ink cartridge replacement position.
![]() Roll Paper Button: Directly to the left of the Maintenance button, this button loads and ejects roll paper. When held down for more than three seconds, this button reverse feeds roll paper so that it can be easily removed from the sheet feeder. Pressing this button also clears the error light if pressed after removing roll paper.
Roll Paper Button: Directly to the left of the Maintenance button, this button loads and ejects roll paper. When held down for more than three seconds, this button reverse feeds roll paper so that it can be easily removed from the sheet feeder. Pressing this button also clears the error light if pressed after removing roll paper.
![]() Ink Cartridge Replacement: The final button in the series on the front panel, this button moves the print head over to the ink cartridge replacement position.
Ink Cartridge Replacement: The final button in the series on the front panel, this button moves the print head over to the ink cartridge replacement position.
 Card
Eject Button: Located on the far right side of the PC card slot, this button
ejects the card.
Card
Eject Button: Located on the far right side of the PC card slot, this button
ejects the card.
 Adjust
Lever: Situated on the right side of the printer (when looking from the
front), this lever adjusts the printer for different paper thicknesses. Setting
the lever to the "+" position prevents ink from smearing on thick
paper or envelopes.
Adjust
Lever: Situated on the right side of the printer (when looking from the
front), this lever adjusts the printer for different paper thicknesses. Setting
the lever to the "+" position prevents ink from smearing on thick
paper or envelopes.
Computer Driver Menus
Main Menu
Launching the printer setup utility displays this set of tab-based menu screens. The first is the Main menu, which allows you to set the basic printer parameters, including the type of paper to be printed on, the ink color, and the printing mode. Under the Media Type pulldown menu, you can specify the type of media you'd like to print to. A wide variety of paper choices are available, and are categorized into groups, including Plain Paper, 360 dpi Ink Jet Paper, Photo Quality Ink Jet Paper, Matte Paper-Heavyweight, Photo Paper, Premium Glossy Photo Paper, Photo Quality Glossy Film, and Ink Jet Transparencies.
Below the Media Type menu is the Ink selection box, which specifies which ink cartridge will be used, Color or Black.
The Mode selection box establishes how much control you have over the actual printing, with three modes available to choose from:
Automatic:
Automatic mode places the printer in control of the print quality and speed settings, based on the current Media Type and Ink selections. Depending on the Media Type selected, a slider bar appears under the "Custom" setting, listing Quality and Speed. You move the slider bar to the position that's most important. The printer will optimize the print job depending on which value is selected, Quality or Speed.
Photo Enhance:
This mode provides a range of preset image corrections to choose from, depending on the type of image being printed. Choices are Standard, People, Nature, Soft Focus, and Sepia. The Digital Camera Correction checkbox appears under the correction type, which smoothes lines and contours in images shot with digital cameras, eliminating some artifacts and "jaggies." Photo Enhance mode is only selectable when printing in 8-, 16-, 24-, or 32-bit color mode, and is not recommended for use when the Roll Paper media type is selected, as gaps may appear in the printing.
Custom: The final mode available is Custom, which allows you to set more specific settings. Under the Custom Settings list, you can select Economy, ICM, or sRGB. Economy mode is best for printing text, as it makes minimal adjustments and prints at a slightly lower quality setting. "ICM" matches the color of the printout to match the monitor currently in use, and "sRGB" matches the color of the printer to other sRGB devices. Clicking the Advanced button pulls up a dialog box for making further adjustments:
The Advanced adjustments include a variety of specialized settings, expanding color management options, as well as providing more control over image attributes and quality settings. At the top left of the dialog box are the Media Type and Ink selection tools, which provide the same options as on the Main menu page. The Print Quality pulldown menu offers a variety of quality settings, allowing you to select the one that best matches the use of your printout. Below the Print Quality setting, a variety of controls set options for printing speed, image orientation, detail, and smoothing edges in low-resolution originals. On the opposite side of the dialog box, a handful of color management options make more fine-tuned adjustments.
If Color Controls is selected, you can adjust the cyan, magenta, and yellow values individually, as well as the brightness, contrast, and saturation. The "Mode" option lets you select between Photo-Realistic or "Vivid" rendering, or "Automatic" as shown above. You'd used "Vivid" for business graphics where you want the brightest colors, while Photo-Realistic would be for photo printing (no surprise there). We ended up just leaving this option set to Automatic for all our prints and they looked just fine. Once you've made your selections, you can save them to apply to other images via the Save Settings button. This is particularly useful for batch processing.
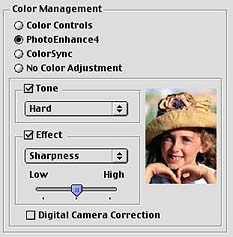
If you select the "PhotoEnhance" option in the color management controls, you'll get options for setting tone (think "contrast") and a variety of effects, including Sharpness, Soft Focus, Canvas, or Parchment. (The last two overlay a texture on whatever subject you're printing, making it look like it was printed on canvas or parchment.) Buried at the bottom of this panel is one of the most significant aspects of the 785EPX. The box marked "Digital Camera Correction" enables Epson's PRINT Image Matching for files that came from cameras supporting that technology. As we mentioned elsewhere in this review, PRINT Image Matching improves color handling in digicam files. It's most visible in certain bright blues and greens, but the most common benefit will be greatly improved skin tones. Very cool!
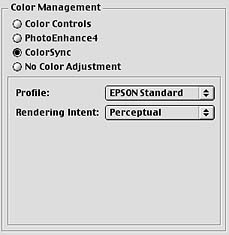
Serious color gurus will be pleased by Epson's support for ICC color profiles. On the Mac, if you have a custom profile made for the 785EPX, it'd just appear in the pulldown labeled "Profile" above. On the PC, there are actually two separate options here, one for simply selecting the ubiquitous (and awful) sRGB color space, the other for selecting ICM color profiles the name for ICC profiles under Windows.
The remaining tools available on the Main menu page are the Ink Levels and Print Preview utilities. Ink Levels simply shows you the current amount of ink available in each cartridge. Clicking on the Print Preview checkbox and then the OK button pulls up a preview screen, allowing you to review the image before printing it. You can always go back to make changes.
Paper Menu

The next tab in the printer setup utility is the Paper menu, which establishes all of the paper attributes. The Paper Source pulldown menu specifies where the printer is pulling paper from, either the Sheet Feeder or Roll Paper. Click the No Margins checkbox to enable borderless printing. With this option checked, you want to set the image size in your software to be just slightly larger than the paper size you're printing on. In this mode, the printer can cleverly print right up to all four edges of the paper, but the print times nearly double as a result.
The Paper Size pulldown menu selects the actual size of the paper being printed on, and includes a Custom option for adding any special paper sizes not listed. Under the Copies selection box, you can set the number of copies, as well as whether or not multiple-page prints are collated or printed in reverse order. Orientation offers the standard Portrait and Landscape options, as well as an option for rotating the image 180 degrees. The final selection is the Printable Area, which designates where the printer will print the image on the page. The Maximum setting instructs the printer to fill the entire printable area.
Layout Menu
The Layout menu page offers slightly more control over where the image will actually print on the media. Clicking on the Reduce/Enlarge checkbox activates the options beneath it, which include Fit to Page and Custom. The Custom setting lets you define your own paper sizes, including the defined printable areas.
The Multi-Page selection lets you choose the layout for printing multiple images. The N-up option prints either two or four images to a page, while the Poster option enlarges a single image to print on 4, 9, or 16 pages.
Clicking on the Settings button when Poster is selected allows you to establish the order of how the enlarged image will print. The Print Cutting Guides checkbox enables you to print alignment marks or trim lines to help you line up and cut out the image for assembly. (This is a pretty slick option - Only a few years back, you had to pay a lot of extra money for software that would let you "tile" images across multiple pages like this.)

The final option on the Layout menu page is the Watermark option, which allows you to place a customized watermark over the printed image. Watermarks can be made up of text or images. (Handy for automatically imprinting copyright information on your prints, without having to modify the original images to do so!)

Once you've selected or created a watermark, the Settings button becomes active on the Layout menu page. Clicking it pulls up the Watermark Settings dialog box, which controls watermark attributes such as color, font, rotation, position, size, and density.
Utility Menu

The Utility menu page features six utility buttons for general printer maintenance.
Test Results
The Epson Stylus Photo 785EPX produced exceptional prints in our testing, really pushing the limits of what we've come to expect from top-grade inkjet photo printers. Photomicrographs of its output show ink dots under extreme magnification, but the 4-picoliter droplets are completely invisible to the naked eye. Tonal gradations were extremely smooth, even in the difficult highlight areas. While we've said in the past that dye-sublimation printers do a better job of "fooling" us into believing their output was produced photographically, recent inkjet photo printers (the 785EPX high among them) have made true believers of us. It's hard to imagine how the output quality could be any better, at least to the naked eye.
Tonal range was excellent, with very deep blacks and clean highlights. We felt that the 785 tended to lose a slight amount of detail in the very darkest shadows, particularly at the 2880 dpi setting,which seemed to ink the paper a bit more heavily than the 1440 dpi option. Color saturation was also a bit high relative to the input images, with the printer set up to assume sRGB as the input color space on our Mac G4. (System 9.0.4) The 785EPX's extensive support for color management makes it very easy to fine-tune the print characteristics to fit your personal tastes though, so we don't view this as a significant issue. (The amount by which it oversaturated the colors was pretty slight anyway.)
The 785EPX's 2,880 x 720 dpi dot pitch is among the highest currently available
in inkjet printers (May 2001), and it shows in the exceptionally fine detail
and crisp edges we obtained in our test prints. The high dot pitch and very
small droplet size also contributed to unusually fine tonal gradations, even
in the highlight areas. (The smaller number of ink droplets deposited in highlight
areas frequently leads to a "grainy" appearance in inkjet prints.
To the naked eye, no such graininess was apparent in any of the our test prints.)
As we observed in the body of this review, we didn't feel that there was a particularly
strong advantage to printing in 2880 dpi mode vs 1440. Both modes produced amazingly
smooth images. - We felt that the 785 produced the most grain-free highlights
and three-quarter tones of any inkjet printer we've tested to date.
We've occasionally seen odd "jaggies" in photos when the image resolution
didn't exactly match the resolution of the output device. For the record, we
saw very little of this in the 785, at least when running at its 1440 and 2880
resolution settings. The greatly enlarged samples below compare the 785EPX's
output with that from a high-end dye-sublimation printer (the Olympus P-400),
a competing high-end photo printer (the Canon S800), and a lower-end 600 x 1,200
dpi resolution consumer photo inkjet printer (the Kodak Personal Picture Maker
200).We felt that the S800 won by a nose in its rendering of smooth diagonal
edges, but that the 785 won with its smoothness of tonal gradations.
 |
 |
|
|
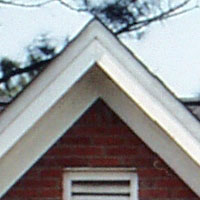
The image above was printed on the Epson Stylus
Photo 785EPX. The source image had a resolution of 400 dpi, while the
printer engine resolution was set to 288x720 dpi.
Comparing this result to that from the $999 Olympus P-400 dye-sub printer above left, the image seems sharper, edges are much more crisp, and finer detail is visible, reflecting the 2880 x 720 dpi accuracy with which individual ink droplets are laid down. Being a true continuous-tone device though, the P-400 edges the 785EPX in terms of smoothness, if only just slightly. Even in this greatly magnified view though, the 785's dots are barely visible: At 2880 dpi, they're completely invisible to the human eye. Compared to the 2400 x 1200 Canon S800 at left, the 785's image is a bit smoother to our eye, as seen in the area just under the peak of the roof. In this region, the S800's image is slightly grainy, while that of the 785 is a bit smoother. (Really though, we're splitting hairs on this score: The dots either produces are so small as to be either nearly or entirely invisible to the unaided eye.) At its highest resolution, we saw almost no tendency of the 785's print drivers to produce "jags" along the sloping edges of the roof trim. (We did feel that the S800 edged the 785 just slightly in its rendering of the diagonal edges of the roof trim though.) Overall, very clean, very sharp, very smooth! |
 |
|
|
|
|
 |
|
|
|
|
|
The 785 EPX's output was very crisp, very smooth, and highly detailed. It showed few of problems with image resampling within the driver software that we've occasionally seen with other printers (At least, at its highest resolution). Its resolution and detail were absolutely outstanding. It resolved more detail than a 314 dpi dye-sub printer that's been somewhat of a standard of image quality for us, while giving up virtually nothing in smooth gradations in the highlights. Overall, a very impressive performance! |
|
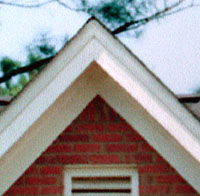
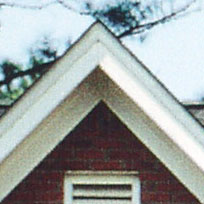
We've mentioned at several points that we saw relatively little benefit in the 785's 2880 dpi printing mode. There is a very significant improvement between 720 and 1440 however. The ultra-macro shots below will help you make up your own mind. There is a bit more detail visible in the 2880-mode print, but you have to enlarge it to this extent see it. (And even then, it's pretty subtle.) For most routine printing, we'd say that the 1440 x 720 dpi printing mode will be more than adequate for the majority of users.
| At 2880 dpi, the Stylus Photo 785EPX's output is crisp, sharp, and very smooth. Virtually no signs of jaggies, although there's a microscopic roughness on the diagonal lines of the roof trim, as seen at right. | |
| At 1440 dpi, the output is virtually identical. Still very crisp, still very smooth, really no more jaggies than we saw in the 2880 dpi image above. Given the markedly shorter print times for virtually no decrease in quality, we'd recommend 1440 dpi for virtually all your photo printing needs. | 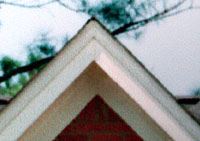 |
| If we were surprised by how little difference we saw between 2880 and 1440, we were eve more surprised by how much difference we saw when we dropped down to 720 dpi. If you have an earlier 720 dpi Epson printer, this alone could be the justification for an upgrade! (We must nonetheless point out that these are still very small imperfections: The area at left is only about a half inch (12mm) across on the print itself.) | 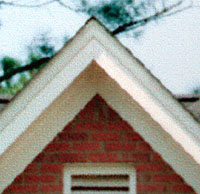 |
Conclusion
Wow, what a great printer! Overall, the Stylus Photo 785EPX showed excellent color rendition and exceptional resolution. Epson's unique borderless printing capability and the easy standalone operation are really the icing on the cake. For a long time, we've held that people will resist printing their digital images until the process gets as easy as just dropping your film at the corner drugstore. The 785 demands a bit more than that, but it's definitely a step in the right direction. Epson's PRINT Image Matching also makes a very discernible difference when printing images from digicams that support the technology. - Gone are the days of sickly-looking "digital skin tones." About the only knock we have against the 785 relative to some of the competition is that it's no speed demon. With full-page print times of 6-10 minutes in its 1440 dpi mode, it's only about average in its print speed among inkjet printers we've tested. Overall though, the whole package is a very compelling proposition: Great prints with or without a computer, PRINT Image Matching for great color from your digicam, and a 20+ year estimated print life. If you're interested in standalone printing, the Stylus Photo 785EPX is hard to beat. (If you don't need the standalone option, the Stylus Photo 780 has essentially identical print characteristics, at a lower price.) Highly recommended!
Reader Comments!
Questions, comments or controversy on this product? Click
this link to see what other Imaging Resource readers have had to say about
the Epson Stylus Photo 785EPX, or add comments of your own!