| Kodak DCS Pro 14n Digital SLR Kodak's latest digital SLR brings full-frame, 13.7 megapixel resolution to market for under $5,000. (Review first posted 3/23/2003) |
 |
<< Return to Main Test Images Page for the Pro 14n
Page: "Studio" Analysis
Studio portrait shot. ~100mm prime lenses on both cameras.
| Pro 14n | EOS-1Ds |
 |
 |
| A natural application of high-res cameras like the
Pro 14n and EOS-1Ds will be studio work, including portraiture. These
situations will be characterized by plenty of light (thanks to the strobes)
and short exposure times, possibly reducing the impact of sensor noise
somewhat. Resolution and detail will be very important, as will accurate,
pleasing rendering of skin tones.
I shot these images with the help of friend and "resident pro" Gibbs Frazeur, using professional studio strobe packs and a standard portrait lighting setup. (Two soft boxes in front of Marti, a background light and a hair light high above to the rear.) We used each camera's strobe white balance setting. Here again, I shot with each manufacturer's ~100mm macro lens, very sharp optics. (Canon 100mm f/2.8, Nikon 105mm f/2.8) While we didn't have the identical lens on both cameras, I think it's pretty fair to say that the performance of the Canon and Nikon optics we used would be pretty closely equivalent, particularly stopped down as much as we had them. We tried to get the scale as close as possible between the two cameras, and once again were within 5%. (Marti fills just slightly more of the frame in the 14n shot than in the 1Ds one.) We also tried to stay as close as possible with the aperture, but for the sake of simplicity bracketed with the lens aperture, rather than trying to vary the output of the studio strobe packs. (Besides being extraordinarily tedious, varying the strobe output would have led to a high probability of the light balance between the various strobe heads not matching from one shot to the next.) As it turned out, the best exposures with each camera were at f/13. The JPEG images linked here are straight from the camera in the case of the EOS-1Ds, and extracted from the DCR files via Photo Desk in the case of the Pro 14n. Once again, I was surprised by how differently the two cameras rendered the color. Overall, I preferred the "look" of the 14n, although in truth it was a little on the reddish side, while the 1Ds came out a bit greenish overall. Detail was fairly similar between the two, but as you can see below, the 14n tends to lose detail in areas of relatively flat contrast. |
|
||||
| The 14n offers two different "Looks" in its setup options. The "Portrait" look produces images with lower contrast and slightly more subdued color saturation, while the "Product" look makes for snappier, higher-contrast images. I used the "Portrait" look for most of my comparison examples here, even though my personal tastes run more toward the "Product" rendering. | |
 |
||
| Pro 14n sharpening options | |
| No Sharpening The 14n offers a pretty flexible set of controls for sharpening images. In the camera, there are four options (off, low, medium, high) for sharpening, but in the Photo Desk software, you can tweak any of three sliders across a broad range of values. The shot at right shows the basic 14n image with no sharpening applied. (For reference, noise reduction processing was set to "normal" here.) |
 |
| "Medium" Sharpening This shot shows the result of the 14n's "medium" sharpening setting, probably adequate for most routine applications. It's a tad bit heavy-handed, but not bad. |
 |
| Unsharp Masking in Photoshop Here's the same crop, only this time processed with Photoshop's unsharp masking filter, with amount/radius/threshold settings of 150/0.6/0. I felt that this did the best job of bringing out all the deatail, without coarsening the finer elements. |
 |
| Pro 14n vs EOS-1Ds detail | |
| 1Ds straight from the camera I did much the same thing with the shot from the 1Ds. This example is straight from the camera. (Canon's internal image sharpening is quite understated, producing soft-looking images, but supporting subsequent sharpening in Photoshop quite well.) |
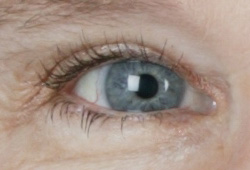 |
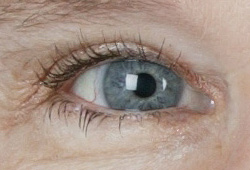
| 1DS with Unsharp Masking Here's the results of unsharp masking applied to the above crop in Photoshop. Parameters used were 170/0.4/0. BTW, The smaller size of Marti's eye here is a combination of the ~5% tighter framing in the 14n's shot, and the somewhat smaller pixels in the 1Ds... |
 |
1Ds scaled and unsharp masked (Full-sized image with this processing not on the server.) |
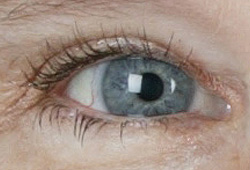 |
| Comparison with 14n For reference, here's the same shot from the 14n, also processed using Photoshop's unsharp masking. The 14n pretty clearly wins this particular comparison, but there's the issue of that 5% difference in scale factor between the two shots. Still I think fair to say that the 14n holds an edge in fine detail in this example. |
|
| Low-contrast detail comparison | ||
| Pro 14n Normal Noise Reduction Medium Sharpening |
Pro 14n No Noise Reduction Photoshop Unsharp Masking |
EOS-1Ds Photoshop Unsharp Masking |
 |
 |
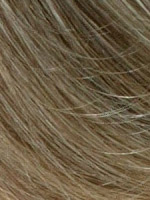 |
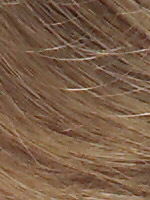
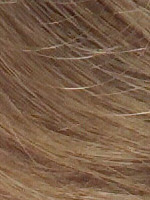
| I've mentioned in my analysis of some of the
other shots that I felt the 14n lost detail in areas of lower subject
contrast. This is a common effect of noise-reduction algorithms, which
commonly seek to "flatten" the image in areas with relatively
small tonal differences. (Figuring that any small bobbles in the tone
are more likely to be caused by noise than to correspond to legitimate
subject detail.) Unfortunately, accurate rendering of human hair involves
faithful reproduction of just such small tonal variations.
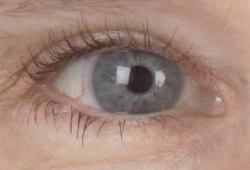
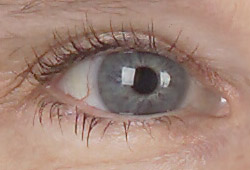
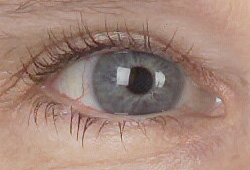
The crops above show roughly the same areas of Marti's hair, shot with the two cameras. At far left is an example from the 14n, with its default noise reduction and image sharpening settings in force. The center sample shows the same image (extracted from the same RAW file), with the noise reduction turned off entirely, and the image sharpened in Photoshop. Even though the NR is turned off entirely in the software, it's evident that some level of noise-reduction processing is still going on, as there are still clearly areas in which the individual strands of hair are "smooshed" together. The crop on the far right is from the EOS-1Ds, sharpened in Photoshop. Note how cleanly the individual strands of hair are delineated, even in areas where there's very little contrast separating them. Note too, the lack of any graininess or jaggies in the strands of hair, due to the 1Ds' anti-alias filter. (Although it must be pointed out that the individual strands of hair that are visible in the 14n examples are somewhat more finely rendered.) These examples show the 1Ds as having a markedly superior ability to preserve fine detail in areas of low contrast. |
||
| Color aliasing/moire | ||
| Pro 14n Normal Noise Reduction Photoshop Unsharp Masking |
Pro 14n Anti-moire noise reduction Photoshop Unsharp Masking |
EOS-1Ds Photoshop Unsharp Masking |
 |
 |
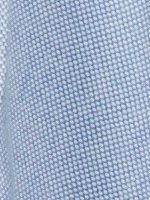 |
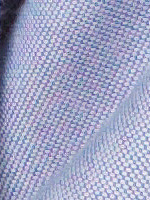
| Most likely because Kodak chose not to use
an anti-aliasing filter on the 14n, I've noticed in several shots that
it has a tendency toward producing color moire artifacts in areas of fine
detail. Here, we see a more subtle color aliasing in the blue oxford-cloth
shirt Marti's wearing. The repeating patterns of blue and white are producing
a subtle moire with the sensor striping. The result is a blotchy pattern
of magenta and cyan tints across some portions of the shirt.
Using the anti-moire noise-reduction option in Photo Desk helps the situation somewhat, but the blotches still remain, and there's some loss of sharpness as well. By comparison, the EOS-1Ds shows no moire at all, and even does a somewhat better job (to my eye at least) of preserving the shape and texture of the threads in the cloth. |
||
Conclusion:
This shot is a bit of a tossup between the two cameras, I think. While the
14n's images are a bit more pink -tinged than was the original subject, I like
it's color rendition (particularly the skin tones) a good bit more than that
of the 1Ds. On the other hand, there's no question that the 1Ds does a much
better job of retaining subtle detail in areas of low contrast, and it shows
none of the tendency toward moire artifacts that the 14n does.
It'll obviously be a matter of personal preference, but I suspect that the 14n may find happy homes with portrait photographers, thanks to its pleasing color and good detail. (Although careful image processing will be required to hold detail in subjects' hair.)
<<"Silos" Analysis
:(Previous) | (Next): "Davebox" Analysis>>
<< Return to Main Test Images Page for the Pro 14n
|
Your purchases help support this site! NOTE: Neither Ritz Camera nor State Street Direct charges a fee to get on their waiting list for these cameras, so there's no reason not to get on both waiting lists to increase your chances of getting a camera sooner. |
|
| Kodak DCS Pro 14n | |
| Canon EOS-1Ds | |
14n Test Images
14n Images from PMA Show
14n Specifications
Up to Imaging Resource digital cameras area

Follow Imaging Resource: