Olympus C-4000 ZoomOlympus introduces a top-of-the-line four-megapixel model with superb *configurability* great image quality, and an impressively low price.<<Optics :(Previous) | (Next): Shutter Lag & Cycle Time Tests>> Page 6:Exposure & FlashReview First Posted: 8/27/2002 |
Exposure
|
Like other Olympus C-Series digicams, the C-4000 Zoom offers a lost of exposure control, including Program, Aperture Priority, Shutter Priority, and Manual exposure modes. Additional exposure options include four ISO settings (Auto, 100, 200 and 400); exposure compensation up to +/- 2 EV, auto bracketing, internal and external flash adjustment, and two metering modes, in addition to a handful of other creative image settings.
In Program mode, the camera selects both the aperture and shutter speed(to a maximum of 1 second), while you control the remaining exposure options such as ISO, Exposure Compensation, White Balance, and metering mode. Aperture Priority lets you set the aperture from f/2.8 to f/11.0, while the camera chooses the best corresponding shutter speed, to a maximum exposure time of 1 second. In Shutter Priority, you can select shutter speeds from 1/1,000 to four seconds, and the camera selects the best corresponding aperture setting. (Note that in program and aperture-priority modes, the default "Auto" setting of the flash will restrict the maximum exposure time to between 1/20 and 1/100 seconds. Slower shutter speeds will only be available if you either turn off the flash, or set it to slow sync mode.)
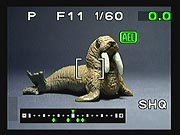
In Manual mode, you control both aperture and shutter speed, the latter of which can extend to 16 seconds. In Manual mode the exposure compensation display at the top of the LCD screen changes into an exposure meter, a helpful feature. As you scroll through various shutter speed/aperture combinations, the camera indicates whether or not it thinks the current setting will give you a correct exposure. It does this by showing the f/stop and shutter speed in green, and the difference between your settings and the "correct" exposure in white numerals, across a range of +/- 3 EV. If the differential exceeds 3 EV, the numbers turn red and stay fixed at a +/- 3 EV reading.
In addition to the four basic exposure modes, a "My Mode" option lets you save up to four separate sets of exposure settings that can be accessed via the virtual mode dial. Thus, if you shoot under the same conditions frequently, you can save the settings and instantly recall them when needed. This can be very handy when you're moving back and forth between indoor and outdoor scenes, as at a party, wedding, or reception. You could set up one My Camera setting for outdoor shooting, with ISO 100 and daylight white balance, and a separate My Camera setting for indoor work, with incandescent or custom white balance and ISO 400. Very slick!
 A
Scene Program stop on the Mode dial offers a "virtual dial" selection
of preset "scene" shooting modes, for specific shooting situations.
Included are Movie (described shortly), Self-Portrait, Night Scene, Landscape
/ Scene, Landscape / Portrait, Sports, and Portrait modes. Each selection appears
in a circular menu pattern on the LCD screen, and the left and right arrow keys
rotate this "virtual dial" around to the desired setting. Self-Portrait
mode lets you take a picture of yourself by holding the camera in front of you.
Night Scene mode optimizes the camera for darker shooting situations, keeping
the exposure under automatic control but adjusting the ISO and shutter speed
for the best exposure. The two Landscape modes are set up for capturing broad
vistas of scenery with or without people in the foreground. In Sports mode,
the exposure system is biased toward faster shutter speeds to freeze the action,
while Portrait mode sets up the camera to capture individual portraits with
wider aperture settings, leaving the subject in focus in front of a slightly
blurred background.
A
Scene Program stop on the Mode dial offers a "virtual dial" selection
of preset "scene" shooting modes, for specific shooting situations.
Included are Movie (described shortly), Self-Portrait, Night Scene, Landscape
/ Scene, Landscape / Portrait, Sports, and Portrait modes. Each selection appears
in a circular menu pattern on the LCD screen, and the left and right arrow keys
rotate this "virtual dial" around to the desired setting. Self-Portrait
mode lets you take a picture of yourself by holding the camera in front of you.
Night Scene mode optimizes the camera for darker shooting situations, keeping
the exposure under automatic control but adjusting the ISO and shutter speed
for the best exposure. The two Landscape modes are set up for capturing broad
vistas of scenery with or without people in the foreground. In Sports mode,
the exposure system is biased toward faster shutter speeds to freeze the action,
while Portrait mode sets up the camera to capture individual portraits with
wider aperture settings, leaving the subject in focus in front of a slightly
blurred background.
 Three
metering systems are available on the C-4000 Zoom: Spot, Multi-Spot, and ESP
multi-patterned metering. Spot and ESP are accessed by pressing the Spot / Macro
/ Print button on the camera's back panel. Under the default ESP multi-patterned
setting, the camera takes readings from a number of areas across the field of
view, and evaluates them to determine the best exposure. Spot metering reads
the exposure from the very center of the image, so you can pinpoint the specific
area of the subject you want properly exposed and lock in on that exposure by
depressing the Shutter button halfway and holding it down while you recompose
the scene. The Multi-Meter function is activated through the Shooting menu in
Aperture or Shutter Priority modes only. Once this menu option is activated,
the Spot / Macro button must be set to Spot mode, and the Function / Protect
button depressed to take individual meter readings from the center of the frame
(inside the exposure brackets). You can take up to eight readings, each of which
will be marked on a relative exposure bar across the bottom of the LCD panel,
and then averaged into the overall reading. The screen shot above right shows
the display after four exposure measurements have been made. You can cancel
the Multi-Spot reading by holding the Function / Protect button down for one
second (the word "Memo" appears in the LCD display).
Three
metering systems are available on the C-4000 Zoom: Spot, Multi-Spot, and ESP
multi-patterned metering. Spot and ESP are accessed by pressing the Spot / Macro
/ Print button on the camera's back panel. Under the default ESP multi-patterned
setting, the camera takes readings from a number of areas across the field of
view, and evaluates them to determine the best exposure. Spot metering reads
the exposure from the very center of the image, so you can pinpoint the specific
area of the subject you want properly exposed and lock in on that exposure by
depressing the Shutter button halfway and holding it down while you recompose
the scene. The Multi-Meter function is activated through the Shooting menu in
Aperture or Shutter Priority modes only. Once this menu option is activated,
the Spot / Macro button must be set to Spot mode, and the Function / Protect
button depressed to take individual meter readings from the center of the frame
(inside the exposure brackets). You can take up to eight readings, each of which
will be marked on a relative exposure bar across the bottom of the LCD panel,
and then averaged into the overall reading. The screen shot above right shows
the display after four exposure measurements have been made. You can cancel
the Multi-Spot reading by holding the Function / Protect button down for one
second (the word "Memo" appears in the LCD display).
In the main exposure modes (Program, Aperture Priority, Shutter Priority, and Manual modes), the C-4000 Zoom provides the usual range of ISO (light sensitivity) settings: An ISO adjustment offers Auto, 100, 200, and 400 ISO equivalents. (Note that when ISO is set to Auto in Program exposure mode, it automatically resets to 100 when you switch to Aperture Priority, Shutter Priority, or Manual exposure modes.)
Camera light meters assume that the world averages out to a medium gray, and make their exposure decisions accordingly. This works well most of the time, but subjects that are very bright or dark overall can trick the metering system. Light subjects will tend to be underexposed, while dark ones can be overexposed. In these situations, you need to be able to adjust the camera's default exposure to compensate for the subject's overall tone. This is the function of the "exposure compensation" adjustment. To adjust the exposure compensation on the C-4000 Zoom, simply press either the right or left Arrow buttons (in any exposure mode except Manual) to increase or decrease the exposure values (EV) in one-third-step increments, up to +/- 2 EV. The current compensation setting is displayed in the upper right corner of the LCD. (The LCD viewfinder must be enabled to adjust this setting, but once it is set, you can turn the LCD off to conserve power, and the setting will remain in effect.)
Sometimes you aren't sure how best to adjust the exposure for a given subject, and don't want to take the time to adjust the exposure compensation manually. (The subject might move or go away while you're fiddling with the camera's controls.) The answer to this dilemma is found in the C-4000's Auto Bracketing (BKT) function. Selected through the Shooting Mode Menu, this feature makes camera automatically "bracket" the exposure for each shot by as much as +/- 2 EV in either three- or five-step increments (0.3, 0.6, or 1.0 EV units each). For example, with a setting of five 0.3 EV steps, the camera will automatically snap five shots, at exposure adjustments of -0.7, -0.3, 0, +0.3, and +0.7 EV, insuring that at least one shot would be exposed just right. The bracketing function centers its efforts around whatever exposure you've previously selected as the starting point, including any exposure compensation adjustments you've made.
White Balance is also set in the Mode Menu, with Auto, One Touch (Manual), or one of six Preset options: Daylight, Overcast, Tungsten, Daylight Fluorescent, Neutral Fluorescent, or Cool Fluorescent, to accommodate a variety of lighting situations. In One Touch mode, white balance is calculated by placing a white card in front of the lens and pressing the OK button. You can also fine-tune the white balance setting with the "WB+/-" setting under the Picture submenu. An adjustment bar appears on the LCD screen, with options to increase or decrease the red or blue tones. (I really like this idea of fine-tuning the white balance. Most digicams tend to have slight biases in their white balance systems under various lighting conditions. Once you get used to how a particular camera shoots, it would be very helpful to have this sort of "tweaking" adjustment available to modify the color shift. - More on this shortly.)
The C-4000 Zoom has a 12-second Self-Timer for self-portraits or those occasions when you don't want to risk camera shake by pressing the Shutter button to make the exposure.
The Function menu option lets you capture images in Black & White or Sepia modes, or use the White and Black Board settings for capturing text on white or black backgrounds respectively. (These modes appear to adjust image contrast and default exposure levels to maximize contrast and force the background toward the appropriate tonal value.)
The "Tweak" Adjustments
To my mind, one of the most powerful and unique capabilities of the C-4000 is embodied in what I call it's "tweak" functions. These are menu options that let you adjust several key exposure characteristics across a fair range of variation, in relatively small steps. I mentioned the white balance "tweak" above, that lets you vary the overall color balance of any selected white balance mode, pushing it toward either the red or blue ends of the spectrum. This can be enormously helpful in adjusting the camera's response to a specific light source, or simply for adjusting the minor color biases that always seem to be present in digicams to more closely match your personal preferences.
The C-4000's "tweaking" options don't end with color balance though, but go on to include contrast, color saturation, and in-camera sharpening as well.
Contrast is an exposure parameter that doesn't get a lot of attention in most camera reviews, but that can have a major impact on image quality. A lot of consumer-level digicams have their contrast artificially boosted to produce the bright, "snappy" images many consumers prefer. This makes for pictures with bright, vibrant colors and lots of "snap," but often leads to blown-out highlights, with lost detail in bright areas of the image. (The C-4000 itself exemplifies this common practice.) Many pros and advanced amateurs prefer images with well-controlled contrast, capturing the full tonal range of the subject and preserving detail in both highlights and shadows, albeit at the cost of images that may seem a little flat. A lot of people (myself included) fall somewhere in between. The C-4000 Zoom's Picture menu provides 11 steps of contrast adjustment, covering a fairly wide range in very small steps. This means you've got a pretty good chance of finding exactly the contrast level you're looking for somewhere among its settings. (I really do wish though, that Olympus either provided a wider range of variation, or centered the range around a less-contrasty setting. The C-4000's default contrast is fairly high, with the result that my personal preference was to set the contrast to -4 or -5 most of the time.)
Another critical image-quality parameter is color saturation. Here again, most consumers prefer brighter, more saturated colors in their photos, even if that's a less faithful reproduction of the original than a more subdued rendering would be. Here again, the C-4000 Zoom offers a wide range of variation, in relatively small steps. Rather than the "special effect" that saturation adjustments end up being on some competing camera models, the saturation menu on the C-4000 lets you precisely tailor the camera to suit your day to day picture-taking preferences.
Finally, there's the matter of in-camera sharpening. This represents a more difficult "tweak" to build into a camera's user interface, since there are actually a couple of different parameters that need to be adjusted to cover the range of possible variations. (Without going into any of the gory details, the two relevant variables are the radius of the sharpening operator, and the amount that's applied.) Nonetheless, the single adjustment provided in the C-4000 Zoom's Picture menu does a pretty good job of offering a range of variation that's both meaningful and useful.
It may seem that I'm spending a lot of time and energy on the C-4000 Zoom's "tweak" adjustments, given their sometimes subtle effect. For people who really care about the details of how their digicams record images though, their importance is hard to overstate. To find this level of control on a camera priced as affordably as the C-4000 Zoom is a double blessing. (You'll find a similar range of "tweak" adjustments in the Minolta Dimage 7i, but that's a considerably more expensive camera.)
Flash
The C-4000 Zoom has a fairly standard built-in flash unit, with four basic operating modes: Auto, Red-Eye Reduction, Forced Flash, and Flash Off modes. Flash range extends to approximately 11.8 feet (3.6 meters) at ISO 100, not only a respectable distance, but one that agrees with my own test results. (At ISO 400, the range would be twice as great, nearly 24 feet.) A Slow Synchro mode (set through the Shooting menu) combines a slow shutter speed with the flash to let more ambient light into the image. This results in more natural lighting behind flash-illuminated subjects. When photographing moving subjects, Slow Synchro will record some motion blur because of the longer exposure time, with the initial or final image frozen by the flash exposure. I say "initial or final," because the Slow 1 menu option fires the flash at the beginning of the exposure (producing a blur in front of the subject), while Slow 2 fires the flash at the end of the exposure (producing a blur behind the subject, where you'd generally expect to see it). There's also a Slow Red-Eye Reduction mode, for portraits.
A five-pin proprietary flash sync socket lets you connect an external flash to the camera for more powerful flash needs. Olympus offers the (very nice) FL-40 external flash as an accessory, which can be controlled through the camera. Both the internal and external flash units can be used together or separately. I have only one small, ergonomic gripe about the external flash (that I've also had with earlier Olympus models): The sync socket is protected by a tiny plastic cover that is very easy to lose. There's nothing attaching it permanently to the camera and it is very small and difficult to grasp.
Another nice feature of the C-4000 Zoom's internal flash system is its Flash Brightness adjustment, which allows you to change the flash brightness from +2 to -2 EV in one-third-step increments. When using the built-in flash with an external unit, you can use this feature to adjust the balance of light between the two.
While the C-4000 Zoom (and most other Olympus digicams) uses a proprietary flash sync connector, Olympus offers several adapter cables and brackets that make it easy to use generic strobes with the camera. (These are very difficult to find at retail, your best bet will probably be to buy them directly from Olympus here.)
Special Exposure Modes
Movie Mode
The C-4000 Movie mode is accessed via the Scene Program setting on the Mode dial on top of the camera. Movies can be recorded in either HQ (320 x 240-pixel) or SQ (160 x 120-pixel) resolution modes. Both record at approximately 15 frames per second. Movies are recorded without sound, but one benefit of this is that the zoom lens can be used while recording. (Zoom lenses generally aren't usable when recording movies with sound because the motors that actuate the zoom lens are too loud, interfering with the audio.) Maximum recording time per clip is limited by the C-4000 Zoom's buffer memory, but is fairly generous, as shown in the table below. Here's a copy of the recording time table from the manual:
|
|
|
|
|
|
||
|
|
(15 frames/sec) |
|
|
|
(15 frames/sec) |
|
The available seconds of recording time available on the memory card appear on the LCD monitor if it's activated, based on the quality mode selected. Note though, that regardless of the total amount of space available on the memory card, individual clips cannot be longer than the times shown in the table above.) You can use the zoom control while recording movies, but the motion of the zoom is somewhat slower than in still recording. Exposure Compensation, Focus Lock, Self-Timer, ISO setting, White Balance, and Function (B&W and Sepia) are also available while in Movie mode.
 First
seen in the Camedia C-3030 (February 2000), the C-4000 Zoom again offers in-camera
"editing" of movies in Playback mode. This capability is accessed
via the Playback menu, Movie Play submenu, and Edit option. In this mode (see
screen shot above), you can scroll forward and backward in the movie, and set
cut points at the beginning and end of a sequence of interest. Movie content
between the two cut points will be preserved, the rest discarded. In a nice
touch though, Olympus allows you to choose whether to modify the original movie
file, or just save a new copy of it, reflecting the effect of the edit you've
made, while the original file remains untouched. - This in-camera editing of
movies makes the function much more useful.
First
seen in the Camedia C-3030 (February 2000), the C-4000 Zoom again offers in-camera
"editing" of movies in Playback mode. This capability is accessed
via the Playback menu, Movie Play submenu, and Edit option. In this mode (see
screen shot above), you can scroll forward and backward in the movie, and set
cut points at the beginning and end of a sequence of interest. Movie content
between the two cut points will be preserved, the rest discarded. In a nice
touch though, Olympus allows you to choose whether to modify the original movie
file, or just save a new copy of it, reflecting the effect of the edit you've
made, while the original file remains untouched. - This in-camera editing of
movies makes the function much more useful.
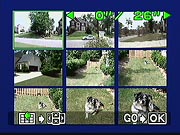 Another
very nice feature of the C-4000's movie mode is its "Index" capability,
a great way of quickly seeing what's "inside" a movie file. In Movie
Playback mode, selecting Index calls up a display similar to that shown in the
screenshot above right. Nine individual frames are shown, equally spaced throughout
the movie. You can change the part of the movie that's shown in the thumbnails
by moving the starting and ending frames shown. When you first enter the mode,
a green outline highlights the first frame. Pressing the right arrow key plays
the movie in slow motion. As the first frame advances, the seven intermediate
frames (between the first and the last) change to maintain their equal spacing
throughout the movie segment that remains. Pressing the left arrow key reverses
the playback, moving the first frame back toward the beginning of the movie.
Hitting the down arrow key switches the highlight to the last frame, letting
you change its position within the movie the same way. Once you've selected
the start and end frames you want, hitting the menu button again lets you save
the index display as a separate image file on the card. Index files for HQ-mode
movies are saved as 1024x768 images, while those for SQ-mode movies are saved
at a resolution of 640x480. These index files go a long way toward solving the
problem of knowing what's recorded in your movie files. About the only feature
I'd like to see added to the movie index display would be a way to "jump"
to one of the intermediate frames shown, as an enhancement to the editing capability
mentioned above. (This is the first time I've seen this particular function
on a digicam, so kudos to Olympus for thinking of it. Hopefully we'll see it
in more cameras as time goes on.)
Another
very nice feature of the C-4000's movie mode is its "Index" capability,
a great way of quickly seeing what's "inside" a movie file. In Movie
Playback mode, selecting Index calls up a display similar to that shown in the
screenshot above right. Nine individual frames are shown, equally spaced throughout
the movie. You can change the part of the movie that's shown in the thumbnails
by moving the starting and ending frames shown. When you first enter the mode,
a green outline highlights the first frame. Pressing the right arrow key plays
the movie in slow motion. As the first frame advances, the seven intermediate
frames (between the first and the last) change to maintain their equal spacing
throughout the movie segment that remains. Pressing the left arrow key reverses
the playback, moving the first frame back toward the beginning of the movie.
Hitting the down arrow key switches the highlight to the last frame, letting
you change its position within the movie the same way. Once you've selected
the start and end frames you want, hitting the menu button again lets you save
the index display as a separate image file on the card. Index files for HQ-mode
movies are saved as 1024x768 images, while those for SQ-mode movies are saved
at a resolution of 640x480. These index files go a long way toward solving the
problem of knowing what's recorded in your movie files. About the only feature
I'd like to see added to the movie index display would be a way to "jump"
to one of the intermediate frames shown, as an enhancement to the editing capability
mentioned above. (This is the first time I've seen this particular function
on a digicam, so kudos to Olympus for thinking of it. Hopefully we'll see it
in more cameras as time goes on.)
Panorama Mode
The C-4000 Zoom offers a Panorama exposure mode when using an Olympus brand panorama-enabled SmartMedia memory card. (All Olympus-branded SmartMedia cards incorporate this feature.) In this mode, the exposure and white balance for a group of shots are determined by the first exposure in the series, making them easier to stitch together in the computer later. The Panorama function is accessed in the Shooting menu through the Camera submenu, but only in the four main exposure modes. (P, A, S, or M) When activated, it provides light blue guide lines at the edges of the pictures to help you align successive shots, leaving enough overlap between them for the stitching software to do its job. Up to 10 shots can be taken in a panoramic series. Note that this function is only enabled by SmartMedia cards with built-in panorama-related firmware found on Olympus brand memory cards. Images are saved individually and then assembled on a computer after they've been downloaded.
Sequence Mode
Taking advantage of its relatively generous buffer memory, the C-4000 Zoom offers a Sequence mode that mimics the motor drive on a film camera, continually recording images for as long as the Shutter button is held down, or until the buffer memory is full (this varies with the image quality and subject, as well as available SmartMedia space). Available with all compression settings except uncompressed TIFF, the slowest available shutter speed in Sequence mode is 1/30 second, to prevent blurring from camera movement, or interference between the image-acquisition time and the demands of the continuous-mode processing. One notable limitation of the Sequence mode is that the camera's internal flash cannot be used, since it can't cycle fast enough to keep up with the camera's shooting. However, if you have an external flash capable of recycling at nearly two frames per second, and you shoot in Aperture Priority mode, an external flash may work just fine. (This limitation on flash recycling in continuous mode is a common constraint, faced by all consumer-level digicams that I'm aware of.) You can also set the camera to base all exposure and focus settings on the first shot taken, or to adjust the exposure and focus with each image (which decreases capture speed).
Shooting speed and sequence length in Sequence Mode are governed by the image size/quality settings you've selected. The frame rate varies between 1.5 and 1.8 frames/second, and the number of images you can record without pausing ranges from 3 at 2288x1712 and high image quality to 200 at 640x480 and normal quality. In "HQ" mode (2288x1712, normal quality), you can snap up to 15 frames before having to wait for the buffer memory to empty, although the cycle time slows to 0.84 seconds (1.19 frames per second) for the last shot. Even more impressive is what happens when you drop down to three megapixel resolution (2048x1536). In that mode, you can snap up to 11 shots at high image quality, or 40 (!) in normal quality, although the cycle time for the last three shots in the series stretches to 0.81 seconds (1.23 frames/second). These are really long sequence lengths, able to capture even extended action sequences.
"2 in 1" Mode
Also accessed through the camera's shooting menu, "2 in 1" mode captures a split-screen image. Once the mode is enabled, the camera guides you capture two sequential images, which it then assembles side by side as a single image. The first image takes up the left half of the screen, and the second is on the right. Because images are divided vertically, this mode will work best with vertical ("portrait") format subjects
Noise Reduction/Low Light
This isn't really a separate shooting mode, but deserves separate mention because of the impact it has on low light performance. All digital cameras are plagued by image noise on long exposures, particularly the "hot pixel" kind caused by leakage currents on the CCD array. This noise appears as isolated bright pixels of varying colors. Like many current higher-end cameras, the C-4000 Zoom employs a "dark frame subtraction" technique to remove the hot pixels. This means that when the noise reduction option is turned on, it takes the camera twice as long to complete an exposure, since it's actually taking two shots, one of the subject, and the other with the shutter closed. The second of these will contain only the CCD noise, which the camera then subtracts from the image of the subject. The results are pretty dramatic, making even the maximum 16 second exposures from the C-4000 quite usable, and easily extending the usable light range of the camera down to the 1/16 foot-candle (0.67 lux) limit of my testing.
Reader Comments! --> Visit our discussion forum for the Olympus C-4000 Zoom!

Follow Imaging Resource: