Olympus C-4040 ZoomOlympus introduces a top-of-the-line 4-megapixel model with noise reduction technology, optimum image enlargement, and newly designed interface<<Shutter Lag & Cycle Time Tests :(Previous) | (Next): Camera Modes & Menus>> Page 8:Operation & User InterfaceReview First Posted: 07/23/2001 |
 Operation and User Interface
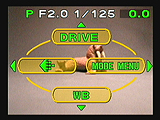
One of the most noticeable changes implemented with the C-4040 is the newly designed user interface. Previous Olympus digicams had a somewhat tedious LCD menu system, requiring you to scroll through pages of options and additional menus just to change one setting. The C-4040's menu system has been greatly simplified. Though there are still several pages of options, the main menu (known as the "Top Menu") is divided into smaller sub-menus, displayed on the screen as three or four buttons, each selected using the Arrow button that corresponds to its position on the screen. The right button is the Mode menu, which includes all of the sub-menus available for that particular Shooting or Playback mode. The Mode menu is divided into four subject tabs -- Camera, Picture, Card, and Setup -- with sub-menus appropriate to that subject tab. The other two or three buttons (top, left, and bottom) are "Short-Cut" menus that provide shortcuts to the most frequently used sub-menus, such as ISO, White Balance, and Quality settings, through the Setup submenu. (In the P and A / S / M modes, all of the Short-Cut buttons are user programmable.) Though it takes some getting used to, this setup is much more efficient than previous models, as you can make fast adjustments to three of the most often used settings.
The C-4040's external control layout is not much different from previous Olympus Camedia digicam setups. We were glad to see the addition of the AE Lock / Custom Function button. You can assign a specific adjustment to this button through the Mode menu (Setup sub-menu), creating a short cut to circumvent the menu system completely. For example, if you use the Quality adjustment a fair amount, you could assign it to the AE Lock / Custom Function button as a short cut.
Control Enumeration
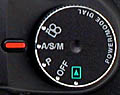
Mode Dial: On top of the camera is the Mode Dial, which turns the camera On or Off, and selects the various camera operating modes: Playback, Off, Program, Aperture / Shutter Speed / Manual (A/S/M), and Movie modes. Program and A/S/M are the Still Shooting or Record modes.

Shutter Button: Located in the center of the Zoom Lever, the Shutter button sets focus and exposure settings when depressed halfway and triggers the shutter when fully depressed.
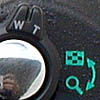
Zoom Lever: On top of the camera, in front of the Mode Dial, the Zoom Lever controls the optical zoom in all exposure modes, and the Digital Zoom when enabled through the Shooting menu. In Playback mode, the lever switches between Index view, normal image display, and playback zoom.

Flash / Erase Button: Located on the top, central portion of the camera's back panel, this button controls the Flash mode in all exposure modes. Pressing it cycles through Auto-Flash, Red-Eye Reduction, Forced Flash, and Flash Off modes. In Playback mode, this button pulls up the Erase menu, which allows you to erase the currently displayed image.
Spot / Macro / Print Button: Directly beneath the Flash / Erase button on the back panel is the Spot / Macro / Print button. In all Shooting modes, this button cycles between normal metering (Digital ESP), Spot metering, Macro (Closeup) focus mode, and Macro with Spot Metering modes. In Playback mode, this button pulls up the Digital Print Order Format (DPOF) print settings menu, which allows you to tag the current image, or all of the images on the card, for printing. Once the image is selected, you can set the number of copies, whether or not to print the date and time stamp on the photo, and print a cropped area of the image.
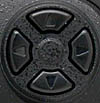
Four-Way Arrow Pad: The largest button on the back panel, the Arrow Pad controls many of the camera's operations. In all Shooting modes except Manual, the left and right Arrow buttons increase or decrease the exposure compensation setting (provided the LCD monitor is active). In Aperture or Shutter Priority exposure modes, the up and down Arrow buttons adjust the lens aperture or shutter speed settings, depending on which mode you've selected. In Manual mode, the up and down Arrows control shutter speed, while the left and right Arrows control aperture.
In Playback mode, the left and right Arrows move forward or backward through the pictures stored on the card, or scroll around portions of the expanded image in Zoom Playback mode.
In the LCD menu system, the Arrow buttons navigate through menu screens and select settings.

OK / Menu Button: Located below the four-way Arrow pad, this button activates the menu system on the rear panel LCD monitor and confirms selected menu settings in the LCD menu screens. If the LCD monitor is turned on when you press the Display button, it will call up the menu options and display them over the image. If the LCD monitor is off when you press Display, it brings up the camera's menu system with no viewfinder image. Holding this button down for approximately one second brings up the Manual Focus distance range, along with the AF and MF icons. Highlighting the MF icon with the right Arrow button engages the Manual Focus mode.

Display Button: Just to the right of the LCD monitor, encircled by a raised plastic lip, this button turns the LCD monitor on or off. If pressed twice in quick succession, it displays the Quick View function, which calls up the previously captured image on the screen. A third press returns the LCD to its normal display.

AEL / Custom / Protect Button: Located on the camera's back panel, below the Display button, this serves as an autoexposure lock in its default setting, or you can change it to a custom function through the Setup submenu. If pressed when Multi Metering mode is activated through the Shooting menu, this button takes up to eight spot meter readings and averages them for a final exposure. In Playback mode, it write-protects individual images against accidental erasure (except from card formatting).

Diopter Adjustment Dial: Located on the left side of the optical viewfinder eyepiece, this dial adjusts the optical viewfinder to accommodate eyeglass wearers.

Follow Imaging Resource: