Olympus C-750 Ultra Zoom4.0 megapixels, a sharp 10x zoom lens, tons of features, and an affordable price!<<Shutter Lag & Cycle Time Tests :(Previous) | (Next): Camera Modes & Menus>> Page 8:Operation & User InterfaceReview First Posted: 03/02/2003, updated 10/17/03 |
Operation and User Interface
The C-750's user interface is very similar to that of the preceding C-730 model,
as well as other recent Olympus C-series digicams. An intuitive set of menu
options is easy to navigate, and many common exposure options are controlled
externally. Even for users new to the interface, menu layouts are quite straightforward.
Because the EVF displays the same information as the larger LCD monitor, you
can quickly verify basic camera settings while aligning a shot, without having
to activate the larger LCD display. A Mode dial on top of the camera changes
capture modes quickly, and the AE Lock button can be customized to activate
a number of settings. When you do have to call up the LCD menu, a shortcut screen
appears first, with quick links to the image quality, white balance, and ISO
settings. (You can also edit these shortcuts through the Setup menu, to select
different camera functions for each.) Once you get into the actual Record menu,
options are organized by function, accessed by a series of tabs along the left
side of the screen. This layout lets you quickly skip to the options you need
without sifting through pages of menu items. In any of the manual exposure modes,
aperture and/or shutter speed is adjusted externally, as is exposure compensation.
Once you get the hang of things, the control layout is quite intuitive and efficient.
Control Enumeration

Mode Dial: On the top of the camera is the Mode Dial, which controls the camera's main operating mode. Choices are Playback, Auto, Portrait, Sports, Landscape/Portrait, Landscape/Scene, Night Scene, Self-Portrait, Movie, My Mode, Aperture / Shutter Speed / Manual (A/S/M), and Program modes.
Zoom Lever: On top of the camera, in front of the Mode Dial, the Zoom Lever controls the optical zoom in all exposure modes, and the Digital Zoom when enabled through the Record menu.
In Playback mode, the zoom lever switches between Index view, normal image display, and playback zoom, and controls the amount of playback zoom applied.
Shutter Button: Located in the center of the Zoom control, the Shutter button sets focus and exposure settings when pressed halfway and triggers the shutter when fully pressed.

Flash / Protect Button: Located on the top, right portion of the camera's back panel, this button controls the Flash mode in all still capture modes. Pressing it cycles through Auto, Red-Eye Reduction, Fill-in Flash, Flash Off, Slow Sync, and Slow Sync with Red-Eye Reduction modes.
In Playback mode, this button marks the displayed image for write-protection, or removes protection. Once protected, files cannot be erased or manipulated in any way, but will still be deleted if the memory card is reformatted.
Flash Release Button: Just above the Flash / Protect button, this button releases the pop-up flash from its compartment.

Spot / Macro / Print Button: Directly to the left of the Flash / Protect button on the back panel is the Spot / Macro / Print button. In all Record modes, this button cycles between normal metering (Digital ESP), Spot metering, Macro (Closeup) mode, and Macro with Spot Metering modes.
In Playback mode, this button calls up the Digital Print Order Format (DPOF) print settings menu, which lets you tag the current image, or all of the images on the card, for printing on a DPOF-compatible output device. Once an image is selected, you can set the number of copies, whether or not to print the date and time stamp on the photo, or whether to print only a cropped area of the image.

Self-Timer / Remote / Erase Button: Adjacent to the viewfinder eyepiece, on the right side, this button controls the camera's Self-Timer and Remote modes, cycling between the two and normal exposure mode in any record mode.
In Playback mode, this button lets you erase the current image. The camera presents a confirmation screen after the Erase button is pressed, to make sure you really meant to delete the image.
![]()
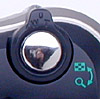
Diopter Adjustment Dial: To the right of the viewfinder eyepiece, this dial adjusts the electronic viewfinder's optics to accommodate eyeglass wearers. I don't have any way of measuring these adjustments, but the C-750's seems to cover a fairly wide range, accommodating even my 20/180 uncorrected vision.
![]()
Power Button: Directly above the top right corner of the LCD monitor, this red button turns the camera on and off.

AE Lock / Custom / Rotation Button: To the right of the Power button, this button locks the exposure setting in any record mode. Through the Setup menu, it can be customized to control a number of other menu functions.
In Playback mode, this button rotates the image display clockwise in increments of 90 degrees.
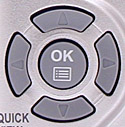
Four-Way Arrow Pad and OK / Menu Button: Made up of four buttons arranged in a circle around a central "OK" button, the Arrow Pad controls many of the camera's operations. In all capture modes except Manual, the left and right arrow buttons increase or decrease the exposure compensation setting. In Aperture or Shutter Priority exposure modes, the up and down Arrow buttons adjust the lens aperture or shutter speed settings, depending on which mode you've selected. In Manual mode, the up and down Arrows control shutter speed, while the left and right Arrows control aperture.
In Playback mode, the left and right Arrows move forward or backward through the pictures stored on the card, or scroll around portions of the expanded image in Zoom Playback mode.
In the LCD menu system, the Arrow buttons navigate through menu screens and select settings. The OK / Menu button in the center of the pad displays the settings menu in any camera mode, and also confirms menu selections.
In any capture mode, pressing and holding the OK button for a few seconds activates the camera's manual focus option. Press the right arrow key to enter manual focus mode, and then use the up and down arrow keys to adjust the focus.

Display Button: Just off the lower right corner of the LCD monitor, this button toggles the viewfinder display between the EVF and LCD monitors. If pressed twice in quick succession while in a capture mode, it displays the Quick View function, which calls up the previously-captured image on the screen and enables most playback-mode functions. A third press of this button or a half-press of the shutter button returns the LCD to its normal viewfinder display.

Follow Imaging Resource: