Nikon CoolPix 885More Pixels, More Features, (a little) More Money - Nikon extends their sub-compact Digicam line!<<Shutter Lag & Cycle Time Tests :(Previous) | (Next): Camera Modes & Menus>> Page 8:Operation & User InterfaceReview First Posted: 9/19/2001 |
Operation and User Interface
The Coolpix models all have a very similar user interface, with the main controls accessed via external buttons and dials, and the less frequently used adjustments available through the on-screen menu system. Because the 885 has such an extensive selection of "fine-tuning" options, its Custom menus are longer than normal and, in some cases, more difficult to navigate. Fortunately, you don't have to delve into those menus unless you want to. (They are also rather small and difficult to read, especially for users who are visually challenged by small typefaces.) The Auto and Movie modes have no on-screen menus at all, and the Scene mode simply provides you with a list of 12 possible shooting scenarios for which you only have to find the appropriate selection -- portraits, sunsets, night scenes, even ski slopes -- and the camera does all the adjusting for you, automatically compensating for darkness, bright sunlight, interiors, and much more. A series of five buttons around the LCD monitor -- each well-marked with its multiple functions -- provides a wide range of fingertip controls. As a group, they cover just about all of the bases: Flash, Self-Timer, Delete, Macro or Infinity focus, Quick Review, and the Menu button. The Multi-Selector control (what we normally refer to as a four-way arrow pad) is a little trickier to navigate, as the arrows often change operations from one mode to the next. However, this is a relatively minor gripe, since it doesn't take long to learn the protocol.
The User Manual is huge, more than 140 pages. As is the case with all Nikon manuals, it is very detailed and leaves very few questions unanswered (if you can take the time to go through it), and the Quick-Start sheet fills in when you just want to learn the bare basics. We did notice a few inconsistencies in the 885 manual though, such as button graphics that don't match the copy, but these are not likely to cause too much confusion. (Most likely a result of rewriting the 880 manual rather than starting from scratch.)
Overall, we were pleased with the 885's operation and layout. Here is a brief rundown of the buttons and menus and how they all fit into the camera's operation.
Control Enumeration
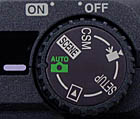
Mode Dial: Located on top of the camera, on the far right side, the Mode dial offers four Shooting modes, a Setup mode, and a Playback mode. Shooting modes include Auto Exposure, Scene, Custom, and Movie.
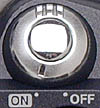
Power Switch: Positioned in front of the Mode dial, surrounding the Shutter button, the Power Switch turns the camera on or off.
Shutter Button: Encircled by the Power Switch, the Shutter button sets focus when halfway depressed and triggers the shutter when fully depressed. Pressing the Shutter button once in Self-Timer mode triggers a 10-second countdown, and pressing it twice triggers a 3-second countdown.
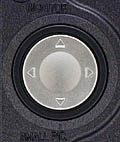
Multi Selector: This "rocker toggle" with four arrow directions marked on it, located near the center of the back panel, performs a variety of functions, including scrolling through images in Quick Review and Playback modes, navigating through camera menus, and controlling the monitor display. Individually, the four buttons perform the following functions:
- Up Arrow: In Shooting mode, turns the LCD monitor on and off, and changes the information display on-screen. In AF Area mode, shifts the autofocus area up. In Menu mode, moves the highlight bar up to make a selection.

- Left Arrow: In full-frame Playback and Quick Review modes, brings up the previously recorded image. In AF Area mode, shifts the autofocus area to the left. In Menu mode, returns to the previous menu.
- Right Arrow: In full-frame Playback and Quick Review modes, brings up the next recorded image. In AF Area mode, shifts the autofocus area to the right.
- Down Arrow: In full-frame Playback and Quick Review modes, creates a small-size picture file. In AF Area mode, shifts the autofocus area down. In Menu mode, moves the highlight bar down to make a selection.
![]()
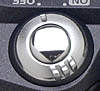
Flash Indicator: The top LED lamp next to the eye-level viewfinder is the red Flash Indicator, which glows steadily when the Flash is charged and ready to fire. When the lamp blinks red, the Flash is charging, and when the lamp is off, the Flash is turned off, or the Auto Flash has determined that a flash is not required.
![]()
Autofocus Indicator: The bottom LED lamp next to the viewfinder glows a steady green color when the subject is in focus. If it flickers, the camera is having trouble focusing on the subject. If the green light flashes after one or more exposures, it means the camera is recording images to the memory card. If the light flashes slowly, the Digital Zoom is activated.

Zoom Button: In Shooting mode, this button controls the optical zoom and digital zoom when engaged. Pressing the "W" side zooms the lens out to the wide-angle position, and pressing the "T" side zooms the lens in to the telephoto position. In Playback mode, pressing the "T" side enlarges the image on screen and pressing the "W" side cancels the enlargement.
![]()
Transfer Button: To the right of the eye-level viewfinder, the Transfer button is used to select images for transfer, and to transfer selected images from the camera to the computer while running NikonView software. When the camera is in Playback mode, the Transfer button is used to select images and movies for transfer to a computer at a later time.

Quick Review Button: Directly below the Multi Selector button, this control is used to view results of previously recorded images while still in Shooting mode. Pressing the button once brings up a thumbnail size review image in the upper left corner of the LCD monitor, while keeping the current, active LCD view on-screen. Pressing the button twice brings up a full-page review image.

EV / Delete Button: The first button in a series (left to right) under the LCD monitor, this button performs several functions when used in combination with other camera controls. Depending on the Shooting mode, it adjusts: Exposure compensation, shutter speed, aperture, and ISO. In Playback mode or Quick Review it is used to delete the currently displayed image.

Focus Mode / Self-Timer / Info Button: The second button under the LCD monitor, it functions as the Focus and Self-Timer selector in Auto, Scene, and Custom Shooting modes. Options include Autofocus (no icon), Landscape (mountain icon), Macro (flower icon), and Self-Timer (clock), which can be combined with Autofocus or Macro. In Playback mode, this button brings up information pages for individual images.

Flash Mode / Index Button: The third button under the LCD monitor, this controls the built-in Flash when the camera is in Shooting mode. Flash options include:
- Auto Flash: Automatically fires when the lighting is low.
- Flash Cancel (Off): Flash will not fire under any lighting conditions.
- Auto Flash w/ Redeye Reduction: This Flash option fires a small pre-flash before the main flash to shrink the size of the subject's pupils and reduce the effects of redeye
- Anytime Flash (Fill Flash): Automatically fires the flash no matter what the lighting conditions.
- Slow Sync: Auto flash combined with a slow shutter speed to record more ambient or background light.
In Playback mode, this button activates the image Index Display.

Menu Button: Located on the right side under the LCD monitor, the Menu button brings up the on-screen menu for the current operating mode. If the menu has more than one page, pressing the Menu button a second time displays the next page of the menu. When the last menu page is displayed, pressing the Menu button exits from the on-screen menu.
Battery Cover Latch: Pushing this sliding gray button opens the battery compartment door.
Camera Modes
![]()
Auto Mode: The Auto Shooting mode controls all exposure settings except Flash, Image Quality, and Image Size.
![]()
Scene Mode: The 885 offers 12 Scene exposure modes, which are preset for specific shooting situations.
 Portrait: Camera settings are optimized for close-up portrait photography. A large lens opening reduces the depth of field, so the subject stays in sharp focus, while the background clutter is blurred to make it less busy. You can use any Flash setting for this mode.
 Party / Indoor: Intended for indoor photography where light levels are low and you want to maintain as much detail as possible. It uses a slow shutter speed to record background lighting, with the Flash set on Auto Flash with Redeye Reduction. A tripod is highly recommended to prevent camera shake.
 Night Portrait: This mode is intended for photographing any close-up subject in a very dark setting. The camera uses a slow shutter speed to record as much ambient light as possible, and the Flash is set on Auto Flash with Redeye Reduction to fill in shadows on the subject if necessary. A tripod is highly recommended to prevent camera shake.
 Beach / Snow: Camera settings are optimized for very bright scenes that include large expanses of snow, beach, or water. As these subjects tend to trick the camera's exposure meter into underexposing the image, Exposure Compensation is adjusted to compensate for the overly bright readings. The Flash and Focus can be set to any mode.
 Landscape: Use this mode for daytime shots of city skylines, mountain ranges, landscapes, or other faraway subjects. The camera's aperture is set to its smallest setting to maintain the maximum depth of field and the Focus mode is set on Landscape (with an option to change it to Self-Timer). The Flash is automatically disabled since it does not have sufficient range to illuminate distant subjects. A tripod is recommended if light levels are low.
 Sunset: Intended for photographing colorful sunsets, usually in low light situations, this mode uses a slow shutter speed and sets the Flash mode to Off, to prevent it from firing. (Not mentioned in the manual, this mode also most likely sets some negative exposure compensation, and sets the white balance to daylight, to preserve the intense colors.) This mode is not recommended for photographing people against a sunset, unless you want them to be recorded as silhouettes with no facial detail. A tripod is highly recommended to prevent camera shake.
 Night Landscape: This mode is used for shooting night scenes with lots of colorful lights at a distance. Employs a slow shutter speed and sets the Focus on Infinity. Must be used with a tripod or other sturdy support.
 Museum: Intended for indoor photography at locations where flash is prohibited. Automatically cancels the flash and employs a slow shutter speed if necessary.
 Fireworks Show: For use when photographing fireworks displays. The camera responds more rapidly to the shutter button, focus is set on Infinity, flash is canceled, and the shutter speed set on slow. Must be used with a tripod or other sturdy support.
 Close-up: Used for close-up pictures of small subjects such as flowers and insects. Cancels the flash, sets focus on Macro, and sets the AF Area mode to Manual so you can choose the area of the picture you want to be in focus.
 Copy: Optimizes camera for copying text or drawings on a white background.
 Backlight: Use this mode for high-contrast situations where your subject is backlit by a bright light source. The Flash is set on Anytime (Fill) Flash to fill in the shadows on the subjects' faces.
![]()
Movie Mode: This Shooting option records movies (without sound) at 320 x 240-pixel resolution, for a maximum of 40 seconds each. Recording begins when the Shutter button is fully depressed, and ends when the Shutter button is depressed a second time (or when the 40 seconds is up or the memory card runs out of space). As the movie is recording, a countdown display is shown on the LCD monitor, indicating the number of seconds remaining in the exposure. Movies are stored as QuickTime files, with .MOV at the end of the file name. The Flash is turned off in this mode, and the Focus is set on Autofocus.
![]()
Playback Mode: The Playback mode displays the most recently recorded image or movie as a full-size still image on the LCD monitor. In single-image playback, you can scroll through stored images using the Left and Right Arrow buttons on the Multi-Selector control panel; adjust the information display by pressing the Focus / Info button; play a movie by pressing the Quick Review button (when the movie is displayed on-screen) and pause it with the same button; and you can select the currently displayed image for transfer to the computer by pressing the Transfer button on the camera's back panel. You can also Delete the currently displayed photo with the EV / Delete button, view multiple images in Index mode by pressing the Flash / Index button, zoom in on the currently displayed still image with the Zoom button, and bring up the Playback menu by pressing the Menu button.
In single-image playback mode, images are displayed briefly as low-resolution photos while they are being read from the memory card (indicated by the appearance of an hourglass icon on the monitor). By pressing the Left and Right Arrow buttons quickly, you can scroll through the low-resolution images without having to wait for each image to load at full resolution, or you can hold down the Arrow buttons and view the image numbers flashing in the lower right corner of the screen. Releasing the Arrow button at a particular frame number will bring up that photo.

Follow Imaging Resource: