Nikon CoolPix 990Nikon updates the hugely successful Coolpix 950, with 3.34 megapixels and numerous enhancements<<Operation & User Interface :(Previous) | (Next): Image Storage & Interface>> Page 9:Camera Modes & MenusReview First Posted: 3/1/2000 |
Camera Modes and Menus
 Automatic Record Mode: Accessed by turning the Power/Mode dial to the "A" setting, this mode puts the camera in charge of exposure and focus, but still leaves settings like flash, exposure compensation, size, quality and the self-timer under the user's control. Pressing the Menu button in this mode pulls up the following Setup menu:
- Folders: pulls up a sub-menu that allows users to create, delete and rename image storage folders in separate groups (much like the 950). This also allows users to select which folder images will be saved to.

- Monitor Options: pulls up a sub-menu that allows users to adjust the brightness and hue of the LCD monitor display.
- Shutter Sound: turns the shutter sound on or off.
- Auto Off: allows users to set the auto-off delay to 30 seconds, one minute, five minutes or 30 minutes.
- Seq. Numbers: turns the file numbering sequence on or off as well as resets the current sequence.
- Card Format: Formats the CompactFlash card and erases all folders and images.
- Date: sets the camera's internal date and time.
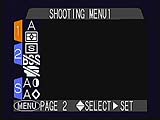
Manual Record Mode: Accessed by turning the Power/Mode dial to the "M" setting, this mode offers several options for manually controlling exposure (Program, Flexible Program, Aperture Priority, Shutter Priority and Manual). Program puts the camera in charge of aperture and shutter speed, while the user can control things like white balance, motor drive, etc. Flexible does the same, but allows the user to select between various combinations of shutter speed and aperture settings. Aperture and Shutter Priority put the user in charge of either the aperture or shutter speed while the camera controls the other value. And finally, Manual lets the user control both aperture and shutter speed, independent of the camera's exposure system. All of these capture modes are accessible by pressing the Mode button and turning the command dial until the desired mode appears on the status display. Pressing the Menu button in this mode pulls up the following settings menus:![]()
 Screen One
- White Balance: pulls up a sub-menu with seven white balance options: Auto, White Balance Preset, Fine (Outdoors), Incandescent, Fluorescent, Cloudy and Speedlight (flash balanced).
- Metering: offers 256 Segment Matrix, Center-Weighted, Spot and Spot AF Area metering options.
- Continuous: offers six "motor-drive" options: Single exposure, Continuous Shooting, Multi-Shot 16, VGA Sequence, Ultra-High Speed, and Movie.
- BSS: turns the Best Shot Selector function on or off.
- Lens: lets the user select between Normal (built-in lens), Wide Adapter, Telephoto 1 (a 2x adapter), Telephoto 2 (a 3x adapter), Fisheye 1 and Fisheye 2 options to accommodate the specified accessory lens. As noted in the main review, the different options adjust various exposure and zoom setting options to best accommodate the chosen lens.
- Image Adjust: allows the user to further alter the image with options of Auto, Normal, More Contrast, Less Contrast, Lighten Image, Darken Image and Black & White. (See discussion under Exposure section of the review, above.)
- Image Sharpening: adjusts the in-camera sharpening to Auto, High, Normal, Low or Off.)
 Screen Two
- User Setting: allows the user to save up to three different sets of user settings to be recalled at any given time (useful for quickly switching between groups of settings for different shooting scenarios).
- Exposure Options: allows the user to turn the AE Lock and Auto Bracketing on or off as well as adjust the exposure compensation. (While exposure compensation can be set from this menu entry, you would more commonly do so via the top-panel +/- button and function wheel.)
- Focus Options: selects between AF Area Modes (Auto, tracking/manual/center, or off), Autofocus Modes (Continuous or Single AF), Peaking (On, Off, Manual Focus only), and Distance Units (feet/meters) focusing modes.
- Zoom Options: allows the user to activate the digital telephoto, designate the startup position (wide, telephoto, or the last-used position, a feature we found particularly welcome). Also lets you select the Fixed Aperture option, which keeps the aperture fixed as the lens zooms. (This last useful for flash photography, with external strobe units.)
- Speedlight Option: allows the user to adjust the flash intensity (+/- 2EV unit range in 1/3 EV steps) and set up the internal and/or external speedlight options (both active or internal flash off).
- Reset All: resets all the menu options to factory defaults (it thankfully does give you an option to back out if you decide you want to).
 Setup Screen
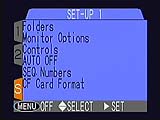
- Folders: pulls up a sub-menu that lets users create, delete and rename image storage folders in separate groups (much like the 950). This also lets users select which folder images will be saved to.
- Monitor Options: pulls up a sub-menu that allows users to adjust the brightness and hue of the LCD monitor display.
- Shutter Sound: turns the shutter sound on or off.
- Controls: allows the user to program the Function 1 and 2 buttons (Mode and -/+ buttons) to set up specific exposure functions. (VERY handy!)
- Auto Off: allows users to set the auto-off delay to 30 seconds, one minute, five minutes or 30 minutes.
- Seq. Numbers: turns the file numbering sequence option on or off as well as resets the current sequence.
- Card Format: Formats the CompactFlash card and erases all folders and images.
- LED Shot Confirm: turns the shot confirmation light on and off. (This is a small orange LED on the front of the lens housing that illuminates briefly after the shutter trips, as an indication that the shot has been taken. Useful for self-timer shots taken without flash.)
- Date: sets the camera's internal date and time.
- Video Mode: sets the video format to NTSC or PAL.
- Language: sets the camera language to German, English, French or Japanese.
Play Mode: Accessed by turning the Power/Mode dial to the Play position, this mode allows users to view captured images and movies. The right and left arrow buttons scroll through images while the Delete and Index Display buttons (beneath the LCD panel) offer quick image deletion and display. Pressing the Menu button in this mode pulls up the Play settings menu:![]()
 Screen One
- Delete: lets the user delete a Selected Image, All Images, Erase Folder or Print Set. (A "Print Set" refers to the set of images currently marked for printing, using the DPOF (Digital Print Order Format))
- Folders: allows the user to create, delete or rename folders as well as select the playback folder from a list.
- Slide Show: starts a slide show playback of all images in a folder and allows the user to set the frame interval.
- Protect: allows the user to select individual images for write protection.
- Hide Image: allows users to hide selected images from view.
- Print Set: allows users to select individual images and mark them on the memory card for subsequent printing by a standalone printer. (This uses the standard Digital Print Order Format (DPOF) protocol.)
 Setup Screen
- Monitor Options: pulls up a sub-menu that allows users to adjust the brightness and hue of the LCD monitor display.
- Shutter Sound: turns the shutter sound on or off.
- Auto Off: allows users to set the auto-off delay to 30 seconds, one minute, five minutes or 30 minutes.
- Seq. Numbers: turns the file numbering sequence option on or off as well as resets the current sequence.
- CF Card Format: Formats the CompactFlash card and erases all folders and images.
- LED Shot Confirm: turns the shot confirmation function on and off.
- Date: sets the camera's internal date and time.
- Video Out: sets the video format to NTSC or PAL.
- Language: sets the camera language to German, English, French or Japanese.

Follow Imaging Resource: