Nikon Coolpix 8700Nikon moves into 8 megapixel territory with a long zoom, and a new body, but the same legendary Nikon feature set!<<Operation & User Interface :(Previous) | (Next): Image Storage & Interface>> Page 9:Camera Modes & MenusReview First Posted: 03/22/2004 |
Record Mode: The rear-panel Mode switch selects between Record and Playback modes. Within Record mode, four main exposure modes are available: Program AE (with Flexible Program), Aperture Priority, Shutter Priority, and Manual. Pressing the Menu button in Record mode calls up the following menu screens:
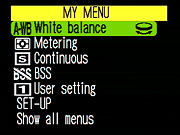
My Menu
 This
is a limited menu that can be customized. By default, it shows White Balance,
Metering options, Continuous mode selected (Single is oddly enough a Continuous
mode), BSS (Best Shot Selector) control, User setting selector, Setup, and
Show all menus. Unfortunately, there does not appear to be an option to just
skip My Menu and go directly to all menus all the time. So the fastest route
is to scroll up, which takes you to the bottom of the screen, or Show all
menus. Press right and you've entered the real menu.
This
is a limited menu that can be customized. By default, it shows White Balance,
Metering options, Continuous mode selected (Single is oddly enough a Continuous
mode), BSS (Best Shot Selector) control, User setting selector, Setup, and
Show all menus. Unfortunately, there does not appear to be an option to just
skip My Menu and go directly to all menus all the time. So the fastest route
is to scroll up, which takes you to the bottom of the screen, or Show all
menus. Press right and you've entered the real menu.
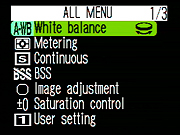
Screen One
 White
Balance: Displays a sub-menu with seven white balance options: Auto,
White Balance Preset, Daylight, Incandescent, Fluorescent, Cloudy, and
Speedlight (flash balanced), Shade.
White
Balance: Displays a sub-menu with seven white balance options: Auto,
White Balance Preset, Daylight, Incandescent, Fluorescent, Cloudy, and
Speedlight (flash balanced), Shade.
- Metering: Offers 256 Segment Matrix, Spot, Center-Weighted, and Spot AF Area metering options.
- Continuous: Offers five "motor-drive" options: Single exposure, Continuous High Speed, Continuous Low Speed, Multi-Shot 16, Ultra-High Speed, and Movie. (See the Exposure section of this review for more information on each of these modes.)
- BSS: Turns the Best Shot Selector function on or off.
- Image Adjustment: Lets you alter the camera's tonal response, with options of Auto, Normal, More Contrast, Less Contrast.
- Saturation Control: Controls the amount of color saturation, and includes a black and white monochrome mode.
- User Setting: When you first power the camera up, it's in a fully-automatic
mode, and none of the sophisticated options are available. (They simply
don't appear on the menu system at all.) In this mode, hitting the Menu
soft key brings up the Setup menu, with User Setting highlighted as
a default option. Selecting C.1 or C.2, instead of the default Auto
enables full camera controls, showing the expanded menu system seen
in the screenshots here. The two User settings let you save completely
different camera setups that include such things as white balance, focus
modes, metering modes, etc, and then rapidly switch between them. A
good system overall, but I bet it'll stump a lot of new owners until
they read the manual. I haven't mentioned Scene Mode, also an option
in the User Setting window, one that will take a little more explaining.
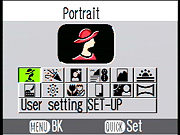 Scene
Mode: Also likely to stump those who don't bother with
the manual are the Scene Modes. 12 "scenes" have
been preprogrammed for the situations that most cameras make
mistakes on, as follows:
Scene
Mode: Also likely to stump those who don't bother with
the manual are the Scene Modes. 12 "scenes" have
been preprogrammed for the situations that most cameras make
mistakes on, as follows:
- SCE1 Portrait biases exposures to wide apertures for blurred backgrounds
- SCE2 Party/Indoor is for capturing background detail and unique indoor lighting
- SCE3 Night Portrait flashes foreground subject while preserving night look in background with a slightly longer exposure after the flash.
- SCE4 Beach/Snow handles the brightness of snow/sand/water reflections without darkening the overall image unnecessarily.
- SCE5 Landscape, lens focuses at infinity and outlines, colors, and contrast are enhanced.
- SCE6 Sunset, preserves deep hues in sunsets and sunrises.
- SCE7 Night Landscape, slow shutter speed for capturing lights at night, noise reduction turns on, focus set at infinity.
- SCE8 Fireworks show, slow shutter speeds, focus set to infinity
- SCE9 Close Up, camera focuses continuously until shutter is pressed halfway, when it is locked.
- SCEa Copy, used for capturing documents.
- SCEb Back Light, provides fill flash for backlit subjects.
- SCEc Panorama assist, displays a ghost of
the previously captured image on a third of the
screen so that images can be lined up with some
overlap.
Screen Two
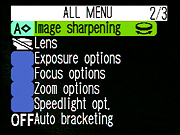 Image
Sharpening: Adjusts the in-camera sharpening to Auto, High, Normal,
Low, or Off.
Image
Sharpening: Adjusts the in-camera sharpening to Auto, High, Normal,
Low, or Off.
- Lens: Sets up the camera's zoom and autofocus for use with Nikon's auxiliary lenses. Lets you select between Normal (built-in lens), Wide Adapter, and Telephoto. The different options adjust various exposure and zoom setting options to best accommodate the chosen lens.
- Exposure Options: Controls the AE Lock function, as well as the maximum bulb exposure duration. (The default is one minute, but you can optionally set it to permit exposures as long as five minutes.)
- Focus Options: Selects between AF Area Modes (Auto, Manual, or Off), Autofocus Modes (Continuous or Single AF), and Focus Confirmation (MF, On, Off).
- Zoom Options: Sets up Digital Telephoto, Fixed Aperture, and Zoom Speed options.
- Speedlight Options: Sets auto/manual flash popup, Flash exposure compensation, and the ability to have both internal and external flashes on, or internal off.
- Auto Bracketing: Accesses the Auto Bracketing and White Balance
Bracketing functions.
Screen Three
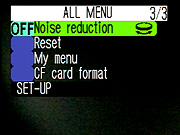 Noise
Reduction: Activates the Noise Reduction feature for shooting in
low-light situations. Noise reduction processing only applies to exposures
of 1/4 second or longer, but note that leaving it enabled all the time
will significantly reduce the maximum shooting speed in continuous capture
mode.
Noise
Reduction: Activates the Noise Reduction feature for shooting in
low-light situations. Noise reduction processing only applies to exposures
of 1/4 second or longer, but note that leaving it enabled all the time
will significantly reduce the maximum shooting speed in continuous capture
mode.
- Reset All: Resets all the menu options to factory defaults (it also (fortunately) gives you an option to back out if you decide you want to).
- My Menu: allows selection of what will appear in simplified menu.
- CF Card Format: formats card.
- Setup: Opens up the Setup menu, which follows.
Setup Screens
Screen 1
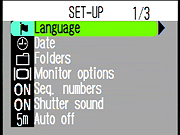 Language:
Changes the menu language to German, English, Spanish, French, Italian,
Dutch, Swedish, Chinese, Japanese, and Korean. It's rather impressive
that the languages are intelligently in the script of their native speakers,
unlike many other products.
Language:
Changes the menu language to German, English, Spanish, French, Italian,
Dutch, Swedish, Chinese, Japanese, and Korean. It's rather impressive
that the languages are intelligently in the script of their native speakers,
unlike many other products.
- Date: Sets the camera's internal date and time.
- Folders: Brings up a sub-menu that lets you create, delete, and rename image storage folders in separate groups. This also lets you select which folder images will be saved to.
- Monitor Options: Displays a sub-menu to adjust both the brightness and hue of the LCD monitor display, or change the display mode (options are Monitor On, Review Only, Preview Only, Monitor Off). You can also set the Start-Up display mode, which activates either the EVF or LCD monitor with startup. The Shutter Release Speed option, which sets the shutter response time to Normal or Quick Response modes, has been carried forward from the 5700 model. Quick Response lets you snap another shot with the same exposure settings very quickly, if you hit the shutter button while the previous shot is still being displayed. You can also set which LCD starts up by default, the EVF or LCD panel. And you can set the Welcome Screen to either the default Nikon screen or to an image of your own choosing.
- Seq. Numbers: Turns the file numbering sequence option on or off, as well as resets the current sequence.
- Shutter Sound: Turns the shutter annunciator on or off.
- Auto Off: Allows users to set the auto-off delay to 30 seconds,
or 1, 5, or 30 minutes.
Screen 2
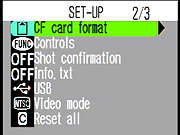 CF
card format: Another place to format the CF card.
CF
card format: Another place to format the CF card.
- Controls: Customizes the controls of the camera. Options are Memorize,
Func, and AE-L/AF-L
- Memorize - Controls which settings made by the user remain in memory when the power is turned off. Flash mode, focus mode, exposure mode, and exposure compensation can all be independently selected to be memorized, or reset to their defaults when the power is cycled.
- Func - Choose which of a variety of functions are assigned to the top-panel "Func" button. Functions available for assignment include user setting, focus mode, flash mode, white balance, and metering pattern.
- AE-L/AF-L - Lets you choose whether the AE-L/AF-L button locks exposure, focus, or both.
- Shot Confirmation: lights self-timer lamp when shutter has tripped. Handy for use in Self-timer mode, MultiShot 16 mode, and some continuous modes.
- Info.txt: When set to ON, creates a text file with details about each photo captured in the folder.
- USB: Sets the type of USB connection to PTP or Mass Storage. PTP lets OS X Macs and Windows XP computers recognize the camera as a camera, linking it to the built-in photo utilities that are part of the operating system. Personally though, I always prefer connecting cameras as mass storage devices, since that gives me more flexibility about what I do with my photos, and usually results in faster download times as well.
- Zoom Options: Activates digital telephoto, also lets you select the Fixed Aperture zoom option, which keeps the lens aperture at the same setting as the lens zooms. There's also a Zoom Speed setting, which offers High and Low zoom speeds.
- Video Mode: Establishes the video format as NTSC or PAL.
- Reset All: Resets everything to default.
 Screen
3
Screen
3
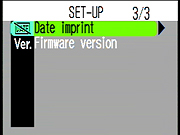
- Date Imprint: Prints either the date or the date and time on each image.
- Firmware Version: Displays data on firmware on the camera. Firmware
is the word for software that is loaded onto a chip in the camera. Cameras
with firmware can usually be updated to support new features, or updated
to fix bugs.
Playback Mode: Accessed by flipping the rear-panel mode switch to
the "Play" position (or by hitting the Quick Review button twice
in rapid succession), this mode lets you view captured images and movies.
The right and left arrow buttons scroll through images while the zoom control
magnifies the image, or lets you view an "index" display of four
or nine images at a time. The Delete button enables quick image deletion.
Pressing the Menu button in this mode calls up the Playback settings menu:
Screen One
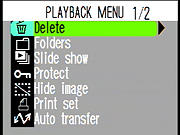 Delete:
Erases the Selected Image, All Images, Print Set, or Transfer marking.
(A "Print Set" refers to the set of images currently marked
for printing, using the DPOF (Digital Print Order Format), while Transfer
refers to images which have been marked for automated upload to your
computer.)
Delete:
Erases the Selected Image, All Images, Print Set, or Transfer marking.
(A "Print Set" refers to the set of images currently marked
for printing, using the DPOF (Digital Print Order Format), while Transfer
refers to images which have been marked for automated upload to your
computer.)
- Folders: Lets you create, delete, or rename folders on the memory card, as well as select the playback folder from a list.
- Slide Show: Starts a slide show playback of all images in a folder and lets set the interval between frames (2, 3, 5, 10 seconds).
- Protect: Write-protects individual images from accidental erasure (except from card formatting).
- Hide Image: Hide selected images from the playback view. Hidden images can subsequently only be seen via the Hide Image menu option, and are protected from accidental erasure via the delete image function. They will, however, still be erased if you reformat the card.
- Print Set: Marks individual images for printing on a DPOF compatible device.
- Auto Transfer: Specifies whether the Nikon View software will automatically transfer files from the camera when connected.
- Move Image: Allows moving images from one folder to another.
- CF Card Format: Yet another place to format the CF card.
- Small Pic: Controls the size of copies created with the Small Pic Function, good for creating smaller versions of files that you can easily email with a press of the shutter button while in playback mode.
- Setup Screen: Same as setup screen in Record mode.

Follow Imaging Resource: