Canon PowerShot S50A sleek design, a hot custom processing chip, new-look user interface, direct support for a Canon inkjet printer, and *five* megapixels of resolution!<<Shutter Lag & Cycle Time Tests :(Previous) | (Next): Camera Modes & Menus>> Page 8:Operation & User InterfaceReview First Posted: 02/27/2003 |
Operation and User Interface
The PowerShot S50's user interface is straightforward and should present a relatively
short learning curve if you read over the Camera User Guide. (Although
there are a lot of features here, so I'd imagine that novice users could
easily spend a couple of hours learning them all. Experienced digicam users
should be able to come up to speed in under an hour though.) I generally prefer
to see external access to as many exposure controls as possible, and the S50
provides a fair amount of control without resorting to the LCD menu. In fact,
one major improvement over the previous S40 model is the new Function menu,
accessed via the FUNC button (though it still relies on the LCD monitor). Instead
of successively cycling through a series of Function and Effects menus, the
new Function menu displays all of its options at once, meaning you only have
to scroll down to the desired option. (Previously, you had to keep pressing
the EV/Function button until the option appeared on-screen.) Also, the Function
menu offers image resolution and quality settings, making them slightly faster
to access than fishing through the main Record menu as on earlier models. The
S50's control buttons are somewhat spread out, so you'll likely have to operate
the camera with two hands when adjusting settings or using the Manual Focus,
although the Zoom and Multicontroller buttons are directly adjacent to the Shutter
button, so you can easily shoot one-handed in most situations.
Shutter Button: Located on the right side of the camera's top panel, when the Shutter button is halfway depressed, it sets focus and exposure, and when fully depressed, it trips the shutter release. In Self-Timer mode, fully depressing the Shutter button triggers a two- or 10-second countdown before the shutter is released.
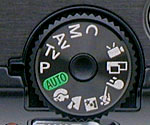
Mode Dial: To the left of the Shutter button, this notched dial is used to select the camera's shooting modes. Canon divides these functions into three categories: Auto, Image Zone, and Creative Zone. The options are as follows:
![]()
Auto: The camera controls everything about the exposure, except for Flash and Macro modes, and image size and quality settings.
"Creative Zone"
 Program
AE (P): Places the camera in control of shutter speed and lens aperture,
while you maintain control over everything else (i.e., white balance, ISO,
metering, exposure compensation, flash, etc.).
Program
AE (P): Places the camera in control of shutter speed and lens aperture,
while you maintain control over everything else (i.e., white balance, ISO,
metering, exposure compensation, flash, etc.).
 Shutter-Speed
(Tv): Allows you to set the lens aperture from f/2.8 to f/8.0 (depending
on the zoom setting), while the camera controls the shutter speed. In this
mode, you maintain control over all other exposure variables.
Shutter-Speed
(Tv): Allows you to set the lens aperture from f/2.8 to f/8.0 (depending
on the zoom setting), while the camera controls the shutter speed. In this
mode, you maintain control over all other exposure variables.
 Aperture-Priority
Av (Av): Allows you to control the shutter speed settings from 1/1,500
to 15 seconds, while the camera controls the aperture. All other exposure
settings are available.
Aperture-Priority
Av (Av): Allows you to control the shutter speed settings from 1/1,500
to 15 seconds, while the camera controls the aperture. All other exposure
settings are available.
 Manual
(M): Provides complete control over all exposure settings, including shutter
speed and lens aperture.
Manual
(M): Provides complete control over all exposure settings, including shutter
speed and lens aperture.
 Custom
(C): Accesses a set of previously-saved exposure settings.
Custom
(C): Accesses a set of previously-saved exposure settings.
"Image Zone"
 Portrait:
Uses a large aperture setting to blur the background and keep the primary
subject in sharp focus.
Portrait:
Uses a large aperture setting to blur the background and keep the primary
subject in sharp focus.
 Landscape:
Employs a small aperture setting to help keep both the background and foreground
in focus.
Landscape:
Employs a small aperture setting to help keep both the background and foreground
in focus.
 Night
Scene: Uses slower shutter speeds and flash for more balanced nighttime
exposures. The slow shutter speed allows more ambient light to be recorded
in the background, while the flash illuminates and freezes the subject. The
Red-Eye Reduction mode can be used with this exposure mode to eliminate redeye
in night portraits.
Night
Scene: Uses slower shutter speeds and flash for more balanced nighttime
exposures. The slow shutter speed allows more ambient light to be recorded
in the background, while the flash illuminates and freezes the subject. The
Red-Eye Reduction mode can be used with this exposure mode to eliminate redeye
in night portraits.
 Fast
Shutter: Uses fast shutter speeds to stop action and maintain sharp focus
on moving subjects.
Fast
Shutter: Uses fast shutter speeds to stop action and maintain sharp focus
on moving subjects.
 Slow
Shutter: Uses slow shutter speeds to deliberately blur fast-moving subjects.
Slow
Shutter: Uses slow shutter speeds to deliberately blur fast-moving subjects.
 Stitch-Assist:
Allows you to record a series of images, either horizontally, vertically,
or in a clockwise, four-quadrant pattern, to be "stitched" together
into one large image or panorama on a computer.
Stitch-Assist:
Allows you to record a series of images, either horizontally, vertically,
or in a clockwise, four-quadrant pattern, to be "stitched" together
into one large image or panorama on a computer.
 Movie:
Records as much as three minutes of moving images with sound, at approximately
15 frames per second.
Movie:
Records as much as three minutes of moving images with sound, at approximately
15 frames per second.
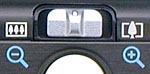
Zoom Lever: Located in front of the Shutter button, the Zoom lever extends the lens to maximum telephoto range when pushed to the right, and returns the lens to maximum wide-angle when pushed to the left. When Digital Zoom is engaged, pushing the Zoom Lever past maximum telephoto activates the Digital Zoom function. In Replay mode, the Zoom lever magnifies the on-screen image when pushed to the right and returns it to normal magnification when pushed to the left.

Replay Button: Beneath the Mode dial, the Replay button automatically puts the camera in Replay mode from any Shooting position. When the lens cover is closed, pushing the Replay button to the right turns on the camera in Replay mode. Pushing the button a second time turns off the Replay function.
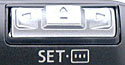
Multicontroller: Located in the top right corner of the back panel, the Multicontroller operates similarly to the round arrow pads found on many digital cameras. The left and right arrows press down on either end in a conventional manner, while the up and down buttons operate by rotating the cylindrical-shaped control up and down. Pushing down on the center serves as the camera's Set button to confirm menu choices. The arrow keys navigate through menu options, while the Set button confirms menu selections.
Pressing the Set button without an on-screen menu active lets you adjust the AF area, using the arrow keys to move the AF target frame freely around an area covering roughly 60 percent of the frame.

Menu Button: The top button on the right of the LCD monitor is the Menu button, which calls up the Record, Setup, My Camera, and Replay menus on the LCD display in all camera modes. A second press of the Menu button cancels the menu display.

Display Button: Just beneath the Menu button, the Display button controls the LCD monitor's display mode. In Record mode, this button turns on the image display with the first press, activates the information display with the second press, and cancels both with the third press. In Replay mode, the button cycles through the captured image information displays.

Macro / Jump Button: Left of the optical viewfinder is the Macro / Jump button, which accesses the Macro function when the camera is in Record mode. In Replay mode, it calls up the "jump bar." When the jump bar is displayed, the right and left arrow buttons jump nine images forward or backward at a time, letting you quickly scan through the images on the memory card.

Flash / Index Display Button: Positioned in the very top left corner of the back panel, this button cycles through the Red-Eye Reduction (Auto), Auto, Red-Eye Reduction (Flash On), Flash On, and Flash Off flash modes. In playback mode, this button displays up to nine images at a time, in a thumbnail index format, on the LCD screen.

Exposure Compensation (EV)/White Balance (WB) / FUNC. Button: The top
button on the left of the LCD menu, this button activates the on-screen Function
menu. You can scroll between the menu items by pressing the up or down arrows
on the Multicontroller, and select options for each with the left and right
arrow buttons. Here's the list of options that can be controlled from here:
 Exposure
Compensation: Increases or decreases the exposure from -2 to +2 EV
in one-third-step increments.
Exposure
Compensation: Increases or decreases the exposure from -2 to +2 EV
in one-third-step increments.
- White Balance: Sets the white balance value to Automatic, Daylight, Cloudy, Tungsten, Fluorescent, Fluorescent H, Flash, or Custom, with an option to save two different Custom settings for later use.
- Drive: Accesses Single, Continuous, or High-Speed Continuous shooting modes, as well as the two- and 10-second Self-Timer modes.
- ISO: Sets the camera's light sensitivity to Auto, or 50, 100, 200, or 400 ISO equivalents.
- Effects: Enables several image effects, including Vivid Color, Neutral Color, Low Sharpening, Sepia, Black and White, or Custom. The Custom option lets you adjust Contrast, Sharpness, or Saturation, by pressing the Metering button while Custom is selected.
- Bracketing: Activates the Auto Exposure Bracketing or Focus Bracketing modes. When either mode is selected, pressing the Metering button accesses the exposure/focus parameters.
- Flash Exposure Compensation: This option lets you adjust the flash exposure compensation from -2 to +2 EV in one-third-step increments. Or, if the Flash Adjust option of the Record menu is set to Manual, you can adjust the flash power to 1/3, 2/3, or Full output.
- Resolution and Quality: This setting adjusts the image resolution, with options of L (2,592 x 1,944 pixels), M1 (1,600 x 1,200 pixels), M2 (1,024 x 768 pixels), S (640 x 480 pixels), or RAW. Pressing the Metering button changes the setting to image quality, with options of Superfine, Fine, and Normal.
![]()
Manual Focus / Delete Button: Located beneath the FUNC. button, the Manual Focus / Delete button activates the Manual Focus if held down in Record mode, while the up or down arrow on the Multicontroller is actuated. In Replay mode, this button brings up the Delete menu on the LCD monitor.
![]()
Metering / Audio Button: Just below the Manual Focus / Delete Button
button, this control places the camera in Evaluative Light Metering, Center-Weighted
Averaging, and Spot AE Point metering modes when the camera is in Record mode.
The Metering button also accesses secondary menu options in the Function menu,
when indicated on the LCD display. Pressing this button in Replay mode allows
you to record up to 60 seconds of sound with individual images.

Follow Imaging Resource: