Olympus D-490 ZoomOlympus updates a popular 1.3 megapixel model to 2 megapixels, with improved features.<<Optics :(Previous) | (Next): Shutter Lag & Cycle Time Tests>> Page 6:Exposure & FlashReview First Posted: 10/28/2000 |
Exposure
The D-490 is great for consumers who want the uncomplicated ease of a point-and-shoot camera. Exposure control is almost entirely automatic, with the camera taking complete control of shutter speed and aperture. The user has the option of adjusting exposure by changing exposure compensation, white balance, metering, ISO setting, image quality, and other settings through the LCD-based menu system. This more extensive LCD menu system is a bit of a departure from the early D-400 designs, which had more control buttons to handle these features.
Exposure Compensation (EV adjustment)
Exposure compensation is controlled through the Record menu, and is adjustable from -2 to +2 Exposure Value units (EVs) in half-step increments. (Each full EV unit corresponds to a doubling or halving of the exposure.) Once you�ve chosen the appropriate EV value, press the OK button to confirm the selection. You can cancel the adjustment through the same process or by closing the lens cover to power down the camera. Olympus warns that this setting may not be as effective when shooting with the flash. As with recent D-400 models, we'd prefer to see an EV adjustment that doesn't rely on the LCD menu system. If the setting was shown on the top status display panel, it could be changed with fewer steps.
Spot Metering Mode
The D-490 offers two metering options: Digital ESP and Spot metering. Both are accessible through the Record menu. The benefit of spot metering is that most metering systems that average the light reading from the entire picture area are easily fooled by backlit or high-contrast scenes. EV adjustments can help with these situations, but spot metering offers a better solution, since it only measures a tiny area in the center of the viewfinder. You can lock the exposure by holding down the shutter release button half way once you�ve metered the area you want properly exposed, then move the camera to reframe the image before you fully depress the shutter.
White Balance
The D-490's White Balance (WB) system adjusts an exposure to compensate for differences in color temperatures from different light sources. The five White Balance options (located in the Record menu) are: Auto (automatically sets the white balance), Daylight (for sunny, outdoor scenes), Cloudy (for overcast days), Incandescent (for typical household lights), and Fluorescent (for offices or large areas that are illuminated by fluorescent tube lights). Once you�ve made your selection, press the OK button to confirm the setting, and the designated icon will appear in the status display panel on top of the camera. You can cancel the setting by reselecting Auto, or by closing the lens cover. We found the D-490's white balance system worked quite well under moderate light changes, but had difficulty with the strong yellowish cast of household incandescent lighting.
Flash
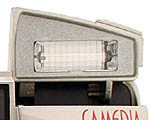 Activating the D-490's flash is simple, just pop
it up with the tab on the front of the camera, and set it to the desired mode
via the flash button on the back panel. The camera will indicate if it thinks a
flash is needed for the exposure by flashing the orange LED next to the optical
viewfinder after the focus has been set. It will also display the flash symbol
on the LCD monitor, if it's activated. You can choose from six flash modes: Auto
(no icon displayed), Redeye Reduction (eyeball icon), Fill-in Flash (lightning
bolt), Off (lightning bolt with a slash), Slow Shutter Synchronization Auto
(lightning bolt with the word "slow" displayed), and Slow Synchronization with
Redeye Reduction (lightning bolt, "slow" and eyeball icons). While Olympus
reports this as six flash modes, the forced Off mode is controlled by merely
closing the flash itself, not through the flash button. Remember that if the
orange LED continues to blink even though the flash is in the "up" position, the
camera is still charging the flash, and isn't ready to fire. Olympus rates the
D-490's flash power as having a maximum range of 8.5 feet (2.6 meters) in
telephoto mode and 13 feet (4 meters) in wide angle mode. In our own tests, we
found the flash highly effective as far away as 14 feet, even in telephoto
mode.
Activating the D-490's flash is simple, just pop
it up with the tab on the front of the camera, and set it to the desired mode
via the flash button on the back panel. The camera will indicate if it thinks a
flash is needed for the exposure by flashing the orange LED next to the optical
viewfinder after the focus has been set. It will also display the flash symbol
on the LCD monitor, if it's activated. You can choose from six flash modes: Auto
(no icon displayed), Redeye Reduction (eyeball icon), Fill-in Flash (lightning
bolt), Off (lightning bolt with a slash), Slow Shutter Synchronization Auto
(lightning bolt with the word "slow" displayed), and Slow Synchronization with
Redeye Reduction (lightning bolt, "slow" and eyeball icons). While Olympus
reports this as six flash modes, the forced Off mode is controlled by merely
closing the flash itself, not through the flash button. Remember that if the
orange LED continues to blink even though the flash is in the "up" position, the
camera is still charging the flash, and isn't ready to fire. Olympus rates the
D-490's flash power as having a maximum range of 8.5 feet (2.6 meters) in
telephoto mode and 13 feet (4 meters) in wide angle mode. In our own tests, we
found the flash highly effective as far away as 14 feet, even in telephoto
mode.Variable ISO
As with previous D-400 models, the D-490 provides variable ISO settings, a very useful feature on digicams. Through the Record menu, you can select from Auto, 100, 200 or 400 ISO settings. Similar to film-based cameras, the ISO refers to the light sensitivity of the capture medium (film or digital CCD). A higher ISO will enable you to shoot with faster shutter speeds and/or smaller apertures than would be needed at a lower ISO, but the resulting image may appear grainy or noisy. While the noise can become fairly pronounced at the higher ISO settings, this option is particularly valuable when you have to shoot at low light levels with longer exposure times. The ability to capture these types of images at all is a tremendous bonus. Higher ISO settings are also valuable in fast-action photography, where higher shutter speeds are better at freezing action.
Self-Timer
Activated by the Self-timer button on the back panel, the D-490's self-timer gives you a 12-second countdown before firing the shutter. The operation is pretty much the same as with other digital cameras. When you engage this mode, the self-timer icon is displayed on the LCD monitor as well as the small status display panel on top of the camera. Then, all you do is fully depress the shutter button to trigger the timer and wait (or run around to the front of the camera to get into the picture). A red LED lights up on the front of the camera to indicate that it's counting down the time, and blinks for the last few seconds before the shutter is tripped. (If you have the beep sounds enabled via the Record menu, the camera also beeps as a warning just prior to the exposure.)
Sequence Mode
The Sequence mode allows you to shoot multiple frames of a scene at approximately half-second intervals. Although Olympus claims that the camera will take as many as 45 sequential exposures, the actual number will depend on the image quality chosen and storage space available. Flash is not available in this mode and the shutter speed is fixed to go no slower than 1/30 second. In Sequence mode, the camera will snap pictures one after another as long as you hold down the shutter button. (Note that shot-to-shot speed is a strong function of the image quality, and you'll only get the two shots per second in "SQ" mode.)
Panorama
The camera's Function option (available through the Record menu) allows you to take panoramic images when a standard Olympus memory card is used. This camera feature is the only one that requires an Olympus brand SmartMedia card, all other camera features work just fine with third party cards. In Panorama mode, blue cropping lines appear to help you line up each image of a panorama sequence and you can take as many exposures as you have room for on the card. All of the exposure settings are determined by the initial exposure, to make "stitching" on the computer easier. Panorama mode is canceled by switching it off in the Record menu. Flash is not available in this mode and Olympus suggests maintaining the same lens focal length (zoom setting) after shooting the first picture to avoid problems when you assemble the pictures. The company also recommends shooting in SQ (standard quality) mode to save SmartMedia space. We just recommend buying a larger memory card, since you're likely to want one anyway!
QuickTime Movies
The D-490 Zoom's QuickTime Movie feature is new to the D-400 series of Olympus digital cameras, though it has been available on higher-end Olympus models for some time. Accessible through the Function option in the Record menu, the QuickTime Movie feature offers two quality settings: High-Quality (HQ) resolution is 320 x 240-pixels; Standard Quality (SQ) resolution is 160 x 120-pixels. In HQ mode, the recording will last approximately 15 seconds. In SQ mode, it will last approximately 60 seconds, but the quality will be significantly lower than with HQ. To record a QuickTime movie, you scroll to the Function Shooting option in the Record menu (identified by a keystone shape with a star inside). Select the movie camera and press OK. A movie camera will appear in the upper left corner of the LCD monitor, and a number will appear in the lower left corner (to count down the seconds), along with a memory gauge (vertical bar) that fills up as you near the end of the recording. To record the movie, frame your subject, depress the shutter button all the way, and hold it down until a beep sounds to signal the end of the recording. The green LED light in the optical viewfinder will blink as the recording is loaded onto the SmartMedia card. You can review the movie in Playback mode. Needless to say, QuickTime Movies take up a lot of space on your card, but if you manage to get a good movie (sometimes it requires a lot of retakes), the novelty and memory is worth every megabyte!
Sharpness Setting
The Sharpness setting was introduced with the previous Olympus D-460 model. Indicated on the Record menu by a circle with a solid and dotted edge, the Sharpness setting gives you the option of taking pictures with Normal or Soft sharpness. Olympus suggests using the "Soft" setting when photographing subjects that will be heavily manipulated on the computer. (In-camera sharpening tends to cause problems when working on images in the computer. You're better off working with an unsharpened image and sharpening it at the end, after you're through with all your manipulations.) While we appreciate this new feature, we'd also like to see an in-camera "Sharpen More" feature to take images in the opposite direction.
Reader Comments! --> Visit our discussion forum for the Olympus D-490 Zoom!

Follow Imaging Resource: