Back
to Full Nikon D70 Review
Back
to Full Nikon D70 ReviewGo to Nikon D70 Data Sheet
Go to Nikon D70 Pictures Page
Up to Imaging Resource Cameras Page
Use your browser's "Back" button to return to the previous page, or the links at the top and bottom of this page to navigate to related information. If you have difficulty fitting the text on this page onto your printer output, simply resize your browser window to a narrower width and print again.
Remember us when it's time to buy!
Dave here: Have our reviews been helpful to you? (Is this article you're reading right now useful?) Preparing this level of information on as many products as we do is incredibly hard work, not to mention expensive. Things on the Internet may look like they're free, but they're not. (As a lot of big dot.com companies are finding out these days.) Somewhere, somebody has to pay to produce worthwhile content. YOU can help us though, by remembering us when it comes time to make your purchase. Would you consider coming back to our site and clicking-through to one of our advertisers to make your purchase? Every dollar you spend with one of our advertisers helps us directly (in affiliate fees) or indirectly (the advertiser will keep renewing their ad contract with us). To make it easy for you to support us, here's a URL you can visit, to see all our current advertisers, with links to click on that will register your visit to them as having come from our site. It's up to you where you buy, but Mike, Mike, Kim, Yazmin, Marti and I would be really grateful if you'd help us out by choosing one of our advertisers to purchase from.
Thank you for your support!
Dave Etchells, Founder & Publisher
Visit our "Buy Now" Page:
https://www.imaging-resource.com/buynow.htm
Back
to Full Nikon D70 Review
Go to Nikon D70
Data Sheet
Go to Nikon D70
Pictures Page
Up to Imaging Resource Cameras
Page
Nikon D70The Nikon D70 is an "entry-level" SLR loaded with features at a sub-$1,000 price. Review First Posted: 04/14/2004 |
|
 |
|
Price breakthrough brings high-quality digital body for under $1,000. |
| |
6.1 megapixel CCD, 3,008 x 2,000 pixel images | |
| |
ISO from 200 to 1600 | |
| |
3 frames per second with instant power-up | |
| |
Part of Nikon "Total Imaging System" | |
| |
Compatible with >90% of all Nikon F-mount lenses ever made! |
Manufacturer Overview Learn how to really use full-functioned cameras like this one - Visit our free Photo Lessons area!
The new Nikon D70 is just the latest in a long line of impressive photographic
tools from one of the leaders of the photo industry. Long an established leader
in the film world, Nikon is a name that is immediately associated with professional
and quality photography. Though immediately identifiable with professionals,
they are recognized as a maker of quality cameras for consumers as well. Their
pro line of film cameras includes the legendary F3, continuously produced for
over 20 years now, and new legends in the making, like the F5 and F100, known
for their toughness and advanced features. In the world of digital, Nikon has
a commanding presence in the "prosumer" market with their Coolpix
series. The Coolpix 900 broke new ground when it was introduced several years
back, followed by the 2 megapixel 950, then the 3 megapixel 990. Lately they've
advanced their "prosumer" line beyond what even their current SLRs
offer with the 8 megapixel Coolpix 8700, with an ED glass lens and a flip out
swivel screen for easy composition from many angles. They've also broadened
the consumer end of their line with the recently introduced Coolpix 3200--an
education in compact camera design and ease of use--and the Coolpix 3700 with
its sleek, compact design, one of our favorite Coolpix designs to date. The
"Nikon Total Imaging System also includes a very successful line of "Coolscan"
film scanners, which we're reviewed elsewhere.
Free Photo Lessons
In early 1999, Nikon entered the professional digital arena with their first all-digital SLR, the D1. The 2.7 megapixel price and list price of $5,850 for the body rocked the pro camera world. Under two years later they raised the bar again with the D1x, a 5.47 megapixel camera at an even lower price point than the D1. Then last year came the D100, with a full 6.1 megapixel imager going for under $2,000, available most places now for around $1,500, body only. This offering was the first Nikon to really draw in the advanced amateur, film SLR owner who has been waiting for just such a product. Then Canon hit the street with a sub-$1,000 digital SLR with a bundled lens to meet that magical $999.99 price point that lured consumers in droves. As they did in the film arena with their N55 to N80 range of cameras, Nikon answered, this time with a camera that exceeds the capabilities of Canon's Digital Rebel. Nikon's answer, the D70, does not include a lens at the sub-$1,000 price, but it has a whole lot more features and a more solid feel than the competition. For an additional $300, users get a special 18-70mm lens (equivalent to a 27-105mm zoom on a 35mm camera), designed just for the camera's smaller sensor. Further, the new camera is compatible with almost the entire range of Nikon's F-mount AF lenses. A lower price is great, but we have to see what compromises Nikon had to make, if any, and whether those compromises will result in significantly reduced image quality over the current Nikon benchmark, the D100. Read on for our detailed analysis. (We'll give you a hint though - There are precious few compromises to be found anywhere in the D70.)
High Points
Comparison with other models
Given all that's new and improved with the D70, I thought it would be helpful to readers to compare its features against those of the earlier D100, as well as against Canon's Digital Rebel and EOS-10D models. Here's the results of my poring through the spec sheets for the various cameras, as well as my own previous tests and reviews:
| Nikon D70 vs. D100 and Canon Digital Rebel, EOS-10D | |||||
| |
D70 | D100 | |
|
|
| Imaging System |
Imaging Element/Effective Pixels | CCD, 6.24 Megapixels 6.1 effective |
CCD, 6.31 Megapixels 6.1 effective |
CMOS 6.5 Megapixels 6.3 effective |
|
| Effective Sensor Size | 15.6 x 23.7mm | 15.1 x 22.7mm | |||
| Picture angle reduction, vs 35mm frame | Approx 1.5x | Approx. 1.6x | |||
| Image Processor | Not stated | |
|||
| Viewfinder | Type | Eye-level pentamirror | Eye-level pentaprism | Eye-level pentamirror | Eye-level pentaprism |
| Coverage | 95% horizontally and vertically | ||||
| Magnification (-1 diopter with 50mm lens at infinity) | 0.75x | 0.8x | 0.8x | 0.88x | |
| Eyepoint | 18mm | 20mm | 21mm | 20mm | |
| Dioptric Adjustment Range | -1.6 to +0.5 diopter | -2.0 to +1.0 diopter | -3.0 to +1.0 diopter | ||
| Focusing Screen | B-type BriteView clear matte screen, with on-demand grid lines | Fixed, all-matte screen | Fixed, new laser matte screen | ||
| Viewfinder Info Display |
AF information (AF points, focus confirmtation, AF area mode, AE/AF lock indicator), exposure information (shutter speed, aperture value, manual exposure, AE/AF lock indicator, exposure level, flash exposure, exposure compensation indicator), flash-ready indicator, shots remaining, battery level | AF information (AF points, focus confirmation light), exposure information (shutter speed, aperture value, manual exposure, AE lock, exposure level), flash information (flash ready, red-eye reduction lamp on, high-speed sync, FE lock), shots remaining, CF card information | AF (AF points, focus confirmation light), exposure (shutter speed, aperture value, manual exposure, AE lock, exposure compensation amount, AEB level, partial metering area), flash (flash ready, red-eye reduction lamp on, high-speed sync, FE lock, flash exposure compensation amount), warnings (exposure warning, improper FE lock warning, CF card full warning, CF card error warning, no CF card warning, busy), maximum burst for continuous shooting, shots remaining | ||
| Depth of Field Preview | Enabled with depth-of-field preview button | ||||
| Recording System |
Recording Media/Quantity/Slot Type | CF card/1 slot/Type I or II | |||
| Compatible File Formats | FAT 16/32 |
||||
| Recording Formats | RAW (NEF), JPEG | RAW (CRW), JPEG | |||
| Maximum Resolution | 3,008 x 2,000 | 3,072 x 2,048 | |||
| Reduced Resolutions (JPEG only) | 2,240 x 1,488; 1,504 x 1,000 | 2,048 x 1,360; 1,356 x 1,024 | |||
| RAW + JPEG Recording | Yes/Basic JPEG only | No | Yes/Middle
Fine JPEG only, embedded in RAW |
Yes/Selectable
JPEG resolution/compression |
|
| Color
Space & White Balance |
User-Selectable Color Space | Yes sRGB (two variants) + Adobe RGB |
sRGB + Adobe RGB |
||
| Processing Parameters (Contrast, Sharpness, Saturation, Color Tone)/# of Increments |
6 options each for sharpness and contrast, 3 options for saturation. 7-step hue adjustment. Digital vari-programs preset various processing parameters as well, and color space III boosts saturation somewhat. | 5 options for sharpening, 6 for contrast, 7 for hue, none for saturation. Second sRGB color space boosts saturation somewhat. | (Same as 10D, but new is default sets: one mimics 10D settings and one boosts contrast, saturation, and sharpening for snappier prints. This is the factory default setting) |
|
|
| Preset WB settings | 6 (Daylight, Cloudy, Shade, Incandescent, Fluorescent, Flash) | ||||
| Manual Color Temperature Setting Range | (No Kelvin option, but very broad Preset WB range) | None | 2,800 ~ 10,000K in 100K increments |
||
| WB Adjustment Range | ±3 steps in 1-step increments 10 mireds per ste |
±3 steps in 1-step increments 5 mireds per step |
|||
| Autofocus System |
Type | TTL phase detection by Nikon Multi-CAM900 autofocus module | TTL-CT-SIR with a CMOS sensor (TTL secondary image registration, phase detection) |
||
| # of Focusing Points (Focusing Point Type) / Superimposed Display | 5 points / Yes | 7 points (1 cross-type, 2 horizontal-type, 4 vertical-type) / Yes | |||
| AF Working Range | EV -1 ~ 19 | EV 0.5 ~ 18 | |||
| AF-assist Beam | Bright incandescent lamp, (Range approx. 3.0 m, 9.8 ft, depending on lens.) Not dependent on flash setting. | Yes, stroboscopic flash (Range: Approx. 4.0m / 13.1ft. at center, approx. 3.5m/11.5ft. off-center) Note: Only available when flash is enabled. | |||
| One-shot AF | Available in all modes | Enabled in Portrait, Landscape, Close-up (Macro), Night Portrait, and A-DEP modes. | Enabled
in Portrait, Landscape, Close-up (Macro), Night Portrait, and A-DEP modes. Selectable in Program, Shutter Priority, Aperture Priority and Manual modes. |
||
| AI Servo (Tracking) AF | Available in all modes | Enabled in Sports mode only. | Enabled in Sports mode. Selectable in Program, Shutter Priority, Aperture Priority and Manual modes. |
||
| AI Focus AF | Slightly different, but closest-subject focus priority available in all modes | Enabled in Full Auto, Flash Off, Program, Shutter Priority, Aperture Priority, and Manual modes. | Enabled in Full Auto and Flash
Off modes. Selectable in Program, Shutter Priority, Aperture Priority, and Manual modes. |
||
| Exposure Control |
Shooting Modes | 11 - Program, shutter-priority AE, aperture-priority AE, Manual, Auto, Portrait, Landcape, Close up, Sports, Night Landscape, Night Portrait. | 4 - Program, shutter-priority AE, aperture-priority AE, manual mode. | 12 - Program AE (Full Auto, Portrait, Landscape, Close-up, Sports, Night Portrait, Flash Off, Program), shutter-priority AE, aperture-priority AE, depth-of-field AE, manual exposure, ETTL autoflash | |
| Metering Zones | 1,005 | 10 | 35 | ||
| Metering Modes | 1) 3D color matrix metering with 1,005-pixel RGB sensor(2) Center-weighted: Weight of 75% (8mm dia. circle) given to 6, 8, 10, or 13 mm dia. circle in center of frame, or weighting based on average of entire frame(3) Spot: Meters 2.3 mm dia. circle (about 1% of frame) centered on active focus area | 1) 3D Matrix Metering with 10-segment SPD, 2) Center-Weighted, 3) Spot Metering | Evaluative (linked to any AF point), center weighted average (set automatically in manual mode), 9% partial | Evaluative (linked to any AF point), center weighted, 9% partial | |
| Metering System Working Range | 1) EV 0 to 20 (3D color matrix or center-weighted metering)2) EV 2 to 20 (spot metering) (ISO 100 equivalent, f/1.4 lens, 20°C/68°F) | 1) Matrix Metering: EV 0-21; 2) Center-Weighted Metering: EV 0-21; 3) Spot Metering: EV 3-21 (at normal temperature, ISO 100 equivalent, f/1.4 lens) | EV 1 ~ 20 | ||
| ISO Range / Extended | 200-1600 | 200-1600 / 3200 | 100 ~ 1600 / -- | 100 ~ 1600 / 3200 | |
| Exposure Compensation | +/- 5EV in 1/2 or 1/3EV increments (can be combined with AEB) | +/- 2EV in 1/3EV increments (can be combined with AEB) | +/- 2EV in 1/2 or 1/3EV increments (can be combined with AEB) | ||
| Automatic Exposure Bracketing | 2 or 3 shots, 1/3, 1/2, 2/3 or 1 EV steps | 2 or 3 shots, 1/3, 1/2, 2/3 or 1 EV steps | +/- 2EV in 1/3EV increments | +/- 2EV in 1/2 or 1/3EV increments | |
| Shutter
Speeds, Frame Rate, Shutter Lag |
Shutter Type | Combined mechanical and CCD electronic shutter | Electronically controlled mechanical | Mechanical, all speeds electronically controlled | |
| Shutter Speed Range | 30 to 1/8000 sec. in steps of 1/3 or 1/2 EV, bulb | 30 to 1/4000 sec. and Bulb | 30 to 1/4000 sec. (1/3EV increments) and bulb | 30 to 1/4000 sec. (1/2 or 1/3EV increments) and bulb | |
| Maximum Frames Per Second/Buffer depth | 2.92 fps / unlimited (In JPEG large/normal, with fast card) | 2.88 fps / 9 frames | 2.5 fps / 4 frames | 2.94 fps / 9 frames | |
| Shutter lag, full AF | 0.34-0.49 | 0.15 | 0.25-0.28 | 0.146 | |
| Shutter lag, prefocus | 0.124 | 0.100 | 0.142 | 0.146 | |
| Startup time | ~ Zero | 0.63 sec | 3.09 sec | 2.32 sec | |
| Flash | Built-in Flash / Guide Number at ISO 100. | Yes (12 meters / 39 feet) | Yes (13 meters / 43 feet) | ||
| Max flash x-sync speed. | 1/500 (!) | 1/180 | 1/200 | 1/200 | |
| Flash Exposure Compensation | -3 to +1 EV, 1/3 or 1/2 EV steps | No | +/- 2EV in 1/2 or 1/3EV increments | ||
| Slow-sync flash | 1st or 2nd curtain | 1st curtain only | 1st or 2nd curtain | ||
| i-TTL flash | Yes | No | n/a | n/a | |
| D-TTL flash | No | Yes | n/a | n/a | |
| PC Sync Terminal | Hot shoe only | Hot shoe only | Yes | ||
| Playback System |
LCD Size / Pixel Count | 1.8 in LCD / 130,000 pixels | 1.8 in LCD / 118,000 pixels | 1.8 in. LCD / 118,000 pixels | |
| Enlarged Playback / Scroll | 1.1 - 4x in 10 steps / Yes | 1.5~10x in 15 steps / Yes | |||
| LCD Monitor Brightness Adjustment Range | 5 steps | ||||
| Automatic Rotation for Vertical Shots | Yes | No | Yes | ||
| Other Features | USB Connection | Yes, PTP-compliant (v2.0 standard, v1.1 speed) | Yes, USB 1.1 | Yes, PTP-compliant, USB v 1.1 | |
| Direct Printing (PictBridge-compliant printers) | Yes | No | Yes | Yes (Not PictBridge, select Canon models only.) | |
| Menu Languages | 11 (Japanese, German, English, Spanish, French, Korean (?), Italian, Simplified Chinese, Dutch, Swedish) | 12 (English, German, French, Dutch, Danish, Finnish, Italian, Norwegian, Swedish, Spanish, Simplified Chinese, and Japanese.) | |||
| Camera Default Reset | Yes | ||||
| Custom Functions (Quantity / Settings) | Yes (9 or 25) | Yes (24) | No | Yes (17) | |
| Remote Control | Optional IR | Optional, 10-pin remote terminal available in optional Multi Function Battery Pack | Optional, Compatible with Remote Switch RS-60E3, Remote Controller RC-5 / RC-1 | Optional, N3-type remote control | |
| LCD Panel Illumination | Yes (dedicated button) | ||||
| Text Comments | Yes, stored in EXIF headers | No | |||
| Body Structure | Body Cover/Chassis | Largely Plastic | Metal | Largely Plastic | Magnesium Alloy/Stainless Steel |
| Power System | Battery Compatibility | EN-EL3, CR2 pack (3 cells) |
EN-EL3 | Main: BP-511 / BP-512 Backup: CR2016 |
Main: BP-511 / BP-512 Backup: CR2025 |
| Rated Shooting Capacity at 20C/68F | 100% AE: 2000 50% Flash: 400 |
100% AE: 1600 50% Flash: 370 |
100% AE: 600 50% Flash: 400 |
100% AE: 650 50% Flash: 500 |
|
| Dimensions & Weight | Dimensions (WxHxD,mm) | 140 x 111 x 78 | 144 x 116 x 80.5 | 142 x 99 x 72.9 | 149.7 x 107.5 x 75 |
| Weight | 595g/21 oz (body only) | 700g /24.7 oz (body only) | 560g/19.7 oz. (body only) 653g/23.0 oz (with battery & card) | 790g/27.9 oz. (body only) | |
| Lens Compatibility | Lens Mount / Compatibility |
|
EF / All EOS lenses, plus Digital Rebel specific EF-S 18-55mm f/3.5-5.6 lens | EF / All EOS lenses | |
Executive Overview
In a bid to bring digital SLR photography into the mainstream, Nikon has introduced the D70. Looking much like a 35mm SLR, the D70 has a professional, though simplified appearance. Equipped with a 6.1 megapixel CCD, the D70 captures very high-resolution images with superb detail and excellent color. Replete with auto and manual exposure modes, the D70 is ready for whatever type of shooting its owner desires, with an instant-on feature for immediate picture-taking, and several scene modes that bias the settings for the best results in a number of common shooting situations.
Capitalizing on the broad line of Nikon optics, the D70 has a standard F lens mount that accommodates most of Nikon's 35mm lenses. This is one of the key advantages of SLR cameras: Interchangeable lenses offer greater flexibility than even high-end prosumer cameras, despite the latters' attachable accessory lenses. Use of the near-historic F mount means that a huge range of lenses originally developed for film cameras can operate on the D70, although older lens models may have quite a few limitations.
The D70 offers several focusing options, including Manual, Single-Servo AF, and Continuous-Servo AF for moving subjects. A five point AF system can be used in three modes: Single Area, Dynamic Area, and Closest Subject. There is no analytical mode (to match Canon's "AI" mode), where the camera looks at the scene and makes decisions based on content, but Nikon chose to leave the photographer greater control over focus. In the first two modes, the user is free to pick a focus point. You can set the AF Point Lock switch to L to keep the focus point set indefinitely at the location you've chosen. Switch it to the dot, and it can be changed, but again only in Single Area and Dynamic Area modes. The user uses the MultiSelector nav disk on the back to move the focus point around in the viewfinder.
The D70 features a true TTL (through the lens) optical viewfinder, complete with information display along the bottom. This shows shutter speed, exposure compensation, flash status, focus point and mode, focus lock, and flash status among others.
The five focus areas are marked by round-edged rectangles that overlay the image. Whether chosen by the user or the camera, the active focus area is highlighted in red when focus lock is achieved under dim lighting, or turns black if the light in the frame is brighter. In either condition, the focus indication can be lost in the details. A brighter light would be better. Custom setting 8 activates an optional Grid Display, useful for matching to the horizon line in landscape shots, walls and floors in architectural shots, or when using a tilt or shift lens.
A diopter correction slider next to the viewfinder can be adjusted from -1.6 to +0.5 to accommodate eyeglass wearers; optional corrective lenses are available that extend the range from -5 to +3.
As is the case with most digital SLRs, the D70's LCD monitor is solely for viewing captured images and displaying the menu system, not for framing shots. (I'm careful to mention this for those potential users accustomed to composing pictures in point-and-shoot rangefinder-style digital cameras, who are considering moving up to a more capable camera.) Also important to know is that digital SLR cameras capture only stills, not video or audio.
In playback mode seven information screens are available, giving a great deal of detail, plus a histogram and highlight displays. The highlight display shows any blown-out highlights, flashing the overexposed areas from white to black. This is something we'd like to see on all digital cameras, including consumer models, to let you know when portions of a photo have been overexposed.
Because this is meant as a consumer SLR, Nikon has added quite a few Scene modes in addition to the usual Program, Aperture Priority, Shutter Priority, and Manual exposure modes that appeared on the D100. The D70 has a full Auto mode for point-and-shoot convenience, as well as Portrait, Landscape, Close Up, Sports, Night Landscape, and Night Portrait. All are quickly selected from the Mode Dial, which turns left or right with no limiter built in. In other words, you can turn toward the icon you want, no matter where you are on the dial, and not worry about whether you're going to run into a limiter, as we see on Canon's competing Digital Rebel model. A minor point perhaps, but one that makes mode selection that much faster.
In Program mode, where most intermediate photographers will probably spend a lot of time, rotating the Main command dial adjusts through the possible combinations of aperture and shutter speed while maintaining proper exposure. This allows the user to decide dynamically whether they want to emphasize depth of field or speed of capture based on the scene. It is not available in full Auto mode, or in any of the Scene modes.
Using a combined mechanical and CCD electronic shutter, the D70 is able to achieve speeds from 30 seconds to 1/8000 second. This is twice the maximum speed of its brother the D100. In manual mode, Bulb is also available, up to a maximum of 30 minutes. Bulb exposures can also be controlled via remote, an important feature for blur-free long exposures. The shutter opens two seconds after the remote is activated, and doesn't shut until the remote is activated again, or the 30 minute maximum exposure time ends.
Nikon's trademark D color matrix metering is available by default when using G or D type lenses. It's considered "3D" because it gathers distance information from the lens to further optimize the meter's effectiveness. Inherited from the Nikon D2H and F5 is the very high resolution of this 3D matrix metering system. The Canon Digital Rebel has a 35 zone matrix meter, and the Nikon D100 has a 10 zone matrix meter, but the D70 has a 1,005 pixel metering sensor, separate from the main image sensor, that covers the entire frame. (Very impressive.) Matrix metering is useful for backlit subjects or when very dark subjects occupy a significant portion of the frame. Center Weighted metering is also available, which measures light from the entire frame, but places the greatest emphasis on a circular area in the center. Spot metering takes a reading from dead center of the image, best when using the AE lock function, because it lets you meter off of a face or other area of primary importance and then recompose. The spot meter on the D70 bases its reading on approximately 1% of the total frame area, providing very precise exposure determination. These latter two metering options are only available in the Program, Shutter, Aperture, and Manual modes; the camera defaults to Matrix in the full Auto and Scene modes.
Sensitivity settings range from ISO 200 to 1600. In testing, we found even ISO 1600 produced entirely acceptable results, with noise levels that were low, if not negligible. A special noise reduction mode can reduce noise in longer exposures with shutter speeds slower than about one second. When Noise Reduction is active, the time to process each image more than doubles, and "Job NR" blinks across the top of the status LCD while the processing is taking place. Surprisingly, my tests showed that having NR active also slowed continuous exposures even in bright lighting, regardless of the shutter speed being used. - This despite the fact that the NR processing is only supposed to apply to very long exposures. The amount of space in the buffer also decreases with NR on.
In Program, Shutter, Aperture, and Manual modes, exposure can be adjusted between -5 and +5 EV in increments of 1/3 EV. The camera can also be set to adjust EV in 1/2 EV increments, if you prefer. EV adjustment values show on the Status LCD only when the EV adjustment button is pressed, though in the viewfinder the scale is skewed on the exposure readout any time an exposure compensation has been specified. Exposure compensation can be immediately reset to 0--along with all other custom settings--via a two-button combination, both marked by a green dot next to both the Bracket and Exposure mode buttons. Hold these buttons down for more than two seconds and all settings are returned to default (see button listings later in this review to see which functions are reset by this process). This is a handy feature that I'd also like to see on other cameras, as it can be tedious resetting a large number of camera settings manually.
Auto Bracketing can help you with EV adjustments of up to plus or minus 2 EV. The camera will take one shot underexposed by the amount you set, one at the "metered exposure" (determined by the camera in Program, Shutter, and Aperture mode; by the user in Manual mode), and one overexposed. The sequence can also be "metered," under, over. Three presses on the shutter are required to complete each bracketing sequence. The sequence can also be applied to flash exposures, and white balance settings. (White Balance Bracketing can only be done in JPEG mode.) In the case of White Balance, Auto Bracketing works a little differently. Instead of requiring three presses on the shutter to complete the sequence, only one press is required to produce the desired number of frames. Users choose between two and three frames and which direction they want to go. A little experimentation is required, as is a thorough read of the manual. The benefits of using this feature could be significant, however, when you're just not sure about the white balance settings and the shot is critical.
White balance can be left in Auto, where the camera will adjust the color temperature from 3,500 to 8,000 Kelvin using both the 1,005 pixel RGB exposure sensor and the CCD image sensor. This is a wider range than the D100's Auto White balance mode offers (but I'd still really like to see it extend lower, to handle the incandescent lighting so common in US interior spaces), though both offer the same preset options, from Incandescent (3,000K) through Fluorescent (4,200K), Sunlight (5,200K), Flash (5,400K), Cloudy (6,000K), and Shade (8,000K). You can also preset a white balance by pointing the camera at a white or gray object, or it can be copied from an existing photograph. You can fine-tune the color balance of all white balance settings (except Preset) from -3 to +3 arbitrary units, for a more precise color balance. The D70 also offers Hue, Tone, and Sharpness adjustments. Tone curves can be set to Auto or set from Normal (0 adjustment) to Low Contrast (-2), Medium Low (-1), Medium High (+1), High Contrast (+2), and Custom. Custom allows the user to download a custom tone curve created in Nikon Capture 4 on a PC.
There are three color modes, two of them sRGB, and one Adobe RGB. The first sRGB (mode Ia) is optimized for skin tones, and is the default setting. The second setting is Adobe RGB (mode II), offering a wider gamut than sRGB, meaning that it can capture and deliver more colors to a program like Photoshop, especially in the green range. It is recommended for photos that will be modified extensively on a computer. The second sRGB (mode IIIa) is optimized for landscape shots, and apparently more closely approximates the color space of the previous D100.
In more than a few ways, the D70 is actually superior to its higher priced predecessor, and one of those is its continuous capture mode. It's not only faster at 3 frames per second compared to the D100's 2.5 fps, it also can capture far more frames without pausing. When using a fast Compact Flash card, like a SanDisk Ultra II (or presumably Lexar's forthcoming 80x cards, when they're available in another month or so), the buffer doesn't fill very quickly. One can watch the counter move down to about a five-frame capacity and slowly move down then back up. The faster the card, the more quickly the new buffer can offload the data, and in the case of high resolution images saved with the "normal" JPEG compression setting, the buffer may never fill at all. This is truly amazing, and a first with any digital camera we've seen. (Although forum poster RobN reminded Dave that the Kyocera/Contax "R" series of consumer cameras have this ability also. - But the D70 is indeed the first d-SLR that can do this. - Thanks Rob!) This effect requires a card with a speed rating of 60x or more.
The D70's built-in pop-up flash has an ISO 200 Guide Number of 15m/49ft (ISO 100 Guide Number would be 11/36; though the D70's ISO starts at 200, so this is only stated for comparison with other cameras and flash units). When a CPU lens is on the camera, Nikon's i-TTL is invoked, allowing complex measurements via low-power "almost invisible" preflashes right before the main flash, that the camera combines with distance information from the lens' CPU. This is excellent for fill flash, because the D70 uses its 1,005 segment Matrix meter to balance foreground lighting against backlighting. When a non-CPU lens is used, the built-in Speedlight supposedly only works in Manual mode, but my test unit showed no difference in flash behavior when I tried it with a couple of my older lenses.
Flash sync modes include Front-curtain sync, Red-eye reduction, Slow sync, Slow sync with red eye reduction, Rear- and Slow rear-curtain sync. In full Auto, Portrait, and Macro modes, Auto front curtain sync, Auto with red eye, and Off are the only options. In Night Capture mode, both Auto flash modes are of necessity Slow sync. Flash Exposure Compensation allows the user to adjust brightness from -3 to +1 EV, providing for very subtle fill-flash effects.
The D70 uses Type I and Type II CF cards and MicroDrives. In addition to three JPEG compression levels, images can also be saved as NEF-format compressed RAW images, or simultaneously as RAW + JPEG files. Resolutions are 3,008 x 2,000, 2,240 x 1,488, and 1,504 x 1,000. When printed at 200 dpi, these can produce images as big as 15 x 10, 11 x 7.5, and 7.5 x 5 inches, respectively. A USB cable comes with the camera for uploads, as well as Nikon PictureProject software and a 30-day free trial of Nikon Capture. A video cable appropriate for the market (NTSC or PAL) is also included.
One EN-EL3 Lithium Ion battery pack powers the D70, providing 7.4V at 1400mAh. Though the battery looks very much like the Canon BP-511, they're not compatible. The EN-EL gives very long run times in the D70, but unfortunately there is no battery pack/vertical grip planned for the camera, an advantage that both the D100 and Digital Rebel have. The battery door does not appear to be removable, and there also appear to be no controller contacts inside the battery compartment or camera bottom that would allow shutter and sub-command dial functions to pass through, only two battery contacts. (So don't hold your breath for a vertical grip to be announced later.)
Offering a 6.1 megapixel imager with beautiful tone and color as well as excellent resolution, a sturdy, competent build, capable of fast capture, and bundled with a very nice lens, all at an affordable price, the D70 is poised to be Nikon's next big hit. This is an amazingly capable camera, with excellent image quality and excellent optics, at a very affordable price. While more expensive than the Canon Digital Rebel, the D70 more than justifies its slight price premium with a plethora of enhanced features.
Design
Taking design cues from both the D100 and D2H, the Nikon D70 is simpler in appearance and smaller size than either. It is nonetheless quite attractive, built of a black polycarbonate body with red, silver, and gray accents. Anyone familiar with Nikon's film or digital cameras will appreciate the similarity of most controls on the D70. The body's plastic body shell and smaller size are responsible for its low weight of 21 ounces, or 595 grams stripped of battery, lens, body cap, and monitor cover. With the battery installed, it weighs in at 28.3 ounces (683 grams), while fully loaded with the battery, a memory card, and the 18-70mm lens shipped with the "bundle," it weighs 39 ounces (1106 grams).
The D70 feels great to hold. The grip and much of the body has a soft rubbery texture and the front grip itself is excellent. The sculpted CF door on the back serves as a great thumb hold, working well against the sharp angle on the front grip to provide a secure one-handed hold. With the 18-70mm lens attached, balance is superb. The handgrip is also long, allowing room for most users' pinkies to rest comfortably with room to spare. The index finger finds the shutter and power switch naturally, but the sub-command dial is a little low for my tastes. All that room I talked about for the pinkie is taken away as the index finger searches for the dial. I suppose the middle finger could stand in for the index finger when controlling the command dial, but that would significantly weaken your grip on the camera in the process.
The metal F-style lens mount is the D70's prominent feature, and certainly its most valuable, offering compatibility with a massive array of quality Nikkor lenses. A D-shaped button just left of the lens serves to release the lens lock. (All directions are noted as if reader were holding the camera face out.) Below this a switch facing off to the left chooses between AF and Manual focus modes. Above the lens release button is the flash pop-up button. Down and to the right is the Depth of Field Preview button. The AF assist light is above that, mounted almost flush with the camera's tumble-home taper. The Sub-command dial is also visible from here, right above the D70's triangular red accent.

The right side of the camera has only the neck strap eyelet and a few screws to speak of. Despite its jutting angle, the eyelet does not jab into your hand at all.

The left side of the D70 has the other neckstrap eyelet and a rubber door covering DC in and Video Out ports. A separate rubber door covers the USB port; having this down low allows for fewer snags when uploading photos, as it keeps the cable close to whatever surface you have the camera resting on. Here you also get a better look at the AF/Manual focus selector switch and the Flash pop-up button.
On top we see the pop-up flash and hot shoe, both in-line with the lens. To the right of the flash gear is the Status LCD. Most of what's available through the viewfinder is available here, plus a few extras. Many features can be set here via button/dial combinations without having to enter the main menu, an excellent benefit as you become more familiar with the camera. Here we also have the shutter button, surrounded by the power switch. The Metering mode button is just behind that, and next to it is the exposure compensation button. The screen illumination button is just right of the status LCD. Both the Screen illumination button and the Metering mode button can be used in combination with the Continuous mode and Bracket buttons to either Format the CF card or Reset the device's settings to default when held down simultaneously for more than two seconds. (To finalize the Reset, you have to release and press these buttons a second time.) Left of the flash is the mode dial, which can be turned in any direction, without limit.
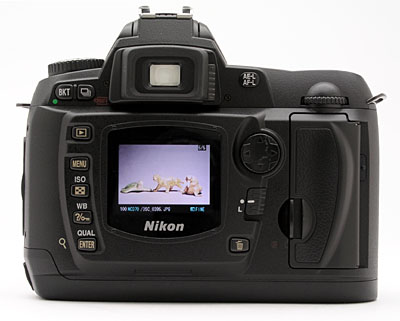
From the back we see a slightly more attractive arrangement of components, when compared to the D100. I found these to be just slightly more consumer friendly in appearance, whereas they're still mostly in the same places for pros who would choose the D70 as a secondary or tertiary camera. Eyeglass wearers will appreciate the reasonable standoff of the viewfinder, as well as its rubber bumper. A sliding diopter correction control is nestled to the right of the viewfinder. Just left of center is the 1.8 inch LCD that comes with a protective plastic cover to prevent scratches to the LCD (I find this a little annoying since my breath too often fogs the cover on the inside, and I cannot wipe it without removing the cover, so I end up keeping the cover in the bag). Upper left of the LCD is the Bracket button, which works in conjunction with the Main command dial on the right. The Continuous capture mode button is just right of the Bracket button. Down the left side of the screen are the Playback button, Menu button, ISO/Thumbnail button, White Balance/Protect/Help button, and Image Quality/Size/Enter/Zoom button. These last three buttons have integrated functions that on the D100 appear on the Mode dial. Their presence here adds a little unnecessary complexity, but it also keeps truer to Nikon's Shot Priority philosophy. With items like ISO on the Mode dial, one couldn't just press the shutter button to enter capture mode, a major hindrance that I noted in my review of the D100.
Above right of the screen is the Auto Exposure/Auto Focus Lock button. Below that is the Multi selector navigator, then the focus point lock switch and the delete button. Finally, there's the CF door, which releases with a sideways press on the latch. Inside is a big button that releases the card with ease.
The bottom panel has slightly raised ribs traversing it, to provide better friction when mounted on a tripod head. Otherwise, it's very flat, making for nice, level mounting on tripods. The metal tripod mount is aligned with the optical axis of the lens. (This will somewhat simplify parallax control on shots to be stitched into panoramas, but note that you'll still need to offset the axis of rotation slightly forward, to position it under the optical center of whatever lens you're using.) The battery compartment is on the right side of the body. A thumbnail-activated lock releases the battery door, and the battery falls free.- Note that there is no sub-latch to keep the battery in place in case the door opens accidentally. Opposite the battery compartment on the left side (when viewed from the back) is a very small rubber Reset button to be used as a last resort, when the camera cannot be reset by other means.
Viewfinder
 Like
all SLRs, by definition the D70 has an optical viewfinder that receives light
through the same lens that will direct light to the imager when the mirror flips
up and the shutter opens. Rangefinder-style cameras have separate optics for
viewfinder and imager, so the image can be slightly off due to what's called
parallax error. This is largely eliminated with LCD viewfinders on consumer-grade
digital cameras, but delay can be increased because the LCD usually lags behind
reality at least a little bit. An SLR design allows the user to see the very
view that the camera will see at the speed of light, eliminating some of the
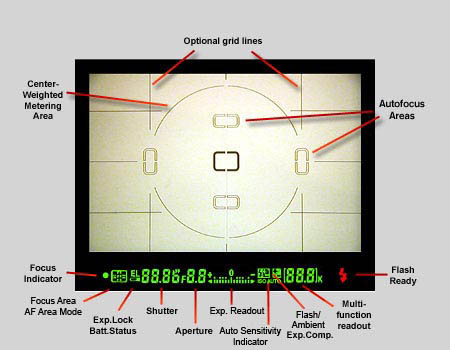
lag factor. An illuminated display inside the viewfinder provides detailed camera
and exposure information, including focus area indicators, focus confirmation,
focus mode, shutter speed, aperture, metering, AE/FV lock, battery status,
exposure and flash compensation, frame counter,
and flash ready light. When activated through the menu, the view also includes an
alignment grid, useful for lining up difficult shots. That this can be turned
on and off indicates that an LCD-equipped mirror is employed in the Pentamirror
arrangement (we're seeing lower cost SLRs sporting Pentamirrors rather than
Pentaprisms. This is also true in Canon's Digital Rebel. Pentamirror finders
are supposed to be less bright than Pentaprisms, but I haven't found any huge
disadvantage among the cameras I've reviewed. A Pentaprism is a solid piece
of crystal or glass that is more expensive than a set of mirrors, and that also
adds weight to the camera body.)
Like
all SLRs, by definition the D70 has an optical viewfinder that receives light
through the same lens that will direct light to the imager when the mirror flips
up and the shutter opens. Rangefinder-style cameras have separate optics for
viewfinder and imager, so the image can be slightly off due to what's called
parallax error. This is largely eliminated with LCD viewfinders on consumer-grade
digital cameras, but delay can be increased because the LCD usually lags behind
reality at least a little bit. An SLR design allows the user to see the very
view that the camera will see at the speed of light, eliminating some of the
lag factor. An illuminated display inside the viewfinder provides detailed camera
and exposure information, including focus area indicators, focus confirmation,
focus mode, shutter speed, aperture, metering, AE/FV lock, battery status,
exposure and flash compensation, frame counter,
and flash ready light. When activated through the menu, the view also includes an
alignment grid, useful for lining up difficult shots. That this can be turned
on and off indicates that an LCD-equipped mirror is employed in the Pentamirror
arrangement (we're seeing lower cost SLRs sporting Pentamirrors rather than
Pentaprisms. This is also true in Canon's Digital Rebel. Pentamirror finders
are supposed to be less bright than Pentaprisms, but I haven't found any huge
disadvantage among the cameras I've reviewed. A Pentaprism is a solid piece
of crystal or glass that is more expensive than a set of mirrors, and that also
adds weight to the camera body.)
The LCD panel is not usable as a viewfinder on digital SLRs, for the simple reason that the mirror is directing light to the optical viewfinder, completely obscuring the digital sensor until the time of exposure. It can, however, provide a good deal of information after an image has been captured, demonstrated mightily in the D100 and D70 designs. No fewer than seven different display screens are available, ranging from no information other than the 130,000 pixel picture, to very detailed lists of the settings, plus a histogram, and an overexposure alert. The histogram is a graph of how many pixels in the image have each brightness level. The brightness is the horizontal axis, running from black on the left to white on the right. The height of the graph shows the number of pixels at that brightness level. This kind of display can be very helpful in determining over- or underexposure. An evenly-exposed, low-contrast subject would create a histogram that stretches across the entire width of the display, using the full range of brightness values available. An underexposed image will have a histogram with all the data lumped on the left of the histogram, and an overexposed image would be bunched up on the right.
 Another
display mode that's useful is the Highlights display, which flashes any overexposed
areas, alternating white and black. Few objects should appear as pure white
in a well-exposed photograph, because few objects in the real world are pure,
saturated white to our eyes. Obvious exceptions are light sources, like lamps
and the Sun. The flashing Highlights display is thus very useful for seeing
any parts of the image that might be overexposed. It's particularly helpful
when only isolated highlight areas are overexposed. Because the histogram display
shows the distribution of all the pixels in the image, small overexposed
areas don't produce a noticeable blip on the graph, making them easy to miss.
The Highlights display takes care of that, by calling attention to overexposed
regions very directly.
Another
display mode that's useful is the Highlights display, which flashes any overexposed
areas, alternating white and black. Few objects should appear as pure white
in a well-exposed photograph, because few objects in the real world are pure,
saturated white to our eyes. Obvious exceptions are light sources, like lamps
and the Sun. The flashing Highlights display is thus very useful for seeing
any parts of the image that might be overexposed. It's particularly helpful
when only isolated highlight areas are overexposed. Because the histogram display
shows the distribution of all the pixels in the image, small overexposed
areas don't produce a noticeable blip on the graph, making them easy to miss.
The Highlights display takes care of that, by calling attention to overexposed
regions very directly.
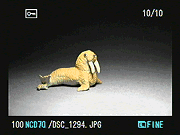
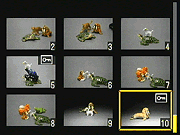 Though
it's buried in the control buttons, the D70 has the ability to zoom in on photos
up to 4x to examine focus in playback mode. The animated series of shots shows
how this works. As you enter a zoomed playback mode, the display changes from
a 3:2 ratio view, which shows the entire image, to a 4:3 ratio, matching the
dimensions of the LCD. Once you've entered zoomed playback mode, pressing the
Thumbnail display button (of all things) while rotating the Main control dial
zooms in on the image. Once zoomed, you can use the Four-way rocker to move
around inside the image. Pressing the Thumbnail display button toggles to a
display showing the position for your zoomed window within the normal-sized
image, indicated by a bold red outline. You can move this window around with
the Rocker Pad control, and then pop back into the zoomed view by releasing
the Thumbnail button again. This may all sound a little complicated, and it
is, but after very little acclimation, I found I could move around within the
enlarged display very fluidly using this arrangement. See the animated screen
shot above for a whirlwind tour of the feature. Pressing Playback Zoom/Quality/Enter
button zooms you in and out by 2x, and you can move around with the navigator
button.
Though
it's buried in the control buttons, the D70 has the ability to zoom in on photos
up to 4x to examine focus in playback mode. The animated series of shots shows
how this works. As you enter a zoomed playback mode, the display changes from
a 3:2 ratio view, which shows the entire image, to a 4:3 ratio, matching the
dimensions of the LCD. Once you've entered zoomed playback mode, pressing the
Thumbnail display button (of all things) while rotating the Main control dial
zooms in on the image. Once zoomed, you can use the Four-way rocker to move
around inside the image. Pressing the Thumbnail display button toggles to a
display showing the position for your zoomed window within the normal-sized
image, indicated by a bold red outline. You can move this window around with
the Rocker Pad control, and then pop back into the zoomed view by releasing
the Thumbnail button again. This may all sound a little complicated, and it
is, but after very little acclimation, I found I could move around within the
enlarged display very fluidly using this arrangement. See the animated screen
shot above for a whirlwind tour of the feature. Pressing Playback Zoom/Quality/Enter
button zooms you in and out by 2x, and you can move around with the navigator
button.
Optics
Learn how to use lens aperture to control depth of field - Visit our free Photo Lessons area!
The D70 accommodates a wide array of Nikkor lenses via the standard Nikon
F lens mount. It will work with older AF lenses that are driven by a mechanical
coupling or with the newer AF-IF or AF-S Nikkor lenses with internal focusing
motors. Despite this backward compatibility, Nikon recommends the D70 be used
with type G or D lenses. These models inclued a microchip to communicate distance
information to the camera, and the G models have apertures that work via electrical
contacts, and so have no aperture ring on them (On older lens models, the aperture
ring must be locked at its minimum setting to be used in
automatic modes.) IX-Nikkor lenses, originally built for APS cameras, are expressly
unable to work with the D70.
Free Photo Lessons
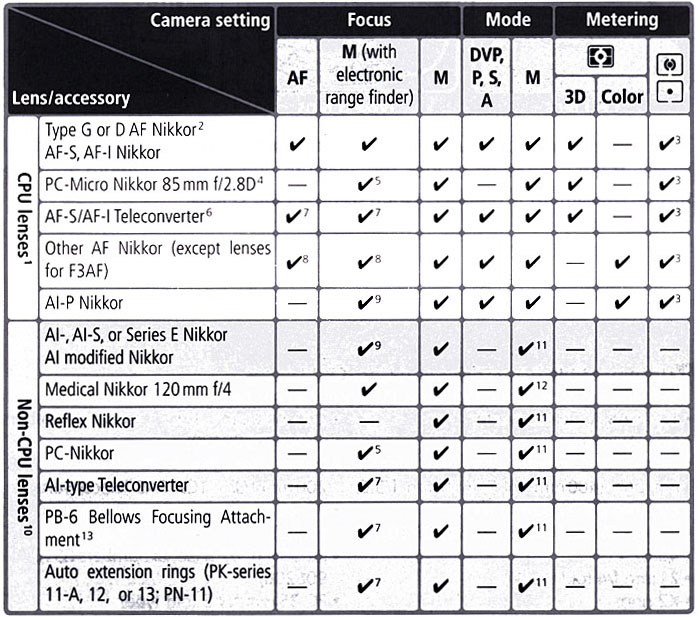
Functions and exposure modes available with a given lens will vary greatly depending on type. G and D type lenses include a microchip that communicates focal distance information to the camera. Lenses without the microchip will disable 3D-Matrix metering mode. See the table below for a brief idea of the functionality available with different Nikkor lens types (abstracted from the D70's manual, used by courtesy of Nikon USA, Inc.)
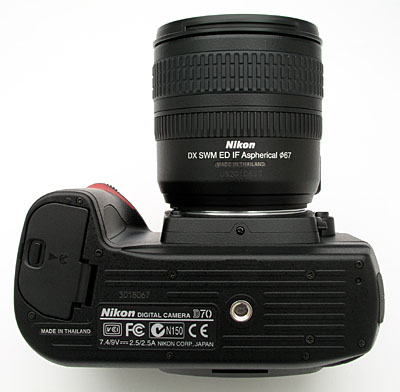
The D70 comes in two packages, either bundled with a lens specially designed for the camera, or body only. As such we'll discuss working with the bundle's 18-70 f/3.5-8.5 ED glass DX lens. As was said of the Canon Digital Rebel's 18-55mm lens, getting the camera without the lens would be a mistake, since it will only be available at a higher price than the bundle after the fact. Body only, the camera is $999 street, with the lens it's $1,299 street. Separately, the lens will likely street at $400 with an SRP of $590. Though many prospective buyers will have a few Nikkor lenses, most consumers will not have an 18mm lens, something necessary to achieve true wide-angle shooting with the "DX" sized sensor used in the D70 and other Nikon d-SLRs. (An 18mm lens on the D70 produces the same field of view as a 27mm lens on a 35mm camera.)

This is an excellent ED glass lens, equivalent to a 27 - 105mm lens on a 35mm camera, with all the necessary electronics to make it 3D matrix metering capable, and a Silent Wave focusing motor. Frankly, as a bundle or otherwise, it's a bargain. Its closest equivalent among Nikkor lenses is the AF-S 17-55mm F2.8G ED DX currently going for $1,400. That's more than the D70 and its lens combined, so unless you already own one of these, strongly consider the bundle. Admittedly a zoom that starts at F2.8 is worth a lot of money, but the 18-70mm's range of f/3.5-4.5 is only a half a stop to a bit more than one stop slower, so consumers will do just fine with it.
The 18-70mm has an F3.5 - 4.5 range, something the Digital Rebel's short back focus EF-S lens does not equal despite its shorter zoom ratio, coming in at F3.5 - 5.6. A look at both side by side tells the story, with the Nikkor offering a far larger objective lens, usually indicating greater light gathering ability. Another subtle advantage of the Nikon 18-70: It uses internal focusing, so the front element doesn't rotate when the camera focuses. This means that the angle of a polarizing or other special effects filter attached to the filter threads won't change as the lens is focused. Also, thanks to its use of the Silent Wave focusing motor, you can manually focus the lens at any time, without having to disengage the camera's focusing mechanism. All this is not to discount the achievement in quality, light weight, and low cost of the Canon EF-S lens, a surprisingly good lens for the money, but I mention it to underscore that for only $300 more than the Rebel's bundle, you're getting a lot more lens. (As well as a good bit more camera, as we'll see later.)
Nikon's ED glass helps minimize chromatic aberration, ED being the company's designation for their high-end line, which uses Extra-low Dispersion glass. The lens has an information window that shows the current focus setting in feet and meters, with raised gold lettering all around. Its mechanisms are all very smooth, with no slop or play, giving a feeling of precision. The hard rubber grips on the focus and zoom rings are textured such that they're easy to hold as well as tell apart by touch. The lens body is metal, with a spatter-painted black texture that matches the texture of the D70's body. The front of the lens is internally threaded for a filter, and has external flanges for the included HB-32 lens hood. The overall impression given by the lens' appearance alone is one of precision and excellence. Using the lens tells the same story.
Focus options
The D70 lets you take advantage of auto or manual focus via a small switch on the front of the camera, next to the lens. Setting the switch to "M" puts the camera into manual focus mode, and AF puts it into Auto Focus mode. As just noted above though, AF-S lenses with the built-in Silent Wave focus motor let you manually focus the lens at any time, regardless of the cameras focus setting. To select between the two types of AF, you need to go to the camera menu and Custom Setting 2 and choose between AF-S (Single Servo) and AF-C (Continuous Servo). Single Servo simply means that the camera sets focus only once, when the Shutter button is first pressed halfway, and is best for still objects. Continuous Servo means that the camera continuously adjusts the focus, as long as the Shutter button is halfway pressed, and is best for moving objects.
There's an important difference between Single and Continuous Servo modes: In Single Servo mode, the shutter won't release unless the lens has achieved focus (Focus Priority). In Continuous Servo mode however, the camera will fire regardless of the state of focus (Release Priority). If you want to be sure that the camera is focused when you snap the picture, use Single Servo mode. Use Continuous Servo for moving subjects, and/or times when the specific instant of shutter release is more important to you than guaranteed sharp focus.
As discussed earlier, focus can be confined to one of the five specific focus points in Single Area mode, or with Dynamic Area which offers focus tracking. Single Area AF simply means that the camera sets focus based on the specific area you've designated. Dynamic AF employs all five of the autofocus areas. When Dynamic Area focusing is enabled, the camera first focuses on the subject in the chosen focus area. When the subject moves to a different AF area, the camera shifts the focus to "follow" the subject. This is great for irregularly moving subjects. (Sports and kids come to mind.) Closest Subject Priority was automatically enabled in both Dynamic and Single Area on the D100, but now it occupies its own slot in the control system. This option means that the camera first focuses on the closest object that falls into one of the five focus points.
In Single Area AF mode, you can change the primary focus area by unlocking the Multi selector (the Four-Way Arrow pad on the back panel) with the sliding switch beneath it and then shifting the focus area using the up, down, right, or left arrow keys. You can lock the focus area selection by turning the switch back to the lock position. By default, the D70 does not "wrap" the focus area selector as you scroll between focus areas. Through the Custom Settings menu though, you can opt for a "Wrap" function. What this means is that if you press the right arrow key again, after the right focus area is already selected, the selection will immediately jump to the left focus area. The same happens when moving the focus area selection vertically.
There are two methods by which you can lock focus on the D70. The first is via the shutter button, placing your subject in the selected focus area, halfway pressing and holding the Shutter button, then realigning the composition and firing the shutter. (This is the default behavior of the shutter button, but it can be disabled.) Unlike most cameras, you can choose whether or not the shutter button also locks exposure, via an option on the Custom Settings menu.) Alternatively, when using Single Servo AF, you can press the AF-L/AE-L button to lock focus (and exposure, unless the button is set for focus-only in the Custom Settings menu). Keeping this button pressed will maintain the focus and/or exposure lock, even if the Shutter button is released. This lets you recompose the photograph without keeping your finger on the Shutter button, but on the AE-L/AF-L button instead. (Reducing the chance that you'll accidentally trip the shutter when you don't intend to.)
There are several options available for the AE-L/AF-L button, which can be set via Custom Settings Menu 15. You can program it to lock either focus or exposure separately, or both together (the default). You can also change its operation so a single press locks and holds the exposure setting. (No need to keep the button pressed down.) Finally, you can set the AE/AF lock button so it alone controls the autofocus system, meaning the autofocus won't actuate when the shutter button is half-pressed, only when the AE/AF lock button is pressed instead. Finally there's the FV lock option, which locks the flash level and keeps it locked until the button is pressed again. (If you're a novice user considering purchasing a D70, and all this sounds confusing, don't let it worry you: The camera's default operation is very straightforward, but the availability of features like these is really liberating for more advanced users.)
Sensor Cleaning!
Everyone understands that lenses sometimes get dust on them and need to be cleaned, and there are a lot of lens-cleaning cloths, solutions and other accessories on the market that work well. BUT, what do you do when your sensor gets dusty? Dust specks on the sensor tend to show up when shooting at very small apertures, appearing as dark blobs on your images. They're distracting at best, a terrible nuisance at worst, if you end up having to retouch every image to rid of them.
Most of us are naturally leery about the idea of poking around inside the delicate innards of our d-SLRs to wrestle with recalcitrant dust specks. Gently blowing the sensor surface (actually, the surface of the anti-aliasing filter) with compressed air gets rid of some dust, but there's invariably a lot that just stays stuck, no matter what. So what do you do?
If you've got dust specks on your sensor (and sooner or later you will), you're going to need to clean it. There are a lot of products out there intended to address this need, but a distressing number of them work poorly (if at all), and many are grossly overpriced. Advertising hype is rampant, with bogus pseudo-scientific jargon and absurd product claims run rampant. And prices - Did I mention prices? How about $100 for a simple synthetic-bristle brush?
So how do you know what product to use?
We don't pretend to have used everything currently on the market, but can tell you about one solution that worked very well for us. The "Copper Hill" cleaning method is straightforward and safe, and in our routine usage here at Imaging Resource, highly effective. Better yet, the products sold by Copper Hill Imaging are very reasonably priced. Best of all, Nicholas R (proprietor of Copper Hill) has put together an amazingly detailed tutorial on sensor cleaning, free for all.
Sensor cleaning is one of the last things people think about when buying a d-SLR, but it's vital to capturing the best possible images. Take our advice and order a cleaning kit from Copper Hill right along with your d-SLR, so you'll have it close at hand when you need it: You'll be glad you did!
(Other than a few backlinks on their site, we receive no promotional consideration from Copper Hill. We just think their sensor cleaning products are among the best on the market, and like their way of doing business. - We think you will too. Check them out.)
Exposure
Learn about white balance and simple lighting techniques for dramatic shots in out free Photo Lessons area!
Available exposure modes include Program AE, Manual, Aperture Priority,
and Shutter Priority modes. Also new are full Auto and Digital Vari-Program
modes (similar to the Scene modes on Nikon's consumer digicams), including Portrait,
Landscape, Close up, Sports, Night landscape, and Night portrait. Shutter speeds
from 30 seconds to 1/8000 second are available, plus bulb for exposures up to
30 minutes. In Program mode, you can use the Main command dial to adjust the
camera's selection in favor of a higher shutter speed and a larger aperture,
or vise versa if the options are available, handy for when you want to emphasize
shutter speed or aperture.
Free Photo Lessons
ISO sensitivity ranges from 200 to 1600, adjustable by pressing the ISO button and turning the Main command dial to change the setting on the Status LCD. It can also be changed in the menu. A Noise Reduction mode in the settings menu reduces fixed-pattern image noise when shooting at the higher sensitivity settings at longer exposure times. White balance modes include Auto, which covers almost the entire range from 3,500K to 8,000K. It can also be set manually for Incandescent (3,000K), Fluorescent (4,200K), Sunlight (5,200K), Flash (5,400K), Cloudy (6,000K), Shade (8,000K), or Preset, which the user sets based on a white or gray object in the scene or a pre-captured photograph. I found the auto white balance generally did a good job, and the Preset option was very accurate under a wide range of lighting conditions. My biggest gripe is that neither Auto nor Incandescent reach down far enough to handle the household incandescent lighting that's so common in the US. (Although Incandescent can be tweaked enough to almost get there.) Why can't digicam companies make auto white balance options with enough range to cover this very common light source?
White balance can be fine tuned by pressing the WB button and turning the sub-command dial. It can be adjusted from -3 to +3 in increments of 1, but the actual step size varies as a function of the white balance mode that's selected. See table below for details, which shows the lighting color temperature that each setting corresponds to.
| Camera Display--> | -3 | -2 | -1 | 0 | 1 | 2 | 3 |
| Direct Sunlight | 5600 | 5400 | 5300 | 5200 | 5000 | 4900 | 4800 |
| Shade | 9200 | 8800 | 8400 | 8000 | 7500 | 7100 | 6700 |
| Overcast | 6600 | 6400 | 6200 | 6000 | 5800 | 5600 | 5400 |
| Incandescent | 3300 | 3200 | 3100 | 3000 | 2900 | 2800 | 2700 |
| Fluorescent | 7200 | 6500 | 5000 | 4200 | 3700 | 3000 | 2700 |
| Flash | 6000 | 5800 | 5600 | 5400 | 5200 | 5000 | 4800 |
The D70 has three metering options, 3D Matrix, Center Weighted, and Spot. The 3D Matrix setting integrates exposure information from 1,005 areas across the entire screen, as opposed to most multisegment sensors that have from 10 to 35 areas to analyze. The scene viewed by the metering sensor is compared to a database of common photographic situations to help the camera decide whether the image consists of a backlit subject, for example, or else a dark foreground object. This information is enhanced (essentially made "3D") by the focus distance information shared from the microchip in the D- and G-series lenses. All Nikon SLRs use some form of matrix metering, but the D70 is the first time that the full 1,005-element RGB sensor originally introduced in the flagship F5 film-based model has been deployed in an "entry level" d-SLR. It's by far the most sophisticated metering system of any d-SLR currently on the market for less than $3,000. The net result of all this is a more frequently accurate metering response than that produced by center weighted metering, especially if the subject is off-center. In practice, I found the D70's metering to generally be quite accurate. It seemed to have a tendency to slightly underexpose most shots by 0.3 to 0.7 EV, but it was pretty consistent in this, leading me to believe that this might represent a deliberate choice by its designers, to avoid losing highlight detail. Overall, I felt pretty confident of getting the exposure I expected with the D70, after relatively little time spent with the camera.
As to the other metering options for the D70, center-weighted metering takes a light reading from the entire image area, but places the greatest emphasis on a circular area in the center. In an unusual feature for an "entry level" d-SLR, as Custom Function menu option lets you select how large an area contributes toward the center-weighting. Options are 6, 8, 10, and 12 mm, with 8mm being the default. Spot metering in the D70 takes a reading from the center one percent of the image area, excellent for quick measurements from a face without having to close the distance much.
The D70's Exposure compensation adjustment lightens or darkens the overall exposure anywhere from -5 to +5 EV units, in one-third step increments. It can also be adjusted to work in half step increments. Note though, that exposure compensation does not work in any of the Digital Vari-Program modes. As noted above, I found the D70 to fairly consistently underexpose shots by about 0.3 EV, since most of my shots were better when set from +0.3 to +0.7 EV. By default, test shots captured under harsh lighting showed the D70 to be quite a bit more contrasty than I'd personally prefer, although the color from the D70 is excellent. There is a variable contrast control buried in the shooting menu that lets you adjust the contrast level to low, normal, or high. I found that this worked fairly well, but a little differently than some. Rather than leaving the midtones at the same brightness and pulling in or pushing out the shadow and highlight values, the contrast adjustment on the D70 leaves the highlight values undisturbed, and adjusts the midtone and shadow levels to affect the contrast. This is good in that it means the camera will hold onto essentially the same highlight detail, regardless of how you have the contrast set, but it also means that contrast adjustments have a pronounced effect on overall image brightness. At the end of the day, the results are the same as a more conventional approach, but it might take a little different approach to understanding exposure and contrast adjustment than many amateurs are accustomed to. (The D70's behavior in this regard will actually be well-suited to pro shooters, who are accustomed to metering for the highlights first and foremost. Here, the approach that's implemented is to expose for the highlights, then use the contrast adjustment to control how you want the midtones and shadows to appear.)
An auto-bracketing feature takes three shots of the same subject with varying exposure values determined by either the photographer in manual mode or by the camera in all other modes. The exposure steps for bracketing can vary across a range of -2 to +2 EV (values are added to the already chosen exposure compensation value), in increments of either one-third or one-half. Through the Custom Settings menu, the Bracketing function can also be set to adjust white balance or flash exposures only. (By default, both ambient and flash exposures are bracketed.)
The D100 also offers Sharpness, Tone Compensation (Contrast), and Hue adjustments, accessed through the Shooting menu. I mentioned the contrast adjustment feature above, but its Custom option deserves special mention. What's unusual here (for an entry-level d-SLR at least) is that the Custom tone compensation option accepts downloaded tone curves from a computer. (If no curve is downloaded, the Custom setting defaults to the Normal setting.) This lets you completely define the camera's tonal characteristics via the computer, something that has heretofore only been available on the highest-end d-SLR models.
 For
those familiar with the concept of the "color wheel", which arranges
visible colors in a circle, Nikon's Hue adjustment will make sense: It offers
a range of adjustment from -9 to +9 degrees around the color wheel. (A complete
circuit of the wheel being 360 degrees.) If you don't carry a degree-calibrated
color wheel in your head, I've provided the illustration of a color wheel at
right. The dark bars show the total shift that the full 18 degree range of adjustment
offered by the D70's hue control can produce. - As you can see, it's a fairly
subtle adjustment. Note too, that the effect on any given color will depend
on where that color is around the wheel. For red colors, a positive adjustment
will shift the red toward orange, while a negative adjustment will shift it
toward purple. For blues though, positive adjustments shift the color toward
purple, while negative adjustments shift it toward cyan. The rollover image
below shows the effect of going from -9 to +9 on the Hue adjustment - The -9
shot is visible by default, move your cursor over the image to see the effect
of the shift to +9 degrees.
For
those familiar with the concept of the "color wheel", which arranges
visible colors in a circle, Nikon's Hue adjustment will make sense: It offers
a range of adjustment from -9 to +9 degrees around the color wheel. (A complete
circuit of the wheel being 360 degrees.) If you don't carry a degree-calibrated
color wheel in your head, I've provided the illustration of a color wheel at
right. The dark bars show the total shift that the full 18 degree range of adjustment
offered by the D70's hue control can produce. - As you can see, it's a fairly
subtle adjustment. Note too, that the effect on any given color will depend
on where that color is around the wheel. For red colors, a positive adjustment
will shift the red toward orange, while a negative adjustment will shift it
toward purple. For blues though, positive adjustments shift the color toward
purple, while negative adjustments shift it toward cyan. The rollover image
below shows the effect of going from -9 to +9 on the Hue adjustment - The -9
shot is visible by default, move your cursor over the image to see the effect
of the shift to +9 degrees.

When reviewing images on the LCD monitor, you can call up a histogram and a highlight function to give you a complete readout on the exposure. This is a useful tool to examine your exposure in the camera instead of waiting to download images and then deciding to reshoot. As I noted in my discussion of these features in the Viewfinder section of this review, I'd like to see the Highlight function be a little more restrained in its reporting of overly-strong highlights. (Actually, the ideal would be to let the user select at what brightness level the highlight warning should activate. Why hasn't any manufacturer done this yet?)
Continuous Shooting Mode
Nikon claims that the D70's Continuous Shooting mode captures 3 frames per
second, depending on the amount of image information and available Compact Flash
space. In practice, I clocked it at 2.92 fps, quite close. When using a fast
Compact Flash card, like a SanDisk Extreme or Ultra II or presumably one of
the even faster Lexar 80x cards that are coming (May, 2004), the buffer doesn't
fill very quickly. One can watch the counter move down to about a five-frame
capacity and slowly move down then back up again. The faster the card, the more
quickly the buffer can offload the data, and in the case of high resolution
with "normal" or "basic" compression, the buffer may never
fill at all. This is truly amazing, and a first with any digital camera I've
seen. Do note though, that this effect requires a card of 60x or more. (Finally,
a camera that really takes advantage of fast memory cards!)
Image Noise
Overall, the D70 has very good noise characteristics. The chart below shows
a plot of noise magnitude vs ISO value for the D70 and Canon Digital Rebel,
but as usual, the chart tells only a small portion of the story. While the D70
shows numerically higher noise levels, particularly at very high ISO settings,
in actual fact, the noise pattern of the D70 is a good bit finer-grained. This
makes it noticeably less objectionable to the eye. Bottom line, I found the
D70's images shot at ISO 1600 to be thoroughly acceptable for all but the most
critical applications. For routine shooting of family memories, I have no qualms
about running the D70 at its maximum ISO setting on a routine basis.

Like many high-end digicams, the Nikon D70 has a "RAW" file format as an option.
If you're new to the world of high-end digital cameras, you may
not be familiar with the concept of the "RAW" file format.
Basically, a RAW file just captures the "raw" image data,
exactly as it comes from the camera's CCD or CMOS image sensor.
So why would you care about that? - RAW files let you manipulate
your images post-exposure without nearly as much loss of image quality
as you'd get with JPEG files. A full discussion of RAW file formats
is way beyond the scope of this article, but Charlotte Lowrie of
MSN Photo has written an excellent article describing the benefits
of the RAW format, titled A
Second Chance to Get It Right. Check it out, it's one of the
clearest tutorials on RAW formats I've seen yet.
What's up with RAW?
Flash (!)
 Built into the D70 is a pop-up
flash unit, which operates in one of five modes: Front-Curtain Sync, Red-Eye
Reduction, Red-Eye Reduction with Slow Sync, Slow Sync, and Rear-Curtain Sync.
Front-Curtain Sync fires the flash at the beginning of the exposure, with every
shot. Red-Eye Reduction mode pulses the very bright autofocus assist lamp before
the main flash exposure, to reduce the Red-Eye Effect in shots of people. Red-Eye
Reduction with Slow Sync works in a similar fashion, but combines the flash
with a slower shutter speed for night portraits. (This reduces the harsh effect
of nighttime flash shots, allowing more of the ambient illumination into the
picture.) Slow Sync mode works with shutter speeds as slow as 30 seconds (!)
to preserve color in night shots. Finally, Rear-Curtain Sync fires the flash
at the end of the exposure, producing light trails behind moving subjects, rather
than in front of them. In all flash modes, the flash fires with every exposure.
Closing the flash disables it completely. The Flash popup button to the left
of the flash doubles as a Flash Compensation button, adjusting the overall brightness
of the flash from -3 to +1 EV in one-third-step increments when used in conjunction
with the Sub Command dial. Pressing the Flash popup button while rotating the
Main Command dial cycles through the available flash modes.
Built into the D70 is a pop-up
flash unit, which operates in one of five modes: Front-Curtain Sync, Red-Eye
Reduction, Red-Eye Reduction with Slow Sync, Slow Sync, and Rear-Curtain Sync.
Front-Curtain Sync fires the flash at the beginning of the exposure, with every
shot. Red-Eye Reduction mode pulses the very bright autofocus assist lamp before
the main flash exposure, to reduce the Red-Eye Effect in shots of people. Red-Eye
Reduction with Slow Sync works in a similar fashion, but combines the flash
with a slower shutter speed for night portraits. (This reduces the harsh effect
of nighttime flash shots, allowing more of the ambient illumination into the
picture.) Slow Sync mode works with shutter speeds as slow as 30 seconds (!)
to preserve color in night shots. Finally, Rear-Curtain Sync fires the flash
at the end of the exposure, producing light trails behind moving subjects, rather
than in front of them. In all flash modes, the flash fires with every exposure.
Closing the flash disables it completely. The Flash popup button to the left
of the flash doubles as a Flash Compensation button, adjusting the overall brightness
of the flash from -3 to +1 EV in one-third-step increments when used in conjunction
with the Sub Command dial. Pressing the Flash popup button while rotating the
Main Command dial cycles through the available flash modes.
The D70's internal flash is fairly powerful, with a guide number of 11 meters or 36 feet at ISO 100. That's a bit of an odd rating, given that the minimum ISO on the D70 is 200, but so many flash units are marketed based on their guide numbers at ISO 100 that Nikon doubtless felt a guide number rating at that sensitivity level would be the most meaningful to consumers. At ISO 200, the corresponding guide number would be 15 meters or 49 feet. This means that an f/2.8 lens will give you an effective range of 17.5 feet, an impressive distance for an on-camera flash. Even with the included 18-70mm F3.5-5.6, the distance drops only to 14 feet, still reasonable. The angular coverage of the flash is enough to cover the field of view of a 20mm lens on the D70-not quite wide enough for the 18mm end of the 18-70mm zoom shipped in the kit.
One note on what appears to be an error in the D70's manual, as it relates to the built-in strobe: The manual states that the onboard flash will revert to manual-only operation with any lens that doesn't contain a CPU. (That is, for all except Nikkor D- and G-type lenses.) In actual use, I found this not to be the case, as the camera seemed to do a very good job of flash metering with any of several non-CPU autoaperture/autofocus lenses I tried it with. (Principally a old 24mm f/4 and my nice old 70-210mm f/4 zoom.) A CPU-equipped lens is certainly necessary to receive all the benefits of 3D Matrix Flash Metering (see below), but for the record, the D70 seems to do quite well with non-CPU lenses too.
Besides its slight limitation in angular coverage, my one complaint about the D70's built-in flash is that it doesn't project very far above the camera body when deployed, at least not relative to the bulk of the 18-70mm kit lens. I found that it was quite easy to get shadows on the subjects if I left the lens hood on. Even without it, with the lens at its maximum 70mm extension and with fairly closeup subjects, I found I could end up with shadows where I didn't want them. Not a huge problem, you just need to back off a little bit on the zoom and shoot with the hood removed, but I mention it to hopefully save readers some blown shots.
Also included on the D70 is an external flash hot shoe, just behind the pop-up flash compartment. The hot shoe accommodates Nikon accessory flash units, as well as a wide range of third party flashes. The full range of flash sync modes remains available for compatible flash units. Different Nikon Speedlights offer different features when used on the D70. The tables below (again used by courtesy of Nikon USA, Inc.) shows the features available when using various Nikon Speedlights with the D70. (Note that while many older flash units will work in non-TTL auto mode with the D70, but the full power of i-TTL is only available with the new SB-600 and SB-800 models. Also, note that the SB-600 and SB-800 have powerful built-in autofocus assist illuminators that take over that function when coupled with the D70. With older flash models, the D70 has to provide its own AF-assist lighting.
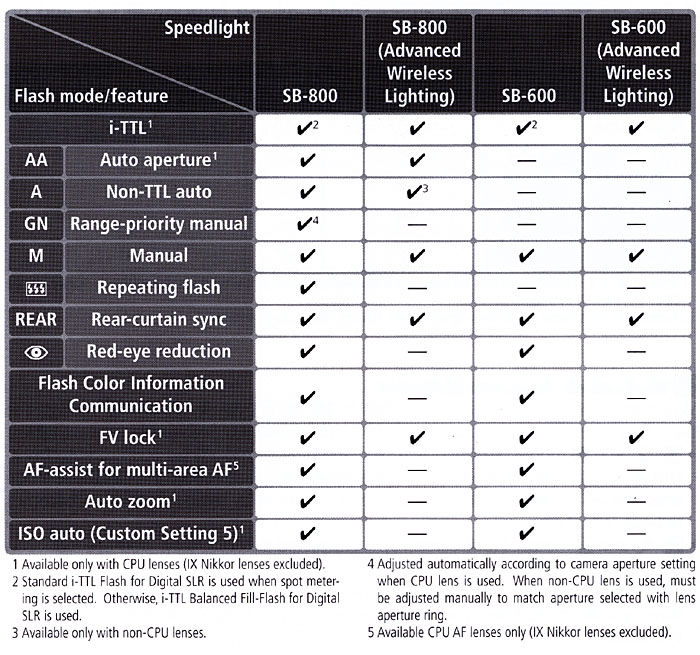
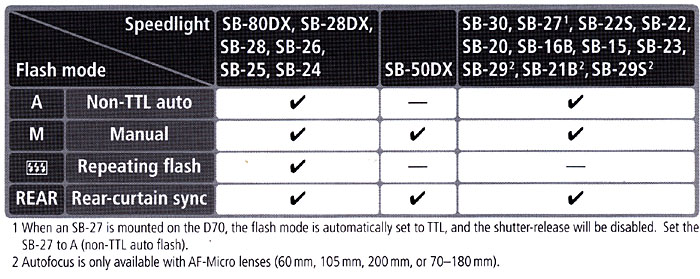
The D70's built-in Speedlight can also be used to control a number of SB-800
and SB-600 flashes in Commander mode for creating dramatic lighting effects.
This mode does not allow for the built-in Speedlight to provide fill, however.
The D70 will appear to flash, but the Commander flashes occur just before the
shutter opens, to tell the other units when to fire, and what intensity to discharge
at. (See the section on remote flash below, for more details.)
3D Matrix Flash Metering
The "3D" aspect of the Nikon metering system is that it uses subject
distance information from the lens (only available with lenses that contain
CPUs) to guide its exposure decisions. This is particularly key with flash exposures,
because flash illumination falls off quite strongly as the subject gets further
from the camera. With 3D Matrix Flash Metering users don't have to give a second
thought to balancing the flash with ambient lighting. Just snap a few test shots
to see how much fill you want, decide what level you need (for instance, -2EV).
Then set that level of flash compensation, set the flash to "fill"
mode, and that's it. This is really a case of technology working perfectly in
the service of creativity. The camera just quietly does its job, so you can
focus on composition, color, interacting with your subjects, etc. It doesn't
remove the creative decisions of how you want to light your subject, it simply
removes the technicalities from the equation.
Wireless Remote TTL (iTTL) Flash
The D70 brings Nikon's unique "iTTL" wireless through the lens
flash metering and control first seen on the D2H down to an entry-level d-SLR.
When the D2H was first introduced, the phenomenal capability of iTTL flash operation
actually struck me as a being a bigger innovation than the D2H itself.
Nikon has long been known for their 3D matrix metered fill-flash capability, and the exceptional ease it brings to fill-flash exposures. With iTTL (the "i" is for "intelligent" TTL), they're further extending the capabilities of their flash technology. For the first time, iTTL makes use of the 1005-element RGB sensor used for the main exposure system, the accuracy of the metering pre-flash has been improved, and wireless capability has been dramatically expanded, with the implementation of true multi-unit, TTL wireless flash autoexposure. To me, that's the most amazing part of the new flash technology: Not just that it provides automatic flash operation without wires, but that it offers true Through The Lens (TTL) metering for flash exposures, even with multiple remote flash units: With an SB-800 speedlight as a master controller, up to three separate groups of SB-600 and SB-800 strobes can be controlled independently, each group consisting of an unlimited number of units. The D70 itself can also serve as a master controller, although it can only control one group at a time, and its internal strobe can't contribute to the exposure when it's acting as a controller. (Note though, that if you mount an SB-800 on the D70's hot shoe, the SB-800 can both act as a master controller, as well as contribute to the exposure itself.)
When I first heard about it, the whole wireless TTL system sounded like just so much magic, but it's actually pretty straightforward once you know what it's doing. (Straightforward, but no doubt requiring a lot of clever engineering.) The key to it all is strobe circuitry that can turn on and off very quickly, and fire multiple precisely timed bursts in a very short period of time. The iTTL system uses this capability in two ways. First, it uses rapid series of very brief pulses of the strobes to let the Master Controller "talk" with the various groups of remote units. The Master can command groups of remotes to fire either very brief pulses for metering, or more powerful flashes for the exposure itself. It does this by sending treating the flash head as a digital data channel, encoding commands about the type and intensity of pulse to fire in the form of rapid bursts of light.
The second way that the fast-pulse capability facilitates iTTL is by making it possible to determine exposure levels from multiple flash groups very quickly. (The speed is important, as you don't want the flash exposure determination to introduce an unacceptable shutter lag when working with multiple groups of speedlights.)
The way the iTTL system works is that the camera tells the Master controller to individually command each group of remote flashes to fire a metering pulse. Using its internal TTL sensors, the camera measures the amount of light coming from each strobe group, and integrates the light readings from all of the strobes with the ambient light coming through the lens. Via the Master controller, it then tells each strobe group how much light to emit for the exposure itself, and triggers them to fire when the shutter is opened.
If this sounds like a lot that has to go on before the shutter opens, that's because it is. It all happens very quickly though, without introducing an appreciable delay in the shutter release. (If you have several groups of strobes involved in a single exposure, and have quick enough visual reflexes, you can actually see a very brief period of flickering strobe flashes before the main exposure itself.)
The results are really pretty amazing. You can more or less scatter strobe units around the set any which way you want, and the iTTL system will deliver not only an accurate default exposure, but perfect control over the light being delivered by each group.
As noted, when the D70 is acting as a master controller, it can only control a single group of strobes, and can't itself contribute to the exposure while it's doing so. It's hard to overstate the flexibility and control this gives you though, as compared to conventional off-camera strobe systems. In particular, while it can only control a single group of strobes, there can be as many individual strobes as you like in that group.
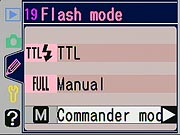 As
alluded to by the screenshot at right, the D70 actually has three separate modes
in which it can control a remote flash: TTL, AA, or Manual. TTL mode works as
described above, with the remote flash(es) firing a metering pre-flash, the
camera reading the resulting exposure information, transmitting the needed exposure
settings back to the remote unit(s), and then firing them all in synchrony.
As
alluded to by the screenshot at right, the D70 actually has three separate modes
in which it can control a remote flash: TTL, AA, or Manual. TTL mode works as
described above, with the remote flash(es) firing a metering pre-flash, the
camera reading the resulting exposure information, transmitting the needed exposure
settings back to the remote unit(s), and then firing them all in synchrony.
AA mode stands for Auto Aperture, and describes the way conventional non-TTL autoexposure flash units commonly work. Based on an aperture value that you or the camera has selected, and the ISO you're currently shooting at, the camera tells the flash how much light it should be trying to produce. The flash then uses its own onboard light sensor to meter the flash itself, shutting off the flash tube once it's accumulated enough reflected light from the subject to account for a good exposure. While not as flexible as the D70's TTL metering mode, AA mode worked very well in my tests, and is in fact quite powerful in its own right. You're free to select from among a range of apertures. At ISO 200, you can use AA remote exposure mode with any aperture from f/2.8 to f/32. As sensitivity increases above ISO 200, the maximum allowable aperture decreases, decreasing one f-stop for each doubling of the ISO, until it hits f/8 at ISO 1600. (That is, you can't use AA mode to control remote flashes with apertures larger than f/8 at ISO 1600.) The manual states that AA mode is only available when using a CPU-equipped lens with the SB-800, but here again, it seemed to work quite well for me with non-CPU lenses as well.
The manual mode in the D70's remote flash control menu does just what you'd expect. It fires slaved SB-800 or SB-600 flash units at fixed power levels, with the power level selectable in one-stop increments from full power down to 1/128th power. (The external flash units have a greater range of control in manual mode than does the D70's internal strobe. The internal strobe power can only be varied from full down to 1/16 power, while the SB-800 can have its power set as low as 1/128 when operating in manual mode.)
Caught in the Act: Advanced Wireless Lighting in Action
This really has nothing to do with the D70 and SB-800's photographic capabilities,
but it's a cool picture, so I thought I'd share it: Luke and I were debating
how many flash pulses we thought we were seeing coming from the D70 and SB-800
in wireless TTL mode while we were measuring the shutter lag in that mode. To
settle the debate, I had Luke hold the SB-800's head directly above the D70's
built-in strobe. I then took another camera, pointed it at the combination,
and panned it rapidly with a long exposure, just as Luke pressed the shutter.
It took a few tries to catch it just right, but the shot above shows that there
are actually a total of five flash pulses emitted by the D70 and SB-800 in the
process of making one wireless TTL exposure. (All this happens in about 0.6
seconds.)

Here's what I think is happening in the shot above:
Some Remote Flash Examples
OK, so all this technology sounds wonderful, but how well does it work?
Without exaggerating, really, really well. The press of too-much-to-do kept
me from spending more time with it, but I shot the images below to give some
idea of just how big a difference off-camera flash can make, versus the limitations
imposed by the on-camera strobe head. Being able to move the light source around
freely really opens up what you can do with flash photography.
In these photos, I didn't try to duplicate the same shot with on/off-camera lighting, as direct comparison without variations wasn't the point. - Although the photos of Micky Mouse the Cat (his name, no wonder he's neurotic) ended up being very similarly posed and framed simply because he was willing to sit more or less still while assistant Chris and I fiddled around with the camera, flash, and soft box. (We used a Photoflex medium Movie Dome for this shot, holding the soft box and SB-800 by hand.)
| D70/SB-800
remote flash examples (Click on a thumbnail to link to the full-res image) |
|
| On-camera | Remote |
 |
 |
| This is just
a basic, on-camera flash shot of Charlotte the wonder dog. Blah. Typical
unevenly exposed, stark, flat-looking amateur flash shot.
(These four shots were all captured with "normal" (medium) JPEG compression, so if you see any artifacts, that's why.) |
Here, Chis was holding the SB-800 overhead, with the leaves from a ficus tree casting some shadows on the backdrop. (Some other shots had more interesting shadow patterns, but Charlotte wasn't posed as well. The Wonder Dog isn't that Wonderful a photo subject...) |
 |
 |
| An on-camera flash shot of Mickey Mouse the not-so-Wonder Cat. (Burdened with that name, it's probably no wonder he's as cross-tempered as he is.) | This version was shot with the SB-800 held inside a Photoflex medium Movie Dome softbox, held a foot to 18 inches above Mickey. Hard to tell it's even a flash shot, the light is so even. |
Onboard flash: Contributes or not?
Experimenting with these various remote modes, I initially was puzzled by the
fact that the onboard flash did indeed seem to affect exposures somewhat, contrary
to what the D70's manual and Nikon themselves said. After a fair bit of experimentation
though, I figured out what was going on. It turned out that the shots in which
I saw an exposure influence from the onboard flash were all taken at close range.
After the remote units have been configured via the series of rapid communications
pulses described earlier, they wait for a single (weak) strobe pulse to trigger
on. The D70's trigger pulse is quite dim, but at close range (a few feet or
so), it's still bright enough to have at least a small effect on the exposure.
The workaround (assuming that you indeed don't want the onboard flash to make
any contribution to the photo) is simply to cup your hand in front of the camera's
flash head. In my experience, there was always more than enough light left spilling
around my hand for the D70 to communicate with the remote SB-800, while its
effect on the subject itself was all but eliminated.
SB-800 Basics (and one important note)
Since so much of the D70's exceptional remote-flash capabilities are tied
to the SB-800 and SB-600 speedlights, it makes sense to include a little information
about the SB-800 here. (SB-600 features are essentially the same, the primary
difference being that the SB-600 can't act as a controller itself. It works
as a highly-capable on-camera strobe, or a remote unit with the full capabilities
of the Nikon Creative Lighting System, but can't control other flash units as
a master.)
In truth, the SB-800 is really deserving of an extensive review in its own right, as there's not nearly enough room here to more than scratch the surface of its capabilities. If I can manage it (doubtful, given my perpetual review overload), I'll come back to it and do a more extensive writeup. In the meantime, here's a bare minimum of what D70 owners might like to know about the SB-800 and using it with their cameras.
The shot above shows the SB-800 perched on the stand that ships in the box with it. This is a very handy accessory for a flash that's likely to be used more often apart from the camera than mounted on it.
There's not a whole lot to see on the front of the SB-800. The flash head rotates 270 degrees horizontally, and 90 degrees vertically, letting you bounce the flash pretty much wherever you might need to when it's mounted on the camera. at the bottom of the front panel is a red-tinted window that hides the bright AF illuminator. This is a very bright red LED that's behind a diffraction grating. When enabled, it projects a crosshatched pattern whenever the camera's AF illuminator would normally trigger. Useful AF range will vary with the lens and aperture in use, but Nikon rates the range at 33 feet (10 meters) with a 50mm f/1.8 lens. Not shown in these photos is the included optional Quick Recycling Battery Pack, which attaches to the right side of the SB-800. (As viewed from the rear, on the left side in the photo above.) This is simply a small plastic compartment that attaches to the side of the SB-800, in place of its battery compartment cover. It carries an additional AA cell, boosting the total battery voltage, and reducing cycle times by about 25%. (Full-power recycle time with freshly-charged NiMH AA cells is nominally about 4.0 seconds. Adding a fifth cell in the Quick Recycling Pack drops that to about 2.9 seconds. Recycle time for less than full-power shots is proportionately faster.)
Also visible on the front of the unit is a small plastic cover that protects the external power terminals. These accommodate any of three different external power packs that Nikon sells, which provide both faster recycling (down to 2.0 seconds for full-power shots) as well as greater battery life.
Just visible on the right side of the flash (left in the photo above) is the small rubber flap that protects the external sync contacts. There are two sets of contacts here, a standard PC terminal, and a proprietary 3-terminal connector for use with Nikon's flash extension cords.
The rear of the SB-800 reveals its LCD panel and controls. At lower right is the on/off switch, with the Ready indicator light just below it. The lever that locks the strobe to the camera's hot shoe is at the bottom, and a red button labeled Flash at lower right is for test-firing the strobe. The gray button above the LCD triggers the flash in a modeling light mode, a very rapid series of strobe pulses that blend visually to produce a near-continuous illumination of the subject, so you can check lighting and shadows.
Below the LCD, a Mode button selects from among the SB-800's various operating modes. Options include TTL, Manual, Auto Aperture, Guide Number (essentially a finer-grained manual adjustment), and RPT, or repeating, in which you can program the unit to deliver a specific number of stroboscopic pulses, at rates ranging from 1 to 100 flashes per second. (The number of flashes will vary as a function of flash rate and power level. Power can be adjusted from 1/8 to 1/128 of maximum, and the number of flashes can be varied from one to as many as 90.)
At the bottom center of the rear panel, a 5-way rocker switch is used for navigating LCD menu items and manually adjusting the SB-800's zoom head. The angular coverage of the SB-800 can be adjusted to match the field of view of a 24-105 mm lens on a full-frame 35mm camera. A wide-angle diffraction lens can be pulled out from above the flash lens and flipped down over it to accommodate lenses as wide as 14mm. Pressing the center of the rocker control actuates the Set button, which confirms menu choices. Pressing and holding the Set button for more than 2 seconds calls up a hidden menu that lets you switch the flash between normal, master, and remote operation, as well as set a variety of other less-frequently accessed flash parameters such as default ISO, LCD contrast and backlight, etc.
SB-800 Menu Screens
As noted above, there's not nearly enough space or time here to go into all
the SB-800's features, but the menu screens shown below will give some idea
of its capabilities.
| SB-800 non-wireless mode menu screens | |
 |
 |
| TTL Balanced Fill-Flash (TTL BL) mode will probably be what most people use most of the time. In this mode, the camera and flash work together to try to deliver an even balance between subject and background lighting. It displays the ISO currently selected on the camera and its resulting estimate of its working range at that ISO. Also shown are an icon indicating that the attached camera supports the Creative Lighting System, and current focal length and aperture setting. | Normal TTL mode is very similar to TTL BL mode, but here the emphasis is solely on the subject. Useful when you want to highlight the subject, and don't care (or may prefer) that the background is over- or underexposed. |
 |
 |
| Auto mode is the way most conventional autoexposure flash units work. In this mode, you set an aperture value on the flash itself, and the flash adjusts its exposure (as measured by its own internal sensor) to produce a good exposure with that aperture value and whatever ISO the camera is currently using. You can then manually adjust the actual exposure by varying the lens aperture. | Auto Aperture mode represents a refinement on normal auto operation. In this mode, the camera tells the flash what ISO, focal length, and aperture it's using, as well as any desired flash exposure compensation, and the flash calculates the needed exposure itself, and meters it with its own built-in (that is, non-TTL) sensor. Operation in this mode is similar to that in A mode, but the flash compensates for any changes in aperture, and you instead control the exposure by adjusting the flash exposure compensation setting. |
 |
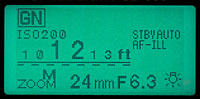 |
| In Manual mode, neither the camera nor the flash exerts any control over the exposure. You simply tell the flash what power level to use. Options range from 1/1 (full power) to 1/128. | "Distance Priority Guide Number" mode is something of a mixture of Manual mode and auto-exposure. It lets you set a fixed distance at which you want to achieve proper exposure, after which the flash will automatically adjust for variations in ISO and aperture. (The range of possible distances will of course vary directly with ISO and aperture.) |
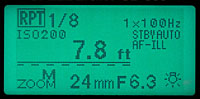 |
|
| This is the SB-800's stroboscope mode. You can program it to emit rapid pulses of light at rates ranging from 1 to 100 flashes/second, with power levels ranging from 1/8 down to 1/128, and in series ranging from 1 to 90 pulses in length. (Note though, that the maximum series length will be a strong function of the power level selected, and a weaker function of the pulse rate.) | |
| SB-800 wireless mode menu screens | |
 |
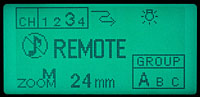 |
| Master controller: When acting as a master controller in Nikon's Creative Lighting System, the SB-800 can independently control exposure modes and power levels for itself and three groups of remote flash units. It can also be assigned to one of four possible control channels, so as many as four different photographers can use Nikon remote flash units at the same venue without interfering with each other. Note that in this mode, you can not only set the exposure levels of each group of remote flashes, but their operating mode as well. Options include TTL, non-TTL Auto, and Manual modes. (In the shot above, the master and Group B are running in TTL mode, with different exposure offsets, while Group A is set to Auto mode with +0.3 EV of exposure boost, and Group C is set to manual mode, at 1/64 power level. |
This is the wireless mode that
most D70 owners will likely use. (Unless they have multiple SB-800 units
and run one as a master, attached to the camera.) Here, the only options
are which channel and group you assign the flash to, and what focal length
you set its zoom head to. (NOTE that you need to assign remote strobes to channel 3, group A in order to work with the D70.) |
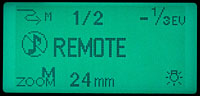 |
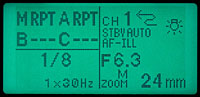 |
| For compatibility with older Nikon wireless flash systems, the SB-800 also supports the "SU-4" signalling system. In this mode, you can select either auto exposure, or a manual mode that lets you set the exposure of different flash units separately. (In the screen shot shown above, I've selected a power level of 1/3 stop below 1/2 power.) In this mode, there's no autoexposure option for adjusting the power of different units. | I wouldn't personally find a great need for it, but you can slave together multiple SB-800 or SB-600 units, firing in strobescope mode. The same range of control over power levels, flash rate and burst length are available remotely as when the strobes are connected directly to a camera. (I can imagine this being very useful for many scientific or industrial applications, using the SB-800s for time/motion studies.) |
Phew! Even that basic coverage of the SB-800's capabilities ended up taking more space than I'd intended, but it's a very impressive piece of technology, well worth its lofty price.
From the above, it's easy to see that flash photography is one area in which the D70 easily outdistances its competition. To even approach the capability offered by the D70, you'd have to spend several hundred dollars more for a wireless strobe trigger system for a competing d-SLR. And even with a wireless slave system, you'd still lack the effortless TTL flash metering the D70 provides. If you have any significant interest in flash photography, the D70 really stands alone (along with its big brother, the D2H) in the d-SLR market.
Shutter Lag / Cycle Times
When you press the shutter release on a camera, there's usually a lag time before the shutter actually fires. This time allows the autofocus and autoexposure mechanisms time to do their work and can amount to a fairly long delay in some situations. Since this number is rarely reported on (and even less often reported accurately), and can significantly affect the picture taking experience, I now routinely measure it, using a custom test system I built for the purpose, accurate to 0.001 second.
| |
|||
| |
Non-speed rated card |
Lexar 4GB 40X |
|
| Power On -> First shot | |
|
Any startup delay was completely
undetectable. Very fast. (And no apparent dependence on card
size, either.) |
| Shutdown | |
|
Shutdown is zero if no images
are in the buffer; otherwise it takes as long as required to save the
files. That could be anything from a second or less to ~9 seconds with
a fast card, to 20 seconds or more with a slow one. |
| Play to Record, first shot | |
|
No more delay from play
to record than minimum shutter lag in record mode. Very fast. |
| Record to play (max/min res) | |
|
Very fast review, even with
NEF files. |
| Shutter lag, full autofocus (no flash) |
|
|
Will depend on lens being used, how far the focus has to traverse from prior shot. Times shown are the minimums we measured with the 18-70mm lens, with no focus traverse before the shot. The first time is with the lens set at wide angle, the second with it set to its telephoto position. |
| Shutter lag, wide angle, full autofocus (on-camera TTL flash) |
0.382 | - | Surprisingly, TTL flash metering adds only 20-40 milliseconds to the shutter lag. (It must issue its metering flash while the AF system is still doing its work.) |
| Shutter lag, manual focus | |
|
Very fast. |
| Shutter lag, manual focus (On-camera TTL flash) |
0.168 | - | Further evidence that the onboard TTL flash adds little or no shutter delay. |
| Shutter lag, manual focus (Off-camera TTL flash, single SB-800) |
0.340 | - | I measured shutter lag with the off-camera flash
with the lens set to manual focus, to provide more precise measurement
of the additional lag due to the remote flash communications.
When there's a remote strobe involved, the shutter lag does indeed increase somewhat. This is due to the time required for the D70 to talk back and forth with the external flash, to configure it for both the metering and main flashes. (This time would likely further increase if more than one remote flash group was in use.) |
| Shutter lag, manual focus (Off-camera AA flash, single SB-800) |
0.317 | - | There's somewhat less delay when running the remote flash in AA mode, but it's very close, possibly within the margin of error for these particular measurements. |
| Shutter lag, manual focus (Off-camera Manual flash, single SB-800) |
0.181 | - | When the remote flash is being controlled in manual mode though, there's almost no increase in shutter lag at all. (Sports shooters take note - If you can run your remotes with the power levels set manually, you'll get very good shutter lag performance.) |
| Shutter lag, prefocus | |
|
Very fast. |
| Cycle time, large/fine files, single shot mode, auto focus | 0.62 (4.7) |
0.53 (1.49) |
These times for the slow card and the fast Lexar one look fairly close, but the real story is about what happens after the buffer fills. The slow card grabs 9 shots, then slowed to 4.7 seconds between frames, while the 40x Lexar card grabbed 21 frames, then slowed only to 1.49 seconds per frame. The slow card took 43 seconds to clear the buffer, the 40x Lexar took only 2 seconds. |
| Cycle time, NEF files, single shot mode, auto focus. | - | 0.6 (1.65) |
I didn't have the patience to test the slow card with NEF files. The 40x Lexar grabbed two shots at 0.6 second intervals, then slowed to 1.65 seconds between shots. (Still not bad at all.) |
| Cycle time, large/fine files, continuous mode | 0.35 (4.7) (2.92 fps) |
0.35 (0.43) (2.92 fps) |
The D70 really takes advantage of fast memory cards. With an old, slow card, the camera runs fast (2.92 frames/second) for ~9 shots, then slows to 4.7 seconds per shot. With a fast Lexar card though, it keeps on chugging at about 2.3 frames per second, even after it runs out of buffer space. Very impressive! |
| Cycle time, large/fine files, continuous mode (Noise Reduction enabled) |
- | 0.68 (0.90) (1.48 fps) |
When I first tested the D70's cycle time, I was surprised to find it could only manage 1.48 frames/second, far short of Nikon's claimed 3 fps. The culprit turned out to be the long-exposure noise reduction option. Even though these shots were captured in bright lighting with short shutter times, having NR enabled really slowed the camera's frame rate! |
Along with its other excellent features, the D70 is a fast and responsive performer. Most impressive of course, is its continuous-mode speed and loooong burst lengths (with appropriately fast memory cards). With many cameras in the past, really fast memory cards often made a difference only in buffer-clearing speed, not so much in burst length or shot to shot cycle time. With the D70 though, we finally have a camera that can really take advantage of fast cards. With a card rated 60x or so, it can actually shoot at 3 frames/second (fps) in large/normal mode without stopping, until the memory card is filled. Even with slightly slower cards in the range of 24-40x, it shows surprisingly long burst capability and surprisingly fast post-buffer-fill speed. Shooting with a 40x Lexar card, I found that I could get off 21 large/fine JPEGs before the speed dropped below ~3 fps (2.92 fps by actual measurement), and even then, the decrease in performance was very modest, with the frame rate dropping only to 2.3 fps.
To make the most of the D70 though, you really do want to have as fast a memory card as you can afford. With an old, slow non-speed-rated card, I found the buffer capacity to be "only" 9 frames (still pretty good), and the post-buffer cycle time to be a sluggish 4.7 seconds/frame. Take my advice, and buy a good, fast card to use with your D70. It's an accessory that you'll be living with for a long time, and it can make a huge impact on the camera's responsiveness.
Startup time is another area where the D100 really blows past the competition. Try as I might, I really couldn't measure any startup delay. Bottom line, the D70 can get ready to shoot a picture at least as fast as you can.
Shutter response was fast but not blazingly so, actually coming in a bit behind the previous D100 in this category, and slightly behind the Digital Rebel as well. Manual-focus and pre-focus lag times were 0.157 and 0.124 seconds, respectively. This isn't bad (and is a good bit faster than the Digital Rebel), but is a notch slower than the D100's 0.100 seconds, and well off the mark of Nikon's own higher-end products. Here's a brief table, comparing the performance of the D70 with that of the Digital Rebel, the original D100, and Canon's EOS-10D:
| d-SLR Timing Performance | ||||
| Parameter | Nikon D70 | Canon Digital Rebel | Nikon D100 | Canon EOS-10D |
| Startup | "Instant" | 3.09 | 0.63 | 2.32 |
| AF Lag | 0.34-0.49 | 0.25-0.28 | 0.150 | 0.146 |
| Prefocus Lag | 0.124 | 0.142 | 0.100 | 0.104 |
| Cycle Time | 0.34 (2.92 fps) |
0.40 (2.50 fps) |
0.35 (2.88 fps) |
0.34 (2.94 fps) |
| Buffer Depth | 9 - 100+ | 4 | 7-9 | 0 |
Overall, the four come in fairly close to each other, with the D70 and Rebel being slower than the other two in terms of AF lag. The huge differences with the D70 are in its effectively zero startup delay, and in its amazing buffer capacity. The impact of the D70's buffer performance was subtle but dramatic. (If that's not an oxymoron.) It wasn't so much something that I was particularly aware of while I was shooting, but rather that I gradually became aware that I never had to wait for the camera when I was shooting in JPEG mode.
Operation and User Interface
The D70 may look a little intimidating to new users at first, but I think Nikon created an excellent transition from the slightly more pro-oriented D100 to the more consumer-oriented D70. The D70's controls are generally straightforward, though they may have a few too many buried functions to grasp at first. Fortunately for the new user, most functions can be performed via the onscreen menu as well.
I really like the overall control layout, which places the main shooting controls on top of the camera and the rest on the back panel. The new Mode dial is now dedicated to the eleven exposure modes and nothing else, keeping it simple for the user. Changing shutter speed, aperture, metering mode, etc. is quick and simple via the Main command and Sub command dials in combination with several buttons on the D70. Once you know where they are and what they do, you'll soon ignore the menu altogether.
The LCD menu itself is well organized and simple to navigate, with four main
tabbed menu pages. When shooting, the detailed information display in the viewfinder
window does a good job of communicating current camera settings. Anyone already
familiar with Nikon's SLRs, whether film or digital, will have no trouble operating
the D100. For less experienced users, an hour or two spent with the manual and
camera together should be enough to get comfortable.
Praise and Complaints
My biggest criticism of the D70 is the focusing indicators on the screen.
They're just not visible in too many lighting conditions. They're either not
lit brightly enough in low light situations, with too much light bleeding from
the active focus point into other inactive ones, or in brighter, more complex
scenes the black LED focus points disappear into the detail. I prefer the bright
red LEDs on cameras like the Digital Rebel. Though the D70's method looks more
futuristic and stylish, it does no good if they're so subtle that the photographer
doesn't know where the camera is focusing.
Also, the camera pretty consistently underexposes shots (generally by anywhere from 0.3 to 0.7 EV, in my experience), most likely to avoid blowing out the highlights. Not a terrible decision on Nikon's part, but still inconvenient. Finally, there's a decidedly cold bias to most indoor shots in situations where most other cameras perform better.
Other than those points, the Nikon D70 is very impressive. More technical details like Flash compensation, Auto White Balance Bracketing, and a smart interface combine with consumer oriented features like Digital Vari-Program modes to make for a camera that's friendly to both amateurs and pros. I particularly like that Nikon took the ISO setting off the main mode dial (where it was located on the D100) and put it on a rear-panel button. On the D100, it was too easy to be in the midst of changing the ISO setting just as the best shot of the day happened in front of you. The camera wouldn't respond to the shutter until you rotated the mode dial back to one of the shooting positions. By contrast, the D70 is always a shooting-priority camera, always responsive to the shutter button regardless of what mode you're in.
Control Enumeration, Command Dials
First are the two Command Dials, the Main Command Dial and the Sub Command Dial. Most camera settings are made by pressing and holding the appropriate button while rotating one or the other of these two controls. Functions controlled by these dials are as follows:
![]()
Main Command Dial: The Main Command Dial is located on the
back of the camera, in the upper right hand corner, right under your right thumb.
Used in conjunction with other buttons, this controls ISO, White Balance, Quality,
and AF Area Mode settings. It also enables or disables the auto-bracketing mode
when used with the BKT button. In Shutter Priority and Manual exposure modes,
this dial sets the shutter speed, although it can be made to control the aperture
instead, via a Custom Menu setting (14). It moves between the continuous capture
modes when the Shooting mode button is pressed, and modifies the Metering mode
and Exposure compensation buttons as well.
![]()
Sub-Command Dial: The Sub Command Dial is located on the front of the handgrip,
just under the shutter button, placed for your index or middle finger to grip.
This dial fine-tunes the white balance across the -3 to +3 range (arbitrary
units) when the White Balance button is pressed. It sets the resolution when
the Quality button is pressed. In Manual and Aperture Priority modes, it sets
the aperture value, although it can be made to control aperture instead, via
a Custom Menu setting. It also controls the White Balance Bracketing when the
BKT button is pressed.
Control Enumeration, Top Panel Controls, Right
The controls on the right side of the top panel are the primary shooting controls, generally dealing with immediate camera operations. Refer to the photo at below to orient yourself for the locations of the individual controls.
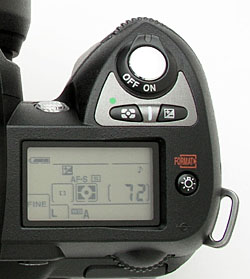

Power Switch: Surrounding the Shutter button on the top right of the camera,
this switch turns the camera on and off. (BIG PLUS: Unlike Nikon's models in
the D1 series, the D70 will delay switching off until it has finished writing
any buffered images to the memory card. This avoids the problem of losing any
buffered images if you shut the camera off too soon.) Camera startup is so rapid,
our testing could not detect any startup time lag. An amazing first in
a camera of this type and price point.
Shutter Button: In the center of the Power switch, on the top of the camera, this button sets focus (when in autofocus mode) when halfway pressed and fires the shutter when fully pressed. Unlike most cameras, you can choose whether or not the shutter button also locks exposure, via an option on the Custom Settings menu, and you can disable AF via the shutter button with another Custom Setting.
When an image is displayed on the LCD monitor, halfway pressing the Shutter button dismisses the display and readies the camera for shooting. (A partial expression of Nikon's "shooting priority" philosophy, a very welcome change relative to the D100's highly "modal" control behavior.)
![]()
Metering selector button: Just behind and left of the shutter release, this
button used in conjunction with the Main command dial switches between Spot,
Center-Weighted, and 3D Color Matrix metering options.
![]()
Exposure Compensation Button: Directly behind and right of the Shutter button
on the top of the camera, pressing this button while turning the main command
dial sets the Exposure Compensation from -5 to +5 exposure equivalents (EV)
in one-third step increments. One-half step increments can be selected instead
via a Custom Setting.

Illuminate Button: Just to the right of the status display panel on top
of the camera, this button illuminates the panel with a green light. Pressing
and holding this button together with the Shooting mode button signals the camera
to format the memory card. (The top-panel LCD data readout flashes "For,"
but doesn't immediately format the card. Press both buttons a second time to
confirm the format operation.) Kudos on this card formatting shortcut!
Control Enumeration, Top Panel Controls, Left
The left side of the D70's top panel is dominated by the Mode Dial. Refer to the shot below to orient yourself for the locations of the individual controls.

Flash Popup/Sync Mode Button: Just left of the flash in the front, holding
this button and rotating the Main Command Dial cycles between the five flash
sync modes (Fill, Red-Eye Reduction, Red-Eye Reduction with Slow Sync, Slow
Sync, and Rear Curtain Sync). Pressing and holding this while turning the Sub
command dial chooses flash compensation values. A single press and release on
this button pops up the built in Speedlight.
Mode Dial
Much simplified from the D100, the D70's Mode dial no longer attempts to do double-duty as a Function dial. All the functions have been moved to buttons that work with the Main- and Sub-command dials, better adhering to Nikon's "shooting priority" philosophy. (This was one of my biggest complaints about the D100's control setup, as covered in my D100 review.(
Control Enumeration, Rear Panel Controls
Most of the rest of the camera's controls are located on the rear panel. The controls along the top of the back panel generally relate to shooting settings, while those on either side of the LCD monitor are associated with playback and menu navigation. We'll start our tour at the top left. - Refer to the photo below to orient yourself.

Auto Bracketing Button: Positioned in the top left corner of the camera's
back panel and marked "BKT," pressing this button and rotating the
Main Command Dial enables the Auto Bracketing function. Turning the Sub-Command
dial instead of the Main Command Dial changes the bracketing step size. Pressing
and holding this button in conjunction with the Metering Mode button resets
the main camera settings to their default values. (Very handy for quickly getting
back to "neutral" when you have a number of settings active. More
kudos to Nikon for this useful shortcut.)

Shooting Mode Button: To the right of the Auto Bracketing button, pressing
this button and rotating the Main Command Dial switches between Single frame,
Continuous, Self-timer, Delayed remote, and Quick response remote modes. Pressing
and holding down this button together with the Illuminate button formats the
memory card.
![]()
Diopter Adjustment Switch: Sitting vertically next to the right side of
the viewfinder eyepiece, this slide control adjusts the optical viewfinder to
accommodate eyeglass wearers. (Range is -2 to +1 diopters.)
![]()
AE/AF Lock Button: Located just right of the viewfinder, this button locks
the exposure and/or focus when pressed. The settings remain locked as long as
you hold the button down, regardless of any action of the shutter button. Several
options for this control can be set via Custom Settings Menu 15. You can program
it to lock either focus or exposure separately, or both together (the default).
You can also change its operation so a single press locks and holds the exposure
setting. (No need to keep the button pressed down.) Finally, you can set the
AE/AF lock button so it alone controls the autofocus system, meaning the autofocus
won't actuate when the shutter button is half-pressed, only when the AE/AF lock
button is pressed instead.
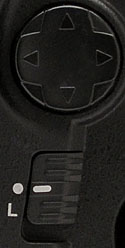
Multi selector / Focus Area Selector and Lock / Four-Way Arrow Rocker Pad:
Just off the top right corner of the LCD monitor on the back panel, this rocker
button with its associated locking switch (directly below it) controls the autofocus
area in Record mode. (Unless the Closest Subject focus mode is enabled, in which
case the camera automatically selects the AF area corresponding to the closest
subject.) The switch beneath it unlocks the rocker control and pressing any
side of the rocker moves the active AF selection in that direction.
In Playback mode, the rocker pad's up and down arrows scroll through captured images while the right and left arrow buttons cycle through various information displays for each image. When you zoom in on an image in playback mode, the rocker pad lets you scroll around the magnified image.
In any settings menu, the arrow directions on this control are used to navigate through the LCD menu system.
![]()
Delete Button: Just below the locking switch of the Four-Way Arrow pad,
this button deletes individual images in playback mode, with a confirmation
screen to give you the opportunity to change your mind.
![]()
Playback Button: Just off the top left corner of the LCD monitor, this button
displays the most recently captured image, putting the camera into Playback
mode. Once an image is displayed, the arrow keys navigate through the other
images saved on the memory card. This button also dismisses the image display.
![]()
Menu Button: Below the Monitor button, this button displays or dismisses
the LCD menu system.

ISO/Thumbnail View Button: Just below the Menu button, this button works
in capture mode to set the ISO. Press and hold this button and rotate the Main
command dial to adjust the ISO. When the camera is displaying captured images
in Playback mode, pressing this button repeatedly cycles through four-image
and nine-image thumbnail displays or a full-screen display. The chosen display
mode remains selected indefinitely, even if the camera is turned off. When a
thumbnail view is activated, you can scroll a cursor through the thumbnail images
very rapidly with the rocker pad. Pressing the Enter button magnifies the image
that's currently selected. Once an image has been magnified, turning the Main
Command dial while the Thumbnail View button is held down changes the level
of magnification, showing the current zoomed display area as a red-bounded rectangle.
Releasing the Thumbnail View button displays the magnified portion of the image
full-screen. See the previous Viewfinder section of this review for a more complete
description of this function.

White Balance/Protect/Help Button: In capture mode, this button sets the
overall color balance. Standard preset values are set by holding this button
and turning the Main command dial, and include Auto, Incandescent, Fluorescent,
Direct Sunlight, Flash, Cloudy, and Shade settings. A PRE (Preset or Custom)
mode is the manual adjustment. Turning the Sub-Command Dial in any exposure
mode but Manual varies the white balance from the default for that setting.
This lets you shift the color balance in relatively small increments, a very
handy feature. Once the Playback button is pressed, this button write-protects
individual images, protecting them from accidental deletion. (Note though, that
even "protected" images will be lost when a card is reformatted.)
If an image is already protected, pressing the Protect button removes protection.
Finally, when in Menu mode/Custom Settings, pressing and holding this button
brings up help to explain each custom setting.

Quality/Enter/Magnify Button: Just below the Protect button, this button
confirms menu selections. In conjunction with the Main command dial, it sets
image resolution, and with the Sub-command dial it sets compression. Finally,
it also activates the playback magnification, when a captured image is displayed
in the LCD monitor.
Control Enumeration, Front Controls:
There are only two controls on the front of the camera body. They are:

Depth of Field Preview Button: On the right side of the body (as viewed
from the back), tucked underneath the right of the lens mount, this button lets
you check the depth of field with the current aperture setting. Pressing the
button stops down the lens, so you can get an idea of the depth of field through
the viewfinder.

Lens Release Button: Just above the Focus Mode Selector Dial, this button
releases the lens from its mount when pressed and held as you turn the lens.
It's best to hold the lens with your right hand while pressing the button and
turning the lens to the left.
Camera Menus
The D70 has a very extensive menu system, but it's cleanly organized as a set of tabbed screens, as on the D100 before it. There are four menus on the D70: Playback, Shooting, CSM (Custom Settings Menu) and Set Up. All menu entries are selected via the 4-way Arrow Pad. The menus themselves are chosen via a "tabbed" interface, with icons on the left of the screen corresponding to the four menus. All screens can be reached whether the camera is in playback or record mode. Apart from specific functional changes from the D100, the D70's menu system uses a slightly larger, smoother font and a new color scheme for enhanced readability. There's also a very nice "help" function that provides plain-English descriptions of the various Custom Settings Menu (CSM) options.
In the section below, rather than reproduce every menu screen in the main body of the review, I've shown screenshots for only the top level of each menu, with clickable links in the descriptive text leading to the individual screens.
Playback Menu
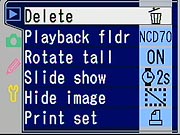
| Playback Menu Options | |||
| Top-Level Selection |
Second-Level | Third-Level | Notes |
| Delete | - Selected |
- Select image from thumbnail
display (view) |
Select one or multiple images, then
execute with "Enter" button.
Delete All doesn't affect images that have been "protected" via the WB/help/protect button |
| Playback Folder | - Current - All (view) |
"All" will also display DCF-compliant image from other manufacturers that may be on the same card. | |
| Rotate Tall | - Yes - No (view) |
Images captured in "portrait" orientation are rotated onscreen to display in their original orientation. (The camera can even tell whether you had the grip side up or down.) | |
| Slide Show | - Start - Frame Interval (view) |
- Select frame interval, 2-10 seconds (view) |
|
| Hide Image | - Select image from thumbnail display (view) |
Hiding an image also protects it from deletion with the "delete all" command. | |
| Print Set | - Select/set - Deselect all? (view) |
- Select image from thumbnail display,
if select/set is chosen (view) |
|
Shooting Menu
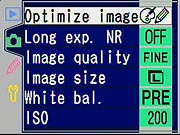
| Shooting Menu Options | |||
| Top-Level Selection |
Second-Level | Third-Level | Notes |
| Optimize Image | - Normal
|
(For Custom option only)
- Done (accept settings)
|
Direct print affects sharpening
and image rendering.
Portrait and Landscape make subtle, specific color and tonal-rendering adjustments. Custom tone compensation option enables curve loaded from computer Ia and IIIa color modes are both sRGB< but IIIa has higher saturation. NOTE - you must select "Done" for custom settings to be registered. |
| Long exp. NR | - Off - On (view) |
Only affects exposures longer than
1 second.
(I found little need for this, the basic exposures are very clean.) |
|
| Image Quality | - NEF (Raw) - JPEG Fine - JPEG Normal - JPEG Basic - NEF + JPEG Basic (view) |
Note that only option for NEF + JPEG is for Basic (lowest) JPEG quality. | |
| Image Size | - L (3008x2008) - M (2240x1488) - S (1504x1000) (view) |
||
| White bal. | - Auto - Incandescent - Fluorescent - Dir. sunlight - Flash - Cloudy - Shade - PRE Preset (view) |
(Preset option only)
- Measure |
All options let you fine-tune white balance
+/- 3 units.
Manual option (PRE) is nice, in that it gives you the choice of setting directly or using a previously-shot photo on the card. |
| ISO | - 200 - 250 - 320 - 400 - 500 - 640 - 800 - 1000 - 1250 - 1600 (view) |
||
Custom Settings Menu (CSM)
When you first turn it on, the D70 displays only the "Simple" Custom Settings Menu (CSM) options, which are the first nine options listed below. You can enable the "Detailed" CSM via an option on the setup menu. The configurability offered by the CSM is another advantage the D70 offers over its primary competitor, the Canon Digital Rebel. A nice addition to the D70 relative to previous Nikon d-SLRs is the new "help" function, which provides a more detailed/plain English description of each CSM option. For those interested, I've provided links below to view each of the help screens. Also, for menu items, I've highlighted the default option with boldface type.
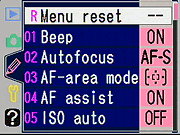
| Custom Settings Menu Options | |||
| Top-Level Selection |
Second-Level | Third-Level | Notes |
| -- Menu Reset | (help) |
Resets the CSM options to their
default values.
(NOTE that the reset that's accomplished by pressing and holding down BKT and meter-pattern buttons for 2 seconds does not reset the CSM settings.) |
|
| 01 Beep | - On - Off (no view) (help) |
Beep sounds for focus confirmation, remote release, or self-timer countdown. | |
| 02 Autofocus | - AF-S - AF-C (view) (help) |
Single or continuous autofocus. (As with other d-SLRs though, AF operates only when shutter button is half-pressed, regardless of this setting.) | |
| 03 AF-area mode | - Single area - Dynamic area - Closest subjct (view) (help) |
Single and Dynamic area let you select the primary
AF point. Closest subject lets the camera choose whichever area has the
closest subject detail.
Single is the default for P, S, A, M and Macro modes. Closest subject is the default for the Scene modes other than Macro. |
|
| 04 AF assist | - On - Off (no view) (help) |
Enable or disable the AF-assist light. Light
only comes on if it's needed.
If SB-800 or SB-600 is attached, camera will use the strobe's AF assist illuminator. |
|
| 05 ISO Auto | - Off - On (no view) (help) |
ON: -- Done P,A, DVP mode (no view) |
Boosts ISO automatically if aperture and/or
shutter speed selection wouldn't provide sufficient light for a good exposure.
If enabled, the P, A, DVP mode option lets you specify the shutter speed below which the camera will begin boosting the ISO value in Program, Auto, and the Scene modes. Options range from 1/125 to 30 seconds. |
| 06 No CF Card? | - Release lock - Enable release (view) (help) |
Prevents shutter release if there's no CF card in the camera. (Helps avoid shooting a pile of photos without "film" in the camera.) | |
| 07 Image review | - On - Off (no view) (help) |
Enables or disables the immediate review of an image on the LCD screen after each shot. | |
| 08 Grid display | - Off - On (no view) (help) |
Enables or disables alignment grid in viewfinder. | |
| 09 EV step | - 1/3 step - 1/2 step (view) (help) |
Sets step size (in EV units) for aperture, shutter,
and exposure compensation adjustment.
(NOTE, ISO steps are always 1/3 EV.) |
|
| 10 Exp comp. | - Off - On (no view) (help) |
Determines whether +/- button is needed to adjust exposure compensation. When "on", you can adjust EV at any time with just the command dial. | |
| 11 Center wtd | - 6 mm - 8 mm - 10 mm - 12 mm (view) (help) |
Selects the area in the center of the frame that's given the greatest weight in center-weighted metering mode. | |
| 12 BKT set | - AE & flash - AE only - Flash only - WB bracketing (view) (help) |
The D70's auto bracketing feature can control either normal (ambient) exposure, flash exposure, both, or white balance variation. | |
| 13 BKT Order | - MTR>Under>Over - Under>MTR>Over (view) (help) |
In auto bracketing mode, you can change the order in which the camera shoots the bracket. | |
| 14 Command dial | - No - Yes (no view) (help) |
This option reverses the roles of the Main and Sub Command dials in all control modes. | |
| 15 AE-L/AF-L | - AE/AF Lock - AE Lock only - AF Lock only - AE Lock hold - AF-ON (view) (help) |
Controls the function of the AE/AF lock button.
Most modes release the lock after the shutter is tripped, but "AE Lock hold" holds the AE setting until the button is pressed again. AF-ON causes the camera to autofocus when the AE/AF button is pressed. |
|
| 16 AE Lock | - AE-L button - + Release bttn (view) (help) |
The first option locks AE with the AE-L/AF-L button only, the second also permits AE lock with a half-press of the shutter button. | |
| 17 Focus area | - No Wrap - Wrap (view) (help) |
When selecting AF points, commanding the selection to move past the edge of the frame causes it to "wrap" around to the other side. | |
| 18 AF area illm | - Auto - Off - On (>view) (help) |
Controls the (too) subtle backlighting of the active AF point when the AF system actuates. In Auto mode, the backlight doesn't activate when you're shooting a bright subject. | |
| 19 Flash mode | - TTL - Manual - Commander mode (view) (help) |
Manual - (set power) Commander mode: |
Sets flash mode. Manual option leads to screen to set power level, from Full down to 1/16. Commander mode leads to screen to select mode for remote flash. Manual mode there leads to a screen to set power level for remote flash, from Full down to 1/128. |
| 20 Flash sign | - On - Off (no view) (help) |
When enabled, a flash indicator (lightning bolt) will flash in the viewfinder when flash is recommended. | |
| 21 Shutter spd | - 1/60 sec - 1/30 sec - 1/15 sec - 1/8 sec - 1/4 sec - 1/2 sec - 1 sec - 2 sec - 4 sec - 8 sec - 15 sec - 30 sec (view) (help) |
Sets the slowest shutter speed that the camera will use in P and A exposure modes when the flash is enabled. | |
| 22 Monitor off | - 10 sec - 20 sec - 1 min - 5 min - 10 min (view) (help) |
Delay after which rear-panel LCD switches off if no activity. | |
| 23 Meter-off | - 4 sec - 6 sec - 8 sec - 16 sec - 30 min (view) (help) |
Length of time the meter displays the exposure setting after it's been activated. (By either a shutter half-press or a press of the AE-L/AF-L button.) Unless the AE-Lock hold option is selected, the meter will continuously update as the scene or camera settings change. | |
| 24 Self-timer | - 2 sec - 5 sec - 10 sec - 20 sec (view) (help) |
Duration of self-timer delay. | |
| 25 Remote | - 1 min - 5 min - 10 min - 15 min (view) (help) |
Sets the length of time the camera will wait for a signal from the remote control before reverting to single-shot or continuous mode, whichever was last in effect. | |
Setup Menu

| Custom Settings Menu Options | |||
| Top-Level Selection |
Second-Level | Third-Level | Notes |
| Folders | - Select folder |
(Select
folder)
(New) |
Select which folder will be used for both image storage and playback. |
| File No. Seq | - Off - On - Reset (view) |
If on, camera will remember and continue file number sequence from one card to the next, and across erase/format operations. | |
| Format | - No - Yes (view) |
Erases all files on card, including any images hidden or "protected" | |
| CSM Menu | - Simple - Detailed (view) |
The camera defaults to showing only the "Simple" Custom Settings Menu, consisting of just the first 9 out of 26 total menu screens. Selecting "Detailed" here enables display of the full CSM. | |
| Date | - On - Off (view) |
||
| LCD Brightness | -2 to +2 (view) |
The camera displays a gray scale on its LCD as an aid to setting the LCD brightness. | |
| Mirror lock-up | - Yes - No (no view) |
For sensor cleaning, locks mirror up and shutter
open. Turn off camera to reset. AC adapter not required.
NOTE: Don't confuse this with a mirror lockup mode that locks the mirror pre-exposure, to minimize camera shake from mirror bounce. (The D70 doesn't have that feature.) |
|
| Video mode | - NTSC - PAL (view) |
Selects video timing for US/Japan or European compatibility. | |
| Language | - Chinese - German - English - Spanish - French - Korean - Italian - Japanese - Dutch - Swedish (view) |
What? No Urdu?
;-) |
|
| Image comment | - Done - Input comment - Attach comment (view) |
(Input comment) | Embeds an alphanumeric character string in the
EXIF header of captured images.
Comments are visible in Picture Project or Nikon Capture 4, versions 4.1 and later. |
| USB | - Mass storage - PTP (view) |
Chooses protocol for USB port. Mass Storage tends to transfer faster, PTP links to automatic camera-download software on Mac OS 10 and Windows XP. | |
| Dust ref photo | - Yes - No (no view) |
Capture a special "Dust Reference" image that can be used with Nikon Capture 4 to automatically touch-out the images of dust specks on the sensor. | |
| Firmware Ver. | (no view) | Displays current camera firmware version. | |
| Image rotation | - Automatic - Off (view) |
The D70 has an orientation sensor that records the position of the camera in the file headers, allowing the images to display in their correct orientation on the camera's LCD or in Nikon's software. This option disables this, useful if you're going to be using in an orientation (straight up or straight down) that would result in incorrect orientation data being recorded. | |
Image Storage and Interface
The D70 uses CompactFlash memory cards for image storage, accommodating Type I and II sizes, as well as the Hitachi Microdrive. Interestingly, the memory card slot on the D70 is canted at about a 15 degree angle relative to the back of the camera, apparently to provide clearance for the battery compartment, making for a more compact hand grip, while allowing for a large battery. The D70 does not come with a memory card, so you'll need to purchase one separately. The D70 utilizes a folder arrangement that lets you organize images in the camera and a sequential frame counter option to avoid problems with overwriting files when copying them to a computer.
Captured images can be individually write-protected via the Protect button on the back panel. Files can also be "hidden," preventing their display during normal playback operation. (Sounds like a handy thing for those photos from last weekend's party. ;-) Hidden files are protected from accidental deletion in the same way that write-protected ones are. Note though, that both write-protected and "hidden" files are only immune to accidental deletion, not card reformatting.
Three image sizes are available: Large (3,008 x 2,000 pixels), Medium (2,240 x 1,488 pixels), and Small (1,504 x 1,000 pixels). File formats include several levels of JPEG compression, as well NEF (RAW) data mode. The latter file format stores the data exactly as it comes from the CCD array, in a losslessly compressed format. Since the NEF format is completely proprietary though, you need Nikon's "Picture Project" or "Nikon Capture" software to read it, or any of several third-party RAW-format converters. As noted, the compressed RAW format is a "lossless" compression, making it difficult to determine the actual amount of compression that will be used for any given file. Nikon estimates that compression saves roughly 50 or 60 percent of card space relative to the uncompressed RAW format seen on Nikon's higher-end d-SLRs and the original D100, but which isn't offered on the D70.
Below are the approximate number of images and their compression ratios for
a 256 MB CompactFlash card. Third-party cards are available as large as 8 GB
for both solid-state memory and MicroDrives. I highly recommend that you consider
a 256 MB card as the bare minimum for this camera: If you own one of these,
you're going to want to take a lot of pictures without having to stop
and download them to your computer. (Really, a 1GB card makes a nice size in
my experience, especially if you want to work with NEF files much.)
| Resolution/Quality 256MB Memory Card |
|
|
|
|
|
| Large 3,008x2,000 |
Images (Avg size) |
23 10.9 MB |
72 3.53 MB |
1.79 MB |
923 KB |
| Approx. Compression |
1.7:1 | 5:1 | |
|
|
| Medium 2,240x1,488 |
Images (Avg size) |
- | 129 1.98 MB |
1.02 MB |
535 KB |
| Approx. Compression |
- | 5:1 | |
|
|
| Small 1,504x1,000 |
Images (Avg size) |
- | 277 923 KB |
512 KB |
284 KB |
| Approx. Compression |
- | 5:1 | |
|
|
The D70 connects to the host computer via a USB port, as either a Mass Storage
or PTP device. The PTP protocol allows Mac OS X and Windows XP to recognize
the D70 as a camera, so they can launch camera-specific operating system software.
The Mass Storage option lets the camera appear as a standard removable disk
device. I personally find the Mass Storage option to be more convenient, as
it doesn't force me through the clunky OS software, and is faster to boot.
Connected to my 2.4 GHz Pentium IV-equipped Sony VAIO desktop computer running Windows XP, I measured the D70's download speed at 971 KB/second in Mass Storage mode and 759 KB/second in PTP mode. Both times were measured with a Lexar 40x 4GB memory card, adjust your expectations up or down depending on the speed of your memory cards.
Lost Images? - Download this image-recovery program so you'll have it when
you need it...
Since we're talking about memory and image storage, this would be a good time
to mention the following: I get a ton of email from readers who've lost photos
due to a corrupted memory card. It's tragic when it happens, there are few things
more precious than photo memories. Corrupted memory cards can happen with any
card type and any camera manufacturer, nobody's immune. "Stuff happens,"
as they say. A surprising number of "lost" images can be recovered
with an inexpensive, easy to use piece of software though. Given the amount
of email I've gotten on the topic, I now include this paragraph in all my digicam
reviews. The program you need is called PhotoRescue, by DataRescue SA. Read
our review
of it if you'd like, but download the program now, so you'll have it.
It doesn't cost a penny until you need it, and even then it's only $29, with
a money back guarantee. So download PhotoRescue
for Windows or PhotoRescue
for Mac while you're thinking of it. (While you're at it, download the
PDF manual and quickstart
guide as well.) Stash the file in a safe place and it'll be there when you need
it. Trust me, needing this is not a matter of if, but when... PhotoRescue
is about the best and easiest tool for recovering digital photos I've seen.
(Disclosure: IR gets a small commission from sales of the product, but I'd highly
recommend the program even if we didn't.) OK, now back to our regularly
scheduled review...
Video Out
US and Japanese models of the D70 come with an NTSC video cable for connection to a television set or VCR (European models come with the appropriate PAL cable). The camera's video timing can be switched back and forth between NTSC or PAL via a menu option. Any and all screens visible on the rear panel LCD are also visible through the video port.
Power
The D70 uses Nikon's EN-EL3 lithium-ion battery pack or an optional AC adapter for power, and also comes with a little battery holder that lets you power it (expensively) from three CR2 non-rechargeable Lithium cells. An indicator on the status display panel lets you know approximately how much battery power is left.
I didn't have access to the external AC adapter when testing the D70, so wasn't able to conduct my usual direct measurements of power consumption. - And battery life on a d-SLR will also vary greatly depending on the lens used and how much the focus motor has to operate.
In the manual, Nikon themselves offer the following characterizations of the D70's battery life:
Example 1
Zoom Nikkor AF-S DX 18–70 mm f/3.5–4.5G IF ED lens; continuous shooting mode; continuous-servo autofocus; image quality set to JPEG Basic; image size set to M; shutter speed 1/250s; shutter-release pressed half way for three seconds and focus cycled from infinity to minimum range three times with each shot; after six shots, monitor turned on for five seconds and then turned off; cycle repeated once exposure meters have turned off.
Number of shots (EN-EL3): 2000
Number of shots (CR2): 560
Example 2
AF-S DX 18–70 mm f/3.5–5.6G IF ED lens; single-frame shooting mode; single-servo autofocus; image quality set to JPEG Normal; image size set to L; shutter speed 1/250s; shutter-release pressed half way for five seconds and focus cycled from infinity to minimum range once with each shot; built-in Speedlight fired at full power with every other shot; AF-assist illuminator lights when Speedlight is used; cycle repeated once exposure meters have turned off; camera turned off for one second with every ten shots.
Number of shots (EN-EL3): 400
Number of shots (CR2): 160
My own experience seemed to thoroughly support Nikon's battery life claims. The D70/EN-EL3 combination seemed to offer really excellent battery life, as I could shoot literally hundreds of photos without draining the battery. Despite the long battery life though, I still heartily recommend purchasing a spare battery pack and keeping it charged for long shooting days or for shooting in cold weather (which can greatly reduce battery capacity). Nikon says they will not be offering an external battery pack/vertical grip for the D70.
Included Software
The D70 ships with Nikon's new PictureProject software, as well as a 30-day free trial of Nikon Capture, their higher-end program for much more extensive manipulation of NEF-format images. Both packages are compatible with both PC and Mac computers, big kudos to Nikon for that.
PictureProject is a new piece of software for Nikon, replacing the previous Nikon View. Nikon had talked up PictureProject quite a bit prior to my receiving a copy of it, so I approached it with a pretty positive mindset. My initial reaction was disappointment over how clunky it was to use with NEF files, and its rather lightweight features, but as I spent more time playing with it, I found myself liking it quite a bit more. (Unlike some other reviewers, I do think it's a bit of a step up from Nikon View.)
Some of my negative reaction to PictureProject may be that I'm just not the sort of user it's intended for: It's clearly aimed at novices and first-time digicam owners, so it's long on automation of file import and simple organizational tools, but rather short on any sort of workflow to support effective use of NEF files, or for efficiently processing large numbers of images. Granted, Nikon wants to protect sales of their high-end Capture 4 software program, but I do think PictureProject could have been made a good bit more capable without treading on Capture 4's toes. As it is, I'm afraid that PictureProject puts the D70 at something of a disadvantage relative to the software package that ships with Canon's Digital Rebel, which includes Adobe's excellent Photoshop Elements right in the box with the camera.
That said, PictureProject does have some nice features for organizing your images, and I liked its email integration quite a bit. I don't normally review bundled software in my camera reviews, but given the change that PictureProject constitutes in the Nikon lineup, I'll make an exception and devote a little time to it here. Here's a brief look at PictureProject's interface and a few of its features. (The screenshots below are all from the Windows version of the program.):
Main Screen
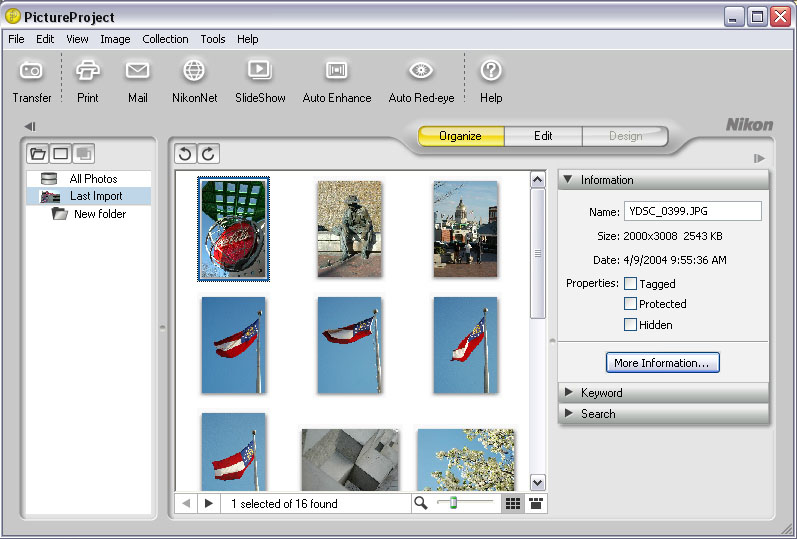
PictureProject is a reasonably competent organizing tool, you can assign keywords to images, tag interesting ones for easier recall, and group them into multiple "collections." Images can belong to more than one collection, making it easy to create multiple groupings. The main screen shows an array of thumbnails, and you can mark individual pictures as being tagged for quick reference, protected, or hidden. Clicking the "Keyword" tab in the left panel lets you create keywords and assign them to images. Finally, you can search by file name, keyword, or date, and can restrict your searches to only those files that have been tagged, protected, or both.
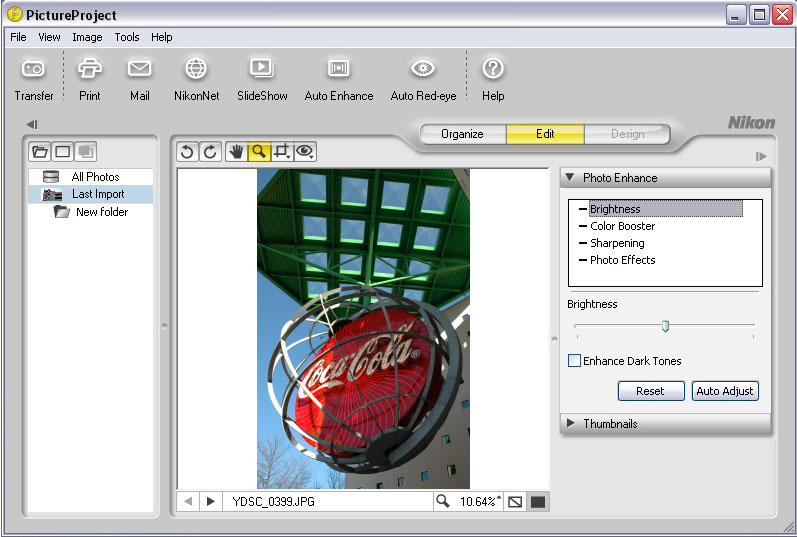
By double-clicking on an image, you can edit it in several ways, including rotating, cropping, redeye removal, and adjusting its brightness, color saturation, and sharpening. You can also convert it to Sepia or Black/White, using the Photo Effects option.
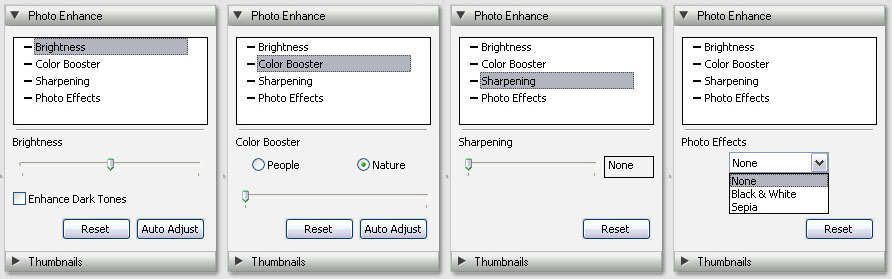
The screen shots above show the controls available for each of the options in the Photo Enhance panel of the Edit screen. The capabilities are fairly modest, particularly in relation to NEF (RAW) files.
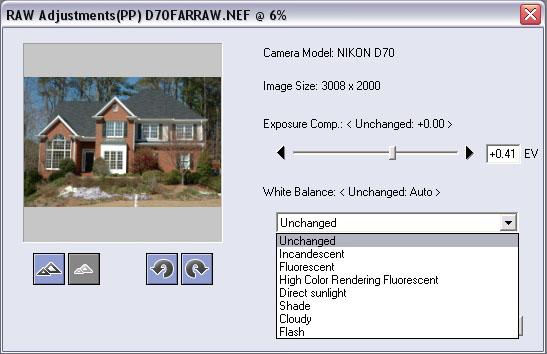
Speaking of NEF files, that was one of my primary beefs with the program. You can convert NEFs to JPEG format en masse, but if you want to save to TIFF, the only way to do so is by exporting the file to another program like Photoshop. The screen shot above shows the Export window, and I've clicked on the White Balance window to show the options available. (No click balance?) Note that you can adjust the exposure compensation here in 0.01 EV increments, whereas the adjustment in Edit mode is in terms of "brightness" only. The Export option lacks the other adjustments available in Edit mode, but if you're exporting to a program like Photoshop or Elements, you'll presumably have much more powerful adjustments available to you there.
This does touch on a major workflow limitation in PictureProject though. While you can export NEF images to another application, you can only do so one at a time. If you want to make any adjustments to a NEF file inside PictureProject, it forces you to save the whole NEF file back to disk before you can go back to Organize mode, export the file as a JPEG, or transfer it to another application. There's no way to export a modified (or unmodified) NEF file directly from Edit mode.
File Menu, Organize
Mode |
File Menu, Edit Mode |
Edit Menu |
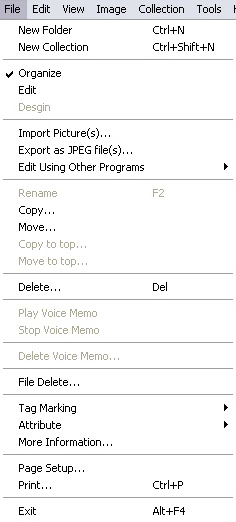 |
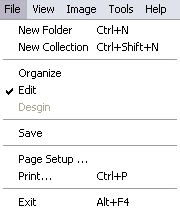 |
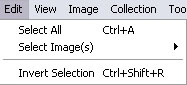 |
View Menu |
Image Menu | Collection Menu |
 |
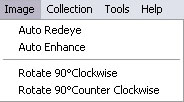 |
 |
| Tools Menu | ||
 |
Since I just mentioned the export capability (or lack thereof) in Edit mode, the shots above show the program's various menus. Only the contents of the File menu vary between modes.
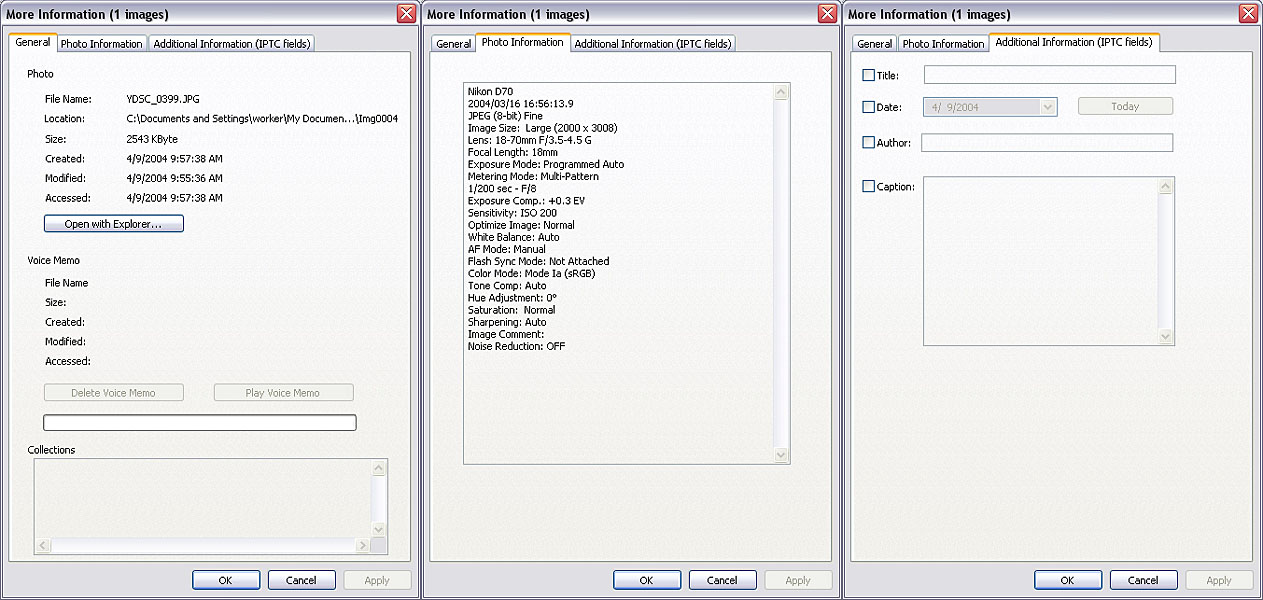
As you'd expect, PictureProject can display essentially all the information embedded in the file headers, including exposure information and even provides access to the IPTC fields. (Rather strange IMHO, in a very consumer-oriented program, as these fields are really only of interest to photojournalists or others working inside large organizations.)
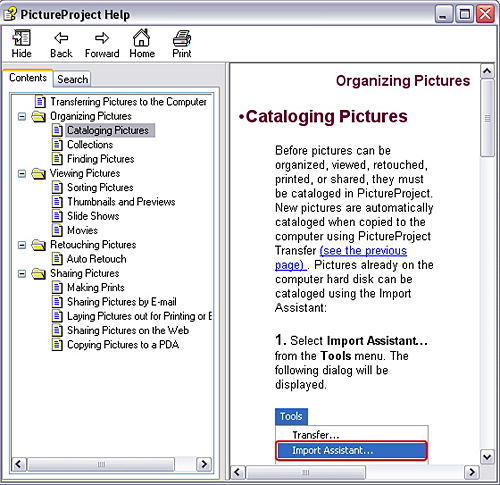
One of PictureProject's weakest points is its online help system. There's just not much there. (The screen shot above shows all there is to see.) While there's a moderately good electronic (PDF file) manual shipped on a second CD, I don't think it begins to make up for the paucity of help within the program itself. - And frankly, the electronic manual could stand to have better detail in several areas as well.

PictureProject's printing capabilities are actually quite nice. There are plenty of options for printing one or more images per page, and to include EXIF exposure information as well. Besides the screen shown above, there's also a screen oriented toward outputting index prints, which also includes the ability to show full EXIF data. (I could actually see myself using this to create hardcopy catalogs of my shots.)
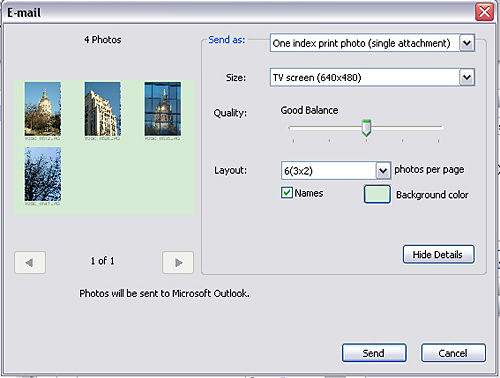
Finally, there's a very nice email option, that takes care of resizing the images for you, and packaging them in an outgoing email message. You can select the size you want the emailed images to be, and whether you want to present them as a single index print photo, or as individual files. From my playing with it, it looks like PictureProject actually sends the emails itself, without having to launch your email application. This is a very nice feature that I suspect even a lot of advanced users would use.
Overall, as I said at the beginning, I started out expecting great things from PictureProject, became more than a little disappointed, but finally ended up liking the package fairly well. If you're an advanced user, you'll probably find yourself frustrated with its lack of an effective workflow for plowing through large numbers of images, tweaking as you go. It's wholly inadequate for working with NEF files, and I think Nikon has committed a serious error there, crippling PictureProject in that regard, to try to protect sales of Capture 4. This is one area where Canon's d-SLRs win hands down over Nikon's.
If your shooting and photo usage profile is more that of a consumer though, PictureProject is a very nice little package. I think purchasers of Nikon's lower-end consumer cameras will be a lot happier with it than D70 owners, but even for sophisticated users, it'd make a nice tool for the Significant Other to use to manage the family photo archives.
Not Included: "Brainware"
Every manufacturer includes some level of needed software with their cameras,
but what's missing is the knowledge and experience to know what to do with it.
For lack of a better term, I've called this "Brainware." There's a
lot involved between snapping the shutter, and watching a beautiful, professional-quality
print spool off your printer, and there's sadly very little guidance as to how
to get from point A to point B.
Fortunately, Uwe Steinmueller of OutbackPhoto.com has come up with an excellent series of e-books that detail every step of the process, show actual examples of files moving through the workflow, and the final results. If you want to get the absolute best prints possible from your digital files, you owe it to yourself to purchase one of the Outback Photo Digital Workflow books.
In the Box
Included in the box with the D70's body box are the following items:
<<D70 Sample Images | Additional Resources and Other Links>>
Reader Comments!
Questions, comments or controversy on this product? Click
this link to see what other Imaging Resource readers have had to say about
the Nikon D70, or add comments of your own!