 Kodak DC240 Digital Camera Kodak develops a capable, responsive mid-range 1.3 megapixel model ("First Look" review date: 15 March, 1999, Full review 2 April, 1999) |
 |
|
1.31 Million pixel sensor |
|
|
1280 x 960 resolution | |
|
|
3X optical zoom plus 2x digital | |
|
|
Autofocus lens w/macro | |
|
|
Built-in flash | |
|
|
Fast startup and cycle times |
Manufacturer Overview
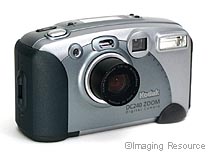
Kodak has long been a "power player" in the world of digital cameras, but for some time now has had a noticeable gap in their product lineup, with inexpensive, easy to use consumer models at one end of the range (the DC200 and DC210 Plus), and powerful prosumer units with scripting and a host of advanced features at the high end (the DC260). Thus, Kodak's lineup has jumped from 1.0 to 1.6 megapixels, but has left the popular 1.3 megapixel resolution level uncovered. Until now, that is: Kodak has now developed the DC240 digital camera, combining a 1.3 megapixel sensor, 3x autofocus optical zoom lens, a well-developed user interface, and the trademark "Kodak color" into an affordable mid-range digicam.![]()
High Points
- 1.31 million pixel sensor
- 1280x960 and 640x480 pixel image sizes
- Fast startup, only ~2.5 seconds to power-on
- RAM buffer to allow two shots within a couple of seconds of each other
- 3x optical zoom (39-117 mm equivalent focal lengths)
- 2x digital zoom
- Fast f/2.8 maximum lens aperture
- Macro focusing to 9.75 inches
- Built-in, 4-mode flash
- Support for both NTSC and PAL video output
- Combined serial/USB interface for maximum compatibility & speed
- Ships with NiMH batteries and charger (Way to go, Kodak!)
- Uses CompactFlash memory, ships with 8 MB card
- Software package includes Adobe PhotoDeluxe & PageMill for both Mac and PC
- Supports new Digital Print Order Format (DPOF) for marking images on card for later printing
Executive Overview
Designed for business, but suitable for the home, the Kodak DC240 Zoom Digital
Camera sports a compact, ergonomic design much like a traditional point-and-shoot
camera. While it doesn't quite pass the "shirt-pocket" test, it's small enough
for a briefcase or large purse, and convenient enough to carry to your next
meeting or family gathering.
The 1.3 megapixel CCD provides two image resolutions: High (1,280 x 960 pixels) and Standard (640 x 480 pixels). Variable Image Quality settings allow you to save your images at three different JPEG compression ratios: Best stores about three images per megabyte of storage space, Better stores four images per megabyte, and Good stores approximately seven images per megabyte. At its highest quality setting, the DC240 produces image files large enough to make high-quality 5 x 7-inch photographic prints. Lower settings are suitable for Web publishing and sharing photographs over the Internet.
The DC240 digital camera features a 3X autofocus zoom lens with a focal length equivalent to a 39-117mm lens on a 35mm camera and an aperture range of f/2.8-16 in wide angle and f/4.5-25.7 in telephoto modes. The zoom control toggle on top allows you to quickly zoom in on your subject with a standard focus range of 20 inches (0.5 m) to infinity in wide-angle or telephoto. A Macro (close-up) feature adds the flexibility of focusing on small subjects at relatively close distances-between 9.8 and 20 inches (0.25 to 0.5 meters). The 2X digital zoom affords even closer inspection, but since it is a digital enlargement of the center CCD pixels, rather than a true optical zoom, image quality will be sacrificed.
The DC240's molded plastic body measures 5.2 x 2 x 3 inches (133 x 51 x 76mm) and weighs just 13 ounces (328 grams) without batteries. It has a silver and gray metallic finish on the front, with a black handgrip that wraps around the right side of the camera and blends into a solid black coating on the back. Both the power switch and shutter button on top of the camera are readily accessible, without undo reaching or having to adjust your grip on the camera. The Mode dial is located in the lower right quadrant of the back panel, making it simple to rotate with the right thumb.
Key features on the camera's front panel include the onboard flash, eye-level optical viewfinder, light sensor (to indicate flash and autofocus status), camera lens, and indicator light for the self-timer. The lens retracts when the camera is turned off and extends when turned on. A plastic lens cap grips the camera case when the lens retracts, but is light enough to not strain the mechanism as it extends.
The controls on the back side of the camera are arranged much like the previous DC210 and DC200 models. Most camera functions are controlled via the LCD menu system, and activated by the Menu button at the upper left corner. Major operating modes are selected with the Mode dial, while menu options are selected with the Scroll buttons located above and below the central function button on the right side of the LCD monitor. Th central function button, which Kodak calls the "Do It" button, activates the LCD screen and confirms selected menu options.
The top of the camera features an LED status display which shows camera settings without the aid of the LCD monitor. The Shutter button is joined by several function controls, including Zoom, Normal/Macro setting, Self-timer On/Off, and a Flash control with Auto, Red-eye, Fill, and Off selections.
Batteries load easily into the battery compartment, accessed from the bottom of the camera. The AC adapter, Video Out, Serial port, and USB connectors are recessed on the left side of the camera, under protective rubber flaps, and the adjoining memory card slot makes it easy to access the supplied Kodak 8MB Picture Card CompactFlash media, even when the camera is mounted on a tripod. Overall, the camera is simple to operate-using the right hand to control image capture, and the left hand to navigate through the various buttons and menu options on the LCD viewfinder. (An optional Picture Card reader is available for accessing images directly from your computer, as well as higher capacity storage media in 10MB, 20MB, 32MB, and 48MB sizes.)
Kodak rates the DC240 at a fixed ISO (light sensitivity) of 140. However, an Exposure Compensation option allows you to adjust exposures from -2 to +2 exposure equivalents (EV) in half-step increments, allowing you to override the camera's ISO. Two metering modes allow you to determine how light is measured: The Multi-Pattern option examines the entire image area to determine the best exposure for the overall picture, while a Center-Weighted setting bases its exposure primarily on the central portion of the frame. By using Center-Weighted metering to measure the light on a subject centered in the frame, and pressing the shutter button halfway, you can lock in an exposure and recompose the picture as you wish, without losing the original exposure rating.
The White Balance feature allows you to adjust your exposures for special lighting conditions. Options include Auto, Daylight, Fluorescent, and Tungsten light sources. A Sharpness feature provides three sharpness settings: Sharp highlights edges in the image to make them stand out; Standard makes no sharpness adjustment; and Soft blurs the edges so they blend in better with the background.
Other DC240 features include: Support for Digital Print Order Format (DPOF) compatible printers (for printing images directly from the PC card), a Border feature to add borders or logos to your pictures; Black & White and Sepia tone special effects, Protect function to prevent images from being accidentally erased from the memory card, and Slideshow for viewing your images as a slideshow on the camera's LCD screen or on a television.
The Kodak DC240 Zoom Digital Camera ships with a hand strap and lens cover, 8MB CompactFlash card, four AA alkaline batteries and four rechargeable NiMH batteries with charger, Serial connection and USB cable for Macintosh and Windows systems, video cable, and CD-ROMs with software and utilities, including Kodak Picture Easy (Windows), TWAIN Acquire module (Windows), Adobe PhotoDeluxe and PageMill software (Windows and Macintosh), Camera Mounter and Camera Controls (Windows), and Picture Transfer and Border Transfer Applications (Windows and Macintosh).
Design
The Kodak DC240 Camera sports a lightweight, compact design, weighing in at
11.6 ounces (328 g) without batteries. It has a compact, ergonomic design much
like a traditional camera, and caters to right-handed camera users, as do most
cameras we've tested. While it doesn't quite pass the "shirt-pocket"
test, all-in-all it's an easy to master design, and small enough to encourage
packing it along on most trips.![]()
The body, at 5.2 x 2.0 x 3.0 inches (133 x 51 x 76 mm), consists of metallized
plastic and has a nice "grip" area to the right of the camera. The
power switch is easily activated with your thumb while holding the camera in
your right hand. The shutter button is readily accessible without stretching
your finger, which makes for easy one-hand capturing of images. The camera mode
dial on the rear of the camera is easily rotated with the thumb of your right
hand, reinforcing the one-hand capture paradigm. The picture card compartment
is also easy to access on the left-hand side of the camera, and it's equally
as easy to load or eject the 8 MB picture card, even when the camera is mounted
on a tripod.![]()
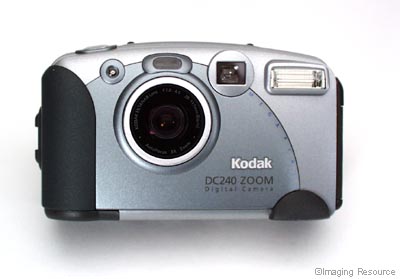
The picture below shows the front of the camera. From right to left, key features
are the onboard flash, viewfinder, light sensor (flash and autofocus), lens,
and indicator light for the self-timer. The lens retracts when the camera is
turned off, and extends when turned on. A plastic lens cap grips the camera
case when the lens is retracted, lightly enough to not strain the mechanism
when the lens extends.
The picture below shows the back side of the camera, with a control layout that will be immediately recognizable to anyone familiar with the previous DC210 and DC200. Most camera functions are controlled via the LCD menu system, activated by the "Menu" button at upper left. Major operating modes are selected with the rotating function dial at lower right, while menu options are selected with the buttons to the right of the LCD screen. The central button (which Kodak calls the "Do It" button) also serves to turn on the LCD screen for use as a viewfinder when in Capture mode.
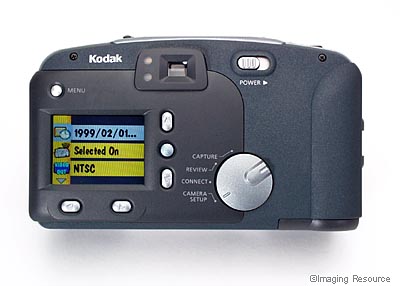
The menu button and scroll buttons for selecting different camera options are located on the camera's back side are easy to maneuver. Similarly, the "DO-IT" button (Kodak's term), which enables the LCD viewfinder when in Capture Mode and confirms highlighted camera menu options, is easily accessible just to the right of the LCD.![]()
Batteries load easily in the battery compartment in the bottom of the camera, and the AC adapter, video out, and serial ports are nicely tucked into the left-hand side of the camera (behind rubber protector flaps) for easy accessibility.![]()
As mentioned, the camera is easily handled with one hand when capturing images, while camera users can navigate through the various buttons and menu options on the LCD viewfinder with the other.![]()
Viewfinder
The DC240 is equipped with both an optical viewfinder, and an LCD display on
the rear of the camera. The LCD is used for both previewing and reviewing images,
and for scrolling through and selecting camera menu options. ![]()
The 1.8-inch LCD can be used to preview an image in Capture mode, or
review images in Review mode. The LCD is equipped with a brightness adjustment,
a small thumb wheel on the bottom of the camera, to adjust LCD viewing for your
particular needs. (Note that this doesn't appear to be a "true" brightness
control, in that it seems to just vary the display contrast, rather than the
brightness of the LCD's backlight.) The "live" images on the LCD are
bright and sharp, with a fairly high refresh rate, albeit not as fast as some
cameras we've tested. Regardless, the LCD is still immensely helpful when framing
your subjects, or when experimenting with what you shot will look like if captured
in sepia-tone, or black and white mode. In "viewfinder" mode, the
240's LCD shows the 100% accuracy we've come to appreciate in the Kodak digital
camera line. (100% viewfinder accuracy is handy for framing critical shots,
but very rare among the digital cameras we've tested.)![]()
The LCD always displays your images in color unless you are snapping
images with one of the special effects turned on. (Black & white or sepia-tone.)
In addition, you'll see helpful icons appear in the LCD if you have adjusted
the cameras exposure, locked the exposure, selected a border to appear over
your image, or turned on the date stamp. Pressing the Menu button in Capture
mode brings up a menu for setting the most commonly-used picture-taking controls.
![]()
When reviewing images, a press of the Menu button displays a series of
icons on the left of the LCD. You can select these icons to view an enlarged
portion of the image on the LCD, delete images, print them, and lock them to
prevent erasure, among other things. The menu icons displayed on the LCD are
easily viewable and easy to navigate through. ![]()
As with most digital cameras, using the LCD for preview and review of
images can drain battery power fairly quickly. You should limit continuous use
of the LCD during your picture-taking sessions for this purpose. For continuous
preview and review, power the camera with an optional AC adapter.![]()
The optical viewfinder on the DC240 displays about 91% of the actual
image taken. It isn't a TTL (Through The Lens) optical viewfinder, but the clarity
of the images in the viewfinder is more than acceptable for viewing at both
the wide angle and the telephoto settings. Unfortunately, the DC240 is not equipped
with a Diopter Adjustment for those camera users (like us) plagued with near-
or far-sightedness, and the viewfinder optics have a fairly low "eye relief."
(This last means that your eyeball needs to be pretty close to the viewfinder
lens. For eyeglass wearers, this means you'll need to press your glasses against
the camera pretty firmly to get a clear view.) On the positive side though,
the DC240's viewfinder is fairly insensitive to lateral eye position, providing
an accurate view regardless of the position of your eyeball.![]()
Optics
Kodak rates the DC240 at an equivalent ISO speed of 140 with a maximum aperture
setting of F/2.8 in wide angle mode, and F/4.5 in telephoto mode. The DC240
includes an optical glass lens that automatically focuses to provide the best
capture of your subject. Depressing and holding the shutter button half-way
after framing your subject locks in the auto focus prior to capture, allowing
accurate focus for off-center subjects. (Center the subject, lock the focus,
then re-frame the shot while still holding the shutter button down, before taking
the picture.) ![]()
The zoom control toggle on the top of the camera lets you quickly zoom
in on your subjects with a standard working range for image capture between
20 inches (0.5 m) and infinity in wide angle or telephoto mode. A macro (close-up)
feature adds the flexibility of allowing you to clearly focus on small subjects
at a relatively close distance from between 9.8 and 20 inches (0.25 to 0.5 m).
Selecting close-up mode automatically zooms the lens to the telephoto end of
its range, and adjusts the focusing to handle closer objects. We found operation
of the zoom lens to be very smooth, with no "preferred" focal-length
settings. The lens was also very responsive to the controls, making it easy
to get exactly the focal length we wanted.![]()
The 3X zoom lens capability has a focal length range equivalent to between
39 mm and 117 mm on a conventional 35 mm camera. The additional 2x digital zoom
capability can get you closer to your subject by magnifying the center of your
image an additional two times, cropping the image to a 640 x 480 pixel size
at the maximum 2x setting. (As with all digital zooms though, the more the image
is magnified, the more blurry it becomes, since it is working with progressively
less data the more the image is magnified.) Some digital zooms simply crop the
image to a smaller size, but the DC240 resamples the image in-camera, so the
final images always have the pixel dimensions you've selected via the menu system.
Also as with other cameras, the digital zoom only works when the LCD is turned
on, because you'd have no way to tell what portion of the image was being viewed
otherwise. The camera interpolates the image in real time on the LCD when zooming
digitally. The final image does appear somewhat "softer," but overall,
the digital zoom capability of the camera is fairly smooth and viewing the zoom
as it happens on the LCD is very helpful in keeping the subject of your shot
correctly centered. Another nice touch is the fine gradations available on the
digital zoom, varying in 0.1x increments from 1.0 to 2.0x. Other than our general
lack of fondness for digital zooms, the one complaint we have about the DC240's
digital zoom is that it can't be used in conjunction with the close-up mode:
Entering close-up mode disables the digital zoom if it's active, or prevents
it from being enabled if it isn't.![]()
Exposure
The DC240 is equipped with two metering modes to help obtain just
the right exposure for your images even in the face of backlight surrounding
the subject. The modes include a Multi-Pattern option that examines the entire
image area to determine the best exposure. This setting will generally be the
best choice for everyday pictures. Conversely, the camera is also equipped with
a Center-Weighted setting that bases its exposure decision primarily on the
central portion of the frame, while de-emphasizing the background. The Center-Weighted
mode will be most useful for shooting portraits shots, or for dealing with backlit
subjects.![]()
A Sharpness feature is included that allows you to choose between three
sharpness options: Sharp, Standard, and Soft. The Sharp option highlights the
edges of your image making them stand out; the Standard option leaves the image
as captured and makes no sharpness adjustment; and the Soft option blurs the
edges in your picture so that they blend in with the background. (This is a
little different than most digital cameras we've tested with "sharpness"
options: Most seem to simply turn off the sharpening function in the "soft"
mode, while the DC240 appears to actually blur the image somewhat when this
option is selected.)![]()
The White Balance feature of the DC240 lets you capture images under
special lighting conditions (fluorescent, evening, or tungsten light, for example),
or create a special color effects. Normally, the Auto option would be used for
everyday pictures and, in most cases, produces images of more than acceptable
quality. Under some circumstances, when taking pictures out-of-doors, or under
daylight lighting conditions, the Daylight option may be preferable: The difference
between the two is pretty subtle when shooting normal subjects, but the "daylight"
option would avoid color shifts due to a preponderance of a particular color
in the subject.) When capturing images indoors, two white balance options are
available: Fluorescent, to correct for the green cast caused by most household
fluorescent lights, or Tungsten, to correct for the orange cast frequently seen
when capturing images under tungsten lighting.![]()
Through an LCD menu option, you can dial in exposure compensation from
-2EV to +2EV in .5EV increments. The DC240 is also equipped with another LCD
option that locks the exposure and white balance settings when the shutter is
tripped for the first shot in a series, or when the Shutter button is half-pressed
for the first time after selecting the option. This Exposure Lock feature works
especially well for capturing a series of images that require consistent exposure
and color balance between them. (For instance, images that will later be combined
together to create a panorama.)![]()
Besides the normal exposure modes, the DC240 sports two special modes,
to take either black & white or sepia-toned images. The black & white
option produces smaller file sizes for a given quality level than is possible
for color pictures. The "sepia" option recreates the look of old-time
photos, which were often rendered in shades of brown, as a result of treating
the prints in a sepia toning solution.![]()
Lastly, after an image is captured, the QuickView feature displays the
image on the LCD. At this point, you can choose to delete the image immediately
and re-shoot, or, if you do nothing, the image will be stored to the cameras
picture card. (The QuickView feature can be turned off to conserve battery life.)![]()
The built-in flash of the DC240 has a working range 1.6 feet to 13.1 feet in wide-angle mode, and 1.6 feet to 8.2 feet in telephoto mode. The "customizable" flash settings include auto flash, red-eye reduction flash, fill-in flash, and off. The flash settings are fairly flexible in that you can choose a different setting for each shot, or you can set a default flash setting in Camera Set-Up mode. The default setting holds through camera power cycles and can be helpful if you regularly shoot images requiring a specific flash option. In common usage, changing a flash setting on the run is so simple, it's not a problem, but the selectable default setting is nonetheless a convenience.
Shutter Lag Time/Cycle Times
Shutter lag time is the amount of time that elapses between pressing the shutter button and the time that the camera actually fires. The camera needs this time to adjust its auto focus and auto exposure setting before capturing the image. We measured the DC240's shutter lag at 0.8 seconds for shots requiring full autofocus, and at 0.15 - 0.2 seconds for those which were pre-focused by half-pressing the shutter button in advance of taking the shot itself. On the DC240, the shot-to-shot cycle time varies in an interesting fashion: For the first three shots, you'll be able to snap away once every 4-5 seconds. If you continue shooting as rapidly as possible, the camera will require more like 8-10 seconds between shots after the first three are taken. (Apparently, the DC240 has some internal memory buffering that permits it to cycle more rapidly for the first few shots.) Given its 1.3 megapixel resolution level, a cycle time of only 4-5 seconds is very good, better than most competing units that we've tested thus far (April, 1999). (Shutter lag measurements were made using the "Camera" utility from Digital Eyes.)
Camera startup time is also quite quick at just over 3.5 seconds and shutdown takes slightly more than 2 seconds. Switching from Capture to Review mode takes just under 2 seconds while switching back to Capture mode is effectively instantaneous.
Operation and User Interface
As mentioned in our "High Points Overview", we found the user interface for the DC240 to be very easy to navigate. On first usage, it took us less than 5 minutes to get a handle on the major control functions of the camera by just experimenting with the different dials and buttons. Reading the manual really wasn't even necessary.
 The
camera operates in one of four different mode settings: Capture, Review, Connect,
and Camera Set-Up. You select which mode you want with the Mode Dial on the rear
of the camera. Depending on which mode you select, pressing the menu button-also
on the rear of the camera-displays a sequence of menu options that are specific
to that mode. Easy-to-access up/down and left/right scroll buttons to the right
and below the LCD screen are used to scroll through the different menus and options,
while a blue button Kodak calls the "DO-IT" button is used to confirm
selections.
The
camera operates in one of four different mode settings: Capture, Review, Connect,
and Camera Set-Up. You select which mode you want with the Mode Dial on the rear
of the camera. Depending on which mode you select, pressing the menu button-also
on the rear of the camera-displays a sequence of menu options that are specific
to that mode. Easy-to-access up/down and left/right scroll buttons to the right
and below the LCD screen are used to scroll through the different menus and options,
while a blue button Kodak calls the "DO-IT" button is used to confirm
selections. The LCD doesn't automatically turn on when in Capture mode. You need to turn it on manually using the DO-IT button. This is mildly annoying if you tend to use the LCD a lot, but does much to conserve battery life. In comparison, the LCD is always on in Review mode and you don't need to enable it. If you need to adjust the LCD brightness, simply use the small thumb wheel on the bottom of the camera. The LCD shuts itself off after 30 seconds of inactivity to save battery power.
While in Capture mode, available menu options include exposure compensation, borders for images, special effect settings, quality and resolution settings, date and time stamp, and white balance and meter mode settings.
Similarly, Review mode provides a variety of options relating to images already captured and stored to the camera's picture card, including deleting, setting print order, "locking" and image, setting slide show timing, and retrieving detailed picture information.
Connect mode lets you connect the camera to a PC or Macintosh computer using the USB or serial cables packaged in the camera box. You can connect to Windows '95 or '98 computers, as well as the new Apple iMac computers with the high-speed USB connections. Of course, you first need to install the DC240 software on your computer before you can acquire images from the camera.
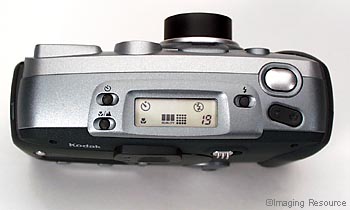
Other control buttons are placed very similarly to other cameras. On the top of the camera, you'll find the Status Display which shows icons for the different camera settings, if the settings are enabled. It's an easy reminder of which menu options you have enabled, the battery power status, and pictures remaining on the picture card, among other things. Also easily accessed atop the camera are the Shutter Button, Zoom Control for telephoto or wide angle shooting, Self-Timer Button, Infinity Focus/Close-Up Button, and lastly, the Flash Button to change flash settings for different exposures. The left-hand side of the camera contains easily accessible ports for the AC Adapter, Video Out, and Serial/USB connections.![]()
Control Enumeration
Self-Timer Mode
The Self-Timer mode has its own button on the top of the camera. You can use the self-timer in conjunction with any of the camera settings you've enabled, like many other camera models. Depressing the Self-Timer button provides a 10 second delay between pressing the Shutter button and the when the camera fires.![]()
Infinity Focus/Close-Up Button
Also located atop the camera, this button toggles between two modes:
- Close-Up-Disables the zoom capabilities of the camera and sets the focus distance to between .8 to 1.6 feet. In Close-Up mode, the LCD is automatically turned on to help you frame your image, since the optical viewfinder won't be as accurate.
- Infinity-Turns off the flash and auto-focus automatically to provide sharp, clear landscape type images.

Capture Mode
With the Mode Dial on the rear of the camera set to Capture, pressing the Menu Button provides the following options for capturing your images:
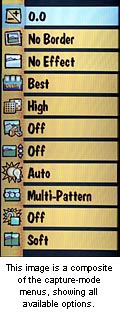 Exposure Compensation: Adjust the exposure set by the camera's automatic metering from +2 EV to -2 EV, in .5 EV steps.
- Border: Allows you to add borders or logos to your pictures. Using the Kodak DC240 Border Transfer utility, you can save borders onto your picture card. Then, you can use the DC240's Border feature to add the borders to your image prior to capture. When in Border mode, the LCD automatically turns on and displays the chosen border so that you can see if the border matches well with your subject. Note that formatting the picture card erases all the borders you've loaded: If you reformat, you'll need to reload.
- Effects: Lets you capture images in Black & White, Sepia (for an antique look), or Document (adds contrast when capturing images containing text) mode. When in Effects mode, the LCD automatically turns on and displays the image with the chosen effect. Use the LCD display to see if the image works well with the effect. If so, capture it. If not, choose another effect and see how it looks.
- Picture Quality: Select one of three settings: Good, Better, and Best. Of course, as you move from Good to Best, more space is needed on the picture card to store the image. The Good setting is more than adequate to capture images for online sharing. In high resolution mode (see below), the picture quality settings correspond to the following file sizes:
- Best: Stores about 3 images per 1 MB of storage space.
- Better: Stores about 4 images per 1 MB of storage space.
- Good: Stores about 7 images per 1 MB of storage space.
- Resolution: Choose from one of two settings: High or Standard.
- High: Use this setting for images that you hope to print. The resolution of the image at this setting is 1280 x 960 pixels.
- Standard: Use this setting when capturing images for online sharing. The resolution of the image at this setting is 640 x 480 pixels.
- Date/Time Stamp: Lets you record the date and time that the image is captured on the image itself.
- QuickView: Displays the image you just captured in the LCD for several seconds after capture. This handy feature lets you review the image and decide if you want to keep it and save it to the picture card. A Delete icon (trash can) appears on the image when viewing it. If you don't like the image, press the left scroll button to delete it. If you like it, do nothing and it will be stored automatically.
- White Balance: Select from one of four white balance settings based on the environment in which you are capturing images:
- Auto: Automatically adjusts the white balance setting to the scene content.
- Daylight: Adjusts the white balance for natural, neutral daylight lighting.
- Fluorescent: Adjusts the white balance for images captured under fluorescent lighting to remove the greenish tint that sometimes occurs.
- Tungsten: Adjusts the white balance for images captured under tungsten lighting to remove the reddish-orange tint that sometimes occurs.
- Metering: Use this option to obtain the best exposure for your images, based on the lighting and subject type. Two metering modes are available:
- Multi-Pattern: Examines the entire image area to determine the best exposure. This setting will generally be the best choice for everyday pictures.
- Center-Weighted: Bases its exposure decision primarily on the central portion of the frame, while de-emphasizing the background. The Center-Weighted mode will be most useful for shooting portraits shots, or for dealing with backlit subjects.
- Exposure Lock: After this option is selected, the camera exposure and white-balance settings will be "locked" as soon as the first shot is taken. These settings will remain in effect until the "lock" is released by revisiting this menu option. Use this feature to insure consistent exposure for multiple shots to be used in panoramas, or other applications requiring consistent exposure.
- Sharpness: Provides three options for sharpening or softening a picture:
- Sharp: Highlights the edges contained within your images so that they stand out more.
- Standard: Captures the image and stores it as is with no changes to sharpness.
- Soft: Blurs fine details so that they become "softer" and edges of objects blend into the image.
Review Mode
Use Review mode to examine already-captured images. When you change from Capture to Review Mode, the LCD automatically activates and displays your images. Use the left/right scroll buttons to scroll through and view all the images currently stored on the picture card.![]()
Pressing the menu button changes what is displayed on the LCD. At the bottom of the LCD you'll see smaller versions of the images that you have captured (if there's more than 1, of course). You can use the left/right scroll buttons to quickly scroll through the images that you have captured to find a particular image. Once you find it, that image appears larger in the LCD. To the left of the LCD, a series of icons appears. Each of these icons represents an operation that you can perform on the selected image. Whenever one of these operations is selected, Delete, for example, the Trash Can icon appears over the image in the LCD.![]()
 Magnify: Lets you magnify and zoom in on a particular portion of a picture for closer examination. The image expands to twice the normal LCD display size. You can use the up/down and left/right scroll buttons to view different parts of the picture at the magnified level. (We liked the smooth scrolling the direction buttons provide in this mode: Many digicams jump between quadrants of the enlarged image, rather than scrolling smoothly.)
- Delete: Lets you delete the current image or all the images stored to the picture card.
- Print Order: Lets you select the current picture or all pictures for printing. Also lets you choose how many copies of the image to print. This information is stored to the picture card along with the image in a special file format. This format can be read by newer card readers or by Kodak Picture Maker kiosks. When you insert the picture card into a reader on the Picture Maker, for example, the Picture Maker will fulfill your order, printing as many copies of the image(s) as you have requested.
- Protect: Prevents an image from being accidentally erased from the picture card. When you protect an image, the Protect icon appears over the image on the LCD.
- Slideshow: Lets you choose the time interval for viewing your images in a slideshow on the LCD or on your television. For television display, you first need to connect the camera to your TV with the video cable supplied. You can set the time interval between successive images from 1 to 99 seconds.
- Information: Displays the Picture Info screen that includes information about the image being viewed. The information includes capture date and time, flash setting, and aperture and shutter speed used to capture the image.
Connect Mode
When you want to connect the camera to a PC for downloading of images, you first need to place the camera in Connect mode. Connect mode enables the different ports on the side of the camera for image transfer. The ports include a standard RS-232 connection for Windows-based computers, and a Universal Serial Bus (USB) connection for Windows '98 based computers, as well as the new Apple iMac computers.![]()
Camera Set-Up Mode
Camera Set-Up Mode provides several options you can use to customize the camera for your own picture-taking needs:
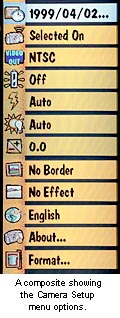 Set Date and Time: Lets you set the month, date, and year.
- Beep: Lets you choose from one of three setting: Off, Selected On (only beeps when the shutter button is depressed), and All On (beeps when any button on the camera is pressed).
Video Out: Supports NTSC for US and Canadian usage, and PAL for European usage.
- Power Save: When turned on, shortens the amount of time that the camera stays on when not in use.
- Flash Default: Lets you choose a flash setting to be in effect every time you turn on the camera. If you consistently capture images in a way that requires only one of the available flash options, you can change the default to the option you need. The available options are Auto (normal default), Fill, Red-Eye, and Off.
- White Balance Default: Lets you choose a white balance setting to be in effect every time you turn on the camera. If you capture images in a way that consistently requires one of the manual white balance options, you can change the default to the option you need. The available options are Auto (normal default), Daylight, Tungsten, and Fluorescent.
- Exposure Compensation Default: Lets you set a default value for exposure compensation. If you capture images in a way that requires a specific exposure value, you can change the default value to the exposure you need. Ambient settings range from +2 EV to -2 EV, in .5 EV steps.
- Border Default: If you have borders loaded on your picture card, you can select a default border to use every time you choose the border option.
- Effects Default: Lets you choose a special effect for your pictures whenever you turn on your camera and begin capturing images. The available options are No Effect (normal default), Black & White, Sepia, and Document.
- Language Default: Choose from one of seven languages: English (normal default for US cameras), Japanese, French, German, Portuguese, Spanish, or Italian.
- About the Camera: Provides you with information about your camera including the number of pictures captured and the number of flashes fired.
- Format: Lets you format picture cards for use with the DC240 if they have a different format or have become corrupted in some way. Remember that formatting removes all information on the card including any borders or graphics you may have stored.
 Image Storage
The DC240 comes equipped with a "CompactFlash" ATA-compatible 8MB picture card. The picture card compartment is easily accessible on the left-hand side of the camera. Open the compartment door, insert the picture card into the slot, push it all the way in, and you're all set to capture images. All images are captured and stored in standard JPEG format. In addition, the camera lets you specify the print order of different images that you capture.![]()
Using the Print option when in Review mode, you can select pictures for printing and choose how many you want. You can even choose to have an index print of all your pictures. This information is stored to the picture card along with the images. If you have a newer PC Card reader, or if you use you picture card on a Picture Maker kiosk, the reader will recognize the print order format and print your pictures automatically!![]()
When you first turn on the camera, the status display includes the number of pictures for which space remains on the picture card. This "Pictures Remaining" number is displayed in the lower-right hand corner of the status display. This number, of course, will vary depending on the Quality setting (Best, Better, Good), and the Resolution level setting (High, Standard). At the high-resolution level, images are stored at 1280 x 960 pixels. At the standard level, they are stored at 640 x 480 pixels. The table below shows the approximate number of images that can be stored on the included 8MB card for each available camera setting:
| Resolution/Quality vs Image Capacity |
|
|
| Best Quality |
|
|
| Better Quality |
|
|
| Good Quality |
|
|
Of course, as with all digital cameras, the number of images stored on each card may vary depending on the complexity of the image being captured. At the high resolution, best quality setting, the average file size is about 500K. At the high resolution, good quality setting, the file size is about 200K, and at the standard resolution, good quality setting, the average file size is about 75K.![]()
The DC240 is equipped with both USB cable for connecting to Windows '98 and Apple iMac computers, as well as an RS-232 and serial adapter plug for transferring images to Windows-based, or Macintosh computers. In our data-transfer tests, the speed advantage of the USB connection became dramatically apparent: We timed the transfer of a 627K maximum-resolution file from the camera to our 350 MHz Pentium II Windows '98 computer. Using the conventional serial port, this transfer required 59.6 seconds, a pretty typical number for an image of this size over a digicam serial connection. Switching to the USB port, this time dropped to an astonishing 3.6 seconds! We often recommend external card readers for our readers, to transfer image files to the host computer more rapidly: With a direct USB connection to the camera though, such accessories really become irrelevant.![]()
Video Out
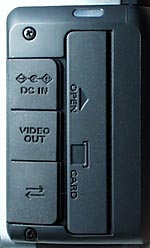 The DC240 supports display of images to a television set through a video out cable supplied with the camera. The video out port is located on the left-hand side of the camera, hidden beneath a rubber protective flap. Both the NTSC signal format for U.S. and Canadian use, and the PAL signal format for European use are supported. A menu option is available on the camera to switch between these signal formats if needed.
![]()
Power
The DC240 is powered by a set of four AA batteries, either 1.2v nickel metal hydride (NiMH) batteries or 1.5v Alkaline batteries, both of which are included with the package so that you can start using the camera as soon as you take it out of the box. Also included is a NiMH battery charger and a set of 4 NiMH batteries (1450 mAh capacity). NiMH batteries require at least 8 hours to fully charge in the provided charger, after which the charger drops the current level to a "trickle," to keep the batteries topped-off. We heartily applaud Kodak's inclusion of the rechargeable batteries and charger in the box with the DC240: High-capacity rechargeable batteries are really a necessity with any digital camera, and Kodak saves users a good $30-50 by including the charger and batteries with the camera.![]()
When the camera is placed in Capture, Review, or Camera Set-Up Mode, the Battery Status Symbol is displayed on the Control Panel on the top of the camera to tell you how much battery power is remaining. The battery compartment on the right, bottom side of the camera is easily accessible for battery changing, but requires the camera to be removed from a tripod in order to access it.![]()
Besides battery power, the DC240 uses an optional AC adapter to power the camera from a standard AC wall outlet. Simply plug the AC adapter into the AC adapter connector under the connector cover on the left-hand side of the camera and you're ready to snap some pictures.![]()
Use the Power Save feature on the camera to shorten the amount of time that the camera stays on when not in use to save battery power. Kodak also recommends that when you use the LCD on the camera, you should limit usage to less than 10 continuous minutes. More continuous usage will surely drain the battery power. If more than 10 minutes is required, purchase the optional AC Adapter.![]()
Included Software
The DC240 is packaged with a variety of different software packages for you to use on your home PC, whether it's a Windows-based system or a Macintosh. All the software is conveniently bundled on an Installer CD. Simply place the CD in the CD ROM drive of your computer, Mac or Windows, and follow a few simple instructions to install the software.![]()
For Windows-based systems, there are 7 applications:
- Mounter Software: Lets you view pictures on the picture card and copy selected pictures to your computer.
- TWAIN Acquire Software: Lets you copy images from the picture card into TWAIN-compliant software programs such as Adobe PhotoDeluxe and Adobe Photoshop.
- Camera Controls Software: Lets you further customize your camera's capture and communications settings using your computer.
- Picture Easy Software: Lets you copy, edit and enhance, organize, and print pictures from your picture card.
- Border Transfer Application Software: Lets you change bitmap (BMP) files into border (BDR) format so that you can copy the borders to your picture card and use them when capturing images.
- Adobe PageMill 3.0: Excellent "what you see is what you get" (WYSIWYG) software for building web pages.
- Adobe PhotoDeluxe version 1.0 for Business: Easy-to-use image-manipulation software, which includes many templates and project guides for creating common business documents.
For Macintosh-based systems, there are 5 applications:
- Picture Transfer Application: Lets you view pictures on the picture card and copy selected pictures to your computer.
- TWAIN Acquire Software: Lets you copy images from the picture card into TWAIN-compliant software programs such as Adobe PhotoDeluxe and Adobe Photoshop.
- Border Transfer Application Software: Lets you change bitmap (BMP) files into border (BDR) format so that you can copy the borders to your picture card and use them when capturing images.
- Adobe PageMill 3.0: Excellent "what you see is what you get" (WYSIWYG) software for building web pages.
- Adobe PhotoDeluxe version 2.0: Easy-to-use image-manipulation software, which includes many templates and project guides for creating common consumer-oriented projects involving images. (Adobe apparently hasn't developed a "business" version of PhotoDeluxe for the Mac.
Test Results
In keeping with our standard policy, our comments here are rather condensed,
summarizing our key findings: For a full commentary on each of the test images,
see the DC 240's "pictures" page.![]()
As with all Imaging Resource camera tests, we encourage you to let your own
eyes be the judge of how well the devices performed: Explore the images on the
pictures page, to see how well the DC240 performed, and how its images compare
to other cameras you may be considering buying.![]()
Overall, we found the DC240 to be a solid performer, with excellent color, and
very accurate viewfinder and exposure systems. It was fast and responsive, apparently
using some degree of RAM buffering internally to improve cycle time for the
first two shots of a series.![]()
The DC240's resolution tested-out at a solid 650 lines per picture height, a
good value for a camera of this resolution level. An early problem that resulted
in fuzzy photos in very bright lighting has happily been cured with a firmware
change, which is user-uploadable for owners of the original models: Big kudos
to Kodak for their provision for user upgrades of the firmware! (Re-test of
a firmware-upgraded DC240 was done in early August, 1999.) The lens is almost
totally free of geometric distortion, across its full focal-length range. (This
is a real rarity in inexpensive zoom optics!)![]()
The viewfinder systems are very accurate, the optical viewfinder showing fully
91% of the final image area, and the LCD finder exactly 100%. The optical finder's
view is well-centered in the final image area, particularly at moderate distances.![]()
All in all, the DC240 turned in a very respectable performance: With it's workmanlike
software bundle and solid capabilities, we expect it will be very successful
in the "business" category Kodak seems to have it pegged for.![]()
Conclusion
The Kodak DC240 fills an important "hole" in Kodak's remarkably broad digital
camera lineup with a mid-range 1.3 megapixel, point-and-shoot digital camera.
Overall, the DC240 proved to be a solid performer, with excellent color and
very accurate viewfinder and exposure systems. It was fast and responsive, apparently
using some degree of RAM buffering internally to improve cycle time for the
first two shots of a series. It came with a great software bundle for business
users and downloadable firmware updates from the Kodak website. While it doesn't
break any new ground, the DC240 provides a strong product for users seeking
"Kodak color" in a 1.3 megapixel design.![]()
Reader Sample Images!
Do you have a DC240 camera? If you'll post an album of your samples
(it's easy to do, and free) and email us at [email protected],
we'll list the album here for others to see!![]()
- Tyson H's
DC240 Albums: Lots of different shots, subjects.
(That's Tyson's, where's yours?)
For More Info:
View the DC240 Sample Pictures Page![]()
Visit the Comparometer(tm) to compare with other cameras.![]()
Visit the Kodak home page for the DC240![]()
Back to the Imaging Resource Digital Cameras Page![]()

Follow Imaging Resource: