The Imaging Resource
Quick Review
Kodak EasyShare DX4330 Digital Camera
 |
Camera QuickLook | |
|
Review Date
|
|
|
|
User Level
|
|
|
|
Product Uses
|
|
|
|
Digicam Design
|
|
|
|
Picture Quality
|
Good, 3.1-megapixel CCD | |
|
Print Sizes
|
Good prints to 8x10 | |
|
Availability
|
Now | |
|
Suggested Retail Price
|
|
|
|
|
||||||||||
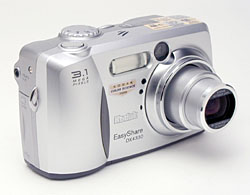
Eastman Kodak Company has a long history of bringing professional imaging processes to the everyday consumer. Kodak's EasyShare System is the company's digital equivalent to its turn-of-the-century Brownie box camera, which came with preloaded film and no manual controls (once users shot all their film, they simply sent the boxes back to Kodak for processing and printing). While the first two Kodak EasyShare digicams, the DX3500 and DX3600, were much more sophisticated than a Brownie, they did feature the same "just press the button" simplicity, with fully automatic controls and an optional docking station that takes all of the guesswork out of digital image manipulation, management, and sharing. As Kodak has evolved the line, they've introduced more advanced cameras that do offer a few user options, but which still retain excellent ease-of-use. The subject of the current review is the EasyShare DX4330, a compact 3 megapixel design that provides good midrange functionality, combined with a very clear menu system and the latest version of Kodak's Picture Software.
Kodak's Picture Software is a big part of the Easy Share story, so much so that I keep hoping to find time to devote a full article to it on its own. Especially in its latest implementation, it walks you through every step of uploading, enhancing, and emailing your photos -- and has about the most graphically intuitive interface of any consumer imaging software I've seen. It automatically sizes the images for printing or emailing, stores copies, applies simple effects, and allows you to make image corrections, such as color, brightness, and contrast adjustments. The entire line of EasyShare cameras are among the easiest and most goof-proof digicams out there, and the DX4330 and Kodak's latest Picture Software carry on that tradition admirably.
The latest addition to Kodak's exceptionally user-friendly line of digicams, the EasyShare DX4330 projects a similar aesthetic to the rest of the EasyShare line. Compact, curvy, and similar in style to a traditional point-and-shoot 35mm film camera, the DX4330 measures only 4.3 x 1.5 x 2.6 inches (110.5 x 39.0 x 66.0 millimeters). The camera's all-plastic body makes it light weight as well, at 7.4 ounces (210 grams) with the battery and memory card, making it a comfortable fit for most hands. The DX4330 squeezes into larger shirt and coat pockets, and comes with a wrist strap for carrying. The camera's compact design includes a retractable lens, protected by a removable plastic lens cap (a tiny strap tethers it to the camera body). The 3.1-megapixel CCD captures high resolution, print quality images, as well as smaller image sizes better suited for distributing via email.
The DX4330 features a 3x zoom lens, equivalent to a 38-114mm zoom on a 35mm lens. (That's a moderate wide angle to a medium telephoto, a fairly typical range among point & shoot digicams.) The camera's autofocus mechanism uses a multi-zone system to "find" the primary subject closest to the lens. The AF area is highlighted in the LCD display with a set of brackets. The DX4330 has a maximum aperture ranging from f/2.8 to f/5.1, depending on the zoom position. Focus ranges from two feet (0.6 meters) to infinity. In Macro mode, focus ranges from 2.8 to 28 inches (7 to 70 centimeters). A Landscape shooting mode fixes focus at infinity, for distant subjects and scenery. In addition to the 3x optical zoom, the DX4330 also offers 3.3x Advanced digital zoom, which effectively increases the camera's zoom range to a total of 10x. Keep in mind though, that digital zoom decreases the overall image quality, since it just "stretches" the center pixels of the CCD image. For composing images, the DX4330 offers both a real-image optical viewfinder as well as a 1.8-inch color LCD monitor. As is usually the case, I found the LCD monitor much more accurate for framing. (Interestingly though, both viewfinders resulted in a smaller image area when framing at full telephoto.)
Exposure control is fully automatic on the DX4330, though the camera does offer a Long Shutter mode that allows longer exposures up to four seconds. A Mode dial on top of the camera offers options of Auto, Sports, Night, Landscape, Macro, and Movie modes. While Auto mode is best for general photography, the remaining preset modes help with special shooting situations such as night shots in the city or the winning goal of a soccer game. In Sports mode, the camera uses faster shutter speeds to "freeze" action. Night mode optimizes the camera for darker portraits and other night scenes, automatically combining the flash with a slower shutter speed to let more light into the image from the surroundings. This brightens the background in flash shots, making for more natural-looking night photos. (You can cancel the flash in Night mode too, for those times when you want to shoot with just the available light.) Landscape mode fixes focus at infinity, for capturing subjects more than about 58 feet (17.5 meters) away from the camera.
The DX4330 employs a matrix metering system, which bases the exposure on several light readings taken throughout the frame. Although you can't adjust the aperture, shutter speed, or metering mode (apart from the Long Shutter mode that I'll get to in a bit), you can increase or decrease the overall exposure through the Exposure Compensation setting under the Record menu. Exposure compensation adjusts the exposure from -2 to +2 exposure equivalents (EV) in half-step increments. (Each full EV unit of adjustment represents a factor of two increase or decrease in the exposure.) White balance remains under automatic control at all times, but the DX4330 does a really excellent job under most light sources. Using Kodak's proprietary Color Science technology, the DX4330 manages to achieve an accurate color balance under an amazingly wide range of lighting conditions. ISO remains under automatic control as well, varying from 120 to 200 equivalent settings. The built-in flash is effective from 2.0 to 11.2 feet (0.6 to 3.4 meters) depending on the setting of the zoom lens, and features Auto, Fill, Red-Eye Reduction, and Off operating modes. For shooting in low light conditions without the flash, a special Long Shutter mode lets you manually select exposure times from 0.7 to 4.0 seconds. Using Long Shutter mode, you can capture bright, usable images at light levels only half as bright as typical city streetlighting. You'll need to use the infinity focus mode for shooting under very dim lighting though, because the 4330's autofocus system doesn't work effectively at light levels darker two to four times brighter than typical city street lighting. A 10-second Self-Timer mode provides a delay between the time the Shutter button is pressed and when the shutter actually opens, so you can get into your own shots.
In addition to its still photography modes, the DX4330 also offers a Movie recording mode for capturing moving images with sound. Recording stops and starts with a brief, full press of the Shutter button, but if you hold the button down for more than a second or two, the camera will automatically stop recording when you let it back up again. As you record, the duration of the movie appears in a running counter on the LCD monitor. Maximum movie lengths depend on the amount of memory space available. (The 16 megabytes of internal memory will let you record movies up to 64 seconds in length.)
The DX4330 is compatible with Kodak's EasyShare camera dock, which offers hassle-free image downloading. You simply put the camera into the dock (a plastic dock insert fits the DX4330 bottom to the dock and comes with the camera) and press the Connect button on the dock. The dock station also serves as an AC adapter and in-camera battery charger (with Kodak NiMH battery packs). Built into the DX4330 is 16 megabytes of internal memory, but the camera also features an SD memory card slot so you can expand the camera's memory capacity. I highly recommend picking up at least a 32 or 64 megabyte card right away, given the camera's 2,160 x 1,440-pixel maximum resolution size. For power, the DX4330 uses either two AA-type lithium or NiMH batteries, or a single CRV3 lithium battery pack. As always, I strongly recommend purchasing a couple of sets of high-capacity NiMH batteries and a good charger, and keeping a spare set of batteries charged at all times. Click here to read my "battery shootout" page to see which batteries currently on the market are best, or here for my review of the Maha C-204F charger, my longtime favorite. The Kodak EasyShare dock is itself a battery charger, and comes with a single NiMH battery pack, but I highly recommend purchasing another set of high-capacity NiMH AA cells, so you'll have spares to pack along on long outings.
Basic Features
- 3.1-megapixel CCD delivering images as large as 2,160 x 1,440 pixels.
- Real-image optical viewfinder.
- 1.8-inch color LCD monitor.
- 3x, 38-114mm (35mm equivalent) lens.
- 3.3x Advanced digital zoom.
- Automatic exposure control.
- Automatic white balance control.
- Maximum aperture of f/2.8 to f/5.1, depending on lens zoom position.
- Built-in flash with four modes.
- 16MB internal memory.
- SD/MMC card storage (optional, card not included).
- Power supplied by two AA-type batteries, one CRV3 lithium battery, Kodak NiMH pack, or optional AC adapter.
- Compatible with optional Kodak EasyShare camera dock (not included).
- Kodak Picture Software included for both Windows and Mac platforms.
Special Features
- Movie mode (with sound).
- Night, Sport, and Landscape photography modes.
- 10-second Self-Timer for delayed shutter release.
- Long Shutter mode for longer exposures (maximum four seconds).
- Macro (close-up) lens setting.
- DPOF (Digital Print Order Format) compatibility.
- USB cable for connection to a computer (driver software included).
Recommendation
|
||||||||||||||||||||||||||||
The DX4330 is an ideal choice for anyone looking for a no-fuss digicam with great image quality. Just about everything is automatically controlled, with great results. That said, the DX4330 does offer a few options for extending its performance. The camera continues with Kodak's very user-friendly interface, making it a good option for kids or novice users. Like Kodak's other EasyShare cameras, when combined with the accessory camera dock, the DX4330 is one of the easiest to use cameras I've seen.
Design
Compact and reasonably small in size, the DX4330 measures 4.3 x 1.5 x 2.6 inches
(110.5 x 39.0 x 66.0 millimeters), just small enough to fit into coat pockets
and purses, and possibly larger shirt pockets. The DX4330 is light weight as
well, at just 7.4 ounces (210 grams) with batteries and memory card. A wrist
strap comes with the camera, but I'd recommend a soft carrying case for travel.
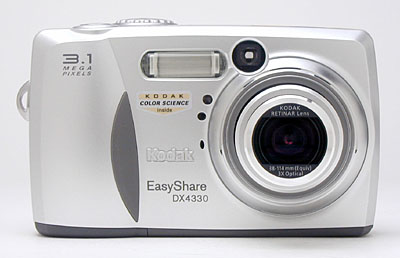
The telescoping lens takes up the right side of the camera's front panel, surrounded by a thick, plastic lip complete with filter threads for accessory lenses. The lens extends outward approximately another 7/8 inch when the camera is powered on. Also on the front panel are the optical viewfinder window, flash, self-timer lamp, light sensor, and tiny microphone. A gently-sculpted hand grip on the side of the camera features a soft, rubbery pad for fingers to cling to.
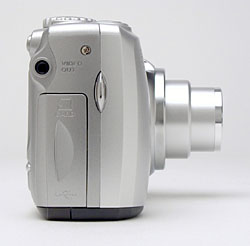
On the right side of the camera (as viewed from the rear) is the SD memory card compartment and Video Out jack. A hinged plastic door protects the compartment, and opens from the back panel. Below the SD card slot is the USB jack, for connecting the camera directly to a computer. A shiny silver eyelet is also on this side of the camera, for attaching the wrist strap.
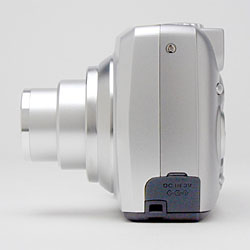
The opposite side of the camera features the DC In jack, covered by a flexible flap. A small eyelet just below the jack compartment provides an attachment point for the lens cap strap.
The Shutter button, Mode dial, Flash button, and speaker are all on the DX4330's top panel, which is slightly curved.

The rest of the camera controls are on the back panel, along with the optical viewfinder and LCD monitor. An indented thumb rest on the right side cups your thumb as you hold the camera, reinforcing the front handgrip. Above the thumb rest is the zoom rocker button. The Share, Delete, Menu, and Review buttons are at each corner of the LCD monitor, and protrude slightly from the back panel. I liked the operation of the Four-Way Arrow pad on the left side of the LCD monitor, which has a rubbery point in the center that makes it easy to grip. The optical viewfinder eyepiece is quite small, but has a fairly high eyepoint to accommodate eyeglass wearers (I could see the full frame even with my eye a good distance from the camera). Next to the viewfinder is a small LED lamp, which lights or flashes to indicate camera status (such as when focus is set, flash is charging, etc.).
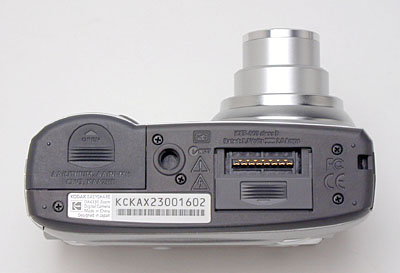
On the bottom panel of the DX4330 are the tripod mount, dock jack, and battery compartment. The plastic, threaded tripod mount is off-center and too close to the battery compartment for quick battery changes while working with a tripod. (I doubt that this will be of much concern to most users though, as the DX4330 is clearly designed for on-the-go shooting.) I prefer metal tripod sockets, but the small size and low weight of the DX4330 mean the plastic socket should hold up fine. The battery compartment features a locking, hinged door, which slides forward to open. The dock connection jack is protected by a sliding plastic door, and connects the camera directly to the EasyShare dock for quick image downloading.
Camera Operation
As I've come to expect from Kodak's EasyShare digicam line, the DX4330 has a very user-friendly interface. The fully automatic exposure control and limited exposure options keep user decisions to a minimum, while the camera's automatic systems do an excellent job of capturing good-looking photos. The LCD menu system is short and simple to navigate the plain-English descriptions of menu items are a welcome change from the too-common cryptic icons on so many other cameras. A Mode dial lets you change camera modes quickly, and once again plain-English descriptions flashed on the LCD screen make operation straightforward for even rank beginners. Given the simple interface and limited controls, you should be able to snap images right away, with hardly a glance at the manual.
External Controls

Shutter Button: Located on the camera's top panel, this button sets focus
and exposure when halfway pressed, and fires the shutter when fully pressed.
In Playback mode, pressing this button returns the camera to the selected
Record mode.
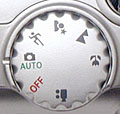
Mode Dial: Just behind the Shutter button, this dial controls the camera's
main operating mode, with the following options available:
 Movie: Records
moving images with sound, for as long as the memory card has available space.
Movie: Records
moving images with sound, for as long as the memory card has available space.
 Off: Turns
the camera off, and signals the lens to retract.
Off: Turns
the camera off, and signals the lens to retract.
 Automatic Record:
Best for most average shooting conditions, this mode places the camera under
automatic exposure control, with limited user options available through the
Record menu.
Automatic Record:
Best for most average shooting conditions, this mode places the camera under
automatic exposure control, with limited user options available through the
Record menu.
 Sports Mode:
Optimizes the camera for moving subjects, freezing action.
Sports Mode:
Optimizes the camera for moving subjects, freezing action.
 Night Mode:
Employs longer shutter speeds to allow more ambient light into the image.
Syncs the flash with the exposure for brighter night shots.
Night Mode:
Employs longer shutter speeds to allow more ambient light into the image.
Syncs the flash with the exposure for brighter night shots.
 Landscape Mode:
Fixes focus at infinity, for capturing distant scenery.
Landscape Mode:
Fixes focus at infinity, for capturing distant scenery.
 Macro Mode:
Changes the focus range for close-up subjects.
Macro Mode:
Changes the focus range for close-up subjects.
![]()
Flash Button: To the left of the Mode dial, this button cycles through
the Auto, Fill, Red-Eye Reduction, and Off flash modes.

Zoom Toggle Button: In the top right corner of the rear panel, this button
controls the optical and digital zoom in any record mode. In Playback mode,
this button lets you zoom in on captured images, to check focus or framing.

Share Button: Above the top right corner of the LCD monitor, this button
lets you tag images for printing, emailing, or as a favorite image. (A heart
icon appears on "favorite" images.) Pressing this button in Review
mode displays the Share menu, with options for DPOF, Email, or Favorite.
![]()
Delete: Just above the Four-Way Arrow pad, this button calls up the Delete
menu in Review mode. You can delete individual images or all images on the
card. There's also an option to cancel.
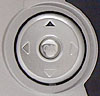
Four-Way Arrow Pad: Dominating the left side of the camera's back panel,
this rocker button features four arrows. In any settings menu, the arrow keys
navigate through options. Pressing the rubbery center of the button acts as
the "OK" to confirm selections. In Record mode, the center button
also controls the LCD display, turning it on or off. In Playback mode, the
right and left arrows scroll through captured images and movies, while the
center button acts as a shortcut to the 2x and 4x image enlargement screens.
![]()
Menu Button: Immediately below the Four-Way Arrow pad, this button displays
the settings menu in Playback or Record modes.
![]()
Review Button: The final control on the back panel, this button is located
in the lower right corner. Pressing this button in any Record mode activates
Playback mode. Once in Playback mode, pressing the Shutter button returns
to the Record display.
Camera Modes and Menus
![]() Movie Mode:
The first mode on the Mode dial, Movie mode is indicated by a movie camera
icon. In this mode, you can record 309 x 206-pixel resolution movies with
sound, at 15 frames per second.
Movie Mode:
The first mode on the Mode dial, Movie mode is indicated by a movie camera
icon. In this mode, you can record 309 x 206-pixel resolution movies with
sound, at 15 frames per second.
![]() Auto Mode:
Marked with a camera icon and the word "Auto," this mode is best
for most average shooting conditions. Exposure is automatically controlled,
but a small selection of user options is available through the Record menu.
Auto Mode:
Marked with a camera icon and the word "Auto," this mode is best
for most average shooting conditions. Exposure is automatically controlled,
but a small selection of user options is available through the Record menu.
![]() Sports Mode:
A small black icon of a person in motion marks this mode on the Mode dial,
which uses faster shutter speeds to capture fast-moving subjects.
Sports Mode:
A small black icon of a person in motion marks this mode on the Mode dial,
which uses faster shutter speeds to capture fast-moving subjects.
![]() Night Mode:
This mode is indicated by a person with a star on the Mode dial, and uses
longer exposure times to capture bright images in low light.
Night Mode:
This mode is indicated by a person with a star on the Mode dial, and uses
longer exposure times to capture bright images in low light.
![]() Landscape Mode:
A mountain icon indicates this mode on the Mode dial. Here, the camera fixes
focus at infinity for distant subjects and scenery.
Landscape Mode:
A mountain icon indicates this mode on the Mode dial. Here, the camera fixes
focus at infinity for distant subjects and scenery.
![]() Macro Mode:
The traditional flower macro symbol marks this mode on the Mode dial. The
focus range changes for close-up subjects in this mode, and limited exposure
options are available.
Macro Mode:
The traditional flower macro symbol marks this mode on the Mode dial. The
focus range changes for close-up subjects in this mode, and limited exposure
options are available.
Playback Mode: Accessed by pressing the Review button, this mode lets you review captured images and movies, as well as manage files.
 Record
Menu: The following menu items appear whenever the Menu button is pressed
in any Record mode. However, not all menu options are available in all modes.
Record
Menu: The following menu items appear whenever the Menu button is pressed
in any Record mode. However, not all menu options are available in all modes.
- Self-Timer: Turns the 10-second self-timer on or off.
- Image Storage: Dictates where images are stored, either in the 16MB internal memory or SD card.
- Exposure Compensation: Adjusts the overall exposure from -2 to +2 exposure equivalents (EV) in half-step increments.
- Long Time Exposure: Accesses longer exposure times, for darker shooting conditions. Manually-selected shutter speeds range from 0.7 to 4.0 seconds.
- Picture Quality: Sets the image resolution to Best (2160 x 1440 pixels), Better (1800 x 1200 pixels), or Good (1080 x 720 pixels).
- Date Stamp: Turns the date stamp function on or off, which records the date over the image. You can choose from a selection of date formats as well.
- Orientation Sensor: Controls the camera's orientation sensor, which
detects when the camera is held vertically. Vertical-format images captured
when the Orientation Sensor is enabled are rotated to their correct orientation
on-screen when they're played back.)
 Setup
Menu: Accesses the following main camera settings:
Setup
Menu: Accesses the following main camera settings:
- Return: Returns to the previous menu display.
- Default Print Quantity: Sets the default number of prints specified when "tagging" images.
- Quickview: Turns Quickview on or off. Quickview automatically displays the most recently captured image, with options to delete or Share.
- Liveview: Disables the LCD's "live" view, meaning you can turn off the LCD as a viewfinder by pressing the center of the Four Way Arrow pad. If off, the LCD remains active at all times.
- Shutter Sound: Enables the shutter noise or turns it off.
- Date & Time: Sets the camera's internal clock and calendar.
- Video Out: Specifies PAL or NTSC as the Video Out signal.
- Language: Sets the menu language to English, German, Spanish, French, Italian, Portuguese, or Japanese.
- Format: Formats the SD memory card or internal memory.
- About: Displays the camera's firmware information.
 Playback
Menu:
Playback
Menu:
- Magnify: Enlarges the displayed image, so that you can check on fine detail and framing.
- Protect: Write-protects the displayed image, preventing it from being accidentally erased or manipulated (except via memory or card formatting). Also removes protection.
- Image Storage: Selects between the internal memory or the SD card for image storage.
- Slide Show: Enables a slide show of captured images, with user-adjustable intervals between images.
- Copy: Copies files from the internal memory to the SD card, or the reverse.
- Video Date Display: Turns on the date display over movie files, with a choice of formats.
- Picture Info: Displays the filename, directory, date, time, and quality information for the current image.
- Setup Menu: Displays the same settings as under the Record menu.
Test Images
See our test images and detailed analysis here.
The thumbnails below show a subset of our test images. Click on a thumbnail
to see the full-size photo.

|

|

|
| |
|
|
|
|
|
|
| |
|
|
|
|
|
|
| |
|
|


Specifications
See the specifications sheet here.
Picky Details
Information on shooting speed, battery life, etc. can be found here.
- Kodak EasyShare DX4330 user reviews on PriceGrabber.com
- Kodak EasyShare DX4330 user reviews on PC PhotoREVIEW
Test Results
- Color: Although the DX4330 offers only automatically-controlled white balance, it does a superb job of interpreting most light sources. In my testing, the DX4330 handled most lighting well, even the very difficult incandescent lighting of my Indoor Portrait (without flash) test. Squinting a little, I could say that I noticed slightly warm tints on the Outdoor Portrait, Davebox, and Musicians target, but the color was still excellent all around. Saturation was good throughout, as well, with colors appearing bright and vibrant. The DX4330 handled the often-difficult blue flowers in the Outdoor Portrait very well, with only the faintest purple tints. Additionally, the camera captured the tough tonal variations on the Davebox target, and reproduced the large color blocks well. Overall, the DX4330 produced excellent color in all my tests.
- Exposure: While exposure was generally accurate, contrast was a little in some cases, notably in the outdoor house, Macro, and Outdoor Portrait shots. The 4330's images were bright and "snappy," but that came at the cost of highlight detail whenever the lighting was harsh and contrasty. Although the DX4330 tended to lose highlight detail, it kept midtones where they should be, and did a good job of preserving shadow detail.
- Resolution/Sharpness: On the whole, the DX4330's in-camera sharpening did a good job, and defined details well. The lens produced some softness in the corners of the images, most noticeable in close-up shots. Overall sharpness and detail were quite good though, a solid 3-megapixel performance.
- Closeups: The DX4330 captured an average to slightly better-than-average sized macro area, at 3.07 x 2.05 inches (78.0 x 52.0 millimeters). Resolution was high, with strong detail in the dollar bill, coins and brooch. Corner softness was much stronger on this shot than any other (a typical problem for consumer-grade digicams in closeup shooting), and extended far into the frame. The camera's built-in flash is positioned too high and to the right on the camera body to illuminate the macro area well, and thus resulted in strong shadow in the bottom left corner of the frame. (Plan on using external lighting for your closest macro shots.)
- Night Shots: The DX4330's "Long Time Exposure" mode offers a maximum shutter time of four seconds, long enough to capture bright images at the 1/2 foot-candle (5.5 lux) light level. For reference, this is about half as bright as typical city street lighting at night, so the camera should do well for night shots under artificial illumination. The target was reasonably bright at the 1/4 foot-candle (2.7 lux) setting, as well. Noise was moderately low, and color was about right, though warm. The biggest problem here was the camera's autofocus system, which had trouble even at the one foot-candle (11 lux) light level. - You'll have to use the infinity-focused "Landscape" mode for any shots under dim lighting, precluding any nighttime closeups.
- Viewfinder Accuracy: The DX4330's optical viewfinder ranges from a little tight at wide angle zoom settings (85.6 percent of the final frame shown) to almost exact at telephoto settings (99% of the final frame shown). While I like to see viewfinders as accurate as possible, I'd like even more for them to behave consistently across the zoom range. - As it is, with the 4330, you'll need to learn to frame a bit tighter for wide angle shots than you will for telephoto. Also, the view varies from being shifted down a little at wide angle, to being shifted up slightly at telephoto. The LCD monitor fared much better, at wide angle anyway, where I measured approximately 99 percent accuracy, almost perfect.
- Optical Distortion: Optical distortion on the DX4330 is better than average at the wide-angle end, as I measured a 0.47 percent barrel distortion. The telephoto end better still, as I only measured an almost-imperceptible two pixels of barrel distortion. Chromatic aberration is moderate, showing about four or five pixels of coloration on either side of the target lines. (This distortion is visible as a very slight colored fringe around the objects at the edges of the field of view on the resolution target.) The DX4330 also showed some corner softness, by far the most evident in the Macro shot. While I'd like to see less chromatic aberration and sharper corners in macro mode, I really liked the low barrel distortion of 4330's lens.
- Battery Life: The DX4330 operates from a pair of AA-type batteries, preferably high-capacity NiMH rechargeables. Battery life is surprisingly good for a camera running on only a pair of AAs. Based on my power drain measurements, worst-case battery life (capture mode with the LCD turned on) should be about an hour and a half with good-quality NiMH cells. With the LCD off, capture-mode run time increases to an astonishing 11 hours, and run time in playback mode is more than two and a half hours. I still strongly recommend purchasing at least two sets of batteries and a good charger though. Click here to read my "battery shootout" page to see which batteries currently on the market are best, or here for my review of the Maha C-204F charger, my longtime favorite. The Kodak EasyShare dock is itself a battery charger, and comes with a single NiMH battery pack, but I highly recommend purchasing another set of high-capacity NiMH AA cells, so you'll have spares to pack along on long outings.
In the Box
In the box are the following items:
- Kodak EasyShare DX4330 digital camera.
- CRV3 lithium battery pack.
- USB cable.
- A/V cable.
- Wrist strap.
- Lens cap with strap.
- EasyShare dock insert.
- Software CD-ROM.
- Operating manual and registration card.
- Large capacity SD memory card. (I'd recommend 32MB as a bare minimum, 64MB would be preferable.)
- Additional set of rechargeable batteries or battery pack.
- AC adapter.
- Small camera case.
- EasyShare camera dock.
Recommended Software: Rescue your images!
Just as important as an extra memory card is a tool to rescue your images when
one of your cards fails at some point in the future. I get a lot of email from
readers who've lost photos due to a corrupted memory card. Memory card corruption
can happen with any card type and any camera manufacturer, nobody's immune.
A surprising number of "lost" images can be recovered with an inexpensive,
easy to use piece of software though. Given the amount of email I've gotten
on the topic, I now include this paragraph in all my digicam reviews. The program
you need is called PhotoRescue, by DataRescue SA. Read our review of it if you'd like, but download the program now,
so you'll have it. It doesn't cost a penny until you need it, and even then
it's only $29, with a money back guarantee. So download PhotoRescue for
Windows or PhotoRescue for
Mac while you're thinking of it. (While you're at it, download the PDF
manual and quickstart
guide as well.) Stash the file in a safe place and it'll be there when you need
it. Trust me, needing this is not a matter of if, but when... PhotoRescue
is about the best and easiest tool for recovering digital photos I've seen.
(Disclosure: IR gets a small commission from sales of the product, but I'd highly
recommend the program even if we didn't.) OK, now back to our regularly
scheduled review...
Conclusion
|
||||||||||||||||||||||||||||
Kodak's EasyShare digital cameras have consistently proved to be among the
easiest to use of any I've tested, and the DX4330 is no exception. It's fully
automatic exposure control performs surprisingly well in a wide variety of conditions,
with the automatic white balance system deserving special commendation. A handful
of preset scene modes help with special shooting conditions, and a few manually-selected
long exposure times let the camera snap good photos under typical nighttime
streetlighting levels. (Although you'll need to use the infinity focus option,
as autofocus operation is limited to much brighter conditions.) The 3.1-megapixel
CCD captures high resolution images, with good color and clarity and plenty
of detail to make sharp 8x10 prints. Overall, the DX4330 is a perfect choice
for novices who want to take great digital pictures without needing to understand
photographic jargon and exposure settings.

Follow Imaging Resource: