The Imaging Resource
Quick Review
Kodak EasyShare DX6490 Digital Camera
 | Camera QuickLook | |
| Review Date |
10/15/2003 | |
| User Level | | |
| Product Uses | | |
| Digicam Design | | |
| Picture Quality | High, 4.0-megapixel CCD | |
| Print Sizes | 8x10 and larger | |
| Availability | Now | |
| Suggested Retail Price (At time of introduction) | | |
| ||||||||||
Eastman Kodak's "EasyShare" line of digital cameras have consistently impressed me as living up to their name, being one of the most unfailingly easy to use line of digicams out there. With the new EasyShare DX6490 though, Kodak moves beyond pure ease of use (although the camera is still very easy to use in full-auto mode) to encompass a range of capabilities that allow the DX6490 to satisfy the desires of "enthusiast" photographers as well. While EasyShare cameras have always had very good color and excellent white balance systems, their lens quality was generally appropriate to the "consumer" market in which they played, and exposure flexibility was generally very limited.
The Kodak EasyShare DX6490 then, comes as a surprise on many fronts, with a 4-megapixel CCD, a high-quality Schneider-Kreuznach 10x optical zoom lens with much lower than average distortion, a capable autofocus system that works down to very low light levels, and an electronic viewfinder system that likewise works very well in dim lighting. Its exposure system spans a range of control from fully automatic to fully manual, and an external flash sync connector permits use with external flash units or even studio strobes. A high-capacity LiIon rechargeable battery is included in the box with the DX6490, adding to the value of the package, and providing generous run times. Its rich set of features are more than mere marketing hype too, as the DX6490 held up very well throughout my testing, delivering excellent photos under a wide range of conditions. All in all, the EasyShare DX6490 is easily the best consumer-level digicam Kodak has made to date, and one that will compete very strongly in the popular long-zoom marketplace. If you're in the market for a very capable long-zoom camera, the EasyShare DX6490 deserves a long, hard look.
Kodak's color and white balance technology has long been among the best in the photo industry, but until now has been restricted to either the low end of the consumer market (in their EasyShare line), or the very high end of the professional world (in their pro SLRs). With the four-megapixel, 10x-zoom EasyShare DX6490 though, Kodak takes a large step toward bringing their excellent color technology to the "enthusiast" market, while still retaining the ease of use the EasyShare line has become famous for. Quite compact in light of the large lens, the DX6490 has an overall body design similar to a number of other long-zoom digicams on the market, with a generous handgrip on the right-hand side, balancing the large lens on the left. It definitely won't fit into your shirt pocket, but the DX6490 is small enough for larger coat pockets, purses, backpacks, etc., and comes with a neck strap. The 4.0-megapixel CCD captures high-quality images, suitable for very sharp 8x10 prints, even with some cropping.
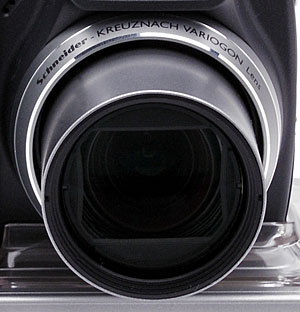
Perhaps the most exciting feature on the DX6490 is the camera's 10x Schneider-Kreuznach Variogon lens, the equivalent of a 38-380mm lens on a 35mm camera (the longest zoom available on any EasyShare model). The all-glass lens has 11 elements in seven groups, with three aspherical elements and lenses made from Extra Low Dispersion (ED) glass. Aspheric lens elements help produce sharp images from corner to corner, because they can bring light rays originating from the center of the lens and the edges into focus at the same point. ED glass reduces chromatic aberration (color fringes around objects at the edges of the field of view). Both technologies are found in higher-end cameras, but relatively few models in the DX6490's price range incorporate either.
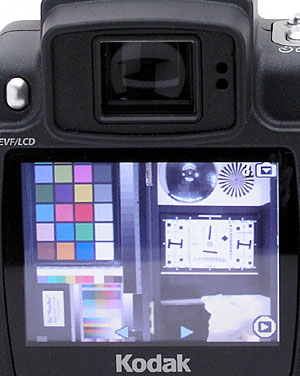
Apertures range from f/2.8 (f/3.7 at telephoto) to f/8, and are either manually or automatically adjustable. The camera's autofocus mechanism uses a multi-zone system to "find" the primary subject closest to the lens. The AF area is highlighted in the LCD display with a set of brackets. (If you prefer, you can change the AF area to read only the center of the frame through the Record menu.) Normal focus ranges from 2.0 feet (0.6 meters) to infinity at wide angle, and from 6.6 feet (2.0 meters) to infinity at telephoto. A Macro mode ranges from 4.8 inches to 2.3 feet (12 cm to 0.7 meters) at the wide angle zoom setting, and from 3.9 to 6.9 feet (1.2 to 2.1 meters) at the telephoto end. There's also a Landscape focus mode that fixes the focal distance at infinity, for distant subjects and scenery. In addition to the 10x optical zoom, the DX6490 also offers as much as 3.0x Advanced Digital Zoom, which effectively increases the camera's zoom range to a total of 30x. Keep in mind though, that digital zoom decreases the overall image quality in direct proportion to the magnification achieved, since it just "stretches" the center pixels of the CCD image. For composing images, the DX6490 offers a 0.44-inch electronic optical viewfinder (EVF) as well as a 2.2-inch color LCD monitor. The larger LCD monitor features a high-resolution, indoor/outdoor display, that's unusually clear and bright under most lighting. Both displays feature image information and menu screens, and a rear-panel button switches the viewfinder display between the two.
The DX6490's LCD-based viewfinders are also much more usable under low-light conditions than those of most other cameras I've tested. I'm usually not a fan of EVFs, because they're generally useless at low light levels. (Many cameras with EVFs can shoot at light levels far below those at which you can actually see what the camera is pointing at!) In contrast, the DX6490's viewfinder screens remained quite usable down to very low light levels. (In my testing, about 16x darker than typical city streetlighting at night.) Kodak achieved this exceptional low-light sensitivity through a special CCD design, that can combine the charge from multiple rows of sensor elements to boost sensitivity at the expense of resolution. This sounds like something you wouldn't want to do, but it turns out that most electronic viewfinders throw away most of the sensor data anyway, to match the limited resolution of the LCD screens. Thus, Kodak's approach gives much greater sensitivity with no apparent loss in resolution on the LCD screens.
Kodak's clever low-light readout system used for the viewfinder system also pays dividends in low-light focusing. Using the same technique of combining data from multiple rows of pixels, the DX6490 can focus accurately in very dark conditions.
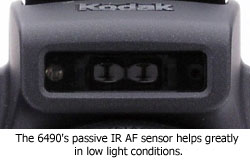
Actually, the pixel-combining technique is only part of the story with the 6490's autofocus system: It's actually a hybrid system, using a passive IR focusing element positioned above the lens, in addition to the usual contrast-detection processing using data collected from the CCD. The passive infrared focusing sensor can operate in complete darkness, and is faster than contrast-detection processing under any light level. In the DX6490, the passive AF system gets the lens into the approximate focusing range quickly, and then the contrast-detect system takes over from there for the final tweaks. While the 6490 only focused with average speed in my tests under normal room illumination, the dual-mode AF system again seemed to produce real benefits under low-light conditions. (Although readers should note that I only found good low-light focusing performance on my evaluation unit of the 6490 when the camera's flash was popped up. With the flash down, low-light focusing was limited to one foot-candle or more, about the level of typical city streetlighting at night.)
The DX6490 offers a full range of exposure control, from the point-and-shoot style of Auto mode to full manual exposure control. The Power/Mode dial on the rear panel not only powers the camera on, but also offers options of Movie, Off, Auto, PASM, Sports, Portrait, and Night settings. While Auto mode is best for general photography, the remaining preset modes help with special shooting situations such as night shots in the city or the winning goal of a soccer game. In Sports mode, the camera's exposure system is biased toward faster shutter speeds to "freeze" action. Portrait mode favors large lens apertures to reduce depth of field, capturing a sharp subject in front of a slightly blurred background. Night mode optimizes the camera for darker portraits and other night scenes, combining the flash with shutter speeds as long as a half-second to let more light into the image from the surroundings. This brightens the background in flash shots, making for more natural-looking night photos. (You can cancel the flash in Night mode too, for those times when you want to shoot with just the available light.) Finally, PASM mode offers Program, Aperture Priority, Shutter Priority, and Manual exposure options. Program mode keeps the camera in charge of both aperture and shutter speed, while Aperture and Shutter Priority modes let you control one exposure variable while the camera selects the other. Manual mode provides complete exposure control, with the user able to set both aperture and shutter speed. Exposure times on the DX6490 range from 1/1,700 to 16 seconds, a much larger exposure range than previously seen on EasyShare digicams. Exposures in most auto modes are limited to a maximum of 1/8 second but extend to 1/2 second in night mode. To access exposure times longer than a half-second, you need to work in either shutter-priority or Manual mode.
The DX6490 employs a Multi-Pattern metering system by default, which bases the exposure on a number of light readings taken throughout the frame. Also available are Center-Weighted and Center-Spot modes. You can increase or decrease the overall exposure through the Exposure Compensation setting from -2 to +2 exposure equivalents (EV) in half-step increments. (Each full EV unit of adjustment represents a factor of two increase or decrease in the exposure.) White balance options include Auto, Daylight, Tungsten, and Fluorescent settings, which take advantage of Kodak's proprietary Color Science technology to achieve an accurate color balance under most lighting. (In my testing, I've found the accuracy and flexibility of Kodak's auto white balance system to be second to none.) ISO is adjustable to 80, 100, 200, 400, or 800 equivalents, with an Auto setting as well, that automatically adjusts ISO over a range of 80-130. The DX6490 also offers a handful of color shooting options (Saturated, Neutral, Sepia, and Black and White), as well as a sharpness adjustment. The built-in, pop-up flash is effective from 2.0 to 16.1 feet (0.6 to 4.9 meters) depending on the setting of the zoom lens, and features Auto, Fill, Red-Eye Reduction, and Off operating modes. Also included on the DX6490 is a PC-sync socket for connecting a more powerful external flash unit (another first in the EasyShare line).
In addition to its still photography options, the DX6490 also offers a Movie recording mode for capturing moving images with sound at 320 x 240 pixels, at approximately 24 frames per second. Recording stops and starts with a full, brief press of the Shutter button, but if you hold the button down for more than a second or two, the camera will automatically stop recording when you let it back up again. As you record, the duration of the movie appears in a running counter on the LCD display. Maximum movie lengths depend on the amount of memory space available, as recording is limited only by available memory space. (Although there is a menu option available that restricts movie length to 5, 15, or 30 seconds, handy for movies recorded with the self-timer.) A Burst photography mode lets you capture as many as six frames in rapid succession (approximately three frames per second) while you hold down the Shutter button. The six-frame maximum burst length applies regardless of resolution, but may be further limited if there isn't enough space on the memory card or the camera's internal memory to store a full sequence. A 10-second Self-Timer mode provides a delay between the time the Shutter button is pressed and when the shutter actually opens, so you can get into your own shots.
The DX6490 is compatible with Kodak's EasyShare camera and printer docks, which offer hassle-free image downloading and printing. In the US and Canada, the DX6490 ships with a 6000-series dock in the box. With Kodak's Picture software installed on your computer and the computer connected to the dock, you simply put the camera into the dock and press the Connect button on the dock to download images. The dock station also serves as an AC adapter and in-camera battery charger. Built into the DX6490 is 16 megabytes of internal memory, but the camera also features an SD/MMC memory card slot so you can expand the camera's memory capacity. I highly recommend picking up at least a 64 megabyte card right away, given the camera's 2,304 x 1,728-pixel maximum image size. For power, the DX6490 uses a single lithium-ion battery pack, which comes with the camera, providing plenty of capacity for longer excursions. (Worst-case run time is about 2 hours and 42 minutes, longer than usual among digicams I've tested.) The necessary battery charger also accompanies the camera, but I strongly recommend picking up a second battery and keeping it freshly charged at all times. The camera also comes with a video cable for viewing images on a television set, and a USB cable for high-speed connection to a computer without the camera dock.
Basic Features
- 4.0-megapixel CCD delivering image resolutions as large as 2,304 x 1,728 pixels.
- 0.44-inch "electronic" optical viewfinder.
- 2.2-inch color LCD monitor.
- 10x, 38-380mm (35mm equivalent) Schneider-Kreuznach Variogon lens.
- 3.0x Advanced digital zoom.
- Auto, Program, Aperture Priority, Shutter Priority, and Manual exposure modes.
- White Balance with four settings.
- Maximum aperture of f/2.8 to f/3.7, depending on lens zoom position.
- Shutter speeds from 1/1,700 to 16 seconds.
- Built-in flash with four modes.
- 16MB internal memory.
- SD/MMC card storage (optional, card not included).
- Power supplied by one rechargeable lithium-ion battery pack or optional AC adapter.
- Compatible with optional Kodak EasyShare camera and printer docks (6000 model camera dock included with some models).
- Kodak EasyShare software included for both Windows and Mac platforms.
Special Features
- Movie mode (with sound).
- Burst photography mode.
- Portrait, Night, Sport, and Landscape photography modes.
- Saturated Color, Neutral Color, Black and White, and Sepia modes.
- Adjustable ISO from 80 to 800, with an Auto setting as well.
- 10-second Self-Timer for delayed shutter release.
- Two AF area modes.
- Multi-Pattern, Center-Weighted, and Center-Spot metering modes.
- External flash PC-sync socket.
- Macro (close-up) lens setting.
- DPOF (Digital Print Order Format) compatibility.
- USB cable for connection to a computer (driver software included).
Recommendation
The DX6490's 10x optical zoom lens, full manual exposure
control, and available point-and-shoot operation make it well suited
for novices and experienced amateurs alike. The camera continues with Kodak's
very user-friendly interface and uncomplicated menu layout, and the varying
levels of exposure control allow novice users to gradually step up control as
they learn more about photography. Like Kodak's other EasyShare cameras, when
combined with the accessory camera dock, the DX6490 is one of the easiest to
use cameras on the market. That said, the DX6490 also has plenty to offer more
advanced users, with options up to and including fully manual exposure control,
an excellent lens, and a sync terminal for use with external flash units. All
in all, an excellent choice in a long-zoom digicam, regardless of a user's experience
level.
Compact and reasonably small in size (even with its large 10x zoom lens), the DX6490 measures 3.9 x 3.2 x 3.2 inches (99.6 x 81.2 x 79.9 millimeters), just small enough to fit into coat pockets and purses, but a good bit too large for shirt pockets. The DX6490's all-plastic body keeps it fairly light weight as well, at 13.5 ounces (382 grams) without the battery or memory card. A neck strap is included for easier toting, which you'll doubtless want to use absent a large enough pocket to hold it. While fairly compact, the DX6490 is still large enough for a good-sized handgrip, and fits into the hand well, the weight of the grip balancing the lens nicely.
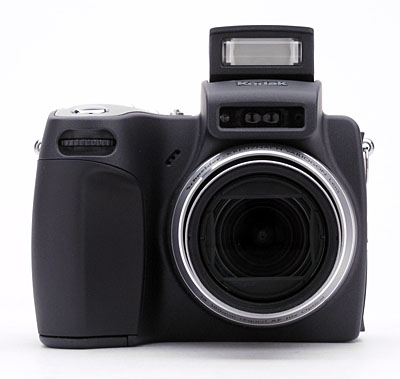
The telescoping lens takes up the right side of the camera's front panel, and extends outward about 3/4-inch when the camera is powered on. A plastic lens cap clamps onto the lens for protection, and features a small tether to attach it to the camera body and prevent it from being lost. In a nice touch, the lens cap rides out with the lens, so you don't have to worry about straining the lens mechanism if you turn on the camera with the lens cap still in place. In addition to the handgrip (covered with a soft, rubbery coating to provide a more comfortable and secure grip), the front panel also holds a tiny microphone, a Command dial used for exposure adjustment, and a window above the lens that shields the light and autofocus sensors, self-timer lamp, and video recording indicator.
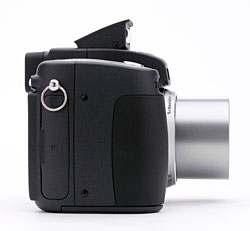
On the right side of the camera (as viewed from the rear) is the SD/MMC memory card compartment, covered by a hinged, plastic door. Just above the compartment is one of the neck strap attachments.

The opposite side of the camera features the external flash PC-sync socket, beneath a flexible, rubber flap. Next to this is the other neck strap attachment. Another connector compartment, also protected by a rubbery flap, contains the DC In, USB, and AV Out jacks.
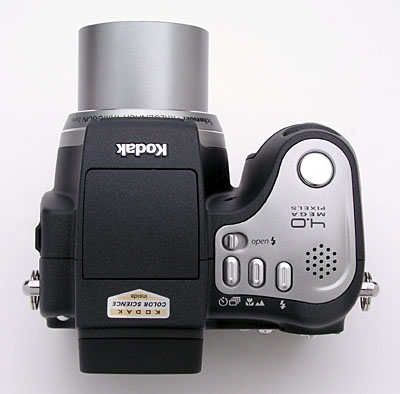
Kodak makes good use of the DX6490's top panel real estate, which features the Shutter, Flash, Focus, and Drive buttons, as well as the pop-up flash release button and a small speaker. Also on top of the camera is the pop-up flash compartment itself.
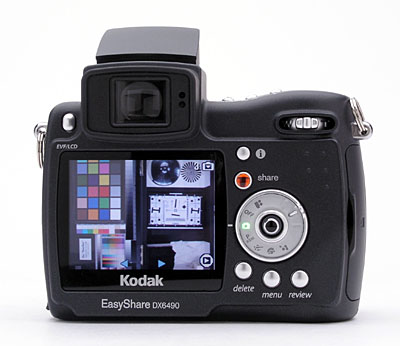
The rest of the camera controls are on the rear panel, along with the electronic optical viewfinder (EVF) and LCD monitor. A series of raised bumps in the upper right corner provides a thumb grip, reinforcing the front handgrip. Above the thumb grip is the zoom switch. Rear panel controls include the Information, Share, Delete, Menu, and Review buttons. There's also a Power/Mode dial for setting the exposure mode, with a joystick-like multi-controller button at its center. The multi-controller toggle navigates through menu settings, confirming selections when pressed straight in. Tucked on the left side of the viewfinder eyepiece is the EVF/LCD button, which switches the viewfinder display between the two monitors.
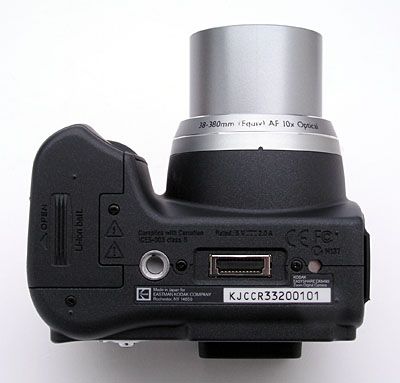
On the bottom panel of the DX6490 are the tripod mount, a connector for the EasyShare dock, and the battery compartment. The threaded metal tripod mount is just off-center and too close to the battery compartment for quick battery changes while working with a tripod. (However, the side access of the DC In jack means you could conveniently plug in the AC adapter when working in a studio.) The battery compartment features a locking, hinged door, which slides forward to open. The dock jack connects the camera directly to the EasyShare dock for quick image downloading. Kudos to Kodak for using a metal tripod socket, rather than a plastic one, as is becoming more common on digicams these days. While the location of the socket isn't ideal for panoramic shooting (which benefits from a socket directly underneath the lens), the socket on the DX6490 is close to camera's center of gravity, reducing strain.
Kodak's EasyShare digicam line has consistently been user-friendly and easy to operate, hence the EasyShare name. The DX6490 proves no exception to this rule, even with its enhanced exposure features. The available semiautomatic and manual exposure control options provide a lot of flexibility, while the camera's fully automatic systems do an excellent job of capturing good-looking photos with little or no user intervention. The LCD menu system is short and simple to navigate, and follows the same format as the rest of the EasyShare line. The Power/Mode dial lets you quickly change camera modes, while the front-panel Command dial efficiently adjusts exposure settings. Given the simple interface and well-marked controls, you should be able to snap images right away, with hardly a glance at the manual. Though for more advanced functions, it shouldn't take more than a half an hour or so to get the gist of things.
Record-Mode Display
 Depending
on the exposure mode, the DX6490's display shows the center autofocus area along
with currently-selected options for image size/quality, macro and flash mode,
the number of images of the current size and quality that can be stored in the
remaining space on the memory card. In PASM mode, the LCD display also includes
shooting mode, aperture, shutter, and exposure compensation settings. The Information
button turns the information display on and off.
Depending
on the exposure mode, the DX6490's display shows the center autofocus area along
with currently-selected options for image size/quality, macro and flash mode,
the number of images of the current size and quality that can be stored in the
remaining space on the memory card. In PASM mode, the LCD display also includes
shooting mode, aperture, shutter, and exposure compensation settings. The Information
button turns the information display on and off.
Playback-Mode Display
 In
Playback mode, you can press the DX6490's multi-controller to zoom in or out
of an image, with a maximum enlargement of 4x. Pressing the multi-controller
upwards enables a more detailed information display, as well as dismisses it.
Pushing down on the multi-controller activates the nine-image index display
mode. Pressing the Information button cancels and recalls the default limited
information display.
In
Playback mode, you can press the DX6490's multi-controller to zoom in or out
of an image, with a maximum enlargement of 4x. Pressing the multi-controller
upwards enables a more detailed information display, as well as dismisses it.
Pushing down on the multi-controller activates the nine-image index display
mode. Pressing the Information button cancels and recalls the default limited
information display.
External Controls

Shutter Button: Located on the camera's top panel, this button sets focus
and exposure when halfway pressed, and fires the shutter when fully pressed.
In Playback mode, pressing this button returns the camera to the selected
Record mode.
![]()
Command Dial: Situated on the front of the hand grip so it's
easily accessible for your right index finger, this dial adjusts a variety
of exposure settings. Pressing the dial lets you select which exposure variable
to adjust (exposure compensation, aperture, shutter speed, or the exposure
mode (P/A/S/M) itself), while a second press locks that selection. Then, turning
the dial adjusts the variable you've chosen.
![]()
Pop-up Flash Release Switch: Sitting next to the flash compartment,
this sliding switch releases the flash into its operating position.

Drive Button: Directly behind the Flash Release switch, this
button accesses the Self-Timer and Burst drive modes.
Focus Button: To the right of the Drive button, this button accesses
the available focus modes, including Normal, Macro, and Landscape.
![]()
Flash Button: Just to the right of the Focus button, this button cycles
through the Auto, Fill, Red-Eye Reduction, and Off flash modes when the pop-up
flash is in its operating position.
![]()
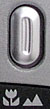
Zoom Toggle Button: In the top right corner of the rear panel, this button
controls the optical and digital zoom in any record mode. (Note though, that
the zoom can only be adjusted in movie mode when you're not actually recording
a movie. This is to prevent the noise of the zoom motor from intruding on
your movie's sound track.)
![]()
Information Button: Adjacent to the top right corner of the LCD
monitor, this button turns the LCD information overlay display on and off.
![]()
Share Button: Below the Information button, this button
lets you tag images for printing, emailing, or as a favorite image. (A heart
icon appears on "favorite" images.) Pressing this button automatically
takes you to Review mode and displays the Share menu, with options for DPOF
settings, Email, or Favorite.
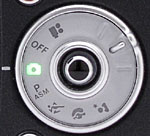
Power/Mode Dial: Taking up the right side of the rear panel, this lighted
dial accesses the following camera modes:
 Movie:
Records moving images with sound, for as long as the memory card has available
space.
Movie:
Records moving images with sound, for as long as the memory card has available
space.
 Off:
Turns the camera off, and signals the lens to retract.
Off:
Turns the camera off, and signals the lens to retract.
 Automatic
Record: Best for most average shooting conditions, this mode places
the camera under automatic exposure control, with limited user options available
through the Record menu.
Automatic
Record: Best for most average shooting conditions, this mode places
the camera under automatic exposure control, with limited user options available
through the Record menu.
 PASM
Mode: Offers Program, Aperture Priority, Shutter Priority, and
Manual shooting modes, for expanded exposure options.
PASM
Mode: Offers Program, Aperture Priority, Shutter Priority, and
Manual shooting modes, for expanded exposure options.
 Sports
Mode: Optimizes the camera for moving subjects, freezing action.
Sports
Mode: Optimizes the camera for moving subjects, freezing action.
 Portrait
Mode: Sets up the camera for capturing portraits. Sharply-focused
subjects are captured in front of slightly blurred backgrounds.
Portrait
Mode: Sets up the camera for capturing portraits. Sharply-focused
subjects are captured in front of slightly blurred backgrounds.
 Night
Mode: Employs longer shutter speeds to allow more ambient light into
the image. Syncs the flash with the exposure for brighter night shots.
Night
Mode: Employs longer shutter speeds to allow more ambient light into
the image. Syncs the flash with the exposure for brighter night shots.
Multi-Controller: Located in the center of the Power/Mode dial, this joystick-like controller navigates through menu options in any settings menu when you press it left or right, up or down, as the case may be. It confirms menu selections when it's pressed straight in.
In Playback mode, the controller scrolls through captured images, when moved left and right. When pressed straight in, it enlarges the displayed image 2x or 4x, or returns to the normal display. Pressing the button down activates the index display mode, while pressing it upward activates a more detailed information display.

Delete: Next to the lower right corner of the LCD monitor, this button
calls up the Delete menu in Review mode. You can delete individual images
or all images on the card. There's also an option to cancel.

Menu Button: To the right of the Delete button, this button displays the
settings menu in Playback or Record modes. It also dismisses the menu display.

Review Button: On the right side of the Menu button, this button activates
Playback mode when pressed in any record mode. Once in Playback mode, pressing
the button again, or the Shutter button, returns to the Record display.

EVF/LCD Button: Tucked away on the left side of the viewfinder
eyepiece, this button switches the viewfinder display between the EVF and
LCD monitor.
Camera Modes and Menus
![]() Movie
Mode: The first mode on the Power/Mode dial, Movie mode is indicated by
a movie camera icon. In this mode, you can record 320 x 240-pixel resolution
movies with sound, at 24 frames per second.
Movie
Mode: The first mode on the Power/Mode dial, Movie mode is indicated by
a movie camera icon. In this mode, you can record 320 x 240-pixel resolution
movies with sound, at 24 frames per second.
![]() Auto
Mode: Marked with a camera icon and the word "Auto," this mode
is best for most average shooting conditions. Exposure is automatically controlled,
but a small selection of user options is available through the Record menu.
Auto
Mode: Marked with a camera icon and the word "Auto," this mode
is best for most average shooting conditions. Exposure is automatically controlled,
but a small selection of user options is available through the Record menu.
![]() PASM
Mode: Next in line on the Power/Mode dial, this mode accesses the
Program, Aperture Priority, Shutter Priority, and Manual exposure modes. Modes
are adjusted on the LCD screen, and the available exposure setting is highlighted.
Program mode keeps the camera in charge of aperture and shutter speed, but
offers expanded exposure options through the Record menu. Aperture and Shutter
Priority modes provide user control over one exposure variable, and Manual
mode provides complete exposure control.
PASM
Mode: Next in line on the Power/Mode dial, this mode accesses the
Program, Aperture Priority, Shutter Priority, and Manual exposure modes. Modes
are adjusted on the LCD screen, and the available exposure setting is highlighted.
Program mode keeps the camera in charge of aperture and shutter speed, but
offers expanded exposure options through the Record menu. Aperture and Shutter
Priority modes provide user control over one exposure variable, and Manual
mode provides complete exposure control.
![]() Sports
Mode: A small black icon of a person in motion marks this mode on the
Power/Mode dial, which uses faster shutter speeds to capture fast-moving subjects.
Sports
Mode: A small black icon of a person in motion marks this mode on the
Power/Mode dial, which uses faster shutter speeds to capture fast-moving subjects.
![]() Portrait
Mode: Indicated by a symbol of a woman's head on the Power/Mode dial,
this mode uses a larger aperture setting to limit the depth of field. The
result is a subject in sharp focus in front of a soft-focused background.
Portrait
Mode: Indicated by a symbol of a woman's head on the Power/Mode dial,
this mode uses a larger aperture setting to limit the depth of field. The
result is a subject in sharp focus in front of a soft-focused background.
![]() Night
Mode: This mode is indicated by a person with a star on the Power/Mode
dial, and uses longer exposure times to capture bright images in low light.
Night
Mode: This mode is indicated by a person with a star on the Power/Mode
dial, and uses longer exposure times to capture bright images in low light.
Playback Mode: Accessed by pressing the Review button, this mode lets you review captured images and movies, as well as manage files.
Record Menu: The following menu items appear whenever the Menu button is pressed in any Record mode. However, not all menu options are available in all modes.
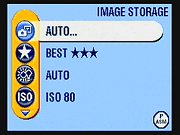
 Image
Storage: Dictates where images are stored, either in the 16MB internal
memory or on a SD/MMC card. If Auto is selected, the camera automatically
stores images to a memory card if one is present.
Image
Storage: Dictates where images are stored, either in the 16MB internal
memory or on a SD/MMC card. If Auto is selected, the camera automatically
stores images to a memory card if one is present.
- Picture Quality: Sets the image resolution and quality. Choices are Best (2,304 x 1,728 pixels), Best 3:2 (2,304 x 1,536 pixels), Better (1,656 x 1,242 pixels), and Good (1,200 x 900 pixels).
- White Balance: Sets the color balance to Auto, Daylight, Tungsten, or Fluorescent settings.
- ISO Speed: Sets the camera's sensitivity to Auto, or to 80, 100, 200, 400, or 800 ISO equivalents. Auto mode varies the ISO between 80 and 130, as light levels dictate.
- Color Mode: Allows you to record images in Saturated Color, Neutral Color, Black and White, or Sepia tones.
- Exposure Metering: Designates the camera's metering mode as Multi-Pattern, Center-Weighted, or Center-Spot.
- Focus Zone: Controls where the camera's AF system determines focus from. Choices are Multi-Zone or Center-Zone.
- Sharpness: Adjusts the in-camera sharpening to Sharp, Standard, or Soft.
- Reset: Resets all camera settings to their defaults.
- Set Album (Still): The DX6490 lets you set up albums through its interface software on a computer. If albums have been set up and downloaded to the camera, you can associate images with a specific album as they are recorded.
- Date Stamp: Turns the date stamp function on or off, which records the date over the image. You can choose from a selection of date formats as well.
- Orientation Sensor: Controls the camera's orientation sensor, which
detects when the camera is held vertically. (Vertical-format images captured
when the Orientation Sensor is enabled are rotated to their correct orientation
on-screen when they're played back.)
 Setup
Menu: Accesses the following main camera settings:
Setup
Menu: Accesses the following main camera settings:
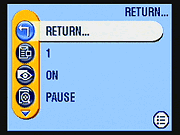
- Return: Returns to the previous menu display.
- Default Print Quantity: Sets the default number of prints specified when "tagging" images.
- Quickview: Turns Quickview on or off. Quickview automatically displays the most recently captured image, with options to delete or Share.
- Advanced Digital Zoom: Controls how digital zoom is accessed. The Continuous setting allows you to seamlessly zoom from the optical zoom range into the digital range. "Pause" tells the camera to pause between ranges. "None" disables digital zoom altogether.
- Shutter Sound: Enables the shutter noise or turns it off.
- Mode Description: Turns the mode description on or off. If on, a short description appears on the LCD screen when entering a mode.
- Date & Time: Sets the camera's internal clock and calendar.
- Video Out: Specifies PAL or NTSC as the Video Out signal.
- Language: Sets the menu language to one of eight languages.
- Format: Formats the SD memory card or internal memory.
- About: Displays the camera's firmware information.
Movie Menu: The following menu items appear whenever the Menu button is pressed in Movie mode. However, not all menu options are available in all modes.
 Image
Storage: Dictates where images are stored, either in the 16MB internal
memory or on a SD/MMC card. If Auto is selected, the camera automatically
stores images to a memory card if one is present.
Image
Storage: Dictates where images are stored, either in the 16MB internal
memory or on a SD/MMC card. If Auto is selected, the camera automatically
stores images to a memory card if one is present.
- Continuous AF: If selected, the lens will continuously focus during movie recording.
- Video Length: Sets the maximum length of movies. Options are unlimited, 5, 15, or 30 seconds.
- Set Album (Video): The DX6490 lets you set up albums through its interface software on a computer. If albums have been set up and downloaded to the camera, you can associate movies with a specific album as they are recorded, the same way you can with still images.
- Setup Menu: Takes you to the same setup menu as described
above for the still-capture record menu system.
Playback Menu:
 Magnify:
Enlarges the displayed image, so that you can check on fine detail and framing.
Magnify:
Enlarges the displayed image, so that you can check on fine detail and framing.
- Share: Enables a sub-menu of file sharing options for
use with the EasyShare dock:
- Cancel Prints: Cancels a print order.
- Print All: Prints one copy of each image on the memory card or internal memory.
- Print: Designates the number of copies of the current image to be printed.
- E-Mail: E-mails a low-resolution copy of the image to a recipient, based on a saved address book.
- Favorite: Marks the current image as a "favorite."
- Album: Adds images to an image album, created on a computer with the camera's interface software.
- Protect: Write-protects the displayed image, preventing it from being accidentally erased or manipulated (except via memory or card formatting). Also removes protection.
- Image Storage: Selects between the internal memory or the SD card for image storage.
- Slide Show: Enables a slide show of captured images, with user-adjustable intervals between images.
- Copy: Copies files from the internal memory to the SD card, or the reverse.
- Video Date Display: Turns on the date display over movie files, with a choice of formats.
- Multi-Up: Enables an index display of images on the memory card or those stored in the internal memory.
- Picture Info: Displays the filename, directory, date, time, and quality information for the current image.
- Setup Menu: Displays the same settings as under the Record menu.
In the Box
Included in the box are the following items:
- Kodak EasyShare DX6490 digital camera.
- Lens cap with strap.
- Lithium-ion battery pack and charger.
- USB cable.
- A/V cable.
- Neck strap.
- EasyShare dock insert.
- EasyShare Camera Dock 6000 (only in specified kits)
- Software CD-ROM.
- Operating manual and registration card.
- Large capacity SD memory card. (I'd recommend 64MB capacity.)
- Additional battery pack.
- AC adapter.
- Small camera case.
- EasyShare camera dock (if not included).
Recommended Software: Rescue your images!
Just as important as an extra memory card is a tool to rescue your images
when one of your cards fails at some point in the future. I get a lot of email
from readers who've lost photos due to a corrupted memory card. Memory card
corruption can happen with any card type and any camera manufacturer, nobody's
immune. A surprising number of "lost" images can be recovered with
an inexpensive, easy to use piece of software though. Given the amount of
email I've gotten on the topic, I now include this paragraph in all my digicam
reviews. The program you need is called PhotoRescue, by DataRescue SA. Read
our review
of it if you'd like, but download the program now, so you'll have it.
It doesn't cost a penny until you need it, and even then it's only $29, with
a money back guarantee. So download PhotoRescue
for Windows or PhotoRescue
for Mac while you're thinking of it. (While you're at it, download
the PDF manual
and quickstart
guide as well.) Stash the file in a safe place and it'll be there when you
need it. Trust me, needing this is not a matter of if, but when...
PhotoRescue is about the best and easiest tool for recovering digital
photos I've seen. (Disclosure: IR gets a small commission from sales of
the product, but I'd highly recommend the program even if we didn't.)
OK, now back to our regularly scheduled review...
See the specifications sheet here.
Information on shooting speed, battery life, etc. can be found here.
- Kodak
EasyShare DX6490 user reviews on PriceGrabber.com
- Kodak
EasyShare DX6490 user reviews on PC PhotoREVIEW
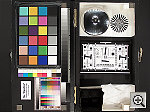
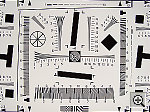
See our test images and detailed analysis here. The thumbnails below show a subset of our test images. Click on a thumbnail to see the full-size photo.

|

|

|
| |
|
|
|
|
|
|
| |
|
|
|
|
|
|
| |
|
|


Test Results
In keeping with my standard test policy, the comments given here summarize only my key findings. For a full commentary on each of the test images, see the DX6490's "pictures" page.
As with all Imaging Resource product tests, I encourage you to let your own eyes be the judge of how well the camera performed. Explore the images on the pictures page, to see how the DX6490's images compare to other cameras you may be considering.
- Color: The DX6490 showed really excellent color in all
my tests. Colors were bright, accurate, and appropriately saturated. In common
with other EasyShare cameras I've tested, the DX6490's auto white balance
system is unusually capable, handling a wide variety of light sources with
ease, including the very difficult household incandescent lighting used in
my Indoor Portrait test, although it left slightly more color in those shots
than I'd personally prefer. (A minor quibble, it was pretty darn good.) While
some color casts were visible in some of my test shots, they were so small
as to amount to hairsplitting in most instances. A lot of other digicam manufacturers
could stand to take a page or two from Kodak's color "play book"...
- Exposure: This was probably the weakest point of the DX6490
in my testing, as it showed a tendency to overexpose shots in a variety of
situations, especially outdoors under high contrast lighting. The camera had
a tough time with the outdoor house shot, as well as the Outdoor Portrait,
where the camera's high native contrast resulted in dark midtones and lost
highlight detail. Indoors, the camera required an average amount of positive
exposure compensation. The over-bright exposure sometimes left colors slightly
weak, but not as much as I would have expected, given my experience with other
cameras. I'd really like to see a slightly more accurate exposure system on
the 6490, but once you become accustomed to its behavior, it's easy enough
to just dial in a little negative exposure compensation to adjust for its
tendencies. (Although it of course would be best if you didn't have to do
that.)
- Resolution/Sharpness: The DX6490 performed very well on
the "laboratory" resolution test chart. It started showing artifacts
in the test patterns at resolutions as low as 800 lines per picture height,
in both horizontal and vertical directions. I found "strong detail"
out to at least 1,150 lines, although you could perhaps argue for as high
as 1,200 lines in the horizontal direction. "Extinction" of the
target patterns didn't occur until about 1,350 lines.
- Closeups: The DX6490 did very well in the macro category,
capturing a tiny minimum area of 2.32 x 1.74 inches (59 x 44 millimeters).
Resolution was very high, with strong detail in the dollar bill, as well as
in the fibers of the gray background. The coins and brooch are soft due to
the very short shooting distance. There's more softness in the corners of
this shot, extending down the entire left side of the frame. (This is pretty
common in super-macro shots with digicams, due to the optical phenomena called
"curvature of field.") Because of the close shooting range and the
DX6490's long 10x lens, the camera's flash was ineffective in this shot, and
underexposed the image a great deal. (Plan on using external illumination
for the closest macro shots with the DX6490.)
- Night Shots: The DX6490's excellent low light performance
was one of the biggest surprises I found while testing the camera. It not
only produced excellent color and moderate noise levels, but its viewfinder
and autofocus systems worked down to the lowest light levels I test at. Overall,
quite impressive, and a performance to shame many of its more expensive competitors.
Unlike most of the EasyShare line of digicams, the DX6490 offers full manual
exposure control and a maximum exposure time of 16 seconds. In combination
with the camera's adjustable ISO option, the DX6490's exposure flexibility
provides very capable low-light shooting. In my testing, the camera produced
clear, bright, usable images down to the 1/16 foot-candle (0.67 lux) limit
of my test, with good color at the 200, 400, and 800 ISO settings. The 80
and 100 ISO images could arguably be used at this light level, although they
were rather dark. Still, both produced good results down to 1/8 foot-candle
(1.3 lux). Image noise remained low up to about ISO 100, became moderate at
ISO 200, and increased to a high level at the 400 and 800 ISO settings.
- Viewfinder Accuracy: The DX6490's electronic "optical"
viewfinder (EVF) is actually a little "loose," showing just a little
more of the image area than what makes it into the final frame. Still, frame
accuracy is very close to 100 percent. The LCD monitor produced the same results,
since it's the same view on a larger screen. Given that I like LCD monitors
to be as close to 100 percent accuracy as possible, the DX6490's LCD monitor
performed very well in this regard.
- Optical Distortion: Optical distortion on the DX6490 is
much less than average at the wide-angle end, where I measured only about
0.4 percent barrel distortion. (Average is around 0.8 percent.) The telephoto
end came out slightly better, as I measured a 0.3 percent barrel distortion.
(Overall, this is a pretty low range of geometric distortion to see in such
a long-ratio zoom lens.) There's also surprisingly little softening in the
corners of the image, and chromatic aberration seems to be quite low as well,
with only fairly weak color visible around the edges of the target lines.
(This distortion is visible as a very slight colored fringe around the objects
at the edges of the field of view on the resolution target.) Overall, Kodak's
claims that the DX6490 has a high-quality lens seem to be well substantiated.
- Shutter Lag and Cycle Time: For all its other stellar qualities,
the DX6490 isn't a speed demon. Its shutter lag ranges from a moderate 0.88
seconds at wide angle to a downright leisurely 1.43 seconds at maximum telephoto.
Most consumer-grade digicams come in between 0.8 and 1.0 seconds (still grossly
too slow, IMHO), and long-zoom models are often slower, but 1.43 seconds is
really longer than anyone should have to wait for their camera to focus itself
and snap the shot. The good news though, is that prefocus shutter lag (the
delay after you've prefocused the camera by half-pressing and holding down
the shutter button) is a very zippy 0.126 seconds.
- Battery Life: Thanks to a beefy rechargeable LiIon battery that's included in the box with the camera, the DX6490 has excellent battery life. With a worst-case run time of 2 hours and 42 minutes, it's easily in the top ranks of cameras I've tested. I still suggest purchasing a second battery along with the camera, but it's perhaps less of an urgent issue with the DX6490 than some competing models.
| Free Photo Lessons | |
|

Related Links
More Information on this camera from Megapixel.net:
Kodak
EasyShare DX6490, Kodak
Digital Cameras, Digital
Cameras

Follow Imaging Resource: