The Imaging Resource
Quick Review
Kodak EasyShare DX7440 Digital Camera
 |
Camera QuickLook | |
|
Review Date |
|
|
|
User Level |
|
|
|
Product Uses |
|
|
|
Digicam Design |
|
|
|
Picture Quality |
High, 4.0-megapixel CCD | |
|
Print Sizes |
Good prints to 8x10 and 11x14 | |
|
Availability |
June, 2004 | |
| Suggested Retail
Price (At introduction) |
|
|
|
||||||||||
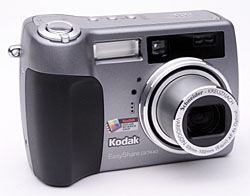
Boasting a 4.0-megapixel CCD, a full range of exposure control, and a compact body style, the Kodak EasyShare DX7440 updates the EasyShare line that's proven so popular among consumers. Compact and similar in style to a traditional point-and-shoot 35mm film camera, the DX7440 measures only 3.9 x 2.7 x 1.6 inches (100 x 69 x 40 millimeters), without the lens extended. The camera's all-plastic body makes it light weight as well, at 8.9 ounces (253 grams) without the battery or memory card. The DX7440 squeezes into larger shirt and coat pockets, and comes with a wrist strap for carrying. Its compact design includes a retractable lens, protected by a built-in, shutter-like lens cover that slides out of the way when the camera is powered on and saves you from worrying about a lens cap (one less hassle when you're traveling). The 4.0-megapixel CCD captures high resolution, print quality images (up to 8x10 or even 11x14 with good detail), as well as smaller image sizes better suited for distributing via email.
Built into the DX7440 is a 4x zoom lens, equivalent to a 33-132mm zoom on a 35mm camera, with lens accessory threads for attaching accessory conversion lenses. (That's a moderate wide angle to a decent telephoto, a fairly typical range among point-and-shoot digicams.) The camera's autofocus mechanism uses a multi-zone system to "find" the primary subject closest to the lens. The AF area is highlighted in the LCD display with a set of brackets. You can change the AF area to read only the center of the frame through the Record menu, or choose Selectable AF, which lets you set the AF area at center, or to the left or right of center. Additionally, you can choose between Continuous and Single AF modes. The DX7440 has a maximum aperture ranging from f/2.8 to f/4.8, depending on the zoom position. Focus ranges from 19.7 inches (50 centimeters) to infinity in normal mode, with a Macro mode ranging from 3.9 to 33.5 inches (10 to 85 centimeters) (The minimum Macro focus distance depends on the zoom setting.) A Landscape focus mode fixes focus at infinity, for distant subjects and scenery. In addition to the 4x optical zoom, the DX7440 also offers as much as 4x Advanced digital zoom, which effectively increases the camera's zoom range to a total of 16x. Keep in mind though, that digital zoom decreases the overall image quality, since it just stretches the center pixels of the CCD image. For composing images, the DX7440 offers both a real-image optical viewfinder as well as a generous, 2.2-inch color LCD monitor.
The DX7440 offers full manual exposure control, as well as a range of partial manual and automatic exposure modes. The Mode dial on the rear panel offers options of Movie, Auto, Scene, Program, Aperture Priority, Shutter Priority, Manual, and Custom exposure modes (as well as a Favorites setting for viewing images saved as "Favorites"). While Auto mode is best for general photography, leaving all of the exposure decisions up to the camera, the Program mode lets you control options such as white balance and exposure compensation while the camera handles the basic aperture and shutter speed settings. Aperture and Shutter Priority modes let you control either aperture or shutter speed, while the camera selects the appropriate corresponding variable. As you'd expect, Manual mode provides complete user control over the exposure, with shutter speeds ranging from 1/2,000 to 64(!) seconds. Finally, the Custom mode lets you save a group of exposure settings that can be instantly recalled. For example, if you frequently shoot indoors under a specific lighting setup, you can save the exposure settings for that exposure situation. The Scene exposure mode offers no less than 16 preset shooting modes, including Portrait, Sports, Landscape, Close-up, Night Portrait, Night Landscape, Snow, Beach, Text, Fireworks, Flower, Manner (for indoor settings without flash), Self-Portrait (for pointing the camera back at you), Party, Children, and Backlight. The available scenes appear at the bottom of the LCD display upon entering the mode, and the Multi-Controller selects the scene.
The DX7440 employs a Multi-Pattern metering system, which bases the exposure on several light readings taken throughout the frame, taking into consideration both brightness and subject contrast to arrive at the optimum exposure. Also available are Center-Weighted and Center-Spot modes. You can increase or decrease the overall exposure from -2 to +2 exposure equivalents (EV) in one-third-step increments. An Exposure Bracketing mode takes a series of three images, at different exposure settings, letting you decide which exposure is best. (You can designate whether the exposure varies by +/- 0.3, 0.7, or 1.0 EV increments through the Record menu.) White balance options include Auto, Daylight, Tungsten, and Fluorescent settings, which take advantage of Kodak's proprietary Color Science technology to achieve an accurate color balance under most lighting. An ISO setting option offers equivalent settings of 80, 100, 200, 400, and 800 (with the 800 setting only available at the 1.1-megapixel resolution). An Auto ISO setting is also available. The DX7440 also offers a range of color settings (High, Natural, and Low color), as well as Black and White and Sepia modes. You can also adjust the in-camera sharpening. The built-in flash is effective from 2.0 to 13.1 feet (0.6 to 4.0 meters) depending on the setting of the zoom lens, and features Auto, Fill, Red-Eye Reduction, and Off operating modes. You can also adjust the flash intensity, from -1.0 to +1.0 EV in one-third-step increments. A 10-second Self-Timer mode provides a delay between the time the Shutter button is pressed and when the shutter actually opens, so you can get into your own shots.
In addition to its still photography modes, the DX7440 also offers a Movie recording mode for capturing moving images with sound. Recording stops and starts with a brief, full press of the Shutter button, but if you hold the button down for more than a second or two, the camera will automatically stop recording when you let it back up again. As you record, the duration of the movie appears in a running counter on the LCD monitor. Maximum movie lengths depend on the amount of memory space available. (The 32 megabytes of internal memory will let you record movies up to three minutes and seven seconds in length.) Movies can be recorded at 320 x 240 pixels at 24 frames/second, or 640 x 480 pixels at 24 frames/second. A Burst photography mode lets you capture as many as six frames in rapid succession (approximately three frames per second according to my tests, although Kodak only claims 2 frames/second) while you hold down the Shutter button, with First and Last settings. First saves the first six images taken, while Last saves only the last six in the series. The six-frame maximum number applies regardless of resolution, but actual burst length may be further limited by the available space on the memory card or internal memory, if either is nearly full.
In addition to its normal camera-related functions, the DX7440 offers a relatively unique "Favorites" feature that Kodak pioneered relatively recently. Observing consumer behavior, Kodak realized that many people use their digicams for "portable slide shows," keeping some of their favorite photos on them, and passing them around to friends and family to share their pictures. Recognizing this as a popular usage pattern, Kodak developed the "Favorites" function, which lets you store reduced-resolution copies of your favorite images on the camera's internal memory. The reduced image resolution (roughly one megapixel in size) lets you carry around many more images than you'd otherwise be able to, yet still provides enough image data to make good-looking 4x6 prints from, should a friend want prints of one or more of your Favorites.
In practice, the Favorites function works in conjunction with Kodak's EasyShare software, installed on your computer. To save an image as a Favorite, you mark it as such by pressing the Share button on the camera's back in Playback mode, selecting the "Favorite" option that appears on the Share menu. The next time you connect the camera to your computer running the EasyShare software, any images marked as Favorites will be download, resized to the Favorites resolution, and then re-uploaded to the camera, to a set-aside portion of its memory. (The EasyShare software also lets you select how much of the camera's internal memory should be devoted to storing Favorites.) All in all, a very slick feature that directly addresses a very common digicam usage.
The DX7440 is compatible with Kodak's EasyShare camera and printer docks, which offer hassle-free image downloading and printing. You simply put the camera into the dock (the DX7440 comes with a plastic insert that fits the camera bottom snugly into the dock) and press the Connect button on the dock. The dock station also serves as an AC adapter and in-camera battery charger. Built into the DX7440 is 32 megabytes of internal memory, but the camera also features an SD/MMC memory card slot so you can expand the camera's memory capacity. I highly recommend picking up at least a 64-megabyte card (preferably a 128 MB one) right away, given the camera's 2,304 x 1,728-pixel maximum resolution size. For power, the DX7440 uses a Kodak EasyShare Li-Ion battery pack, or the optional AC adapter. Since the camera does not accommodate AA-type batteries, I highly recommend picking up a spare battery pack and keeping it on-hand and freshly charged. The camera comes with a battery charger in case you don't have the accessory dock. Also packaged with the DX7440 are USB and AV cables, as well as a software CD loaded with the EasyShare software for downloading and managing images.
Basic Features
- 4.0-megapixel CCD delivering images as large as 2,304 x 1,728 pixels.
- Real-image optical viewfinder.
- 2.2-inch color LCD monitor.
- 4x, 33-132mm (35mm equivalent) lens.
- 4x digital zoom.
- Auto, Program, Aperture Priority, Shutter Priority, and Manual exposure modes, plus 16 preset Scene modes.
- White Balance with four settings.
- Maximum aperture of f/2.8 to f/4.8, depending on lens zoom position.
- Shutter speeds from 1/2,000 to 64 seconds, depending on exposure mode.
- Built-in flash with four modes and an adjustable intensity setting.
- 32MB internal memory.
- SD/MMC card storage (optional, card not included).
- Power supplied by one Kodak EasyShare Li-Ion pack, or optional AC adapter.
- Compatible with optional Kodak EasyShare camera and printer docks (not included).
- Kodak EasyShare software included for both Windows and Mac platforms.
Special Features
- Movie mode (with sound).
- Burst photography mode.
- Auto Exposure Bracketing mode.
- Custom exposure mode for saving frequently-used settings.
- Black and White, Sepia, and three color modes.
- Adjustable ISO from 80 to 800, with an Auto setting.
- 10-second Self-Timer for delayed shutter release.
- Image sharpness adjustment.
- Three AF area modes, plus Single and Continuous AF modes.
- Macro (close-up) lens setting.
- Accessory lens thread.
- DPOF (Digital Print Order Format) compatibility.
- USB cable for connection to a computer (driver software included).
Recommendation
Like the rest of Kodak's EasyShare line, the DX7440 boasts
a simple-to-understand user interface that keeps the fun in point-and-shoot
digital photography. The DX7440's range of exposure modes is perfect for all
experience levels though, combining optional advanced exposure modes with the
ease of use that's made the EasyShare line so popular with consumers. The DX7440's
versatile setup is a good option for kids or novice users who want to quickly
learn more about photography, while more experienced users will enjoy the compact
size and flexible controls. The combination of fully automatic controls with
more advanced options makes the DX7440 a good camera for users looking for a
camera that's easy to use, yet has advanced features that they can grow into
as their skills develop. Combined with one of Kodak's EasyShare "Printer
Docks", the DX7440 offers an all-in-one solution to digital photography,
letting you go from the camera directly to great-looking prints without the
use of a computer.
Compact and reasonably small in size, the DX7440 measures 3.9 x 1.6 x 2.7 inches (100 x 40 x 69 millimeters), just small enough to fit into coat pockets and purses, and possibly larger shirt pockets. The DX7440 is light weight as well, at just 8.9 ounces (253 grams) without battery or memory card. A wrist strap comes with the camera, but I'd recommend a soft carrying case for travel.

The telescoping lens takes up the right side of the camera's front panel, surrounded by a thick, plastic lip complete with a set of threads that accept an optional lens adaptor for use in mounting filters and accessory lenses. The lens extends outward just shy of 3/4-inch when the camera is powered on. A shutterlike lens cover automatically slides out of the way as well, eliminating the need for a removable lens cap. Also on the front panel are the optical viewfinder window, flash, autofocus sensor, self-timer lamp, light sensor, and tiny microphone. A gently-sculpted finger grip on the side of the camera features a soft, rubbery pad for your fingers to cling to.
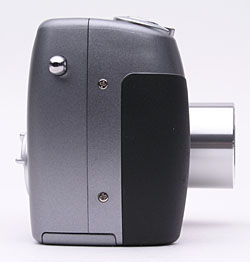
On the right side of the camera (as viewed from the rear) is only the shiny, silver eyelet for attaching the wrist strap.
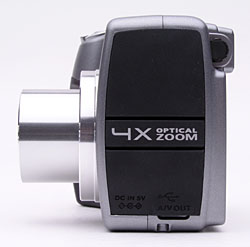
The opposite side of the camera features the DC In, AV Out, and USB jacks, beneath a flexible, rubbery flap that's attached to the camera. The diopter adjustment dial for the optical viewfinder is also visible here, on the very edge of the viewfinder eyepiece.
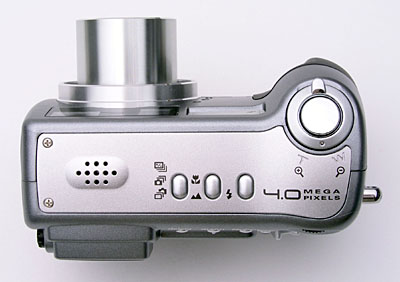
The Shutter, Flash, Focus, and Drive buttons are all on the camera's top panel, along with the speaker grille and Zoom lever.
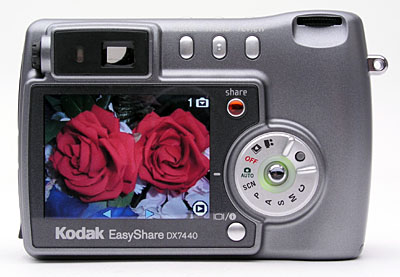
The rest of the camera controls are on the rear panel, along with the optical viewfinder and 2.2-inch LCD monitor. A slight bulge on the right side give your thumb something to rest against as you hold the camera, reinforcing the front handgrip. Above the thumb rest is a small jog dial, for adjusting a variety of camera settings. Lining up to the right of the optical viewfinder are the Delete, Menu, and Review buttons, with the Share and Display / Info buttons in the two right corners of the LCD panel. A large Mode dial takes up the lower right portion of the rear panel, with a joystick-like multi-controller button in its center and a small button that releases the dial for turning. The multi-controller navigates through menu settings, and confirms selections when pressed. The optical viewfinder eyepiece is quite small, but has a moderately high eyepoint to accommodate eyeglass wearers. (I could see the full frame while wearing my glasses, but found that I often ended up with the viewfinder eyepiece lightly touching my lenses.) As noted above, it also has a diopter adjustment tucked on its side. (The diopter adjustment seems to cover a reasonably wide range, almost compensating for my own 20/180 uncorrected vision at the nearsighted end of its adjustment range.) Next to the viewfinder is a small LED lamp, which lights or flashes to indicate camera status (such as when focus is set, flash is charging, etc.).
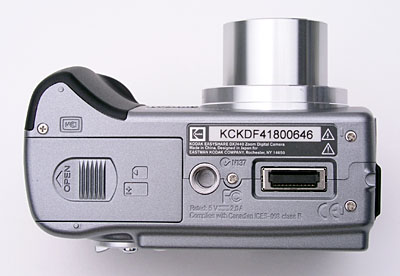
On the bottom panel of the DX7440 are the metal tripod mount (kudos for the use of metal here), dock jack, and battery / memory card compartment. The threaded tripod mount is just off-center and too close to the battery / memory card compartment for quick battery changes while working with a tripod. The battery / memory card compartment features a locking, hinged door, which slides to the side to open. Inside, the battery pack and SD card slots line up side-by-side, and a small ejection lever locks the battery in place or releases it. (The SD card is ejected by pressing it down quickly, which pops it out slightly.) The dock connection jack connects the camera directly to the EasyShare dock for quick image downloading.
As I've come to expect from Kodak's EasyShare digicam line, the DX7440 has a very user-friendly interface. The full range of available exposure control options give users a lot of flexibility when they want it, while the camera's automatic systems do an excellent job of capturing good-looking photos under a wide range of conditions. The Jog dial on the camera's rear panel lets you quickly change exposure settings, such as exposure compensation, shutter speed, ISO, etc., without delving into the LCD menu system - quite a handy feature. The LCD menu system is short and simple to navigate, and the plain-English descriptions of menu items are a welcome change from the too-common cryptic icons on so many other cameras. A Mode dial lets you change camera modes quickly, and once again, plain-English descriptions displayed on the LCD screen make operation straightforward even for rank beginners. Given the simple interface and limited controls, you should be able to start snapping images right away, with hardly a glance at the manual. For more advanced functions, it shouldn't take more than a half an hour to an hour (depending on your level of expertise) to get the gist of things.
Record-Mode Display
 Depending on the exposure mode, the DX7440's LCD display shows the center autofocus
area along with currently-selected options for image size/quality, macro and
flash mode, the number of images of the current size and quality that can be
stored in the remaining space on the memory card. In Program, Aperture Priority,
Shutter Priority, Manual, and Custom modes, the LCD display also includes shooting
mode, aperture, shutter, ISO, flash exposure compensation, and exposure compensation
settings. Pressing the Display button once in a record mode cancels the information
display, while a second press cancels the display entirely. A third press brings
back the image and information displays.
Depending on the exposure mode, the DX7440's LCD display shows the center autofocus
area along with currently-selected options for image size/quality, macro and
flash mode, the number of images of the current size and quality that can be
stored in the remaining space on the memory card. In Program, Aperture Priority,
Shutter Priority, Manual, and Custom modes, the LCD display also includes shooting
mode, aperture, shutter, ISO, flash exposure compensation, and exposure compensation
settings. Pressing the Display button once in a record mode cancels the information
display, while a second press cancels the display entirely. A third press brings
back the image and information displays.
Playback-Mode Display
 In Playback mode, you can use the DX7440's Zoom lever to zoom in or out on an
image, with a maximum enlargement of 8x. A thumbnail display of the images on
the card is also available, through the camera's Playback menu. The Display
button offers a more detailed information display, reporting the exposure settings
used to capture the current image. The normal Playback display reports the image
number, and any shared settings information.
In Playback mode, you can use the DX7440's Zoom lever to zoom in or out on an
image, with a maximum enlargement of 8x. A thumbnail display of the images on
the card is also available, through the camera's Playback menu. The Display
button offers a more detailed information display, reporting the exposure settings
used to capture the current image. The normal Playback display reports the image
number, and any shared settings information.
External Controls
Shutter Button: Located on the camera's top panel, this button sets focus
and exposure when halfway pressed, and fires the shutter when fully pressed.
In Playback mode, pressing this button returns the camera to the selected
Record mode.
Zoom Lever: Encircling the Shutter button on the camera's top panel, this lever controls the optical and digital zoom in any record mode. In Playback mode, the lever controls the amount of digital enlargement applied to captured images, to a maximum of 8x.

Flash Button: Diagonally behind the Shutter button to the left, this button
cycles through the Auto, Fill, Red-Eye Reduction, and Off flash modes.

Focus Button: To the left of the Flash button, this button controls
the camera's focus mode, cycling between Normal AF, Macro, and Landscape focus
settings.

Drive Button: Next to the Focus button, this button cycles through
the First Burst, Last Burst, and Exposure Bracketing drive settings.

Delete: Next to the optical viewfinder on the camera's rear panel, this
button calls up the Delete menu in Review mode. You can delete individual
images or all images on the card. There's also an option to cancel.

Menu Button: To the right of the Delete button, this button displays the
settings menu in Playback or Record modes.

Review Button: Directly to the right of the Menu button, this button activates
Playback mode when pressed in any record mode. Once in Playback mode, pressing
the button again, or the Shutter button, returns to the Record display.
![]()
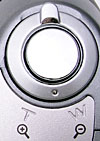
Jog Dial: Tucked in the top right corner of the rear panel, this
ridged dial controls a handful of camera settings when rotated. In Program,
Aperture Priority, Shutter Priority, Manual, or Custom exposure modes, turning
the dial moves a triangular yellow cursor between different exposure variables
on the LCD monitor, while a full press of the dial selects the current exposure
option for adjustment. Once selected, you can change the setting by changing
the dial. Pressing the dial again de-selects the current option, so you can
choose a different parameter to adjust. Available exposure settings (depending
on the particular exposure mode you're in) are exposure compensation, flash
exposure compensation, ISO, shutter speed, and aperture.

 Share
Button: Located in the top right corner of the LCD monitor, this
button lets you tag images for printing, emailing, or as a favorite image.
(A heart icon appears on "favorite" images.) Pressing this button
in Review mode automatically enables Playback mode, and displays the Share
menu with the following options:
Share
Button: Located in the top right corner of the LCD monitor, this
button lets you tag images for printing, emailing, or as a favorite image.
(A heart icon appears on "favorite" images.) Pressing this button
in Review mode automatically enables Playback mode, and displays the Share
menu with the following options:
- Cancel Prints: Cancels a print order.
- Print All: Prints one copy of each image on the memory card or internal memory.
- Print: Designates the number of copies of the current image to be printed.
- E-Mail: E-mails a low-resolution copy of the image to a recipient, based on a saved address book.
- Favorite: Marks the current image as a "favorite."
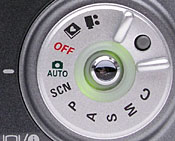
Mode Dial: Taking up the lower right corner of the rear panel, this large
dial features a small locking button that releases it for turning. The following
camera modes are available:
- Movie: Records moving images with sound, for as long as the memory card has available space.
- Favorites: Displays any images that have been saved as favorites.
- Off: Turns the camera off, and signals the lens to retract.
- Automatic Record: Best for most average shooting conditions, this mode places the camera under automatic exposure control, with limited user options available through the Record menu.
- Scene Mode: Offers 16 preset shooting modes, including Portrait, Sports, Landscape, Close-up, Night Portrait, Night Landscape, Snow, Beach, Text, Fireworks, Flower, Manner, Self-Portrait, Party, Children, and Backlight.
- Program Mode: Offers a range of exposure options for the user, though the camera remains in control of aperture and shutter speed.
- Aperture Priority Mode: Lets the user adjust the lens aperture setting, while the camera controls the shutter speed. All other exposure options are available.
- Shutter Priority Mode: Opposite of Aperture Priority mode, this mode puts the user in control of the shutter speed and the camera in charge of aperture.
- Manual Mode: This mode offers full user control over the exposure.
- Custom Mode: Lets the user save a selection of exposure settings for quick recall.
Multi-Controller: Located in the center of the Mode dial, this joystick-like controller navigates through menu options in any settings menu. When pressed, it confirms menu selections.
In Playback mode, the controller scrolls through captured images, when moved left and right. Pressing the button down activates the index display mode.

Info Button: Positioned in the lower right corner of the LCD monitor,
this button reports various camera settings for quick reference when pressed.
Camera Modes and Menus
![]()
Movie Mode: The first mode on the Mode dial, Movie mode is indicated by
a movie camera icon. In this mode, you can record 640 x 480 or 320 x 240-pixel
resolution movies with sound, at 13 or 24 frames per second, respectively.
![]()
Favorites Mode: An album icon with a heart on its cover indicates
this mode on the Mode dial. In this mode, any images that have been designated
as "favorites" are displayed. (Note that it only displays Favorites
that have been processed through the EasyShare software, so newly-capture
images marked as Favorites will not appear.)
![]()
Auto Mode: Marked with a camera icon and the word "Auto," this
mode is best for most average shooting conditions. Exposure is automatically
controlled, but a small selection of user options is available through the
Record menu.
![]()
Scene Mode: The letters "SCN" indicate this mode on the Mode
dial, which offers 16 preset shooting modes. Available "scenes"
are Portrait, Sports, Landscape, Close-up, Night Portrait, Night Landscape,
Snow, Beach, Text, Fireworks, Flower, Manner, Self-Portrait, Party, Children,
and Backlight.
![]()
Program Mode: A single letter "P" notes this mode,
which provides basic user control over Record menu options, but leaves the
camera in charge of shutter speed and aperture settings.
![]()
Aperture Priority Mode: The initial "A" stands for Aperture
Priority mode, where the user has control over the lens aperture setting.
The camera maintains control over the shutter speed.
![]()
Shutter Priority Mode: Like Aperture Priority mode, this mode places the
user in charge of one exposure variable. Here, the user can set the shutter
speed, while the camera selects the best lens aperture. An "S" marks
this mode on the Mode dial.
![]()
Manual Mode: Indicated with an "M" on the Mode dial, this mode
provides complete user control over both shutter speed and lens aperture simultaneously.
![]()
Custom Mode: The final position on the Mode dial, this mode lets
you save a selection of exposure settings for recall later.
Playback Mode: Accessed by pressing the Review button, this mode lets you review captured images and movies, as well as manage files.
Record Menu: The following menu items appear whenever the Menu button is pressed in any Record mode. However, not all menu options are available in all modes.
 Custom
Mode: Selects which exposure mode (Program, Aperture Priority,
Shutter Priority, or Manual) is activated in Custom mode.
Custom
Mode: Selects which exposure mode (Program, Aperture Priority,
Shutter Priority, or Manual) is activated in Custom mode.
- Self-Timer: Activates the 10-second Self-Timer, or disables it.
- Picture Size: Sets the resolution for still images. Choices are 4.0 MP (2,304 x 1,728 pixels), 3.5 MP 3:2 ratio (2,304 x 1,536 pixels), 3.1 MP (2,048 x 1,536 pixels), 2.1 MP (1,656 x 1,242 pixels), or 1.1 MP (1,200 x 900 pixels).
- Compression: Sets the JPEG compression to Standard or Fine.
- White Balance: Sets the color balance to Auto, Daylight, Tungsten, or Fluorescent settings.
- Exposure Bracketing Interval: Designates the exposure equivalent (EV) step size that images vary by when the Auto Exposure Bracketing feature is used. Choices are +/- 0.3, 0.7, or 1.0 EV.
- Exposure Metering: Sets the camera's metering mode to Multi-Pattern, Center-Weighted, or Center-Spot.
- Focus Zone: Controls what portion of the frame the camera's AF system determines focus from. Choices are Multi-Zone, Center-Zone, or Selectable-Zone (either center, left, or right).
- AF Control: Sets the autofocus to Continuous or Single modes, or to Accessory Lens.
- Color Mode: Allows you to record images in High, Natural, or Low Color, or in Black and White or Sepia tones.
- Sharpness: Controls the in-camera sharpening, with options of High, Normal, or Low.
- Reset to Default: Resets all camera settings to their defaults.
- Set Album (Still): The DX7440 lets you set up albums through its interface software on a computer. If albums have been set up and downloaded to the camera, you can associate images with an album as they are recorded.
- Image Storage: Dictates where images are stored, either in the 32MB internal memory or SD card. If Auto is selected, the camera automatically stores images to a memory card if one is present.
- Liveview (Auto): Disables the LCD's "live" view in Auto mode, meaning you can turn off the LCD as a viewfinder by pressing the multi-controller. If this setting is off, the LCD remains active at all times.
- Video Size: Sets the pixel resolution for Movie mode. Choices are 320 x 240 or 640 x 480 pixels.
- Video Length: Sets the default video length to Continuous,
or to 5, 15, or 30 seconds.
- Setup Menu: Displays the following Setup options:
 Return:
Returns to the previous menu display.
Return:
Returns to the previous menu display.
- Quickview: Turns Quickview on or off. Quickview automatically displays the most recently captured image, with options to delete or Share.
- Advanced Digital Zoom: Controls how digital zoom is accessed. The Continuous setting allows you to seamlessly zoom from the optical zoom range into the digital range. "Pause" tells the camera to pause between ranges. "None" disables digital zoom altogether.
- Print Warning: If activated, this feature turns the zoom slider red if the digital zoom is set too high to render an acceptable 4x6-inch print.
- Sound Themes: Selects the camera's operating sounds. Choices are Shutter Only, Default, Classical, Jazz, and Sci-Fi. (All sounds are disabled in the camera's Manner scene mode.)
- Sound Volume: Sets the volume to Low, Medium, or High, or turns sound off.
- Mode Description: If enabled, displays a description of each camera mode on the LCD monitor when first accessed.
- Date & Time: Sets the camera's internal clock and calendar.
- Video Out: Specifies PAL or NTSC as the Video Out signal.
- Orientation Sensor: Controls the camera's orientation sensor, which detects when the camera is held vertically. Vertical-format images captured when the Orientation Sensor is enabled are rotated to their correct orientation on-screen when they're played back.)
- Date Stamp: Turns the date stamp function on or off, which records the date over the image. You can choose from a selection of date formats as well.
- Video Date Display: Like the Date Stamp option above, imprints the date and time on video files, with a choice of display formats.
- Language: Sets the menu language to one of nine languages.
- Format: Formats the SD memory card or internal memory.
- About: Displays the camera's firmware information.
Playback Menu:
 Album:
Adds images to an image album, created on a computer with the camera's interface
software.
Album:
Adds images to an image album, created on a computer with the camera's interface
software.
- Protect: Write-protects the displayed image, preventing it from being accidentally erased or manipulated (except via memory or card formatting). Also removes protection.
- Image Storage: Selects between the internal memory or the SD card for image storage.
- Slide Show: Enables a slide show of captured images, with user-adjustable intervals between images.
- Copy: Copies files from the internal memory to the SD card, or the reverse.
- Multi-Up: Enables a index display of images on the memory card or stored in the internal memory.
- Setup Menu: Displays the same settings as under the Record menu.
In the Box
In the box are the following items:
- Kodak EasyShare DX7440 digital camera.
- Kodak EasyShare Li-Ion battery pack with charger.
- USB cable.
- A/V cable.
- Wrist strap.
- EasyShare dock insert.
- Software CD-ROM.
- Operating manual and registration card.
- Large capacity SD memory card. (I'd recommend 64MB as a bare minimum.)
- Additional battery pack.
- AC adapter.
- Small camera case.
- EasyShare camera dock.
Recommended Software: Rescue your Photos!
Just as important as an extra memory card is a tool to rescue your images
when one of your cards fails at some point in the future. I get a lot of email
from readers who've lost photos due to a corrupted memory card. Memory card
corruption can happen with any card type and any camera manufacturer, nobody's
immune. A surprising number of "lost" images can be recovered with
an inexpensive, easy to use piece of software though. Given the amount of
email I've gotten on the topic, I now include this paragraph in all my digicam
reviews. The program you need is called PhotoRescue, by DataRescue SA. Read
our review
of it if you'd like, but download the program now, so you'll have it.
It doesn't cost a penny until you need it, and even then it's only $29, with
a money back guarantee. So download PhotoRescue
for Windows or PhotoRescue
for Mac while you're thinking of it. (While you're at it, download
the PDF manual
and quickstart
guide as well.) Stash the file in a safe place and it'll be there when you
need it. Trust me, needing this is not a matter of if, but when...
PhotoRescue is about the best and easiest tool for recovering digital
photos I've seen. (Disclosure: IR gets a small commission from sales of
the product, but I'd highly recommend the program even if we didn't.)
OK, now back to our regularly scheduled review...
See the specifications sheet here.
Information on shooting speed, battery life, etc. can be found here.
See our test images and detailed analysis here. The thumbnails below show a subset of our test images. Click on a thumbnail to see the full-size photo.

|

|

|
| |
|
|
|
|
|
|
| |
|
|
|
|
|
|
| |
|
|


Test Results
In keeping with my standard test policy, the comments given here summarize only my key findings. For a full commentary on each of the test images, see the EasyShare DX7440's "pictures" page.
As with all Imaging Resource product tests, I encourage you to let your own eyes be the judge of how well the camera performed. Explore the images on the pictures page, to see how the DX7440's images compare to other cameras you may be considering.
Not sure which camera to buy? Let your eyes be the ultimate judge! Visit our Comparometer(tm) to compare images from the DX7440 with those from other cameras you may be considering. The proof is in the pictures, so let your own eyes decide which you like best!
- Color: Good color accuracy, somewhat high saturation.
Like many consumer digicams, the DX7440's color is quite bright and
punchy. - But that's because most consumers like bright, snappy-looking
photos. The DX7440 did tend toward a slightly reddish color balance in a
lot of my shots, regardless of white balance setting, but the color cast
probably isn't enough to bother most consumers. The reddish tinge did tend
to make skin tones a little more pink than in real life, but wasn't too
visible otherwise, particularly when viewing the 7440's images in isolation.
(That is, it's much more evident when comparing the camera's images to those
from a camera with a cooler or more neutral cast, but by themselves, the
7440's photos generally look OK. On the Indoor Portrait (without flash),
the 7440 did a pretty good job of handling the very warm-hued household
incandescent lighting, something many cameras have a lot of trouble with.
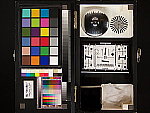
- Exposure: A slight tendency to overexpose, and rather
high contrast. Exposure was typically a little bright with the DX7440,
with fairly high contrast as well. The camera came closer than most do to
the correct exposure on the high-key outdoor portrait shot, requiring only
a small amount of positive exposure compensation. That said though, midtones
remained slightly dark and some detail was lost in the strongest highlights.
Indoors, the camera required a lower than average amount of positive exposure
compensation, and the flash exposure was reasonably bright as well. The
DX7440 had no trouble distinguishing the subtle pastel tones on the Q60
target of the Davebox, despite high contrast and exposure, though shadow
detail was limited. Overall, not bad, but I'd have been happier with a little
better accuracy and lower contrast.
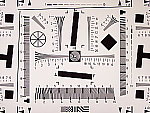
- Resolution/Sharpness: High resolution, 1,150 lines
of "strong detail." The DX7440 performed well on the "laboratory"
resolution test chart. It started showing artifacts in the test patterns
at resolutions as low as 800 lines per picture height, in both horizontal
and vertical directions. I found "strong detail" out to at least
1,100, arguably 1,200, lines. "Extinction" of the target patterns
didn't occur until about 1,400 lines.
- Image Noise: Low image noise at low ISOs. Also low at higher
ISO settings, but a heavy price is paid in terms of image detail. Image
noise is present in the DX7440's images but quite low at the 80 and 100
ISO equivalent settings. As the ISO increases, the noise levels remain fairly
low, but that's because the camera makes a heavy tradeoff with subtle subject
detail to suppress the noise in the final images. The net effect isn't too
bad at ISO 200, but the ISO 400 shot looks almost like a watercolor painting
in places. - Don't shoot with the DX7440 at ISO settings over 200 if you
care about subtle detail in your photos.
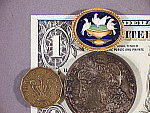
- Closeups: An average size macro area, with some softness
in the corners but overall good detail. The DX7440 turned in about an
average performance in the macro category, capturing a minimum area of 2.99
x 2.24 inches (76 x 57 millimeters). Resolution was high, with clear, sharp
details in the brooch, coins, and dollar bill. As with the macro modes of
most digicams I test, there was some softness in each of the four corners,
but it didn't extend very far into the frame. Color balance was pinkish
with the Auto white balance setting, but exposure was good. Undoubtedly
tricked by the reflections from the coins and the brooch, the DX7440's flash
throttled down a little too much for the macro area, producing a dim exposure.
(With less reflective subjects though, the DX7440's flash should work well
for macro shooting.)
- Night Shots: Excellent low-light performance, with
good color and exposure in almost total darkness. Very good low-light focusing
as well. With a maximum exposure time of 64 seconds and full manual
exposure control, the DX7440 is well-suited for low-light shooting. The
camera produced clear, bright, usable images down to the 1/16 foot-candle
(0.67 lux) limit of my test, with good color at all four ISO settings. Noise
was very low at the 80 and 100 ISO settings, and only increased to a moderate
level at ISO 200. Even at ISO 400, image noise is lower than I'd expect,
but as we saw earlier, the way the DX7440 achieves its low noise levels
at high ISO settings is by trading away a lot of subtle subject detail.
- Viewfinder Accuracy: A somewhat tight optical viewfinder,
but accurate LCD monitor. The DX7440's optical viewfinder was somewhat
tight at the telephoto setting, showing about 85 percent of the final frame
area. (While a lot tighter than I like to see, this is actually about average
among consumer digicams.) However, at the wide angle lens position, frame
accuracy was better, showing about 90 percent of the final frame. The LCD
monitor fared much better, showing 99+ percent frame regardless of lens
settings. (Though the measurement lines were just out of frame at wide angle.)
Given that I like LCD monitors to be as close to 100 percent accuracy as
possible, the DX7440's LCD monitor performed very well here, but I'd like
to see the optical viewfinder a little more accurate.
- Optical Distortion: Very low distortion, good sharpness
to the corners of the frame. Optical distortion on the DX7440 was very
low at the wide-angle end, where I measured only 0.2 percent barrel
distortion. The telephoto end fared about the same, also with an 0.2 percent
barrel distortion. Both numbers are quite a bit lower than average. Chromatic
aberration is also very low, showing at most about four pixels of very faint
coloration on either side of the target lines. (This distortion is visible
as a very slight colored fringe around the objects at the edges of the field
of view on the resolution target.) Finally, the DX7440's lens seems to hold
sharpness very well out into the corners, with less of the softness there
that I'm accustomed to seeing in digicam images. All in all, a very high-quality
lens.
- Shutter Lag and Cycle Time: Very good timing performance.
I found the DX7440 to be quite a bit better than average, both in terms
of shutter response and shot to shot cycle times. Its full-autofocus shutter
lag ranged from 0.38 to 0.54 seconds, quite a bit better than average. Its
lag when prefocused was 0.13 seconds, also quite good. Shot to shot cycle
times are likewise a good bit better than average, at 1.18 seconds for up
to six frames.
- Battery Life: So-so battery life with LCD on, excellent battery life using only the optical viewfinder. With worst-case runtime of 96 minutes in capture mode with the rear panel LCD illuminated, the DX7440 has only average battery life. BUT, with the LCD turned off, record-mode run time stretches to well over five hours, a very good performance indeed. Playback-mode battery life is also pretty good, at a little under 3 hours.
| Free Photo Lessons | |
|


Follow Imaging Resource: