Olympus E-10A 4 megapixel sensor and unique SLR optics make for a major coup for Olympus! (Final review, based on full-production model.)<<Operation & User Interface :(Previous) | (Next): Image Storage & Interface>> Page 9:Camera Modes & MenusReview First Posted: 1/26/2001 |
Camera Modes and Menus
(Because the capture
modes all share the same menu options, we'll discuss each capture mode
individually and then list the record menu selections.)
Manual
Exposure Mode: Accessed by turning the mode dial to the "M" position, this
mode allows you to control the shutter speed (from eight to 1/640 seconds, with
a Bulb setting) and lens aperture (from f/2.0 to f/11.0, depending on the zoom
setting). You also have control over all other exposure variables, except for
metering mode, exposure compensation, and AE Lock.
Shutter Priority
Exposure Mode: Marked on the mode dial with an "S," this mode puts you in
control of the shutter speed while the camera controls the lens aperture. The
lens aperture range remains the same, but the shutter speed range changes to two
to 1/640 seconds. All exposure variables are available, including flash mode,
ISO, metering, exposure compensation, AE Lock, sharpness, contrast, and white
balance.
Aperture Priority Exposure Mode: This mode is noted on
the mode dial with an "A," and allows you to set the lens aperture while the
camera selects the best corresponding shutter speed. Aperture and shutter speed
values remain the same as with Shutter Priority mode, as does the amount of
exposure control available with other features.
Program Exposure
Mode: Denoted on the mode dial with a "P," this mode puts the camera in
charge of both aperture and shutter speed, basing the exposure values on the
available light. Aperture and shutter speed ranges remain the same as with
Aperture and Shutter Priority modes, and all exposure features are
available.
Record Menu: Available in all four capture modes, this
menu is accessed by pressing the Menu button. The following options are
available:
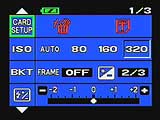 Card Setup: Reformats the SmartMedia or CompactFlash card,
erasing all images on the card (even write-protected ones).
Card Setup: Reformats the SmartMedia or CompactFlash card,
erasing all images on the card (even write-protected ones).
- ISO: Adjusts the camera's sensitivity setting to Auto, 50, 100, or
200 ISO equivalents.
- Bracket: Activates the auto bracketing feature, and allows you to
set the exposure adjustment variable to 1/3, 2/3 or one EV.
- Flash Intensity: Sets the flash intensity level from -2 to +2 EV,
in 1/3 EV increments.
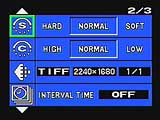 Sharpness: Selects the image sharpness setting (Hard, Soft, or
Normal).
Sharpness: Selects the image sharpness setting (Hard, Soft, or
Normal).
- Contrast: Allows you to set the image contrast (High, Normal, or
Low).
- Record Mode: Determines the image quality and size for the camera's
"standard" image quality selections. Options are TIFF, SHQ, HQ, and SQ, each
with 2240 x 1680, 1600 x 1200, 1280 x 960, 1024 x 768, and 640 x 480 image
sizes available (except for TIFF, which is only available with the 2240 x 1680
resolution size). JPEG compression ratios of 1:2.7 (! - very low), 1:4, or 1:8
are also available for each selection.
- Interval Time: Activates time-lapse photography and sets the
shooting interval anywhere from one minute to 24 hours. (Draft manual said 30
seconds, but our prototype unit had 1 minute as the shortest interval.)
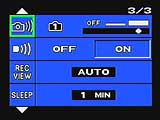 Shutter Sound: Chooses between two different shutter sounds,
and sets the volume to off, low, or high volume levels.
Shutter Sound: Chooses between two different shutter sounds,
and sets the volume to off, low, or high volume levels.
- Camera Sound: Disables (or enables) all camera sounds.
- Record View: Chooses whether or not the captured image is
immediately displayed after shooting, for image confirmation and for how
long.
- Sleep Mode: Determines the period of inactivity before the camera
shuts itself off, from one to 10 minutes. You can also disable the sleep
function.
Playback Mode: This mode is marked on the mode dial with the
traditional green playback symbol. In Playback mode, you can scroll through
captured images, delete them, protect them, or copy them. You can also view an
index display of nine thumbnails on a page, or digitally enlarge the captured
image and check fine details. Pressing the menu button displays the following
selections:
 Slide Show: Begins an automatic slide show of all captured
images on the memory card.
Slide Show: Begins an automatic slide show of all captured
images on the memory card.
- Copy: Allows you to copy selected images, or all images, from one
memory card to another.
- Card Setup: Reformats the SmartMedia or CompactFlash memory card,
deleting all images (even write-protected ones).
- Brightness: Adjusts the LCD monitor's brightness.
Print Mode: Marked on the mode dial with a green printer symbol,
this mode allows you to mark images for printing on a DPOF compatible device,
and set the number of prints. You can also create index print files. Pressing
the Menu button calls up the following Preprint menu:
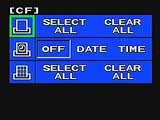 Print: Selects all images for printing or cancels the print
request.
Print: Selects all images for printing or cancels the print
request.
- Time Stamp: Activates the time stamp function, which prints either
the date or time on the images.
- Index Print: Selects all images for an index print, or cancels the
request.
PC Connection Mode: This mode, marked on the mode dial with a
crooked arrow, sets up the camera for connection to a computer. It also accesses
the main camera settings menu, once the Menu button is pressed. Options are:
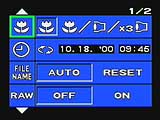 Conversion Lens: Determines which conversion lens is in use.
- Battery Type: (Mentioned in draft manual, not present on our prototype
test unit - tells the camera what type of battery is being used - NiCd, NiMH,
Alkaline, or Lithium)
- Date and Time: Sets the camera's internal clock and calendar.
- File Name: Tells the camera to Reset the file naming with each new
memory card, or continue from card to card (the Auto setting).
- RAW: Enables and disables the RAW data format, for saving images
as unprocessed, uncompressed 10-bit CCD data files.
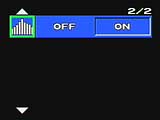 Histogram: Switches the histogram function on or off.

Follow Imaging Resource: