Canon EOS-1DCanon leaps into the professional SLR arena, with the fastest digital SLR on the planet!<<Operation & User Interface :(Previous) | (Next): Image Storage & Interface>> Page 9:Camera Modes & MenusReview First Posted: 12/08/2001 |
Camera Menus
The EOS-1D offers four menus, all of which are available at all times
by pressing the Menu button.
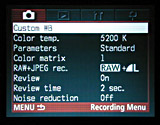 Record Menu
- Custom WB: Lets you select an image for the Custom White Balance setting. For example, to set the Custom White Balance, you capture an image of a gray card in the lighting in question. You would then select that image through the Custom WB menu option as the image to base the white balance on, and apply that to the current subject. You could also apply the white balance from a previously captured image.
- Color Temperature: Selects the Kelvin temperature (for the Color Temperature white balance setting) over a range of 2800°K to 10,000°K in 100°K increments.
- Parameters: Accesses any of up to three customized camera settings created on the host computer with the camera's driver software (such as tone curves, sharpness level, JPEG compressing settings, etc.).
- Color Matrix: Sets the color characteristics for the image, with
five options. (See the extensive discussion of color space options under the
"Exposure" section of this review.)
- 1: Natural hue and chroma, best for capturing natural color tone.
- 2: Sets the hue and chroma for skin tones.
- 3: Adjusts hue and chroma to match high-chroma slide film.
- 4: Corresponds to Adobe RGB color space.
- 5: Lowers chroma, for more moderate color tone.
- RAW+JPEG Record: Enables the camera to record both formats at once, or to record RAW images alone. Options are: RAW, RAW plus Large/Fine JPEG, RAW plus Large/Normal JPEG, and RAW plus Small/Fine JPEG.
- Review: Turns on an automatic review of captured images. Image review can display the image only or the image with information.
- Review Time: Establishes the time length that the review image appears on the LCD screen, with options of two, four, or eight seconds, or "Hold" (which displays the image for half of the time allotted for the auto shutoff).
- Noise Reduction: Activates or deactivates the Noise Reduction feature,
which reduces the image noise in long exposures.
 Playback
Menu
Playback
Menu
- Protect Images: Write-protects the selected image(s), preventing accidental erasure or manipulation in any other way. Does not protect from erasure due to card formatting, however. Protection can also be removed here.
- Erase All on CF Card: Erases all unprotected images on the memory card.
- Highlight Alert: Enables (or disables) the Highlight Alert, which flashes the blown-out highlights in the image review.
- Display AF Points: Displays the AF points used to determine focus
when the image information is displayed.
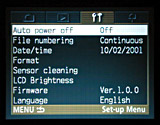 Setup Menu
- Auto Power Off: Specifies the period of time of inactivity that must pass before the camera automatically shuts itself off. Options are 1, 2, 4, 8, 15, or 30 minutes, or Off.
- File Numbering: Resets file numbering, or continuously numbers frames until the folder is full. The "M-Reset" option creates a new folder and resets file naming to start at 0001.
- Date/Time: Sets the camera's internal clock and calendar, as well as the format of the date.
- Format: Formats the CompactFlash card, erasing all images (even write-protected ones).
- Sensor Cleaning: Readies the CCD sensor for cleaning, the directions for which are in the Instruction Manual.
- LCD Brightness: Adjusts the brightness of the LCD monitor display.
- Firmware: Updates the camera's firmware when the appropriate CompactFlash card is inserted.
- Language: Sets the menu language to English, German, French, Spanish,
or Japanese.
Custom Menu
Custom Functions
The EOS-1D is quite probably the most configurable camera I've seen to
date at any price point. The combination of Custom Menu and Personal Function
options is almost overwhelming. An amazing range of the camera's operating functions
is subject to user configuration, with no fewer than 21 "Custom" function
menus and 24 "Personal" functions. (The numbering for the "Personal"
functions runs to 28, but there are several numbers within that range that aren't
used. Canon did this so the Personal Functions on the EOS-1D and EOS-1v would
align with each other. - There are some personal functions that are relevant
to the 1v which do not appear on the 1D.
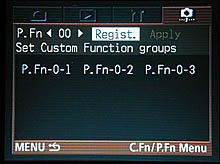
To help you manage the EOS-1D's configurability, you can group both custom and personal functions into "custom function groups", letting you quickly switch between different sets of them for different shooting conditions or photographers.
Here's a list of the Custom Function options, and the camera features they control. (I didn't bother showing you screen captures of these, as there's really not much information displayed on these screens other than a list of options for each. The list below has more detail on the actual operation of each menu than is in the menus themselves.)
- Custom Functions: Allows you to set the camera's Custom Functions
according to preferences.
- C.Fn-00: Focusing Screen
I confess I don't really know what aspect of camera operation is affected by this option, but you apparently have to inform the camera which focusing screen it's using. (For exposure determination?)- 0-New Laser-matte screens.
- 1-Laser-matte screens.
- C.Fn-01:Finder display during exposure.
Specifies whether the viewfinder display is on during Continuous Shooting or not.- 0-On
- 1-Off
- C.Fn-02: Shutter release without CF card
Designates whether the Shutter button will work when no CompactFlash card is inserted.- 0-Possible
- 1-Not Possible
- C.Fn-03: ISO speed expansion
- 0-Standard ISO options
- 1-Expanded ISO (includes ISOs 100 and 3,200, shown in top panel LCD as L and H respectively)
- C.Fn-04: Shutter Button/AE Lock Button
Controls the usage of the Shutter button and AE Lock button.- 0-The Shutter button controls autofocus and the AE Lock button controls AE Lock.
- 1-The Shutter button controls AE Lock with a half-press, and the AE Lock button sets focus.
- 2-In Al Servo AF mode, pressing the AE Lock button momentarily stops the Al Servo AF operation, exposure is set when the picture is taken.
- 3-In Al Servo AF mode, pressing the AE Lock button starts and stops Al Servo AF operation, exposure is set at image capture.
- C.Fn-05: Manual Rv/Av set. for Manual Exposure
Select which controls affect shutter speed and aperture in manual exposure mode. (Also affects how autoexposure bracketing functions in Manual mode.)- 0-Main dial controls shutter speed, Quick Control dial controls aperture.
- 1-Quick Control dial adjusts shutter speed, Main dial adjusts aperture.
- 2-Same setup as 0, only the aperture can be adjusted without the lens attached to the camera.
- 3-Same setup as 1, with adjustable aperture even without the lens attached to the camera.
- C.Fn-06: Exposure level increments.
- 0-Adjusts exposure compensation in one-third-step increments.
- 1-Full-stop increments.
- 2-Half-stop increments.
- C.Fn-07: USM lens electronic MF.
Controls when and how the manual focus ring on USM AF lenses is active.- 0-Turns electronic MF on after One-Shot AF.
- 1-Turns electronic MF off after One-Shot AF (prevents accidental focus adjustments from any movement of focus ring).
- 2-Electronic MF is always off.
- C.Fn-08: Top LCD panel, back LCD panel
- 0-Top LCD displays remaining shots, back LCD displays file number.
- 1-Top LCD displays ISO, back LCD displays remaining shots.
- 2-Top LCD displays ISO, back LCD displays file number.
- 3-Top LCD displays the number of shots in folder, back LCD displays remaining shots.
- C.Fn-09: Auto Bracketing Sequence/Cancel
(Alters Auto Exposure Bracketing (AEB) sequence and cancellation. "Cancel" means AEB mode is canceled whenever the camera is shut down or the lens is changed.)- 0-Standard exposure is followed by under- and then overexposures, auto cancellation of mode.
- 1-Standard exposure is followed by under- and then overexposures, no cancellation of mode.
- 2-Underexposure is followed by standard and overexposure, auto mode cancellation.
- 3-Underexposure is followed by standard and overexposure, no mode cancellation.
- C.Fn-10: AF Point Illumination
The EOS-1D shows which AF points are active in the viewfinder. This control adjusts their display.- 0-On
- 1-Off
- 2-On without dimming
- 3-Brighter
- C.Fn-11: AF Point Selection Method
Lets you choose which buttons control AF selection and Exposure compensation. Likewise controls which control dial affects vertical and horizontal point selection.- 0-Default selection method.
- 1-Reverses functions of the AF Point Selection and Exposure Compensation buttons.
- 2-During exposure metering, Quick Control dial sets horizontal AF point, while vertical points are set by Assist button and Main dial.
- 3-Reverses functions of AF Point Selection and Flash Exposure Lock buttons.
- C.Fn-12: Mirror Lockup
Mirror lockup reduces vibration on long exposures, particularly with long tele lenses. When enabled, a double-press of the shutter button is required to capture a shot. (First press locks mirror, second fires shutter.)- 0-Disables mirror lockup.
- 1-Enables mirror lockup, which prevents camera movement caused by mirror reflex.
- C.Fn-13: Number of AF points, Spot Metering
Controls the number of selectable AF points, and whether the spot metering tracks the active AF point or remains at the center of the frame.- 0-45 point, Spot Metering uses center AF point.
- 1-11 points, Spot Metering uses active AF point.
- 2-11 points, Spot Metering uses center AF point.
- 3-Nine points, Spot Metering uses active AF point.
- C.Fn-14: Auto reduction of daylight sync
Optionally increases fill-flash exposure with backlit subjects, to compensate for influence of backlighting on the flash exposure. (For Canon speedlights only)- 0-Disable: Normal fill-flash exposure.
- 1-Enable: Prevents underexposure of a subject in front of a strong backlight.
- C.Fn-15: Shutter curtain (flash) synchronization
- 0-1st curtain
- 1-2nd curtain
- C.Fn-16: Safety shift in Av or Tv
Allows the exposure system to adjust the dominant exposure parameter if the subject's brightness changes suddenly. (Eg, the camera can override the aperture setting in Av mode and the shutter setting in Tv mode if needed.)- 0-Disable
- 1-Enable: Shifts the shutter speed and aperture to match any shift in the exposure conditions.
- C.Fn-17: AF point activation area
Expands active AF area, helpful for use with erratically moving subjects.- 0-Single AF point
- 1-Area expands by one point all around the manually selected AF point.
- 2-Sets the AF point activation area to seven or 13 points to suit the lens focal length.
- C.Fn-18: Switch to registered AF point
Defines the button combinations used to switch between normal AF and a previously-registered AF point.- 0-Assist button plus AF Point Selection button
- 1-Assist button only
- 2-Assist button must be held down.
- C.Fn-19: Lens AF stop button function
Some Canon lenses (the super telephotos) have a special "AF stop" button on them, normally used to control AF operation, to avoid excessive AF "hunting". This Custom Function option controls how the 1D interprets actuation of the AF stop button.- 0-AF stop
- 1-AF start
- 2-AE lock while metering
- 3-AF point, holding down button switches from manual to auto, or from auto to center.
- 4-AF mode, button switches from One-Shot to Al Servo AF modes.
- 5-IS Start (Image Stabilizer).
- C.Fn-20: Al Servo tracking sensitivity
Controls AF tracking speed. (Slower settings can prevent you from losing focus lock if another object is momentarily interposed between the camera and subject. On the other hand, you'll want to use a faster setting for fast-moving subjects.)- 0-Standard
- 1-Slow
- 2-Moderately slow
- 3-Moderately fast
- 4-Fast
- C.Fn-00: Focusing Screen
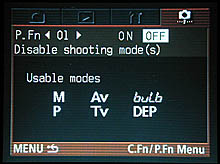
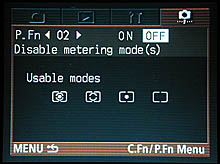
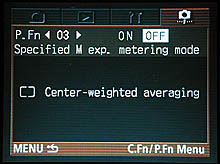
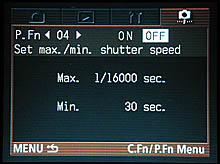
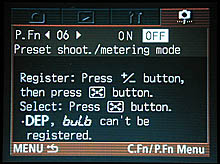
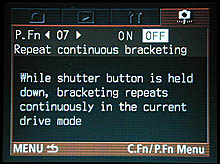
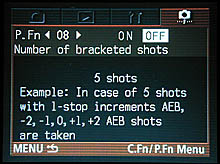
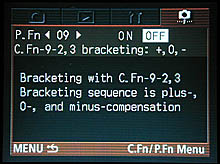
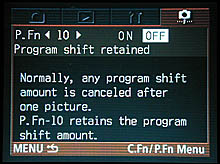
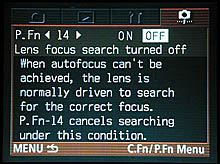
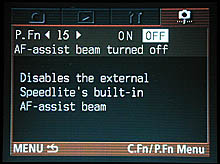
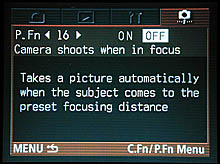
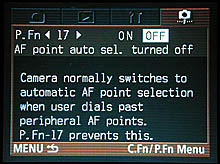
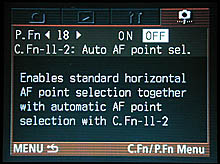
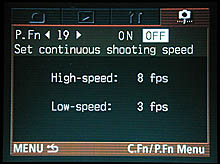
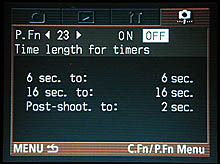
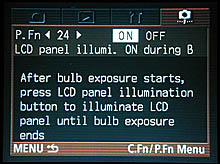
Personal Functions: A wide variety of secondary camera options can be controlled via the "Personal Functions" menu system. These are options that are less integral to basic camera operation, but that fall more into the realm of personal preferences. (Examples include things like setting the continuous shooting speed, enabling or disabling metering modes, whether or not to illuminate the LCD panels during bulb exposures, etc.)
These functions are enabled or disabled via the host software provided with
the camera. - The default is for none of the personal function options to be
available: You'll have to connect the camera to the computer and turn them on
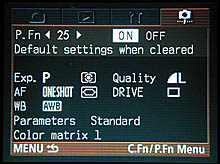
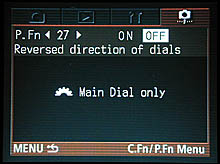
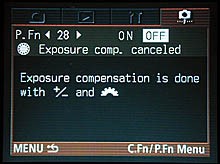
before they'll be accessible on the LCD menu system. The menu displays in this
mode are unusually informative, as Canon has made excellent use of the high-resolution
LCD panel to show explanatory information. Accordingly, I'll simply show screenshots
of each Personal Function menu in the table below.
 |
 |
 |
 |
 |
 |
 |
 |
 |
 |
 |
 |
 |
 |
 |
 |
 |
 |
 |
 |
 |
 |
 |
 |
 |

Follow Imaging Resource: