 Back
to Full Canon EOS-1D Review
Back
to Full Canon EOS-1D ReviewGo to Canon EOS-1D Data Sheet
Go to Canon EOS-1D Pictures Page
Up to Imaging Resource Cameras Page
Use your browser's "Back" button to return to the previous page, or the links at the top and bottom of this page to navigate to related information. If you have difficulty fitting the text on this page onto your printer output, simply resize your browser window to a narrower width and print again.
Remember us when it's time to buy!
Dave here: Have our reviews been helpful to you? (Is this article you're reading right now useful?) Preparing this level of information on as many products as we do is incredibly hard work, not to mention expensive. Things on the Internet may look like they're free, but they're not. (As a lot of big dot.com companies are finding out these days.) Somewhere, somebody has to pay to produce worthwhile content. YOU can help us though, by remembering us when it comes time to make your purchase. Would you consider coming back to our site and clicking-through to one of our advertisers to make your purchase? Every dollar you spend with one of our advertisers helps us directly (in affiliate fees) or indirectly (the advertiser will keep renewing their ad contract with us). To make it easy for you to support us, here's a URL you can visit, to see all our current advertisers, with links to click on that will register your visit to them as having come from our site. It's up to you where you buy, but Mike, Mike, Kim, Yazmin, Marti and I would be really grateful if you'd help us out by choosing one of our advertisers to purchase from.
Thank you for your support!
Dave Etchells, Founder & Publisher
Visit our "Buy Now" Page:
https://www.imaging-resource.com/buynow.htm
Back
to Full Canon EOS-1D Review
Go to Canon EOS-1D
Data Sheet
Go to Canon EOS-1D
Pictures Page
Up to Imaging Resource Cameras
Page
Canon EOS-1DCanon leaps into the professional SLR arena, with the fastest digital SLR on the planet! Review First Posted: 12/08/2001 |
|
| Canon EOS-1D Digital Camera Canon (finally) drops the other shoe with a 4-megapixel pro SLR speed demon! (Review first posted 08/29/2001) |
 |
 |
|
4+ megapixel sensor delivers 2,496 x 1,662 pixel images |
|
|
Blazing 8 frame/second speed! | |
|
|
Ultra-rugged, environmentally-sealed design | |
|
|
Full support for RAW file format in-the-box | |
|
|
Highly configurable to suit individual shooting needs/styles |
Manufacturer Overview
Ask a photographer, be they professional or amateur, to name the first couple
of camera manufacturers that they can think of, and chances are that one of
those would be Canon. Ask the same photographer what the Canon name means to
them, and many would suggest that they associate the name with innovation, the
company having brought such technological advances as Eye-Controlled Focusing
(Canon EOS 5, 1992) and the USM ultrasonic motors used in the more recent Canon
EF lenses, which are extremely quiet and very fast.
In the digital realm, Canon's progress has been marked by cautious advances, but excellent products when they finally make a step. In the consumer realm, their digital cameras offer good value and exceptional color and image quality. About a year and a half ago, they introduced their first digital SLR, the EOS-D30. While many D30's found homes in professional photographer's equipment kits, it clearly wasn't intended to be a fully professional camera. Compared to Canon's film-based SLRs, the D30 was slower and less ruggedly constructed than Canon's pro models.
Now, after several apparent development delays, Canon has come forth with the first digital SLR they're comfortable applying the label "professional" to, and it's clearly a formidable entry to the market. It holds the distinction of being the fastest true digital SLR on the planet, with blazing 8 frames/second maximum frame rate. It also incorporates all the sophisticated exposure and autofocus modes of Canon's top-of-the-line EOS-1v film SLR, as well as that model's exceptional ruggedness and environmental sealing. As you'll see in the review below (one of the most extensive I've yet written), it has digital sophistication to match it's construction and raw performance specs. Overall, a very impressive camera, destined to be almost required equipment for professional Canon shooters.
High Points
Specification Comparison
Many of our readers will be interested in comparing the features and capabilities
of the EOS-1D against other current professional SLR digicams. To aid in that
end, we've prepared a chart
comparing the EOS-1D to the earlier EOS-D30, Nikon's D1H, D1X, and the original
D1, and Kodak's DCS-760. - To save page-loading and -rendering time, I've set
it up as a separate page. (Thanks to my News Editor, Mike Tomkins for preparing
this detailed chart!) Click here
to view it.
Executive Overview
For professional Canon shooters accustomed to working with Canon's top-of -the-line
EOS-1v film SLR, the EOS-1D will be immediately familiar, with a body design
and control layout that is virtually identical to its film-based predecessor.
Obviously, Canon's goal was to produce a camera that looks, feels, and operates
as much like the EOS-1v as possible, and to all appearances, they've succeeded.
EOS-1v shooters should have little difficulty switching between the two cameras.
One notable carryover from the EOS-1v design is the remarkably rugged and environmentally
sealed magnesium alloy body. While Magnesium alloy bodies are de rigueur
in high-end professional cameras these days, the environmental sealing of the
1D is something else again. With all its myriad flaps, knobs, buttons, and switches,
it never occurred to us that it might be possible to actually seal a digital
SLR against the elements. That's exactly what Canon's done with the EOS-1D,
with more than 70 O-ring and gaskets protecting the internal mechanisms. You
still won't want to take it underwater diving without a housing, but it will
certainly be able to stand up to shooting in driving rain, blizzards, or dust
storms.
The EOS-1D's lens mount accommodates the full line of Canon EF lenses, employing
the same highly-praised 45-point Area Ellipse autofocus system that is used
by the 35mm EOS-1v. This sophisticated system allows you to manually select
the autofocus area from a 45-point ellipse, or you can set the camera to determine
focus area based on the subject. You can also opt for One-Shot focusing or select
the Al Single Servo AF, which tracks rapidly moving subjects as fast as 80 mph
(based on Canon's testing). The TTL optical viewfinder uses a pentaprism design
to display the full view of the lens, along with an information readout that
reports all of the most important exposure information, including aperture,
shutter speed, resolution size, and exposure compensation.
The 2.0-inch, TFT color LCD monitor provides both image playback and on-screen
menu viewing, and has a brightness adjustment for bright or dark viewing situations.
An image information display reports in-depth exposure information, and includes
a histogram showing the tonal distribution throughout the image. Additionally,
a highlight feature "blinks" any blown-out highlights in the captured
image. This is a feature that I've found exceptionally useful on past Canon
digicam models.
The EOS-1D offers total exposure control, with Program AE, Aperture Priority,
Depth of Field AE, Shutter Priority, Manual, and Bulb exposure modes available.
In Program AE, you can select from a range of equivalent exposure settings simply
by turning the Main dial on top of the camera. Aperture and Shutter Priority
modes offer limited manual control, while the Manual mode gives total control
of aperture and shutter time to the photographer. In Depth of Field AE, you
can specify a depth of field that you'd like to maintain, while the camera finds
the best exposure to achieve that goal. (Handy if you're trying to eke out the
last iota of shutter speed, wanting to keep the aperture as large as possible,
while still holding focus.) Bulb mode simply extends the Manual mode to include
unlimited shutter times. Here, you can keep the shutter open for as long as
the camera has power. (Quite unusual, as most digital cameras set a fixed limit
on maximum bulb exposure times.) A Noise Reduction menu option engages Canon's
very effective Noise Reduction technology for any exposures longer than 1/15
second.
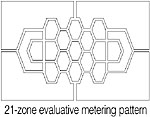
The EOS-1D employs a 21-Zone Evaluative Metering system, which divides the
image area into 21 zones of different sizes, with a honeycomb pattern in the
central portion of the frame. Each of the 21 zones is assessed to determine
exposure, using an algorithm that takes contrast and tonal distribution into
account, going much further than with simple averaged metering. Other metering
options include Center-Weighted, Partial, Spot, Multi-Spot, Spot AF, and Flash
Exposure Lock. Exposure compensation is adjustable from -3 to +3 exposure values
(EV) in one-third-step increments. If you're unsure about the exposure, an Auto
Exposure Bracketing feature captures three shots at different exposures. The
EOS-1D also offers White Balance and ISO Auto Exposure Bracketing options. (This
last should be particularly interesting for pros, who may want to bracket without
disturbing the aperture or shutter speed settings.)
Ten white balance modes are provided, including Auto, Daylight, Shade, Overcast,
Tungsten, Fluorescent, Flash, Custom (manual setting), Color Temperature, and
Personal White Balance. Color Temperature covers a range of color temperatures
from 2,800°K to 10,000°K, in 100-degree increments, and Personal White
Balance allows you to download as many as three white balance settings from
a host computer. The EOS-1D's extensive menu system offers a variety of Color
Matrix options, for both sRGB and Adobe RGB color spaces, and a Custom Functions
menu so you can completely customize the user interface. A Personal Functions
menu option also allows you to download image attribute settings (including
a custom tonal curve) from a computer.
An external flash hot-shoe and PC sync socket offer two external flash connection
options. Canon recommends using its EX series of flash units, though some third-party
units are compatible as well. The Flash Exposure Lock button locks the exposure
for the flash, and a Flash Exposure Compensation button alters the flash exposure
from -3 to +3 EV in one-third-step increments. You can also alter the ambient
exposure compensation without altering the flash intensity.
The EOS-1D offers Low-Speed Continuous and High-Speed Continuous shooting modes
through the Drive setting. Low-Speed Continuous captures as many as 21 consecutive
frames at approximately three frames per second, while High-Speed Continuous
captures the same number of frames at approximately eight frames per second.
(The actual frame rate and number of frames in a sequence will vary depending
on CompactFlash space, image size, and the amount of image information to record.)
The 1D has a buffer capacity of 21 frames in normal JPEG mode, but only 16 shots
in RAW mode, and only 14 frames when the ISO is set to higher than 800. Several
pro photographers have commented that these are rather small buffer sizes, particularly
at high ISOs. The Drive options also include two different Self-Timer options,
with delay times adjustable via the LCD menu system.
The EOS-1D captures images at either 2,464 x 1,648- or 1,232 x 824-pixel resolution,
with JPEG compression levels of Fine and Normal available for the larger images,
and Fine for the smaller ones. A RAW image option is also available, recording
the full pixel information from the CCD without any processing. The EOS-1D is
accompanied by an IEEE-1394 "FireWire" interface cable for a super-speedy
connection to a computer. Canon's Solution Disk software and a copy of Adobe
photocopy LE are included with the camera, for use on both PC and Macintosh
computers. For power, the EOS-1D uses an NP-E3 rechargeable NiMH battery pack
or an AC adapter (both accompany the camera). A CR2025 lithium coin cell serves
as backup for the camera's calendar and clock settings.
Heavy in features and capabilities, the EOS-1D's heft and size are relatively trifling matters. The sturdy EOS-1D body is ready for any situation. Its user interface is customizable and straightforward (once you get the hang of it), and its extensive controls are enough to make any pro photographer happy. Designed for professionals who want the convenience of digital imaging with the look, feel, and interface of Canon's already successful pro 35mm line, the EOS-1D appears ideally suited for professional sports and photojournalistic shooters. (I just wish it had a larger buffer memory.)
Design
The introduction of the EOS-1D represents Canon's first excursion into the true
professional digicam arena. (The earlier EOS-D30 had neither the ruggedness
nor speed required by the professional marketplace, although many pro Canon
shooters used them.) Weighing in at a hefty 2.7 pounds (1,250 grams) without
the battery, lens, or CompactFlash card installed, the Canon EOS-1D is more
than a handful. Its magnesium-alloy body is exceptionally tough and durable,
ready for heavy use. Size and portability weren't top design considerations
for the 1D. Instead, Canon opted for maximum speed, ruggedness, and compatibility
with the EOS-1v film camera. The EOS-1D measures a whopping (by consumer digicam
standards) 6.1 x 6.2 x 3.1 inches (156 x 157.6 x 79.9mm ), and definitely requires
a two-handed grip. Compared to other pro digital SLRs though, the EOS-1D is
actually pretty compact, thanks to Canon's being able to integrate all the camera
electronics directly into a conventional body design. (No need for a bulky electronics
compartment tacked onto the bottom of the camera.)
The resemblance between the EOS-1D and the film-based EOS-1v (introduced a year earlier) is more than close -- the two cameras are virtually identical. All of the conventional controls (AF, Mode, Drive, ISO, Exposure Compensation, etc.) are exactly the same, except for the obvious differences, such as those digital controls on the 1D that simply don't apply to a film camera, and the lack of a film compartment door -- but everything that can be the same is. This extends even to the Custom Function options. In some cases, Canon has left an "empty" function on the 1D, simply so the function numbers shared with the 1v will be the same. If you're comfortable using an EOS-1v, you'll be able to transition to the 1D with almost no learning curve, and switching rapidly back and forth between the two should involve no confusion.
One of the most welcome aspects of the EOS-1D's design is that it needs little protection from the elements. A feature inherited from the EOS-1v, its weatherproof body features rubber-sealed compartments and controls (with no fewer than 72 sealing components), making the camera ideal for shooting in any type of inclement weather -- driving rain, snow, dust storms, or mud -- it should make little difference to the 1D. Though it's not certified for submersion, I'm willing to bet you could give it a quick dunk with no ill effects. This is a huge advantage over other pro digital SLRs on the market today (October, 2001), and I think it will be of major significance to practicing pros.
|
|
| EF 16-35mm f/2.8L USM |
| EF 70-200mm f/2.8L IS USM |
| EF 300mm f/2.8L IS USM |
| EF 400mm f/2.8L IS USM |
| EF 400mm f/4 DO IS USM |
| EF 500mm f/4L IS USM |
| EF 600mm f/4L IS USM |
The front of the EOS-1D is simple in design, featuring only the lens mount and a few controls. A small release button on the right side of the lens (when looking from the front) releases the lens from its mount, allowing you to remove it completely. The large, hefty hand grip is big enough to provide a secure hold on the camera, even with a lens attached. At the bottom of the hand grip is a secondary shutter button and Main dial, for use when holding the camera vertically. Also visible from the front of the camera is the main Shutter button, mounted at a sloping angle from the top panel, as well as the front of the battery compartment. (The latter being the low bulge along the bottom of the camera that also serves as a hand grip when holding it vertically.) Hidden on the right front side (when looking from the front) is the ambient-light White Balance sensor, covered by a white diffuser window. (Just above the EOS-1 logotype.) This sensor helps the camera determine the proper color balance, using its "hybrid" white balance technology. Finally, the Depth of Field Preview button can be seen on the left side of the lens mount.
The right side of the camera (as viewed from behind) holds the secondary Flash Exposure Lock button; the On/Off switch, which activates the secondary camera controls; the secondary function dial; and the secondary shutter button.
Lining the opposite side of the camera are the Flash PC socket, Remote Control, and Digital input jacks, each covered by a flexible synthetic rubber flap. At the bottom is the battery compartment and its release controls -- a rotating lock and a release button which must both be activated to open the compartment door. Though I found this system a little difficult to operate at times, it does ensure that the battery stays in place, and won't accidentally end up on the ground.
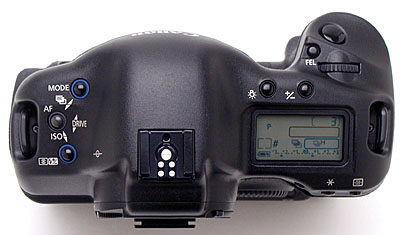
The EOS-1D's top panel holds several camera controls, including the Mode, AF, Drive, ISO, Metering/Flash Exposure Compensation, LCD Illumination, Exposure Compensation, Flash Exposure Lock, and Shutter buttons. A small Main dial is located just behind the Shutter button, and is used to adjust camera settings. (The Main dial is used by itself to set aperture and shutter speed in some modes, or works with the plethora of other buttons to engage the actual setting changes.) The external flash hot shoe crowns the camera's top panel, and a small, black-and-white LCD monitor reports camera information such as battery power, exposure mode, aperture, shutter speed, and exposure compensation, among others.
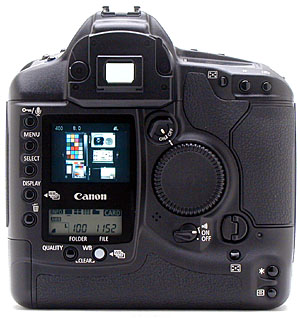
The remaining camera controls are located on the back panel, along with the LCD monitor and optical viewfinder eyepiece. A diopter adjustment dial and the optical viewfinder eyepiece shutter flank the eyepiece on either side. A removable soft rubber eyecup (included in the box with the 1D) can be attached to improve viewing in strong ambient lighting. In the center of the back panel is a large Quick Control dial, which also selects camera settings when turned on (a small switch above the dial turns it on or off). While it does work in conjunction with some of the camera's buttons, the Quick Control dial primarily serves as part of the user interface for the LCD menu system. Camera controls on the back panel include the Assist, AE Lock, AF Point Selection, Sound/Protect, Menu, Select, Display, Erase, Quality, and White Balance buttons. In the lower right corner are the secondary Assist, AE Lock, and AF Point Selection buttons, for use when holding the camera vertically. The 2.0-inch LCD monitor displays image playback and menu screens, and a secondary, black-and-white LCD panel just below it reports more camera information. Also on the back panel is the CompactFlash card slot, released by turning the small release key just below it.
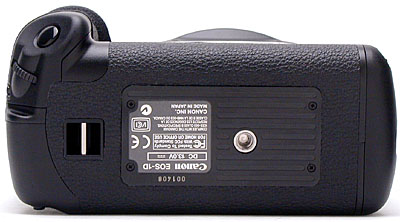
The bottom panel of the EOS-1D holds only a tripod socket and an attachment eyelet for the wrist strap. The tripod mount is directly below the centerline of the lens, reducing parallax errors between shots when panning.
Viewfinder
 A TTL optical
viewfinder is the sole mechanism for composing images on the EOS-1D, as the
2.0-inch LCD monitor is purely for image review and menu navigation. (This is
typical of most SLRs, the light path is either through the eyepiece or onto
the CCD, with no provision for a "live" LCD viewfinder display.) Fortunately,
the optical viewfinder on the EOS-1D offers a true 100% field of view, a relative
rarity, even among high-end SLRs. The optical viewfinder has a glass pentaprism
design, using a mirror to reflect the view from the lens, just as in a traditional
SLR viewfinder design. A full information overlay along the bottom of the viewfinder
window reports the current exposure settings, including shutter speed, aperture,
exposure compensation, and ISO, among other information. A circular black outline
at the center of the viewfinder window indicates the central spot-metering area,
(although as we'll see later, the 1D is capable of spot metering at a number
of locations within the field of view). A large black elliptical outline marks
the boundaries of the autofocus area. A total of 45 discrete autofocus sensors
are distributed within this ellipse, and may be used singly or in combination
as I'll describe in the "Optics" section of this review. Active AF
points illuminate red when the Shutter button is half-pressed.
A TTL optical
viewfinder is the sole mechanism for composing images on the EOS-1D, as the
2.0-inch LCD monitor is purely for image review and menu navigation. (This is
typical of most SLRs, the light path is either through the eyepiece or onto
the CCD, with no provision for a "live" LCD viewfinder display.) Fortunately,
the optical viewfinder on the EOS-1D offers a true 100% field of view, a relative
rarity, even among high-end SLRs. The optical viewfinder has a glass pentaprism
design, using a mirror to reflect the view from the lens, just as in a traditional
SLR viewfinder design. A full information overlay along the bottom of the viewfinder
window reports the current exposure settings, including shutter speed, aperture,
exposure compensation, and ISO, among other information. A circular black outline
at the center of the viewfinder window indicates the central spot-metering area,
(although as we'll see later, the 1D is capable of spot metering at a number
of locations within the field of view). A large black elliptical outline marks
the boundaries of the autofocus area. A total of 45 discrete autofocus sensors
are distributed within this ellipse, and may be used singly or in combination
as I'll describe in the "Optics" section of this review. Active AF
points illuminate red when the Shutter button is half-pressed.
The amount of information conveyed by the EOS-1D's viewfinder readouts is quite impressive, all the more so because the display is actually quite uncluttered and easy to understand. The illustration below (courtesy Canon USA) shows all the internal viewfinder displays and their functions. (Readers familiar with the EOS-1v film SLR will immediately recognize the strong similarities between this display and the one used on that camera.) Apart from the 1D's viewfinder displaying information for ISO setting (optional), JPEG mode, and the number of shots remaining in a burst, the major differences between the 1v and 1D's viewfinder have to do with the latter's being masked to accurately depict the area covered by the CCD sensor. Because the CCD sensor is smaller than the 35mm film frame, the AF ellipse covers a greater percentage of the frame, as do the metering sensors for spot and partial metering. (Metering areas are 3.8% and 13.5% of frame area on the 1D, vs 2.3% and 8.5% for the 1v.)

On the left side of the viewfinder eyepiece is a diopter adjustment dial, which
corrects the viewfinder display from -3.0 to +1.0 diopter units to accommodate
eyeglass wearers. The viewfinder has a moderately high eye point, meaning that
the view should be reasonably clear, even with fairly thick eyeglasses. (In
addition to the rather wide range of diopter adjustments available on-camera,
Canon also offers dioptric correction lenses for the viewfinder ranging from
-4 to +3 diopters in 10 steps. These clip on externally, and act in addition
to the built-in diopter adjustment, for a total range of -7 to +4 diopters.
(If you can see to pick up the camera, you should be able to see through the
viewfinder.) On the right side of the viewfinder eyepiece is a small lever that
opens and closes a shutter behind the eyepiece. This prevents any additional
light from filtering into the camera through the viewfinder eyepiece during
long exposures on a tripod. The EOS-1D also features a removable eyecup that
fits over the viewfinder eyepiece, handy for high ambient light environments.
 The 2.0-inch, TFT
color LCD monitor is used only for image playback and menu viewing, and is made
up of approximately 120,000 pixels. A brightness control offers five brightness
levels, helpful for viewing in excessively dark or bright situations. Images
can be displayed with or without the relevant image information, and the EOS-1D
offers four- or nine-image index display modes. A very useful feature is the
optional Highlight Alert, which flashes overexposed sections of the image gray/white
during playback. An optional histogram display is also available, which is handy
for assessing overall exposure, though I've personally found the blinking highlight
display much more useful for showing where I've blown out highlights. (The problem
with a histogram display is that blown highlights usually represent only a small
percentage of overall image area, meaning it's hard to pick them up on the histogram
readout. A blinking area on the LCD playback display is pretty hard to miss.)
The 2.0-inch, TFT
color LCD monitor is used only for image playback and menu viewing, and is made
up of approximately 120,000 pixels. A brightness control offers five brightness
levels, helpful for viewing in excessively dark or bright situations. Images
can be displayed with or without the relevant image information, and the EOS-1D
offers four- or nine-image index display modes. A very useful feature is the
optional Highlight Alert, which flashes overexposed sections of the image gray/white
during playback. An optional histogram display is also available, which is handy
for assessing overall exposure, though I've personally found the blinking highlight
display much more useful for showing where I've blown out highlights. (The problem
with a histogram display is that blown highlights usually represent only a small
percentage of overall image area, meaning it's hard to pick them up on the histogram
readout. A blinking area on the LCD playback display is pretty hard to miss.)
A feature I sorely missed seeing in the 1D's LCD display was any form of zoomed
playback. Most cameras I've tested make some provision for enlarging images
on the LCD monitor during playback. This can be handy for checking fine framing
details, or (if a high enough enlargement factor is provided) for checking focus
and depth of field. The EOS-1D has no option for enlarged playback.
Active Mirror Technology
As I mentioned earlier, the EOS-1D is incredibly fast, faster than many film
cameras. (Up to 8 frames per second.) It turns out that in normal situations,
even the bounce of the mirror as it settles back into position after each shot
would prevent frame rates this high. To overcome this, Canon developed "Active
Mirror" technology for the EOS-1v model, which uses active drive electronics
to damp out mirror vibrations in half the time that would be required otherwise.
The sheer shot-to-shot speed of Active Mirror technology is only part of the
equation though -- because the mirror moves so fast, the viewfinder blackout
time between exposures is reduced to only 45 milliseconds. I commented on this
in my preview article about the 1D, remarking that I'd report on my subjective
experience once I got my hands on an actual test sample. Having now had the
benefit of personal experience, I can say that the viewfinder remains very usable,
even when the shutter is clattering away at the maximum frame rate. Quite impressive!
Optics
Sensor
One of the first notable characteristics of the EOS-1D's optical system is its
unusually large sensor. The chip on the 1D measures 28.7 x 19.1mm. Oddly, Canon
states the multiplier ratio for this sensor to be 1.3x -- relative to the full
35mm frame (24 x 36mm) -- but a little math reveals that it's actually only
1.255x. Thus, a 16-35mm wide-angle lens works about like a 20-44mm lens on a
35mm camera. This ability to shoot wider with common lenses will be welcomed
by many photojournalists, a market at which the 1D is clearly aimed.
The EOS-1D's CCD has a total of 4.48 million pixels, arranged in a 2,664 x
1,681-pixel array. Of these, only 2,496 x 1,662, or 4.15 million are "effective"
pixels, the rest are lost to dark current calibration and edge effects. After
processing, the resulting images measure 2,464 x 1,648 pixels at full size,
or 1,232 x 824 at half-size. (Interestingly though, the RAW images include the
full 2,496 x 1,662 pixels of the CCD array.)
Many people have commented on Canon's decision to go with a CCD sensor in the
EOS-1D, particularly after the stunning success of the CMOS technology used
in the D30. This decision was apparently driven by Canon's design goal of eight
frames per second (fps) continuous shooting. A large-area CMOS sensor simply
couldn't read out the image data quickly enough to keep up with such a high
frame rate. Canon claims that the noise reduction technology and larger pixels
of the 1D's CCD sensor will result in images with even lower noise than those
from the D30, a fact supported by direct measurements on my Davebox test target.
When I compared images captured by the 1D and D30 using the same ISO setting
(200 in this example), I found that image noise from the 1D was noticeably lower.
(A standard deviation of 1.17 for the large gray midtone swatch on the 1D's
MacBeth chart versus 1.24 for the same swatch shot with the D30.) This is quite
impressive, given the exceptional smoothness of the D30. The numbers were borne
out by examining the individual color channels of images from the 1D, where
I found remarkably little noise in the blue and red channels. (I have to say
though, that there's a possibility that some psychovisual effect is coming into
play here. Despite the numbers and visual evidence of the individual color channels,
when I look at 1D and D30 images side-by-side on-screen, I pick the D30's image
as the one every time. Go figure…)
Lenses
The EOS-1D features a Canon EF lens mount, which accommodates the full range
of Canon EF lenses. I normally cite the aperture and focal length of a digicam's
lens in this part of my reviews, but because the EOS-1D accepts a wide range
of lenses, these characteristics will vary depending on the lens in use. Our
initial evaluation model was accompanied by Canon's 28-70mm L-series lens with
a maximum f/2.8 aperture setting. This is a pretty sharp lens, albeit not quite
as sharp as the 100mm macro lens I used for a portion of my testing of the D30.
(Update - I've now gotten a sample of the Canon 100mm macro lens, and have added
shots with it to the 1D's sample pictures page.)
Antialiasing Filter
Essentially all of today's digital cameras use "antialiasing" filters
in front of the CCD array to reduce color aliasing in images containing high
spatial frequencies (high-contrast, closely spaced lines). These filters work
by slightly blurring the image -- technically, by knocking off the high spatial
frequencies, while hopefully leaving the lower frequencies undisturbed. The
problem of course, arises in trying to balance the need for antialiasing with
the desire to maintain good image sharpness. Too strong a filter produces soft-looking
images, while too weak a filter results in color "twinkles" and "jaggies"
appearing in the fine details. Some high-end cameras leave the choice up to
the user, with a removable antialiasing filter that allows the user to choose
whether or not to use it, based on specific shooting conditions.
Canon claims to have taken a different approach with the 1D, deliberately choosing
an antialiasing filter with a higher cutoff frequency, and relying on fancy
image processing to eliminate or reduce any aliasing that might creep in as
a result. How well does it work? It's a little tough to say, as differences
in sharpness and detail can be so subtle between cameras. Compared to other
4-megapixel cameras I've tested, I can say that it does seem to deliver about
as much detail as any of them, and also displays an absolute lack of color artifacts
and aliasing in my resolution target shots. Overall, it looks like Canon's antialiasing
solution is quite effective.
 Autofocus
The EOS-1D employs a very fast autofocus system, with a myriad of focusing options.
At the heart of Canon's advanced AF is an unusually large AF frame. (The region
over which the AF system can take readings to determine focus.) As in the EOS-1v,
no fewer than 45 autofocus points cover a large portion of the overall field
of view. As shown in the diagram at right, seven of these are "cross"
sensors, sensitive to both horizontal and vertical detail, while the remaining
38 respond to texture in the horizontal axis only. The EOS-1D can select the
specific AF point automatically (based on the closest subject with reliable
autofocus characteristics), or the user can select a specific AF point manually.
The AI Servo AF system can also track moving subjects anywhere in the AF frame,
if they're initially locked-in via the central AF area.
 In the Manual/45-point
mode, you can select any one of the 45 AF points manually, and the camera will
use that point exclusively in its focus determinations. Selection is made by
using both the front and back Main and Quick Control dials.
In the Manual/45-point
mode, you can select any one of the 45 AF points manually, and the camera will
use that point exclusively in its focus determinations. Selection is made by
using both the front and back Main and Quick Control dials.
 No two ways about
it, 45 focus points are probably a lot more than you need for manual selection,
and choosing just one of them could be more time-consuming than you'd like,
particularly in a fast-paced shooting situation. Custom Function menu item 13-2
simplifies the AF choice, reducing the number of available AF points to 11,
and arranging them in a cross pattern. Selection is again made using both the
front and back Main and Quick Control dials.
No two ways about
it, 45 focus points are probably a lot more than you need for manual selection,
and choosing just one of them could be more time-consuming than you'd like,
particularly in a fast-paced shooting situation. Custom Function menu item 13-2
simplifies the AF choice, reducing the number of available AF points to 11,
and arranging them in a cross pattern. Selection is again made using both the
front and back Main and Quick Control dials.
 When speed is really
the issue, Custom Function menu option 13-3 further reduces the available AF
points to nine, all located around the periphery of the AF frame area. The advantage
of this is that only the Quick Control dial is needed to select an AF point,
rotating the selection point around the edge of the AF area as it is rotated.
This allows for a much faster selection, and is particularly useful for situations
where the photographer is dealing with an off-center subject..
When speed is really
the issue, Custom Function menu option 13-3 further reduces the available AF
points to nine, all located around the periphery of the AF frame area. The advantage
of this is that only the Quick Control dial is needed to select an AF point,
rotating the selection point around the edge of the AF area as it is rotated.
This allows for a much faster selection, and is particularly useful for situations
where the photographer is dealing with an off-center subject..
The "Assist" button on the top of the camera's rear panel offers another
important speed-related feature: You can "memorize" any individual
focusing point (whether at the center of the AF area, or more likely an off-center
one pertinent to your particular subject), and then quickly return to it by
pressing the Assist button.
 Sometimes, you
may want to use more than one focusing point (for example, if your subject is
fast-moving, low-contrast, or if you're working in low-light conditions). For
these situations, Canon has provided the Focus Point Expansion option, available
as Custom Function menu items 17-1 and 17-2. In these modes, you can still manually
select a single focus point, but the camera then looks at up to six surrounding
points to determine focus. Only the selected point lights up in the viewfinder,
but as many as six other points are used to determine focus.
Sometimes, you
may want to use more than one focusing point (for example, if your subject is
fast-moving, low-contrast, or if you're working in low-light conditions). For
these situations, Canon has provided the Focus Point Expansion option, available
as Custom Function menu items 17-1 and 17-2. In these modes, you can still manually
select a single focus point, but the camera then looks at up to six surrounding
points to determine focus. Only the selected point lights up in the viewfinder,
but as many as six other points are used to determine focus.
In addition to being able to select the AF area, you can also set the camera
to One-Shot AF or AI Servo AF. One-Shot AF is intended for stationary subjects,
and locks in focus on one area. In Al Servo AF mode, the camera tracks moving
subjects, keeping the subject in sharp focus no matter where it appears in the
frame. (As fast as 186 mph or 300 km/h, until the car is as close as 66ft/20m,
when using the 300mm f/2.8L IS lens, according to Canon.)
Canon's current USM lenses allow direct manual focusing at any time, regardless
of the operation of the AF system. (The mechanically-coupled manual focusing
overrides any AF setting.) A few early USM lenses had "electronic manual
focus", and the 1D supports manual "tweaking" of the focus setting
with those lenses, if you hold down the shutter button after the initial autofocus
is achieved.
A Depth of Field Preview button on the camera's front panel allows you to check
the depth of field and focus for the current aperture setting. The preview is
displayed in the viewfinder, and is helpful for determining how much of the
scene will be in focus.
Overall, the Canon EOS-1D's AF technology is very impressive. (Based on my opinion of the EOS-1v's much-vaunted implementation of the same technology.) It's both flexible and very fast, well-suited to the demands of professional sports shooters and photojournalists.
Sensor Cleaning!Everyone understands that lenses sometimes get dust on them and need to be cleaned, and there are a lot of lens-cleaning cloths, solutions and other accessories on the market that work well. BUT, what do you do when your sensor gets dusty? Dust specks on the sensor tend to show up when shooting at very small apertures, appearing as dark blobs on your images. They're distracting at best, a terrible nuisance at worst, if you end up having to retouch every image to rid of them.
Most of us are naturally leery about the idea of poking around inside the delicate innards of our d-SLRs to wrestle with recalcitrant dust specks. Gently blowing the sensor surface (actually, the surface of the anti-aliasing filter) with compressed air gets rid of some dust, but there's invariably a lot that just stays stuck, no matter what. So what do you do?
If you've got dust specks on your sensor (and sooner or later you will), you're going to need to clean it. There are a lot of products out there intended to address this need, but a distressing number of them work poorly (if at all), and many are grossly overpriced. Advertising hype is rampant, with bogus pseudo-scientific jargon and absurd product claims run rampant. And prices - Did I mention prices? How about $100 for a simple synthetic-bristle brush?
So how do you know what product to use?
We don't pretend to have used everything currently on the market, but can tell you about one solution that worked very well for us. The "Copper Hill" cleaning method is straightforward and safe, and in our routine usage here at Imaging Resource, highly effective. Better yet, the products sold by Copper Hill Imaging are very reasonably priced. Best of all, Nicholas R (proprietor of Copper Hill) has put together an amazingly detailed tutorial on sensor cleaning, free for all.
Sensor cleaning is one of the last things people think about when buying a d-SLR, but it's vital to capturing the best possible images. Take our advice and order a cleaning kit from Copper Hill right along with your d-SLR, so you'll have it close at hand when you need it: You'll be glad you did!
(Other than a few backlinks on their site, we receive no promotional consideration from Copper Hill. We just think their sensor cleaning products are among the best on the market, and like their way of doing business. - We think you will too. Check them out.)
Exposure
Wide Range of Exposure Options
With a design mimicking the 35mm EOS-1v model, the EOS-1D offers full manual
exposure control, as well as a complement of partial manual and automatic exposure
modes. For example, you can choose between Program AE, Aperture Priority, Shutter
Priority, Depth of Field AE, Manual, and Bulb modes. The majority of these are
fairly self-explanatory, as Program AE, Aperture Priority, Shutter Priority,
and Manual modes provide varying degrees of manual and automatic exposure control.
While available apertures vary with the lens used, shutter speeds range from
1/16,000 to 30 seconds in all modes except Bulb, which keeps the shutter open
as long as the Shutter button is depressed. (Interestingly, Bulb mode has no
time limit, other than the available charge in the battery (claimed in the manual
to be about 1.5 hours!) Canon's optional RS-80N3 remote switch and TC-80N3 Timer
Remote Controller allow you to take long time exposures without having to hold
your finger on the Shutter button. One interesting note is that in Program AE
mode, turning the Main dial on top of the camera cycles through a range of equivalent
exposure settings, allowing you to pick the best exposure with an emphasis on
either aperture or shutter speed, while letting the camera determine the exposure.
(This is commonly referred to as a "program shift" or "vari-program"
option.)
Depth of Field AE Mode
Canon's unique Depth of Field AE (DEP) mode works well when shooting scenes
with subjects that are separated from each other. (An example might be a shot
with one person standing in front of another.) Quite often, you'll want to stop
down the lens enough to guarantee that both of your subjects are in focus, but
won't know just how small an aperture is needed. You'll also want to keep the
aperture as large as possible, to reduce shutter times. Without the tedious
use of a depth-of-field table, it can be difficult to accurately determine the
best aperture and focus point to use. The EOS-1D takes the guesswork out of
situations like this, with its DEP mode. In this mode, the camera calculates
the maximum aperture that can be used to keep both subjects sharply focused.
When DEP is selected, the 1D uses only a single autofocus sensor in the center
of the field of view. You use this sensor to "show" the camera which
two objects you want to have simultaneously focused, and the camera does the
rest. You center the viewfinder on the first object (near or far, it doesn't
matter) and half-press the shutter button. The viewfinder displays "dEP
1" to indicate that it's measured the distance to the first object. You
repeat the process with the second object, upon which the viewfinder shows "dEP
2". The camera computes the maximum aperture that will hold both subjects
in focus, and sets the lens focal distance accordingly. Half-pressing the Shutter
button will show the aperture and shutter speed the camera has selected. Fully
pressing the Shutter button takes the picture. If 6 seconds past before the
shutter is pressed, the camera forgets the DEP points, letting you set a new
pair.
Noise Reduction System
The remaining exposure mode is Bulb, which simply allows you to take long exposures
for unlimited periods of time, depending on the type of power source (Canon
estimates a fully charged battery pack will allow for a 1.5-hour maximum exposure
time, however the AC adapter allows for unlimited exposure times.) The EOS-1D
automatically employs a noise reduction system in exposures longer than 1/15-second
(this function can be turned off through the Record menu when shot-to-shot cycle
time is an issue). To reduce image noise, the camera 1D captures a second, blank,
image with the shutter closed, which is then compared against, and subtracted
from, the original to remove the noise. (I was somewhat surprised to find that
the noise reduction system worked even in Bulb exposure. The top LCD readout
displays "busy" if you try to take another shot while it's capturing
the dark frame reference image. Very slick! (It's the first time I've seen a
noise reduction system that works with such extremely long exposure times.)
To prevent any camera movement during long exposures (from holding down or releasing
the Shutter button), it's best to work with the accessory remote control and
attach the camera to a tripod.
In my testing, I found the EOS-1D's noise reduction system very effective.
It won't work miracles with a warm camera (image noise roughly doubles for every
8°C rise in temperature), but it does a very good job of eliminating image
noise under normal shooting conditions. Depending on exposure times and CCD
temperature, you can still end up with quite a few "stuck" pixels
in bulb exposures, but the level is far below what it is with the noise reduction
turned off. (And for dealing with those remaining stuck pixels, I highly recommend
Mike Chaney's Qimage
Pro, a program with an amazing ability to remove spot noise without disturbing
the underlying image.
 Metering Sensors
To determine exposure, the EOS-1D borrows the 21-Zone Evaluative Metering system
employed by the 35mm EOS-1v. Evaluative metering divides the image area into
21 zones of different sizes, with a honeycomb pattern in the central portion
of the frame. The full Evaluative Metering mode determines the exposure by assessing
each of the 21 zones and averaging the best exposure value for the entire frame.
The 21-zone system also offers Center-Weighted and Partial metering modes. In
Center-Weighted metering, the camera reads the exposure from the entire scene,
but places emphasis on a large area in the center of the frame. Partial metering
works along similar lines, but only places emphasis on approximately 13.5 percent
of the center area.
Spot Metering Options
In addition to the Evaluative Metering options, the EOS-1D also offers a range
of Spot metering choices. Normal Spot metering bases the exposure on a reading
taken from the very center of the frame, and is usually chosen for use with
high-contrast subjects. Alternatively, in some autofocus modes, you can choose
to link the Spot metering area to one of 9 or 11 active AF points. When you
use Custom Function menu 13 to limit the selectable AF points to either 9 or
11, the manually-selected AF point is linked to a 3.8 percent Spot Metering
sensor, centered on that point. Another option is to choose the Multi-Spot metering
option, which bases the exposure on as many as eight separate readings from
different parts of the image. In Multi-Spot metering mode, the central spot
metering sensor is activated, and a meter reading is taken every time you press
the "FEL" button on the top front of the camera. As you take successive
readings, the exposure readouts in the viewfinder show the current aperture
and shutter speed settings the camera has computed, while the vertical exposure
level indicator shows the relative light levels corresponding to each of the
points you measured. This is a pretty powerful exposure option, giving the photographer
great control over the final exposure. The exposure level indicator gives you
a pretty good idea of how much dynamic range the shot requires, and you can
choose to give more weight to a given area of the image by taking multiple readings
there. Very slick, a great feature!
Exposure Lock
As you'd expect, the EOS-1D also offers an Exposure Lock option, which lets
you lock exposure independently from the autofocus determination. You simply
center the frame on the part of the subject you want to expose for, and press
the AE Lock button, marked with an "*" on the camera. What's interesting
though, is that this same AE Lock capability is extended to flash exposures
when using Canon Speedlights. When shooting with an external flash, a Flash
Exposure Lock option (the same FEL button used in the Multi-Spot metering mode)
works with Spot metering to determine and lock the flash exposure. While not
a multi-spot system, you can select a specific portion of the image on which
to meter for flash exposure, just as you can with non-flash shots using the
AE Lock button. You can also lock non-flash exposures, by pressing the AE Lock
button marked with an "*" on the camera body.
Exposure Compensation
Exposure Compensation is adjustable from -3 to +3 exposure values (EV) in one-third-step
increments. An Auto Exposure Bracketing option is available when you're not
sure about the best exposure. Three images are captured in succession -- one
at the metered exposure, one overexposed, and one underexposed. The amount of
exposure variation can vary as much as +/-3 EV steps. In addition to aperture
or shutter-speed based bracketing, the EOS-1D offers a unique ISO speed bracketing
option. In this mode, the camera leaves the aperture and shutter settings at
their predetermined values, and brackets the exposure by varying the ISO light
sensitivity of the camera. I'm not pro shooter myself, but this feature has
elicited some interest from folks like Rob
Galbraith, who says that ISO bracketing just might convert him to automatic
exposure bracketing.
ISO Sensitivity
The EOS-1D's light sensitivity is adjustable from 200 to 1,600 ISO equivalents,
which is expandable to 100 to 3,200 ISO equivalents through an on-screen menu
option. You can experiment with a range of ISOs, by using the ISO Auto Bracketing
function to capture three images at different ISO settings. The first image
is taken at the set ISO value, followed by one at the next lowest value, and
one at the next highest value. For example, bracketing the ISO around the 200
value results in a series of images taken at 100, 200, and 400 ISO equivalents.
One of the first questions people will ask about the EOS-1D is whether its images
are as noise-free at any given ISO setting as those recorded with the remarkable
EOS-D30, which uses a CMOS sensor with active-pixel technology. (As opposed
to the more conventional CCD in the EOS-1D.) As I commented earlier, my response
to this question is somewhat mixed. On a purely technical level, when I compared
noise levels in images shot with the EOS-1D and EOS-D30 under the same controlled
conditions, I found that the absolute noise levels in the images from the 1D
were lower. This conflicted somewhat with the visceral reaction I had when viewing
images from the two cameras. Visually, my subjective opinion is that the images
from the D30 were slightly superior, due to their buttery smoothness. Certainly,
the image noise levels from the 1D are very low, but I think there remains some
impossible-to-define characteristic of images from the D30's CMOS sensor that
render them more pleasing.
10 White Balance Modes
The EOS-1D offers 10 White Balance modes from which to choose, including Auto,
Daylight, Shade, Overcast, Tungsten, Fluorescent, Flash, Custom, Color Temperature,
and Personal White Balance. Custom is the manual white balance option, which
determines the white balance setting from a previously-captured image of a gray
card. This method differs from the customary use of a white card held in front
of the lens. (The D30 also used this approach.) While slightly less convenient
for on-the-fly white balance adjustment (you have to shoot the test image, then
go back into the menu system to select it as the white balance reference), the
advantages are actually manifold. First, you can easily store several different
reference images on the camera's card, letting you quickly switch between different
custom white balance settings. This can be very handy in environments where
you need to quickly switch between radically different lighting environments.
(Consider sports shooting, where you may want one custom setting for the stadium
lights and another for the fluorescent lighting of the locker room.) Another
advantage of Canon's custom white balance approach comes in scenarios where
multiple photographers are covering the same event. The same set of white balance
reference images can be loaded onto each shooter's CF cards, making for perfect
color consistency between all the cameras and shooters. (A great help for post-event
image workflow!). Here's a list of the available White Balance modes:
Hybrid Auto White Balance
Here's a feature I've been expecting to turn up in digicams for a while now
-- white balance determination that's independent of subject color! Normally,
digicams compute white balance by analyzing the image captured by the sensor.
This is fine if the subject has no predominant coloration of its own, but fails
miserably for subjects with dominant color casts. (For instance, a model wearing
a red dress against a maroon background would trick the camera into thinking
the scene lighting was very reddish. The result would be an inappropriate cyan
correction being applied to the image, to counterbalance the red.) In the EOS-1D,
Canon has integrated an incident illumination sensor on the front of the camera
that ties into the white balance system. This gives the camera additional information
about the lighting, which is unaffected by subject coloration. I'll be interested
to see how this innovation works out in practice, but I applaud the basic concept.
White Balance Bracketing
White Balance Bracketing is another useful feature that Canon included in the
EOS-1D. You can set the camera to shoot three images at the same exposure level,
varying the White Balance setting between shots by up to +/- 3 steps, each step
being equivalent to 5 Mireds (Micro-reciprocal degrees). Mireds are a bit of
an arcane measurement, but represent the units most directly applicable to the
mathematics of color adjustment, their main benefit being that they're additive.
A filter that shifts 3200°K light by 100°K will produce a much different
shift (measured in degrees Kelvin) with 7000°K light, hence the use of mireds
to describe the shift, rather than degrees Kelvin. (For example, 5 mireds at
3200°K is a shift of only 52°K, while 5 mireds at 7000°K is a shift
of about 257°K.) This is all a little convoluted for the uninitiated, but
pro photographers are accustomed to working with mireds in calculating filter
factors, and professional color meters generally offer a mired scale for calculating
filter corrections.)
White Balance in Degrees Kelvin
I also liked Canon's provision of a Color Temperature white balance option,
which allows the user to select the desired color temperature in 100-degree
increments from 2,800°K to 10,000°K. I'd actually like to see the lower
end of this range extend a little further, since household and commercial incandescent
lighting tends to be more in the range of 2,500°K to 2,800°K. Still,
the Color Temperature white balance is very handy, particularly if the shooter
has access to a color temperature meter.
"Personal" White Balance Settings for Rapid-fire Custom Changes
Finally, the Personal White Balance feature allows you to create as many as
three different white balance settings on a computer and load them into the
EOS-1D for quick use. This strikes us as another great option for pros who have
to shoot under highly variable lighting, or for groups of pros needing consistency
between their setups. Not quite as flexible as the Custom option, because the
Personal settings must be downloaded to the camera from a host computer, but
arguably more powerful, not to mention having the advantage of allowing you
to switch between three distinct custom settings very quickly.
"Color Matrix" options
We're (finally) starting to see a move away from the tyranny of the sRGB
color space. sRGB produces bright, saturated color on computer monitors, but
has a woefully restricted color gamut. Bottom line, sRGB is fine for consumer-level
devices, but is really unsuited for color-critical professional applications.
Nikon took a step away from sRGB in its D1x and D1h models, by providing support
for the so-called Adobe RGB color space in addition to the default sRGB. The
EOS-1D goes a step further, offering no fewer than five color-space options
through the Record menu. Canon calls these "Color Matrix" settings,
and they offer an interesting range of possibilities. The table below lists
their attributes.
|
|
|
| Color Matrix 1 | Default color matrix. Normal saturation, sRGB color space. |
| Color Matrix 2 | sRGB color space, but hue and chroma optimized for reproduction of skin tones. (A little warmer, more saturated in the reds and pinks.) |
| Color Matrix 3 | sRGB color space, extra saturation. Intended to reproduce the characteristics of high-chroma slide film. |
| Color Matrix 4 | Adobe RGB color space, normal hue and chroma within that space. Much wider color gamut than sRGB, which means images will look dull on sRGB monitors. Excellent for use in color-managed workflows, particularly ones going to print as final output. |
| Color Matrix 5 | Mysterious low-saturation color space. Apparently sRGB-based, but color saturation is lower than normal. |
For the pros likely to buy this camera, I call particular attention to Color Matrix settings 4 and 5. Setting 4 is matched to Adobe RGB, although Canon's documentation is careful to point out that the files created in this mode do not contain any ICC tag information identifying the color space as such. This means that you'll have to explicitly set the color space in your color management software to achieve accurate results. Color Matrix setting 5 is a little mysterious, as there are some indications Canon intended it to be a special wide-gamut color space, but now treats it simply as a low-saturation sRGB.
Tonality and Custom Tonal Curves
This is a major feature of the EOS-1D, but was also the source of some problems
in the first prototype units I tested: The original firmware for the
1D had an extremely contrasty total curve as its default setting. Firmware 1.0.1
corrected this quite a bit, but the tonal curve is still much more contrasty
than I like to see in a professional camera. Fortunately, the final production
model appears to have entirely corrected the problem, even though the firmware
versions still reads 1.0.1. The camera's 12-bit A/D conversion and excellent
electronics produce a wide dynamic range, providing a lot of tonal information
for the camera to work with in generating the final output file.
Canon recognizes that different pros may prefer different tonal curves, and
has thoughtfully provided a means to implement custom curves via the host computer.
Canon's included "acquire" software (which really does much more than
just acquire images) lets you create a custom tonal curve and then download
it into the computer. This tonal curve then becomes available via the "Parameters"
option in the LCD record menu.
While I really like the ability to custom edit the EOS-1D's tonal curves, I
unfortunately can't say the same for the software interface Canon provides to
perform the task. It's one of the most unfriendly applications I've encountered
in recent memory -- not so much because it's particularly difficult to understand,
but because it provides essentially no feedback on the effects of the adjustments
you're making, or for that matter, on the correspondence between the tonal curve
controls and what part of the visible tonal range they affect.
The screenshots below show the tone-curve editing window and a preview image of my horribly contrasty "outdoor portrait" test shot. (Dave here: Before I get taken to task yet again for how horrid the lighting is on this image, please note that the awful lighting is deliberate, intended to be a stress-test of how well cameras handle extreme contrast and harsh highlights. Of course you'd never set up a serious shot like this, but I wanted a test subject that would stretch the limits of the cameras I tested. This lighting certainly does that.)
NOTE that in the following, the "default" exposure and tone curve examples were taken from one of the early prototype cameras I tested, NOT the final production model. The point here is to simply show how the tone-curve editing feature works, and what it's results are, so please regard the photos as illustrative examples only, and NOT representative of the production cameras' actual performance!
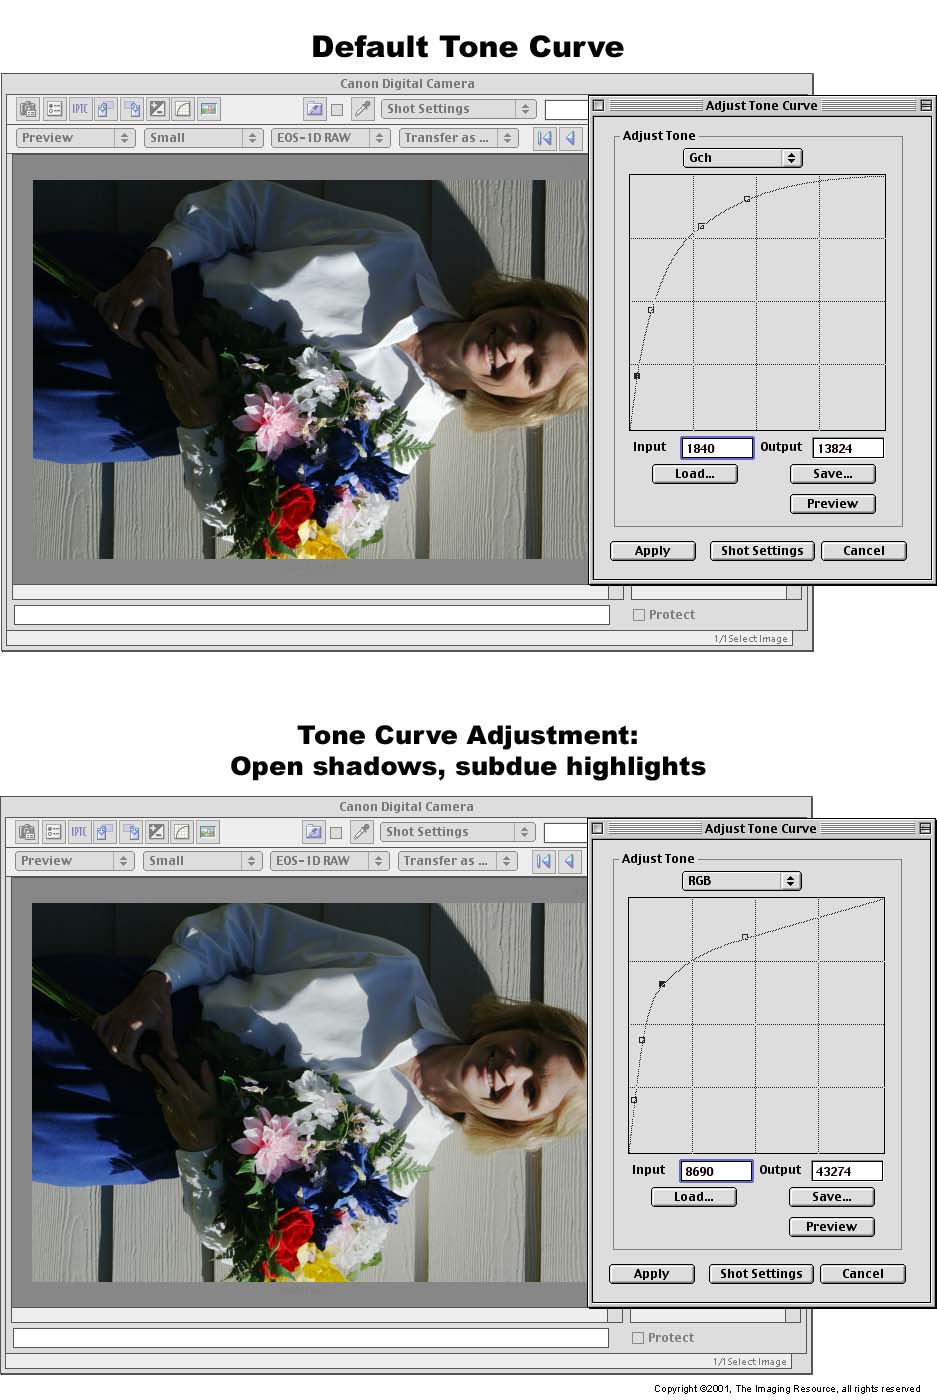 The
top shot in the table at right shows a default exposure and tonal curve from
a prototype camera, while the bottom one shows a considerably modified tonal
curve, and the preview image resulting from it. (Click on the images to see
them 1:1 at their original size.) I can't say I'm completely happy with the
result, but that's a reflection of my limited skills, lack of time, and how
time-consuming the tool is to use, much more so than any lack of power in the
tool itself. This is all really straightforward, but as usual, the devil is
in the details. First of all, the preview images aren't generated in real-time,
but rather they take a good 12-13 seconds (on a 500 MHz G4 PowerMac) to be generated
when you request them. By the time you wait for the preview to appear and make
a few adjustments to the curve, it can easily take 30 seconds for iteration
of the curve. Worse, you have no idea what part of the image's tonal curve you're
actually affecting when you're making adjustments. It turns out that the midtone
range of the image actually corresponds to a point pretty far to the left side
of the tonal curve in the adjustment window. You'd think it would have been
easy to add an eyedropper control to the tonal curve function, so you could
click on a portion of the image and see where that particular point fell along
the curve. This would let you quickly see what you needed to adjust and by about
how much. As it is, you end up "flying blind," reduced to guessing
and then waiting for the preview image to find out whether or not you guessed
right.
The
top shot in the table at right shows a default exposure and tonal curve from
a prototype camera, while the bottom one shows a considerably modified tonal
curve, and the preview image resulting from it. (Click on the images to see
them 1:1 at their original size.) I can't say I'm completely happy with the
result, but that's a reflection of my limited skills, lack of time, and how
time-consuming the tool is to use, much more so than any lack of power in the
tool itself. This is all really straightforward, but as usual, the devil is
in the details. First of all, the preview images aren't generated in real-time,
but rather they take a good 12-13 seconds (on a 500 MHz G4 PowerMac) to be generated
when you request them. By the time you wait for the preview to appear and make
a few adjustments to the curve, it can easily take 30 seconds for iteration
of the curve. Worse, you have no idea what part of the image's tonal curve you're
actually affecting when you're making adjustments. It turns out that the midtone
range of the image actually corresponds to a point pretty far to the left side
of the tonal curve in the adjustment window. You'd think it would have been
easy to add an eyedropper control to the tonal curve function, so you could
click on a portion of the image and see where that particular point fell along
the curve. This would let you quickly see what you needed to adjust and by about
how much. As it is, you end up "flying blind," reduced to guessing
and then waiting for the preview image to find out whether or not you guessed
right.
Once you have a tonal curve you like, you can apply it to the image as you convert it to a JPEG, save it to disk to apply to other images, or (this is the cool part) download it to the camera, where it can be applied as part of the custom parameter sets. (Note though, that all three sets of custom parameters share the same tonal curve. The camera has room for only two tonal curves, its default and one custom one.) It's entirely possible that more experience twiddling with the curves would leave you more comfortable about what to move and by how much, but it looks to us like this would take a long time to achieve. Bottom line, I'm happy to see the custom tone curve capability included in the EOS-1D, but suggest that you allow a lot of time for playing with it! (A long weekend wouldn't be too much.)
| What's up with RAW? | |
|
 Flash
Flash
Like most pro cameras, the EOS-1D has both an external flash hot-shoe as well
as an external PC socket for connecting a strobe. The hot-shoe accommodates
all Canon EX series speedlights, as well as a variety of third-party flash units.
A Flash Exposure Lock button allows users to lock the flash exposure in advance
of the shot, and a Flash Exposure Compensation option adjusts the overall flash
power from -3 to +3 EV in one-third-step increments (only for Canon EX series
speedlights). Automatic flash exposure bracketing is also available. A High
Speed Sync option synchronizes the flash with all shutter speeds available on
the EOS-1D, from 1/16,000 to 30 seconds. (Note though, that a full-power flash
almost invariably lasts longer than 1/16,000 second, so you won't see the full
flash power when working with a shutter speed that fast.) When using a Canon
EX flash unit, you can also sync up wireless slave units for greater coverage,
with no connecting wires, special codes, or anything. Full TTL flash metering
is available even with multi-flash wireless setups. (Canon's series of dedicated
Speedlights have a remarkable range of capabilities, really deserving of a review
of their own, rather than the very brief treatment I'm giving them here. Unfortunately,
I really don't have the time or space to go into all their functions, and the
details of how they integrate with the EOS-1D.)
Continuous Shooting
Two Continuous Shooting modes are available on the EOS-1D: High-Speed and Low-Speed.
High Speed Continuous Shooting captures as many as eight frames per second,
provided you're using a fast enough shutter speed. (For maximum frame rates,
Canon says you need to use a shutter speed of 1/500 second or faster.) Low-Speed
Continuous mode captures approximately three frames per second. In both modes,
the maximum burst series is 21 frames (unless memory space is limited to a smaller
number). Maximum burst length drops to 14 frames at ISO settings higher than
800. (See the Shutter Lag/Cycle Time section of the review below for more information
on shooting speed.)
Self-Timer Modes
The EOS-1D offers two Self-Timer modes, 10-Second and 2-Second. Both modes are
accessed through the Drive button on top of the camera, the same button that
activates the Continuous Shooting modes. The actual delay time in each Self-Timer
mode can be adjusted from the host computer, across a range of zero to 3600
seconds(!).
Shutter Lag / Cycle Times
When you press the shutter release on a camera, there's usually a lag time before
the shutter actually fires. This time allows the autofocus and autoexposure
mechanisms time to do their work and can amount to a fairly long delay in some
situations. Since this number is almost never reported on, and can significantly
affect the picture taking experience, we now routinely measure it using a special
electronic test setup.
Power
On -> First shot
Very fast startup.
Shutdown
Time to finish writing large/fine file.
Play
to Record, first shot
Very fast - only normal shutter lag,
camera is always ready to shoot.
Record
to play
Quite fast, time for display of large/fine
file.
Shutter
lag, full autofocus, "awake"
AF time will
obviously vary greatly with lens. This was with 28-70mm L-series.
Shutter
lag, full autofocus, "asleep"
AF time isn't
affected much when the camera is in it's "semi-sleep" mode.
Shutter
lag, manual focus, "awake"
The 55msec
shutter lag Canon touts obviously applies only in manual focus mode. (Since
lens AF will be variable.)
Shutter
lag, manual focus, "asleep"
Note
though, that shutter lag in manual focus gets quite a bit longer when
the camera goes into its "semi sleep" mode after about 2 seconds
of no control actuation.
Shutter
lag, prefocus
Zounds!
This is *really* fast: This is the time when the camera is prefocused
by half-pressing and holding the shutter before the shot itself.
Cycle time,
single shot mode
Extremely
fast - seemed to be more limited by how fast our finger was than by the
camera itself.
Cycle time,
continuous "H" mode
(7.7 frames/sec)
Very
fast! Just a shade off the 8.0 fps claimed by Canon. (We're happy to give
them 0.3 fps of leeway though.) 21 frame burst for most settings, 16 frames
for RAW mode, 14 frames for ISOs greater than 800. Buffer clears in 20
seconds with fast 12x memory card, 34 seconds with ordinary one. See
text below for odd behavior with fast/slow memory cards!
Cycle time,
continuous "L" mode
(3.0 frames/sec)
3 fps as claimed.
Interestingly, a fast card gives much longer runs before buffer fills.
No question about it, the EOS-1D is the fastest pro SLR we've tested to date. Every parameter is fast, from shutter lag and AF performance to shot-to-shot cycle times.
We encountered some very interestingbehavior when we tested the 1D's performance with fast & slow memory cards. We used an old Kingston 64 megabyte card as the "slow" one, and a Lexar 256MB 12x card as the "fast" one. As you'd expect, the buffer cleared more quickly with the faster card, albeit not nearly in proportion to the difference in the cards' claimed write speeds. With the Kingston card, the buffer took about 34 seconds to empty vs 20 for the Lexar.
Where the real twist came in was when we shot in RAW or RAW/L modes (the latter being the mode that saves both a RAW and large/fine JPEG file at the same time). We were very surprised to find that the 1D would only capture 8 frames in RAW mode or 4 in RAW/L mode with the Kingston card when set to either motor drive speed! With the Lexar 12x card, we got the full 16 frames that Canon says the buffer is good for. This was very surprising because the buffer memory should eliminate any influence of card speed on the capture process. Memory card speed thus appears to be a very important consideration when using the 1D in motor-drive mode! (You heard it here first.)
A little less startling, although still underscoring the importance of high-speed memory cards for the EOS-1D, was our observation of the dependence of maximum run length on card speed in low-speed motor drive mode. Since the camera can write data to the memory card even while it's capturing new images, a fast memory card can extend run lengths considerably. In high-speed mode, there's little effect, but at the 3fps motor drive speed, we found that the Lexar card delivered run lengths of 30 shots, to the Kingston card's 22.
Operation and User Interface
The EOS-1D's user interface is certainly one of the most complex I've encountered,
with extensive external camera controls that have multiple functions, and duplicate
controls for vertical shooting. I admit that I had to refer to the manual on
a number of occasions to fully understand what each control did. However, once
I became familiar with the layout and began to memorize each button's function(s),
camera operation was straightforward and quite efficient. This is definitely
not a camera for a casual user, but professional shooters will find it very
fast and flexible to operate. Dual controls for the Shutter button, AE Lock,
AF Point Selection, and the Assist button enable you to comfortably operate
the camera horizontally or vertically, a mandatory option for pro photographers.
The combination of control dials and buttons allows you to adjust most of the
camera's settings without venturing into the LCD menu system, a great time-saver
in fast-paced shooting situations. For those times when the LCD menu is unavoidable,
the menu system offers straightforward navigation, once you get the hang of
Canon's user interface. (A silly thing, but it took us an inordinate amount
of time to get used to the operation of the "Select" button and the
Quick Control dial. Once I became acclimated, it was very fast, but there was
a fair bit of frustration in the first day of shooting.) Following are a few
illustrations of the camera's operating controls and readouts, courtesy of Canon
USA, with callouts and other modifications ©Imaging Resource. I then step
through all the controls in my usual fashion, followed by descriptions of the
camera's various menu screens.
)
|
 |
LCD Data Readouts
The EOS-1D uses two monochrome LCD data readouts to report camera status, and
provide a visual user interface to the various knobs, dials, and buttons. As
with the D30, you can actually control quite a bit of the camera's operation,
without venturing into the menu system on the color LCD screen. This not only
saves power (by avoiding the hefty drain of the large LCD screen), but makes
the camera much quicker to operate. Here are the details of the information
provided by the two LCD readouts, on the top and back of the camera:
Control Enumeration
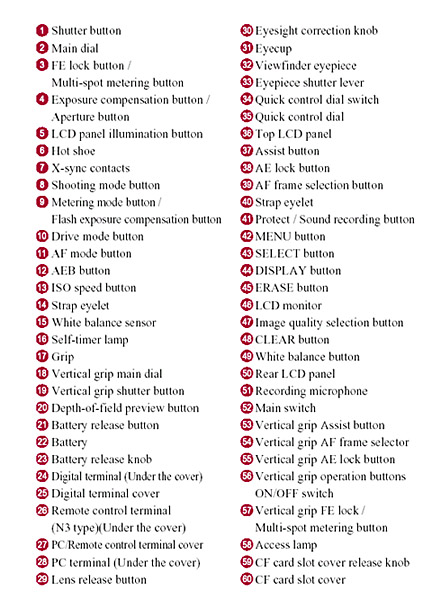
With the foregoing as background, here's a step-by-step description of the 1D's various controls and their operation:
Shutter Button: Located on the top of the camera body, sloping down toward
the front panel, this button sets focus and/or exposure when pressed halfway.
A full press fires the shutter.

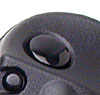
Depth of Field Preview Button: Hidden on the lower left side of the lens
mount (when looking from the front), this button previews the depth of field
in the viewfinder. Pressing the button stops the lens down to the selected aperture,
letting you visually check the depth of field.

Lens Release Button: On the right side of the camera's front panel, this
semicircular button releases a latch so the lens can be removed.

FE Lock / Multi-Spot Metering Button ("FEL"): Situated on the
top panel of the camera, just behind the Shutter button, this button controls
the flash exposure lock and Multi-Metering functions, just like its vertical
grip counterpart. Pressing the button when a Canon Speedlight is in use locks
the exposure based on a test flash. In Multi-Spot Metering mode (with the flash
off), this button selects up to eight metering points for exposure calculation.
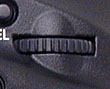
Main Dial: To the right of the FE Lock / Multi-Spot Metering button,
this dial controls a variety of camera functions when turned while pressing
a control button. Depending on the exposure mode, turning the dial on its own
adjusts some of the functions listed on the top LCD panel, such as aperture
or shutter speed. In Program AE mode, turning this dial cycles through a range
of equivalent exposure settings.

LCD Panel Illumination Button: Directly behind the FE Lock / Multi-Spot
Metering button, this button activates a blue background illumination for both
the rear and top status LCD panels. You can turn off the illumination by pressing
the button a second time. Pressing the button once leaves the light on for six
seconds, and the light will automatically shut off if the shutter is opened.
(A custom menu function lets you leave this backlight on during bulb exposures,
handy for watching the display that shows the cumulative exposure time.)

Exposure Compensation / Aperture Button: To the right of the LCD Panel
Illumination button, this button controls the exposure compensation in conjunction
with the Main dial (in all exposure modes except Manual). Pressing the button
blanks all the top-panel LCD readouts except the exposure compensation indicator,
and connects the Main dial to the exposure compensation adjustment. Pressing
the button again or half-pressing the shutter button registers the exposure
compensation setting you've selected, and puts the camera back in shooting mode.
In Manual mode, pressing this button while turning the Main dial controls the
aperture setting. (This is a little awkward: Using the rear-panel Quick Control
dial to set the aperture in Manual mode is much easier.)
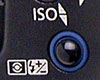
Metering Mode / Flash Exposure Compensation Button: The first button
on the far left side of the top panel (when looking from the back), this button
changes the current metering mode when pressed while turning the Main dial,
cycling through Evaluative, Partial, Spot, Center-Weighted, and AF Point-Linked
Spot metering modes. When pressed while turning the Quick Control dial on the
back panel, the flash exposure compensation is adjusted from -3 to +3 exposure
values (EV) in one-third-step increments. (Note that this only applies to Canon
dedicated Speedlights.) Pressing this button in conjunction with the Shooting
Mode button while turning the Main dial adjusts the camera's Drive mode, cycling
through Single Frame, High-Speed Continuous, Low-Speed Continuous, 10-Second
Self-Timer, and Two-Second Self-Timer modes. Finally, pressing this button in
conjunction with the AF Mode button while turning the Main dial sets the ISO
sensitivity.
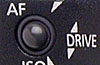
AF Mode Button: The next button on the left, just in front of the Metering
Mode / Flash Exposure Compensation button, this button sets the autofocus mode
when pressed while turning the Main dial, cycling between One-Shot AF and Al
Servo AF (which focuses continuously to track moving subjects). Pressing this
button while holding down the Metering Mode / Flash Exposure Compensation button
and turning the Main dial adjusts the ISO setting. Additionally, holding down
this button while pressing the Shooting Mode button and turning the Main dial
activates the Auto Exposure Bracketing mode and sets the amount of exposure
variation.

Shooting Mode Button: The last button on the left side of the top panel,
this button sets the camera's exposure mode when held down while turning the
Main dial, cycling through the following modes:
When pressed in conjunction with the AF Mode button while turning the Main
dial, this button activates the Auto Exposure Bracketing mode and adjusts the
amount of exposure variation. Pressing this button while holding down the Metering
Mode / Flash Exposure Compensation button adjusts the camera's Drive mode, cycling
through Single Frame, High-Speed Continuous, Low-Speed Continuous, 10-Second
Self-Timer, and Two-Second Self-Timer modes.

Diopter Adjustment Dial: Located on the camera's back panel, to the left
of the viewfinder, this dial adjusts the optical viewfinder display to accommodate
eyeglass wearers.
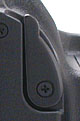
Eyepiece Shutter Lever: On the opposite side of the viewfinder, this
lever opens and closes a small shutter inside the eyepiece, which prevents incident
light from affecting the exposure when the camera is mounted on a tripod. (Normally,
the photographer's eye prevents ambient light from entering the viewfinder eyepiece.)

Assist Button: Directly to the right of the Eyepiece Shutter lever, this
button registers the selected AF point when pressed in conjunction with the
Flash Exposure Lock button. Pressing this button with the AF Point Selection
button switches between the normal AF mode and the registered AF point. Very
handy for quickly switching between a specific AF point and normal multi-area
AF operation. The operation of this control may be modified somewhat through
Custom Function menu 18.

AE Lock ("*") Button: To the right of the Assist button, this
button locks the exposure when pressed. (The AE Lock is canceled six seconds
later, or when a shot is taken, whichever comes first.)

AF Point Selection Button: Directly to the right of the AE Lock button,
this button selects one of the 45 AF points when pressed while turning either
the Quick Control or Main dials. (The Quick Control dial selects vertically,
while the Main dial selects horizontally.) Pressing this button simultaneously
with the Assist button switches between the normal AF mode and the registered
AF point.
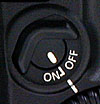
Quick Control Dial Switch: In the center of the back panel, above the
Quick Control dial, this switch turns the dial on or off, as a precaution against
changes being made if it is accidentally turned.
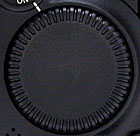
Quick Control Dial: The large dial in the center of the back panel, this
dial controls a variety of camera settings when turned while pressing control
buttons. During image playback, turning this dial scrolls through captured images,
and it is a primary user interface element for navigating the LCD menu system.
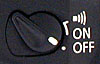
Main Switch: Directly below the Quick Control dial, this switch turns
the camera on or off. In its third position (marked with a little speaker icon),
the beeper is enabled, to signal when focus is achieved.

CompactFlash Slot Release Switch: Located at the bottom left corner of
the CompactFlash compartment, this switch unlocks the compartment door, allowing
you to remove the CompactFlash card.

Protect / Sound Recording Button: The first button in a series lining
the left side of the LCD monitor, this button assigns or removes write protection
for selected files during image playback. Also in Playback mode, this button
allows you to record as long as 30 seconds of audio to attach to an image file,
by holding down the button for two seconds. (Very handy for pros needing to
keep track of what's recorded in various shots.)

Menu Button: Directly below the Protect / Sound Recording button, this
button displays the LCD menu system.

Select Button: The third button in the series on the left side of the
LCD monitor, this button selects menu settings while in the LCD menu system.
When playing back images, this button selects individual images for manipulation.

Display / White Balance Bracketing Button: Just below the Select button,
this button controls the LCD display mode when playing back images. A full press
of the button turns the display on or off. Holding down the button while turning
the Quick Control dial cycles through the image playback display modes, including
Info (with histogram), Single Image Display, Four-Image Display, and Nine-Image
Display. When the LCD monitor is disabled, holding down this button while turning
the Quick Control dial allows users to create new image storage folders. In
Record mode, pressing this button in conjunction with the White Balance button
activates the White Balance Bracketing mode.

Erase Button: The last button in the series, this button erases selected
images or folders.

Quality Button: Located below the LCD monitor, this button cycles through
the file resolution and quality settings when pressed while turning the Quick
Control button. Pressing and holding this button with the White Balance button
for two seconds returns the camera's settings to their defaults.
![]()
White Balance Button: Directly to the right of the Quality button, this
button cycles through the available White Balance settings when pressed while
turning the Quick Control dial. When held down in conjunction with the Quality
button, this button resets the camera settings to their defaults. Holding this
button while pressing the Display button activates the White Balance Bracketing
mode.
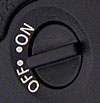
Vertical Grip Operation On/Off Switch: Located on the right side of the
camera (when looking from the back) and near the cluster of vertical grip controls,
this switch turns those controls on or off. Disabling the controls prevents
accidental activation when shooting with the camera in a normal horizontal orientation.
Vertical Grip Shutter Button: Directly below the primary Shutter button,
but on the bottom panel of the camera, this button performs the same shutter
functions when shooting with the camera held vertically.
Vertical Grip Main Dial: Like the Main dial on top of the camera, this
dial controls a variety of camera settings when rotated while holding down a
control button. Located just behind the Vertical Grip Shutter button, this dial
controls several functions on the top LCD panel when turned by itself, such
as aperture or shutter speed, depending on the exposure mode. When turned while
in Program AE mode, the dial cycles through a range of equivalent exposures.

Vertical Grip FE Lock / Multi-Spot Metering Button ("FEL"):
Just behind the Vertical Grip Main dial, this button locks the exposure when
an external flash is used. Like the main FE Lock button, when no flash is in
use, this button sets the metering points for the Multi-Spot Metering mode,
which averages the exposure from as many as eight separate readings.

Vertical Grip Assist Button: Just like the Assist button at the top of
the back panel, this button (located in the lower right corner of the back panel)
registers the AF point when pressed in conjunction with the Flash Exposure Lock
button. It also switches between the normal AF setting and the registered point
when pressed simultaneously with the AF Point Selection button.

Vertical Grip AE Lock Button: To the right of the Vertical Grip Assist
button, this button locks the exposure for a maximum of six seconds when pressed
once.
![]()
Vertical Grip AF Point Selection: The final vertical grip control in
the lower right corner of the back panel, this button performs the same functions
as its main counterpart, allowing you to select an AF point for use by holding
down the button and turning the Quick Control or Main dial. Pressing this button
with the Assist button selects between the normal AF mode and the registered
AF point.

Battery Compartment Release Button: Situated on the left side of the
camera, when looking from the back, this button unlocks the battery compartment
door handle, which can be turned to release the battery.
Camera Menus
The EOS-1D offers four menus, all of which are available at all times
by pressing the Menu button.
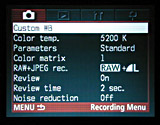 Record Menu
 Playback
Menu
Playback
Menu
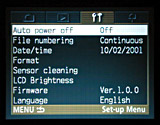 Setup Menu
Custom Menu
Custom Functions
The EOS-1D is quite probably the most configurable camera I've seen to
date at any price point. The combination of Custom Menu and Personal Function
options is almost overwhelming. An amazing range of the camera's operating functions
is subject to user configuration, with no fewer than 21 "Custom" function
menus and 24 "Personal" functions. (The numbering for the "Personal"
functions runs to 28, but there are several numbers within that range that aren't
used. Canon did this so the Personal Functions on the EOS-1D and EOS-1v would
align with each other. - There are some personal functions that are relevant
to the 1v which do not appear on the 1D.
To help you manage the EOS-1D's configurability, you can group both custom and personal functions into "custom function groups", letting you quickly switch between different sets of them for different shooting conditions or photographers.
Here's a list of the Custom Function options, and the camera features they control. (I didn't bother showing you screen captures of these, as there's really not much information displayed on these screens other than a list of options for each. The list below has more detail on the actual operation of each menu than is in the menus themselves.)
Personal Functions: A wide variety of secondary camera options can be controlled via the "Personal Functions" menu system. These are options that are less integral to basic camera operation, but that fall more into the realm of personal preferences. (Examples include things like setting the continuous shooting speed, enabling or disabling metering modes, whether or not to illuminate the LCD panels during bulb exposures, etc.)
These functions are enabled or disabled via the host software provided with
the camera. - The default is for none of the personal function options to be
available: You'll have to connect the camera to the computer and turn them on
before they'll be accessible on the LCD menu system. The menu displays in this
mode are unusually informative, as Canon has made excellent use of the high-resolution
LCD panel to show explanatory information. Accordingly, I'll simply show screenshots
of each Personal Function menu in the table below.
 |
 |
 |
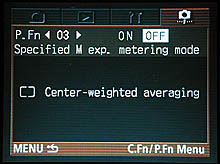 |
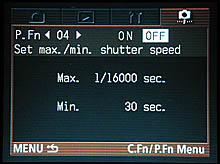 |
 |
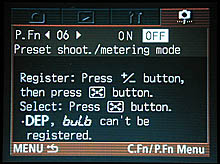 |
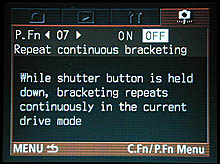 |
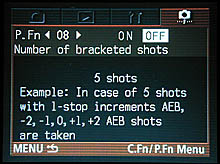 |
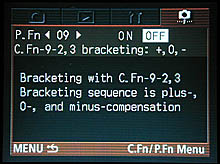 |
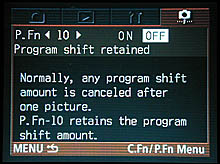 |
 |
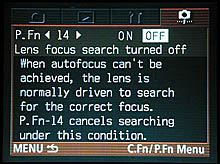 |
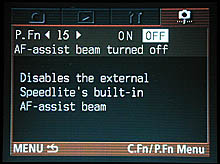 |
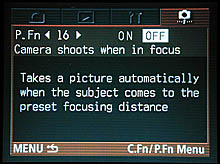 |
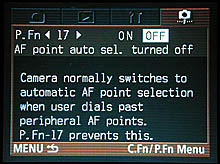 |
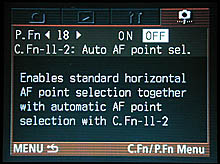 |
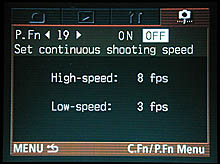 |
 |
 |
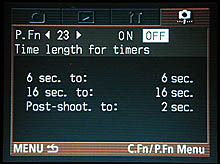 |
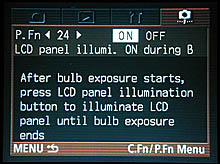 |
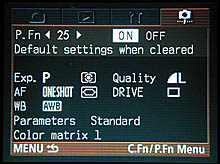 |
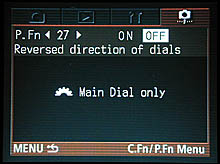 |
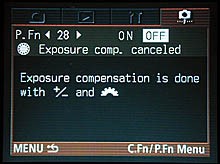 |
Image Storage and Interface
The EOS-1D stores images on a CompactFlash Type I or II memory card, and is
compatible with IBM MicroDrives. The EOS-1D does not come with a memory card,
but accessory cards are currently available in sizes as large as 640 MB. (One
Gigabyte in the case of the largest IBM MicroDrive.) CompactFlash cards cannot
be entirely write-protected, but the EOS-1D allows you to write-protect individual
images via the Protect option of the Playback menu. Write-protecting an image
only saves it from accidental erasure or manipulation, not from card formatting,
which erases the entire card.
The EOS-1D offers two resolution sizes: 2,464 x 1,648 and 1,232 x 824 pixels. Two standard JPEG compression levels are available as well, Fine and Normal. The compression levels corresponding to Fine and Normal can be adjusted via the host software, and loaded into the camera as part of custom parameter sets. There's also a RAW mode, which records all the information from the CCD, without any processing. The camera can be configured to save both a RAW and JPEG-compressed image at the same time, for every shot captured. Given a large enough memory card, this looks like a very useful operating mode, giving you a ready-to-use JPEG file as well as a "digital negative" in the form of the RAW file. As noted earlier, RAW-format images can be processed on the host computer to change White Balance and even Color Matrix settings. Exposure can also be adjusted by as much as +/- 2 EV on a RAW file. Canon includes a utility for processing and viewing RAW files as part of its Solution disk.
Following are the approximate number of storable images and the associated compression ratios for a 128MB CompactFlash card. File sizes and compression ratios shown here are based on the default JPEG compression settings used by the camera. Higher or lower compression ratios used as part of custom parameter settings would obviously increase or decrease file sizes. (These numbers are based on the camera's displayed "shots remaining" with a 128 MB card. Canon's official nominal sizes for images with various size/quality settings are 4.8 MB for RAW, 2.4 MB for large/fine JPEGs, 1.3 MB for large/normal, and 1.1 MB for small/fine. Note that these "official" nominal sizes will result in slightly lower capacities (and lower compression ratios) than I've listed below.)
|
Resolution/Quality 128MB Memory Card |
|
|
|
|
| Full Resolution 2464x1648 | Images (Avg size) |
28 4.2 MB |
79 1.6 MB |
1.1 MB |
| Approx. Compression |
1:1 | 7.5:1 |
|
|
| Half Resolution 1232x824 | Images (Avg size) |
|
0.64 MB |
|
| Approx. Compression |
|
|
|
|
Interface software and an IEEE-1394 "FireWire" cable also accompany the camera, for high speed connection to a PC or Macintosh. I tested the EOS-1D's FireWire transfer rate with my 500 MHz G4 PowerMac. I found it to be significantly faster than USB-connected cameras I've tested in the past, but not nearly as fast as I was expecting. The EOS-1D downloaded 14.7MB of files in 16 seconds, for a transfer rate of 920KB/second. Fast, but not blazing...
Video Out
The EOS-1D has no video output.
Power
 Power is supplied
to the EOS-1D via an NiMH rechargeable battery pack or the included "DC
Coupler" (AC adapter) accessory. The NP-E3 battery pack and DC coupler
both accompany the camera, along with a battery charger. According to Canon,
a freshly charged NP-E3 battery pack should produce as many as 500 shots at
normal temperature. (At low temperatures, battery capacity can be significantly
reduced.) The (approximate) amount of battery life remaining is displayed on
the top LCD status display panel. An Auto Power-Off feature automatically turns
off the camera after 1, 2, 4, 8, 15, or 30 minutes, depending on the time set
through the settings menu (you can also turn this off). ACR2025 lithium battery
serves as the backup power supply for the camera's internal calendar and clock.
Power is supplied
to the EOS-1D via an NiMH rechargeable battery pack or the included "DC
Coupler" (AC adapter) accessory. The NP-E3 battery pack and DC coupler
both accompany the camera, along with a battery charger. According to Canon,
a freshly charged NP-E3 battery pack should produce as many as 500 shots at
normal temperature. (At low temperatures, battery capacity can be significantly
reduced.) The (approximate) amount of battery life remaining is displayed on
the top LCD status display panel. An Auto Power-Off feature automatically turns
off the camera after 1, 2, 4, 8, 15, or 30 minutes, depending on the time set
through the settings menu (you can also turn this off). ACR2025 lithium battery
serves as the backup power supply for the camera's internal calendar and clock.
Working with the DC coupler, I performed my usual measurements on the EOS-1D's
power consumption in various operating modes. (Really, runtime in various operating
modes makes a lot more sense than the "number of shots" figures
published by the manufacturers and some other sites. The number of shots is
certainly important to a photographer, but shooters expecting 500 shots from
the EOS-1D would be sorely disappointed if they tried to capture all those shots
over the course of a five-hour shooting session.) Here's what I found for the
1D's power consumption numbers:
|
|
(@ 13v) |
(1650 mAh NP-E3 pack) |
| Capture Mode, "semi-sleep" |
|
|
| Capture Mode, "awake" |
|
|
| Memory Write (transient) |
|
|
| Image Playback |
|
|
Overall, the 1D's run time numbers reflect the huge capacity of its hefty 1650 mAh, 12-volt battery pack, but not as much as I'd been expecting. (Just for reference, this is fully 2.6 times more power than that delivered by a set of 4 NiMH AA cells, as used in most consumer digicams.) Runtime in "standby" mode (capture mode, but with the camera in the "semi sleep" mode it goes into after two seconds of inactivity) is nearly six hours, but active capture mode drops this to only about two-and-a-half hours. Furthermore, the power demands of fast-acting autofocus lenses with large optics are considerable. (Current drain spikes over 1 amp when a Canon USM autofocus lens is focusing.) Likewise, the 1D's shutter mechanism consumes a noticeable amount of power. Overall, the EOS-1D has very good battery life, but a practicing pro should definitely plan on purchasing a second NP-E3 battery and packing it along. For extended studio work, the DC coupler will be a lifesaver.
Included Software
| |
|
|
A single software CD comes with the EOS-1D, containing Canon's Solution Disk software for both PC and Macintosh platforms. The camera connects to the computer via an IEEE-1394 "FireWire" interface cable. The Solution Disk software package includes Canon Utilities, RemoteCapture (for operating the camera from the computer), and the necessary drivers. I mentioned the Canon software earlier, calling particular attention to the ability it provides the user to customize the camera's tone curves. I hope to write at some length about the EOS-1D's software, as the ability to manipulate and upload new tone curves to the camera is a significant differentiator between the 1D and competing cameras. Time constraints (and the extraordinary amount of time I've already spent on this camera, having now been through three major reshoots of my test images) may preclude a full treatment of the software. - I'll have to see how the time goes. For now, here's a simple list of what's included on the cross-platform disk:
In the Box
Included with the EOS-1D digital camera are the following items:
Test Results
There's no question that the EOS-1D is a professional camera, and it has the image quality to live up to that billing. I've now had the chance to test a full-production model of the EOS-1D, and found its image quality (particularly color and tonal balance) noticeably improved relative to the prototypes I'd tested previously. You can find quite a number of test images posted on our Sample Pictures page for the1D, with a lotof analysis and comment there as well. In this section, I'll just summarize my findings. I sometimes include some cropped images here in the test results section, but this time there's just too much to fit, so I'll just *really* recommend you click on over to the Sample Photo Page! - Besides my usual battery of standardized test images, you'll also find a gallery of photos snapped by writer gal Stephanie Boozer (an unsung IR hero who helps me with a lot of the gruntwork on many of these reviews)...
As I mentioned earlier, relative to the CMOS-based EOS-D30 introduced last year, I found that the EOS-1D actually had lower image noise. This was a little surprising, as I felt that the D30 images looked smoother to my eyes, but concluded that this was an effect of the somewhat different tonality of the two cameras. No question about it, in repeated measurements, the EOS-1D came up the winner in the noise department.
Two areas I was happy to find improvement in relative to the earlier prototype units were the color management and tone curves. I felt that the color was truer on the production model I based this review on than in either of the prototype firmware releases I'd worked with earlier. Even more importantly, the tone curves of the production unit yielded much more pleasing photos, with much lower contrast and more consistent exposure. While the last iteration of prototype firmware did a good job of preserving highlight detail, the resulting photos tended to be quite dark in the midtones. - I always felt they needed a good bit of post-exposure twiddling to produce what I felt was proper tonality. With the production unit though, the images generally came out spot-on, very nicely balanced.
Of course, the 1D does permit users to completely control the camera's tone curve themselves, by downloading a custom curve to the camera from the driver software. This capability is unique in my experience, and struck me as a remarkably powerful option. - I'll bet we see this feature copied in other pro digicams in the near future. Unfortunately, the software interface by which custom tone curves are arrived at is still rather user-hostile, and enormously time-consuming to operate. I'd hoped for a major revamp of the user interface for the tone-curve adjustment option, but there'snot yet any sign of revision there. That's too bad: This is just too powerful a capability to leave locked behind an awkward user interface!
On this first production unit of the EOS-1D, color is excellent, and the five different "color matrices" with their different gamuts and saturation characteristics are very welcome. I particularly applaud the support of Adobe RGB as a color space, and am intrigued by the low-saturation sRGB space, wondering if that might be an avenue to even broader-gamut color, in color-managed environments.
Thanks to the noise reduction technology perfected over the last year in Canon's consumer camera line, the EOS-1D is a fantastic low-light shooter. I've only just received a wired remote release for the camera, so my efforts thus far at super-long exposure night shots were marred by excessive camera shake, but I can report that I was able to capture eminently usable images with two minute (!) exposure times, in conditions too dark for me to even walk around comfortably. The EOS-1D literally sees (much) better in the dark than you do! I missed having an AF-assist illuminator on the camera, but dedicated Canon speedlights provide this function. - I'll try some really long nighttime exposures with the wired remote release as soon as I get the opportunity, hopefully within the next week.
The EOS-1D's optical viewfinder was exceptionally accurate, testing out just shy of the 100% claimed for it by Canon. (I actually measured frame coverage at 99%.)
As measured on my ISO 12233 test target, resolution on the EOS-1D was right in line with its 4 megapixel sensor, although images shot with the camera's default settings showed a characteristic softness I first saw in the D30. This is apparently because the camera's default behavior is to apply little or no in-camera sharpening to the images, an approach I find entirely appropriate for a professional digital camera: Better to have the photographer explicitly sharpen the images post-exposure than run the risk of too much sharpening applied in-camera, and impossible to correct after the fact. I found "strong detail" in the resolution target images out to about 1,100 lines per picture height horizontally, and 900-1,000 lines vertically, with extinction of the target patterns occurring at around 1,500 lines.
In this section of my reviews, I normally also summarize test results involving lens performance. In the case of the EOS-1D, optical characteristics will obviously vary depending on the particular lens being used, so the optical distortion measurements I'd normally report here really aren't applicable. (Likewise flash range and coverage.) Suffice to say though, that the Canon lenses, particularly the "L" series glass are of exceptional quality.
Overall, the EOS-1D delivered excellent-quality images, at an amazing frame rate. Whether due to my own earlier carping about the overly-contrasty tone curve of the prototype units, or as a result of Canon's own internal evaluations, they've significantly improved the 1D's tonal rendition, and appear to have further tweaked the color management as well. The result is a camera that shoots beautiful photos and an absolutely unprecedented frame rate. Unusual speed, unusual power, unusual flexibility, and excellent images. -- Canon did themselves proud on this one.
Conclusion
In typically Canon fashion, the EOS-1D was a long time coming, but
delivers an impressive punch now that it's here. There's no question that Canon
has staked new ground in the no-excuses professional digital SLR category. The
EOS-1D is not only the fastest pro digital SLR, but arguably the most rugged
and most configurable. Color and resolution both look very good, very much up
to the standard you'd expect from Canon. I complained about the default tone
curve in the prototype units I tested, but the production model performed quite
well in this area, Canon apparently having tweaked the tone curve one last time.
- And of course, Canon has thoughtfully provided the capability to adjust the
tone curve (however laboriously) to exactly suit your preferences. Other aspects
of the camera are very welcome, including particularly the ability to use both
RAW and JPEG files with no perturbation in the workflow. - I really like the
concept of having a JPEG "finished file" available immediately, with
a RAW-format "digital negative" available as backup in the event of
exposure slips or second-guessing on color matrix settings. Priced competitively,
it won't deliver quite the shock to the market that the earlier EOS-D30 did,
but certainly answers the demands professional Canon shooters have been making
for a camera worthy of their affections.
The obvious question many of our readers and prospective purchasers will ask
is how its 4 megapixel sensor compares with the 6 megapixel one in the Nikon
D1x, and the 5 megapixel one in the (just now forthcoming) Olympus E-20N. Frankly,
this is an issue to be decided by the ultimate users of the camera, not "ivory
tower" reviewers like myself. ;-) While resolution is one of those things
(like money or good looks) that's hard to have too much of, I do think that
the 4 megapixel resolution of the 1D will be very appropriate for Canon's target
market of photojournalists & sports shooters. Commercial photographers looking
for high-resolution images for double-truck catalog or fashion spreads may want
more, but they're more likely to buy a high-resolution studio camera anyway.
Bottom line, I think Canon's going to be able to sell every EOS-1D they can
produce. All in all, a great showing from Canon in the pro digital SLR market!
<<EOS-1D SAMPLE IMAGES! | Additional Resources and Other Links>>
Reader Comments!
Questions, comments or controversy on this product? Click
this link to see what other Imaging Resource readers have had to say about
the Canon EOS-1D, or add comments of your own!
)