Olympus EVOLT E-500By: Shawn Barnett and Dave Etchells8.0 megapixels, ZUIKO DIGITAL lens mount, digital SLR design, and loads of features! <<Shutter Lag & Cycle Time Tests :(Previous) | (Next): Camera Modes & Menus>> Page 10:Operation & User InterfaceReview First Posted: 09/25/2005, Updated: 12/05/2005 |
Operation and User Interface
The E-500's user interface is similar to its predecessors, with a multi-page menu system that's easy to navigate. The standard Olympus Shortcut menu screen has been omitted, made unnecessary by the many single-purpose buttons for major functions on the camera body. Menu layouts are straightforward. A Mode dial on top of the camera changes capture modes quickly. Once you get into the Record menu, options are organized by function, accessed by a series of tabs along the left side of the screen. This layout lets you quickly skip to the options you need without sifting through pages of menu items. In any of the manual exposure modes, aperture and/or shutter speed is adjusted externally, as is exposure compensation. Once you get the hang of things, the control layout is quite intuitive and efficient.
Control Enumeration

Lens Release Button: Tucked away next to the right side of the lens barrel (as viewed from the front), this button unlocks the lens from the mount.

Shutter Button: Located on an angled panel atop the right handgrip, the Shutter button sets focus and exposure settings when pressed halfway and triggers the shutter when fully pressed.

+/- (Exposure Compensation) Button: Behind the Shutter button, this button adjusts the exposure compensation from +5 to -5 EV in 1/3 or 1/2-step increments when pressed while turning the Control dial.
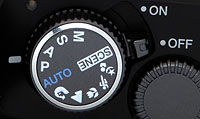
Mode Dial: The most prominent control on the top panel, this dial controls the camera's main operating mode. Choices are Manual, Shutter Priority, Aperture Priority, Program, Auto, Portrait, Landscape, Macro, Sports, Night Scene, and Scene modes.
Power Switch (see image above): Jutting out from under the Mode dial on the right side, this switch turns the camera on and off.
Control Dial: Right of the Mode dial is the Control dial, which adjusts a wide variety of settings when turned while pressing control buttons.
In Playback mode, this dial controls digital enlargement of captured images up to 14x when turned toward the right. The dial also accesses the four, nine, 16, and 25 image thumbnail index display modes, plus the calendar mode when turned to the left.

Diopter Adjustment Dial: Tucked on the left side of the viewfinder eyepiece, this dial adjusts the optical viewfinder's optics to accommodate eyeglass wearers.

Flash Release Button: The top button in a series lining the left side of the LCD monitor, this button releases the pop-up flash. A second press displays the Flash Mode menu, with options varying with the exposure mode. If set through the Setup menu, pressing this button with the +/- button lets you adjust the flash exposure compensation.
![]()
Playback Button: Below the Flash Release button, this button switches the camera to Playback mode. The E-500 is a "shooting priority" camera, so you can return to capture mode either by pressing the Playback button again, or simply by pressing the Shutter button.
![]()
Erase Button: Next in line below the Playback button, this button lets you erase the currently displayed image, with a Yes/No confirmation screen. If pressed while the camera is in a shooting mode, the most recently-captured image appears on the LCD display with an option to erase it.
![]()
Menu Button: Directly below the Erase button, this button calls up the settings menus in any camera mode.
![]()
Info Button: The final button in the series lining the LCD monitor, this button controls the amount of information displayed on the LCD monitor in Playback mode, cycling through six display modes, including a histogram display.

AE/AF Lock / Protect Button: On the right side of the viewfinder eyepiece, this button locks the exposure and/or focus setting in any record mode, and can be programmed through the settings menu.
In Playback mode, this button marks an image for write-protection.

White Balance Button: In the top right corner of the rear panel, this button can be programed to access the One-Touch WB setting, or to display a range of image preview options for double-checking the white balance setting.

AF Area Selection Button: To the right of the One-Touch WB button, this button lets you manually select the active AF point, or leave AF area selection under automatic control.

Drive / Copy / DPOF Button: Next to the top right corner of the LCD monitor, this button cycles through the E-500's available drive settings, including Single-Frame, Sequential Shooting, Self-Timer 12S, Self-Timer 2S, Remote Control 0S, and Remote Control 2S modes.
In Playback mode, this button lets you copy files from one memory card to another. If the camera is connected to a printer, pressing this button lets you instantly print selected images.
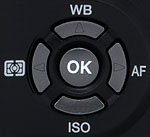
Four-Way Arrow Pad (White Balance, AF, ISO, and Metering Buttons): Made up of four buttons arranged in a circle, the Arrow Pad controls many of the camera's operations. The top arrow key controls the White Balance mode, while the right arrow selects the AF mode. The bottom arrow adjusts the ISO setting in conjunction with the Control dial, and the left arrow sets the camera's metering mode.
In Playback mode, the left and right Arrows move forward or backward through the pictures stored on the card. Up and down arrows jump through the images 10 frames at a time. All four are used to scroll around portions of the zoomed image in Zoom Playback mode.
In the LCD menu system, the Arrow buttons navigate through menu screens and select settings.
OK Button (see image above): Located in the center of the Four-Way Arrow pad, this button confirms menu and control selections.

Follow Imaging Resource: