Fuji FinePix 40iLook! There in your pocket! It's a camera! It's an MP3 player! It's... The Fujifilm Finepix 40i!<<Shutter Lag & Cycle Time Tests :(Previous) | (Next): Camera Modes & Menus>> Page 8:Operation & User InterfaceReview First Posted: 11/03/2000 |
Operation and User Interface
The F40i's user interface is uncomplicated and easy to learn. We barely needed the manual to perform the camera's basic functions. There are only a few exposure adjustments available, and these are controlled through the LCD menu. Flash and LCD display Off/On are controlled via external buttons, as are the Digital Zoom, Menu/OK, and Back controls (used to exit the Menu selection mode). While we normally like to see less reliance on the LCD menu system, we also understand Fujifilm's need to maintain minimal external elements with this compact model. The LCD menus themselves are also very simple, and are navigable via the arrow buttons on the back panel. The tiny, wired remote is also very straightforward, and we enjoyed its remote image capture and playback utilities, in addition to the MP3 control.
Control Enumeration

Shutter Button: Located on the very right side of the camera's top panel, this button sets exposure and focus when depressed halfway, and fires the shutter when fully depressed. In Movie mode, pressing this button starts and stops the movie and sound recording functions. When operating in Self-Timer mode, a full press of the shutter button triggers a 10-second countdown.
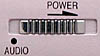
Power/Audio Switch: Located to the left of the shutter button, this switch powers on the camera when pushed to the right, or activates the MP3 playback mode when pushed to the left. When you activate the camera's power, the lens cover retracts and the lens extends slightly into its operating position (these actions are reversed when the camera is powered off). Sliding the switch into the Audio position activates the MP3 player capability.
Flash Button: The smallest control on the camera's top panel, this button is marked with a traditional flash symbol. By pressing it sequentially, you cycle through the following modes: Auto, Red-Eye Reduction, Forced Flash, Suppressed Flash, and Slow Synchro.
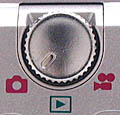
Mode Dial: located to the right of the optical eye-level viewfinder on the camera's back panel, this ribbed dial controls the camera's operating mode. It has three positions, each marked with standard record, playback, and movie icons:
- Photography (Record) Mode: Sets up the camera for recording still images, in either Automatic or Manual exposure modes (selectable in the Record menu).

- Playback Mode: Allows you to Playback, Erase, Protect, and Resize images, as well as set them up for printing on a DPOF compatible device, and add various wipe effects to the playback function. You can also review movie images, switch to index display (one of two formats), and zoom-in on and scroll around full-size images.
- Movie Record Mode: Sets the image resolution size to 320 x 240 pixels. This mode allows you to record up to 80 seconds of moving images (with sound) per file. Digital Zoom is available to 1.88X.
![]()
Left and Right Arrow Buttons: Located in the top right corner of the back panel, these two buttons serve multiple functions. In any Record mode menu, they navigate through available options, and the Zoom control (below) is used to scroll through the settings within option windows. In Playback mode, these two buttons scroll through captured images and index displays.
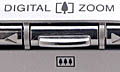
Digital Zoom Control: Centered between the left and right arrow buttons, this toggle switch controls the digital zoom (up to 3.75X in Photography Record mode and up to 1.88X in Movie Record mode). In any Record menu, this toggle switch acts as the up and down arrows when selecting menu options. In Playback mode, it controls the movie playback function. When viewing captured still images, this toggle controls the Playback zoom feature, which allows you to enlarge an image to examine fine details. Once the captured image is enlarged, all four arrow buttons allow you to scroll within the image to view different areas

Display Button: Located above the top left corner of the LCD monitor, this button controls the LCD display. In Record mode, the Display button cycles through the LCD monitor's image and information displays. When in Auto Exposure mode, the first press activates the monitor image and shooting information; the second press brings up a framing grid to help you line up your shots; the third press turns off the grid and information display, leaving just the image; and the fourth press turns the LCD monitor off entirely. In Manual mode, the information display is automatically activated when the camera turns on. Pressing the Display button once brings up the image and center target, the second press removes all information, leaving the image alone, and the third press returns to the information display. In Playback mode, the button cycles through the normal image display, information display, and index display.
![]()
Back Button: To the right of the Display button, the Back button backs out of menu changes and menu screens.
![]()
Menu/OK Button: The far right button above the LCD monitor is the Menu/OK control. It activates the option menus in Still and Playback camera modes. Once activated, the right and left arrow keys are used to scroll from one menu to the next, and the zoom control is used to select different options within the menus. One the menu option is selected, the OK button is used to set or confirm the selection.
Remote Control Enumeration
Record/Play Button: Located on the right side of the display panel, the Record/Play button serves in multiple capacities. In Photography Record mode, it doubles as a remote control shutter release and a playback button. In Audio mode, it serves as the Play/Pause/Stop button for listening to MP3 files.
Volume Buttons: The Volume control buttons are used to adjust the output of the MP3 player.
Left and Right Arrow Buttons: In Photography mode the arrow buttons (located just below the volume controls) are used to zoom in and out of an image with the Digital Zoom. In Playback mode, the arrow buttons are used to scroll through displayed images. In Audio mode, the arrows operate like comparable music players, skipping backward and forward through available MP3 tracks.
Bass Button: Located on the bottom of the remote control, this button adjusts the bass level of the MP3 player. Normal mode keeps the bass at normal levels, while Bass 1 and Bass 2 incrementally increase the amount of bass.
Mode Button: Directly beside the Bass button, the Mode button controls the MP3 playback mode. Normal mode plays all of the tracks in sequence, then stops at the end. Repeat All Tracks mode plays each of the tracks and then repeats them, until you discontinue the playback. Repeat Track continuously repeats the same track, until you stop it.
Hold Switch: Opposite the Mode and Bass buttons, this sliding switch locks and unlocks the controls on the Remote control. This prevents settings from being accidentally changed while the remote is being handled.

Follow Imaging Resource: