Fuji FinePix S602 ZoomFuji's latest electronic SLR offers improved image quality, fast response, high ISOs, and 30 fps movies at full VGA resolution!<<Optics :(Previous) | (Next): Shutter Lag & Cycle Time Tests>> Page 6:Exposure & FlashReview First Posted: 4/18/2002 |
Exposure
|
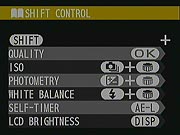 To further speed access to key controls, Fuji included a Shift button, which provides shortcuts to several menu options, including resolution and quality settings, ISO, metering mode, white balance, self-timer and LCD brightness. (The available shortcut controls are shown in the screen shot at right.) You can control these functions by pressing Shift along with another button, sometimes rotating the command wheel to make a particular selection. As a memory aid, pressing and holding the Shift button brings up a display showing which combinations control what. In normal operation though, you don't have to wait for that display to appear, just press the appropriate combination, make your selection, and continue with your shooting. It'll take a little memory work to learn which buttons control what in this "shortcut mode," but it'll be time well spent, as the shortcuts do let you navigate these key camera options much more quickly.
A Power / Mode switch on top of the camera puts the S602 Zoom into either Record or Playback modes, with an Off setting that completely powers down the camera. Once in Record mode, the main exposure modes are all accessed via the Exposure Mode dial, with options of Set, Manual, Aperture Priority, Shutter Priority, Program AE, Auto, Scene Program, and Movie. The Set position displays a camera settings menu, which I'll detail further on. In full Auto exposure mode, the camera controls all aspects of the exposure, leaving you in charge of zoom, flash mode, and any special drive settings. Scene Program mode offers a handful of preset shooting modes, set up for specific situations. Turning the Command wheel next to the Exposure Mode dial cycles through Portrait, Landscape, Sports, Night Scene, and Black and White Monochrome modes.
The remaining exposure modes on the dial offer a range of manual control options. Program AE lets the camera control shutter speed and aperture, but gives you control over all other exposure variables. A nice feature here is that rotating the Command wheel cycles through a range of equivalent exposure settings, letting you choose between wider apertures and faster shutter speeds or the opposite. (A nice touch, since this is often what you're trying to accomplish when you'd otherwise drop into Aperture or Shutter Priority mode.) Aperture and Shutter Priority modes both offer limited control, letting you adjust either the lens aperture or shutter speed while the camera picks the best value of the other variable. In both modes, turning the Command wheel adjusts the setting you're controlling. An exposure readout on the LCD reports whether the resulting shot will be under- or overexposed, giving you a chance to change the setting. Finally, Manual exposure mode offers total exposure control, letting you select both aperture and shutter speed together. In all exposure modes other than Auto, Scene Program, and Manual, the Exposure Compensation adjustment lightens or darkens the overall image from -2 to +2 exposure equivalents (EV) in one-third-step increments.
Exposure times range from 1/2,000 to three seconds in Auto and Scene Modes, while Programmed AE, Aperture Priority and Shutter Priority modes restrict the upper limit to 1/1,000. Conversely, Manual mode increases the range to include exposure times from 1/10,000 to 15 seconds. Turning the Command wheel alone in Manual mode sets shutter speed, while holding down the Exposure Compensation button and turning the wheel adjusts the aperture setting.
By default, the S602 Zoom uses a multisegment metering system, which bases the exposure on readings taken from 64 zones throughout the frame. The camera also offers Average and Spot metering modes, accessible through the settings menu. Average metering reads the entire scene and bases the overall exposure on the average value. Alternatively, Spot metering bases the exposure on a reading from the very center of the frame (good for off-center or high contrast subjects). The AE Lock button lets you lock the exposure for a specific part of your subject, by aiming the camera to center the area you want to base exposure on in the viewfinder, and then pressing the button until the AE Lock icon appears on the LCD display. The exposure will remain locked until the AE Lock button is pressed again or the Shutter button is fully pressed and released. While you can achieve much the same effect with most cameras by half-pressing and holding the shutter button prior to the exposure, that approach has the sometimes undesired side effect of also locking focus. You may not need it often, but when you do, a separate AE Lock control is invaluable.
If you're not sure of the exact exposure to use, an Auto Exposure Bracketing function snaps a series of three images at different exposure settings, making it easier to get a good exposure in critical shooting conditions. You can set the exposure step size for these series through the Record menu. The camera captures one image at the normal exposure, one slightly underexposed, and one slightly overexposed.
In any of the nonautomatic exposure modes, the camera's ISO sensitivity setting can be adjusted to 160, 200, or 400, regardless of the resolution setting. Selecting the 800 or 1600 ISO equivalents forces the camera's resolution to 1.0 megapixels because these ISO values rely upon Fuji's Pixel Data Coupling, which combines data from groups of four pixels at a time. (Image quality is automatically set to Normal at both high sensitivity settings.)
The S602 Zoom has a full range of color balance settings, adjusted through the White Balance option. Choices include Auto, Custom 1, Custom 2, Daylight, Shade, Daylight Fluorescent, Warm White Fluorescent, Cool White Fluorescent, and Incandescent settings. The two Custom settings are manual adjustments, and base the white balance on a white card placed in front of the camera. These settings are saved in the camera's memory, allowing you to recall either the Custom 1 or Custom 2 setting at any time. (Having two separate custom white balance settings can be very handy if you're shooting in an environment with mixed lighting.) In addition to white balance, a Sharpness adjustment lets you control the in-camera sharpening, offering Hard, Normal, and Soft adjustment settings.
For delayed exposures, the S602 Zoom's Self-Timer mode offers two- and 10-second countdowns between the time the Shutter button is fully pressed and when the shutter actually fires. The 10-second option gives you time to compose the shot, then run around in front of the camera to get into your own pictures. The 2-second self-timer option is very handy when you have the camera propped on a tripod or other support for a long exposure, and don't want the pressure of your finger on the shutter button to jostle it. With the short self-timer option, you can prop the camera, trip the timer, and the shutter will release a couple of seconds later, after any vibrations have died down. A useful feature!
Flash
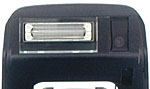 The built-in, pop-up flash on the S602 Zoom operates in one of five modes, all accessed by turning the Command wheel while pressing the Flash button on top of the camera. Modes include Auto (lightning bolt icon with an "A"), Red-Eye Reduction (eyeball icon), Forced On (lightning bolt), Forced Off (lightning bolt with a slash), Slow-Synchro (lightning bolt with an "S"), and Slow-synchro with Red-Eye Reduction (eyeball with "Slow" beneath it). Auto, Forced On, and Forced Off are pretty self-explanatory. Red-eye Reduction means that the camera fires a small pre-flash before the full flash, to reduce the occurrence of the Red-eye Effect. The Slow-Synchro modes combine the flash with a slow shutter speed and are good for night subjects because they allow more ambient light into the image. (This helps avoid the common syndrome of a ghastly white subject in front of a pitch-dark background so common in flash shots from low-end cameras.) A small release button on the left side of the flash (as viewed from the back) releases the flash from its compartment. Note that the flash must be popped up in order to change its operating mode. A brightness adjustment accessed through the settings menu increases or decreases the overall flash power from -0.6 to +0.6 EV in one-third-step increments. This is handy for balancing flash exposure with light coming from other sources in the scene, although I'd really like to see it extend further toward negative exposure compensation, for those times when you really want only a subtle fill-light.
The external flash hot shoe on top of the camera features a single contact, and hosts a range of Fuji and third-party flash units, apparently synchronizing to shutter speeds as fast as 1/1,000-second. The internal and external flash units cannot operate together, so the pop-up flash should be closed when an external flash is in use. (Another note to the Fuji engineers: Why not allow the internal flash to fire along with an external one? - If you combined this with a broader range of exposure adjustment for the onboard, it'd permit all sorts of combination direct/bounced flash exposure tricks.)
Movie and Sound Recording
When it was first announced, the movie resolution and frame rate were two specs that really raised eyebrows in the digicam community. The S602 Zoom's Movie mode captures moving images with sound at either VGA (640 x 480 pixels) or QVGA (320 x 240 pixels) resolutions. Full VGA resolution movies are big news in and of themselves, but when you add the fact that the 602 will acquire them at a full 30 frames per second it's even more remarkable. Not enough? Consider that it'll can also grab VGA-resolution movies at 30 fps without a gap, up to the full capacity of the memory card! (No buffer limitations, but you do have to have a very fast memory card to keep up with the high data rate.) It's still not a digital video recorder, and the files you end up with are really huge, but this is breakthrough technology in anybody's book. Movie recording stops and starts with a full press of the Shutter button, and a timer appears in the LCD monitor to report the available recording time. Most of the exposure features are adjustable in movie mode, with the exception of flash, digital zoom, and the high-speed still-capture shooting options.
Back when Fuji first announced their SuperCCD technology, they spoke of possible future capabilities it could bring to motion recording. We're now seeing that promise bear fruit, in the high resolution/high speed motion capture of the S602. The key technology here is what Fuji calls their "Pixel-Mixing Technology," in which the signals from the higher-resolution SuperCCD sensor are actually mixed on-chip, while still in analog form. This mixing happens not only vertically on the CCD array itself, but horizontally in the data-readout shift registers at the bottom of the array. The end result is that the 3+ megapixel chip can be clocked as if it were a VGA-resolution video sensor, greatly speeding the process of getting the data off the chip and into memory. Even with this advantage in the CCD though, I suspect there was still some tricky engineering involved in arranging things so the huge amount of data could stream through the JPEG compression and onto the memory card fast enough to not slow the 30fps frame rate. Very impressive!
Voice Memo Mode
Accessed via the settings menu, a Voice Memo mode lets you record short sound clips to accompany still images in Auto and Scene Program exposure modes (also in Playback mode). Voice captions can last as long as 30 seconds. When activated, Voice Memo mode begins recording audio immediately after image capture, with a recording indication on the LCD screen.
Continuous Shooting
The S602 Zoom offers a range of high-speed shooting modes, all selected by holding down the Drive Mode button and turning the Command wheel. The available modes are called Top-5 Frame, Auto Bracketing (discussed above), Final-5 Frame, and Long-Period Continuous Shooting.
Perhaps the most interesting of the continuous modes are the ones called Top-5 Frame and Final-5 Frame. Top-5 Frame captures five consecutive frames at intervals as quick as 0.2 seconds, depending on the file size and quality settings. After the series is captured, all images are displayed at the bottom of the LCD screen as thumbnails while they are being recorded to the memory card. Final-5 Frame mode captures as many as 25 frames at the same 5 fps frame rate while the Shutter button is held down. The camera then records the last five frames of the series, recording what happened just before you released the shutter button. Final-5 Frame mode is thus especially handy for capturing fleeting moments. - If you're like me, you always recognize the perfect expression on your child's face or the perfect pose by your pet a fraction of a second after it's gone. With the Final-5 Frame feature, I can finally capture all those previously-missed moments, since the camera effectively reaches back in time to grab what I was looking at up to a second before I released the shutter button.
For more extended rapid-fire shooting, Long-Period Continuous Shooting mode works only in Auto exposure mode, and automatically sets the image resolution to 1.0-megapixels. What you gain though, is the ability to capture up to 24 seconds of continuous action, albeit with a longer interval between frames of about 0.6 seconds. (That's about 40 frames, at a rate of about 1.7 frames/second.) As with the Movie mode though, you do need a fast memory card to get the best performance from Long-Period Continuous Shooting mode.
Multi-Exposure Mode
A Multi-Exposure mode lets you overlay images in the same file, for a double-exposure effect. Activated through the settings menu, Multi-Exposure mode continuously overlays exposures until you tell it to stop, merging each new image with the one (itself possibly also a composite) already in memory. A preview screen appears after each shot, so that you can check the effect. You can also opt to return to the previous version of the image (before your last exposure) and start over from there. I'm honestly not sure what use this might be, as it seems easier to do this (with more control to boot) in an image-editing program. It's there if you want it though...
Reader Comments! --> Visit our discussion forum for the Fuji FinePix S602 Zoom!

Follow Imaging Resource: