Fuji FinePix S602 ZoomFuji's latest electronic SLR offers improved image quality, fast response, high ISOs, and 30 fps movies at full VGA resolution!<<Shutter Lag & Cycle Time Tests :(Previous) | (Next): Camera Modes & Menus>> Page 8:Operation & User InterfaceReview First Posted: 4/18/2002 |
Operation and User Interface
With a lot knobs, switches, and buttons spread out around its case, the
S602 Zoom's user interface at first seems more complicated than it really is.
Most of the exposure features can be controlled externally, though they do require
the LCD display to be active so that you can see the settings you've selected.
(A small status display panel would be handy here for making quick changes while
keeping the LCD display in the smaller EVF view.) A Shift button on the left
side of the camera provides shortcut access to a number of functions, saving
a lot of time otherwise spent scrolling through menus or switching the mode
dial to the Setup position. When you do have to deal with the LCD menu though,
it's very straightforward, consisting of a row of subject tabs at the bottom
of the LCD display. As you scroll through each tab, the relevant options appear
above it. Though you'll probably spend an hour or more learning to use the camera,
operation becomes progressively easier and faster as you get to know the camera.
Shutter Button
Located on the top panel in the center of the Power / Mode dial, this black button sets focus and exposure when halfway pressed and fires the shutter when fully pressed. If the self-timer is activated, a full press of the Shutter button triggers the two- or 10-second countdown.

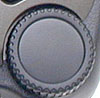
Power / Mode Dial
Surrounding the Shutter button on the top panel, this dial controls the camera's power, and selects either Record or Playback operating modes.

Exposure Compensation Button
Just behind the Power / Mode dial on the top panel, this button lets you adjust the exposure compensation from -2 to +2 EV units (f-stops for the old timers among us) in one-third-step increments, by pressing it while simultaneously turning the Command wheel (except in Manual, Scene Program, and Auto modes). In Manual exposure mode, this same set of actions adjusts the lens aperture setting from f/2.8 to f/11.

Flash Button
Just to the right of the Exposure Compensation button, this button sets the onboard flash mode. If the pop-up flash is released to its operating position, pressing this button displays the on-screen flash menu. Holding the button down while turning the Command wheel selects Auto, Red-Eye Reduction, Forced On, Forced Off, Slow-Synchro, or Red-Eye Reduction Slow-Synchro modes.

Drive Mode Button
Directly behind the Flash button, pressing this button displays the on-screen Drive menu. Turning the command wheel with the Drive Mode button held down selects Single Exposure, Top-5 Frame, Auto Bracketing, Final-5 Frame, and Long-Period Continuous Shooting modes (the latter in Auto mode only).
Command Wheel
Located in the far lower right corner of the top panel, behind the Drive Mode button, this ribbed black wheel adjusts various camera settings when turned while pressing a control button. In Manual mode, turning this wheel with no control button pressed sets the shutter speed. In Aperture and Shutter Priority modes, turning the wheel adjusts the corresponding exposure setting (aperture or shutter speed, respectively), while in Program AE mode, turning the wheel selects between a range of equivalent exposure settings. (This last lets you bias the camera's exposure system to prefer larger or smaller apertures, giving you some degree of control over depth of field and shutter speed, while still maintaining automatic exposure control.)
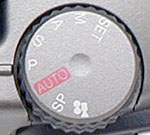
Exposure Mode Dial
Directly to the left of the Command wheel, this large, ribbed dial controls the camera's exposure mode, offering the following selections:
 Movie: Records movies
with sound, for as long as the memory card has available space. (No buffer
limitations!)
Movie: Records movies
with sound, for as long as the memory card has available space. (No buffer
limitations!)
 Scene Program: Offers
a selection of preset "scenes" for shooting in specific situations.
Scene options are Portrait, Landscape, Sports, Night Scene, and Black and
White Monochrome.
Scene Program: Offers
a selection of preset "scenes" for shooting in specific situations.
Scene options are Portrait, Landscape, Sports, Night Scene, and Black and
White Monochrome.
 Automatic Exposure Mode:
Puts the camera in charge of all exposure decisions, with the exception of
flash mode, macro focusing, continuous shooting, and the self-timer.
Automatic Exposure Mode:
Puts the camera in charge of all exposure decisions, with the exception of
flash mode, macro focusing, continuous shooting, and the self-timer.
 Program AE Mode: Lets
the camera control shutter speed and aperture, while the user controls all
other exposure variables. (And a range of shutter speed/aperture combinations
can be selected by rotating the Command Wheel.)
Program AE Mode: Lets
the camera control shutter speed and aperture, while the user controls all
other exposure variables. (And a range of shutter speed/aperture combinations
can be selected by rotating the Command Wheel.)
 Shutter Priority Mode:
The user controls the camera's shutter speed setting, from 1/1,000 to three
seconds, while the camera chooses the best aperture value. All other exposure
options are available.
Shutter Priority Mode:
The user controls the camera's shutter speed setting, from 1/1,000 to three
seconds, while the camera chooses the best aperture value. All other exposure
options are available.
 Aperture Priority Mode:
Just the opposite of Shutter Priority, the user now controls the lens aperture
(from f/2.8 to f/11 in 13 steps) while the camera selects the best corresponding
shutter speed. (Maximum aperture at telephoto is actually f/3.1, but the display
still reads f/2.8.) All other exposure settings are available.
Aperture Priority Mode:
Just the opposite of Shutter Priority, the user now controls the lens aperture
(from f/2.8 to f/11 in 13 steps) while the camera selects the best corresponding
shutter speed. (Maximum aperture at telephoto is actually f/3.1, but the display
still reads f/2.8.) All other exposure settings are available.
 Manual Exposure Mode:
Provides total control over the exposure, increasing the shutter speed range
to include exposure times from 1/10,000 to 15 seconds. All exposure functions
except for Exposure Compensation are available.
Manual Exposure Mode:
Provides total control over the exposure, increasing the shutter speed range
to include exposure times from 1/10,000 to 15 seconds. All exposure functions
except for Exposure Compensation are available.
 Set Mode: Displays
the Setup menu for changing basic camera settings.
Set Mode: Displays
the Setup menu for changing basic camera settings.

AEL Button
Positioned in the top right corner of the rear panel, this button locks the exposure setting until pressed again or until the Shutter button is fully pressed and released.
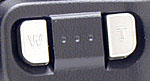
Zoom Buttons (Playback Zoom Control)
Directly to the left of the AEL button, these buttons control the optical and digital telephoto when the camera is in Record mode. In Playback mode, the buttons zoom the LCD view in and out of captured images, enlarging details.

Back Button
Beneath the "T" button of the Zoom controls, this button backs out of menu selections without making any changes. It can also be used to quickly exit from some camera functions. (Such as enlarged playback of images.)

Focus Check Button
To the left of the Back button, this button enlarges the center portion of the frame on the LCD monitor by about 2x, making it easier to see the results of manual focus adjustments. (This enlargement isn't available in 1M or VGA resolution modes.)

EVF / LCD Button
Adjacent to the top right corner of the LCD monitor, this button switches the viewfinder and playback displays between the electronic viewfinder eyepiece and LCD monitor.

Display Button
Directly below the EVF / LCD button, this button cycles through the information display options in both Playback and Record modes. In Record mode, one of the optional displays includes an alignment grid that divides up the image area into thirds, horizontally and vertically. (This is very handy for lining up the camera with objects in the scene, to insure that your photos are square and level.) In Playback mode, the display button also activates a nine-image index display mode.
Four Way Arrow Pad
Located beneath the Focus Check and Back buttons on the back panel, this arrow button toggles up and down or left and right, with an arrow in each direction. In any settings menu, the arrow keys navigate through menu options and selections.
In Playback mode, the right and left arrows scroll through captured images on the memory card. When an image has been enlarged in Playback or in Preview mode, all four arrows move around within the enlarged view.
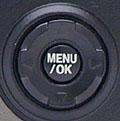
Menu / OK Button
Tucked in the center of the Four Way Arrow pad, this button calls the settings menu in any mode (except for Set mode, which displays the Setup menu immediately upon entering that mode). This button also acts as the "OK" to confirm menu changes.

Diopter Adjustment Dial
Just on the left side of the optical viewfinder eyepiece, this dial adjusts the focus of the viewfinder to accommodate near- or farsighted users.

Pop-Up Flash Release Button
Nestled on the left side of the camera, just beneath the pop-up flash compartment, this button releases the flash, allowing it to spring open its operating position.

Macro Button
Located the furthest forward on the camera lens (and marked with the standard Macro flower icon), this button cycles through Normal AF, Macro, and Super Macro modes when pressed repeatedly.

Shift Button
Directly to the right of the Macro button, this button displays shortcuts to menu functions in both Record and Playback modes.

Info Button
Just beneath the neck strap eyelet on the left side of the camera, this button displays exposure and camera information in both Record and Playback modes. In Record mode, it lists the current exposure settings. In Playback mode, it shows a histogram of the captured image, as well as the exposure settings used to capture it.

Focus Switch
Below the Info button, this switch selects manual or automatic focus control.
One-Push AF Button
Centered inside the Focus switch, this button momentarily triggers the autofocus system to quickly adjust the focus when you're in manual focus mode. (This is very handy for getting the focus "in the ballpark" before fine-tuning it manually.)
MF Adjustment Ring
Encircling the end of the lens barrel, this notched ring adjusts the focus when the camera is in manual focus mode.

Follow Imaging Resource: