Sony Cyber-shot DSC-F717Sony updates their already-impressive five megapixel F707, with improved user controls, better color, amazing white balance performance, and an external flash hot shoe!<<Shutter Lag & Cycle Time Tests :(Previous) | (Next): Camera Modes & Menus>> Page 8:Operation & User InterfaceReview First Posted: 9/2/2002 |
Operation and User Interface
The F717 packs a lot of camera controls into a relatively small space, making
good use of the left side of the lens barrel to spread the controls out a bit.
The panoply of external controls may seem a bit much at first, but I always appreciate
having as much external control as possible, as it saves having to scroll through
menu items for common settings. Given my prior experience with the F707 model,
I quickly adapted to the F717's control layout, which has only subtle differences.
Even novice users should be able to quickly adapt to the F717's control setup
though, as it's very logically laid out. The Mode dial on top of the camera controls
the main exposure mode, while things like Flash mode, Macro mode, White Balance,
Exposure Compensation, etc. are all controlled via small buttons, either on the
rear panel or along the left side of the lens barrel. The Command dial, located
in front of the Shutter button, lets you quickly adjust aperture and / or shutter
speed without accessing a menu system, a nice touch. I also liked the precise
control offered by the zoom toggle, with its slow or fast zoom operation, as well
the dual-purpose use of the Focus / Zoom ring. Overall camera operation is smooth
and efficient, with an easy-to-navigate LCD menu system and a user interface that
doesn't require a long learning curve. You may spend a few minutes reading through
the manual, but once you get the hang of things, the user interface is quite intuitive.
Control Enumeration

Shutter Button: Located on the right side of the top panel, on an angled
ridge that slopes down toward the front of the camera, this button sets focus
and exposure when pressed halfway. Fully depressing the button fires the shutter.
When the Self-timer is enabled, fully depressing the Shutter button begins a 10-second
countdown before the shutter fires.
![]()
Exposure Compensation Button: Adjacent to the Shutter button, this button
highlights the exposure compensation adjustment on the LCD screen. Once highlighted,
the exposure compensation is adjusted by turning the Command dial (below). A second
press of the button removes the highlight.
![]()
Command Dial: Directly in front of the Shutter and Exposure Compensation
buttons, this black, notched dial controls various exposure settings in any Record
mode. In Aperture Priority, Shutter Priority, and Manual exposure modes, it controls
exposure compensation, aperture, and / or shutter speed settings. Turning the
dial scrolls through the available settings, while a quick press of the dial selects
the setting for adjustment (highlighting it in yellow on the LCD screen). Once
the setting is selected, it can be adjusted by turning the dial forward or backward.
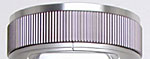
Manual Focus / Zoom Adjustment Ring: Surrounding the end of the lens barrel,
this notched collar adjusts the focus when the camera is in Manual focus mode.
When the camera is set to Auto focus mode, this ring controls the optical and
digital zoom settings. Through the Setup menu, the ring can be programmed such
that either clockwise or counterclockwise motion moves the lens toward the telephoto
end of its range. (Regardless of the direction of the zoom setting, clockwise
rotation of the ring (as seen from the rear of the camera) always reduces the
focal distance.)

Open Battery Compartment Switch: Located on the right side of the camera
(as viewed from behind), this sliding catch unlocks the compartment door, revealing
the battery and Memory Stick compartments.
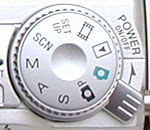
Mode Dial: Sitting atop the Power switch, this notched dial controls the
camera's operating mode. Choices are Full Auto (green camera icon), Program AE
(black camera icon), Shutter Priority, Aperture Priority, Manual, Scene, Setup,
Movie, and Playback modes.
Power Switch: Located underneath the Mode dial on top of the camera, pushing
this switch forward turns the camera on or off.
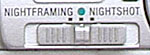
NightShot / NightFraming Switch: To the left of the Mode dial, this switch
activates either the NightShot or NightFraming modes, for low-light and no-light
shooting and framing. The center position returns the camera to normal operation.

Four Way Arrow Pad: Located in the top right corner of the camera's rear
panel, this rocker pad has four arrows, one pointing in each direction (up, down,
left, right). In any record mode (except Movie), the Up arrow controls the Flash
mode, cycling between Auto, Forced, and Suppressed. The Left arrow controls the
Quick Review function, which provides a quick playback of the most recently captured
image. The Right arrow activates the Macro shooting mode, and the Down arrow activates
the Self-Timer mode.
In Playback mode, the Right and Left arrows scroll through captured images. The
Up and Down arrows control the playback volume. When an image has been digitally
enlarged, pressing the center of this button returns to the normal view.
In all camera modes, the arrow keys navigate through settings menus, highlighting
menu options. Pressing the center of the pad confirms menu selections.
![]()
Menu Button: To the left of the Four Way Arrow pad is the Menu button,
which activates and deactivates the settings menus in all camera modes (except
for Setup mode, which automatically displays the menu upon entering the mode).

Index Button: Adjacent to the Menu button on the left, this button calls
up a nine-image index display in Playback mode. Pressing the button a second time
activates an information display for the thumbnail image selected, reporting the
main exposure information for the currently selected image. A third press returns
to the normal, single-image display.

Display Button: Located to the right of the viewfinder eyepiece, this button
controls the on-screen information display in all camera modes (except Setup mode).
It also enables the histogram display. Repeated presses cycle through no/limited
information, detailed information, and detailed information with histogram display.

Finder / LCD Switch: Just above the top left corner of the LCD monitor,
this switch directs the viewfinder display to either the viewfinder eyepiece (EVF)
or the LCD monitor.

Diopter Adjustment Dial: Positioned directly above the viewfinder eyepiece,
this dial adjusts the viewfinder to accommodate far- or nearsighted users.
![]()
White Balance Button: Located on the left side of the lens barrel (as viewed
from behind), this button cycles through the available White Balance settings:
Auto, Daylight, Cloudy, Fluorescent, Incandescent, and One-Push (manual setting).
![]()
One-Push Button: Just to the left of the White Balance button, this button
sets the One-Push white balance, based on a reading from a white card held in
front of the lens.
![]()
Metering Button: Directly above the White Balance button, this button cycles
through the Multi-Pattern, Center-Weighted, and Spot metering options.

AE Lock: Above the Metering button, this button locks the exposure reading
until it's pressed again, or until the Shutter button is pressed.

Zoom Rocker Button: Slightly protruding from the middle of the lens barrel,
this rocker button controls the optical and digital zoom in any Record mode. In
Playback mode, this button controls the digital enlargement of captured images,
as much as 5x.
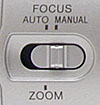
Focus Switch: To the left of the Zoom rocker button, this sliding switch
alternates between Auto and Manual focus modes. In the Auto position, it also
enables the Focus / Zoom ring to control optical and digital zoom.

Follow Imaging Resource: