Sony MVC-FD95Sony takes the Mavica line to 2.1 megapixels, and 12-bit digitization!<<Operation & User Interface :(Previous) | (Next): Image Storage & Interface>> Page 9:Camera Modes & MenusReview First Posted: 7/13/2000 |
Camera Modes and Menus
The MVC-FD95 has a number of operating modes, selected via the Program AE button mentioned above. Because the LCD screen displays for them are virtually identical, we won't show the different displays separately here.
Automatic Exposure (no icon): In this mode, the camera controls both aperture and shutter speed, basing the exposure on existing light levels. The user has control over exposure compensation (EV), flash, white balance and metering.
Movie Mode: This mode allows you to capture up to a 60 second 160 x 112 or a 15 second 320 x 240 movie with sound. You have all the above exposure capabilities, including the ability to change from Automatic Exposure to any of the Program AE modes.
Playback Mode: This mode allows you to review captured still images and movies on the LCD panel. An index display puts up to six images on the screen at one time for quick review.
Capture Mode Menu: Pressing the up arrow on the rocker toggle button calls up the capture menu when in Still or Movie capture modes. From there, you have the following submenus:
- Self-Timer: Activates the 10 second self-timer mode.

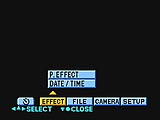 Effect:
- Date/Time: Turns the date and time LCD display on and off.
- Picture Effect: Accesses the Solarize, Black & White, Sepia
and Negative Art picture effects.
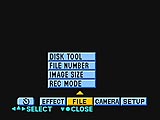 File:
File:
- Record Mode: Sets the still record mode to Text, Voice, E-Mail or Normal. In Movie mode, allows you to change the minimum record time (in response to a quick press of the shutter button) to five, 10 or 15 seconds.
- Image Size: Sets the still image sizes to 1600 x 1200, 1600 (3:2), 1600 (ECM), 1024 x 768 or 640 x 480. In Movie mode, sets the image size to 320 x 240 or 160 x 112.
- File Number: Sets the file numbering to Series or Normal.
- Disk Tool: Allows you to format the disk, copy the disk or cancel
the selection.
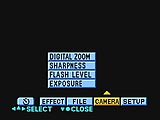 Camera:
- Exposure: Sets the exposure compensation from -2.0 to +2.0 in 1/3 EV increments.
- Flash Level: Sets the flash intensity level to High, Normal or Low.
- Sharpness: Sets the sharpness level anywhere from -2 to +2.
- Digital Zoom: Turns the 2x digital telephoto function on and
off.
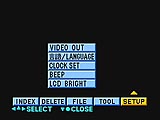
 Setup:
- LCD Bright: Adjusts the brightness of the LCD displays.
- Beep: Turns the camera's beep sound on or off.
- Clock Set: Changes the camera date and time settings.
- Language: Sets the menu language to English or Japanese.
- Video Out: Sets the camera's video out signal to NTSC or PAL
formats.
Playback Mode Menu: Activating the Playback menu pulls up the
following submenus:
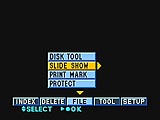
- Index: Calls up a nine image index display.
- Delete: Deletes the currently displayed image with an option to cancel.
 File:
File:
- Protect: Write protects the currently displayed image.
- Print Mark: Turns the camera's print mark on and off (date and time stamp).
- Slide Show: Allows you to view captured images in a slide show format, as well as set up time intervals and the number of repeats.
- Disk Tool: Allows you to format or copy the disk, with an option
to cancel.
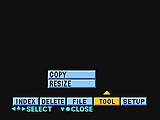 Tool:
Tool:
- Resize: Allows you to resize captured images.
- Copy: Copies the currently displayed image.
 Setup:
- LCD Bright: Adjusts the brightness of the LCD displays.
- Beep: Turns the camera's beep sound on or off.
- Clock Set: Changes the camera date and time settings.
- Language: Sets the menu language to English or Japanese.
- Video Out: Sets the camera's video out signal to NTSC or PAL formats.

Follow Imaging Resource: