Panasonic Lumix DMC-FZ20By: Dave EtchellsPanasonic introduces a five-megapixel digicam with the high quality optics of a 12x Leica lens. <<Shutter Lag & Cycle Time Tests :(Previous) | (Next): Camera Modes & Menus>> Page 9:Operation & User InterfaceReview First Posted: 12/17/2004 |
Operation and User Interface
The Lumix DMC-FZ20's user interface is straightforward and should present a relativelyshort learning curve if you read through the included manual. (Although there are a lot of features here, so I'd imagine that novice users could easily spend a couple of hours learning them all. Experienced digicam users should be able to come up to speed on the major functions in under an hour though.) I generally prefer to see external access to as many exposure controls as possible, and the DMC-FZ20 does provide a fair amount of control without resorting to the LCD menu system. The camera's Multicontroller controls a wide variety of functions independently of the LCD menu, though the menu itself is straightforward. As noted earlier, I also found the FZ20's menu system unusually fast to navigate.
Shutter Button: Located on the right side of the camera's top panel and
surrounded by the Zoom lever, the Shutter button sets focus and exposure when
halfway pressed, and when fully depressed, it trips the shutter release. In
Self-Timer mode, fully depressing the Shutter button triggers a two- or 10-second
countdown before the shutter is released.
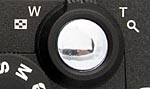
Zoom Lever: Surrounding the Shutter button, this lever controls the optical and digital zoom in any Record mode.
In Review mode, pushing the lever toward the "W" end activates a nine-image index display mode. Pushing the lever to the "T" end digitally enlarges a captured image as much as 16x. When playback zoom is enabled, pushing the lever back toward the "W" zooms back out.
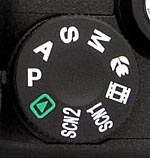
Mode Dial: To the left of the Shutter button, this notched dial is used
to select the camera's shooting modes as follows:
 Program AE (P):
Places the camera in control of shutter speed and lens aperture, while you
maintain control over everything else (i.e., white balance, ISO, metering,
exposure compensation, flash, etc.).
Program AE (P):
Places the camera in control of shutter speed and lens aperture, while you
maintain control over everything else (i.e., white balance, ISO, metering,
exposure compensation, flash, etc.).
 Aperture
Priority (A): Allows you to set the lens aperture from f/2.8 to f/8.0
(depending on the zoom setting), while the camera controls the shutter speed.
In this mode, you maintain control over all other exposure variables.
Aperture
Priority (A): Allows you to set the lens aperture from f/2.8 to f/8.0
(depending on the zoom setting), while the camera controls the shutter speed.
In this mode, you maintain control over all other exposure variables.
 Shutter Speed Priority
(S): Allows you to control the shutter speed settings from 1/2,000 to
eight seconds, while the camera controls the aperture. All other exposure
settings are available.
Shutter Speed Priority
(S): Allows you to control the shutter speed settings from 1/2,000 to
eight seconds, while the camera controls the aperture. All other exposure
settings are available.
 Manual (M):
Provides complete control over all exposure settings, including shutter speed
and lens aperture.
Manual (M):
Provides complete control over all exposure settings, including shutter speed
and lens aperture.
 Macro:
Places the camera into Macro mode, letting you focus on smaller objects at
a closer range.
Macro:
Places the camera into Macro mode, letting you focus on smaller objects at
a closer range.
 Movie:
Records moving images without sound, at either 30 or 10 frames per second.
Recording times are limited by memory card capacity and frame rate.
Movie:
Records moving images without sound, at either 30 or 10 frames per second.
Recording times are limited by memory card capacity and frame rate.
 SCN1:
Accesses one of nine preset scene modes.
SCN1:
Accesses one of nine preset scene modes.
 SCN2:
Same as above, accesses one of nine preset scene modes. (Through the Setup
menu, you can opt for a specific scene setting to automatically enable for
both modes.)
SCN2:
Same as above, accesses one of nine preset scene modes. (Through the Setup
menu, you can opt for a specific scene setting to automatically enable for
both modes.)
 Playback:
Lets you review captured images and movie files.
Playback:
Lets you review captured images and movie files.

Burst Mode Button: Directly behind the Shutter button / Zoom lever
combo on the top panel, this button accesses the three Burst modes (High, Low,
or Infinity), or returns to the single-shot mode.
![]()
Flash Release Button: Located on the rear panel, just below the pop-up
flash compartment, this button releases the pop-up flash from its closed position.

Diopter Adjustment Dial: Hidden away on the left side of the optical
viewfinder eyepiece, this dial corrects the viewfinder optics for eyeglass wearers,
with a range from +4 to -4.

EVF/LCD Button: The first button in a series lining the top of the
rear panel, this button switches the viewfinder display between the EVF and
LCD monitors.

Display Button: To the right of the EVF/LCD button, this button controls
the image and information displays in Record and Playback modes. In Record mode,
pressing the button cycles between the five display modes, which include the
image with information, image with information and histogram, "Out of Frame"
display, alignment grid, image with no information, and LCD monitor off (you
cannot disable the EVF, however).
In Playback mode, pressing the button cycles between the image with information, expanded information and histogram, and no information displays.

Exposure Button: On the right side of the Display button, this button
lets you shift the exposure in Program AE mode. After the shutter button has
been halfway pressed (displaying the aperture and shutter speed on the LCD screen),
pressing this button enables Program Shift mode. You can then use the right
and left arrow keys to shift the exposure toward a slower or faster shutter
speed, or toward a larger or smaller lens aperture. In Aperture Priority, Shutter
Priority, and Manual exposure modes, pressing this button lets you adjust the
aperture and/or shutter speed by pressing the button and then using the arrow
keys to adjust the selected variable. (As noted in my User Notes above, I felt
that this setup was a little awkward to use.
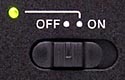
Power Switch: To the right of the Exposure button, this sliding switch
turns the camera on or off. Powering the camera on with the Mode dial set to
a record mode triggers the lens to extend. (Likewise, turning the camera off
causes the lens to retract.)

Menu Button: Next to the upper right corner of the LCD monitor is the Menu
button, which calls up the settings menus on the LCD display in all camera modes.
A second press of the Menu button cancels the menu display.

Four-Way Multicontroller: Located directly to the right of the LCD, the
Multicontroller is a four way rocker disk that accesses a variety of camera
settings. The arrow keys navigate through menu options and adjust camera settings.
In most record modes, the up arrow accesses the Exposure Compensation, Auto
Exposure Bracketing, Flash Exposure Compensation, and White Balance Adjustment
tools. The right arrow cycles through the available flash modes, while the left
arrow cycles through the Self-Timer modes. The down arrow activates a quick
review of the most recently captured image.
In Playback mode, the right and left arrow keys navigate through captured images and movie files. When an image has been digitally enlarged, the four arrow keys pan around within the image.

Delete Button: Adjacent to the lower right corner of the LCD monitor, this
button pulls up the delete menu in Playback and Review modes.

Focus Switch: Tucked on the left side of the lens barrel (when viewing the
camera from the rear), this switch selects between Auto and Manual focus modes.
A third position lets you quickly set the autofocus in manual focus mode, so
that you can fine tune it with the focus ring.
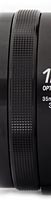
Focus Ring: Encircling the outer edge of the lens, this ridged ring twists
left and right so you can manually adjust focus.

Follow Imaging Resource: