Canon PowerShot G2Canon updates their very popular G1 with a 4 megapixel CCD and improved color management.<<Shutter Lag & Cycle Time Tests :(Previous) | (Next): Camera Modes & Menus>> Page 8:Operation & User InterfaceReview First Posted: 08/16/2001 |
Operation and User Interface
Like its predecessor, the G1, the Canon G2's combination of control buttons and dials may seem a little complicated at first glance, but once we became familiar with the features, we actually found the user interface to be very intuitive. We generally prefer to change as many exposure settings as possible without resorting to the LCD menu, and the G2 provides a fair amount of external control. The camera controls are somewhat spread out, but it's possible to operate the camera one-handed and still access the majority of the buttons (we wouldn't recommend it unless you're working at fast shutter speeds or with a flash). We appreciated the small status display panel on top of the camera, which allows you to check current camera settings without having to activate the LCD monitor (a nice battery conservation feature). We also enjoyed shooting with the rotating LCD screen, which made composing shots from odd angles a lot easier to manage. The ability to flip the monitor all the way around to face the back panel was great for keeping fingerprints and smudges off of the screen when handling the camera.
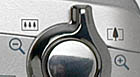
The new, larger hand grip was a real bonus, as it provided a much firmer hold on the camera. The only control features we had a hard time operating were the Main Power and Mode dials, which were difficult to turn with just one finger or thumb (especially one-handed). We found the force required to turn the Main dial from the Shooting mode to the Off position frequently pushed it beyond the target setting and on to the Replay mode. A two-finger approach worked much better. Take note that when using the Mode dial, the settings align with a very small and inconspicuous marker jutting from the base of the flash hot shoe mount (on the left side of the dial), which is easy to miss if you're not paying attention.
Control Enumeration
Zoom Toggle: Encircling the Shutter button on top of the camera is a toggle switch that controls the optical zoom in any Record mode. Pushing it to the left gives you the wide-angle setting and pushing it to the right zooms into telephoto.
In Replay mode, this toggle switch controls the digital enlargement, allowing you to enlarge captured images as much as 5x to examine fine details.

Shutter Button: In the center of the Zoom toggle switch is the Shutter button. When halfway depressed, it sets focus and exposure; when fully depressed, it trips the shutter release. In the Self-Timer / Wireless mode (see below), fully depressing the Shutter button triggers a 12-second countdown before the shutter is released. Holding the button down after an exposure displays the captured image on the LCD monitor for as long as you hold it down. You can also program the camera to provide an automatic 2- or 10-second display of the captured image by setting the Review value in the Record menu.

Continuous / Self-Timer / Wireless Controller Button: Located just behind the Shutter button and Zoom toggle switch, this button cycles between the Continuous Shooting, Self-Timer / Wireless Control, and Single frame recording modes.
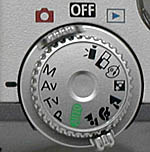
Mode Dial: To the left of the Continuous / Self-Timer button, and sitting on top of the camera's power control, this notched dial is used to select the camera's shooting modes. Canon divides these functions into two categories: Image Zone and Creative Zone. Their options are as follows:
Creative Zone
 Manual (M): Provides complete control over all exposure settings, including shutter speed and lens aperture.
 Aperture-Priority AE (Av): Allows you to set the lens aperture from f/2 to f/8 (depending on the zoom setting), while the camera controls the shutter speed. In this mode, you maintain control over all other exposure variables.
 Shutter-Speed Priority (TV): Allows you to control the shutter speed settings from 1/1,000 to 15 seconds, while the camera controls the aperture. All other exposure settings are available.
 Program AE (P): Places the camera in control of shutter speed and lens aperture, while you maintain control over everything else (i.e., White Balance, ISO, Metering, Exposure Compensation, Flash, etc.).
 Auto: The camera controls everything about the exposure, except for Flash mode and the Resolution and Compression settings.
Image Zone
 Pan Focus: Fixes the camera's lens at the widest angle setting, so that close-up and distant subjects will remain within the focus area. Best used for sports or fast-action photography.
 Portrait: Uses a large aperture setting to blur the background and keep the primary subject in sharp focus.
 Landscape: Employs a small aperture setting to keep both the background and foreground in focus.
 Night Scene: Uses slower shutter speeds and flash to even out nighttime exposures. The slow shutter speed allows more ambient light to be recorded in the low-light areas, while the flash freezes the subject. The Red-Eye Reduction mode can be used with this exposure mode to eliminate red-eye in night portraits.
 Color: Records the image in Vivid or Neutral color, Black-and-White, or Sepia tone.
 Stitch-Assist: Allows you to record a series of images, either horizontally, vertically, or in a clockwise, 360-degree pattern, to be "stitched" together into one large panoramic image on a computer.
 Movie: Records up to two minutes of moving images with sound, at approximately 15 frames per second.
![]()
Main / Power Dial: Located directly beneath the Exposure Mode dial, this larger notched dial controls the camera's operating mode. The following options are available:
- Shooting Mode: Sets up the camera to record still or moving images, using a variety of exposure modes. When the dial is set to a Shooting position, the lens telescopes out from the camera body.
- Power Off: Powers the camera off and signals the lens to retract back into the lens barrel.
- Replay Mode: Frequently referred to as "Playback" mode, this function allows you to scroll through captured images, as well as erase, protect, or rotate them; make a slide show; or set them up for printing on a Digital Print Order Format (DPOF) device.

Four Way Arrow Pad: Positioned in the top right corner of the back panel, this rocker pad features four arrows, one in each direction (up, down, left, right). In any settings menu, these arrows navigate through menu options. In shooting modes, the Left and Right arrows work in conjunction with several exposure controls to adjust settings. When Manual Focus is enabled, the Up and Down Arrows manually adjust focus. In Manual exposure mode, the Left and Right Arrows set the shutter speed, while the Up and Down Arrows set the lens aperture. In Aperture and Shutter-Speed priority modes, the Left and Right Arrows adjust the designated exposure variable. When using the four-function Exposure Compensation button, the arrows help you select the exposure variation in the three Exposure Compensation functions, and scrolls through the eight available White Balance settings.
In Replay mode, the Right and Left Arrows scroll through captured images. When the playback zoom feature is enabled, all four arrows allow you to move around within the enlarged image to examine fine details.

Menu Button: Just beneath the Four Way Arrow pad is the Menu button, which calls up the settings menus on the LCD display in all camera modes. A second press of the Menu button cancels the menu display.

Set Button: To the left of the Menu button, this button confirms or sets any on-screen menu selections. Pressing this button outside of a settings menu in Record mode allows you to set the focus / spot metering area, either in the center of the image, or to the left or right.
In Replay mode, it sets menu options and plays back movie files.

* Button: Located to the right of the LCD monitor, this button serves as the Auto Exposure (AE) and Flash Exposure (FE) Lock button in Record mode.
When the Quick Review mode is active or in Replay mode, pressing this button pulls up an erase menu for erasing the displayed image.

Exposure Compensation Button: Immediately below the * button, this four-function button scrolls through four shooting adjustments: Exposure Compensation, White Balance, Flash Exposure Compensation, and Auto Exposure Bracketing. When set on Exposure Compensation (press the button one time), you can use the right and left arrow buttons to control the exposure compensation from -2 to +2 EV in one-third-step increments. The White Balance setting (press two times) lets you choose the White Balance value from Auto, Daylight, Cloudy, Tungsten, Fluorescent, Fluorescent H, Flash, and Custom options. Flash Exposure Compensation (press three times) works similarly to the standard Exposure Compensation function, by adjusting the flash intensity from -2 to +2 EV in one-third-step increments. Finally, the Auto Exposure Bracketing mode allows you to take a series of three images at different exposure variations.

Display Button: Just below the Exposure Compensation button, the Display button controls the LCD monitor's display mode. In Record mode, this button turns on the image display with the first press, activates the information display with the second press, and cancels both with the third press.
In Replay mode, the button cycles through the captured image information displays, including a detailed information display with a histogram.

Macro / Jump Button: Located over the top right corner of the LCD monitor, this button accesses the Macro function when the camera is in Record mode.
In Replay mode, it pulls up the "jump bar." When the jump bar is displayed, the right and left arrow buttons jump either nine images forward or nine images backward.
![]()
Metering Button: To the left of the Macro / Jump button, this control places the camera in either Spot or Center-Weighted Averaging metering modes when the camera is in Record mode.

Diopter Adjustment Lever: Located on the left side of the optical viewfinder eyepiece, in a recessed niche, this lever adjusts the optical viewfinder's focus to accommodate eyeglass wearers.
![]()
Flash / Index Display Button: Positioned in the very top left corner of the back panel, this button cycles through the Automatic, Red-Eye Reduction (Auto), Red-Eye Reduction (Flash On), Flash On, and Flash Off internal flash modes.
In Replay mode, this button displays up to nine images at a time, in a thumbnail index format, on the LCD screen.

Manual Focus Button (MF): Located on the speaker side of the camera (closest to the lens), this button puts the camera into Manual Focus mode, or returns it to Autofocus, when in Record mode.

Battery Cover Lock: This sliding latch is located on the bottom panel of the camera, next to the battery compartment door. Sliding the switch locks and unlocks the battery compartment.

Follow Imaging Resource: