The Imaging Resource
Quick Review
Konica Minolta DiMAGE G600 Digital Camera
 |
Camera QuickLook | |
|
Review Date |
|
|
|
User Level |
|
|
|
Product Uses |
|
|
|
Digicam Design |
|
|
|
Picture Quality |
Very High, 6.0-megapixel CCD | |
|
Print Sizes |
good 8x10
and larger even with cropping |
|
|
Availability |
|
|
| Suggested Retail
Price (At introduction) |
|
|
Introduction
|
||||||||||
NOTE: Given that the Konica Minolta G600's features and controls are virtually identical to those of the DiMAGE G500, most of the information below is the same as that in the G500's review. Accordingly, if you're already familiar with the G500, you can just skip down to the Sample Pictures and the following Test Results and Conclusion sections below, to learn how the G600 performed in my tests.
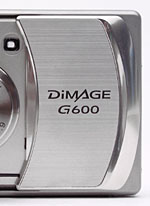
Don't let its small size fool you, Konica Minolta's DiMAGE G600 digicam packs a lot of features into its tiny body. Boasting an all-metal, very compact body and full assortment of exposure options (including full manual exposure control and a nice range of color adjustments), the G600 should be a good fit for a wide range of users. The dual-slot memory system accepts both SD memory cards and Sony Memory Sticks (a feature that first debuted on the Konica KD-400), although the G600 doesn't provide compatibility with the Memory Stick Pro format, as did the recent G400 model. Adding to the G600's attractions are its tiny size and all-metal body, as well as a high-resolution, four-megapixel CCD and very fast startup time (according to my tests, 1.9 seconds from power up to the first shot captured, fast indeed). Compact and rugged, the G600 should stand up to its share of knocks and jostles, another bonus when traveling. The sliding lens cover design eliminates the need for a lens cap, and keeps the camera front smooth and pocket-friendly. Small enough for the average shirt pocket, the G600 comes with a wrist strap for easy toting. The 3x zoom lens and 6.0-megapixel CCD capture high resolution, print quality images, with great color and detail.
Equipped with a telescoping, 3x, 8-24mm Hexanon lens (39-117mm 35mm equivalent), the G600's tiny size doesn't compromise its optics. Focus remains under automatic control, and ranges from 1.64 feet (0.5 meters) to infinity in normal mode, and from 2.36 inches (6 centimeters) to infinity in Macro mode. (The G600's macro capabilities are pretty good, its minimum macro area is a small 1.91 x 1.43 inches or 48 x 36 millimeters.) Apertures range from f/2.8 to f/8.3, with actual values depending on the zoom setting. A blue AF illuminator light strip on the front of the camera shines a (somewhat dim) light on the subject when shooting in low-light situations, and lights up playfully when the camera is powered on. In addition to the camera's 3x optical zoom, as much as 3x digital zoom is also available, effectively increasing the G600's zoom capabilities to 9x. (I always remind readers though, that digital zoom decreases the overall image quality because it simply enlarges the center pixels of the CCD image. Resulting images generally have softer details and higher noise levels.) Both a real-image optical viewfinder and 1.5-inch color LCD monitor are available for composing images. The unusually bright and contrasty LCD monitor features an information display that reports limited camera settings information, including the shutter speed and aperture settings (when the Shutter button is halfway pressed).
The G600 offers either full manual or full automatic exposure control (the Manual setting is accessed through the Record menu). Limited external controls keep the user interface simple, but also mean greater reliance on the LCD menu system. That said, the G600's LCD menus are straightforward and uncomplicated, with a scrolling page layout. The sliding lens cover serves as the power switch, triggering the lens to extend forward when opened. Macro, Self-Timer, and Distant View (landscape) photography modes are accessed via the left arrow of the Four-Way Arrow pad. By default, the G600 employs a TTL center-weighted metering system, but a Spot metering option is available through the Record menu. An Exposure Compensation adjustment lightens or darkens the overall image from -1.5 to +1.5 exposure equivalents (EV) in one-third-step increments. Shutter speeds range from 1/2,000 to one second in normal shooting mode, but the Manual exposure mode offers maximum exposure times up to 15 seconds. The camera's White Balance adjustment offers Auto, Daylight, Cloudy, Fluorescent, and Tungsten options, for shooting under different light sources. You can also opt to record images in Black-and-White or Sepia monotones. The G600's built-in flash operates in Auto, Forced, Red-Eye Reduction, Suppressed, and Slow-Sync modes. A menu option lets you control flash power, from -1 to +1 EV.
The G600 also features a Movie mode, activated through the Record menu. The camera captures moving images with sound for as long as 30 seconds per clip, at 320 x 240 pixels. (The amount of available memory card space may also limit the length of movie files.) As with most cameras offering sound recording with their movie options, you can set the G600's lens to whatever zoom position you like prior to the start of recording, but once recording has begun, the focal length is fixed. This prevents the noise of the zoom motor from affecting the audio track. You can also record short sound clips to accompany images, for a maximum of 30 seconds (or as long as the memory card has available space.) Audio clips can be recorded whenever you capture an image or anytime afterwards. A Continuous shooting mode is hidden in the camera's Setup menu, and once activated, shoots a rapid sequence of images for as long as the Shutter button is held down. The camera's Self-Timer mode offers a short delay (either three or 10 seconds) between the time the Shutter button is pressed and the shutter actually opens, giving you time to zip around in front of the camera for a self-portrait. Through the Record menu, the G600 also offers an ISO adjustment, with equivalent settings of 50, 100, 200, and 400. Contrast, Sharpness, and Saturation can also be adjusted, as well as the individual red, blue, and green levels.
As I mentioned above, the G600 stores images either on Sony Memory Sticks or on SD/MMC memory cards, both available separately in a variety of storage capacities. A 16MB SD card ships with the camera, but I'd recommend picking up a higher-capacity card, especially given the camera's maximum 2,816 x 2,112-pixel resolution. Two megabytes of internal flash memory provide a small buffer that temporarily saves images, and that permits the copying files between memory cards. The camera utilizes a rechargeable NP-600 lithium battery pack for power, which comes with the camera, along with a battery charger. (An AC adapter is available as a separate accessory, and uses a "dummy" battery to plug into the camera.) The G600 features a USB jack and cable for downloading images to a computer. Two CD-ROMs also come with the camera, one loaded with DiMAGE Viewer software for downloading and organizing images, and the other loaded with the instruction manuals. (The necessary USB drivers are also provided.)
All in all, the DiMAGE G600 is a very competent little camera, particularly given that it has successfully addressed my main criticism of the earlier G500, namely that model's sluggish shutter response.
Basic Features
- 6.0-megapixel CCD delivering maximum 2,816 x 2,112-pixel resolution images.
- Real-image optical viewfinder.
- 1.5-inch color LCD monitor.
- Glass, 3x 8-24mm Hexanon lens (equivalent to a 39-117mm lens on a 35mm camera).
- 3x digital zoom.
- Automatic and full manual exposure control.
- Aperture range from f/2.8 to f/8.3.
- Shutter speeds from 1/2,000 to 15 seconds.
- Built-in flash with five modes, and an adjustable intensity setting.
- SD/MMC and Sony Memory Stick card storage, 16MB SD card included.
- 2MB internal memory.
- Power supplied by lithium-ion battery pack or optional AC adapter (battery and charger included).
- DiMAGE Viewer imaging application included, for Windows and Macintosh platforms.
Special Features
- Movie with sound recording mode.
- Three or ten-second Self-Timer for delayed shutter release.
- Continuous Shooting mode.
- Sepia and Black-and-White color modes.
- Adjustable ISO setting.
- Contrast, Saturation, and Sharpness settings, as well as individual Red, Blue, and Green adjustments.
- White balance (color) adjustment with five modes.
- Voice caption recording.
- Spot metering option.
- Distant View record mode for landscape shots.
- DPOF (Digital Print Order Format) compatibility.
- USB cable for connection to a computer (driver software included).
Recommendation
With its dual-format memory card slot, tiny size, and simple, point-and-shoot operation, Minolta's DiMAGE G600 is a rugged, portable option for techno-savvy consumers. Accepting both SD/MMC cards and Sony Memory Sticks, the G600 is geared toward those consumers who want to make the most of their techno-gadgets by adding a very compact digicam to the mix, and sharing memory cards between their various units. The camera's stainless steel alloy body is perfect for travel, as is the small size and pocket-friendly design. The 6.0-megapixel CCD and 3x optical zoom are enough to satisfy advanced users looking for a general-purpose camera with great image quality, and the option of either automatic or full manual exposure control welcomes a range of experience levels.
Trim, compact, and light weight, the G600 is ready for travel. Its stainless steel alloy body can withstand some wear and tear, and the very small size is perfect for pockets. The sliding lens cover keeps the front panel smooth whenever the camera is shut off, making it easy to stash it in a pocket at a moment's notice. Measuring 3.75 x 2.25 x 1.19 inches (94 x 56 x 29.5 millimeters), the G600 is easily pocketable, though its thickness and angular shape are perhaps best suited for a purse or bag. Despite its rugged metal body, the camera remains light weight at just 7.8 ounces (221 grams) with the battery and memory card loaded. A wrist strap secures the camera while in-hand. Those wanting to maintain its nice sheen should get a soft case.
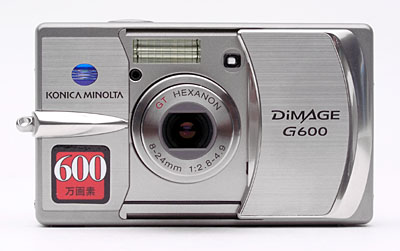
The G600's front panel is fairly smooth with the lens cover closed, with the exception of some very small protrusions. Sliding open the lens cover triggers the 3x zoom lens to telescope outward into its shooting position. I'm accustomed to sliding lens covers opening from left to right, but the G600's operates in the opposite direction to those of most cameras, which initially took some getting used to. The lens comes out very quickly, in under one second, and the camera can capture its first shot in as little as 1.69 seconds after being turned on. In addition to the lens, the camera's flash, optical viewfinder window, AF assist lamp, and a small light sensor are also beneath the sliding cover. The thin, horizontal AF assist lamp below the lens shines a cool blue when lit, adding to the G600's stylish appearance. Though the camera doesn't have much of a hand grip, a rounded lateral ridge on the front panel serves as a finger grip, and an indented grip pattern on the rear panel helps provide purchase for your thumb. (Overall though, the G600 doesn't offer the most secure grip I've seen on a digicam.)
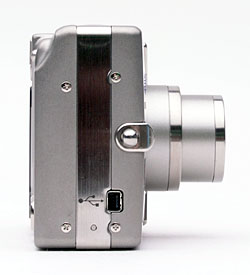
On the right side of the camera is an eyelet for attaching the wrist strap, as well as the USB jack.
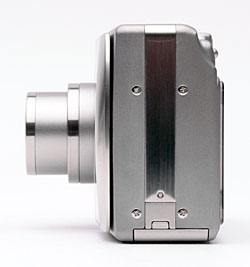
The opposite side of the camera is smooth and flat. At the very bottom of the panel a small, removable plug in the battery compartment provides an opening for the AC adapter cord, which attaches to a "dummy" battery.
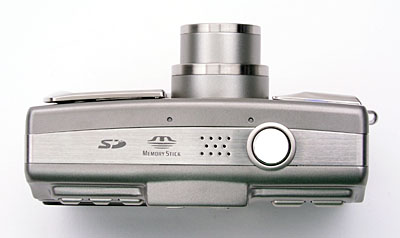
A smooth, low profile Shutter button and the camera's microphone grille are the only features on the top panel, which is also very flat.
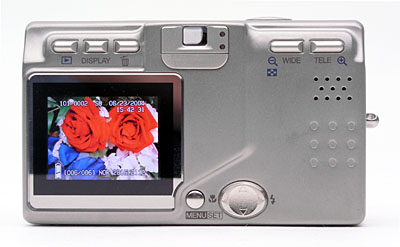
The remaining camera controls are on the rear panel, along with the LCD monitor and optical viewfinder. The tiny optical viewfinder eyepiece doesn't have a diopter adjustment, but does have a moderately high eyepoint. (I could see the full view while wearing my eyeglasses, but ended up with my lenses touching the rear panel of the camera: Eyeglass wearers may be more comfortable framing images with the LCD monitor.) Two LED lamps on the right side of the eyepiece light or blink to indicate camera status, such as when focus is set or the flash is charging. The Playback, Display, Erase, and Zoom buttons are arranged on either side of the eyepiece. Just below the Zoom buttons (which are in the top right corner) is the camera's speaker grille. The 1.5-inch color LCD monitor dominates the left side of the back panel, and directly to the right of it are the Menu/Set and Four-Way Arrow pad rocker buttons.
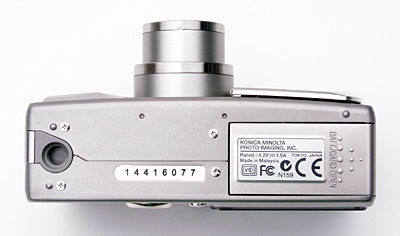
The G600's bottom panel is also smooth and flat. A plastic threaded tripod mount sits to the extreme right (when looking from the back), which may encourage the camera to sit slightly tilted on a tripod head. (This is easily remedied by tilting the tripod head itself, but I still think it's worth mentioning.) Also on the bottom panel is the battery and memory card slot, covered by a sliding, hinged door. The slot houses both Sony Memory Sticks and SD/MMC memory cards, as well as a lithium-ion battery pack. While I lacked the necessary power connector to perform my usual battery-life tests, I found that the G600 would run for about 84 minutes on a fully-charged battery, in its worst-case power drain mode (capture mode with the rear panel LCD illuminated).
The G600's limited external controls make it less daunting to approach than cameras with more complicated control layouts, but also mean that you'll need to access the LCD menu system to change most camera settings. Still, the external controls offer basic image erase, flash mode, and capture mode functions, about all that the typical point & shoot user will need for normal operation. The LCD menu system is fairly straightforward, with two or three pages of options per menu. The arrow keys scroll through menu items, and you can easily exit the menus by pressing the left arrow until the main LCD display returns. Because of the camera's point-and-shoot nature, you'll likely spend more time shooting than sifting through menu items. Given the fairly intuitive user interface, it shouldn't take more than a few minutes to be able to use the camera in "point and shoot" mode, but some study will be required to familiarize yourself with the G600's more advanced features. A hardcopy Quick Guide is all you'll need to get up and running, though a full copy of the instruction manual accompanies the camera on CD-ROM.
 Record
Mode Display: In Record mode, the G600's LCD reports the type of memory
card in use, date and time, level of battery power, number of available images,
and the file resolution and quality settings. When the Shutter button is halfway
pressed, the display also reports the selected aperture and shutter speed settings
(in auto mode). Pressing the Display button once cancels the information display,
while a second turns off the LCD monitor entirely. A third press restores the
default display.
Record
Mode Display: In Record mode, the G600's LCD reports the type of memory
card in use, date and time, level of battery power, number of available images,
and the file resolution and quality settings. When the Shutter button is halfway
pressed, the display also reports the selected aperture and shutter speed settings
(in auto mode). Pressing the Display button once cancels the information display,
while a second turns off the LCD monitor entirely. A third press restores the
default display.
 Playback
Mode Display: In Playback mode, the LCD reports the file name, series
number, date and time, type of memory card, and the resolution and quality settings.
Pressing the Display button simply dismisses and recalls the information display.
A Playback zoom feature is available using the Zoom controls, as is a nine-image
index display.
Playback
Mode Display: In Playback mode, the LCD reports the file name, series
number, date and time, type of memory card, and the resolution and quality settings.
Pressing the Display button simply dismisses and recalls the information display.
A Playback zoom feature is available using the Zoom controls, as is a nine-image
index display.
External Controls
Sliding Lens Cover: Sliding from right to left across the front of the camera,
the lens cover acts as the power switch and enables the lens to telescope forward
when slid fully open. Closing the cover signals the lens to retract, and shuts
off the camera.

Shutter Button: Located on the far right side of the top panel, this button
sets focus and exposure when halfway pressed, and fires the shutter when fully
pressed.

Wide and Tele Zoom Buttons: Positioned in the top right corner of the camera's
back panel, these buttons control the optical and digital zoom in Record mode.
In Playback mode, these buttons control the digital enlargement of captured images.

Erase Button: Directly to the left of the viewfinder eyepiece on the back
panel, this button erases a single image in Playback mode. If pressed in Record
mode, the most recently captured image is displayed with an option to erase
it.

Display Button: To the left of the Erase button, this button controls the
LCD display mode in Record and Playback modes, cycling through information displays
and disabling the LCD itself.

Playback Button: The far left control on the camera's back panel, this button
activates Playback mode while the camera is in Record mode. If the camera is
powered off, pressing and holding this button activates the camera in Playback
mode. A second press shuts the camera off.

Menu / Set Button: Adjacent to the bottom right corner of the LCD monitor,
this button activates the LCD menu in any mode. It also confirms menu selections.
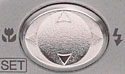
Four Way Arrow Pad: Just to the right of the Menu / Set button, this rocker-style
arrow pad has four arrows, one in each direction. Through the Setup menu, the
arrow keys can be programmed to handle a few other functions. In any settings
menu, these arrows navigate through menu selections.
In Record mode, the left arrow cycles through the available capture modes: Macro, Distant View, Self-Timer, Self-Timer with Macro, and Self-Timer with Distant View. The right arrow key controls the flash mode, cycling through Auto, Red-Eye Reduction, Forced, Slow-Sync, and Suppressed modes. If Manual exposure mode has been enabled, the up and down arrows control aperture, while the left and right arrows adjust shutter speed.
In Playback mode, the left and right keys scroll through captured images on the memory card. When an image has been enlarged, all four arrow keys move around within the enlarged view. In normal display mode, the up arrow displays exposure information, such as shutter speed, lens aperture, flash mode, and file size.
Camera Modes and Menus
Record Mode: Activated whenever the camera is powered on by sliding open the lens cover, this mode records moving or still images. Pressing the Menu button displays the following options:
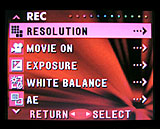 Resolution:
Sets the image resolution and compression level. Resolution choices are 2,592
x 1,944; 2,048 x 1,536; 1,600 x 1,200; or 640 x 480 pixels, and JPEG compression
settings include Fine and Normal.
Resolution:
Sets the image resolution and compression level. Resolution choices are 2,592
x 1,944; 2,048 x 1,536; 1,600 x 1,200; or 640 x 480 pixels, and JPEG compression
settings include Fine and Normal.
- Movie On: Turns Movie mode on or off.
- Exposure Compensation: Increases or decreases exposure from -1.5 to +1.5 exposure equivalents (EV) in one-third step increments. However, the numeric amount of adjustment is not displayed, just a graphic bar across the bottom the screen.
- White Balance: Places color balance under Auto control, or sets it for Daylight, Cloudy, Fluorescent, or Incandescent light sources.
- Auto Exposure (AE) Mode: Places the exposure metering in Center-Weighted (default) or Spot modes.
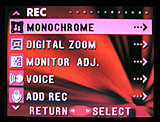 Monochrome:
Records images in sepia-tinted or black-and-white monotones.
Monochrome:
Records images in sepia-tinted or black-and-white monotones.
- Digital Zoom: Turns the 3x digital zoom option on or off.
- Monitor Adjust: Controls the brightness of the LCD monitor display, as well as the level of red, blue, or green in the display.
- Voice: Enables voice recording for sound clips to accompany images (sound clips recorded immediately following image recording).
- Add Record: Adds a voice tag to a previously recorded image. You can also erase previous recordings.
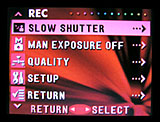 Slow
Shutter: Enables Slow Shutter mode, which
extends the shutter speed range to 15 seconds. Slow shutter speeds are selected
according to the flash mode.
Slow
Shutter: Enables Slow Shutter mode, which
extends the shutter speed range to 15 seconds. Slow shutter speeds are selected
according to the flash mode.
- Manual Exposure: Turns manual exposure mode on or off. If on, you can adjust both shutter speed and aperture settings.
- Quality: Accesses ISO (Auto, 50, 100, 200, or 400), Flash Intensity, Saturation, Contrast, Sharpness, and RGB settings.
- Setup: Accesses the Setup menu (described below).
- Return: Dismisses the LCD menu and returns to the normal display.
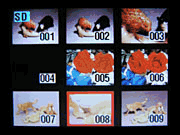
Playback Mode: This mode lets you review captured images on the memory card, erase them, protect them, set them up for printing, etc. The Playback button on the back panel enables the mode, whether the camera is powered on or off. Pressing the Menu button displays the following options:
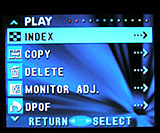 Index:
Displays as many as nine thumbnail-sized images on the LCD monitor.
Index:
Displays as many as nine thumbnail-sized images on the LCD monitor.
- Copy: Copies an image file from one memory card to another.
- Delete: Erases a single image, selected images, or all images from either memory card.
- Monitor: Adjusts the brightness of the LCD display, as well as the red, blue, and green levels.
- DPOF: Accesses the camera's DPOF (Digital Print Order Format) settings, which setup images for printing. You can specify individual images or all images, as well as the number of copies to print.
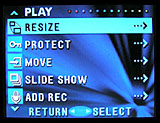 Resize:
Reduces the current image size.
Resize:
Reduces the current image size.
- Protect: Write-protects the currently-displayed image, or removes protection. You can also mark selected images or all images for protection.
- Move: Moves image files from one memory card to another.
- Slide Show: Plays back all images on the selected memory card automatically, with short intervals in between.
- Add Record: Records a voice tag for previously captured images, or removes voice tags.
- Setup: Accesses the Setup menu.
- Return: Dismisses the LCD menu and returns to the normal display.
Setup Menu: Enabled via either the Record or Playback menus, the Setup menu has the following options:
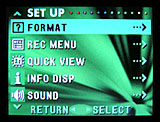 Format:
Formats the specified memory card, erasing all files, even protected ones.
There is also an option to format the camera's internal memory.
Format:
Formats the specified memory card, erasing all files, even protected ones.
There is also an option to format the camera's internal memory.
- Record Menu Settings: Changes the contents of the Record menu to either Basic or Details. (The Basic setting eliminates some menu options.)
- Quick View Settings: Enables or disables a short post-capture display.
- Info Display: Turns the LCD information display on or off.
- Sound: Turns the camera's beep and sound effects on or off.
- Date Set: Sets the camera's internal clock and calendar.
 Date
Set: Sets the camera's internal clock and calendar.
Date
Set: Sets the camera's internal clock and calendar.
- Self-Timer: Sets the Self-Timer's countdown time to 10 or three seconds.
- Auto Power-Off: Turns on or off the camera's auto shut-down feature, and sets the shutoff time period to 10 or three minutes.
- Number Reset: Determines whether the camera resets file numbering with each new memory card, or continues number in sequence, regardless of card.
- Memory Priority: Specifies which memory card to access first, SD or Memory Stick, if both are inserted into the camera.
- Language: Changes the camera's menu language.
- Add Record Set: If set to On, this function lets you record a voice tag with each image. If Off, you must enable the recording feature through the menu system.
 Language:
Changes the camera's menu language.
Language:
Changes the camera's menu language.
- Add Record Set: If set to On, this function lets you record a voice tag with each image. If Off, you must enable the recording feature through the menu system.
- Custom: Lets you assign specific functions to the arrow keys of the Four-Way Arrow pad. Exposure Compensation, White Balance, AF Lock, AE Lock, Flash, Macro, and Continuous settings are available. (The Continuous setting enables a Continuous Shooting mode, which takes a sequence of images for as long as the Shutter button is held down.)
- Default: Resets menu settings to their defaults.
- Return: Returns to the main Record or Playback menu screen.
In the Box
The following items are included in the box:
- Minolta DiMAGE G600 digital camera.
- Wrist strap.
- 16MB SD/MMC card.
- Lithium battery pack.
- Battery charger.
- USB cable.
- Two software CD-ROMs.
- Quick start manual and registration card.
- Larger capacity SD memory card. (These days, 128MB is a good tradeoff between cost and capacity.)
- Additional battery pack.
- AC adapter kit.
- Small camera case.
Recommended Software: Rescue your Photos!
Just as important as an extra memory card is a tool to rescue your images when
one of your cards fails at some point in the future. I get a lot of email from
readers who've lost photos due to a corrupted memory card. Memory card corruption
can happen with any card type and any camera manufacturer, nobody's immune.
A surprising number of "lost" images can be recovered with an inexpensive,
easy to use piece of software though. Given the amount of email I've gotten
on the topic, I now include this paragraph in all my digicam reviews. The program
you need is called PhotoRescue, by DataRescue SA. Read our review
of it if you'd like, but download the program now, so you'll have it.
It doesn't cost a penny until you need it, and even then it's only $29, with
a money back guarantee. So download PhotoRescue
for Windows or PhotoRescue
for Mac while you're thinking of it. (While you're at it, download the
PDF manual
and quickstart
guide as well.) Stash the file in a safe place and it'll be there when you need
it. Trust me, needing this is not a matter of if, but when... PhotoRescue
is about the best and easiest tool for recovering digital photos I've seen.
(Disclosure: IR gets a small commission from sales of the product, but I'd highly
recommend the program even if we didn't.) OK, now back to our regularly
scheduled review...
See camera specifications here.
Cycle times, shutter lag, battery life, etc. can be found here.
See the full set of
my sample pictures and detailed analysis
here. The thumbnails below show a subset of my test images. Click
on a thumbnail to see the full-size photo.
Photo Gallery: For a set of more pictorial sample photos from the Konica Minolta DiMAGE G600, visit our Konica Minolta G600 photo gallery.
 |
 |
 |
| |
|
|
|
|
|
|
| |
|
|
|
|
|
|
| |
|
|


Test Results
In keeping with my standard test policy, the comments given here summarize only my key findings. For a full commentary on each of the test images, see the DiMAGE G600's "pictures" page.
As with all Imaging Resource product tests, I encourage you to let your own eyes be the judge of how well the camera performed. Explore the images on the pictures page, to see how the G600's images compare to other cameras you may be considering.
Not sure which camera to buy? Let your eyes be the ultimate judge! Visit our Comparometer(tm) to compare images from the G600 with those from other cameras you may be considering. The proof is in the pictures, so let your own eyes decide which you like best!
- Color: Very accurate color, apart from oversaturation
of reds and some greens. Throughout my testing, the G600 produced slightly
warm color balances, with both the Auto and Daylight white balance settings,
but the effect was generally slight. Apart from the slight warm cast though,
the G600's color was considerably more accurate than most digicams I test,
with little of the oversaturation that's common among consumer digicams. The
exception to this was that it significantly oversaturated reds and some greens.
Overall though, its images were quite pleasing. Indoors, its incandescent
white balance setting did a good job handling the very warm-toned household
incandescent lighting of my "Indoor Portrait" test, something few
cameras do well.
- Exposure: Better than average exposure accuracy. The
G600's exposure system handled my test lighting well, accurately exposing
most shots, and generally requiring less exposure compensation than average.
The exception was that it required a lot of exposure compensation on
the Indoor Portrait test. The G600's default contrast was fairly high, but
its contrast adjustment option worked very well, allowing it to preserve highlight
detail even under the deliberately harsh lighting of the Outdoor Portrait
test.
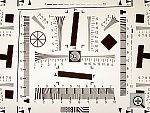
- Resolution/Sharpness: Excellent resolution, 1,450 lines
of "strong detail." The G600 performed very well on the "laboratory"
resolution test chart. It started showing artifacts in the test patterns at
resolutions as low as 1,000-1,100 lines per picture height, in both horizontal
and vertical directions. I found "strong detail" out to at least
1,450 lines, although some less conservative readers and reviewers might argue
for as much as 1,600 lines. "Extinction" of the target patterns
didn't occur until about 1,900 lines. (Imatest reported somewhat lower numbers,
about 1,223 line widths/picture height, when normalized to a 1-pixel sharpening
radius.)
- Image Noise: Fairly good image noise for a compact 6-megapixel
model. While the G600's image noise is on the high side, based strictly
on numeric measurements, its noise has a very fine-grained pattern, which
makes it less objectionable than it would be otherwise. Overall, good noise
characteristics, particularly for a high-resolution subcompact model.
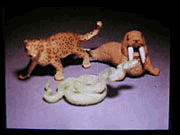
- Closeups: A small macro area with good detail in the
dollar bill. Flash performs pretty well, though with some falloff along the
bottom of the frame. The G600 did very well in the macro category, capturing
a minimum area of only 1.90 x 1.42 inches (48 x 36 millimeters). Resolution
was high, and detail was strong in the dollar bill. However, the coins and
brooch were soft due to the very short shooting distance (and probably some
softness in the corners as well). As with most digicam macro modes, the G600's
macro shots were fairly soft in the corners, blurring the details of the dollar
bill slightly. The G600's flash throttled down very well for the macro area,
though its position on the camera is a little high, resulting in a shadow
in the lower portion of the frame.
- Night Shots: Pretty good low-light performance, though
a slight reddish cast from the dim lighting. Poor autofocus performance in
dim light though. The G600 produced clear, bright, usable images down
to the 1/16 foot-candle (0.67 lux) limit of my test, at the ISO 200 and 400
sensitivity settings. At ISOs 50 and 100, images were bright to about 1/4
foot-candle (2.7 lux) and 1/8 foot-candle (1.3 lux) respectively. Color balance
was reddish with the Auto white balance, and increased in intensity at the
dimmer exposures. Focus was a little soft in many of the shots, as the G600's
autofocus system has difficulty with dim lighting. (It can only focus successfully
to light levels of about two foot-candles, about twice as bright as normal
city street lighting.) Noise was fairly low, though it increased at ISOs 200
and 400 (further skewing the color balance).
- Viewfinder Accuracy: A typically tight optical viewfinder,
but very accurate LCD monitor. The G600's optical viewfinder was a little
tight, showing only approximately 85 percent frame accuracy at both wide angle
and telephoto zoom settings. The LCD monitor fared much better, showing about
99 percent frame accuracy. Given that I like LCD monitors to be as close to
100 percent accuracy as possible, the G600's LCD monitor is essentially perfect
in that regard, but I'd like to see a more accurate optical viewfinder. (Even
though most digicams average about 85% accuracy with their optical viewfinders,
I still consider that too low.)
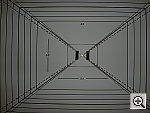
- Optical Distortion: Slightly high barrel distortion,
low chromatic aberration, and good corner sharpness. Optical distortion
on the G600 was higher than average at the wide-angle end, where I measured
approximately 0.9 percent barrel distortion. The telephoto end fared a little
better, as I found only 0.2 percent barrel distortion there. Chromatic aberration
was very low, showing only two to three pixels of moderate coloration on either
side of the target lines. (This distortion is visible as a very slight colored
fringe around the objects at the edges of the field of view on the resolution
target.) The G600's images were also unusually sharp from corner to corner,
further evidence of a high-quality lens.
- Shutter Lag and Cycle Time: Average shutter lag, slower than average
cycle times. Like many other compact digicams, the G600's performance
tends toward the slow side of the average range. Its full-autofocus shutter
lag times of 0.86 to 1.01 second is right in the average range, but it's lag
time when prefocused is only 0.055 second, which is very fast. Cycle
times are slower though, averaging 3.18 seconds from shot to shot, regardless
of image size. In "continuous" mode, this time improves to only
about 2 seconds per shot, still not very fast.
- Battery Life: Rather short battery life. Like many compact digicams, battery life is a definite weak point with the G600. It uses a custom power adapter, so I couldn't perform my usual direct power-consumption measurements, but I measured its worst-case run time (capture mode with the LCD turned on) at 84 minutes. This is definitely on the short side among cameras currently on the market, so my usual advice of purchasing a second battery along with the camera applies doubly for the G600.
| Free Photo Lessons | |
|


Follow Imaging Resource: