Konica Minolta DiMAGE A200Konica Minolta trims a little and adds a little relative to their top-end A2 model, delivering a strong contender in the 8-megapixel derby.<<Optics :(Previous) | (Next): Shutter Lag & Cycle Time Tests>> Page 7:Exposure & FlashReview First Posted: 12/22/2004 |
Exposure
| Free Photo Lessons | |
|
In straight Auto mode, the camera controls everything about the exposure, except for flash, zoom, and focus. Program AE mode keeps the camera in charge of the exposure, while you have control over all other exposure options. Aperture Priority mode lets you select the lens aperture setting, from f/2.8 to f/11 depending on the zoom setting, while the camera selects the most appropriate corresponding shutter speed from 30 seconds to 1/3,200 (note that 1/3,200 is only available at f/8 or above though, the limit being 1/1,600 with wider apertures). In Shutter Priority mode, the user selects the shutter speed, from 1/1,600 to 30 seconds, while the camera chooses the best corresponding aperture setting. Switching to Manual mode gives you control over both shutter speed and aperture from 30 seconds to 1/1,600, with a Bulb setting available for longer exposures. (For some reason, Manual mode doesn't give you the option for the 1/3,200 shutter speed, even when the aperture is set to f/8 or higher.) Exposure time in Bulb mode is determined by how long you hold down the Shutter button, up to a maximum of 30 seconds. (I strongly recommend use of the optional wired remote in Bulb mode, as the pressure of your finger on the Shutter button is bound to jiggle the camera somewhat, blurring the image.)
As described above, the Konica Minolta DiMAGE A200 also offers four preset
scene modes (referred to as Digital Subject Programs), accessed via the Exposure
Mode dial. Portrait mode produces better-looking people shots by enhancing skin
tones and decreasing the depth of field (to create a slightly blurred background).
Sports mode provides faster shutter speeds to freeze action, and is supposed
to maintain focus on quickly moving subjects better. (I have no way to verify
the enhanced AF performance though.) In Sunset mode, the camera employs slightly
slower shutter speeds to let in more of the ambient light, and lets you record
the warm colors of the scene without compensating for them in the white balance
system. In Night Portrait mode, the camera also uses a slower shutter speed
to allow more ambient light into the image, however it also records true black
values and preserves the bright colors of artificial lighting. The Exposure
Mode dial also features a Memory Recall setting, which lets you save as many
as five registers of settings. Selecting a setting
automatically applies the settings to the camera, which can be recalled by turning
the Exposure Mode dial to another position.
The Konica Minolta A200's default metering mode is a 256-segment evaluative
system, which takes readings throughout the image to determine exposure. Center-Weighted
and Spot metering options are also available. Spot metering is useful for high-contrast
subjects, as it bases the exposure reading on the very center of the image,
letting you set the exposure based on a small portion of your subject. Center-Weighted
metering also bases the exposure on the center of the image, but the camera
takes its readings from a much larger area in the middle of the frame. You can
also hold or lock the exposure reading for a particular part of the image by
pressing the AE Lock button on the back panel. This button
can be programmed to act as either a "hold" or "toggle"
control. "Hold" mode does just that, it holds the current setting
until you release the AE Lock button again. Toggle mode locks and releases the
exposure/focus setting with successive actuations of the AE Lock button.
Halfway pressing the Shutter button also locks exposure and focus, but only
in autofocus mode.
The DiMAGE A200's light sensitivity can be set to Auto, or to ISO equivalents
of 50, 100, 200, 400, or 800. As with other consumer and prosumer digicams that
sport ISO 800 options though, I didn't find the ISO 800 setting to be particularly
useful, because image noise levels were so high. A Noise
Reduction option is available for longer exposures and higher ISO settings,
reducing somewhat the amount of image noise that would otherwise result, but
doesn't have any effect on shorter exposures at high ISO. Exposure compensation
is adjustable from -2 to +2 exposure equivalents (EV) in one-third-step increments,
and an auto-bracketing option can snap three shots in rapid succession, varying
the exposure between each in steps of 0.3 or 0.5 EV units. Exposure
compensation is adjusted by pressing the up arrow on the Four-way Arrow pad,
which displays the Exposure Compensation and Flash Exposure Compensation adjustment
scales. Use the up and down arrows to select an adjustment scale, and either
the left and right arrows or the Control dial to change the setting. The Auto
Exposure Bracketing option is enabled through the Drive button, and you can
set the bracketing parameters once you've selected Bracketing mode. (The A200's
bracketing option is also available for white balance.)
Like the DiMAGE A1 and A2 before it, the Konica Minolta A200 offers very flexible
control over white balance, color rendition, and tonal range. Its white balance
system offers a total of nine options, including Auto, Daylight, Tungsten, Fluorescent
(two settings), Cloudy, Shade, Flash, and Custom, which is the manual setting.
The Custom Set mode determines white balance by snapping a picture of a white
card. The camera then adjusts its color balance to render the white card with
a neutral hue, and saves the setting as the Custom option. Two
Custom settings can be saved, very useful if you need to switch back
and forth between different lighting conditions quickly.
Contrast and Color Saturation controls are adjustable in 11 steps across a fairly
broad range of settings, and are accessed through the Function menu. The DiMAGE
A200 also offers a Filter (hue) setting in the Function menu. Depending on the
color mode selected through the Custom Settings menu, the Filter option adjusts
the overall color cast of the image, again in 11 steps. The color range here
varies from blue to yellow, exactly the color axis that you'd want to adjust
to compensate for different color temperatures in your lighting. Positive adjustments
warm the image, while negative adjustments produce a cooler color balance. In
Black and White mode, the Filter effect tones the image from neutral to red,
green, magenta, blue, and back to neutral (zero position).
The combination of fine steps and wide adjustment ranges in the Digital Effects
controls mean you can really customize the A200 to exactly suit your preferences
for color and tonality. Most cameras offering saturation, white point, and contrast
variations treat them more as special effects, rather than as adjustments for
fine-tuning camera response.
The Color Mode option of the Record menu offers Natural
and Vivid sRGB color modes, as well as Embedded Adobe RGB, Black and White,
and Portrait settings. Adobe RGB color space has a much broader gamut or range
of reproducible colors than does sRGB, the color space used by most digital
cameras and computer monitors. (The Embedded designation simply means that the
color space information is embedded in the image file.) Adobe RGB images will
look rather dull when displayed on monitors tuned to the sRGB standard, but
when used in a color-managed work environment, they can capture and reproduce
a much greater range of colors. The Portrait setting optimizes color for captivating
portraits, using the sRGB color space. The record menu also offers a Sharpness
adjustment, for controlling the amount of in-camera sharpening applied to an
image.
Drive Modes
The Konica Minolta DiMAGE A200 features several Drive mode settings, accessed
by pressing the Drive button and selecting from the Drive menu with the control
dial. Within the Continuous Advance option, you can choose between Standard,
High Speed, and UHS (Ultra High Speed) modes. In standard Continuous Advance,
the DiMAGE A200 captures a maximum of five frames at approximately two frames
per second. High Speed mode captures a maximum of five full-size frames at approximately
2.3 frames per second. (Note that the monitor shuts off during the High Speed
series.) Finally, UHS mode captures 40 640 x 480-pixel images at about 10 frames
per second, regardless of the current image quality setting. Focus is locked
with the first frame, regardless of the focusing mode. (In Standard mode, if
the focus is set to Continuous, the camera will adjust focus for each shot and
thus slow down the frame rate.)
As mentioned above, the Drive
setting also accesses the Self-Timer and Auto Exposure Bracketing modes. The
Self-Timer fires the shutter either two or ten seconds after the shutter button
is pressed. The shorter delay is very handy when you need to prop the camera
on something to take a photo in dim lighting, and don't want the pressure of
your finger on the Shutter button to jiggle the camera. The ten-second delay
is long enough that you can run around to get into the photo yourself. An LED
lamp on the front of the camera blinks and the camera beeps as the self timer
is counting down, the blink and beeps becoming faster in the last few seconds.
Auto Exposure Bracketing mode captures a series of three
images (one at the metered exposure, one underexposed, and one overexposed).
You can set the exposure variation between exposures to 0.3 or 0.5 EV. The A200's
automatic bracketing also lets you bracket white balance, offering two bracketing
modes. WB1 has a smaller bracket size than WB2, but both bracket three images:
one at the normal setting, one cooler, and one warmer.
The Drive setting also offers a Remote Control mode, for use with the included
wireless remote control unit. The DiMAGE A200's remote control can operate the
camera from about 13.1 feet (4 meters) away, and the Remote Control mode simply
tells the camera to respond to the remote unit. The remote unit has a Four-way
Arrow pad that adjusts optical and digital zoom, and has a two-second Self-Timer
button in addition to a shutter release.
Movie Mode
The Konica Minolta A200 has a Movie mode that
records moving images with sound, for as many as 15 minutes per clip (though
the manual notes that low light levels can shorten the maximum recording time).
The amount of recording time appears in the LCD or EVF monitor display, and
varies with the resolution and frame rate of the movie, the available CompactFlash
card space, and the speed of the memory card. Movies are recorded at either
800 x 600; 640 x 480; or 320 x 240-pixel resolutions, with frame rates of approximately
15 or 30 frames per second. (800 x 600-pixel resolutions can only be recorded
at 15 frames per second.) Through the Record menu, you can set the movie mode
to Standard or Night modes. Night mode records black and white movies in low
lighting situations, and is far more effective in dim lighting than the vast
majority of digicam movie options I've seen.
Flash
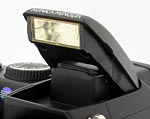 The
Konica Minolta DiMAGE A200 features a built-in, pop-up flash, which operates
in either Fill-Flash, Fill-Flash with Red-Eye Reduction, Slow-Sync with Red-Eye
Reduction, or Rear Flash sync. To release the flash from its compartment, pull
on the two small tabs on either side of the casing and lift up the flash head.
Close it again by simply pushing the flash head back down. The Flash mode is
changed through the Function menu. In Fill-Flash mode, the flash fires with
every exposure, regardless of lighting conditions. Fill-Flash with Red-Eye Reduction
fires a series of small pre-flashes before firing the flash at full power for
the exposure itself. This makes your subjects' pupils contract and reduces the
occurrence of the Red-Eye effect. Slow-Sync mode times the flash with a slower
shutter speed, firing the flash at the beginning of the exposure. The Rear Flash
Sync mode fires the flash at the end of the shutter time, rather than the beginning.
If you have moving objects in a relatively brightly lit environment, this will
produce a sharp image of your subject, with a "motion trail" following
behind it. The flash is in the Off position when it's closed.
The
Konica Minolta DiMAGE A200 features a built-in, pop-up flash, which operates
in either Fill-Flash, Fill-Flash with Red-Eye Reduction, Slow-Sync with Red-Eye
Reduction, or Rear Flash sync. To release the flash from its compartment, pull
on the two small tabs on either side of the casing and lift up the flash head.
Close it again by simply pushing the flash head back down. The Flash mode is
changed through the Function menu. In Fill-Flash mode, the flash fires with
every exposure, regardless of lighting conditions. Fill-Flash with Red-Eye Reduction
fires a series of small pre-flashes before firing the flash at full power for
the exposure itself. This makes your subjects' pupils contract and reduces the
occurrence of the Red-Eye effect. Slow-Sync mode times the flash with a slower
shutter speed, firing the flash at the beginning of the exposure. The Rear Flash
Sync mode fires the flash at the end of the shutter time, rather than the beginning.
If you have moving objects in a relatively brightly lit environment, this will
produce a sharp image of your subject, with a "motion trail" following
behind it. The flash is in the Off position when it's closed.
For use with studio strobes and conventional slave triggers,
the DiMAGE A200 also has a manual flash power option. This lets you set the
flash power to Full, 1/2, 1/4, 1/8, or 1/16 power manually. In this mode, the
flash fires only once, at the moment of exposure. The single flash pulse prevents
false triggering when working with conventional slave triggers.
The Konica Minolta A200 also includes a top-mounted hot shoe for attaching an external flash unit. The shoe design and contact arrangement are set up for Konica Minolta's own dedicated flash units, but I imagine that compatible models are available from the major third-party flash manufacturers (Sunpak et. al.). Konica Minolta's own Program Flash models 2500(D), 3600HS(D), and 5600HS(D) work with the DiMAGE A2, and two macro flashes (Macro Twin Flash 2400 and Macro Ring Flash 1200) will work with an accessory macro flash controller. Konica Minolta also makes an adapter (part number PCT-100) that takes the proprietary hot shoe contacts to a standard PC-style sync connector, but from all I've heard, this accessory is virtually impossible to find at retail.

Follow Imaging Resource: