The Imaging Resource
Quick Review
Kyocera Finecam L4v Digital Camera
 |
Camera QuickLook | |
|
Review Date |
|
|
|
User Level |
|
|
|
Product Uses |
|
|
|
Digicam Design |
|
|
|
Picture Quality |
High, 4.03-megapixel CCD | |
|
Print Sizes |
4x6, 5x7, 8x10 inches | |
|
Availability |
|
|
| Suggested Retail
Price (At introduction) |
($239-$299 street) |
|
Introduction
|
||||||||||
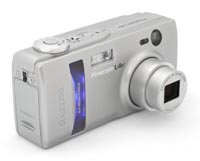
Kyocera has updated their line with the Finecam L4v, a compact 4.03-megapixel digicam with partial manual exposure control. With its pocket friendly design, 3x optical zoom, and handful of exposure options, the L4v is a pleasant little digicam for both novices and more advanced users alike. The most obvious advantage of the L4v is the unusually large 2.5-inch LCD monitor, which takes up almost the entire rear panel of the camera. The rest of the camera is more middle-of-the-road, but read on for all of the details.
One of the biggest things Kyocera's FineCam L4v digital camera has going for it is its 2.5-inch LCD display. Taking up most of the camera's rear panel, the L4v's LCD monitor provides a generous display for framing and reviewing images. But that's not all that the L4v has up its sleeve. Equipped with a 4.03-megapixel CCD, 3x optical zoom lens, and a handful of creative exposure options, the L4v is one of the more recent additions to Kyocera's line of digicams. While not exactly "pocket sized", the L4v's long, thin dimensions should fit into larger coat pockets and most purses, and the retractable lens with built-in cover keeps the front panel low-profile when you're on the go. The camera also comes with a wrist strap to keep it securely in-hand. The matte-finish, silver body is metal with low-key accents and logos, though a vertical strip on the front of the camera glows a cool blue when the camera is powered on. Exposure control is mainly automatic, though a limited number of manual settings are available. The L4v's 4.03-megapixel CCD delivers high resolution images, which can be printed as large as 8x10 inches with good detail. A lower resolution setting creates images better suited for email distribution to family and friends.
Equipped with a 5.8-17.4mm lens, equivalent to a 35-105mm lens on a 35mm camera, the L4v features true, 3x optical zoom. Maximum aperture ranges from f/2.8 to f/4.7, depending on the zoom setting, and remains under automatic control most of the time. However, through the Manual exposure menu, you can manually set the aperture to f/2.8 or f/7.5--but nowhere in between. Focus ranges from 2.12 feet (64.5 centimeters) to infinity in normal AF mode, and from 9.64 inches to 2.12 feet (24.5 to 64.5 centimeters) in Macro mode. A manual focus mode option is available, but the L4v's distance readout on the LCD monitor makes it a little tough to accurately gauge focus. The image in the LCD monitor doesn't enlarge, so it's tough to know whether or not you have a tight lock on focus. Additionally, only sporadic distance numbers appear on the monitor, making it difficult to judge actual distances in between markers. Still, I always appreciate the option for manual focus control, especially in low-light shooting situations when a camera's AF system often has trouble. The L4v also offers Wide and Spot AF areas. A Landscape mode sets focus at Infinity, for shots of expansive scenery. In addition to the 3x optical zoom, the L4v also features as much as 4x digital zoom. Remember though, that digital zoom often decreases the overall image quality because it simply enlarges the center pixels of the CCD image, and shouldn't be relied on for sharp details and high image quality. For composing shots, the L4v has both a real-image optical viewfinder and a generous 2.5-inch TFT, color LCD monitor. The LCD monitor's information display includes basic camera information, such as the shooting mode and image quality setting, as well as the current image capacity of the memory card. A set of focus/exposure brackets is in the center of the display for lining up shots.
The L4v offers automatic exposure control, as well as a handful of manual adjustments to achieve more creative effects. Through the LCD menu, the Manual menu option pulls up a sub-menu of exposure options. An AE Mode setting lets you choose between Program and two aperture settings, and a Long Exposure mode offers two-, four-, and eight-second exposure times. However, in all other cases, shutter speed and aperture remain under automatic control. The L4v's full shutter speed range extends from 1/2,000 to eight seconds, though the two-second and longer times are only available in Long Exposure mode. The L4v employs a Multi-Area Evaluation metering system by default, which divides the image area into sections to determine the best overall exposure. Through the camera's menu, Spot and Center-Weighted options are also available. You can adjust the overall exposure from -2 to +2 exposure equivalents (EV) in one-third-step increments, also through the LCD menu. ISO sensitivity options include 80, 160, and 320 equivalent settings to increase low-light shooting performance, with an Auto adjustment as well. White balance options include Auto, Daylight, Tungsten, Cloudy, Fluorescent, and Preset (manual setting). There's also a Color mode for capturing images in black-and-white or sepia tones, and Chroma and Sharpness adjustments. The camera's built-in flash operates in either Auto, Red-Eye Reduction Auto, Fill-In, Flash-Off, Night Backdrop (slow-sync setting), or Red-Eye Reduction Forced modes. The Flash button cycles through each mode, and an icon appears on the LCD display indicating the selection.
The L4v also features a Movie mode, which records as much as 120 seconds of moving images with sound at the 160 x 120-pixel resolution. At 320 x 240 pixels, movies can be a maximum of 30 seconds each. (The actual amount of recording time will depend on the available memory card space.) The L4v's Movie mode also provides an option for recording movies without sound. For self-portraits or timed shots, the L4v's Self-Timer counts down from either two or 10 seconds after the Shutter button is fully pressed before the shutter fires.
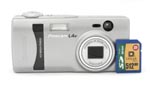
The L4v stores images on SD-type memory cards, and comes with a 16MB card. I highly recommend picking up a larger memory card, given the L4v's 2,304 x 1,728-pixel maximum resolution setting, as SD cards are available in capacities as large as 512 megabytes. The camera utilizes two AA-type batteries, one CR-V3 lithium-ion battery pack, or the optional AC adapter for power. A set of single-use AA alkaline batteries comes with the camera, but I highly recommend picking up a set of rechargeable NiMH batteries and a charger for better battery performance. Read my "battery shootout" page to see which batteries currently on the market are best, or my review of the MAHA C-204F charger, my long-time favorite. Battery life is shorter than average (see the L4v's Picky Details page), so plan on buying high-capacity batteries and a good-quality charger along with the camera. The L4v will automatically shut itself down after a small period of inactivity, a feature which can be disabled through the Set-up menu. The included USB cable allows quick downloading of captured images to a computer, and USB drivers and Adobe Photoshop Album software come on an accompanying CD (compatible with Windows and Macintosh operating systems). The L4v is DPOF (Digital Print Order Format) compatible, with a handful of print settings available in Playback mode.
Basic Features
- 4.03-megapixel CCD delivering image resolutions as high as 2,304 x 1,728 pixels.
- 3x, 5.8-17.4mm lens, equivalent to a 35-105mm lens on a 35mm camera.
- Maximum aperture of f/2.8 at full wide-angle and f/4.7 at full telephoto.
- Intelligent Video AF focusing system.
- Up to 4x digital enlargement.
- Real-image optical viewfinder and large, 2.5-inch color LCD monitor.
- Program AE, Aperture Priority, and Long Shutter exposure modes.
- Shutter speeds from 1/2,000 to eight seconds.
- Built-in flash with six operating modes.
- Adjustable White Balance with six settings, including a custom setting.
- Multi-Segment, Center-Weighted, and Spot metering modes.
- Sensitivity equivalents of 80, 160, and 320 ISO, plus an Auto setting.
- Files saved in the JPEG format.
- SD memory card storage.
- Power from two AA NiMH or alkaline batteries, one CRV3 lithium battery, or optional AC adapter.
Special Features
- Movie with sound recording mode.
- Adjustable Color mode, with black-and-white and sepia settings.
- Two- and 10-second Self-Timer.
- Manual focus option.
- Wide and Spot AF area options.
- Landscape (infinity) and Macro focus modes.
- Chroma and Sharpness adjustments.
- DPOF (Digital Print Order Format) compatibility.
- USB cable for connection to a computer.
- Software CD with Adobe Photoshop Album.
Recommendation
Operating mainly under automatic exposure control, the Finecam L4v is primarily aimed at novice photographers and others who want to let the camera do all the work. That said, two available aperture settings and a Long Exposure mode provide some degree of exposure control for those users who want to step outside the camera's automatic boundaries. Plus, the ability to manually adjust white balance and increase the ISO sensitivity makes the camera flexible for more difficult shooting situations. The 4.03-megapixel CCD captures high-resolution images, meaning you can print your snapshots as large as 8x10 inches with good quality. The L4v's compact design is good for travel, as the low-profile camera can be slipped into a coat pocket or purse quickly when on the go. The user interface is fairly uncomplicated, and won't require much downtime to learn. Overall, the L4v makes sense for anyone just starting out in digital photography, providing high resolution imagery with some versatile exposure control. While the camera's list price of $549 is very high, its street price of around $300 is reasonable, offering higher resolution than most models at that price.
 Long
and lean, with a rectangular profile, the Finecam L4v is compact and lightweight.
Measuring 4.44 x 2.16 x 1.38 inches (113 x 55 x
35 millimeters), the L4v should easily fit into most larger shirt and coat pockets,
and in the average purse. The telescoping lens retracts almost flush with the
camera front, keeping the front profile fairly smooth. The camera's wrist strap
is great when holding the camera in-hand, but I'd recommend a small camera bag
to protect the camera's attractive silver finish when traveling. The metal body
has an attractive matte-silver finish, and is light, at just 8.0
ounces (226 grams), with the batteries and memory card.
Long
and lean, with a rectangular profile, the Finecam L4v is compact and lightweight.
Measuring 4.44 x 2.16 x 1.38 inches (113 x 55 x
35 millimeters), the L4v should easily fit into most larger shirt and coat pockets,
and in the average purse. The telescoping lens retracts almost flush with the
camera front, keeping the front profile fairly smooth. The camera's wrist strap
is great when holding the camera in-hand, but I'd recommend a small camera bag
to protect the camera's attractive silver finish when traveling. The metal body
has an attractive matte-silver finish, and is light, at just 8.0
ounces (226 grams), with the batteries and memory card.
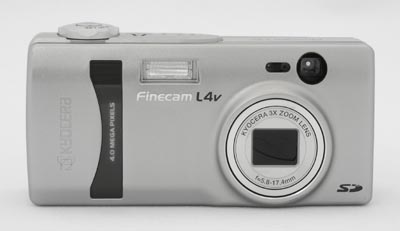
The L4v's front panel is reasonably smooth with the lens retracted, leaving just a small protrusion around the outside ring of the lens barrel. A protective shutter automatically opens when the camera is powered on, as the lens telescopes outward (thus eliminating the need for a lens cap). Fully extended, the lens projects another 7/8-inch from the camera body. Also on the front panel are the flash, optical viewfinder window, and a window for the camera's light sensor and Self-Timer LED lamp. Though the camera doesn't offer a handgrip, a slight indention provides a tiny grip for fingers. A vertical strip next to the indentation glows blue when the camera is powered on.

The right side of the L4v (as viewed from the rear) holds the shared battery and memory card compartment, protected by a sliding plastic door. Beneath the door, the battery compartment and SD memory card slot line up side by side. A second hinged door protects the actual battery slot, and is released by pressing a small button that unlocks the door. Also on this side of the camera is the wrist strap lashing point, directly above the compartment door.
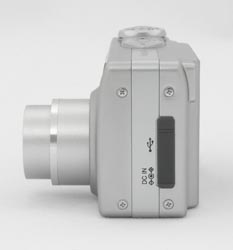
The opposite side of the camera holds the connector compartment, protected by a flexible, rubbery flap that remains tethered to the camera when opened. Beneath the flap are the USB and DC IN connector jacks.

The Shutter and Power buttons share the L4v's top panel with the camera's microphone and speaker, as well as the main Mode dial.
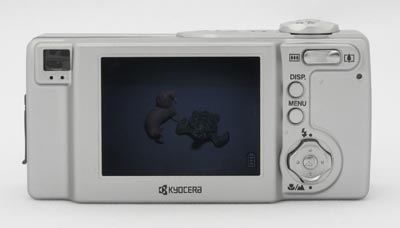
The L4v's remaining controls are on the back panel, along with the large, 2.5-inch LCD monitor and optical viewfinder. A set of LED lamps beneath the optical viewfinder eyepiece report camera status, such as when focus and exposure are set, the battery is charging, or the flash is charging. The viewfinder eyepiece is very small, and I would recommend using the LCD monitor for the most accurate framing. On a positive note though, the L4v's optical viewfinder has a very high "eye point," making it easy to use for eyeglass wearers. Lining the LCD monitor on the right side are the Zoom lever, Display button, Menu button, and the Four-Way Arrow pad. This four-way rocker button controls a variety of functions, with an OK button in the center to confirm camera settings. Also on the back panel is a tiny LED in the top right corner that indicates when the camera is accessing the memory card.
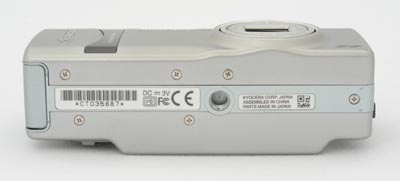
Finally, the L4v has a fairly flat bottom panel, with just the plastic-threaded tripod mount nearly center.
The L4v operates under automatic exposure control most of the time, but an on-screen LCD menu system offers a handful of exposure options, including a few aperture and shutter speed settings. External controls include flash mode, Macro mode, zoom, and the main camera mode, but the remaining camera settings rely on the LCD menu system. The LCD menu system itself is fairly simple to navigate however, as a set of menu options appear along the bottom edge of the display, and the arrow keys navigate the choices. (You have to press the OK button to actually change and cycle through settings.) The only two-page menu is under the Manual settings option, but is fairly straightforward as well. With the instruction manual in-hand, I'd estimate the better part of a half-hour to get familiar with the camera.
 Record
Mode Display: In Record mode, the L4v's LCD monitor reports limited
camera information, such as the file size and quality settings, and any exposure
settings such as flash mode, aperture selection, etc. A set of focus brackets
in the center of the display indicates the focus area. Pressing the Display
button cancels the information display except for the focus brackets, flash
mode, and battery information. A second press of the Display button cancels
the display entirely.
Record
Mode Display: In Record mode, the L4v's LCD monitor reports limited
camera information, such as the file size and quality settings, and any exposure
settings such as flash mode, aperture selection, etc. A set of focus brackets
in the center of the display indicates the focus area. Pressing the Display
button cancels the information display except for the focus brackets, flash
mode, and battery information. A second press of the Display button cancels
the display entirely.
 Playback
Mode Display: In Playback mode, the LCD monitor shows the last image
recorded, with the battery-life icon in the lower right corner. This icon shows
three bars, giving reasonable notice before you need to replace the batteries.
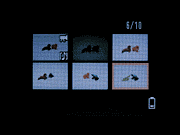
You can zoom in one level to 2x, and zoom out to display six thumbnail images
across the middle of the display via a menu item. From the menu you can resize,
rotate, play a slideshow, print, record a note, protect, and erase images. Pressing
the Display button calls up an information screen that reports the file and
folder name of the image, as well as limited exposure information.
Playback
Mode Display: In Playback mode, the LCD monitor shows the last image
recorded, with the battery-life icon in the lower right corner. This icon shows
three bars, giving reasonable notice before you need to replace the batteries.
You can zoom in one level to 2x, and zoom out to display six thumbnail images
across the middle of the display via a menu item. From the menu you can resize,
rotate, play a slideshow, print, record a note, protect, and erase images. Pressing
the Display button calls up an information screen that reports the file and
folder name of the image, as well as limited exposure information.
External Controls
![]()
Shutter Button: Surrounded by the Mode dial, this silver button on the
top panel sets focus and exposure when halfway pressed, and fires the shutter
when fully pressed.
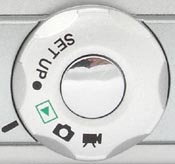
Mode Dial: Encircling the Shutter button on the top panel,
this dial controls the camera's operating mode. The following options are available:
 Setup:
Displays the camera's Setup menu on the LCD, which adjusts basic camera settings.
Setup:
Displays the camera's Setup menu on the LCD, which adjusts basic camera settings.
 Playback:
Lets the user review captured images and movies on the SD card.
Playback:
Lets the user review captured images and movies on the SD card.
 Still
Image Record: Sets up the camera to record still images, with a handful
of exposure options available.
Still
Image Record: Sets up the camera to record still images, with a handful
of exposure options available.
 Movie
Record: Records moving images with or without sound, with some exposure
options available.
Movie
Record: Records moving images with or without sound, with some exposure
options available.

Power Button: To the left of the speaker on the top panel, this smaller,
silver button turns the camera on or off (triggering the lens to telescope forward
when the camera is powered on).

Zoom Rocker Button: This rocker button is in the top right corner of
the back panel, and controls the optical and digital zoom while the camera is
in Record mode. (Zoom is disabled when recording sound in Movie mode.)
In Playback mode, this button controls the digital enlargement of captured images.

Display Button: Below the Zoom Rocker button, this button controls the
LCD image and information display, in all modes except Set Up.

Menu Button: Directly below the Menu button, this button displays the
settings menu in both Playback and Record modes. It also dismisses the menu
display.

Four-Way Arrow Pad: Located beneath the speaker on the camera's rear
panel, this four-way rocker button features an arrow pointing in each direction,
and the center of the button acts as the "OK" for confirming selections.
In all mode menus, the arrow keys navigate through menu selections.
In Record mode, when manual focus is enabled, the right and left arrows control the focus setting. The up arrow controls the flash mode, cycling through Auto, Red-Eye Reduction Auto, Fill-in, Forced Off, Night Backdrop, and Red-Eye Reduction Forced settings. The down arrow cycles between Macro, Landscape, and normal AF modes.
In Playback mode, the left and right arrows scroll through captured images on the card. When an image has been digitally enlarged, the arrow keys move around within the enlarged view. The up arrow displays and dismisses an information screen about the currently-displayed image.
Camera Modes and Menus
Record Mode: Designated on the Mode switch by a small camera symbol, this mode sets up the camera for capturing still images. Pressing the Menu button pulls up the following settings menu:
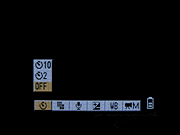 Self-Timer:
Offers two- and 10-second self-timer modes, or returns to the normal capture
mode.
Self-Timer:
Offers two- and 10-second self-timer modes, or returns to the normal capture
mode.
- Pixels: Sets resolution to 2,304 x 1,728; 1,600 x 1,200; 1,280 x 960; or 640 x 480 pixels.
- Quality: Adjusts the image quality to Fine or Normal compression settings.
- Exposure Compensation: Increases or decreases exposure from -2 to +2 EV in one-third-step increments.
- White Balance: Offers Auto, Daylight, Tungsten, Cloudy, Fluorescent, and Preset (manual) white balance settings.
- Manual Details: Displays the menu described below.
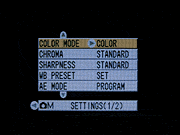 Manual
Details: Displays the following sub-menu:
Manual
Details: Displays the following sub-menu:
- Color Mode: Records images in Color, Black-and-White, or Sepia tones.
- Chroma: Adjusts chroma to Standard or "+" and "-" settings.
- Sharpness: Controls the amount of in-camera sharpening. Options are Standard, or a range from -1 to +3 settings in arbitrary units.
- WB Preset: Adjusts the manual white balance setting, based on a white card held in front of the camera.
- AE Mode: Sets the exposure control to Program, and offers f/2.8
or f/7.5 aperture settings.
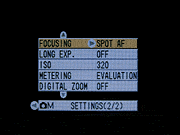 Focusing:
Offers Manual, Wide AF, and Spot AF modes.
Focusing:
Offers Manual, Wide AF, and Spot AF modes.
- Long Exposure: Offers two-, four-, and eight-second shutter times, or deactivates the mode.
- Sensitivity: Sets the camera's ISO sensitivity to Auto, or to 80, 160, or 320 ISO equivalents.
- Metering: Controls the camera's exposure metering mode. Options are Evaluation, Spot, and Center-Weighted.
- Digital Zoom: Activates or deactivates the 4x digital zoom.
Movie Mode: Indicated on the Mode switch with a movie camera symbol, this mode captures moving images with or without sound. The following menu options are available. (Sorry, no screen shots of the Movie Mode menu.)
- Self-Timer: Offers two- and 10-second self-timer modes, or returns to the normal capture mode.
- Pixels: Sets resolution to 320 x 240 or 160 x 120 pixels.
- Sound: Turns audio recording on or off.
- Exposure Compensation: Increases or decreases exposure from -2 to +2 EV in one-third-step increments.
- White Balance: Offers Auto, Daylight, Tungsten, Cloudy, Fluorescent, and Preset (manual) white balance settings.
- Manual Details: Displays the following sub-menu:
- Color Mode: Records images in Color, Black-and-White, or Sepia tones.
- WB Preset: Adjusts the manual white balance setting, based on a white card held in front of the camera.
- Focusing: Offers Manual, Wide AF, and Spot AF modes.
Playback Mode: This mode lets you review captured images on the memory card, as well as erase them, write-protect them, or set them up for printing on a DPOF device. Menu options in this mode include:
 Multi:
Displays the six-image index display of images on the SD memory card. Also
switches back to Single display mode.
Multi:
Displays the six-image index display of images on the SD memory card. Also
switches back to Single display mode.
- Sound Recording: Records a short sound clip to accompany a captured image (maximum of 30 seconds).
- Protect: Write-protects the currently-displayed image, preventing it from being erased or manipulated (except via card formatting). This option can also remove protection.
- Erase: Deletes the current image from the memory card.
- Erase All: Erases all images from the memory card, except for write-protected
images.
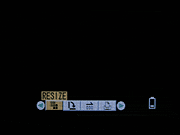 Resize:
Displays the Resize menu, with options of Execute Resizing, Resized Image
Playback, and Return. Execute Resizing lets you specify the cropped area and
then save a new copy at the smaller resolution. The playback option confirms
the resize, with an option to delete the file. (secondary
screens)
Resize:
Displays the Resize menu, with options of Execute Resizing, Resized Image
Playback, and Return. Execute Resizing lets you specify the cropped area and
then save a new copy at the smaller resolution. The playback option confirms
the resize, with an option to delete the file. (secondary
screens)
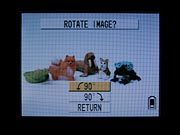
- Rotate: Rotates the displayed image in 90-degree increments clockwise. (secondary screen)
- Auto Play: Enables an automatic slide show playback of all images on the memory card. You can adjust the interval and starting frame. (secondary screens)
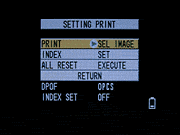
- Print: Displays the DPOF settings options, which let you set the
number of prints to be made, designate an index print, or reset all print
settings. (secondary screens)
Setup Mode: This mode offers the opportunity to change the following camera settings:
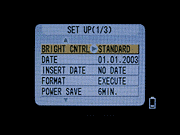 Bright
Control: Adjusts the overall brightness of the LCD display. Options
are Standard, or +/- 2 in arbitrary units.
Bright
Control: Adjusts the overall brightness of the LCD display. Options
are Standard, or +/- 2 in arbitrary units.
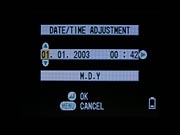
- Date: Sets the camera's internal calendar and clock, as well as the display format. (secondary screen)
- Insert Date: Lets you insert a date overlay over captured images.
- Format: Formats the SD memory card, erasing all files, even write-protected ones. (secondary screen)
- Power Save: Turns off the Power Save function, or sets the time period
to 15 seconds or one, three, or six minutes.
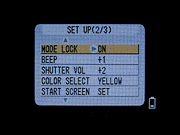 Mode
Lock: Activates the Mode Lock function, which saves the current exposure
settings whenever the camera is powered off, so that they are instantly recalled
when the camera is switched back on.
Mode
Lock: Activates the Mode Lock function, which saves the current exposure
settings whenever the camera is powered off, so that they are instantly recalled
when the camera is switched back on.
- Beep: Turns the camera's beep sounds off, or adjusts the volume to +1, +2, or +3.
- Shutter Volume: Controls the camera's shutter noise, turning it off or adjusting it from +1 to +3 in volume.
- Color Select: Designates the display color of selected menu items. Choices are Purple, Red, Yellow, or Blue.
- Start Screen: Sets the startup screen to a Kyocera logo
image, an image from the SD card, or turns the startup-screen feature off.
(secondary screen)
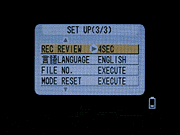 Record
Review: Activates a post-capture review screen for two or four seconds,
or disables image review.
Record
Review: Activates a post-capture review screen for two or four seconds,
or disables image review.
- Language: Sets the camera's menu language to Japanese, English, French, German, Spanish, or Chinese.
- File Number: Resets the file numbering for new SD cards. (secondary screen)
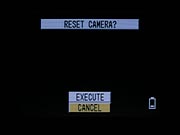
- Mode Reset: Returns all camera settings to their defaults. (secondary
screen)
In the Box
The L4v arrives with the following items:
- Hand strap.
- Lithium battery pack (CR-V3).
- USB cable.
- 16MB SD memory card.
- Software CD.
- Instruction manual, Quick Start Guide, and registration kit.
- Large capacity SD memory card.
- Rechargeable AA batteries and charger.
- AC adapter.
- Soft case for travel.
Recommended Software: Rescue your images!
Just as important as an extra memory card is a tool to rescue your images
when one of your cards fails at some point in the future. I get a lot of email
from readers who've lost photos due to a corrupted memory card. Memory card
corruption can happen with any card type and any camera manufacturer, nobody's
immune. A surprising number of "lost" images can be recovered with
an inexpensive, easy to use piece of software though. Given the amount of email
I've gotten on the topic, I now include this paragraph in all my digicam reviews.
The program you need is called PhotoRescue, by DataRescue SA. Read our review
of it if you'd like, but download the program now, so you'll have it.
It doesn't cost a penny until you need it, and even then it's only $29, with
a money back guarantee. So download PhotoRescue
for Windows or PhotoRescue
for Mac while you're thinking of it. (While you're at it, download the
PDF manual and quickstart guide as well.) Stash the file in a safe place and
it'll be there when you need it. Trust me, needing this is not a matter of if,
but when... PhotoRescue is about the best and easiest tool for recovering
digital photos I've seen. (Disclosure: IR gets a small commission from sales
of the product, but I'd highly recommend the program even if we didn't.)
OK, now back to our regularly scheduled review...
See camera specifications here.
Cycle times, shutter lag, battery life, etc. can be found here.
See the full set of my sample pictures and
detailed analysis here.
The thumbnails below show a subset of my test images. Click on a thumbnail to
see the full-size photo.
 |
 |
 |
| |
|
|
|
|
|
|
| |
|
|
|
|
|
|
| |
|
|


Test Results
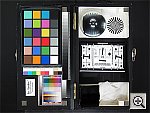
In keeping with my standard test policy, the comments given here summarize only my key findings. For a full commentary on each of the test images, see the Finecam L4v's "pictures" page.
As with all Imaging Resource product tests, I encourage you to let your own eyes be the judge of how well the camera performed. Explore the images on the pictures page, to see how L4v's images compare to other cameras you may be considering.
Not sure which camera to buy? Let your eyes be the ultimate judge! Visit our Comparometer(tm) to compare images from the L4v with those from other cameras you may be considering. The proof is in the pictures, so let your own eyes decide which you like best!
- Color: Good color, minor color casts. The L4v produced
pretty good color overall, with accurate hue and appropriate saturation in
most instances. Skin tones were accurate, and the always-difficult blue flowers
in the bouquet used in the Outdoor Portrait shot were quite hue-accurate,
just a slightly darker than in real life. Indoors, the camera's white balance
system had a little trouble with household incandescent lighting, but I judged
the yellowish color cast left in its images as being within an acceptable
range. Overall, a good performance, color-wise.
- Exposure: Generally accurate exposure, but with slightly
high contrast. The L4v generally seemed to require less exposure compensation
than most cameras I test, so I rate its exposure as more accurate than average.
It had a little difficulty with the deliberately harsh lighting of my outdoor
test shots, its high native contrast losing highlight detail while plugging
the shadows somewhat. Its contrast levels were within the "average"
range among cameras I've tested, but I'd like to see either a lower default
contrast, or some sort of an adjustment to reduce it manually.
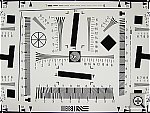
- Resolution/Sharpness: Slightly disappointing resolution
for a four-megapixel camera. The L4v performed fairly well on the "laboratory"
resolution test chart, though somewhat below my expectations for a four-megapixel
camera. It started showing artifacts in the test patterns at resolutions as
low as 600 lines per picture height, in both horizontal and vertical directions.
I found "strong detail" only to 1,050 lines in both directions.
"Extinction" of the target patterns occurred around 1,200-1,250
lines.
- Image Noise: Acceptable image noise at ISO 80, high at ISO 160,
very high at ISO 320. Overall, the L4v's image noise was higher than average.
While it wasn't particularly visible at ISO 80, it was obvious at ISO 160,
and I personally wouldn't consider the camera usable at ISO 320.
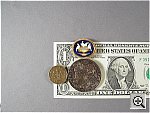
- Closeups: Mediocre macro performance: A large macro
area, but good detail. Flash throttles down, but with strong falloff in the
corners. The L4v did worse than average in the macro category, capturing
a large minimum area of 6.45 x 4.84 inches (164 x 123 millimeters). Resolution
was high, with pretty good detail in the dollar bill, coins, and brooch, though
details weren't terribly well-defined. Some slight corner softness was visible
in all four corners, and details were a bit soft throughout the center of
the frame as well. Exposure was a little bright, and contrast was high. The
L4v's flash throttled down a little too well for the macro area, with strong
falloff in the corners of the frame.
- Night Shots: Pretty good low light images, capable of
shooting under average city street lighting at night. Limited autofocus performance
though. The L4v produced clear, bright, usable images down to the 1/4
foot-candle (2.7 lux) light level at all three ISO settings. (You could arguably
use some of the shots taken at the lower light levels, but the lighting is
quite dim.) Noise was pretty low at the ISO 80 setting, high at ISO 160, and
very high at ISO 320. The biggest limitation of the L4v's low light capability
was its autofocus performance: It works reliably only to about two foot-candles,
and marginally at one foot-candle. In a typical night scene, there'll often
be brighter reflections within the frame that the camera will be able to focus
on, but for the most part, you'll need to use the L4v's manual focus option
for night shooting.
- Viewfinder Accuracy: An accurate LCD monitor, but rather
tight optical viewfinder. The L4v's optical viewfinder was pretty tight,
showing only about 82 percent of the final image area at both wide angle and
telephoto zoom settings. Images framed with the optical viewfinder were also
somewhat off-center. The LCD monitor fared much better, showing about 97 percent
accuracy at wide angle, and about 99 percent at telephoto. (Though at telephoto,
the sides of the frame were cut off slightly.) Given that I like LCD monitors
to be as close to 100 percent accuracy as possible, the L4v's LCD monitor
performed well here, but its optical viewfinder could use some help.
- Optical Distortion: High barrel distortion at wide angle,
low distortion at telephoto, very little chromatic aberration. Optical
distortion on the L4v was quite high at the wide-angle end, where I measured
an approximate 1.2 percent barrel distortion. The telephoto end fared much
better, as I couldn't even find a full pixel of distortion. (I actually noticed
about a half-pixel of barrel distortion.) Chromatic aberration was very low,
showing only about two or three pixels of very faint coloration on either
side of the target lines. (This distortion is visible as a very slight colored
fringe around the objects at the edges of the field of view on the resolution
target.)
- Shutter Lag and Cycle Time: Rather slow performance all around.
With a full autofocus delay ranging from 1.25 to 1.30 seconds, the L4v's shutter
lag is considerably slower than average. (The average range is 0.8 to 1.0
seconds, still too slow in my opinion.) Cycle time was similarly sluggish,
at 4.79 seconds between shots in large/fine mode. Definitely not a camera
for sports or other fast-paced action.
- Battery Life: Short battery life. With a worst-case run time of 70 minutes (based on standard 1600 mAh NiMH cells, performance with modern, higher-capacity cells would be proportionately longer), the L4v's battery life is very much on the short side of average. It improves to 112 minutes with the LCD turned off, but the poor accuracy of the LCD viewfinder makes it a little problematic using the camera in this mode. Given its power-hungry ways, several sets of high-capacity NiMH AA cells and a good charger to go along with them should be considered mandatory equipment with the L4v. To see which NiMH cells are best, see my battery shootout page. Read my review of the Maha C-204F charger, to learn why it's my longtime favorite.
Although it carries a high list price, the L4v is generally
available at low enough "street" prices that it can amount to a pretty
good deal for a four-megapixel, 3x zoom-equipped digicam. In my testing, it
showed good color, producing pleasing-looking images under a wide range of shooting
conditions. On the down side, I found its resolution not quite up to the best
of its four-megapixel brethren, its shutter lag and cycle time on the slow side,
its battery life rather short, and its image noise higher than average. Despite
these limitations though, the FineCam L4v generally produces good-looking images,
so it could still be an attractive purchase, particularly if you find one at
the lower end of its price range.

Follow Imaging Resource: