The Imaging Resource
Quick Review
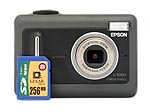
Epson PhotoPC L-500V Digital Camera
|
|||||||||||||||||||||

Introduction
|
|||||||||
The Epson L-500V is the first digital camera from that company in quite a while, but their (much) earlier PhotoPC 3000 and 3100 were among my favorites at the time. The new Epson L-500V happily carries forward many of the hallmarks of the earlier Epson models, including good color and build quality. Among its most salient points though, the Epson 500V sports one of the most downright beautiful LCDs I've yet seen in a digital camera. All in all, the L-500V is an excellent product with which to mark Epson's return to the consumer digital camera market. - Read on for all the details!
The Epson PhotoPC L-500V is small and rectangular, well-shaped for larger coat pockets and most purses, with a sophisticated, minimally-styled body. Though quite compact, the camera accommodates a very generous 2.5-inch LCD monitor, which serves as the camera's only viewfinder. Featuring a 5.0-megapixel CCD and 3x optical zoom lens, the L-500V captures clear pictures, suitable for printing as large as 11x14 inches, or to 8x10 inches with a fair amount of cropping. Smaller resolutions are also available, more convenient for sending as email attachments. The L-500V is a no-hassle, point-and-shoot style digital camera, making operation easy and efficient, and even boasts a handful of preset scene modes for trickier situations.
The L-500V's 3x optical zoom lens has a focal range from 5.6-16.8mm, the equivalent of a 34-102mm lens on a 35mm camera. Focus ranges from 19.7 inches (50 centimeters) to infinity in normal focus mode, with a macro setting that lets you get as close as 1.97 inches (5.0 centimeters) for excellent close-up photos. In addition to the 3x optical zoom, the L-500V also features up to 4x digital zoom, though I always remind readers that digital zoom results in lower image quality, since the camera is just cropping out and enlarging the central portion of the CCD's image. For image composition, the L-500V features only the 2.5-inch LCD monitor on its rear panel, which offers a very bright and remarkably high-resolution display. An information display on the LCD monitor reports a handful of camera settings (including aperture and shutter speed when the Shutter button is halfway pressed).
True to point-and-shoot form, exposure on the L-500V remains under automatic control at all times, great for novices looking for simplicity, but with no provision for direct exposure control by more experienced users. A Power button on top of the camera turns the camera on, and a small Mode dial on top selects between Setup, Playback, Automatic, Manual, Continuous Shooting, and Movie modes. Though the camera offers Automatic and Manual exposure modes, the "Manual" in this case refers only to the ability to adjust exposure compensation, white balance, etc., and the access that's provided to the options on the Record menu. The Automatic setting takes away all user control, with the exception of flash, self-timer, and macro settings. (Note that the image resolution is fixed at 2,560 x 1,920 pixels in Auto mode.) In the Manual setting, the camera's Record menu becomes accessible (by hitting the Menu button on the rear panel), where you can adjust resolution and quality, exposure compensation, ISO, and the white balance. You can also access the camera's preset scene modes, which include Portrait, Landscape, Night View, and Night Portrait options. Portrait mode sets up the camera for good-looking portraits by using a larger lens aperture, so that the subject is in focus but the background is softly blurred. Alternatively, Landscape mode sets the camera up for shooting distant subjects, and keeps both the foreground and background in good focus. The two Night modes extend the camera's capabilities for darker settings, employing a higher sensitivity and longer shutter speeds (to a maximum of one second). Very oddly though, the longest exposures are available only when the flash is turned on and set to its "slow synchro" mode. - With the flash off, the longest exposure you can achieve in any mode is 1/2 second, limiting the cameras low-light performance quite a bit. Of the two Night modes, the Night Portrait option simply employs the flash so that you get a good exposure of your subject without losing the detail and color of the darker background.
Though you can't set the shutter speed or lens aperture directly, you can increase or decrease the overall exposure via the Exposure Compensation option of the Record menu, which is adjustable from -2 to +2 exposure values (EV), in one-half-step increments. You can also adjust the camera's sensitivity to 100, 200, or 400 ISO equivalents, or use the Auto setting, which fluctuates from 50 to 400 ISO equivalents depending on the lighting conditions the camera is faced with. The L-500V's adjustable White Balance setting offers Auto, Daylight, Cloudy, Incandescent, Fluorescent, and Mercury modes, handling a variety of common light sources. An unusual option on a digital camera, the L-500V also lets you select from a range of printing borders to overlay onto an image. The PIF (Print Image Framer) button on the rear panel lets you select from one of four frames saved in the camera's memory, or you can choose from over 100 additional frames via the accompanying software. (The Epson software lets you save a selection of these frames to an SD/MMC card in-camera, where you can then access them out in the field.) While PIF is an interesting option, it isn't one I'd think terribly important to be able to do in-camera. Finally, the L-500V's flash operates in Fill-in, Off, Auto, Red-Eye Reduction, and Slow-Sync modes.
The Movie option on the Mode dial records moving images with sound, at either 640 x 480, 320 x 240, or 160 x 120 pixels, each with Fine and Normal quality options. The amount of recording time depends on the resolution and quality settings, doesn't appear to be limited by the internal buffer memory. - Recording can continue as long as the memory card has room. (Note that slow memory cards could result in shorter recording times though, if the card isn't able to keep up with the camera.) Unlike many digital cameras, the Epson L-500V permits zooming during movie recording, but it's only digital zooming, so image quality suffers as you zoom in. - For critical subjects, use the zoom lens to frame your subject before you start the actual recording.
The L-500V also offers a Continuous Shooting mode, which captures a rapid burst of images, at three frames per second. Amazingly, with a fast SD memory card, the L-500V can maintain the three frame per second capture rate until the memory card is full. (Or for at least 150 images in sequence, the most that we tested it to.) This is very unusual, particularly in a compact camera model. - Most digital cameras can only capture a handful of shots in Continuous mode before having to pause to write the data to the memory card. A Self-Timer mode provides either a two- or 10-second delay between the time the Shutter button is pressed and the time that the camera actually takes the picture, giving the photographer time to run around and get into the picture.
Images are stored on SD/MMC memory cards (a 16MB SD card is included, although higher capacity cards are available, up to 1GB), and they can be downloaded via an exceptionally fast USB connection to a PC or Macintosh computer. The L-500V does contain four megabytes of internal memory, though this is apparently only useful for temporary buffer storage, and not for any actual image storage. The L-500V is powered by a single lithium-ion battery pack, and comes with the necessary battery charger. Since the L-500V doesn't accommodate AA batteries in any shape or form, and given its relatively modest battery life (96 minutes in capture mode), I highly recommend picking up a spare battery and keeping it freshly charged and on-hand.
Basic Features
- 5.0-megapixel CCD delivering image resolutions of 2,560 x 1,920 pixels.
- 3x zoom lens (equivalent to a 34-102mm lens on a 35mm camera).
- 4x digital zoom.
- Beautiful 2.5-inch color LCD monitor.
- Automatic exposure control.
- Built-in flash with five modes.
- 4MB internal memory.
- SD/MMC memory storage (16MB card included).
- USB computer connection.
- Power from one lithium-ion battery pack (charger included).
- Software for Mac and PC.
Special Features
- Portrait, Landscape, Night View, and Night Portrait scene modes
- Movie (with sound) recording mode, recording limited only by memory card capacity.
- Unique print border options and extensive printing menu.
- Continuous Shooting mode, limited only by memory card capacity.
- Shutter speeds from 1/2,000 to one second depending on the exposure and flash mode.
- Aperture range from f/2.8 to f/4.9.
- Self-timer for delayed shutter release.
- Macro (close-up) lens adjustment.
- Auto ISO setting or 100, 200, and 400 ISO equivalents.
- White balance (color) adjustment with six options.
- DPOF (Digital Print Order Format) printing compatibility.
User Recommendation
With a very straightforward user interface and minimal external controls, the L-500V is a great choice for beginning photographers who want to capture great pictures without a lot of complexity. (Though intermediate and advanced users might be interested in the L-500V for its small size and ease of use as a second "fun" camera.) The L-500V's exposure system is capable of handling most common shooting conditions, and the available preset scene options extend the camera's capabilities for low lighting, portrait, and landscape applications. (Although its low-light capability is somewhat limited.) Small, compact, and boasting an exceptionally bright, clear, and very large LCD display as well as good picture quality, the L-500V should please the average consumer.
 The Epson PhotoPC L-500V is compact and stylish, with a two-tone charcoal and black body that's very understated. Rectangular and without any large protrusions (with the lens neatly stowed), the L-500V is a perfect fit for larger coat pockets and most average purses. Measuring just 2.5 x 3.6 x 1.3 inches (63 x 92 x 32 millimeters) and weighing only 6.9 ounces (196 grams) with the battery and memory card installed, the L-500V fits the hand well and isn't a burden to carry. When not in use, the telescoping zoom lens retracts neatly inside the body, and a small plastic leaf shutter automatically closes over the lens to protect it. It's quick on the draw and easy to hold.
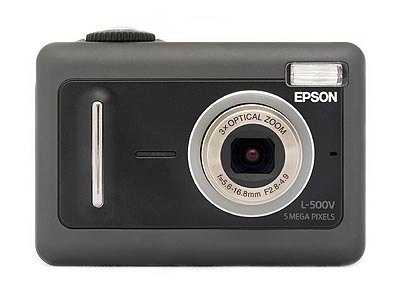
The L-500V's front panel is fairly plain, holding only the lens, flash, and tiny hole for the microphone. The 3x, 5.6-16.8mm zoom lens (equivalent to a 34-102mm zoom on a 35mm camera) dominates the right side of the front of panel. A thin, silver, vertical strip serves as the only finger grip on the front of the camera, but I found it sufficient for a fairly firm grip.
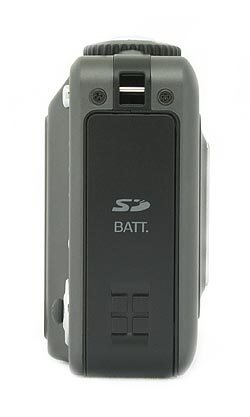
The right side of the camera (as viewed from the rear) houses the battery and SD/MMC compartment, protected by an easy to open, hinged plastic door. Above the door is a small eyelet for attaching a wrist strap (though no wrist strap is included).
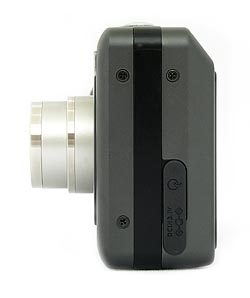
The left side features the connector compartment, protected by a flexible, rubbery flap that remains tethered to the camera when opened. Beneath the flap are the DC In and USB connector jacks.
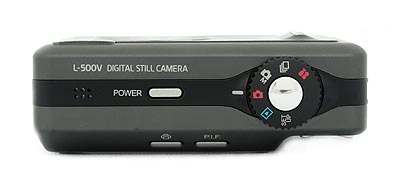
The camera's top panel holds the Power button, Mode dial, and Shutter button. On the right side of the top panel is the camera's small speaker.
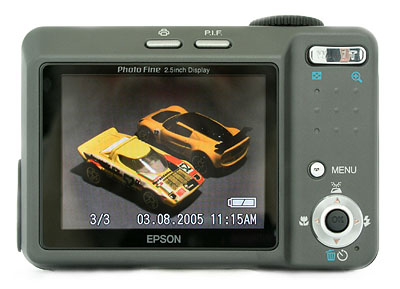
The camera's rear panel holds the remaining camera controls, along with the 2.5-inch color LCD monitor for previewing and playing back images. The LCD display reports a variety of camera and exposure settings, including the aperture and shutter speed settings (when the Shutter button is halfway pressed) and battery status. Above the LCD monitor are the Print and PIF buttons, which control the camera's printing and picture border options. The camera's Zoom control is in the upper right corner, conveniently located right above a series of raised bumps for better thumb traction when holding the camera. In the lower right corner of the rear panel is a multi-directional joystick, encircled by a silver ring with small arrows pointing in four directions (Up, Down, Left, and Right). Moving the joystick in one of the four directions accesses a camera adjustment tool (Outdoor View, Flash Mode, Self-Timer/Erase, or Macro settings), while pressing down on the joystick acts as the "OK" to set options. You can also use the joystick to navigate through settings menus and captured images. Just above the joystick controller is the Menu button, which accesses the settings menu in any mode.
Finally, the L-500V's flat bottom holds the threaded plastic tripod screw mount. While most users of the L-500V probably won't care, I was pleased to see that I could change the battery and memory card without removing my tripod mounting plate from the camera's bottom.
Because the L-500V is a true point-and-shoot style digital camera, operating it is really a breeze. Novices will appreciate the Auto shooting mode, which handles all of the exposure decisions, including the image resolution and quality, as well as a "manual" mode that allows exposure compensation, ISO, and white balance adjustments. The Mode dial on top of the camera controls the main operating mode, with options for Setup, Playback, Automatic, Manual, Continuous Shooting, and Movie. The L-500V's onscreen LCD menu (activated by the Menu button) is short and sweet, and simple to navigate with the multicontroller on the rear panel. Given the L-500V's straightforward setup and limited controls, I'd estimate that most users will be able to snap images straight out of the box, with only a cursory look at the instruction manual.
Record-Mode Display
 In record mode, the LCD monitor displays the subject with a basic information overlay, which includes a brief battery level check. (A battery icon indicates the amount of charge and then disappears from view.) The LCD also has a central autofocus and exposure bracket, and reports the flash mode, any currently-selected exposure compensation setting, ISO setting, the current size/quality setting, the number of images that can be stored on the remaining memory card space at the current size/quality, and any other basic camera settings. Half-pressing the Shutter button causes the camera to display the shutter speed and aperture setting it has chosen for the current lighting conditions. (While you can't change these directly unless you're in Manual mode, it's very nice to know what settings the camera has selected.) The autofocus brackets also turn green to indicate that focus is set. You can disable the information display through the Record menu.
Playback-Mode Display
 In Playback mode, the LCD display shows the most recently captured image, with a detailed information overlay. Any user-set exposure options are displayed, as well as the file number, exposure mode selected, aperture, shutter speed, and the date and time of image capture. The image resolution and quality settings are also present, in addition to the series number of the image. Through the Playback menu, you can opt for a more basic information display, or disable the information display altogether. Pressing the wide-angle side of the zoom lever takes you to an index display showing images on the memory in groups of 12 small thumbnails. (You can navigate a yellow outline cursor over these thumbnails by using the multicontroller. Pressing the telephoto side of the zoom lever will bring the currently-selected image up full-screen.) Pressing the telephoto side of the zoom lever when viewing an image full-size on the LCD screen will zoom in on the image, handy for checking focus and precise framing.
External Controls
![]()
Power Button: Located in the center of the camera's top panel, this button turns the camera on and off.
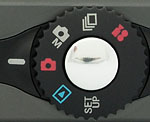
Mode Dial: Surrounding the Shutter button on the camera's top panel, this ribbed dial is sets the camera's operating mode, offering Setup, Playback, Automatic, Manual, Continuous Shooting, and Movie modes. (See menus and descriptions below.)
Shutter Button (see image above): Shiny and encircled by the Mode dial, this button sets focus and exposure when halfway pressed, and fires the shutter when fully pressed.
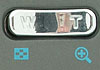
Zoom Control: Positioned in the top right corner of the rear panel, this two-way rocker button controls optical and digital zoom.
In Playback mode, this button controls the digital enlargement of a captured image, when pressed on the telephoto side. (Very handy for checking focus or the expressions on people's faces in group shots.) Also in Playback mode, the wide-angle end of the button activates the Index Display mode, which displays as many as 12 thumbnail images on the screen at one time.
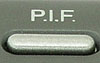
P.I.F. Button: Directly above the LCD monitor on the rear panel, this button calls up the Frame Selection screen, which lets you apply a border to an image for printing. You can select from one of four options saved on the camera, or access any that have been saved on a SD/MMC memory card.
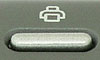
Print Button: To the left of the P.I.F. button, this button accesses the camera's DPOF print settings. You can set the print options for a specific image, or for all images on the memory card. You can also opt to print images as an "Album," which offers a range of layouts to choose from. Once you've specified your print options, you can set the number of copies, whether to imprint the date, specify a paper type and any borders, and choose the print quality. Very nice print control!
![]()
Menu Button: Positioned to the right of the LCD monitor, this button displays the available LCD menu for the current camera mode. In Auto mode, no menu is available, and in Setup mode, the menu automatically appears. This button also backs out of menu screens.
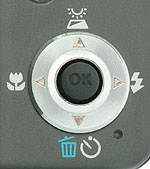
Multicontroller Joystick: Directly below the Menu button, this joystick-like controller moves up, down, left, and right, and can be pressed straight in at center. Actuating the controller in any direction navigates through menu options in a settings menu, or scrolls through captured images in Playback mode. Pressing the center of the button confirms selections.
In most record modes, pressing the controller up accesses the Outdoor display mode for the LCD monitor, which improves viewing in bright sunlight. Pushing the controller to the right controls the Flash mode, cycling through Auto, Fill, Off, Red-Eye Reduction, and Slow-Sync modes. Pushing the controller to the left turns the Macro (close-up) mode on and off, and pressing it down accesses the two Self-Timer modes.
In Playback mode, the Right and Left arrows scroll through captured images. When Playback zoom is enabled, all four arrows scroll around within the enlarged view, while pressing the center button returns to the normal, 1x display. Pushing the controller downward displays the image erase menu.
Camera Modes and Menus
![]()
Setup Mode: Labeled simply as "Setup" on the Mode dial, this mode automatically displays the camera's main setup menu, detailed below.
![]()
Playback Mode: Playback mode is noted on the Mode dial with the traditional Playback symbol (a triangle enclosed within a rectangle outline). In this mode, you can scroll through captured images, delete them, rotate them, and set them up for printing.
![]()
Automatic Mode: Indicated on the Mode dial with a red camera icon, this mode puts the camera in control over the exposure and everything except Macro, Zoom, Flash, and the Self-Timer. No LCD menu is available in this mode, and the resolution is automatically set to 2,560 x 1,920 pixels.
![]()
Manual Mode: Indicated on the Mode dial with a silver camera icon and a "M," this mode provides access to the LCD menu system, and options for adjusting the ISO, exposure compensation, and white balance settings, in addition to resolution and quality.
![]()
Continuous Shooting: Next on the Mode dial and indicated by a series of rectangular frames, this mode lets you capture a rapid series of images while holding down the Shutter button. Actual frame rates and the total number of images will vary with the resolution and quality settings, as well as the amount of available space on the memory card.
![]()
Movie Mode: A red movie camera icon marks this mode on the Mode dial. In Movie mode, you can record moving images and sound, for as long as the memory card has space. Resolution and quality choices are 640 x 480, 320 x 240, or 160 x 120 pixels, with Fine and Normal quality options. The amount of available recording time depends on the quality settings, and the amount of available memory card space.
Record Menu: Available in most of the Record modes by pressing the Menu button, the Record menu offers the following options (some options are not available in all modes):
 Scene: Offers Normal, Landscape, Portrait, Night View, and Night Portrait preset modes.
- Resolution: Sets the resolution to 2,560 x 1,920; 1,600 x 1,200; or 640 x 480 pixels. In Movie mode, options are 640 x 480, 320 x 240, and 160 x 120.
- Quality: Sets the JPEG compression level to Fine, Normal, or Economy. Movie mode options are Fine and Normal only.
- EV (Exposure Compensation): Increases or decreases the overall exposure from -2 to +2 exposure values (EV) in one-half-step increments.
- ISO: Adjusts the camera's light sensitivity. Options are Auto, or 100, 200, and 400 ISO equivalents.
- White Balance: Adjusts the overall color balance of the image, to suit the light source. Options are Auto, Daylight, Cloudy, Incandescent, Fluorescent, and Mercury.
- Info Display: Controls the amount of information displayed on the LCD screen in Record mode. You can choose between the basic display and an Off setting.
Setup Menu: Displays the main Setup menu:
- Page 1:
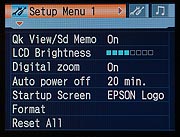 Quick View/Sd Memo: Turns the instant image review function on or off. The Sd Memo On option enables automatic sound memo recording during the review.
- LCD Brightness: Controls the brightness of the LCD display.
- Digital Zoom: Turns the digital zoom function on or off.
- Auto Power Off: Sets the period of inactivity before the camera shuts itself off. Options are one, three, five, or 20 minutes.
- Startup Screen: Lets you choose the startup screen display. You can choose the Epson logo or opt for a captured image from the memory card.
- Format: Formats the memory card, erasing all files.
- Reset All: Resets the camera to its default settings.
- Page 2:
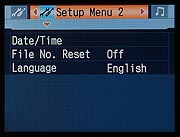 Date / Time: Sets the camera's internal clock and calendar.
- File Number Reset: Sets whether file numbering continues from card to card, or resets with new memory cards.
- Language: Sets the menu language to one of nine.
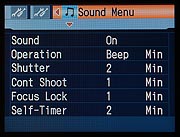
- Sound Menu:
- Sound: Turns all camera sound on or off. If off, the following menu options are unavailable.
- Operation: Sets the type of sound for camera operation, as well as the volume. You can also copy a sound to the memory card, or delete a sound.
- Shutter: Sets the sound and volume for shutter noises. You can also copy and delete sounds from the memory card.
- Continuous Shooting: As with the above, lets you set the sound for Continuous Shooting mode, as well as the volume. Copy and Delete options are also available.
- Focus Lock: Sets the sound options for the focus lock indicator.
- Self-Timer: Sets the sound options for the self-timer.
Playback Menu:
- Page 1:
 Delete One: Deletes a selected image from the memory card.
- Delete All: Deletes all images from the memory card.
- Delete Group: Deletes a pre-selected group of images from the memory card.
- Slide Show: Enables an automated playback of all images on the memory card.
- Sound Memo: Lets you record a short sound clip to accompany a captured image, like an audio caption.
- Info Display: Controls the level of information displayed on the LCD monitor. Options are Basic, Detailed, and Off.
- Rotate: Rotates the selected image in 90-degree increments, clockwise or counterclockwise.
- Page 2:
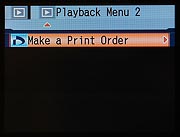 Make a Print Order: Lets you select images for printing, and set the number of copies to print.
In the Box
Included with the Epson PhotoPC L-500V digital camera are the following items:
- 16MB SD card.
- Lithium-ion rechargeable battery pack.
- Battery charger and cable.
- USB cable.
- Software CD containing the Epson imaging software, USB drivers, and a copy of the manual.
- Extra battery pack
- AC adapter
- Wrist strap.
- Large capacity
SD/MMC memory card.
(These days, 128 - 256 MB is a good tradeoff between cost and capacity.) - Carrying case
Recommended Software: Rescue your Photos!
Just as important as an extra memory card is a tool to rescue your images when one of your cards fails at some point in the future. I get a lot of email from readers who've lost photos due to a corrupted memory card. Memory card corruption can happen with any card type and any camera manufacturer, nobody's immune. A surprising number of "lost" images can be recovered with an inexpensive, easy to use piece of software though. Given the amount of email I've gotten on the topic, I now include this paragraph in all my digital camera reviews. The program you need is called PhotoRescue, by DataRescue SA. Read our review of it if you'd like, but download the program now, so you'll have it. It doesn't cost a penny until you need it, and even then it's only $29, with a money back guarantee. So download PhotoRescue for Windows or PhotoRescue for Mac while you're thinking of it. (While you're at it, download the PDF manual and quickstart guide as well.) Stash the file in a safe place and it'll be there when you need it. Trust me, needing this is not a matter of if, but when... PhotoRescue is about the best and easiest tool for recovering digital photos I've seen. (Disclosure: IR gets a small commission from sales of the product, but I'd highly recommend the program even if we didn't.) OK, now back to our regularly scheduled review...
See the specifications sheet here.
Cycle times, shutter lag, battery life, etc. can be found here.
See my sample pictures and detailed analysis here. The thumbnails below show a subset of our test images. Click on a thumbnail to see the full-size photo.

|

|

|
| |
|
|
|
|
|
|
| |
|
|
|
|
|
|
| |
|
|


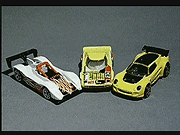
"Gallery" Photos
For those readers interested in a set of less "standardized" photos from the Epson L-500V, we've put together a "photo gallery" of more pictorial shots captured with the L-500V.
In keeping with my standard test policy, the comments given here summarize only my key findings. For full details on each of the test images, see the L-500V's "pictures" page.
For a look at some more pictorial photos from this camera, check out our Epson L-500V Photo Gallery.
Not sure which camera to buy? Let your eyes be the ultimate judge! Visit our Comparometer(tm) to compare images from the Epson L-500V with those from other cameras you may be considering. The proof is in the pictures, so let your own eyes decide which you like best!
- Color: Good to excellent color. Marginal handling of household incandescent lighting. The Epson L-500V produced very good color throughout my testing. Hue accuracy was better than average, and saturation levels were dead-on for most colors as well. (Just slightly high for the red-orange part of the spectrum.) Skin tones were also quite natural. Its white balance setting did pretty well too, leaving just a very slight warm cast in most shots. Under the difficult incandescent lighting of my Indoor Portrait test, it left more color cast in its images than I'd like, but the results were still better than I've seen from many cameras.
- Exposure: Better than average exposure accuracy. The L-500V's exposure system was more accurate than most, producing accurate exposures in most instances, and generally requiring less exposure compensation in shots that require it than do most cameras I test. Contrast levels were a little higher than I'd personally prefer, but here again, were better than those of most digital cameras I test. Flash exposures were also quite accurate, although flash range was a little restricted.
- Resolution/Sharpness: High resolution, 1,300 lines of "strong detail." The L-500V performed about average on the "laboratory" resolution test chart for its 5.0-megapixel class. It started showing artifacts in the test patterns at resolutions as low as 1,000 lines per picture height vertically and horizontally. I found "strong detail" out to at least 1,300 lines. "Extinction" of the target patterns didn't occur until about 1,650 lines.
- Image Noise: Fairly low image noise at low ISOs, shots at ISO 400 usable to 8x10 inches. The L-500V produced fairly low image noise at the 100 ISO setting, and noise only increased slightly at the 200 setting. At ISO 400, noise was much higher and brighter, however. That said, its ISO 400 images would probably be acceptable to most users when printed at sizes 8x10 inches and under, and look entirely fine at 5x7 and below.
- Closeups: A very small macro area with great detail. Flash has trouble up close though. The L-500V performed well in the macro category, capturing a minimum area of only 1.70 x 1.27 inches (43 x 32 millimeters). Resolution was very high, showing a lot of fine detail in the dollar bill. Details were quite soft on the coins and brooch due to the close shooting range.. (Not the fault of the camera, shallow depth of field is an optical fact of life in extreme closeups.) The L-500V's flash had a lot of trouble at such close range though, overexposing the shot greatly. - Plan on using external lighting for your tightest closeups with the L-500V.
- Night Shots: Sensitive enough for average city street lighting at night, but you'll need the flash for anything darker. Excellent low-light autofocus performance. The L-500V produced clear, bright, usable images only down to the 1/2 foot-candle (5.5 lux) light level, at all ISO 200 & 400. At ISOs 100 and 200, images were somewhat dim at this light level, but still usable. Noise was actually quite low, with pretty good results even at the ISO 400 setting. Since city street-lighting at night generally corresponds to a light level of about one foot-candle, the L-500V should capture moderately bright images in this setting, though you'll need the flash for anything darker.
- Viewfinder Accuracy: A very accurate (and beautiful) LCD monitor. The L-500V's LCD monitor was very accurate, showing 99+ percent accuracy at both wide angle and telephoto zoom settings. Given that I like LCD monitors to be as close to 100 percent accuracy as possible, the L-500V performed well here.
- Shutter Lag and Cycle Time: Average shutter response and cycle time, impressive continuous shooting performance. In most respects, the Epson L-500V turned in an average performance here, with shutter lag and cycle times very much in the average range. The one notable exception was its continuous-mode shooting speed, with the camera able to capture shots at an uninterrupted pace of 3 frames/second until the memory card ran out of space. (Note though, that our tests were done with fairly fast Lexar SD cards. Slower cards may result in shorter sequences of shots before the camera has to wait for the memory card to catch up with it.)
- Optical Distortion: Lower than average barrel distortion at wide angle. Very low chromatic aberration, good corner sharpness. Geometric distortion on the Epson L-500V was a bit lower than average at the wide-angle end, where I measured approximately 0.6 percent barrel distortion. The telephoto end fared a little better, as I measured approximately 0.2 percent pincushion distortion. Chromatic aberration was very low, resulting in only slight coloration. (This distortion is visible as a very slight colored fringe around the objects at the edges of the field of view on the resolution target.) Images were very sharp in the corners at wide angle, a bit better than average at telephoto. A good performance overall.
- Battery Life: Somewhat limited battery life. With a worst-case run time of only 96 minutes, the Epson L-500V's battery life is on the short side of average. I highly recommend purchasing a second battery along with the camera, and keeping it charged to bring along on extended outings.
- Print Quality: Good prints to 11x14", a little soft at 13x19. ISO 400 shots acceptable at 8x10", fine at 5x7". Excellent color. Testing hundreds of digital cameras, we've found that you can only tell just so much about a camera's image quality by viewing its images on-screen. Ultimately, there's no substitute for printing a lot of images and examining them closely. For this reason, we now routinely print sample images from the cameras we test on our Canon i9900 studio printer, and on the Canon iP5000 here in the office. (See our Canon i9900 review for details on that model.) The Epson L-500V produced good-looking prints to about 11x14", although 13x19" ones would be suitable for display on a wall. Image noise at ISO 400 was noticeable but probably acceptable for most users in 8x10" prints, but entirely fine at 5x7". Color was bright and accurate across the board, but the shots taken under incandescent lighting were definitely more yellow than I like to see.
Conclusion
| Pro: | Con: |
|---|---|
|
|
| Free Photo Lessons | |
|


Follow Imaging Resource: