Back
to Full Konica Minolta Dynax Maxxum 7D Review
Back
to Full Konica Minolta Dynax Maxxum 7D ReviewGo to Konica Minolta Dynax Maxxum 7D Data Sheet
Go to Konica Minolta Dynax Maxxum 7D Pictures Page
Up to Imaging Resource Cameras Page
Use your browser's "Back" button to return to the previous page, or the links at the top and bottom of this page to navigate to related information. If you have difficulty fitting the text on this page onto your printer output, simply resize your browser window to a narrower width and print again.
Remember us when it's time to buy!
Dave here: Have our reviews been helpful to you? (Is this article you're reading right now useful?) Preparing this level of information on as many products as we do is incredibly hard work, not to mention expensive. Things on the Internet may look like they're free, but they're not. (As a lot of big dot.com companies are finding out these days.) Somewhere, somebody has to pay to produce worthwhile content. YOU can help us though, by remembering us when it comes time to make your purchase. Would you consider coming back to our site and clicking-through to one of our advertisers to make your purchase? Every dollar you spend with one of our advertisers helps us directly (in affiliate fees) or indirectly (the advertiser will keep renewing their ad contract with us). To make it easy for you to support us, here's a URL you can visit, to see all our current advertisers, with links to click on that will register your visit to them as having come from our site. It's up to you where you buy, but Mike, Mike, Kim, Yazmin, Marti and I would be really grateful if you'd help us out by choosing one of our advertisers to purchase from.
Thank you for your support!
Dave Etchells, Founder & Publisher
Visit our "Buy Now" Page:
https://www.imaging-resource.com/buynow.htm
Back
to Full Konica Minolta Dynax Maxxum 7D Review
Go to Konica Minolta Dynax Maxxum 7D
Data Sheet
Go to Konica Minolta Dynax Maxxum 7D
Pictures Page
Up to Imaging Resource Cameras
Page
Konica Minolta Dynax Maxxum 7DAt long last, Minolta SLR owners have a *very* worthy body to use with their lens collections! Review First Posted: 11/27/2004, Updated: 02/01/2005 |
|
 |
|
6.1-megapixel CCD delivers uninterpolated
images as large as 3,008 x 2,000 pixels. |
| |
Interchangeable lens mount hosts a wide range
of Konica Minolta lenses. |
|
| |
Advanced Konica Minolta Body-Based
Anti-Shake Technology. |
|
| |
Full manual exposure control, with an abundance
of custom camera settings and fine tuning for image adjustment. |
Manufacturer Overview
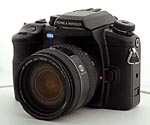
The Konica Minolta Maxxum 7D is arguably one of the most eagerly-awaited digital cameras announced in the last year or so. Minolta was one of the leading manufacturers of film-based SLRs back in the heyday of that format, in the early- and middle-1970s. As a result, there are literally millions of existing Minolta film SLR owners who have been waiting for a digital model to use their extensive collections of Minolta lenses with. Technically labeled the "Dynax" 7D, most of its fans are likely to simply refer to it as a Minolta Maxxum 7D or just Minolta 7D, given their long familiarity with the Minolta name, dating back well before the merger of Konica and Minolta a couple of years ago.
For Maxxum fans, the new Maxxum 7D will seem immediately familiar and comfortable,
as many of its operating controls are carried forward from previous Maxxum film
models. The Konica Minolta Maxxum 7D is a true digital SLR though, aimed at
professionals and experienced amateurs serious about digital photography. As
noted, the camera's wealth of external exposure controls and overall styling
match those of earlier Maxxum designs, so many users will immediately feel at
home. The Maxxum 7D offers a 6.1-megapixel sensor yielding images as large as
3,008 x 2,000 pixels. In a market increasingly crowded with "me-too"
models though, the Konica Minolta Maxxum 7D stands out, thanks to one of its
unique body-based anti-shake technology. This one feature adds tremendous value,
effectively turning family of high-end DiMAGE digicams brought professional
camera design to the consumer, marrying the benefits of full exposure control
with the ease of automatic and preset shooting modes. Models like the DiMAGE
7 series and the A2 presented pro-level control over the full image (from exposure
to attributes such as sharpness, contrast, etc.), but in a package that appealed
to experienced amateurs and novices alike, without compromising quality or performance.
all your Minolta autofocus lenses into image-stabilized models. With
conventional anti-shake lenses typically costing hundreds of dollars more than
models without anti-shake, the built-in anti-shake capability of the Konica
Minolta Maxxum 7D could easily be worth thousands of dollars to a shooter with
a large lens collection.
Other characteristics and specifications of the Konica Minolta Maxxum 7D are fairly typical for a camera of its class, with all the features you'd expect in a basic digital SLR, but wrapped in a uniquely "Minolta" package. The plethora of external buttons and knobs may appear intimidating to some users at first approach, but a very modest amount of time spent learning the camera's interface will leave you appreciating the speed and fluidity that all the external buttons bring to the Maxxum 7D's operation.
Highlights
The arrival of the Konica Minolta Maxxum 7D is something of a milestone for the entire industry. Konica Minolta is the last of the top five camera companies from the last century to enter the digital SLR market. In order of relative prestige (at the time, anyway), for around thirty years those companies were Nikon, Canon, Minolta, Pentax, and Olympus. There were many other third tier manufacturers, one of which has since merged with Minolta, and some of them are still around. You may disagree with my pecking order, and there are many excellent cameras that are and were made by other companies, but the big market shapers of the last century were these five. In this century, much has changed, with Sony and Kodak--market leaders in the digicam category--shaping quite a bit of the existing market; but Sony has no SLR, and sales of this new Konica Minolta SLR will easily eclipse Kodak's ground breaking professional offerings in a short time if only a few Minolta SLR fans step up to the plate.
Among these big five, their power, influence, and sales statistics have varied over the years, often leapfrogging one another as they went. Of course, it was the masses of SLR photographers who put these top five in place by voting with their dollars. Most will not shoot with anything but their favorite brand. Loyalty is part of the reason these big five have remained enthroned, but so is familiarity with a company's philosophy, reflected in the camera line's common control layout and image capture methodology. For years I stuck with only two brands of SLR--Olympus and Mamiya--because only they had the shutter speed control arrayed in a ring around the lens opening. It wasn't so much that I thought it was the only way, it was just the way I was used to, and I wasn't willing to change. Also, an avid photographer will of necessity build up quite a collection of lenses and accessories, making a platform switch an expensive proposition.
Though most press and art photographers I know who shoot 35mm and digital SLRs use Nikon and Canon, I know of no one who would say there's anything wrong with Minolta cameras or lenses; most just aren't familiar with the line because of their habitual use of the brands they or their company have invested in heavily. But there are hundreds of thousands of proud and happy Minolta owners out there who have been waiting impatiently for release this camera: the Konica Minolta Dynax/Maxxum 7D. Following as it does in the footsteps of the 35mm Minolta Maxxum 7, the Maxxum 7D accepts an impressive line of lenses and flashes, and borrows quite a bit from its film brother in terms of controls and design.
In other ways, however, the Konica Minolta Maxxum 7D stands on its own. Its controls will be familiar to existing Minolta 35mm camera owners, but what goes on inside is quite a bit different, with in-camera image stabilization that is backward compatible to all the existing Minolta--and probably third party--lenses that will fit, and a sophisticated set of professional options that fairly bewilder in their sheer number, if not their surprising usefulness. Some options are unique enough that I find myself reciting, "Only from the mind of (Konica) Minolta."

I love the word "bristling," and the Konica Minolta Maxxum 7D gives me ample reason to use it, because it is just bristling with controls. Switches, dials, buttons, and sliders burst from its skin like guns from a battleship. Dials are nestled under other dials and buttons are surrounded by still more dials. Nearly every major control you'd want to access quickly has an external control at the ready for your immediate adjustment. Where most camera manufacturers have buttons that rely on the LCD to show you the selected setting as you cycle through the cryptic icons and words, on the Maxxum 7D the same icons and words appear on the many dials, switches, and buttons. The separate Status LCD has been removed to make room for more controls, but the main LCD serves as a reasonable replacement, as we'll see.
I can say three things about the Konica Minolta Maxxum 7D: It's made for those who want digital, but still like the feel and ready access to analog controls. It's made for the photographer who likes to be intimately familiar with every aspect of his camera, and intends to keep it for many years. It's made for the photographer who actually likes to read manuals to get the most from his photographic tool. Thankfully, the manual is fairly well-written, though we recommend reading all you can, even a book by a Minolta SLR expert to really understand this powerful tool. Though it has easy-to-use full-auto modes for the novice, the Konica Minolta Maxxum 7D is for the dedicated, sophisticated photographer. In particular, it has several features that would be invaluable to event photographers whose work takes them both indoors and outdoors in all manner of lighting situations. Wedding photographers immediately come to mind.
Feel
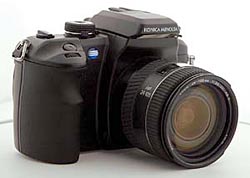
Feeling about as heavy as it looks, the Konica Minolta Maxxum 7D is a handful. The grip is nicely shaped with a rubbery finish, but it doesn't quite go deep enough. To get a good purchase on it, you have to press your fingertips into the body. The problem isn't really the grip, though. The length from front to back is just about right for most palms. The body is just very thick and takes up much of the finger space. Otherwise, Konica Minolta has made a nice looking, quality digital camera with a magnesium underbody. All body panels fit tightly and the feel is extremely solid.
The lens likewise has a tight fit. There seems to be little slop when finding the mount openings, in that you have to be spot on to get the lens mount through the opening in the body. It could be that the mechanically-driven focus motor coupling requires more precision (Minolta lenses are driven through a mechanical linkage between the lens and body, with the actual focus motor residing in the camera body, rather than in the lens as modern Nikon and Canons do). Once the lens is properly mounted, the AF motor gives it a little test, moving a little left and a little right. It's here that I remember that if you're not careful where you put your fingers, some of these Minolta lenses will break your thumb or forefinger when they focus, because unlike other manufacturer's lenses, the motor turns the external focus ring very firmly. (Alright, it won't really break your finger, but it will surprise you and can jerk the camera a bit. I also worry what it'll do to the motor or gears over time, if the focus drive ends up fighting your fingers very often.)
The shutter button seems oddly placed, set back from the leading edge of the grip and recessed in a groove, though once you're used to it, you find it's less likely to be activated by accident as you hold the camera waiting for the next shot because your finger actually wants to rest on that leading edge.
Controls are man-sized, buttons are big enough to know for certain that you're pressing that very button and not some button nearby, and it is clearly indicated which icon is currently selected by a given switch or dial. The two largest dials are more like control towers, with a dial accessed and read from the top, and another switched from underneath. My favorite is the Exposure compensation control on the left of the top deck. You can choose to adjust your exposure compensation by 1/2 increments or 1/3 increments depending on which side you switch it to. Beneath this is the Flash Exposure Compensation dial, whose scale is viewed from the back, while the lever that turns it juts out from the front of the dial. A similar arrangement drives the Mode dial. For once there's little naming confusion for the Mode dial: both major Mode categories are controlled here. You control the Exposure Mode (Program, Aperture, Shutter, etc.) with the top dial, and change the Drive Mode (Continuous, Bracketing, Single, Self-Timer) with the bottom dial. We particularly liked the AF/MF button on the back of the camera, which allows you to either momentarily trigger the AF system, or to toggle between Manual and Auto Focus modes, just in case you decide you want to refine what the AF system has done on the fly. Excellent. Easy. No attention required for the LCD, so your brain can begin to assign one set of controls visually to that part of the camera. Your mental map doesn't need to include a slew of menus and button combinations just to change a basic setting, it can become second nature--the kind of thing your finger muscles can learn to do without conscious thought.

Of course, that doesn't mean this is an all-manually-controlled camera. Not at all. For in addition to all these switches and buttons is a massive menu system and all the customary dials and buttons that drive the camera. Thankfully, the saving grace is Konica Minolta Maxxum 7D's 2.5 inch display, which makes the menu text big and clear. This big screen also doubles as the camera's status display. When used as a status display, it even rotates as you rotate the camera, either left or right. (No, it doesn't go upside down, though of course we had to try.) Just as Olympus chose to do on their EVOLT, most users will want to--indeed need to--leave the status display on all the time to see the vital metering and setting information, even with the preponderance of dials and switches. They even placed two IR sensors under the optical viewfinder to turn off the screen when you put the camera to your eye to keep glare from affecting your view. Of course, once you've captured a picture, it displays here in beautiful color and you can zoom in or out.
| Capture Menu |
Custom Menu |
 |
 |
| Play Menu |
Setup Menu |
 |
 |
Modes
With all these switches and dials, it's easy to get lost. When these controls are software-driven as on other cameras, you can simply switch to a different mode and most of your settings will change to normal via software control, especially if you run to the Green Zone or Full Auto mode. But on the Maxxum 7D all those switches can't be so easily overridden. Or can they? This is where the camera starts to mess with your mind. Many of these settings can indeed be overridden. If you set the Exposure Mode dial to preprogrammed mode 1, 2, or 3, you can assign all the settings you like to that switch setting and regardless what the Exposure Compensation and Bracketing dials are set to, your previously-saved settings are recovered and active. This could be extremely valuable to that wedding photographer I mentioned earlier, because this can include both separate Exposure bracketing and Flash exposure bracketing modes.
Nine Point AF
 The
Konica Minolta Maxxum 7D has a 9-point AF sensor with sensors arrayed at different
angles around the screen. A line of fine LEDs lights up at each point to indicate
which point was selected for focus. So long as the scene is bright and reasonably
contrasty, focus performance is fast, although in our
early testing we found that it wasn't always dead-on accurate. We often found
it necessary to take over manual control to get sharp focus.
The
Konica Minolta Maxxum 7D has a 9-point AF sensor with sensors arrayed at different
angles around the screen. A line of fine LEDs lights up at each point to indicate
which point was selected for focus. So long as the scene is bright and reasonably
contrasty, focus performance is fast, although in our
early testing we found that it wasn't always dead-on accurate. We often found
it necessary to take over manual control to get sharp focus.
Anti-Shake
 The
big technology advance in the Konica Minolta Maxxum 7D is the Anti-Shake (AS)
system. All other companies with such technology do their shake compensation
in the lens, necessitating purchase of special lenses that cost more money.
Konica Minolta has moved their mechanism into the camera body. Put simply,
rather than move an optical element inside the
lens body, they move the imaging sensor itself inside the camera. A computer
detects the motion--from a heartbeat, nervous hands, or breathing, for example,
and moves the imaging sensor to counter it.
The
big technology advance in the Konica Minolta Maxxum 7D is the Anti-Shake (AS)
system. All other companies with such technology do their shake compensation
in the lens, necessitating purchase of special lenses that cost more money.
Konica Minolta has moved their mechanism into the camera body. Put simply,
rather than move an optical element inside the
lens body, they move the imaging sensor itself inside the camera. A computer
detects the motion--from a heartbeat, nervous hands, or breathing, for example,
and moves the imaging sensor to counter it.
 A major
difference between the two methods became noticeable when we first looked
through the viewfinder: it didn't seem to be working. We have grown accustomed
to lens-based anti-shake systems in the other SLRs we've tested, and expected
the surreal floating viewfinder experience we normally
see with such systems, but our attempts at simulating a shake was not producing
any visible dampening of the motion. Of course, we thought. The dampening
is occurring inside the camera, and has no effect on the image coming off
the mirror, so we never actually see the Anti-Shake mechanism at work. Instead,
a five-step LED bargraph inside the viewfinder
tells us by degree how much the Anti-Shake mechanism is being forced to work.
So long as only three bars are lit, the AS will likely be able to dampen the
vibration. Shake more, and the bars will go up to four or five, which we presume
means that the ability of the AS to compensate is approaching or exceeding
its limit. Seems reasonable. Short of attaching the relatively heavy prism
to the AS mechanism, this is the best compromise. The weight of the prism
is obviously what kept them from taking this route, because there's no way
a linear motor could accelerate such a relatively heavy object at so rapid
a rate and be ready to counter the opposite motion without taking up a whole
lot more space and battery power.
A major
difference between the two methods became noticeable when we first looked
through the viewfinder: it didn't seem to be working. We have grown accustomed
to lens-based anti-shake systems in the other SLRs we've tested, and expected
the surreal floating viewfinder experience we normally
see with such systems, but our attempts at simulating a shake was not producing
any visible dampening of the motion. Of course, we thought. The dampening
is occurring inside the camera, and has no effect on the image coming off
the mirror, so we never actually see the Anti-Shake mechanism at work. Instead,
a five-step LED bargraph inside the viewfinder
tells us by degree how much the Anti-Shake mechanism is being forced to work.
So long as only three bars are lit, the AS will likely be able to dampen the
vibration. Shake more, and the bars will go up to four or five, which we presume
means that the ability of the AS to compensate is approaching or exceeding
its limit. Seems reasonable. Short of attaching the relatively heavy prism
to the AS mechanism, this is the best compromise. The weight of the prism
is obviously what kept them from taking this route, because there's no way
a linear motor could accelerate such a relatively heavy object at so rapid
a rate and be ready to counter the opposite motion without taking up a whole
lot more space and battery power.
Actually though, the bargraph anti-shake indicator is more than just a compromise, it's a valuable tool in its own right. With a conventional lens-based AS system, you can tell when it's working by the viewfinder image, but you don't have any idea of how hard it's working. That is, there's no warning as to whether or not you're about to push it beyond its limits. With the Maxxum 7D, you have a very good sense of whether you're well within the system's limits, or about to run out of "anti-shake gas," so to speak. Very nice, and having now seen this sort of display on the Maxxum 7D, we find ourselves wishing for it on our own Canon and Nikon d-SLRs.
The big question of course, is how well the 7D's anti-shake works. The short answer seems to be "pretty well." We conducted some tests against a Canon IS lens (a 28-135mm f/3.5 - 5.6 IS model) on a Digital Rebel against the 7D's in-body anti-shake, and found the two fairly equal in their capabilities. (The 7D edged the Canon lens slightly at 50mm, and the two solutions were in more or less a dead heat at 135mm.) Minolta's in-body anti-shake approach does seem to be more effective at shorter focal lengths than longer ones, which is what we'd expected to see. - At long focal lengths, small amounts of body movement will result in relatively large amounts of image blurring. This means that any body-based anti-shake system would have to be exceptionally sensitive to correct for image blurring with long telephoto lenses. That said though, the 7D's anti-shake did very well in our tests. (Read the "Optics" section of this review for more details.)
 Taking
aim at the professional digital SLR market, Konica Minolta released the Dynax/Maxxum
7D, which offers exceptional exposure control and a solid build reminiscent
of a high-end 35mm SLR. The body is literally covered with control buttons,
switches, and dials, giving the 7D a somewhat daunting appearance. While the
multitude of external controls may appear complicated at first glance, I actually
found them to be well laid-out and very sensible after working with the camera
for a short while. I always prefer more external control and less reliance on
the LCD menu system, and the 7D has external controls in abundance. The 7D features
a 6.1-megapixel CCD and has a Konica Minolta standard lens mount that accommodates
a wide range of Konica Minolta AF lenses.
Taking
aim at the professional digital SLR market, Konica Minolta released the Dynax/Maxxum
7D, which offers exceptional exposure control and a solid build reminiscent
of a high-end 35mm SLR. The body is literally covered with control buttons,
switches, and dials, giving the 7D a somewhat daunting appearance. While the
multitude of external controls may appear complicated at first glance, I actually
found them to be well laid-out and very sensible after working with the camera
for a short while. I always prefer more external control and less reliance on
the LCD menu system, and the 7D has external controls in abundance. The 7D features
a 6.1-megapixel CCD and has a Konica Minolta standard lens mount that accommodates
a wide range of Konica Minolta AF lenses.
The 7D's all-black and rather bulky body measures a substantial 5.9 x 4.2 x
3.1 inches (150 x 106 x 78 millimeters) without a lens, and weighs in at over
a pound and a half, or 26.8 ounces (760 grams), without the lens, battery, or
memory card. In other words, the 7D's body is quite a handful on its own. An
accessory camera bag would certainly be the preferred method of carrying and
storing the 7D, but the positions of the eyelets for the included neck strap
at least let the camera hang level when it's suspended from them. Inside, the
7D is built around a rugged magnesium-alloy frame.
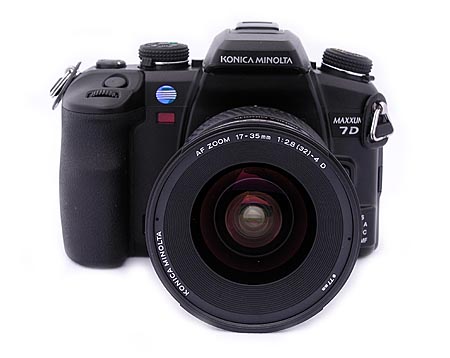
The camera's front panel houses the Konica Minolta A-type bayonet lens mount, lens release button, Depth of Field Preview button, Focus Mode dial, Self-Timer light, and the front of the pop-up flash compartment. Also visible from the front of the camera are the Shutter button and Front Control dial, located at the top of the hand grip. An indentation near the top of the hand grip comfortably cradles your middle finger as it curls around the grip.
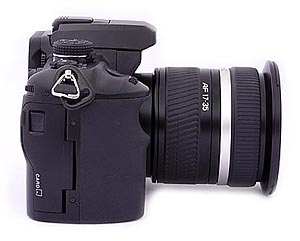
The right side of the camera holds the CompactFlash memory card slot, covered by a hinged plastic door. The 7D accommodates Type I or II CF memory cards, including Microdrives. Nestled inside the compartment door is the shared-use A/V Out / USB 2.0 jack for direct connection to a computer or television set. A nicely designed sliding plastic door protects the terminal from dust. At the very top of the right panel is one of the two neck strap attachment eyelets.
The left side of the camera features a host of input jacks, including the Flash sync terminal at the very top, above the DC In and remote control terminals. The Flash sync and DC In jacks are both protected by flexible rubber flaps that remain tethered to the camera body, while a sliding plastic cover protects the remote terminal. Also on this side of the camera is the second neck strap eyelet.
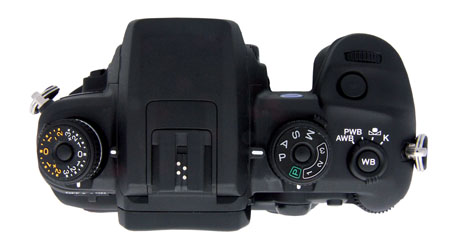
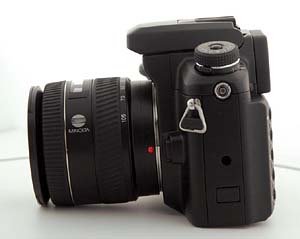
The top panel accommodates the pop-up flash compartment and external flash hot shoe; the latter is protected by a sliding plastic cover that is completely removable from the camera body. The hot shoe employs a custom electrode setup and mounting bracket for Konica Minolta accessory flash units, and so isn't compatible with generic hot-shoe flashes. The pop-up flash has two small tabs on either side that allow you to lift it up into its upright position. In addition, there are a number of controls that access various camera functions, including the Exposure Mode Dial and release button, Drive Mode dial, White Balance button and dial, a Shutter button, Front Control dial, Exposure Compensation dial and release button, and the Flash Compensation dial. Just behind the Exposure Mode dial is a small silver icon (a circle with a line through it), indicating the CCD focal plane.
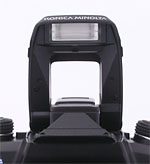
The remaining controls are on the camera's rear panel, along with the optical viewfinder and LCD monitor. The 7D's optical viewfinder is surrounded by a flexible, removable cup, and features two sensors below it that detect when your eye is next to the camera. (You can enable these sensors through the Custom menu to automatically detect your eye in front of the viewfinder and disable the information display on the LCD monitor, cutting out any distracting glare.) A diopter adjustment dial on the right side of the eyepiece adjusts the view for eyeglass wearers. Controls on the left side of the rear panel include the Power switch, and the Menu, Display, Magnification, Delete, and Playback buttons. On the other side of the LCD monitor are the Memory Set and ISO buttons, along with the Anti-Shake switch. A Multi-controller serves as an eight-directional navigational tool, with a Spot AF / OK button at its center. A Focus Area switch surrounds the Multi-controller. Directly above this are the AE Lock button, Metering Mode dial, AF/MF / Slow Sync button, and Rear Control dial.
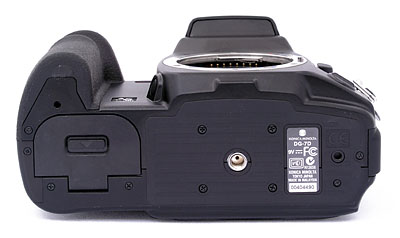
The camera's bottom panel is fairly flat, with a grooved grip pad surrounding the metal tripod mount. Also on the bottom panel is the camera's battery compartment, which features a locking, hinged door. The battery compartment is just far enough from the metal tripod mount to allow quick battery changes while working with a tripod (depending of course on the size of your tripod's mounting plate), something I always look for in a digicam, given the amount of studio shooting I do.
Viewfinder
 The
7D features a digital SLR design, so the optical viewfinder offers a true, through-the-lens
(TTL) display. A dioptric adjustment dial accommodates eyeglass wearers, letting
them adjust the viewfinder optics across a range of -3.0 - 1.0 diopters. (For
reference, the nearsighted end of this range just barely accommodated my own
20/180 vision.) The viewfinder eyepiece has a reasonably high eyepoint, but
I still ended up with the rubber eyecup touching my eyeglasses if I wanted to
see the whole frame. (Overall, a passing grade in eyeglass-friendliness, but
not the best I've seen.)
The
7D features a digital SLR design, so the optical viewfinder offers a true, through-the-lens
(TTL) display. A dioptric adjustment dial accommodates eyeglass wearers, letting
them adjust the viewfinder optics across a range of -3.0 - 1.0 diopters. (For
reference, the nearsighted end of this range just barely accommodated my own
20/180 vision.) The viewfinder eyepiece has a reasonably high eyepoint, but
I still ended up with the rubber eyecup touching my eyeglasses if I wanted to
see the whole frame. (Overall, a passing grade in eyeglass-friendliness, but
not the best I've seen.)
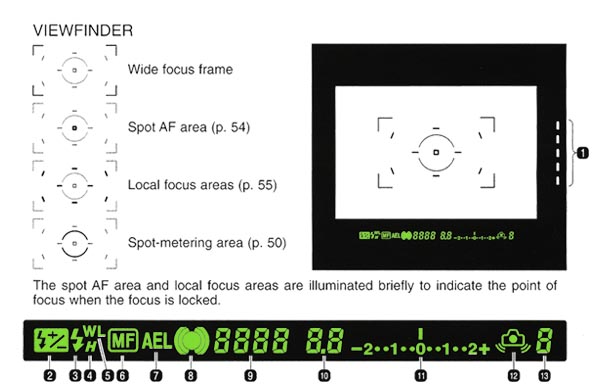
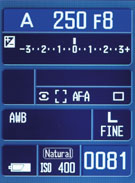
The viewfinder has an extensive information display, and features a series
of focus and exposure target marks in the center of the view that highlight
briefly when the AF system is activated. Camera information appears beneath
the image area in a small strip, and reports all of the major camera settings,
such as shutter speed, aperture, flash mode, EV compensation, etc. Lining the
right side of the image area is the Anti-Shake scale, indicating the degree
of stabilization whenever Anti-Shake mode is activated. The information readout
in the viewfinder activates whenever you half-press the Shutter button, and
remains active for a few seconds afterward.
Inset behind a pair of vertical windows on the right side
of the viewfinder, a set of infrared sensors detects your eye as it approaches
the viewfinder, and deactivates the LCD information display if you have the
auto-display option enabled. A Diopter Control
dial adjusts the viewfinder to accommodate eyeglass wearers.
The rear-panel, 2.5-inch, TFT color LCD monitor is for image review, status display, and menu display. In any capture mode, pressing the Display button on the rear panel reports camera settings in the LCD display. You can choose between full or basic display modes, which essentially control how detailed the camera information is. A third press of the Display button disables the information readout entirely. By default the LCD reports the full status information screen whenever the camera is powered on or a control is activated. As mentioned above, the Auto Display option of the Custom menu disables the LCD display whenever your eye is detected by the sensors beneath the optical viewfinder. If this function is set to Manual, you must press the Display button to disable the display.
 In
Playback mode, the LCD monitor's default mode shows the most recently captured
image, with a limited information overlay reporting the resolution and quality,
date and time, folder, file number, frame number, and the total number of images.
Pressing the up arrow key on the Multi-controller enables a histogram display,
which also shows expanded exposure information for the image. Just above the
histogram is what Konica Minolta calls the Luminance Limit display, which alternately
flashes any under and over-exposed areas in the frame. (This function can sometimes
be more helpful than the histogram, in that you can directly see what parts
of the image are too dark or light.) Pressing the down arrow in this mode also
rotates the display, first counter-clockwise, then clockwise, then back to normal.
In
Playback mode, the LCD monitor's default mode shows the most recently captured
image, with a limited information overlay reporting the resolution and quality,
date and time, folder, file number, frame number, and the total number of images.
Pressing the up arrow key on the Multi-controller enables a histogram display,
which also shows expanded exposure information for the image. Just above the
histogram is what Konica Minolta calls the Luminance Limit display, which alternately
flashes any under and over-exposed areas in the frame. (This function can sometimes
be more helpful than the histogram, in that you can directly see what parts
of the image are too dark or light.) Pressing the down arrow in this mode also
rotates the display, first counter-clockwise, then clockwise, then back to normal.
You can zoom in on captured images in Playback mode, by pressing the button with the magnifying-glass icon adjacent to the left side of the LCD screen. When zoomed in, the rear control dial changes the zoom amount, and pressing the center button of the multi-controller toggles between the magnified view and a full-frame view with the current magnified area outlined in red.
Optics
| Free Photo Lessons | |
|
 The
7D features a standard Konica Minolta A-type bayonet lens mount, which accommodates
a wide range of Konica Minolta lenses. (According to the manual, essentially
all Konica Minolta AF lenses can be used, though MD and MC series manual focus
lenses are not compatible. Additionally, the AF Macro 3x - 1x f/1.7-2.8 lens
cannot be used with Anti-Shake, nor does Anti-Shake work with any lens with
a macro release.) A small button on the front of the camera releases the lens
from its mount, so that it can be turned and removed. The 7D's CCD is smaller
than a 35mm frame, meaning that the angle of view at any given focal length
will not be the same as on a 35mm camera. To find the approximate 35mm equivalent
focal length, multiply the focal length of the lens by 1.5. (Thus, a 100mm lens
will provide about the same view as a 150mm lens on a 35mm camera.)
The
7D features a standard Konica Minolta A-type bayonet lens mount, which accommodates
a wide range of Konica Minolta lenses. (According to the manual, essentially
all Konica Minolta AF lenses can be used, though MD and MC series manual focus
lenses are not compatible. Additionally, the AF Macro 3x - 1x f/1.7-2.8 lens
cannot be used with Anti-Shake, nor does Anti-Shake work with any lens with
a macro release.) A small button on the front of the camera releases the lens
from its mount, so that it can be turned and removed. The 7D's CCD is smaller
than a 35mm frame, meaning that the angle of view at any given focal length
will not be the same as on a 35mm camera. To find the approximate 35mm equivalent
focal length, multiply the focal length of the lens by 1.5. (Thus, a 100mm lens
will provide about the same view as a 150mm lens on a 35mm camera.)The Focus Area switch on the rear panel offers three autofocus options: Wide Focus Area, Focus Area Lock, and Focus Area Selection. The default option is a nine-point Wide Focus area, indicated by an array of dashes inset within four widely-spaced brackets in the viewfinder image. By pressing and holding down the Spot AF / OK button in the center of the Multi-controller, you can switch between Wide Area and Spot Point autofocusing modes (the latter indicated by a target box in the center of the viewfinder). Wide Area AF bases its focus on the most prominent subject detail in the portion of the image that falls within the AF brackets. Spot Focus bases its focus on the very center of the frame, where the target crosshairs reside. The Focus Area Lock setting locks the focus for whatever focus mode you're in. Finally, Focus Area Selection lets you manually set the main AF point by using the Multi-controller to highlight one of the nine AF points. The active AF area is briefly illuminated in the viewfinder. Interestingly, though the Multi-controller appears to be a four-way, it is effectively used as an eight-way controller in order to reach all eight outer AF sensors. Pressing between the up and right arrows actuates both the up and right controls, indicating that you want to go (diagonally) to the upper right sensor. The reason we know it's not an actual eight-way control is that if you press up and then right, you go to the right sensor, not the upper right sensor. Rather, pressing and holding the up button and then pressing the right button takes you to the upper right sensor. Once you've set the AF area, sliding the switch to the Focus Area Lock position locks the AF point.
In shooting with the camera, its autofocus generally work quite well, but we found it "hunting" a bit more frequently than we were accustomed to. Not a huge effect, and also not one that we have any sort of an objective measurement for. It was just our impression that the 7D sometimes hesitated a little in coming to focus, in situations where we felt that other SLRs we've used wouldn't have had a problem. On a positive note though, the 7D's AF system seemed to do better than average under dim lighting, and its AF-assist light worked very well for focusing (on nearby objects, at least) in complete darkness.
The
7D also employs Konica Minolta's Anti-Shake technology, which uses a highly
sensitive angular rotation sensor and Smooth
Impact Drive Mechanism (SIDM) to move the
CCD assembly itself to counteract camera movement, rather than the more common
approach of moving an optical element inside the lens. (The shot above shows
a rear view of the anti-shake module, removed from the camera.) This has the
huge benefit of offering Anti-Shake with essentially any lens that works on
the camera (subject to the few restrictions mentioned earlier). When Anti-Shake
is activated, the Anti-Shake scale on the right side of the viewfinder display
indicates the degree of stabilization. A downside to Minolta's body-based Anti-Shake
approach though, is that while you can see the results of stabilization on competing
lens-based designs, you have only this scale to tell you how the 7D's Anti-Shake
mechanism is doing. Anti-Shake minimizes the effect of blurring caused by slight
camera movement, which is more noticeable at long focal lengths.
Testing
such shake-compensating mechanisms presents several problems, and each manufacturer's
method seems to work better in some conditions than in others. But we do an
informal test by lashing two competing models together and averaging the results
of each camera under different conditions. (See my comments
in our review of the Panasonic FZ15 for a more complete description of our
approach.) I call it informal because the variables are such that we can't accurately
set a benchmark. Every photographer shakes a little more or less, and the differing
focal lengths of the various cameras combined with the shutter lag and AF factors
make only an informal test practical. Developing a shake table that would adequately
simulate the various types of acceleration, rotation, pitch and yaw that a camera
experiences in the hands of a human being would be prohibitively expensive.
Further, given the various mechanisms used, any kind of structured test could
favor one design over another, necessitating costly redesign of the system.
So testing will stay informal for now.
In this case, we lashed up a Canon EOS Digital Rebel with a 28 - 135mm IS (Image Stabilized) lens to the Konica Minolta Maxxum 7D. On the 7D, we used a 28-70mm f/2.8 lens for testing at shorter focal lengths and a 100 - 300mm f/4.5-5.6 lens for testing at 135mm. Both cameras have about the same size sensor (6 megapixels), and we tried to match the focal length of the lenses in our tests as closely as possible. (As it happened, we got them nearly dead on at 135mm, but had the Rebel zoomed in about 7% more at the ~50mm setting). We adjusted the exposure parameters on both cameras manually, so they'd both be set at the same shutter speed (1/15 second for the 50mm shots, 1/25 second for the ones at 135mm). Holding the assembly in our hands, we pressed the two shutter buttons as near to simultaneously as we could manage. It's likely that there was a slight offset between the firing of each camera's shutter, but the two shots in each pair were almost certainly captured within a tenth of a second of each other, so the shake seen by each camera should have been nearly identical.
The results were interesting. As usual, there was a lot of variation from shot to shot, and on any given shot, one camera or the other might have a bit easier time of it, depending on where within their range of travel their anti-shake elements happened to be at the moment the shutter button was pressed. Nevertheless, we ended up with a pretty clear idea of how well the 7D's anti-shake worked relative to that of the Canon 28-135mm IS lens. Bottom line, at the 50mm focal length, the 7D slightly edged the performance of the Canon system, although the amount of difference was fairly slight. At 135mm, the two cameras came out in nearly a dead heat numerically (we scored successive pairs of images between the two cameras, and averaged the results to come up with a relative numerical score). But, we found the results with the Canon system to be more consistent. (That is, there were fewer extremely sharp or extremely blurry images.) At the end of the day, at 50mm and 1/15 second, 8 out of 10 of the 7D's images were what we'd consider usable, vs 7 out of 10 of the Rebel's (with another three of the Rebel's shots being somewhat marginal), while at 135mm 8 out of 10 of the Rebel's images were acceptable (with one marginal), vs 6 out of 10 of the 7D's (with one marginal).
So the 7D's anti-shake system does indeed seem to work pretty well, at least at the 135mm-and-below focal lengths where we did a direct comparison with Canon's lens-based IS system. At longer focal lengths it seemed to become less effective, but still delivered pretty dramatic improvements in sharpness relative to unaided handheld shots.
| Typical Results at 50mm, 1/15 second | |
| With Anti-Shake | Without Anti-Shake |
 |
 |
| Typical Results at 135mm, 1/25 second | |
| With Anti-Shake | Without Anti-Shake |
 |
 |
Amidst the hair-splitting involved in ranking one anti-shake system against another, it's important to step back and look at what the actual impact of the system in question is. To that end, check out the images above. These were captured with the dual-camera lashup described above, with the 7D's anti-shake system turned on, and the IS on the Canon system turned off to provide the samples without anti-shake. Here again, there was a fair bit of variation from shot to shot, but the examples shown are pretty representative of the general run of results. These images show how dramatically the 7D's anti-shake system reduces image blurring due to camera shake at reasonable shutter speeds. There's a rule of thumb that says to use a shutter speed at least the inverse of the focal length you're shooting at (that is, 1/50 second for shots at 50mm, and 1/135 second for shots at 135mm). Some people with very steady hands and good technique can do a lot better than this, others a bit worse, but it's a useful guideline. For my own part, I find that if I'm really careful, I can maybe get about a factor of two better than the guideline, but at those speeds I'm likely to end up with a fair number of blurry shots. The shots above were captured a good two f-stops slower than the recommended shutter speeds, and the results pretty well speak for themselves. Bottom line, it's hard to overstate the value of a good anti-shake system for handheld photography in uncertain light.
Sensor Cleaning!
Everyone understands that lenses sometimes get dust on them and need to be cleaned, and there are a lot of lens-cleaning cloths, solutions and other accessories on the market that work well. BUT, what do you do when your sensor gets dusty? Dust specks on the sensor tend to show up when shooting at very small apertures, appearing as dark blobs on your images. They're distracting at best, a terrible nuisance at worst, if you end up having to retouch every image to rid of them.
Most of us are naturally leery about the idea of poking around inside the delicate innards of our d-SLRs to wrestle with recalcitrant dust specks. Gently blowing the sensor surface (actually, the surface of the anti-aliasing filter) with compressed air gets rid of some dust, but there's invariably a lot that just stays stuck, no matter what. So what do you do?
If you've got dust specks on your sensor (and sooner or later you will), you're going to need to clean it. There are a lot of products out there intended to address this need, but a distressing number of them work poorly (if at all), and many are grossly overpriced. Advertising hype is rampant, with bogus pseudo-scientific jargon and absurd product claims run rampant. And prices - Did I mention prices? How about $100 for a simple synthetic-bristle brush?
So how do you know what product to use?
We don't pretend to have used everything currently on the market, but can tell you about one solution that worked very well for us. The "Copper Hill" cleaning method is straightforward and safe, and in our routine usage here at Imaging Resource, highly effective. Better yet, the products sold by Copper Hill Imaging are very reasonably priced. Best of all, Nicholas R (proprietor of Copper Hill) has put together an amazingly detailed tutorial on sensor cleaning, free for all.
Sensor cleaning is one of the last things people think about when buying a d-SLR, but it's vital to capturing the best possible images. Take our advice and order a cleaning kit from Copper Hill right along with your d-SLR, so you'll have it close at hand when you need it: You'll be glad you did!
(Other than a few backlinks on their site, we receive no promotional consideration from Copper Hill. We just think their sensor cleaning products are among the best on the market, and like their way of doing business. - We think you will too. Check them out.)
Exposure
| Free Photo Lessons | |
|
In straight Auto mode, the camera controls everything about the exposure, except
for flash, zoom, and focus. Program AE mode keeps the camera in charge of the
exposure, while you have control over all other exposure options. While in Program
AE mode, you can rotate either of the control dials while half-pressing the
Shutter button to scroll through a range of equivalent exposure settings. Thus,
you can bias your exposure toward a faster shutter speed or greater depth of
field as circumstances dictate. Aperture Priority mode lets you select the lens
aperture setting, while the camera selects the most appropriate corresponding
shutter speed. In Shutter Priority mode, the user selects the shutter speed,
from 1/4,000 to 30 seconds, while the camera chooses the best corresponding
aperture setting. Switching to Manual mode gives you control over both shutter
speed and aperture, with a Bulb setting available for longer exposures. Exposure
time in Bulb mode is determined by how long you hold down the Shutter button.
There doesn't appear to be any limit to the duration of Bulb exposures, but
it appears that the dark-frame subtraction will only compensate for exposures
up to 30 seconds long. (I strongly recommend use of the optional wired remote
in Bulb mode, as the pressure of your finger on the Shutter button is bound
to jiggle the camera somewhat, blurring the image.) A Depth of Field Preview
button on the front of the camera lets you view a scene through the viewfinder
with the aperture stopped down, giving you an idea of the depth of field available
before actually capturing an image. The Exposure Mode
dial also features three Memory Recall settings, each of which bring up a previously-saved
register of settings. (The M Set button on the rear panel lets you set up a
Memory Recall mode.)
The 7D's default metering mode is a 14-segment honeycomb pattern system, which
takes readings throughout the image to determine exposure. Center-Weighted and
Spot metering options are also available via the Metering Mode dial on the rear
panel. Spot metering is useful for high-contrast subjects, as it bases the exposure
reading on the very center of the image, letting you set the exposure based
on a small portion of your subject. Center-Weighted metering also bases the
exposure on the center of the image, but the camera takes its readings from
a much larger area in the middle of the frame. You can also hold or lock the
exposure reading for a particular part of the image by pressing the AE Lock
button on the back panel. This button can be programmed
to act as either a "hold" or "toggle" control through the
Custom menu. "Hold" mode does just that, it holds the current setting
until you release the AE Lock button again. Toggle mode locks and releases the
exposure/focus setting with successive actuations of the AE Lock button.
(Spot Hold and Toggle options lock the area for Spot AE, regardless of the metering
mode selected on the dial.) Halfway pressing the Shutter button also locks exposure
and focus, but only in autofocus mode.
The 7D's light sensitivity can be set to ISO equivalents of 100, 200, 400, 800,
1,600, or to an optional 3,200 setting, or left in Auto mode for the camera
to adjust as it sees fit. (The 3,200 option only appears if enabled through
the Custom menu.) A Noise Reduction option is available for longer exposures
and higher ISO settings, and greatly reduces the amount of image noise that
would otherwise result. Exposure compensation is adjustable from either from
-2 to +2 exposure equivalents (EV) in one-third-step increments, or from -3
to +3 EV in half-step increments, by turning the Exposure Compensation dial
on top of the camera. (As noted earlier, the 7D is unusual in that it offers
half-step increments on one side of its Exposure Compensation dial, and third-stop
increments on the other side. Very slick.) An Auto Exposure Bracketing option
can snap three or five shots in rapid succession, varying the exposure between
each in steps of 0.3 or 0.5 EV units. You can also bracket the exposures using
the flash. The 7D's Drive mode dial offers Auto Exposure Bracketing for either
Single Advance or Continuous Advance drive settings.
The 7D offers very flexible control over white balance, color rendition, and tonal range, all available with a flip, press, and scroll. You start adjusting its white balance system with a flip of the main White Balance switch on the top deck, which has settings of Auto, Preset, Custom, and Kelvin. Under the Preset option, you can use the button in the center of the switch to bring up the menu, and the front scroll wheel to select among Daylight, Shade, Cloudy, Incandescent, Fluorescent, or Flash light sources. For each preset, you can manually adjust the white balance from -3 to +3 in arbitrary units using the rear scroll wheel or up and down arrow keys (except for the Fluorescent setting, which adjusts from +4 to -2.) With the exception of the Fluorescent setting, each adjustment step is equivalent to about a 10 mired shift. The Custom Set mode determines white balance by snapping a picture of either a white or neutral gray card. The camera then adjusts its color balance to render the white card with a neutral hue, and saves the setting as the Custom option. As many as three Custom settings can be saved, very useful if you need to switch back and forth between different lighting conditions quickly. Under the Kelvin Temperature setting, you can set the white balance to a specific Kelvin degree setting. A Kelvin white balance option gives great flexibility for matching known color temperatures. Using the front command dial or left and right arrows, you can adjust the color temperature by 1000K, or by 100K using the rear command dial or the up and down arrows.
A Digital Effects (FX) option under the shooting menu offers control over image
contrast, saturation, sharpness, and hue, in five steps from -2 to +2 arbitrary
units. The Color Mode option of the Record menu offers Natural and Natural Plus
sRGB color modes, as well as an Embedded Adobe RGB setting. Adobe RGB color
space has a much broader gamut or range of reproducible colors than does sRGB,
the color space used by most digital cameras and computer monitors. The Embedded
designation simply means that the color space information is embedded in the
image file. Adobe RGB images will look rather dull when displayed on monitors
tuned to the sRGB standard, but when used in a color-managed work environment,
they can capture and reproduce a much greater range of colors.
Drive Modes
The 7D's Drive Mode dial, nestled under the Exposure Mode dial, accesses
a range of shooting modes, including Single Frame Bracketing, Continuous Advance
Bracketing, Single Frame Advance, Continuous Advance, 10-second Self-timer,
and Two-second Self-timer modes. Both of the bracketing modes access the camera's
Auto Exposure Bracketing system, explained above. In Continuous Advance mode,
the 7D captures a rapid series of images, with a maximum frame rate of three
frames per second. Actual frame rates will vary, depending on the image size
and quality settings, as will the total number of images in the series, due
to the amount of memory card space.
The two Self-Timer modes fire the shutter a short delay after the Shutter button is pressed. The shorter, two-second delay is very handy when you need to prop the camera on something to take a photo in dim lighting, and don't want the pressure of your finger on the shutter button to jiggle the camera. The 10-second delay is long enough that you can run around to get into the photo yourself. An LED lamp on the front of the camera blinks and the camera beeps as the 10-second Self-Timer is counting down, the blink and beeps becoming faster in the last few seconds. (No indication is given for the shorter countdown.) As with many other functions on the 7D, I liked being able to choose between the 2- and 10-second delay settings without having to delve into a menu screen.
Accessed through the Record menu instead of the Drive Mode dial, the 7D's Interval mode captures a series of images at specific intervals over time, providing a built-in time-lapse capability. The 7D can capture as many images in the sequence as the memory card will allow, with frame intervals ranging from 30 seconds to 60 minutes, and a delayed start time as long as 24 hours.
Flash
 The 7D features a built-in,
swing-up flash , which operates in either Fill-Flash, Red-Eye Reduction, Rear
Flash sync, or Wireless modes. (I call it a swing-up flash because it doesn't
pop up automatically when needed, and also doesn't manually pop up at the press
of a button under spring pressure, which would be more convenient when you're
in a hurry.) To release the flash from its compartment, pull on the two small
tabs on either side of the casing and lift up the flash head. Close it again
by simply pushing the flash head back down. The Flash mode is changed through
the Record settings menu, or optionally through the Custom option of the Function
dial. In Fill-Flash mode, the flash fires with every exposure, regardless of
lighting conditions. Red-Eye Reduction fires a series of small pre-flashes before
firing the flash at full power for the exposure itself. This makes your subjects'
pupils contract and reduces the occurrence of the Red-Eye effect. The Rear Flash
Sync mode fires the flash at the end of the shutter time, rather than the beginning.
If you have moving objects in a relatively brightly lit environment, this will
produce a sharp image of your subject, with a "motion trail" following
behind it. The flash is in the Off position when it's closed. The Wireless mode
lets the camera work with wireless remote flash units, with four channels available
through the settings menu, so different camera/flash setups working in the same
area won't interfere with each other. (Konica Minolta makes two flash units
that support the 7D's wireless capability, the Program/Maxxum 5600HS [D] and
3600HS [D].)
The 7D features a built-in,
swing-up flash , which operates in either Fill-Flash, Red-Eye Reduction, Rear
Flash sync, or Wireless modes. (I call it a swing-up flash because it doesn't
pop up automatically when needed, and also doesn't manually pop up at the press
of a button under spring pressure, which would be more convenient when you're
in a hurry.) To release the flash from its compartment, pull on the two small
tabs on either side of the casing and lift up the flash head. Close it again
by simply pushing the flash head back down. The Flash mode is changed through
the Record settings menu, or optionally through the Custom option of the Function
dial. In Fill-Flash mode, the flash fires with every exposure, regardless of
lighting conditions. Red-Eye Reduction fires a series of small pre-flashes before
firing the flash at full power for the exposure itself. This makes your subjects'
pupils contract and reduces the occurrence of the Red-Eye effect. The Rear Flash
Sync mode fires the flash at the end of the shutter time, rather than the beginning.
If you have moving objects in a relatively brightly lit environment, this will
produce a sharp image of your subject, with a "motion trail" following
behind it. The flash is in the Off position when it's closed. The Wireless mode
lets the camera work with wireless remote flash units, with four channels available
through the settings menu, so different camera/flash setups working in the same
area won't interfere with each other. (Konica Minolta makes two flash units
that support the 7D's wireless capability, the Program/Maxxum 5600HS [D] and
3600HS [D].)
In Program AE, Full Auto, and Aperture Priority exposure modes, pressing and
holding the AE Lock button activates a Slow-Sync mode setting, which balances
the flash exposure with the ambient lighting. The exposure is based on the ambient
light, and the flash power is based on the aperture setting. Results with indoor
and outdoor shots that include light fixtures can be dramatic and pleasing.
The 7D offers two methods of flash metering. Its default mode is called ADI,
which stands for Advanced Distance Integration. In this mode, it bases its flash
exposure on the lens aperture and distance feedback from the autofocus system,
as well as on the light reflected back from a pre-flash. By determining how
far away the target subject is, the camera knows how much flash power is required
to illuminate it, and so is less likely to be fooled by subjects that are unusually
light or dark overall. Alternatively, the Pre-Flash TTL (through the lens) method
bases the exposure determination solely on a small metering flash before the
main exposure. Used in conjunction with the spot autofocus option mentioned
earlier, the ADI flash metering should be more accurate with small subjects
against a different colored background than the pre-flash method.
For use with studio strobes and conventional slave triggers, the 7D also has a manual flash power option. This lets you set the flash power to Full, 1/2, 1/4, 1/8, or 1/16 power manually. In this mode, the flash fires only once, at the moment of exposure. The single flash pulse avoids false triggering when working with conventional slave triggers.
The 7D also includes a top-mounted hot shoe for attaching an external flash
unit. The shoe design and contact arrangement are set up for Konica Minolta's
own dedicated flash units, but I imagine that compatible models are available
from the major third-party flash manufacturers (Sunpak et. al.). Konica Minolta's
own Maxxum/Program Flash models 2500(D), 3600HS(D), and 5600HS(D) work with
the 7D, and two macro flashes (Macro Twin Flash 2400 and Macro Ring Flash 1200)
will work with an accessory macro flash controller. The 7D is compatible with
the High Speed Sync (HSS) function of the Maxxum/Program Flash 5600HS(D) and
3600HS(D) units, meaning the camera can use its full range of shutter speeds
up to 1/4,000 second.
An external flash sync terminal (the so-called "PC" style connector)
accommodates just about any third-party flash unit. This makes the 7D much more
appealing to photographers who already have an existing strobe system for the
studio.
Shutter Lag/Cycle Times
When you press the shutter release on a digital camera, there's a delay or lag time before the shutter actually fires. This time allows the autofocus and autoexposure mechanisms to do their work and can amount to a significant delay in some situations. Likewise, the delay from shot to shot can vary greatly, and is also important to the picture-taking experience. Since these numbers are rarely reported by manufacturers or reviewers (and even more rarely, reported accurately), I routinely measure both shutter lag and cycle times using an electronic test setup I designed and built for the purpose. (Crystal-controlled timing, with a resolution of 0.001 second.) Here are the numbers I collected for the 7D:
| |
||
| |
(secs) |
|
| Power On -> First shot | |
Lens AF
syncs, card is accessed. Fairly fast, not amazingly so for a digital
SLR though. |
| Shutdown | |
Card access LED takes its
time on shutdown. Longest time corresponds to clearing nine RAW-mode
files from the buffer memory. |
| Play to Record, first shot | |
Very fast. |
| Record to play | |
First time is that required
to display a large/fine file immediately after capture, second time
is that needed to display a large/fine file that has already been processed
and stored on the memory card. Both times are fairly fast. |
| Shutter lag, full autofocus | |
First time is at full wide-angle, second is full telephoto. Quite fast. |
| Shutter lag, continuous autofocus | |
Little or no benefit to
continuous AF with stationary subjects, but no penalty either. |
| Shutter lag, manual focus | |
Not especially fast for
a digital SLR. |
| Shutter lag, prefocus | |
Time to capture, after half-pressing
shutter button. Fairly comparable speed to its competition. |
| Cycle Time, max/min resolution | 0.61 |
Shoots at about the same rate for large/fine images or "TV" mode (640x480) images. Times are averages. In large/fine mode, shoots 14 frames this fast, then slows to about 4.5 seconds per shot. In TV mode, maintains this rate indefinitely. Buffer clears in 46 seconds in large/fine mode, but only 2 seconds in TV mode. Average speed for a digital SLR of its class, good buffer capacity. (Times measured with a Lexar 80x CF card.) |
| Cycle Time, RAW | 0.68 |
Times are averages. Shoots 9 frames this fast, then slows to about 7.3 seconds per shot. Buffer clears in 60 seconds. Average speed for this level d-SLR, rather slow buffer-clearing time. (Times measured with a Lexar 80x CF card.) |
| Cycle Time, continuous mode, max/min resolution | 0.36 (2.75 fps) |
Shoots at about the same rate for large/fine images or "TV" mode (640x480) images. Times are averages. In large/fine mode, shoots 15 frames this fast, then slows to about 3.1 seconds per shot. In TV mode, shoots 65 shots this fast, then slows only slightly. Buffer clears in 47 seconds in large/fine mode, 11 seconds in TV mode. Again, average speed for its class. (Times measured with Lexar 80x CF card.) |
| Cycle Time, continuous RAW |
0.36 |
Times are averages. Shoots 9 frames this fast, then slows to about 7.4 seconds per shot. Buffer clears in 85 seconds. Average speed for its class. |
The word that comes to mind when thinking about the Maxxum 7D's speed is "average." - But that's not a bad thing, given the field it's playing in. Full-autofocus shutter lag is actually faster than most d-SLRs, at about 0.27 second, although its manual focus lag is only slightly better. At 0.61 second, shot to shot cycle times are decent and its 14-shot JPEG buffer capacity should be enough for most users. At 2.75 frames/second, continuous-mode shooting speed is also right on par with its primary competitors. Overall, a very workmanlike performance.
The 7D's user interface appears complex at first glance, as the camera provides a great deal of external control. However, once you work with the camera and spend a little time getting comfortable, you'll find the controls very intuitive and well-placed. Unlike most of its competitors, the Maxxum 7D's external dials and buttons access essentially all of the main camera settings, reserving the LCD menu system for less commonly-used functions. Front and Rear Control dials quickly access shutter speed and aperture settings, in addition to a wide range of functions when used with other control buttons. Most of the camera adjustments are made by rotating a dial, pressing a button, and turning one of the control dials. This may sound like a lot of steps, but in practice I've always found external mechanical controls like these much faster to navigate than LCD menu options. With a little practice, the experienced photographer can develop a muscle-memory map of the camera and actuate some controls by feel alone.
The LCD monitor doesn't act as a viewfinder, but does offer a control panel of sorts, showing you the main camera settings and presenting adjustment screens for some of the control buttons. (You can disable the LCD display entirely using the Display button, or activate the full or basic information readouts.) You can also see the main exposure settings through the viewfinder.
Getting to know the camera will probably take a little time, given the large number of custom settings and setup options, and the interface itself will take a little getting used to if you hadn't previously used a Maxxum film SLR. However, once you get the hang of it, the control layout and overall feel of the camera are quite natural. Right out of the box, you could probably snap a few images with just a cursory look at the manual, but plan on investing more time to get better acquainted with all of the camera's controls and settings. The manual is extensive and goes in greater depth than most manuals we've seen.
Control Enumeration
Depth of Field Preview Button: Tucked away on the right side
of the lens mount, this button stops down the lens to the selected aperture,
so you can get an idea of the depth of field when looking through the viewfinder.

Lens Release Button: On the left side of the lens mount, this button
unlocks the lens so that it can be removed from the camera.

Focus Mode Dial: In the bottom right corner of the front panel, this
dial controls the main focus mode:
![]()
Front Control Dial: This ridged wheel sits in front of the Shutter button
on top of the handgrip, conveniently under your index finger. All of the most
commonly used camera settings are adjusted by using this wheel in conjunction
with one of the function dials or control buttons on the camera. It also controls
aperture and shutter speed in Aperture Priority and Shutter Priority exposure
modes and shutter speed in Manual mode.

Shutter Button: Just behind the Front Control dial, this button sets exposure
and focus (in autofocus mode) when half-pressed, and trips the shutter when
fully pressed.
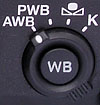
White Balance Dial and Button: This control combination is located
on the far right side of the camera's top panel, and controls the white balance
settings. The dial offers four main positions:
The central WB button selects white balance settings, and registers the white balance in Custom mode.
Drive Mode Dial: This mode dial is directly beneath the Exposure Mode
dial on the right side of the top panel, and accesses the camera's drive settings,
which include Single and Continuous Advance Bracketing modes, Single Frame Advance,
Continuous Advance, and the 10 and Two-second Self-timer modes.
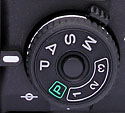
Exposure Mode Dial and Release Button (see image above): Stacked
right on top of the Drive Mode dial, this dial selects the camera's exposure
mode. A Release button in the center of the dial unlocks it so that it can be
turned, preventing you from accidentally switching camera modes while performing
other operations (such as turning the Drive Mode dial). Options are Manual,
Shutter Priority, Aperture Priority, Program AE, Auto, and three Memory Recall
modes.
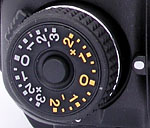
Flash Compensation Dial: Almost hidden beneath the Exposure Compensation
dial on the left side of the camera's top panel, this dial controls the flash
compensation, from -2 to +2 EV in half-step increments.
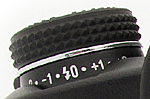
Exposure Compensation Dial and Release Button (see image above): Sitting on top of the Flash Compensation dial, this notched dial features a release button just like the Exposure Mode dial. You can adjust the exposure compensation either from -3 to +3 exposure equivalents (EV) in one-third-step increments (lettered in gray), or from -2 to +2 EV in half-step increments (lettered in orange). You choose what exposure increment you want to use by rotating the dial around to one side or the other. (The orange side of the dial gives you 1/3 EV increments, the silver side gives 1/2 EV steps.)
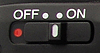
Power Switch: Located in the top left corner of the rear panel, this
sliding switch turns the camera on or off.
![]()
Menu Button: The top button in a series lining the left side of the LCD
monitor, this button calls up the menu system. Pressing it a second time returns
to the LCD's information screen.
![]()
Display Button: Directly below the Menu button, this button controls
the LCD information display in Record and Playback modes. Though the LCD monitor
does not provide any image preview, it does report the camera's exposure settings.
Pressing this button cycles between the full information display, basic display,
and no display (disables the LCD entirely). In Playback mode, this button cycles
between an information overlay, no information, and the index display.
![]()
Magnify Button: Next in line below the Display button, this button controls
the amount of digital enlargement applied to captured images in Playback mode.
The amount of magnification available depends on the image resolution, and RAW
images cannot be enlarged. (Once an image has been enlarged, the arrow keys
pan the view.)
![]()
Delete Button: Right below the Magnify button, the Delete button prompts
the camera to ask if you want to delete a displayed image.
![]()
Playback Button: The final button in the series on the left side of
the LCD monitor, this button accesses the camera's Playback mode, so that you
can review any captured images. Once in Playback mode, a second press of the
Playback button returns to Record mode. (You can also press the Shutter button.)

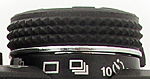
Diopter Control Dial: Practically hidden on the right side of the optical
viewfinder, this tiny dial adjusts the viewfinder display to accommodate eyeglass
wearers.
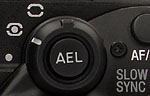
Metering Mode Dial: To the right of the viewfinder eyepiece, this dial
sets the camera's metering mode to Spot, 14-segment Honeycomb-pattern, or Center-weighted
modes.
AE Lock Button (see image above): Tucked in the center of the Metering Mode dial, this button locks the exposure. When using the flash in Program, Aperture Priority, or Full Auto exposure modes, this button accesses the Slow-Sync flash function. Pressing and holding the button locks the exposure, and the flash output is based on the locked reading.

AF/MF Button: To the right of the Metering Mode dial, this button lets
you quickly switch between auto and manual focus modes. The autofocus mode used
will depend on the setting of the Focus Mode dial. If the dial is set to Manual
Focus, this button will access the Single-shot AF mode.
![]()
Rear Control Dial: Positioned in the top right corner of the camera's
rear panel, this dial controls a variety of exposure settings when turned
while pressing a control button. (-3.0 to +1.0 diopter range.)
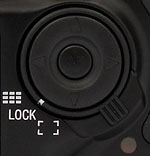
Multi-controller and Spot AF / OK Button: Adjacent to the top right corner
of the LCD monitor, this rocker control steps through selections within the
LCD menu system and interacts with various status messages or requests for
confirmation that appear on the LCD screen. You navigate the menus by pressing
one of the four arrows around the control's periphery, and confirm selections
by pressing the Spot AF / OK button in the center of the control. When selecting
an AF area, the rocker actually moves in eight directions, giving you more
flexibility in moving the AF point. In Playback mode, the right and left arrows
scroll through captured images on the memory card, while the up arrow activates
a histogram display. In Record mode, when the AF Area mode is set to Wide,
pressing and holding the center of the control switches the camera to Spot
autofocus mode. Once in Spot AF, rocking the control moves the Spot indicator
around the frame to the nine available focus points.
Focus Area Switch (see image above): Surrounding the Multi-controller, this low-profile switch sets the AF area to one of the following:

Memory Set Button: Located beneath the Multi-controller and next to
the lower right corner of the LCD monitor, this button lets you store as many
as three sets of camera settings, accessed through the 1, 2, and 3 positions
of the Exposure Mode dial.

ISO Button: Directly beneath the Memory Set button, this button accesses
the camera's sensitivity menu. Using the left and right arrow keys or the Front
or Rear Control dials, you can set the ISO equivalent to Auto, 100, 200, 400,
800, 1,600, or 3,200. (The 3,200 option is only available if enabled through
the setup menu.)
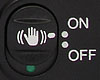
Anti-Shake Switch: In the lower right corner of the rear panel, this
switch turns the camera's Anti-Shake System on and off.
![]()
Battery Compartment Latch: Located in the center of the battery compartment
door on the bottom of the camera, this latch unlocks and opens the battery compartment
cover.
Capture Mode: When powered on, the camera is automatically placed into Record mode. The Exposure Mode dial on top of the camera sets the main shooting mode, with the following options:
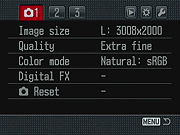
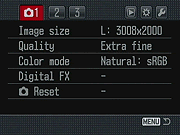 Image
Size: Sets the pixel dimensions of captured still images. Choices
are 3,008 x 2,000 pixels (Large); 2,256 x 1,496 (Medium); and 1,504 x 1,000
(Small).
Image
Size: Sets the pixel dimensions of captured still images. Choices
are 3,008 x 2,000 pixels (Large); 2,256 x 1,496 (Medium); and 1,504 x 1,000
(Small).
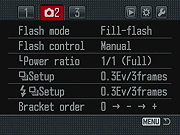 Flash
Mode: Choose from Fill-Flash, Red-Eye Reduction, Rear Flash Sync,
and Wireless. Rear Flash Sync is a slow-sync option that combines slower
shutter speeds with the flash. The "Rear Flash" refers to what
is commonly known as rear-curtain sync, in which the flash fires just before
the shutter closes, rather than just after it opens. With rapidly moving
subjects, this produces motion blurs that trail the sharp, flash-exposed
image, rather than preceding it. The Wireless setting allows the flash to
work with wireless and remote slave units, with four available channels.
Wireless operation with Konica Minolta's excellent 5600HS[D] flash unit
is very smooth.
Flash
Mode: Choose from Fill-Flash, Red-Eye Reduction, Rear Flash Sync,
and Wireless. Rear Flash Sync is a slow-sync option that combines slower
shutter speeds with the flash. The "Rear Flash" refers to what
is commonly known as rear-curtain sync, in which the flash fires just before
the shutter closes, rather than just after it opens. With rapidly moving
subjects, this produces motion blurs that trail the sharp, flash-exposed
image, rather than preceding it. The Wireless setting allows the flash to
work with wireless and remote slave units, with four available channels.
Wireless operation with Konica Minolta's excellent 5600HS[D] flash unit
is very smooth.
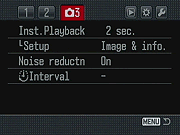 Instant
Playback: Enables an instant review of the most recently captured
image, or disables it. Display times include 10, five, or two seconds.
Instant
Playback: Enables an instant review of the most recently captured
image, or disables it. Display times include 10, five, or two seconds. Delete:
Lets you delete the current photo, all photos, or only marked photos.
Delete:
Lets you delete the current photo, all photos, or only marked photos.
 Slide
Show: Initiates a slide show of photos on the memory card.
Slide
Show: Initiates a slide show of photos on the memory card.
 AF
/ Shutter Release Priority Setup: Designates the priority of
the Shutter button as AF or Release. The AF option will not release the
shutter unless focus is set, while the Release setting trips the shutter
even if AF is not established.
AF
/ Shutter Release Priority Setup: Designates the priority of
the Shutter button as AF or Release. The AF option will not release the
shutter unless focus is set, while the Release setting trips the shutter
even if AF is not established. Control
Dial Setup: Controls the operation of the front and rear control
dials in Full Auto, Program, and Manual exposure modes. You can set the
Front and Rear Control dials to control either shutter speed or aperture.
Control
Dial Setup: Controls the operation of the front and rear control
dials in Full Auto, Program, and Manual exposure modes. You can set the
Front and Rear Control dials to control either shutter speed or aperture. Shutter
Lock: If enabled, this lock prevents the shutter from opening
when a lens is not attached to the camera (protecting the CCD from dust).
Shutter
Lock: If enabled, this lock prevents the shutter from opening
when a lens is not attached to the camera (protecting the CCD from dust). ISO
Button Setup: Designates whether the ISO button controls camera
sensitivity or Zone Matching. (Zone Matching is used for recording high
or low key scenes.)
ISO
Button Setup: Designates whether the ISO button controls camera
sensitivity or Zone Matching. (Zone Matching is used for recording high
or low key scenes.) LCD
Brightness: Adjusts the brightness of the EVF or LCD display, with
eleven steps of brightness adjustment available for each.
LCD
Brightness: Adjusts the brightness of the EVF or LCD display, with
eleven steps of brightness adjustment available for each.
 File#
Memory: Chooses whether or not to number images sequentially
across memory cards. If set to "yes," the 7D will remember the
last number used to name a file, even if a different card is inserted.
File#
Memory: Chooses whether or not to number images sequentially
across memory cards. If set to "yes," the 7D will remember the
last number used to name a file, even if a different card is inserted.
 LCD
Backlight: Specifies the period of time before the LCD backlight
turns off to conserve power. Times are 5, 10, 30, or 60 seconds.
LCD
Backlight: Specifies the period of time before the LCD backlight
turns off to conserve power. Times are 5, 10, 30, or 60 seconds.
 The 7D uses CompactFlash Type
I or Type II memory cards, or the IBM Microdrive for image storage. The camera
ships without a memory card, so you'll want to purchase one at the same time.
The CompactFlash slot is on the right side of the camera, covered by a hinged
plastic door that opens easily and snaps shut crisply. The card inserts with
the connector edge going in first, and the rear of the card facing the back
of the camera. A small button beside the slot ejects the card by popping it
up slightly, letting you pull the card the rest of the way out.
The 7D uses CompactFlash Type
I or Type II memory cards, or the IBM Microdrive for image storage. The camera
ships without a memory card, so you'll want to purchase one at the same time.
The CompactFlash slot is on the right side of the camera, covered by a hinged
plastic door that opens easily and snaps shut crisply. The card inserts with
the connector edge going in first, and the rear of the card facing the back
of the camera. A small button beside the slot ejects the card by popping it
up slightly, letting you pull the card the rest of the way out.
Although individual CompactFlash cards cannot be write-protected or locked against erasure or manipulation, the 7D lets you lock individual images or groups of images through the Playback menu. Once protected, images cannot be erased or manipulated in any way, except through card formatting. The Playback menu also lets you delete images shown in the LCD display, change the number of images in the Index display, create a custom slide show, and set images up for printing on DPOF compliant printers.
Three image resolution settings are available: 3,008 x 2,000; 2,256 x 1,496;
and 1,504 x 1,000 pixels. Files may be saved in any one of three JPEG compression
levels, as well as a compact RAW format. (By its nature, the RAW format only
saves the full-resolution image size.) The 7D also allows you to simultaneously
save images in both RAW and JPEG formats, allowing you to have the convenience
of JPEG files but the security of a RAW copy of your images should you desire
the maximum quality later.
The table below summarizes the compression ratios and number of images that
can be stored on a 256 MB memory card (a common size that should probably be
considered a minimum for use with the camera), with each Resolution / Quality
(JPEG Compression) combination.
| Resolution/Quality 256 MB Memory Card |
Fine | Normal | |
|
|
| 3008 x 2000 | Images (Avg size) |
41 6.1 MB |
82 3.1 MB |
139 1.8 MB |
27 9.5 MB |
| Approx. Compression |
3:1 | 6:1 | 10:1 | 2:1 | |
| 2256
x 1496 |
Images (Avg size) |
73 3.5 MB |
142 1.8 MB |
237 1.1 MB |
|
| Approx. Compression |
3:1 | 6:1 | 9:1 | ||
| 1504
x 1000 |
Images (Avg size) |
158 1.6 MB |
294 869 KB |
466 549 KB |
|
| Approx. Compression |
3:1 | 5:1 | 8:1 |
||
A USB 2.0 High Speed cable and interface accompanies the Maxxum 7D for quick connection and image downloading to a PC or Macintosh computer. By default, it appears as a "storage class" USB device, meaning that no driver software is needed for Mac OS versions 8.6 or later or for Windows Me, 2000, and XP. The Konica Minolta Maxxum 7D connects to a host computer via a USB interface. Downloading files to my Sony desktop running Windows XP (Pentium IV, 2.4 GHz), I clocked it at 1182 KBytes/second, an excellent rate. (Cameras with slow USB interfaces run as low as 300 KB/s, cameras with fast v1.1 interfaces run as high as 600 KB/s. Cameras with USB v2.0 interfaces run as fast as several megabytes/second.)
When its USB interface is set to PTP mode, the Konica Minolta Maxxum 7D supports
direct printing (no computer required) to PictBridge compatible photo printers.
The extent of PictBridge support varies greatly between cameras, and the 7D's
support is more robust than many. Provided that it's connected to a printer
that offers an equivalent level of support and control, you can select paper
size, bordered or borderless, print quality, and date imprint options directly
from the camera's menu system. (Very slick.) Printing via PictBridge to our
Canon i9900 studio printer though, we found it to be rather slow in formatting
and preparing the data to send to the printer. (It took 3 minutes and 50 seconds
to print a 4x6 photo at best quality.)
Recommended Software: Rescue your Photos!
Since we're talking about connectivity and memory cards, this would be a good
place to mention recovering images from damaged memory cards: Just as important
as an extra memory card is a tool to rescue your images when one of your cards
fails at some point in the future. I get a lot of email from readers who've
lost photos due to a corrupted memory card. Memory card corruption can happen
with any card type and any camera manufacturer, nobody's immune. A surprising
number of "lost" images can be recovered with an inexpensive, easy
to use piece of software though. Given the amount of email I've gotten on the
topic, I now include this paragraph in all my digicam reviews. The program you
need is called PhotoRescue, by DataRescue SA. Read our review
of it if you'd like, but download the program now, so you'll have it.
It doesn't cost a penny until you need it, and even then it's only $29, with
a money back guarantee. So download PhotoRescue
for Windows or PhotoRescue
for Mac while you're thinking of it. (While you're at it, download the
PDF manual
and quickstart
guide as well.) Stash the file in a safe place and it'll be there when you need
it. Trust me, needing this is not a matter of if, but when... PhotoRescue
is about the best and easiest tool for recovering digital photos I've seen.
(Disclosure: IR gets a small commission from sales of the product, but I'd highly
recommend the program even if we didn't.) OK, now back to our regularly
scheduled review...
Video Out
The 7D provides a video output jack with an accompanying video cable. The signal timing can be set to NTSC or PAL via the Setup menu. The Video output duplicates the contents of the LCD in all modes, permitting it to be used as an auxiliary viewfinder.
Power
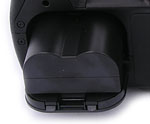 The
7D uses an NP-400 rechargeable lithium-ion battery pack for power, or the optional
AC adapter. The camera comes with a battery and charger and shows excellent
battery life, but I highly recommend picking up a spare and keeping it freshly
charged at all times.
The
7D uses an NP-400 rechargeable lithium-ion battery pack for power, or the optional
AC adapter. The camera comes with a battery and charger and shows excellent
battery life, but I highly recommend picking up a spare and keeping it freshly
charged at all times.
Here are the power-consumption numbers I measured for the 7D in the lab, along
with estimated run times, based on a single lithium-ion cell:
| |
(@6 volts on the external power terminal) |
(7.4v 1500mAh LiIon cell) |
| Capture Mode, w/LCD | |
|
| Capture Mode, no LCD | |
|
| Half-pressed shutter w/LCD | |
|
| Half-pressed w/o LCD | |
|
| Memory Write (transient) | |
|
| Flash Recharge (transient) | |
|
| Image Playback | |
|
Like most digital SLRs, the 7D's battery life is excellent, largely because it doesn't have to keep the CCD and LCD clocking away to frame its shots. With run times of over 6 hours in record mode and better than 2.5 hours in playback, a fully charged NP-400 battery will last most shooters all day. If you plan lots of shooting in continuous mode though, I'd suggest picking up an extra battery pack.
In the Box
The 7D ships with the following items:
Recommended Accessories
Test Results
In keeping with my standard test policy, the comments given here summarize only my key findings. For a full commentary on each of the test images, see the Konica Minolta Maxxum 7D's sample pictures page.
For a collection of more pictorial images from the Konica Minolta Maxxum 7D, check out our Maxxum 7D photo gallery.
Not sure which camera to buy? Let your eyes be the ultimate judge! Visit our Comparometer(tm) to compare images from the Maxxum 7D with those from other cameras you may be considering. The proof is in the pictures, so let your own eyes decide which you like best!
As with all Imaging Resource product tests, I encourage you to let your own eyes be the judge of how well the camera performed. Explore the images on the pictures page, to see how the Konica Minolta Maxxum 7D's images compare to other cameras you may be considering.
Conclusion
| Free Photo Lessons | |
|
<<Maxxum 7D Sample Images | Additional Resources and Other Links>>
Reader Comments!
Questions, comments or controversy on this product? Click
this link to see what other Imaging Resource readers have had to say about
the Konica Minolta Dynax Maxxum 7D, or add comments of your own!