Nikon D100Nikon ups the ante with 6 million pixels, superb color and resolution, at a 'bargain' price!<<Executive Overview :(Previous) | (Next): Viewfinder>> Page 3:DesignReview First Posted: 5/31/2002 |
Design
Similar in appearance to the Nikon N80 and F100 35mm SLRs, the D100 SLR digital camera is the latest in Nikon's line of professional digicams. The D100's familiar body design and control scheme should ease the transition from film to digital shooting, especially for anyone already familiar with Nikon's film cameras. The black body is a very rugged combination of metal and structural plastic that's roughly the same size as the N80, at 5.7 x 4.6 x 3.2 inches (144 x 116 x 81 millimeters). The mix of plastic and metal helps keep the camera's weight manageable, as the D100 weighs only 14.7 ounces (416 grams) without the battery or lens.
In the D100, Nikon has managed to make a camera body that feels "just right" in virtually every aspect. Its weight is quite moderate, and the balance in your hand is really excellent. I think they did a particularly good job on the subtleties of the handgrip: It's just the right size for most users, neither too big nor too small. The fairly sharp angle between the inset finger grip and the front of the grip makes for a very secure grip, particularly when combined with its high-friction tactile coating. Surprising for a pro-level digital SLR, the D100 can quite comfortably be used singlehanded.
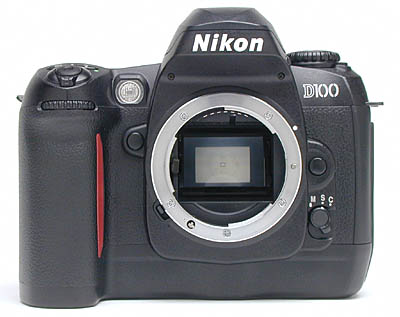
Dominating the D100's front panel is Nikon's standard “F” lens mount, which accommodates a broad spectrum of Nikkor lenses (the instruction manual has a complete list of compatible lens types). A small black button on the left side of the lens (as viewed from the back) unlocks the lens, letting you twist it out of the mount. Just below this button is the Focus Mode dial, which selects between Single-Servo and Continuous-Servo AF modes, or the Manual focus mode. On the opposite side of the lens is the Depth of Field Preview button, just below the AF assist lamp. Also visible from the front is the Sub-Command dial at the top of the hefty hand grip.
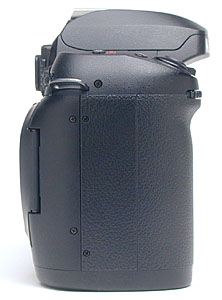
The right side of the camera (again, as viewed from the back) is devoid of detail apart from an eyelet for attaching the neck strap.
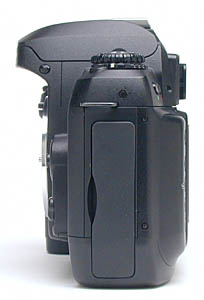
The left side of the D100 features another neck strap eyelet and the connector compartment. A flexible, rubbery flap protects the compartment, and remains attached to the camera when opened. Inside the compartment are the Digital, DC In, and Video Out connector jacks. I initially found this flap a little difficult to get back into place. I eventually discovered the sight trick of pushing the "hinge" of the flap back into the camera body first, then smoothing the rest of the flap into place. Once I learned to get the hinge properly stowed first, the flap was very easy to deal with. (And more substantial feeling than most such flaps I've encountered.) Also visible from this view is the Flash Release button, on the side of the pentaprism housing, just below the tip of the flash compartment lid.
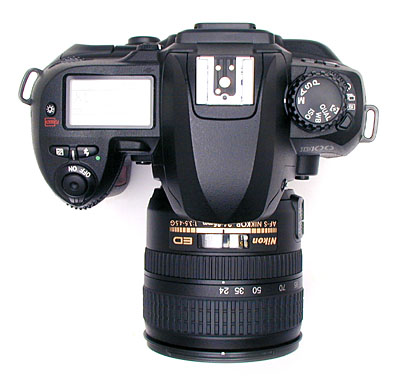
The pop-up flash compartment and external flash hot shoe are centrally located on the D100's top panel. To the right of the flash unit, a small status display panel reports basic exposure information, as well as a few main camera settings. This panel lets you change a variety of camera settings without entering the LCD menu system, a feature I always appreciate. Remaining camera controls include the Shutter button, Mode dial, Flash and Exposure Compensation buttons, as well as a LCD Illuminator button that lights the status display panel when it's too dark to see otherwise. The Function Dial sits on top of the Mode Dial, which has a small button to lock it in place. Finally, the Power switch surrounds the Shutter button, with a large tab to make turning easy and quick.
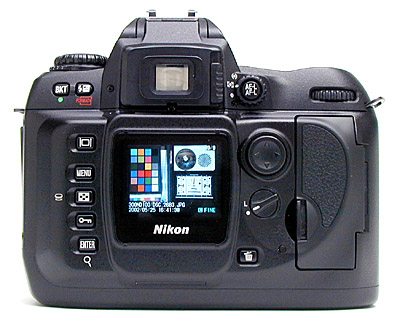
The D100's back panel holds the majority of the camera's controls, as well as the LCD monitor, viewfinder eyepiece, and memory card compartment. The optical viewfinder has a fairly high eyepoint, so the full display remains visible at a good distance from the camera. - This is a decided plus for eyeglass wearers like myself. As further accommodation to those of us with suboptimal eyesight, a sliding diopter adjustment on the right side of the eyepiece changes the focus of the viewfinder optics. Positioned just left of center, the 1.8-inch LCD monitor comes with a protective plastic cover that keeps the monitor safe from accidental scratches. Several camera controls flank the LCD monitor on each side, including a Four-Way Arrow pad for navigating the LCD menu system. The memory card compartment takes up the far right side of the back panel, with a hinged plastic door that snaps shut. A small LED lamp just beside the compartment lights whenever the camera accesses the memory card (indicating that you shouldn't open the compartment door or remove the card). Directly above the memory compartment is the Main Command Dial, which navigates menus and changes camera settings.
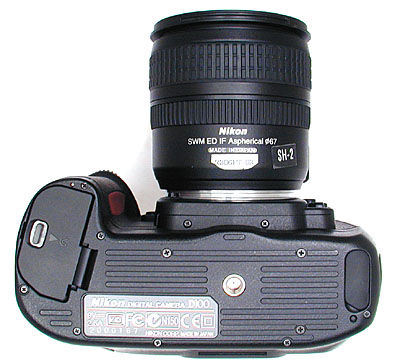
The camera's bottom panel has slightly raised ribs traversing it, to provide better friction when mounted on a tripod head. Apart from these though, it's quite flat overall. A threaded metal tripod mount sits near the center of the body, aligned with the optical center of the lens, and very close to the center of mass of the camera. The the battery compartment is on the right side of the body (when viewed from the back). A lock button in the battery compartment door prevents it from opening accidentally, and the pressure of the door holds the battery in place. Opposite the battery compartment, a small rubber plug protects a set of electrical contacts that interface with the optional portrait grip/battery unit.
Reader Comments! --> Visit our discussion forum for the Nikon D100!

Follow Imaging Resource: