Nikon D100Nikon ups the ante with 6 million pixels, superb color and resolution, at a 'bargain' price!<<Operation & User Interface :(Previous) | (Next): Image Storage & Interface>> Page 9:Camera Modes & MenusReview First Posted: 5/31/2002 |
Camera Modes and Menus
Menus:
There are four menus on the D100: Playback, Shooting, CSM (custom menus) and Set Up. All menu entries are selected via the 4-way Arrow Pad. The menus themselves are chosen via a "tabbed" interface, with icons on the left of the screen corresponding to the four menus. In the section below, rather than reproduce every menu screen in the main text here, I've shown screenshots for only the top level of each menu, with clickable links in the descriptive text leading to the individual screens.
Playback Menu:
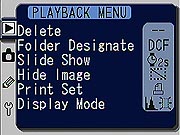
- Delete (screenshot): Deletes individual images or all images from the memory card (except for protected images). Options are All or Selected, which pulls up a thumbnail display.
- Folder Designate (screenshot): Creates new folders for storing images, or allows the user to select the folder in which to save images.
- Slideshow (screenshot): Enables an automated slide show of captured images on the memory card, and allows you to set the display interval between images from two to 10 seconds.
- Hide Image (screenshot): "Hides" selected images, so that they don't display during Playback view.
- Print Set (screenshot): Sets up images for printing using the DPOF (Digital Print Order Format). You can select images for printing from a thumbnail view, and designate the number of prints to be made.
- Display Mode (screenshot): Controls the display options in Playback mode. Options are Image Only, Histogram, Highlights, and Both (adds both histogram and highlight displays to the Playback options).
 Shooting
Menu:
Shooting
Menu:
- Bank Select (screenshot): Two "banks" of settings can be saved on the D100, labeled A and B, letting you save user-specific settings to be called up at anytime.
- Image Quality (screenshot): Sets the image compression level. Choices are NEF (RAW), TIFF, JPEG Fine, JPEG Normal, and JPEG Basic quality settings.
- Resolution (screenshot): Sets the image resolution to Large (3,008 x 2,000 pixels), Medium (2,240 x 1,488 pixels), or Small (1,504 x 1,000 pixels).
- White Balance (screenshot): Adjusts the camera's color balance to match a variety of light sources. Choices are Auto, Incandescent, Fluorescent, Direct Sunlight, Flash, Cloudy, Shade, and Preset (manual setting). You can also preset the exposure mode (P, A, S, M) in which to shoot the frame used for preset white balance determination.
- ISO (screenshot): Changes the camera's sensitivity setting, with options of 200, 250, 320, 400, 500, 640, 800, 1,000, 1,250, 1,600, Hi 1 (3,200), and Hi 2 (6,400).
- Image Sharpen (screenshot): Adjusts the in-camera sharpening. Choices are Auto, Normal, Low, High, or None.
- Tone Compensation (screenshot): Adjusts the overall tone and contrast of the image. Choices are Auto, Normal, Low Contrast, High Contrast, and Custom (lets you download a tone curve from a computer).
- Color Mode (screenshot): Sets the camera's color profile to I sRGB, II Adobe RGB, or III sRGB. (III sRGB apparently has been tweaked for increased color saturation.)
- Hue Adjustment (screenshot): Controls the overall hue of the image. Adjustment values range from +9 to -9 degrees, in +/-3-step increments. The step sizes are somewhat arbitrary, and vary in the magnitude of their effect, depending on the white balance mode you're in. - See the Exposure section of this review (above) for a detailed explanation of their action.
 Custom
Settings Menu:
Custom
Settings Menu:
- R - Menu Reset (screenshot): Resets all camera settings to their defaults.
- 0 - Bank Select (screenshot): The D100 can store custom settings in up to two "banks" of settings, allowing you to save a series of adjustments to be recalled at any time. Options are A and B.
- 1 - Image Review (screenshot): Activates or deactivates the Image Review option, which automatically displays the captured image on the LCD screen during recording.
- 2 - No CF Card? (screenshot): When set to On, doesn't allow shooting without a CompactFlash card. If Off, the camera saves images to its buffer memory.
- 3 - ISO Auto (screenshot): Places the camera's sensitivity setting under automatic control, disabling the ISO Boost (Hi 1 and Hi 2) options.
- 4 - Long Exposure NR (screenshot): Turns on the Noise Reduction system for long exposures, which employs a dark-frame subtraction method to reduce image noise.
- 5 - File Number Sequence (screenshot): Turns file numbering sequencing on or off. Sequenced file numbering continues from one memory card to the next, instead of resetting with each new card.
- 6 - Monitor Off Delay (screenshot): Controls the length of time that the LCD monitor remains on during a period of inactivity. Time periods are 10 or 20 seconds, or 1, 5 or 10 minutes.
- 7 - Auto Meter-Off Delay (screenshot): Sets the amount of time that the exposure information displays in the control panel on top of the camera. Choices are 4, 6, 8, or 16 seconds, or 30 minutes.
- 8 - Self-Timer Delay (screenshot): Sets the countdown time for the self-timer to 2, 5, 10, or 20 seconds.
- 9 - EV Steps (screenshot): Specifies the amount of variation between exposure settings (shutter speed, aperture, Exposure Compensation, and Auto Bracketing), either 1/2 or 1/3 step.
- 10 - Easy Exposure Compensation (screenshot): Specifies how Exposure Compensation is adjusted. Options are to use the Exposure Compensation button and the Main Command dial together, or the Main Command dial by itself.
- 11 - Bracket Set (screenshot): Specifies whether the autoexposure and flash exposure change with each shot taken in Auto Bracketing mode, also has a White Balance bracketing option. Choices are AE and Flash (bracketing affects both), AE Only, Flash Only, and White Balance.
- 12 - Bracketing Order (screenshot): Sets the order of the Auto Bracketing exposure series, either Meter, Under, then Over, or Under, Meter, then Over.
- 13 - Assign Command Dial (screenshot): Assigns the Main Command dial function. “Off” puts the Main Command dial in control of shutter speed, with the Sub-Command dial in charge of aperture. “On” reverses the assignment of these controls. (Main controls aperture, sub controls shutter.)
- 14 - Assign AE-L / AF-L Button (screenshot): Sets the function of the AE / AF Lock button. Choices are AE Lock only, AF Lock only, AE Lock hold, and AF-ON.
- 15 - AE Lock Button (screenshot): Designates whether the AE Lock button locks exposure by itself, or when pressed in conjunction with the Shutter button.
- 16 - Illumination (screenshot): Determines whether the LCD illumination activates with the Illumination button only or when any button is pressed.
- 17 - Focus Area Select (screenshot): Determines whether or not the autofocus area selector tool "wraps" from top to bottom or left to right when selecting the autofocus area.
- 18 - Focus Area Illumination (screenshot): Turns on or off an illuminated indicator, which appears whenever focus is set, or places it under Auto control.
- 19 - Grid Display (screenshot): Turns the alignment grid display in the optical viewfinder on or off.
- 20 - Dynamic AF, Single-Servo (screenshot): Determines whether the autofocus bases focus on the closest subject or if the user selects the focus area when the camera is used in Single-Servo shooting mode.
- 21 - Dynamic AF, Continuous Servo (screenshot): Similar to the previous menu option, this determines whether focus is based on the closest subject or an area chosen by the user, for the Continuous Servo focus mode.
- 22 - AF Assist Illuminator (screenshot): Activates the AF Assist light on the camera's front panel, which automatically comes on in dark shooting situations. Also disables the light.
- 23 - Flash Mode (screenshot): Places the flash under Manual or D-TTL control. (D-TTL automatically adjusts the flash power based on shooting conditions.)
- 24 - Anti-Mirror-Shock Mode (screenshot): Enables or disables the Anti-Mirror-Shock mode, which prevents any vibration from shutter movement in long exposures.
Setup Menu:
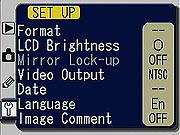
- Format (screenshot): Formats the memory card, erasing all images on the card, even write-protected ones.
- LCD Brightness (screenshot): Controls the brightness of the LCD display.
- Mirror Lock Up (no screenshot): Turns Mirror Lock on or off. If on, locks the mirror upright so you can clean or inspect the low-pass filter that protects the CCD.
- Video Output (screenshot): Assigns the Video Out signal to PAL or NTSC.
- Date (screenshot): Sets the camera's internal calendar and clock.
- Language (screenshot): Sets the LCD menu language to German, English, French, Japanese, or Spanish.
- Image Comment (screenshot): Lets you attach text to an image.

Follow Imaging Resource: