Olympus C-5000 Zoom(none)<<Shutter Lag & Cycle Time Tests :(Previous) | (Next): Camera Modes & Menus>> Page 8:Operation & User InterfaceReview First Posted: 11/04/2003 |
Operation and User Interface
The C-5000 features a user interface similar to the C-4000 model, although the "virtual dial" for the Scene Program modes has been moved to the Mode dial for quicker actuation. Like previous Olympus digicams, the C-5000 Zoom's menu system has an initial menu screen with four shortcut buttons on it that lead to sub-menus for quick access of frequently-used menu items. These shortcuts are displayed on the screen as three or four buttons, each selected using the arrow key that corresponds to its position on the screen. Although it can take a little getting used to, this dual-level menu system does let you make adjustments to three of the most often used camera settings quite quickly, and imposes only a slight penalty for less-frequently accessed functions. The C-5000's external control layout is very similar to previous Olympus Camedia digicam setups, although some buttons have been moved around. The Custom Function / Protect button (which normally activates the virtual mode dial in A/S/M and Scene modes) can have a special function assigned to it through the Setup sub-menus. This lets you create a short cut to circumvent the menu system for a frequently-used adjustment. With its range of control buttons and menu options, it'll probably take a typical user an hour or so to get familiar with the camera's setup.
Control Enumeration
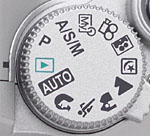
Mode Dial: The most obvious control on top of the C-5000 is the
Mode Dial, which selects the various camera operating modes: Playback,
Auto, Portrait, Sports, Landscape-Portrait, Landscape-Scene, Night
Scene, Self-Portrait, Movie, My Mode, Aperture / Shutter Speed / Manual
(A/S/M), and Program.

Power Dial: Stacked underneath the Mode dial, the Power dial (a
lever, really) turns the camera on and off.

Zoom Lever: Also on top of the camera, in front of the Mode
Dial, the Zoom Lever controls the optical zoom in all exposure modes,
and the digital zoom when enabled through the Shooting menu. In
Playback mode, the lever switches between Index view, normal image
display, and playback zoom.
Shutter Button: Located in the center of the Zoom Lever, the Shutter button sets focus and exposure settings when depressed halfway and triggers the shutter when fully pressed.

Quick View Button: Angled down from the top panel toward the rear
of the camera, this button pulls up the Quick View display of the most recently
captured image. Pressing the button a second time returns to record mode.
![]()
Flash / Erase Button: Located on the top, central portion of the
camera's back panel, this button controls the Flash mode in all
exposure modes for which flash is available. Pressing it cycles through
Auto-Flash, Red-Eye Reduction, Forced Flash, Flash Off, and Slow Sync
modes. In Playback mode, this button calls up the Erase menu, which
allows you to erase the currently displayed image.

Spot / Macro / Protect Button: Directly beneath the Flash /
Erase button on the back panel is the Spot / Macro / Protect button. In
all Shooting modes, this button cycles between normal metering (Digital
ESP), Spot metering, Macro (Closeup) focus mode, and Macro with Spot
Metering modes. In Playback mode, this button write-protects the
displayed image. It can also remove protection.
![]()
AE Lock / Custom / Rotate Button: Directly to the right of the Spot
/ Macro / Protect button, this button locks the exposure when pressed in
Record mode. It can also be programmed through the settings menu to handle
a number of other functions as well. In Playback mode, this button rotates
the displayed image 90 degrees clockwise each time it is pressed.
![]()
Monitor Button: Adjacent to the top right corner of the LCD
monitor, this button controls the LCD image and information displays, turning
both on or off simultaneously.
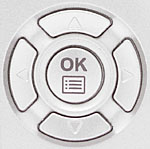
Four-Way Arrow Pad: The largest
control on the back panel, the Arrow Pad controls many of the C-5000's
operations. In all Shooting modes except Manual, the left and right
Arrow keys increase or decrease the exposure compensation setting
(provided the LCD monitor is active). In Aperture or Shutter Priority
exposure modes, the up and down Arrow keys adjust the lens aperture or
shutter speed settings, depending on which mode you've selected. In
Manual mode, the up and down Arrows control shutter speed, while the
left and right Arrows control aperture.
In Playback mode, the left and right Arrows move forward or backward through the pictures stored on the card, or scroll around portions of the expanded image in Zoom Playback mode.
In the LCD menu system, the Arrow keys navigate through menu screens and select settings.
OK / Menu Button: Located in the center of the four-way Arrow pad, this button activates the menu system on the rear panel LCD monitor and confirms selected menu settings in the LCD menu screens. If the LCD monitor is turned on when you press the Display button, it will call up the menu options and display them over the image. If the LCD monitor is off when you press Display, it brings up the camera's menu system with no viewfinder image. Holding this button down for approximately two seconds brings up the Manual Focus distance display, along with the AF and MF icons. Highlighting the MF icon with the right Arrow button engages the Manual Focus mode, after which the up and down Arrow buttons adjust the focus.

Follow Imaging Resource: