Canon PowerShot Pro90 ISAn impressive update to the PowerShot "Pro" line, with a 10x optically stabilized zoom lens and 2.6 megapixel CCD!<<Optics :(Previous) | (Next): Shutter Lag & Cycle Time Tests>> Page 6:Exposure & FlashReview First Posted: 2/6/2001 |
Exposure
The Pro90 features a wide range of exposure controls, with a variety of exposure modes available through the Mode dial. Canon has divided the exposure modes into zones: Auto, Image, and Creative. On the camera's Mode dial, Auto is positioned in the middle of the dial, with the Creative and Image Zones on either side. Auto simply refers to the fully Automatic exposure mode, which limits your control to resolution, compression, flash, zoom, and self-timer. The Image Zone includes Pan Focus, Portrait, Landscape, Night Scene, Black and White, Stitch Assist, and Movie modes, all preset to handle specific shooting situations. Pan Focus mode fixes the focal range, thus eliminating the shooting delay that results while the camera sets the focus. Portrait mode uses a larger aperture to decrease the depth of field, keeping the subject in sharp focus and the background slightly blurred. Alternately, Landscape mode uses a smaller aperture setting to increase the depth of field and place the foreground and background in focus.
Night Scene uses a slower shutter speed to capture night and twilight scenes. Flash is also available in this mode for capturing night portraits. Black and White mode simply captures images in black-and-white monotone. (Although the images from Black and White mode are stored as full RGB files, meaning they are no smaller than full-color ones.) Stitch Assist is a panoramic mode that allows you to capture multiple images that can be "stitched" together later on a computer. A framing guideline keeps a portion of the previously captured image on the LCD screen, to help you line up the next shot. All exposure settings are locked with the first shot, and up to 26 consecutive images can be recorded for a vertical, horizontal, or larger square image.
The last of the Image Zone modes is Movie mode, which captures moving images with sound at a resolution of 320 x 240 pixels. The maximum movie length is 30 seconds, with a frame rate of 15 frames per second. Recording begins when you fully depress the shutter button once, and ends with a second press (or when the CompactFlash card runs out of free space, or the 30 second maximum recording time is reached). In just about all of the Image Zone modes, the AE Lock, FE Lock, metering mode, RAW file format, and image adjustment tools (ISO, contrast, sharpness, and saturation) are not available. We don't formally test movie recording functions on the digicams we test, but did notice a rather loud buzz on the audio track of any movies we tried recording with the Pro90. We can't imagine this being a normal behavior, but can't chalk it up to a prototype foible, as the unit we received was a full production model in retail packaging.
The Creative shooting zone includes Program AE, Shutter Speed Priority AE, Aperture Priority AE, and Manual exposure modes. (The AE stands for auto exposure, indicating that in these modes, the camera is making specific exposure decisions.) The Creative Zone provides full access to the camera's variety of exposure settings, including exposure compensation, metering, white balance, and image adjustments such as sharpness, contrast, and saturation. The first mode in the Creative Zone, Program AE, places the camera in control of the shutter speed and aperture settings only, while the user controls all other exposure variables. Shutter Speed Priority AE allows the user to control the shutter speed, from 1/1,000 to eight seconds, while the camera selects the best corresponding aperture. Working along similar lines, the Aperture Priority AE mode gives the user control over the lens aperture setting, from f/2.8 to f/8.0, while the camera chooses the correct shutter speed. Finally, Manual mode gives the user complete control over all exposure settings, including both shutter speed and aperture.
In Shutter Speed Priority, Aperture Priority, and Manual exposure modes, if the user-selected settings will result in an under- or overexposure, the offending variable glows red in the LCD monitor and blinks in the top status display panel. In Shutter Speed Priority or Aperture Priority mode, only the user-adjustable variable shows in the LCD display until you half-press the shutter button, at which point both parameters appear. In both Shutter Speed Priority and Aperture Priority modes, the variable is adjusted by pressing the right and left arrow buttons; while in Manual exposure mode, the right and left arrows control shutter speed, and the up and down arrows control aperture.
In all exposure modes, the Pro90 features a two- or ten-second image review screen, which pops up while the captured image is being recorded to the memory card. (You can cancel the review function through the Record menu.) By pressing the "*" button during the two-second image review, you can instantly erase the image from the card (with an option to cancel). The "instant review" image display can be prolonged by two means. First, you can simply hold down the shutter button after snapping the shot. This will hold the review image on the LCD until you release the shutter button. (This appears to be a "family trait" of Canon digicams, a feature we personally find very useful.) The second method of retaining the review display is to momentarily press the "Set" button on the camera's back during the normal review period. This will hold the review image until the shutter button is half-pressed.
Exposure compensation is controlled by pressing the White Balance/Exposure button once, which displays an adjustment bar at the bottom of the LCD screen and on the status display panel. The right and left arrow buttons control the adjustment, which ranges from -2 to +2 exposure equivalents (EV) in one-third-step increments. Exposure compensation is available in all exposure modes except Auto and Manual. The Pro90 features seven White Balance options, set by pressing the White Balance button on the camera's back panel twice and selecting the desired setting from the menu (also using the right and left arrow buttons). Auto, Daylight, Cloudy, Tungsten, Fluorescent, Flash, and Custom White Balance modes match a variety of light sources. The Custom White Balance option matches the white balance to the current lighting, and is manually set by placing a white card or piece of paper in front of the lens. Once the white paper fills the field of view on the LCD screen, pressing the "*" button sets the white value. (The Pro90 will also let you snap images directly from the White Balance menu, returning you to the menu once the image is recorded.) White balance is adjustable in all modes except Auto and Black and White.
The Metering button on top of the camera cycles back and forth between Spot and Center-Weighted Averaging metering systems. Spot metering bases the exposure on a reading from the very center of the image, and is good for high-contrast or backlit subjects. The Center-Weighted Averaging system combines the average value from the entire image with the value of the center of the image. Metering mode is only adjustable in Program, Shutter Speed Priority, and Aperture Priority exposure modes.
In the "Creative" exposure modes, the "*" button on the back panel controls the AE Lock. To lock an exposure reading, simply frame that portion of the subject in the center of the LCD screen, hold down the shutter button halfway (to lock focus), then press the "*" button and recompose the subject before firing the shutter.
Several image adjustments are available on the Pro90, which are only available when shooting in the Creative Zone. ISO, contrast, sharpness, and saturation are all adjustable through the camera's Record menu. ISO options include: Auto, 50, 100, 200, and 400 equivalents, with ISO 50 as the default setting. The Contrast, Sharpness, and Saturation options all feature three settings: Weak (-), Neutral (0), and Strong (+).
 Flash
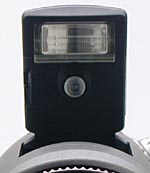
FlashThe Pro90 features a built-in, pop-up flash, which operates in five modes: Auto, Red-Eye Reduction Auto, Red-Eye Reduction On, On, and Off. Unlike many pop-up flash designs, the Pro90's internal flash does not have a release button. Instead, the flash pops up automatically when the shutter button is halfway depressed, as long as the flash mode is set to anything other than Off. We found this to be somewhat annoying when shooting in a hurry, as it causes a short delay before the shutter can be fired while you wait for the flash to open and charge.
The five flash modes operate much as their names suggest. Automatic mode gives the camera control over when to fire the flash, based on the existing exposure conditions. Both the Red-Eye Reduction modes fire a small pre-flash before firing the full flash, to reduce the occurrence of red-eye effect (caused by a reflection from a non-contracted pupil). The difference between the two modes is that the Red-Eye Reduction Auto fires at the camera's discretion and Red-Eye Reduction On fires with every exposure, regardless of light levels. The last two flash modes, On and Off, set the flash to fire with every exposure or not at all (respectively). Canon estimates the Pro90's flash range to be effective from 2.3 to 13.8 feet (70cm to 4.2m) at the 100 ISO setting.
The Pro90 also allows you to adjust the flash intensity level, using the same White Balance button on the back panel that controls Auto Exposure Bracketing, Exposure Compensation, and White Balance. Pressing the button four times displays the Flash Exposure compensation adjustment bar at the bottom of the LCD screen and status display panel. Flash exposure is adjustable from -2 to +2 exposure equivalents (EV) in one-third-step increments by pressing the right and left arrow buttons.
The "*" button on the back panel allows you to lock the flash exposure setting, in much the same way normal AE Lock functions. (The "*" button automatically controls the flash exposure, or FE Lock, when the flash is enabled.) To lock the flash exposure, center the desired portion of the subject in the frame (with the flash enabled), press the shutter button halfway to set focus, then press the "*" button. The flash will then fire a pre-flash and lock the exposure to the best intensity for the subject. You can press the "*" button more than once, as it simply readjusts the flash exposure lock each time. Once the flash exposure is locked, simply re-frame the subject and fire the shutter. FE Lock is beneficial for backlit subjects, for which the camera's flash may not automatically fire, and is only available in the Program, Shutter Speed Priority, and Aperture Priority exposure modes.

The Pro90 features a hot shoe on its top panel for connecting to a more powerful external flash. The camera's automatic exposure controls will function with Canon Speedlite units (220EX, 380EX, 420EX, or 550EX), as will the FE Lock, shutter synchronization, flash exposure compensation, and auto zoom functions. Other manufacturers' flash units can also be used, though Canon does not guarantee that all of the camera's functions will work with the external unit. Check the flash manual and verify the contacts before attaching it to the camera.
Self-Timer / Wireless Remote Mode
The Pro90 features a 10-second self-timer, activated by pressing the shutter button fully in Self-Timer / Wireless Remote mode. The mode is accessed by the Continuous Shooting / Self-Timer / Wireless Remote button on top of the camera (just below the status display panel). Once the timer has been activated, the self-timer lamp on the front of the camera blinks until the shutter opens (the lamp blinks faster during the last two seconds). The infrared remote control is effective up to 16.4 feet (5.0 meters) from the camera, within 15 degrees to the right or left of the remote sensor on the front of the camera. Pressing the remote shutter button triggers a shorter, two-second countdown before the shutter opens.
Continuous Shooting Mode
Also accessed through the Continuous / Self-Timer / Wireless Remote button, Continuous Shooting mode captures a series of sequential images at approximately 0.7 frames per second (image quality set to Large/Fine), when the shutter button is held down. The actual frame rate varies with the subject and shooting conditions. The total number of sequential images depends on the amount of available space on the CompactFlash card. In this mode, the camera is saving the images to an internal buffer memory prior to writing them to the memory card. Thus, once the buffer memory is filled, the capture speed slows dramatically. The number of images that can be captured at full speed depends on the image size and quality setting. At the high resolution setting, 6, 10, or 20 images can be captured in rapid sequence at the Super, Fine, or Normal image-quality settings. The internal flash is available in this mode, however, the frame rate will slow to accommodate the necessary charging time for the flash. Images are saved to an internal memory buffer before being saved to the memory card, which causes a slight delay in capture time when the internal memory fills up. Continuous Shooting is accessible in all exposure modes except Auto, Stitch Assist, and Movie.
Auto Exposure Bracketing Mode
For situations when the best exposure isn't immediately obvious, the Pro90 offers an Auto Exposure Bracketing mode, controlled through the White Balance button on the back panel (three presses access the mode). Auto Exposure Bracketing takes three shots in sequence, each at different exposure settings, after just one press of the shutter button. The amount of exposure variation is adjustable from -2 to +2 exposure values (EV) in one-third-step increments. An adjustment menu appears on the bottom of the LCD screen, with the marker set at zero. The right arrow button expands the exposure range, while the left arrow button reduces it. For example, pressing the right arrow button to include -1 and +1 EV settings will take an image at the currently set exposure, one at -1 EV, and one at +1 EV. We like the way Canon has implemented the display showing the bracketing setup, in that it shows not only the range of the exposure bracketing, but also the amount of offset in the initial exposure value, as set by the Exposure Compensation adjustment. Auto Exposure Bracketing is only available in Program, Shutter Speed Priority, and Aperture Priority exposure modes. Canon notes that if the Auto Exposure Bracketing range is left at zero, the camera will take an image at the currently set exposure, plus or minus what the metering system dictates.
Reader Comments! --> Visit our discussion forum for the Canon PowerShot Pro90 IS!

Follow Imaging Resource: