Canon PowerShot Pro90 ISAn impressive update to the PowerShot "Pro" line, with a 10x optically stabilized zoom lens and 2.6 megapixel CCD!<<Shutter Lag & Cycle Time Tests :(Previous) | (Next): Camera Modes & Menus>> Page 8:Operation & User InterfaceReview First Posted: 2/6/2001 |
Operation and User Interface
We found the Pro90 user interface is reasonably uncomplicated, though a few of the controls confused us at first. For example, we kept expecting the Flash button to release the pop-up flash, but in this model, the button controls the Flash mode and the camera releases the flash when needed. Another control that mystified us in the beginning was the "*" button, which changes functions depending on the exposure mode you're in, and whether or not the flash is in use. Still, a quick read of the manual set us straight and made operation relatively smooth. We did notice that the placement of the Arrow rocker, Set, and Menu buttons was somewhat awkward, in that we kept pressing them by mistake whenever we picked up or set down the camera. This was pretty harmless most of the time, as the camera was turned off, and even when the camera was on, none of the buttons cause any unalterable changes. The control layout and camera weight pretty much rule out one-handed operation, since you'll need the other hand to support the heavy lens (unless it's mounted on a tripod). One-handed shooting is possible, but not really recommended. The User Guide was fairly easy to follow, and offered several shortcuts to change camera settings and avoid scrolling through the menu. The settings menu is set up like many other Canon digicams, and is reasonably short to navigate.
Control Enumeration

Shutter Button: Located on the front of the hand grip, this small silver button sets focus when halfway depressed, and fires the shutter when fully depressed. When the Self-Timer mode is enabled, the shutter button triggers a 10-second countdown.

Zoom Ring: Encircling the end of the lens barrel, this notched ring controls the 10x optical zoom. The zoom directions are marked on the side of the lens: One tree for telephoto and three trees for wide-angle. You can activate the Digital Zoom through the Record menu by choosing either 2x or 4x, or by turning past the telephoto range while pressing the Set button. Turn the ring one time for 2x or two times for 4x Digital Zoom. Holding down the Set button and turning the ring back toward the wide-angle setting turns the Digital Zoom off.
Jump Button: Located on the camera's top panel, this button activates the Jump feature in Playback mode, which displays the Jump bar on the LCD screen (pressing the right and left arrow buttons "jumps" ahead or behind nine images).

Index View Button: Just below the Jump button, this button enables and disables the nine-image thumbnail index display in Playback mode. In Record mode, when the LCD monitor is folded back against the camera body, this button switches the viewfinder display back and forth between the small viewfinder LCD and the larger LCD monitor.

Metering / Enlarge Button: The button below Index View is the Metering / Enlarge button. It cycles between Spot and Center-Weighted Averaging metering systems in Record mode, and in Playback mode, enlarges the currently displayed image to 2.5x or 5x when pressed sequentially. (Once the image is enlarged, you can scroll around inside it with the arrow buttons.) A third press of the button displays the captured image full screen.

Continuous / Self-Timer / Wireless Remote: Located below the small status display panel on top of the camera, this button cycles between Continuous Shooting, Self-Timer / Wireless Remote, and normal shooting modes.

Flash Button: Positioned on the side of the lens barrel, just beneath the pop-up flash compartment, this button controls the flash operating mode. Pressing the button sequentially cycles through the Auto, Red-Eye Reduction Auto, Red-Eye Reduction On, On, and Off modes. If the pop-up flash is closed, the camera will automatically open it once the shutter button is depressed halfway in any flash mode except Off. (Note: Auto and Red-Eye Reduction Auto options are not available in Program, Aperture Priority, Shutter Speed Priority, or Manual modes.)

Manual Focus (MF) Button: To the right of the Flash button on the lens barrel, the MF button places the camera in Auto or Manual Focus modes. Holding the button down and pressing the up and down arrow buttons manually adjusts the manual focus. A second press of the button returns the camera to standard autofocus mode. If the MF button is pressed quickly while the shutter button is halfway pressed, it locks focus, allowing the user to recompose the shot without holding down the shutter button.
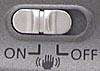
Image Stabilizer Switch: Directly to the right of the MF button on the lens barrel, this sliding switch turns the Image Stabilizer function on or off.

Main Dial: Also on the lens barrel side of the camera, this notched dial is under the Mode dial, and controls the camera's operating mode, with the following options:
 PC Connection: This option enables the camera to connect to and communicate with a computer for downloading images.
 Replaying (Playback) Mode: The Replaying option displays captured images on the memory card one at a time or in Index format, with options to protect, erase, or set them up for printing.
 Off: Turns the camera off.
 Shooting (Record) Mode: Sets up the camera for recording images.
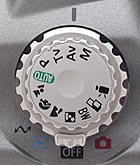
Mode Dial: Stacked on top of the Main Dial, the Mode Dial is also notched for easy turning. The Mode Dial controls the following camera exposure modes:
 Movie:
Records moving images with sound.
Movie:
Records moving images with sound.
 Stitch Assist:
Captures a series of images to be "stitched" together on a computer
into a panoramic or large square photograph.
Stitch Assist:
Captures a series of images to be "stitched" together on a computer
into a panoramic or large square photograph.
 Black and
White: Captures images in black-and-white monotones.
Black and
White: Captures images in black-and-white monotones.
 Night Scene:
Uses a slow shutter speed to capture night and twilight scenes, and can be
used with flash for night portraits.
Night Scene:
Uses a slow shutter speed to capture night and twilight scenes, and can be
used with flash for night portraits.
 Landscape:
Employs a small aperture to increase the depth of field, keeping both the
foreground and background in focus.
Landscape:
Employs a small aperture to increase the depth of field, keeping both the
foreground and background in focus.
 Portrait:
Uses a large aperture to decrease the depth of field, so a sharply focused
subject in front will be set against a blurred background.
Portrait:
Uses a large aperture to decrease the depth of field, so a sharply focused
subject in front will be set against a blurred background.
 Pan Focus:
Fixes the focus for faster shooting.
Pan Focus:
Fixes the focus for faster shooting.
 Auto:
Places the camera in complete automatic exposure control. The user controls
only flash mode, resolution, compression, and the self-timer / continuous
shooting modes.
Auto:
Places the camera in complete automatic exposure control. The user controls
only flash mode, resolution, compression, and the self-timer / continuous
shooting modes.
 Program AE:
Gives the user control over all exposure variables, with the exception of
shutter speed and aperture.
Program AE:
Gives the user control over all exposure variables, with the exception of
shutter speed and aperture.
 Shutter Speed
Priority: Allows the user to set the shutter speed, from 1/1,000 to eight
seconds, while the camera selects the best corresponding aperture.
Shutter Speed
Priority: Allows the user to set the shutter speed, from 1/1,000 to eight
seconds, while the camera selects the best corresponding aperture.
 Aperture Priority:
Lets the user control the lens aperture, from f/2.8 to f/8.0, while the camera
sets the shutter speed.
Aperture Priority:
Lets the user control the lens aperture, from f/2.8 to f/8.0, while the camera
sets the shutter speed.
 Manual:
Provides the user with full control over all exposure variables.
Manual:
Provides the user with full control over all exposure variables.

Diopter Adjustment Dial: Hidden beneath the viewfinder eyepiece, this tiny dial adjusts the focus of the viewfinder to accommodate eyeglass wearers.

"*"/AE Lock / FE Lock Button: Located to upper right of the LCD monitor and marked with an astrix "*" symbol, this button controls Exposure and Flash Exposure Lock. In Program AE, Shutter Speed Priority, or Aperture Priority modes, pressing this button locks the exposure reading for the image, and it will stay locked until the button is pressed again, or the shutter button is fully depressed. If the flash is set to Auto or Red-Eye Reduction Auto, it locks the exposure for the flash. Once pressed, the flash fires a small pre-flash to judge the correct exposure reading, and retains the information for the exposure. In both cases, the exposure is based on the center of the image. In any Record mode, pressing this button while the post-capture image preview is still displayed allows you to delete the displayed image. When the Custom White Balance option is selected, pressing this button sets the current white value. In Playback mode, pressing this button pulls up the Erase sub-menu for the currently displayed image.
![]()
Exposure Compensation / WB (White Balance) / AEB (Auto Exposure Bracketing / Flash Exposure Compensation Button: Directly below the "*" button, this button is marked with four symbols, one for each of its functions. In all exposure modes except for Auto and Manual, one press of this button pulls up the Exposure Compensation adjustment bar, which adjusts the exposure from -2 to +2 exposure equivalents (EV) in one-third-step increments. In all exposure modes except Black and White and Auto, a second press of this button pulls up the White Balance menu, with options for Auto, Daylight, Cloudy, Tungsten, Fluorescent, Flash, and Custom. In Program AE, Shutter Speed Priority, and Aperture Priority exposure modes, pressing this button three times enables the Auto Exposure Bracketing mode, which takes a series of three images at different exposure levels (one at the current setting, one overexposed, and one underexposed). An exposure adjustment bar allows you to control the exposure variation from -2 to +2 EV in one-third-step increments. Finally, in all exposure modes except for Auto, Movie, and Manual, pressing this button four times pulls up the Flash Exposure Compensation bar, which varies from -2 to +2 EV in one-third-step increments.

Display Button: Adjacent to the lower right corner of the LCD monitor, this button controls the information display on the LCD monitor and smaller viewfinder in both Record and Playback modes. In Record mode, the button switches between no information and a detailed information display, which reports camera and exposure settings. In Playback mode, when a single image is displayed, this button cycles between the simple display (limited information such as file name, date, and image quality), detailed information (exposure settings), and no information display. Pressing this button in Index Display mode cycles between limited information and no information.

Four-Way Arrow Rocker Button: Located on the very top right side of the back panel, this button features four arrows, one in each direction (up, down, left, and right). In any camera menu, these arrows navigate through menu options and settings. In Aperture and Shutter Speed Priority modes, the left and right arrows control the exposure variable. In Manual exposure mode, the left and right arrows control shutter speed, while the up and down arrows adjust the lens aperture. In Playback mode, the left and right arrows scroll through captured images, either in single or index display mode.

Set Button: Just below the arrow rocker button, the Set button confirms menu choices in any settings menu. In Playback mode, pressing the Set button begins movie playback. In Record mode, pressing the Set button while turning the zoom ring beyond the optical telephoto limit enables the digital telephoto mode and enlarges the image by 2x or 4x. Holding down the Set button and turning the ring back toward the wide angle setting turns Digital Zoom off.

Menu Button: To the right of the Set button, the Menu button displays the settings menu in any Record mode as well as in Playback mode. Pressing the button a second time dismisses the menu display.

Follow Imaging Resource: