The Imaging Resource
Quick Review
Toshiba PDR-3310 Digital Camera
(By Stephanie Boozer.)
 |
Camera QuickLook | |
|
Review Date |
|
|
|
User Level |
|
|
|
Product Uses |
|
|
|
Digicam Design |
|
|
|
Picture Quality |
Good, 3.2-megapixel CCD | |
|
Print Sizes |
4x6, 5x7 inches | |
|
Availability |
Now | |
| Suggested Retail
Price |
|
|
|
||||||||||
Introduction
A leader in both the computing and digital imaging industries, Toshiba America
introduced its first digital still camera in 1996. The PDR-2 revolutionized
consumer digital photography by offering the first PC Card interface, a low-power
CMOS chip for image capture, and an interface specifically designed for use
with Toshiba's popular laptop computers. The company is also known for inventing
the SmartMedia flash memory card, one of the most popular in-camera storage
formats in the digicam industry, and the FlashPath card adapter, which enables
users to read SmartMedia cards directly from a computer's 3.5-inch floppy drive.
Currently, Toshiba offers a wide range of digicam models, generally concentrating
on offering high value and rich feature sets at affordable prices. The subject
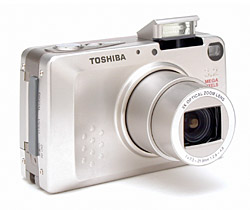
of the current review is the PDR-3310, a very stylish three megapixel camera
in a rugged, compact, all-metal body. While the build quality appears very high
though, I was less impressed with the 3310's performance. It's certainly a serviceable
camera with a good range of capabilities, but I didn't feel it came up to the
image-quality standard of other three megapixel cameras. Read on for all the
details...
Small in stature but big on features, Toshiba's PDR-3310 ranks among the smallest digicams currently on the market. Neat and trim, the PDR-3310 is small enough for shirt pockets and small purses, and has a low-profile front that glides into pockets easily. The camera fits well into one hand, and comes with a wrist strap. The two-toned silver body is largely covered with thin aluminum panels, which keep it light weight and portable, as well as rugged. Body design and feature setup are virtually identical to the Kyocera S4, to the extent that the 3310 looks like a rebadged S4 with a 3.2 megapixel CCD in it. Like the S4, the PDR-3310 features automatic exposure control with a handful of manual adjustments available. The PDR-3310's 3.2-megapixel CCD delivers moderately high-quality images, which can be printed as large as 5x7 inches with good detail. A smaller resolution setting creates images better suited for email distribution to family and friends.
Equipped with a 7.3-21.9mm lens, which is equivalent to a 35-105mm lens on a 35mm camera, the PDR-3310 features true, 3x optical zoom. Maximum aperture ranges from f/2.8 to f/4.8, depending on the zoom setting, and remains under automatic control most of the time. Through the Manual exposure menu, you can manually set the aperture to f/2.8 or f/9.6, but nowhere in between. (The camera appears to have only two aperture settings.) Focus ranges from 1.96 feet (60 centimeters) to infinity in normal AF mode, and from 6.69 to 23.6 inches (17 to 60 centimeters) in Macro mode. A manual focus mode option is available, though the PDR-3310's non-numeric distance readout on the LCD monitor makes it a difficult to accurately gauge focus, and there are only 7 separate focus positions. The image in the LCD monitor doesn't enlarge, so it's hard to know whether or not you have a tight lock on focus. Still, I always appreciate the option for manual focus control, especially in low-light shooting situations. A Landscape mode sets focus at Infinity, for shots of expansive scenery. In addition to the 3x optical zoom, the PDR-3310 also features as much as 2x digital zoom. Remember though, that digital zoom decreases the overall image quality because it simply enlarges the center pixels of the CCD image, and shouldn't be relied on for sharp details and high image quality. For composing shots, the PDR-3310 has both a real-image optical viewfinder and 1.5-inch polysilicon, TFT, color LCD monitor. The LCD monitor's information display includes basic camera information, such as the shooting mode and image quality setting, as well as the current image capacity of the memory card. A set of focus/exposure brackets is in the center of the display, for lining up shots. Both optical and LCD viewfinder displays are a little tight, the optical finder showing about 87% of the image area, and the LCD about 92%. (I really like to see 100% accuracy for LCD viewfinders, so the 3310 could use a little improvement in that area.)
The PDR-3310 offers automatic exposure control, as well as a handful of manual adjustments for extra flexibility. Through the LCD menu, the Manual menu option calls up a sub-menu of exposure options. An AE Mode setting lets you choose between Program and two aperture settings, and a Long Exposure mode offers two-, four-, and eight-second exposure times. In all other cases though, shutter speed and aperture remain under automatic control. The PDR-3310's full shutter speed range extends from 1/2,000 to eight seconds, though the two-second and longer times are only available in Long Exposure mode. The PDR-3310 employs a Multi-Area Evaluation metering system by default, which divides the image area into sections to determine the best overall exposure. Through the LCD menu, Spot and Center-Weighted options are also available. You can adjust the overall exposure from -2 to +2 exposure equivalents (EV) in one-third-step increments, also through the LCD menu. ISO sensitivity options include Standard (100 equivalent), as well as 2x and 4x settings to increase low-light shooting performance. White balance options include Auto, Daylight, Tungsten, Cloudy, Fluorescent, and Preset (manual setting), for a range of light sources. There's also a Color mode with options for capturing images in black-and-white or sepia tones. The camera's built-in, pop-up flash automatically flips up when the camera is powered on, and operates in either Auto, Red-Eye Reduction Auto, Fill-In, Flash-Off, or Red-Eye Reduction Forced modes. The Flash button cycles through each mode, and an icon appears on the LCD display indicating the selection.
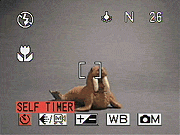
The PDR-3310 also features a Movie mode, accessed through the Quality setting of the LCD menu, which records as much as 15 seconds of moving images (without sound) per clip. Movies are recorded at a 320 x 240-pixel resolution, and the actual amount of recording time depends on the available memory card space. (Never longer than 15 seconds per clip, but possibly shorter if your memory card is almost full.) For self-portraits or timed shots, the PDR-3310's Self-Timer counts down from either two or 10 seconds between the time the Shutter button is fully pressed and when the shutter fires. The Self-Timer setting in the LCD menu cycles between the two countdown times, and the normal exposure mode.
The PDR-3310 stores images on SD-type memory cards, and comes with a 16MB card. I highly recommend picking up a larger memory card, given the PDR-3310's 2,048 x 1,536-pixel maximum resolution, as SD cards are now widely available in capacities as large as 128MB. The camera utilizes either a lithium-ion battery pack or the AC adapter for power, both of which come with the camera. The included AC adapter acts as an in-camera battery charger as well. Since the PDR-3310 doesn't have any AA-type battery capability, I strongly advise getting an additional battery pack, and keeping it freshly charged and on-hand. (The 3310 has rather short battery life, see the Picky Details page for the specifics.) The PDR-3310 will automatically shut itself down after a small period of inactivity, which can be set through the Set-up menu to one, two, or three minutes. (You can also turn the power save function off.) The PDR-3310 features a USB jack for downloading images to a computer, and comes with the appropriate cable, as well as drivers and Image Expert software on a CD-ROM (compatible with Windows and Macintosh operating systems). For connecting to a television set, the PDR-3310 has a Video Out jack and comes with a video cable. (You can set the video mode to PAL or NTSC through the Setup menu.) The PDR-3310 is DPOF (Digital Print Order Format) compatible, with a handful of print settings available in Playback mode.
Basic Features
- 3.2-megapixel CCD delivers image resolutions as high as 2,048 x 1,536 pixels.
- 1.5-inch color LCD monitor.
- Real-image optical viewfinder.
- 3x, 7.3-21.9mm lens (35-105mm 35mm lens equivalent), with maximum aperture from f/2.8 to f/4.8.
- 2x digital zoom.
- Automatic exposure control, with Long Exposure mode for exposures as long as eight seconds.
- Full shutter speed range from 1/2,000 to eight seconds.
- Multi-Area Evaluation, Spot, and Center-Weighted metering modes.
- ISO rating of 100, with 2x and 4x adjustable settings.
- Built-in flash with five operating modes.
- Adjustable white balance with six modes, including a manual setting.
- SD-type memory card storage.
- Power supplied by rechargeable lithium-ion battery pack or AC adapter, both included.
Special Features
- Movie (without sound) recording mode.
- Adjustable Color mode, with black-and-white and sepia settings.
- Two- and 10-second Self-Timer.
- Manual focus option.
- Landscape (infinity) and Macro focus modes.
- DPOF (Digital Print Order Format) compatibility.
- USB cable for connection to a computer.
- Software CD with interface software and USB drivers.
- Video Out jack for connection to a television set.
Recommendation
With the PDR-3310's mostly automatic exposure control, the camera is a good option for novice consumers who want to let the camera do all the work. However, the availability of two specific aperture settings, as well as three long exposure shutter times provides some options for those who want just a little more control. Likewise, the ability to manually adjust white balance and increase the ISO sensitivity makes the camera flexible for more difficult shooting situations. The 3.2-megapixel CCD captures a fair amount of detail, meaning you can print your snapshots as large as 5x7 inches with good quality, wlthough 8x10s would be somewhat soft. The PDR-3310's small, compact design is excellent for travel and inconspicuous shooting, as the low-profile camera can be slipped into a pocket quickly when on the go. The user interface is fairly uncomplicated, so shouldn't require much of a learning curve to master. The PDR-3310 is a solid 3.2-megapixel compact camera, suitable for novices or advanced users looking for a go-anywhere camera. It does look like you trade off some image quality for the small dimensions though, as other 3-megapixel cameras on the market deliver sharper images.
Tiny and light weight, the PDR-3310 definitely ranks among the smaller digicams I've seen, with an appearance and setup virtually identical to the Kyocera S4. Measuring just 3.6 x 2.2 x 1.2 inches (91 x 57 x 31.5 millimeters), the PDR-3310 easily fits into shirt pockets and small purses. Additionally, the telescoping lens retracts almost flush with the camera front, keeping the front profile fairly smooth. The camera's wrist strap is great when holding the camera in-hand, but I'd recommend a small camera bag for better protection when travelling. An all-plastic body keeps the PDR-3310 very light weight, at just 6.2 ounces (175 grams), without the battery or memory card.
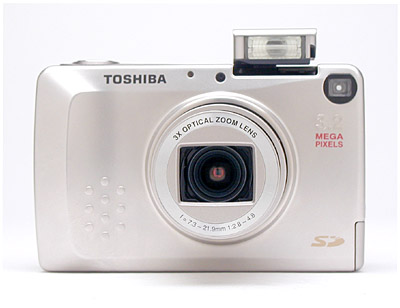
The PDR-3310's front panel is almost smooth with the lens retracted, leaving just a small protrusion around the outside ring of the lens barrel, and a slight bulge on the right-hand side of the camera (as viewed from the back) to form a subtle hand grip. A protective shutter automatically opens when the camera is powered on, as the lens telescopes outward (thus eliminating the need for a lens cap). The camera's pop-up flash also automatically opens when the camera is powered on, making the flash visible from the front. (The flash closes itself as well, whenever the camera is shut off.) Below the flash compartment and to the right is the front of the optical viewfinder window. On the opposite side of the flash compartment are the camera's light sensor and the Self-Timer LED lamp.
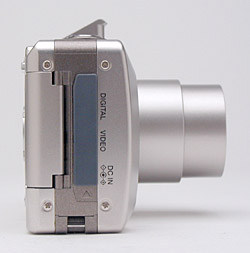
The right side of the PDR-3310 (as viewed from the rear) holds the connector compartment, protected by a flexible, rubbery flap that remains tethered to the camera at the top. Beneath the covering are the Digital (USB), Video, and DC In connector jacks. Directly below the connector compartment is an eyelet for attaching the wrist strap. Also on this side of the camera is the SD memory card slot, which opens from the back panel. The hinged door is released by a button on the back panel before swinging open to reveal the card slot.
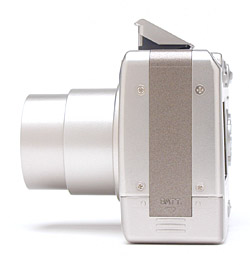
The only feature on the PDR-3310's left side is the battery compartment, covered by a locking plastic door. The door slides downward before opening, and snaps back into place securely to close (the pressure from the door locks the battery into position).
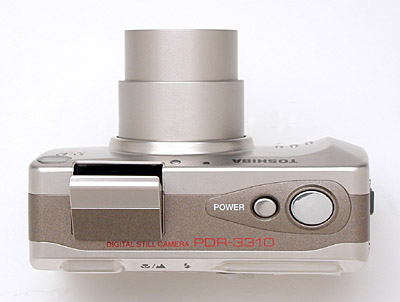
The Shutter and Power buttons share the PDR-3310's top panel with the pop-up flash.

The majority of the PDR-3310's controls are on the back panel, along with the LCD monitor and optical viewfinder. A set of LED lamps next to the optical viewfinder eyepiece report camera status, such as when focus and exposure are set, the battery is charging, or the flash is charging. The viewfinder eyepiece is very small, with a somewhat low eyepoint, which might make it difficult to use for people with thick eyeglasses. I could only see the full view from a short distance, and would recommend that eyeglass wearers use the LCD monitor for the most accurate framing. Lining the top of the back panel are the Macro/Landscape, Flash, and Zoom buttons, as well as a Mode switch that controls the camera's main operating mode. A Four Way Arrow pad in the center of the back panel controls a variety of functions, with an OK button in the center to confirm camera settings. Also on the back panel are the SD compartment release lever, and Menu and Display buttons.
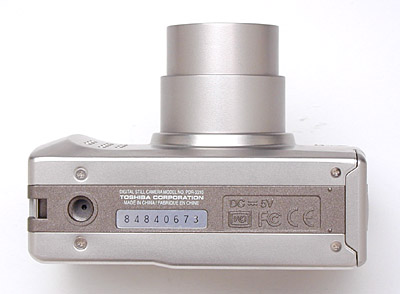
Finally, the PDR-3310 has a fairly flat bottom panel, with just the plastic-threaded tripod mount on the far left side (in this view anyway, actually the right side of the camera). The position of the tripod mount could potentially make for a slightly tilted connection on some tripod heads, which could easily be fixed by adjusting the tilt of the tripod head itself.
Camera Operation
The PDR-3310 operates mainly under automatic exposure control, but an on-screen LCD menu system offers a handful of exposure options. A few camera settings feature external controls, such as flash, Macro mode, zoom, and the main camera mode, but the remaining settings rely on the LCD menu system. The LCD menu system itself is simple to navigate however, as a set of menu options appear along the bottom edge of the display, and the arrow keys navigate the choices. You have to press the OK button to actually change and cycle through settings, which seemed somewhat strange at first. However, once I got the hang of the camera's operation, changing settings was a breeze. The only two-page menu is under the Manual settings option, but is fairly straightforward as well. With the instruction manual in-hand, I'd estimate the better part of a half-hour to get familiar with the camera.
External Controls

Shutter Button: This large, silver button on the top panel sets focus
and exposure when halfway pressed, and fires the shutter when fully pressed.
![]()
Power Button: On the left side of the Shutter button, this smaller silver
button turns the camera on or off (triggering the pop-up flash to open and the
lens to telescope forward when the camera is powered on).

Macro / Landscape Button: Directly to the right of the optical viewfinder
eyepiece on the camera's back panel, this button alternates between the normal
AF mode, Macro mode, and Landscape mode (which sets focus to infinity).

Flash Button: Adjacent to the Macro / Landscape button on the right,
this button cycles through the available flash modes:
- Auto: Lets the camera control when to fire the flash, based on the existing lighting conditions and whether or not the subject is backlit.
- Red-Eye Reduction Auto: Keeps the camera in control over when to fire the flash, but pops a small pre-flash before firing the flash at full power, to eliminate the Red-Eye effect in the subject's pupils.
- Fill-In Flash: Fires the flash with every exposure, regardless of lighting conditions. (Handy for backlit subjects.)
- Forced Off: Completely disables the flash.
- Red-Eye Reduction Forced: Fires the Red-Eye Reduction pre-flash with every exposure.

Mode Switch: Next in line to the right of the Flash button, this switch
controls the camera's main operating mode:
 Setup: Displays the
camera's Setup menu on the LCD, which adjusts basic camera settings.
Setup: Displays the
camera's Setup menu on the LCD, which adjusts basic camera settings.
 Playback: Lets the
user review captured images and movies on the SD card.
Playback: Lets the
user review captured images and movies on the SD card.
 Record: Sets up the
camera to record still images and movies, with a handful of exposure options
available.
Record: Sets up the
camera to record still images and movies, with a handful of exposure options
available.
![]()
Zoom Controls: These two buttons are in the top right corner of the back
panel, and control the optical and digital zoom while the camera is in Record
mode.
In Playback mode, these buttons control the digital enlargement of captured images, as much as 2x.
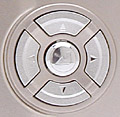
Four Way Arrow Pad: Located in the center of the back panel, these four
buttons are arranged in a circle, with an arrow pointing in each direction.
In all mode menus, the arrow keys navigate through menu selections.
In Record mode, when manual focus is enabled, the right and left arrows control the focus setting. The down arrow dismisses the information display on the LCD monitor, as well as recalls it.
In Playback mode, the left and right arrows scroll through captured images on the card. When an image has been digitally enlarged, the arrow keys move around within the enlarged view. The up arrow displays and dismisses an information screen about the currently-displayed image.
OK Button: Positioned in the center of the Four Way Arrow pad, this button confirms menu selections. It also scrolls through the available options for each menu setting, when pressed repeatedly.
In Record and Playback modes, pressing this button outside of the menu system displays the LCD brightness adjustment screen.
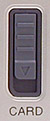
SD Card Release Lever: All the way on the far right of the rear panel, this
sliding lever releases the SD compartment door.

Menu Button: At the bottom of the rear panel, this button displays the settings
menu in both Playback and Record modes. It also dismisses the menu display.

Display Button: To the left of the Menu button, this button cancels and
recalls the LCD display entirely in Record mode.
Camera Modes and Menus
 Record
Mode: Designated on the Mode switch by a small camera symbol, this mode
sets up the camera for capturing still images. Pressing the Menu button pulls
up the following settings menu:
Record
Mode: Designated on the Mode switch by a small camera symbol, this mode
sets up the camera for capturing still images. Pressing the Menu button pulls
up the following settings menu:
- Self-Timer: Offers two- and 10-second self-timer modes, or returns to the normal capture mode.
- Quality / Movie: Cycles between the available image resolutions and Movie mode. Still image resolution choices are: Super Fine (2,048 x 1,536 pixels), Fine (2,048 x 1,536 pixels), Normal (1,024 x 768 pixels). Movie resolution is 320 x 240 pixels.
- Exposure Compensation: Increases or decreases the overall exposure from -2 to +2 EV in one-third-step increments.
- White Balance: Offers Auto, Daylight, Tungsten, Cloudy, Fluorescent,
and Preset (manual) white balance settings.
 Set
Details: Displays the following sub-menu:
Set
Details: Displays the following sub-menu:
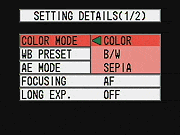
- Color Mode: Records images in Color, Black-and-White, or Sepia tones.
- WB Preset: Adjusts the manual white balance setting, based on a white card placed in front of the camera lens.
- AE Mode: Sets the exposure control to Program, and offers f/2.8 or f/9.6 aperture settings.
- Focusing: Places focus control under Automatic or Manual modes.
- Long Exposure: Offers two-, four-, and eight-second shutter times, or deactivates the mode.
- Sensitivity: Sets the camera's ISO sensitivity to Standard (ISO 100), or to 2x or 4x settings.
- Metering: Controls the camera's exposure metering mode. Options are Evaluation, Spot, and Center-Weighted.
- Record Review: Turns the instant image review function on or off.
- Digital Zoom: Activates or deactivates the 2x digital zoom.
 Playback
Mode: This mode lets you review captured images on the memory card, as well
as erase them, write-protect them, or set them up for printing on a DPOF device.
Menu options in this mode include:
Playback
Mode: This mode lets you review captured images on the memory card, as well
as erase them, write-protect them, or set them up for printing on a DPOF device.
Menu options in this mode include:
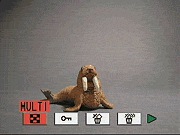
- Multi: Shows an index display of all images on the SD memory card, six images at a time. Also switches back to Single display mode.
- Protect: Write-protects the currently-displayed image, preventing it from being erased or manipulated (except via card formatting). This option can also remove protection.
- Erase: Deletes the current image from the memory card.
- Erase All: Erases all images from the memory card, except for write-protected images.
- Rotate: Rotates the displayed image in 90-degree increments in either direction.
- Auto Play: Enables an automatic slide show playback of all images on the memory card. You can adjust the interval and starting frame.
- Print: Displays the DPOF settings options, which let you set the number of prints to be made, designate an index print, or reset all print settings.
- Trimming: Crops the current image and saves it as a lower-resolution image. You can select the full image, or zoom in 2x or 4x, and pan the zoomed area around the image to select the portion you want to crop out. Once selected, you can choose to save the cropped image at resolutions of 320x240 or 160x120. Trimmed images are stored in a separate folder on the memory card, and are only viewable on the camera's LCD by using the "Trimmed Image Playback" option on the Trimming menu.
 Setup
Mode: This mode automatically displays the following camera settings:
Setup
Mode: This mode automatically displays the following camera settings:
- Date: Sets the camera's internal calendar and clock, as well as the display format.
- Format: Formats the SD memory card, erasing all files, even write-protected ones.
- Beep: Turns the camera's beep sounds on or off.
- Power Save: Turns off the Power Save function, or sets the time period to one, two, or three minutes.
- Mode Lock: Activates the Mode Lock function, which saves the current exposure settings whenever the camera is powered off, so that they are instantly recalled when the camera is switched back on.
- Language: Sets the camera's menu language to Japanese, English, French, German, or Spanish.
- Video Out: Establishes the Video Out signal as NTSC or PAL.
- File Number: Resets the file numbering for new SD cards.
- Mode Reset: Returns all camera settings to their defaults.
- Color Select: Designates the display color of selected menu items. Choices are Purple, Red, Yellow, or Blue.
Test Images
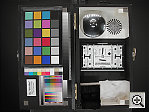
See our sample pictures and detailed analysis here.
The thumbnails below show a subset of our test images. Click on a thumbnail
to see the full-size photo.
 |
 |
 |
| |
|
|
|
|
|
|
| |
|
|
|
|
|
|
| |
|
|


See camera specifications here.
Cycle times, shutter lag, battery life, etc. can be found here.
- Toshiba PDR-3310 user reviews on PriceGrabber.com
- Toshiba PDR-3310 user reviews on PC PhotoREVIEW
Test Results
- Color: The PDR-3310 produced pretty good color throughout most of our testing, although skin tones in outdoor shots looked a little pink. Color saturation was a little low in most shots, but well within the acceptable range. The 3310's manual white balance did a very good job with the tough incandescent lighting of the Indoor Portrait test, while the Auto white balance setting worked well under other conditions. Color accuracy was generally good, apart from purplish tints in the blue flowers of the indoor and outdoor portrait tests. (This particular color seems to confound about 70% of the cameras I test.)
- Exposure: The PDR-3310's metering system was generally fairly accurate, although it tended toward slight overexposure in several of my standard test shots. This led to slightly washed out color in several of the tests. On the other hand, it did require some positive exposure compensation on both the outdoor and indoor portrait tests. The camera's images are slightly contrasty, although this only seemed to be a problem when I was shooting under very contrasty lighting.
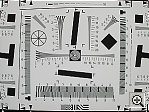
- Resolution/Sharpness: Image sharpness was below average for a 3.2-megapixel camera, although the 3310 seemed to capture a fair amount of detail. Random details such as the fine foliage in the House and Far-Field Test were very soft, as were the rounded details in the Macro and Musicians targets. (Linear, vertically or horizontally oriented details seemed a bit sharper.)
- Closeups: The PDR-3310 performed well here, capturing a minimum area of 2.5 x 1.9 inches (63.8 x 47.9 millimeters). Resolution was moderately high, with a lot of fine detail visible in the dollar bill, coins, and brooch. Corner softness wasn't too bad, and details were reasonably sharp throughout the frame.
- Night Shots: Thanks to its long-shutter mode, the PDR-3310 can capture good-looking photos under very dark conditions. (As low as 1/16 foot-candle, much darker than standard city street-lighting.) Noise levels are fairly high though, particularly at the longest exposure times.
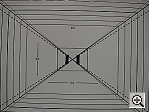
- Viewfinder Accuracy: The PDR-3310's optical viewfinder is a little tight (albeit slightly more accurate than average), showing about 87 percent of the frame at both wide angle and telephoto lens settings. The CCD must have been shifted slightly in our evaluation unit, as both images framed with the optical viewfinder are slanted toward the lower right corner. The LCD monitor was only slightly more accurate, showing approximately 92 percent of the frame at wide angle and approximately 93 percent at telephoto. Since I generally prefer LCD monitors to be as close to 100 percent accuracy as possible, the PDR-3310 has some room for improvement here.
- Optical Distortion: Optical distortion on the PDR-3310 is higher than average at the wide-angle end, where I measured a 0.87 percent barrel distortion. The telephoto end fared only a little better, as I measured a 0.62 percent barrel distortion there. Chromatic aberration is moderate, showing about three to four pixels of coloration on either side of the target lines. (This distortion is visible as a very slight colored fringe around the objects at the edges of the field of view on the resolution target.) I also noticed slightly soft corners in some shots, but the effect wasn't too strong.
- Battery Life: The PDR-3310 runs from a very small custom LiIon rechargeable battery, and has rather short battery life as a result. Worst case run time with the LCD turned on in capture mode was only about 60 minutes, increasing only to 90 minutes when the LCD was turned off. While most compact cameras have limited battery life, the 3310 is at the shorter end of the range. Definitely plan on purchasing a spare battery when you buy the camera.
In the Box
The PDR-3310 arrives with the following items:
- Hand strap.
- AC adapter.
- Lithium-ion battery pack.
- Video cable.
- USB cable.
- 16MB SD memory card.
- Software CD-ROM.
- Instruction manual and registration kit.
- Large capacity SD memory card.
- Additional lithium-ion battery pack.
- Soft case for travel.
With its tiny size, very light weight, and rugged mostly-metal body, the Toshiba PDR-3310 is definitely travel worthy. Exposure control is mainly automatic, good for novices, but some expanded exposure options provide additional flexibility and creativity. With a 3x zoom lens, the PDR-3310 is a versatile camera, and the 3.2-megapixel CCD captures reasonably good-quality images. The PDR-3310's adjustable ISO and Long Shutter times extend the camera's low-light shooting capabilities, and the availability of black-and-white and sepia shooting modes is fun. There's a price to pay for the compact size though, in the form of images with approximately the level of a good 2-megapixel camera, rather than the 3.2-megapixels the 3310 actually posesses. Battery life is also rather short. If you need a compact, ruggedly-constructed digicam, and don't do a lot of photo printing at sizes larger than about 5x7 inches, the PDR-3310 could be a good choice.
- Optical Distortion: Optical distortion on the PDR-3310 is higher than average at the wide-angle end, where I measured a 0.87 percent barrel distortion. The telephoto end fared only a little better, as I measured a 0.62 percent barrel distortion there. Chromatic aberration is moderate, showing about three to four pixels of coloration on either side of the target lines. (This distortion is visible as a very slight colored fringe around the objects at the edges of the field of view on the resolution target.) I also noticed slightly soft corners in some shots, but the effect wasn't too strong.

Follow Imaging Resource: