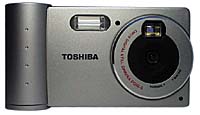
 Toshiba PDR-5 Digital Camera Second-generation, low-power, ultra-portable; now with reflective LCD & flash |
 |
|
"Super CMOS" 692 x 504 sensor |
|
|
Reflective LCD panel (no wash-out!) | |
|
|
Compact ultra-portable design | |
|
|
Ultra low power circuitry | |
|
|
Built-in flash & PC-Card adapter | |
Toshiba is one of the true giants of the electronics & computer industries,
but was a longtime holdout in the digital camera arena. Their original PDR-2
was clearly intended as a useful accessory to their powerful, cost-effective
laptop computers. The PDR-5 continues and extends that mission, adding a host
of new features. Together with the simultaneously-introduced PDR-M1 (reviewed
elsewhere on this site), Toshiba has bracketed the range of current point &
shoot digital camera technology, with strong offerings at both VGA (PDR-5) and
megapixel-plus (PDR-M1) resolution levels.![]()
Overview
If you're familiar with Toshiba's PDR-2, the PDR-5 can be described as "more
of the same (much more)." It uses a further-refined "Super-CMOS"
image sensor, actually sporting a few more pixels than appear in the final file,
with 350,000 pixels arranged in a 692x504 array, producing final images either
640x480 ("fine" mode) or 320x240 ("standard" mode) pixels
in size. The PDR-5 includes both optical and LCD viewfinders, a built-in flash,
serial digital and video outputs, and the unique flip-out PC-card interface
pioneered by the PDR-2.![]()
Design
The PDR-5 follows the tradition of the earlier PDR-2, presenting an ultra-compact
case design, with a unique built-in PC-card adapter: Unlatch the back, fold
it open, and plug the whole camera directly into the card slot on your laptop
computer! The camera will appear to the computer as another hard drive, and
you can just click and drag the image files onto your hard disk. Thanks to the
high-speed interface, it takes literally seconds to transfer a camera full of
images, rather than minutes.![]()
Design of the PDR-5's card interface was complicated by the need to provide
viewing access to the large LCD screen on the camera's back when the card adapter
is in the "closed" position. This was accomplished by including a
glass window in the back panel, through which the LCD screen is viewed during
normal operation. Ultra low-profile pushbuttons on the hinged back provide control
functions accessible on the back panel of the camera, without interfering with
the card-slot interface.![]()
At a diminutive 4.3 x 2.6 x 1.1 inches (110 x 65 x 28 mm) and 6.8 ounces
(192 gm), the PDR-5 will fit any shirt pocked easily, making it a true "road
warrior."![]()
Viewfinder
One of the most noticeable differences between the PDR-5 and its younger brother
the PDR-2 is the PDR-5's inclusion of a large (2.5 inch) LCD panel in addition
to the bright optical viewfinder.![]()
The optical viewfinder is virtually identical to that of the PDR-2, using
the light-yellow "ghost marks" to show the area captured by the image
sensor. (There's probably some industry term for this sort of viewfinder, but
we don't happen to know it: We refer to the framing guides as "ghost marks"
because they appear as a transparent overlay on the image itself.) As eyeglass
wearers, we find this type of viewfinder more difficult to use, since the position
of our eyeballs relative to the viewfinder optics is such that the framing marks
don't catch the light well. On the other hand, we can usually see the marks
in at least one corner of the frame, and can judge fairly well from there where
things will fall in the final picture.![]()
On the plus side, we found the optical viewfinder on the PDR-5 to be
noticeably more accurate than that on most digital cameras we've tested. The
framing guides in the viewfinder mark a space that's fully 92% of the area finally
captured by the image sensor. (In our viewfinder accuracy test, we were setting
the darker reference lines of our target to lie exactly underneath the framing
marks: If you were to use the inside edges of the framing guides as your reference,
the result would be more accurate still.)![]()
The LCD on the PDR-5 is in many ways the biggest news of all with the
product: It's the first reflective LCD we'd seen anywhere, let alone on a digital
camera. (Actually, the black & white LCDs commonly used for status readouts,
wrist watches, etc., are all reflective. The big news here is that this is a
continuous-tone color reflective LCD.) So what's the big deal with that? Most
color LCD screens work by affecting light shining through them, provided by
an electroluminescent "backlight." These backlights have two problems
though: 1) They burn an incredible amount of battery power. 2) They wash out
badly in bright light, due to the limited amount of light shining through them.
The reflective LCD screen in the PDR-5 completely eliminates both these problems.
Because it works by reflected light, there is NO backlight at all, meaning dramatically
lower power consumption. (Toshiba reports 1/10th the power consumption of conventional
LCD displays.) Even better, the brighter the external illumination, the brighter
the PDR-5's display is. (Only fellow digital camera "weenies" can
truly appreciate the deep satisfaction we felt when holding the PDR-5 out in
FULL SUNLIGHT, and marveling at the bright, razor-sharp image on its LCD viewscreen!)![]()
Of course, there's no free lunch, at least not when it comes to LCD panels:
The reflective LCD on the PDR-5 is always as bright as the light shining on
it, but never brighter. Thus, in a dimly-lit setting, the LCD panel can be difficult
to read, unless you have a small flashlight handy to shine on it. In practice,
it had to get pretty doggone dim before this became a problem, but a few unpleasant
words escaped our mouths while prepping our viewfinder accuracy shot, which
is taken in near-total darkness, since it's also a test of flash coverage. (This
also was where we really felt the lack of a tripod socket on the PDR-5.)![]()
For the record, when running in "viewfinder" mode, the LCD
display of the PDR-5 provides an accurate representation of the final image
area, almost exactly matching the 92% view provided by the optical viewfinder.![]()
Optics
The PDR-5 sports a fast f2.5 lens, with a focal length equivalent to a 39mm
lens on a 35mm film camera. This is a moderate wide-angle, taking in a very
slightly narrower range than the 35mm focal lengths that are more typical. (Moderate
wide-angle lenses of this type are typical for most point and shoot cameras,
whether film or digital. In most point and shoot applications, the ability to
fit more of the subject into the frame than a "normal" lens would
permit is a definite plus.) For our part, we actually prefer a slightly less
wide-angle lens like that on the PDR-5, to reduce some of the distortion encountered
in close-ups.![]()
The lens is a fixed-focus design (further reducing the already-low power
consumption of the PDR-5), with a macro mode that can be selected by sliding
a front-panel control to the "macro" position. In normal mode, it
focuses from 20 inches (50 cm) to infinity, while the macro setting covers 4
to 8 inches (10-20 cm). Despite its wide-angle lens, the macro setting allows
for fairly tight close-ups, covering an area of 3x4 inches (7.7 x 10.2 cm) at
closest approach.![]()
We found the fixed-focus lens a little "soft" at infinity,
but quite sharp at intermediate distances. Besides reduced power consumption,
another advantage of the fixed-focus design is that you never have to worry
about a lost shot because the autofocus system couldn't achieve a "lock."
(This is no small issue, as many autofocus camera owners, both film and digital,
can attest to.) The PDR-5 lens does improve on that of the PDR-2 though, by
correcting the slight light fall-off the PDR-2 showed in the corners of the
frames.![]()
The lens aperture switches between f2.5 and f5.6 as the camera's autoexposure
system (see below) sees fit. This behavior is common to essentially all low-end
digital (and most film) cameras, with the camera choosing a combination of shutter
speed and lens aperture depending on shooting conditions.![]()
Exposure
The PDR-5 is rated at an equivalent ISO speed of 100. This rating, combined
with the shutter speed range of 1/8 to 1/2,000 of a second, and the f2.5/5.6
lens should result in a range of usable illumination of EV 10.5 to EV 21. In
practice, we felt that actual performance was a bit better than this on the
low end, extending down to perhaps EV 8 or 9 with +1EV exposure compensation
dialed-in.![]()
The autoexposure system works through the lens, and so is less likely
to be affected by stray light than otherwise. Nonetheless, like all automatic
exposure systems, it will still be "fooled" by subjects with unusual
lighting (backlit subjects, light subjects against dark backgrounds, etc.) To
accommodate these situations, the PDR-5 allows you to adjust the exposure relative
to what the automatic system would select. We were a little puzzled by the PDR-5's
controls in this area though, in that the manual claims an adjustment range
of +/- 1EV, in 0.5-EV steps, but the adjustment control itself in the menu system
shows three steps on either side of zero! Either the actual range is +/- 1.5
EV, or the step size is 1/3 EV. In practice, the adjustment worked well and
allowed pretty fine control, although its range was a bit more limited than
we'd like, so our guess is that the step size is actually 1/3 EV. (For those
unfamiliar with photographic jargon, an EV-unit is equivalent to a one f-stop
change on a lens: A total change in light level of 2x up or down.) We also had
a small quibble with the placement of the EV adjustment control in the LCD menu
system, in the fourth slot down from the top: In our experience, we find ourselves
using EV compensation fairly regularly, and so like to see this control more
easily accessible.![]()
As another aid in achieving correct exposure with unevenly-lit subjects,
the PDR-5 has an exposure-lock function: When you press the shutter button halfway
down, the camera "locks-in" its exposure, based on whatever the camera
is pointed at. As long as you keep the shutter button partially depressed, this
exposure setting is maintained until you actually fire the shutter, even if
the lighting changes. This is a very useful feature, as you can aim the camera
toward an object with the same brightness as your subject to set the exposure,
and then aim back to the subject itself to take the actual exposure. In this
way, you can take shots with (for instance) the sun in a corner of the frame,
yet still get the correct exposure for your subject.![]()
MPORTANT NOTE: This is where we insert our standard tirade against camera
users attempting to hand-hold exposures at very slow shutter speeds: The 1/8th
second lower limit on the PDR-5's shutter speed can be a great help in getting
shots in conditions that would otherwise be too dark. This is a long exposure
though, well beyond most people's ability to hold the camera steady enough to
render a sharp image. Normally, we advise readers to use a tripod in dark situations,
but the PDR-5 (with its strong focus on portability) lacks a tripod socket.
In any event, if the lighting is dim, it's prudent to try to brace yourself
or the camera against something stationary while snapping the picture.![]()
White balance is another important characteristic of digital cameras:
Like most film, digital sensors lack our eyes' abilities to compensate for color
differences between different light sources: We can look at an object under
incandescent, fluorescent, or daylight, and colors will appear about the same
to our eyes. Cameras on the other hand, record exactly what they're seeing,
faithfully reproducing any color cast in the illumination. To adjust for this,
most cameras incorporate some form of "white balance" compensation,
in which the camera's circuitry tries to adjust the color balance of the captured
image to produce an overall neutral color cast. Various cameras succeed at this
to varying degrees, and none are perfect. The PDR-5's automatic white balance
capabilities appear to be very much on a par with those of other cameras on
the market, removing most of the lighting's color cast, but leaving enough behind
to convey the "feeling" of the original photo. To provide better results
in various lighting conditions, or in situations where large, strongly colored
objects might "fool" the white balance circuitry, the PDR-5 allows
you to select fixed white balance settings. The fixed settings available adjust
for incandescent, fluorescent, and daylight lighting conditions. (Our indoor
portrait test shots were captured using the "incandescent" white-balance
setting.)![]()
Like most digital cameras, the PDR-5 includes a self-timer option, to
allow the photographer to get into the picture him/herself. In self-timer mode,
the camera will wait for 10 seconds after the shutter is pressed before snapping
the picture, blinking a front-panel LED to count down the time. The self-timer
mode only stays in effect for a single shot, making sure you don't miss a shot
by inadvertently leaving the camera in self-timer mode. The only oddity about
the self-timer on the PDR-5 is that there's no way to attach the camera to a
tripod to hold it steady while you run around to get in the picture! While the
camera is strongly aimed at the "ultra portable" market, we missed
the presence of a tripod mount, and question the usefulness of the self-timer
feature without it. (Actually, if there's a conveniently-located flat surface
available, you can pop open the PC-card adapter on the camera's back and swing
it out a ways to prop the camera up with. - This actually works pretty well,
but we still would have liked a tripod mount.)![]()
VGA-resolution cameras have some decided benefits over the megapixel
monsters, one of which is drastically better "cycle time" - the time
it takes the camera to store one image and get ready to take the next one. For
the PDR-5 in "Fine" mode, picture-to-picture cycle time is only 5
seconds. (This compares to 20 seconds or more for some megapixel units.) This
is a definite plus when you're trying to capture multiple shots of a subject
in a short time period.![]()
Flash
One big difference between the PDR-5 and the earlier PDR-2 is the inclusion
of a built-in flash unit on the PDR-5. The documentation didn't specify a range
for the flash unit, but in practice, it seemed to work fine out to at least
10 feet. In typical indoor use, we found the effect of the flash fairly subtle:
The CMOS image sensor is sufficiently sensitive that well-lit indoor shots appear
to require relatively little "help" from the flash. The PDR-5's flash
incorporates an optional red-eye reduction mode, in which a pre-flash makes
the pupils of subjects' eyes close slightly before the main, picture-taking
flash fires. This reduces the amount of light reflected from inside their eyes,
reducing the dreaded "red eye" effect. Through the back-panel LCD
menu system, you can set the flash to auto mode (the default), always on, always
off, or red-eye reduction mode. We liked the fact that the camera remembered
the previous flash setting when it was powered-down, relieving us from having
to re-set it every time we powered the camera back up again. Another nice feature
of the PDR-5's flash is how well it worked in close-up shooting, "throttling
down" to produce well-exposed images, rather than obliterating the details
in a wash of light.![]()
Multi-Exposure Mode
If a shot every 5 seconds isn't fast enough for you, the PDR-5 also has a 4-shot,
"multi exposure" mode. This mode uses a special clocking of the sensor
array to capture 4 half-resolution (320x240) frames in rapid sequence, taking
about 1 second to grab all four. (The manual claimed one shot per second, but
we believe that was a typo, as the camera consistently took less than a second
to capture the four images during our tests.) The four images thus captured
are stored as a single, "tiled" image in the camera's memory, with
each shot in the sequence taking up one quadrant of the full-sized frame.![]()
Black and White Mode
A second unusual feature of the PDR-5 is its provision for black-and-white image
capture. Black & white images occupy the same space in memory as full-color
ones, but the image compression used appears to be less aggressive, making for
fewer compression artifacts. In truth, we found the quality improvement to be
subtle, but it is there if you look closely for it. (We observed it the most
clearly in the macro shots, looking at fine detail in the engraving on the dollar
bill.)![]()
Operation and User Interface
Essentially all user-interface functions on the PDR-5 are accessed via the large
LCD panel on the camera's back. Top-panel controls are limited to the power
switch, record/play selector, display (LCD) on/off toggle, and the shutter button.
On the camera's front, a small switch under the lens selects between normal
and macro operation. All other functions are accessed via the rear-panel LCD,
by pressing the "menu" button. Once within the menu system, you use
the 4-way "multi-function" switch to step between menu entries, and
to make choices for each option.![]()
Record Mode Options
The list of options available to control image capture is quite extensive, requiring
three successive screens of menus to hold them all.![]()
The first option in record mode is "erase," with menu choices
of "Last," "All," and "FMT." You select from among
these by pressing the left or right arrow buttons of the multi-function control,
and then the shutter button to perform the selected action. As you'd expect,
"Last" erases the last picture you took, displaying it first, while
"All" erases all images in the current folder (see below) as well
as the folder itself, and "FMT" reformats the SSFDC memory card.![]()
The second record-mode menu entry lets you control the on-board flash
operation. Options here include Auto, fill or force-flash (a lightning-bolt
icon), red-eye reduction mode (an eyeball icon - "eyecon"?), and off
(a lightning-bolt with a circle and bar through it).![]()
Next up is the "Mode" menu, controlling compression and recording
mode, with options "Std," "Fine," and "B/W." As
we noted earlier, the black/white mode is an interesting addition, but one that
didn't seem to dramatically affect camera resolution.![]()
The last entry on the first screen of the record-mode menu is the exposure-adjustment
control. This provides you three steps on either side of neutral to either increase
or decrease exposure relative to what the camera's automatic exposure system
would select. When you activate the exposure adjustment mode by pressing either
the right or left arrow button, the first press turns on the LCD in a "live
preview" mode, visible behind the menu entries. This through-the-lens view
responds in real time as you adjust the exposure up or down with subsequent
right/left-arrow button actuations. This control is one area in which we differ
philosophically from the PDR-5s designers: We much prefer the exposure adjustment
control to either be directly accessible from the external button controls,
or placed very high in the menu hierarchy, to facilitate rapid access. Others
may not make such extensive use of the exposure adjustment controls as we do,
but we found the number of button actuations required to access the PDR-5's
exposure adjustment control annoying.![]()
The second menu screen for record mode leads off with a "brightness"
adjustment for the LCD display. "Brightness" probably isn't an accurate
description, since the reflective display doesn't emit any light, and so can't
be "bright," but we suspect everyone will understand what we're talking
about. Similar to the exposure-adjustment control, the brightness adjustment
displays a real-time image behind the menu entries, allowing you to see the
effect of your adjustment in real-time.![]()
Next is a menu entry for enabling the "multi" mode, with choices
being "Off" or "Multi4." We described the "Multi4"
exposure mode earlier: This is how you enable it. When selected, it applies
only to the next exposure. (The camera reverts to single-frame mode immediately
after capturing the 4 images.)![]()
The next record-mode menu entry controls the self-timer. Similar to Multi4
mode, the timer setting only applies to the next picture taken: Once the exposure
has been made, the camera reverts to standard, non-delayed exposure mode.![]()
The final entry on the second screen of menu items in record mode is
simply labeled "Beep." As you would expect, it turns the soft beeps
the camera makes to acknowledge commands or announce status changes on or off.
The default for this control is "on," but the camera remembers the
prior setting even if the camera is powered down and back up again. (This is
a good idea, and one we specifically checked for: If you're trying to be stealthy
(or at least, unobtrusive), the last thing you want is for your camera to revert
to "noisy" mode when it wakes back up.)![]()
The final menu screen in record mode allows for controlling several less-commonly-needed
options, plus the camera's white-balance setting(?!). This screen provides controls
for setting the time and date, and selecting either Japanese or English for
the menu language. We found the location of the white-balance ("WH.BAL")
setting on this final menu screen very puzzling, as it is a control we find
ourselves using a fair bit in normal digicam shooting: Our experience has been
that the explicit white-balance settings of various cameras almost always produce
significantly different results than do their automatic white balance functions.
Knowing how these controls behave can be a real help in controlling your camera's
color balance under different lighting conditions. Consequently, we'd much prefer
to see this control placed higher in the menu hierarchy. Once you get there
though, the PDR-5 provides a good range of color-balance options, including
automatic, fluorescent, incandescent, and daylight. We found that the daylight
setting produced noticeably warmer color on our "musicians" shot than
did the automatic setting. As we said, experimenting with manual color-balance
settings can produce significantly better results than just relying on the camera's
automatic capabilities in this area. Even though its buried at the "far
end" of the PDR-5s menu structure, it's worthwhile to take advantage of
this feature.![]()
Playback-Mode Controls
In playback mode, the range of options available to you are somewhat smaller,
occupying only 4 screens, and overlapping somewhat with those available in record
mode.![]()
The first choice doesn't depend on the menu system at all: Pressing the
up- or down-arrow on the multi-function control displays up to 12 saved images
on the screen at a time. A "selection dot" appears on the currently-active
image, and can be moved to a different image by pressing the arrow keys on the
multi-function control pad. Pressing the shutter button brings the selected
image up full-screen. If the current folder (see below) has more than twelve
images in it, they'll be displayed on groups of twelve: Scrolling past the end
or beginning of a group will bring up the next twelve images in sequence.![]()
The playback-mode menu selection controls the slide-show option, with
"on" or "off" being the only choices. When the slide-show
is activated, the camera begins with the first image in memory, and cycles through
all available images at about five-second intervals. We found the display in
slide-show mode a trifle distracting, as all images display with an overlay
showing frame number, date and time captured, and the advice "Cancel:Menu,"
indicating that you can exit the slide show by pressing the "menu"
button. It would be nice to be able to turn off all these information displays,
to let you just see the images themselves. This very well may happen when viewed
through the external video connection, but we didn't receive the video cable
with our evaluation unit, so weren't able to test this.![]()
The second playback-mode menu option lets you zoom into an individual
image, expanding the picture so that the LCD displays only about 1/3 of it at
a time. When you enter zoom mode, you'll see a small white "cursor dot"
that's initially located in the center of the screen. Pressing the shutter button
will zoom in on the portion of the image centered on the cursor dot. Pressing
the "menu" button will zoom you back out again, allowing you to move
the cursor dot to another location. Five different "zoom locations"
are supported, corresponding to the center of the frame, and the four corners.
When in "zoom" mode, we expected to be able to move around the image
by pressing the arrow keys, but found that the only way to move to a different
part of the image was to hit the menu button, move the cursor dot, and then
zoom back in by pressing the shutter button. This wasn't too bad in practice,
but less convenient than it could have been.![]()
The final menu selection on the first playback-mode screen is a control
for LCD "brightness," identical to that we covered earlier under record
mode. The playback-mode brightness adjustment though, uses the currently-chosen
stored image as the "backdrop" example to show the effects of your
adjustments.![]()
On the second playback-mode screen, we found two mundane entries, and
one surprise: On the mundane front, controls equivalent to those available in
record mode for the beep annunciator and menu-system language are present. The
surprise was an entry titled "Folder." This function was mentioned
so briefly in the draft documentation we received with the camera that we missed
it entirely on our first read-through. It turns out the PDR-5 supports multiple
folders on-disk, sort of... We say "sort of" because there appear
to be no provisions for moving images between folders within the camera itself,
nor for creating new folders: That task is left for the host computer when the
unit is plugged into a PCMCIA card slot. Likewise, we could discover no way
to select a specific folder when capturing images: All new images default to
being stored in the highest-numbered folder. (But we're getting ahead of ourselves...)![]()
We experimented with creating folders on the camera while it was plugged
into our laptop's PC-card slot. We found that the PDR-5 is rather particular
about its folder names: Even if we adhered to the DOS all-caps, 8 character
file naming convention, the PDR-5 refused to recognize most folder names we
created. We were successful though, in having it recognize a folder name of
the same format as its default "IM01TOSH" name: Folders created on
the laptop with the same name, but differing in the numerals included (e.g.,
IM02TOSH) worked fine.![]()
Curiously though, while we could create new folders, move images around
between them with the host computer, and choose between folders for playback
purposes, the PDR-5 steadfastly refused to store captured images in any folder
other than the highest-numbered one. This seemed odd, but it appears that the
"folder" feature is primarily intended as a way of organizing images
into groups for slide-show or other display purposes.![]()
Image Storage and Interface
The PDR-5 stores images on a removable "SmartMedia" SSFDC storage
card, and comes with a 2 megabyte card as standard equipment. This is sufficient
to store about 25 "fine" resolution images, or around 50 "standard"
ones. (The manual claims 20 and 40 images respectively, but most of the shots
we took with the camera came out at about 75-80 Kbytes in fine mode, or 38-39
Kbytes in standard.)![]()
Note that the PDR-5 is designed to accept ONLY the 3 volt variety of
SSFDC cards: 5 volt cards simply won't work, although we don't know if attempting
to do so would result in any physical damage to the camera or the card.![]()
Being a newly-designed SSFDC-based camera, the PDR-5 can handle the newer
16-megabyte capacity cards, with their changed specifications. (At this writing,
many older SSFDC-based digital cameras have proven to be unable to use the high-capacity
16 megabyte cards, due to internal design changes of the cards themselves.)![]()
The SSFDC card can be removed from the camera via a bottom-mounted sliding
door: Sliding the door back reveals the card protruding slightly from a recessed
slot. Pressing the card releases a latch, allowing it to spring out for easy
access. New cards are inserted by sliding them in until they latch, and then
closing the door on them.![]()
If you have either a laptop with a PC-Card (originally called PCMCIA)
slot in it, or a PC-Card reader for your desktop computer, you won't need to
worry about any other means of connecting to the PDR-5: Like its predecessor
the PDR-2, the PDR-5 has a built-in PC-Card interface that hinges out from the
back of the camera. Data transfer speed using this card interface will be somewhat
dependent on your PC's capabilities, but the built-in card slot of most laptops
will transfer a full card of images in literally a few seconds.![]()
If you don't have a laptop, or want to interface the camera to your desktop
machine, you have two options. Unlike the earlier PDR-2, the PDR-5 includes
a serial computer interface, so you'll be able to connect it to your computer's
serial port, like most other digital cameras. We weren't able to test this capability
with our early-production test unit, as we had neither the software nor serial
cable to support it. We expect that data transfers would take about as long
as they do with most serial-connected digital cameras of similar resolution,
on the order of 10-15 seconds per image.![]()
Another option with SSFDC-based cameras is to purchase the optional "FlashPath"
floppy-disk adapter. This amazing unit looks like a floppy disk, and in fact
plugs directly into a standard PC (soon to support Mac also) floppy drive. Driver
software allows you to read and write files to and from the SSFDC card. This
method of transfer works about as fast as a typical floppy drive (no surprise
there), moving about 1.6 megabytes of data a minute on our elderly Pentium 133
Windows machine. This is considerably faster than typical serial transfers though,
making the adapter well worth its $99 street price.![]()
Video Out
Another addition since Toshiba's earlier PDR-2 camera is a video output connection
for connection to an external video monitor. Again, we weren't able to test
this function on our eval unit, as it arrived minus video cable. The provision
of a video output increases the usefulness of the camera for business purposes,
turning it into a standalone presentation machine. One note though: Given the
high cost of the lithium battery, and the likely power drain required to drive
a video output, we strongly recommend that you use the AC adapter when you're
giving a presentation!![]()
Power
Which brings us to the issue of power. The PDR-5 is powered by a CR123-type
lithium battery (1300 mAh capacity), and uses ultra low-power CMOS circuitry
(including the image sensor!) to maximize battery life. The flash and LCD panel
both consume significant amounts of power relative to the rest of the camera,
but the unique reflective LCD pioneered by Toshiba reportedly consumes only
1/10th as much power as conventional backlit LCD panels.![]()
The net of all this is that the PDR-5 should be extremely stingy in its
use of battery power. In particular, if you avoid using the flash or the LCD
panel, you should be able to get many hundreds of shots from a single battery.
Comparing this unit to the earlier PDR-2, it has a much higher-capacity battery,
and we used the CMOS-based PDR-2 to take several hundred test images on a single
battery, which still read "full" when we were done! On the downside,
you will want to be judicious in your use of the LCD and flash, because the
CR123 lithium batteries aren't cheap, typically running $6-8 apiece.![]()
Unfortunately, the evaluation unit we received had apparently suffered
some shipping damage from the time it left the Toshiba rep's hands to when it
arrived in our studio: Based on the back-panel red/green LED, it looked like
it was continuously charging the flash unit, which would have placed a very
heavy drain on the battery. This was borne out by our experience of getting
only a half-hour or so of use on a fresh battery, even if we left the LCD panel
off most of the time. (Actually, if the problem was the flash unit, the fact
that the camera ran a half hour or so with the flash charging continuously speaks
well of the efficiency of the flash circuitry, in that it only takes a few seconds
to charge the flash under normal circumstances: A half-hour of continuous charging
should correspond to hundreds of flash shots!) Toshiba has promised us a replacement
unit to re-test, as soon as they can break loose a couple of units from their
production run. Whenever we manage to re-test with a good unit, we'll update
this review, and post notices on both our news and the "new on the site"
pages.![]()
Included Software
Again, we're at a disadvantage here, as our "beta" test unit arrived
all by itself, without software, cables, etc. Toshiba tells us that the shipping
units come with software and cables to support both Mac and Windows (both '95
and '98 flavors!), welcome support for the Mac users among us. We'll update
this section of the review as well, once we get the production unit to re-test...![]()
Test Results
As with all Imaging Resource camera tests, we encourage you to let your own
eyes be the judge of how well the devices performed: Explore the links at the
bottom of this page, to see how well the Toshiba PDR-5 performed, and how its
images compare to other cameras you may be considering buying.![]()
The comments here are a summary of our more detailed analysis on
the "Pictures" page for the PDR-5: Refer
to that page for a more in-depth analysis of the test results.![]()
Overall, we found the PDR-5 produced noticeably better images than its predecessor
the PDR-2, with improved color saturation and detail. We at first judged the
camera a bit negatively due to its slight undersaturation of colors, but we
later discovered that this was a consequence of it's careful attention to capturing
a full tonal range, a more important characteristic in our view. (See our comments
on the pictures page, under the "Davebox" test shot.) We found that
the minor under-saturation was easily corrected with a simple contrast boost
in almost any image-manipulation program.![]()
Visual resolution of the PDR-5 was in-line with that of other VGA-level
cameras we've tested, at about 350-375 line pairs per picture height in both
vertical and horizontal directions. The resolution test images were noticeably
free of color artifacts at high spatial frequencies though, a plus over many
earlier devices. The outdoor "far-field" test shot showed a somewhat
softer focus at infinity, although we don't have any quantitative measurements
to give us exact numbers.![]()
Both optical and LCD viewfinders on the PDR-5 were quite accurate, showing
about 92% of the area captured by the CMOS sensor, in both vertical and horizontal
directions, with the area shown well-centered within the final image.![]()
Despite its moderately wide-angle (39mm equivalent) lens, the PDR-5 did
quite well in its macro mode, capturing a subject area 3 x 4 inches (7.7 x 10.2
cm) at closest approach. We also found that the flash worked quite well close-in,
successfully throttling its output down to a level that wouldn't wash out the
subject. (Although very light subjects did show some tendency to lose detail
at the closest macro distance.)![]()
See for Yourself!
Take a look at the test images from the PDR-5
(with extensive comments), or jump to the Comparometer(tm)
page to compare its reference images with those from other digital cameras.![]()
Conclusion
Overall, the PDR-5 performed admirably relative to its VGA-resolution competitors.
It considerably extends and enhances the capabilities and performance of the
earlier PDR-2, and would be an excellent choice for anyone seeking the ultimate
in portability and ease of interface to a notebook computer.![]()
View the data sheet for the PDR-5
View the test images from the PDR-5
Visit the Toshiba web page for the PDR-5

Follow Imaging Resource: