|
("First Look" review date: 16 February, 1999, Full Review posted 10 March, 1999) |

 |
|
1.5 Million pixel sensor |
|
|
1280 x 1024 resolution | |
|
|
3X optical zoom | |
|
|
Autofocus lens w/macro | |
|
|
Built-in flash | |
|
|
Flexible "manual" exposure mode |
Preface
Toshiba has long been a huge player in the world of computers and electronics,
and rapidly established a place for itself over the last year in the digital
camera industry. At the low end of their line, they presented users with truly
innovative VGA-resolution cameras incorporating built-in PCMCIA interfaces,
allowing the cameras themselves to be plugged directly into a laptop computer
for downloading images. At the high end, they introduced the PDR-M1 1.5 megapixel
digital camera. ![]()
The earlier PDR-M1 was a huge success, offering excellent picture quality at
a true bargain price. Not only was its price right, but it actually offered
more picture-taking control than many cameras costing quite a bit more. In fact,
we'd commented on several occasions that the only significant feature it seemed
to be missing was a zoom lens. Zoom Lens? Did someone say Zoom Lens? - Evidently,
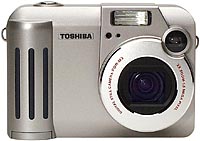
Toshiba was listening, because here comes the PDR-M3 -- In many ways the same
camera, only with a 3x optical zoom added, along with some minor but noticeable
improvements in image quality. (And as we said, the PDR-M1 already did quite
well in the image quality department!)![]()
High Points Overview
- 1.5 megapixel, 1/2 inch CCD sensor for excellent resolution
- 1280x1024, 640x480 image sizes
- 3x true optical zoom lens (35-105mm equivalent on 35mm camera)
- 2x digital zoom extends effective focal length to 210 mm equivalent
- Macro focus to 25cm
- Both optical and LCD (1.8", 70K pixel) viewfinders
- Internal 5-mode flash
- Flash modes include low-power "Ext. Sync." mode for use with external slave triggers
- 64-zone through the lens (TTL) exposure metering
- Exposure compensation of +1.5/-0.9EV for ambient illumination
- Exposure compensation of +/- 0.6EV for flash (!)
- User-selectable autoexposure program bias toward large/small aperture
- Video output (NTSC, US/Canada; PAL, European models)
- 1/4 to 1/1000 shutter speeds
- ISO 100 light sensitivity, f3.8/7.6 (wide/tele) maximum lens aperture
- Uses SmartMedia memory, comes with 4MB card
- Special LiIon battery pack, with included AC adapter/charger

EZ Print Link
Readers have requested free-formatted versions of our reviews (without the graphical
accouterments of our page design), to make printing easier. We are accommodating
this request with special copies of each review, formatted to allow the text
flow to be dictated by the browser window. Click here
for a print-optimized page.![]()
Design
The PDR-M3 is housed in an attractive, compact metallized plastic case, with
a retracting lens assembly to make the unit more compact in the "off"
state. At 4.8 x 3.35 x 2.38 inches (122 x 85 x 60 mm), and 12 ounces (340 gm)
without the battery pack, it is slightly larger than average among competing
camera models. The thickness of the body prevents it's passing the "shirt
pocket" test, being a little too large to fit comfortably into a standard
men's-size shirt pocket. It does sport a sturdy metal bracket though, to which
a wrist strap can be attached. Another touch we appreciated was the inclusion
of a metal tripod socket, a distinct rarity among even high-end digicams these
days.![]()
As with essentially every digital camera we've tested, the PDR-M3 is "right-handed,"
with most of the controls set up for use by the thumb and fingers of the right
hand. Overall, we found its design, ergonomics, and user interface to be excellent:
The camera controls and menus are very easy to navigate in normal shooting,
and even the complexity of "manual" mode was quite easy to maneuver
through.![]()
Viewfinder
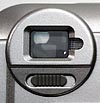
As with most digital cameras today, Toshiba has resolved the "optical vs.
LCD" viewfinder dilemma by providing both. The optical viewfinder on the
PDR-M1 is clear and bright, but crops the image relative to the CCD's field
of view somewhat more than we'd like, showing only about 80% of the area actually
captured by the camera at the wide-angle end of the lens' range, and 76% of
the final area at the telephoto end. The LCD viewfinder is much more accurate,
but still not perfect, revealing about 89% of the final image area. The area
shown by the LCD viewfinder is consistently well-centered in the actual field
of view of the sensor, as is the optical viewfinder at the wide-angle end of
the lens' range. At the telephoto end of the zoom though, the optical viewfinder
is biased slightly toward the lower right corner of the CCD's view, producing
images slightly off-center up and to the left.![]()
 Other than our complaint about excessive image
cropping in the optical finder, both optical and LCD viewfinders worked well.
The optical finder is bright and easy to use even for eyeglass wearers (a point
we're always sensitive too, belonging to that category ourselves), and dioptric
correction, shown at right, is provided that appears to span a surprisingly
broad range. (Almost enough for Dave to use minus his glasses, quite a feat
given his 20/180 vision!) The LCD finder is quite bright and sharp, with a very
high refresh rate that makes tracking even fast-moving objects quite easy. Unfortunately,
it shares the tendency to wash out in direct sunlight that we've observed in
all but a very few LCD screens.
Other than our complaint about excessive image
cropping in the optical finder, both optical and LCD viewfinders worked well.
The optical finder is bright and easy to use even for eyeglass wearers (a point
we're always sensitive too, belonging to that category ourselves), and dioptric
correction, shown at right, is provided that appears to span a surprisingly
broad range. (Almost enough for Dave to use minus his glasses, quite a feat
given his 20/180 vision!) The LCD finder is quite bright and sharp, with a very
high refresh rate that makes tracking even fast-moving objects quite easy. Unfortunately,
it shares the tendency to wash out in direct sunlight that we've observed in
all but a very few LCD screens.![]()
Besides the "live" image itself, the LCD shows a number of useful
information displays when used as a viewfinder, including data & time, current
image quality setting, digital zoom mode, and a "shake" warning when
the camera has selected a slow shutter speed, and the flash is disabled. In
"manual" mode, the current status of essentially all of the adjustable
settings are shown on the LCD, including exposure compensation, white balance
setting, flash exposure setting, and whether "synchro" mode is enabled
or not (more on this last option later).![]()
Optics
The PDR-M3 has a sharp all-glass 3x zoom autofocus lens design, with a focal
length equivalent to a 35-105mm zoom lens on a 35mm camera. (This translates
to a range from moderate wide-angle to moderate telephoto.) A 2x "digital
zoom" is also available, that crops down to the central 640x480 portion
of the sensor array. The maximum lens aperture of f/3.8-f/7.6 (wide-angle to
telephoto) is a bit "slower" than most current digital cameras, particularly
at the telephoto end of the lens' range. In operation, the lens aperture switches
automatically between the f/3.8-f/7.6 maximum opening and an f/5.5-f/11 aperture
as directed by the exposure system.![]()
 The autofocus distance for the lens ranges
from 35 inches (0.9 m) to infinity in normal mode, and from 9.75 inches (25cm)
to 35 inches in macro mode. The 105mm-equivalent telephoto performance of the
lens combines with this close-focusing to produce a very respectable macro performance.
In our tests, the minimum area covered by the PDR-M3 in macro mode was 2.9 x
3.6 inches (73 x 91 mm).
The autofocus distance for the lens ranges
from 35 inches (0.9 m) to infinity in normal mode, and from 9.75 inches (25cm)
to 35 inches in macro mode. The 105mm-equivalent telephoto performance of the
lens combines with this close-focusing to produce a very respectable macro performance.
In our tests, the minimum area covered by the PDR-M3 in macro mode was 2.9 x
3.6 inches (73 x 91 mm). ![]()
The one significant limitation we found in the PDR-M3's optical design was the
lack of filter threads for mounting external auxiliary lenses. This is unfortunate,
as the camera's excellent exposure control suits it for use by more-sophisticated
camera buffs, who frequently would want to further enhance its functionality
through auxiliary lenses. (In practice though, virtually all digital cameras
with telescoping lenses have foregone filter threads, to avoid problems with
damage to the lens mechanisms resulting from overly enthusiastic attachment
or removal of balky filters.) We did appreciate Toshiba's inclusion of a lens
cover, attached to a short tether which can be tied to the left-hand body lug
to prevent losing it.![]()
Exposure
The PDR-M3's sensor is rated by Toshiba at an official ISO equivalent of 100,
very typical for the current crop of digital cameras. The combination of a slightly
"slower" lens though, and a maximum exposure time of 1/4 seconds translates
to fairly modest low-light performance: Taking the official ISO rating, maximum
aperture, and maximum exposure time produces a minimum usable light level of
about EV 10.5. This agrees fairly well with our own testing, in which we were
able to obtain usable images down to EV10. Not to despair though, as this light
level roughly corresponds to well-lit residential interiors: Don't expect to
use this camera for outdoor shots by moonlight, but it should work reasonably
well in typical residential and office settings.![]()
The PDR-M3 uses a surprisingly sophisticated 64-segment matrix metering algorithm
that produced very good exposures under a range of conditions. (Even our tough
"outdoor portrait" shot only needed about +0.6EV of exposure compensation,
less than most cameras we've tested.) We feel the camera fits the description
of "point and shoot" very well indeed in this respect.![]()
The PDR-M3 provides an unusual degree of control over the exposure system in
several ways. One such is via an LCD menu option that lets you specify a preference
for either greater depth of field or higher shutter speed. While not quite an
aperture- or shutter-priority exposure system, this option lets you bias the
exposure program in favor of larger or smaller lens apertures, a simple yet
useful extension of the camera's automatic exposure system.![]()
Most digital cameras these days allow the user to dial-in some degree of exposure
compensation, to handle subjects with difficult lighting. (Backlit subjects,
for instance, require more exposure than the meter indicates, since it's basing
its calculation in part on the brighter background area.) The PDR-M3 goes most
of the competition a step or two better in this area though, by providing not
only a wide compensation range of +1.5 to -0.9EV in 0.3 EV steps for ambient
lighting, but a range of +/- 0.6EV in 0.3 EV steps for flash exposure as well!
This ability to adjust flash exposure is very rare in our experience, and is
a feature we'd like to see more digicam manufacturers incorporate in their products.
(Reduced flash exposure can contribute greatly to more-natural indoor shots.)![]()
Also like most digital cameras, the PDR-M3 provides an exposure/focus lock function,
when the shutter button is half-pressed. This can be useful for situations where
a subject is off-center, or as a means to achieve more-accurate exposure by
excluding strong light sources near the subject from the exposure determination.
(With patience and a tripod, this can also be used as a way to balance the exposure
for multiple shots used to compose a panorama.)![]()
One feature we particularly liked on the PDR-M3 was the automatic image "preview"
in manual mode: After each picture is captured, it is displayed on the LCD screen,
giving you the option to either save it to the memory card, or discard it. The
image remains more or less indefinitely, but if you take no action, it will
be lost when the camera powers-down automatically to save power.![]()
Flash
The on-board flash of the PDR-M3 is quite competent, offering 5 different exposure
modes. Its effective range is from 1.3 to 6.5 feet (0.4 to 2.0 meters) at the
telephoto end of the lens' range, and 1.3 to 9.75 feet (0.4 to 3.0) meters at
the wide-angle end. Contrary to the conservative 1.3 foot minimum distance Toshiba
rates it for though, we found the flash worked well all the way down to the
minimum focusing distance of 9.75 inches (25mm). Available flash modes are on,
off, auto, auto red-eye reduction, slow sync, and "ext sync." In our
tests, we were surprised to find how well the built-in flash's illumination
blended with the tungsten room lighting in our indoor portrait shot: Many cameras
produce unnatural bluish highlights under these conditions.![]()
The "external sync" option deserves special comment: In keeping with
the greater degree of exposure flexibility the PDR-M3 offers in other areas,
it also includes a thoughtful provision for using it with external, slave-triggered
flash units. In "ext sync" mode, the on-board flash fires a single,
fairly weak pulse. This is sufficient to trigger a slave strobe unit at reasonable
range (up to 2 meters), but not enough to contribute significantly to the exposure.
In this mode, the shutter speed is fixed at 1/125, and the lens aperture at
its smallest opening (f/7.6-f/11). The white balance is also adjusted to the
5700K value typical of most professional flash units. Again, while far from
the level of control provided by a professional 35mm camera, this minor extension
of the PDR-M3's capabilities translates into a significant increase in usability.![]()
 White Balance
The PDR-M3 provides a total of six different white-balance settings, including
auto, sunny, cloudy, warm fluorescent, cool fluorescent, and incandescent. The
white-balance settings are available in the "Manual" record mode,
accessible via the 4-way rocker control on the camera's back panel. We found
the M3's automatic white balance to work quite well within a reasonable range
of illumination, but it had a hard time with the very strong yellowish cast
of the lighting for our "indoor portrait" shot, and it seemed to leave
a slight magenta tint under normal "daylight" conditions. (Its "incandescent"
setting did a fairly good job with the strong color cast of the household incandescent
bulbs, but (in common with most digicams we test), its incandescent setting
appears to be balanced for professional tungsten lighting, at a color temperature
of 3200K.) For daylight shooting, we found the "sunny" white balance
setting produced the best results.![]()
Shutter lag and cycle times
When you press the shutter release on a camera, there's usually a lag time before
the shutter actually fires. This delay is to allow the autofocus and autoexposure
mechanisms time to do their work, and can amount to a fairly long time in some
situations. Since this number is almost never reported on, and can significantly
affect the picture-taking experience, we now routinely measure it, using a little
Windows utility developed by Digital Eyes.![]()
We found the PDR-M3's autofocus to be slightly slower than that of many cameras
we've tested, requiring about 1.2 seconds for a full autofocus cycle before
the shutter tripped. Prefocusing by half-pressing the shutter release in advance
of the exposure itself reduced the lag time to about 0.25 seconds, fairly typical
of the current range of cameras shooting under that condition. Shot-to-shot
cycle times range from 11 seconds in large/fine mode, to 6.8 seconds in 640x480
mode with "Basic" image quality selected, neither the slowest nor
the fastest camera we've tested to date.![]()
Camera startup is fairly fast, at just over 5 seconds, and shutdown occurs in
about 3.5 seconds. Switching from record to playback mode (with a large/fine
resolution image to be displayed) also requires about 5 seconds, while the change
back to record mode is almost instantaneous. (You can take a new picture as
soon as you rotate the function dial back to either manual or auto record position.)![]()
Operation and User Interface
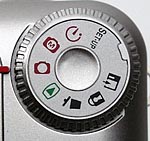 As we noted earlier, we found the user interface
of the PDR-M3 very easy to navigate, despite the range of functions and picture-taking
controls it offers. Major operating modes are selected via the function wheel
in the upper right-hand corner of the camera's back, as shown at right. Within
each major mode, functions are selected from an LCD menu system, using the three
controls just above and to the left of the rear-panel LCD screen. The function
of these controls varies slightly, depending on whether you're in "Auto
or "Manual" record modes.
As we noted earlier, we found the user interface
of the PDR-M3 very easy to navigate, despite the range of functions and picture-taking
controls it offers. Major operating modes are selected via the function wheel
in the upper right-hand corner of the camera's back, as shown at right. Within
each major mode, functions are selected from an LCD menu system, using the three
controls just above and to the left of the rear-panel LCD screen. The function
of these controls varies slightly, depending on whether you're in "Auto
or "Manual" record modes.![]()
![]()
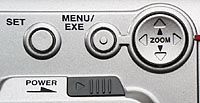
The three menu-related controls of the PDR-M3 are shown at left. The "Set"
button brings up a set of four menus, governing flash operation, image compression,
file size, and macro operation. When the menu system is active, you can move
between menus by pressing the right or left arrows on the 4-way rocker control
(labeled "zoom" in the photo). Once a menu is selected, the up and
down arrows on the rocker can be used to choose the menu option you want. After
you've configured all your menu choices, pressing either the "Set"
or "Menu/Exe" buttons saves the settings. In normal operation (when
the menu system isn't enabled), the up and down arrows on the rocker control
actuate the zoom lens. ![]()
In "Manual" record mode, the LCD is always active, with a 5-menu system
constantly present. This manual-mode menu system controls white balance settings,
exposure compensation for both ambient and flash illumination, exposure preference
(full program, or large/small aperture preference), and the external flash sync
function. In manual mode, you can immediately select any of the 5 menus by pressing
the left or right arrows on the 4-way rocker control, and then using the up/down
arrows to choose the desired option. You save your choices by pressing the "Menu/Exe"
button, upon which the up/down arrows on the 4-way control return to their normal
function of controlling the zoom lens.![]()
As noted, we found the combination of function wheel and LCD menu system very
easy to navigate: We generally like "function wheels", because they
separate major camera operating modes, and help avoid the overloading of functions
on the various control buttons. In our opinion, this usually produces an operating
interface that is easier for novices to learn quickly, and which is quick to
navigate in actual use.![]()
Control Enumeration
With the foregoing as an overview, we'll now plunge into our standard enumeration
of camera functions, stepping through the major operating modes one at a time.![]()
Setup
Setup mode produces the LCD menu shown at right. Options available here are
as follows: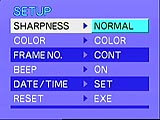
- Sharpness (Hard, Normal, Soft) - Like most digital cameras, the PDR-M3 normally provides some degree of "sharpening" for its pictures, whereby image contrast is locally enhanced wherever an abrupt tonal change is encountered. (In other words, at a light-to-dark transition, the light side is lightened further, and the dark side darkened, immediately adjacent to the transition itself.) This tricks our eyes into seeing a "sharper" edge than we would otherwise. Unlike most cameras though, the PDR-M3 allows the user to specify how much of this effect is applied. The "Hard" setting applies quite a lot, the "Normal" option is about typical of most digicams, while the "Soft" setting appears to apply no artificial sharpening at all. This last can be a real boon if you prefer to apply "unsharp masking" in PhotoShop or other high-end imaging program after the fact, for tricky subjects.
- Color (Color, B/W) - The PDR-M3 includes a black and white recording mode, which improves memory usage and removes color artifacts when shooting pictures with fine detail. If you're going to be using the final images in a black & white publication, this setting can save significant memory, while retaining high image quality.
- Frame No (Cont, Renew) - In the "Cont" setting, the PDR-M3 will continuously increment the frame number used to create the file name for each image, continuing the count between memory cards, or after a card has been emptied of images. This helps avoid problems of accidentally overwriting images on the host computer's hard disk that have the same file name.
- Beep (On, Off) - Turns the annunciator beeps on or off.
- Date/Time (Set) - Takes you to a menu screen for setting date and time.
- Reset (Exe) - Single menu option returns all camera settings to their
factory defaults. (Useful for quickly resetting multiple manual-mode settings,
combined with sharpness, color, etc.)
Self-Timer
The self-timer option has its own position on the function dial, which unfortunately
means you can't use it with any of the special options from the manual-record
mode. In self-timer mode though, all of the normal automatic-mode menu options
are available, including flash mode settings, image compression, file size,
and the macro option. (We frequently find ourselves using self-timers in macro
mode, to avoid camera shake on the rickety copy stand we use for our macro shots.)![]()
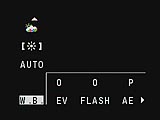
Manual Record Mode
Five menus are available here, directly from the LCD viewfinder display. (The
last menu item is located off-screen to the right, and must be reached by scrolling
the cursor with the 4-way rocker control.)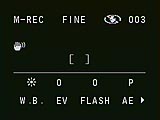
- WB - White balance setting. Options include auto, sunny, cloudy, warm fluorescent, cool fluorescent, and incandescent.
- EV - Ambient exposure compensation. Settings range from +1.5 EV to -0.9 EV, in 0.3 EV steps.
- Flash - Flash exposure compensation. Settings range from +0.6 EV to -0.6 EV, in 0.3 EV steps.
- AE - Autoexposure program options. Settings include "P", for normal full-program operation, "Max Aperture" for a program biased to use the larger lens aperture whenever exposure conditions permit, and "Max Depth" for a program biased to use the smaller lens aperture, conditions permitting. Either aperture setting will be overridden if the light level is either too high or too low to accommodate the selected aperture size.
- EXT-SYNC - External Sync option for the onboard flash. Options are on and off. If set to On, other manual-mode controls are disabled, the shutter speed is set to 1/125, the lens aperture set to the smaller f/7.6-f/11 setting, and flash power reduced to the minimum required to trigger external slave units. White balance is also set to 5700K, to match most professional strobe units.
In addition to the preceding "manual mode" menu options, all the
standard "auto" mode options described below are also available in
manual record mode.![]()
Auto Record Mode
In Auto record mode, the LCD display screen doesn't illuminate unless you press
the "Disp" button just to the right of it, or the "Set"
button above it. The "Set" button brings up the menu system, while
the "Disp" button controls the LCD's use as a viewfinder, and display
of the information overlay. Once you've made your menu selections, pressing
either the "Set" or "Menu/Exe" button will save them. The
menu called up by the "Set" button contains four sub-menus, as described
below: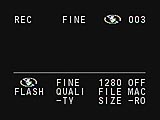
- Flash - Select flash operating mode. Options include auto, red-eye redution, fill flash, off, and "sync" mode. The "sync" mode provides a slow-sync function, in which a slower than normal shutter speed is used in conjunction with the flash, allowing more ambient light in, to help illuminate darker background elements.
- Quality - Select level of image compression. Options include Fine, Normal, and Basic.
- File Size - Choose base file size. Options include 1280x1024 and 640x480.
- Macro - Turns macro function on or off.
Playback Mode
The PDR-M3 provides several unusual in-camera effects in playback mode, that
may be applied to pictures without resorting to the use of a host computer.
Applying a special effect to an image leaves the original untouched, producing
a new image in the camera's memory.
- Playback (Exe) - Begins a "slide show" playback of images in the camera's memory, at about 7 seconds per image at the 1280x1024 pixel size, and 4 seconds per image at the 640x480 size.
- Soft Focus (Level 1, Level 2) - Applies a "soft focus" effect to the currently-selected image, blurring the details. (Level 2 produces a greater blurring than Level 1.) After the effect has been applied, you're given the option of discarding the new image, or saving it. If you choose to save it, it is stored in a separate file on the camera's memory card.
- Cross Filter (White1, White2, Rainbow1, Rainbow2) - This effect places "cross"
patterns on highlights in the image. The White options create white crosses,
while the Rainbow ones create crosses tinged with rainbows, simulating an
optical refraction effect. The two options for each type of cross produce
larger or smaller patterns.
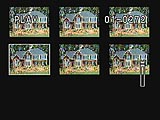
Multi-frame playback.
 This one eluded us until we broke down and
read the manual: You can quickly review images stored on the camera's memory
card, viewing groups of 9 tiny "thumbnails" at a time. To access this
review mode, press the "Disp" button twice in rapid succession. You
can scroll through the images displayed by using the 4-way rocker control to
move a cursor highlight from image to image. Once you've selected the image
you want, you can display it full-screen by pressing the "Disp" button
once again.
This one eluded us until we broke down and
read the manual: You can quickly review images stored on the camera's memory
card, viewing groups of 9 tiny "thumbnails" at a time. To access this
review mode, press the "Disp" button twice in rapid succession. You
can scroll through the images displayed by using the 4-way rocker control to
move a cursor highlight from image to image. Once you've selected the image
you want, you can display it full-screen by pressing the "Disp" button
once again.![]()
Playback zoom viewing
We often find ourselves wishing for more resolution and detail in the LCD screen
during playback, to see if we caught fine details properly in the shots we've
just taken, or if the fine framing is correct. Toshiba addresses this need in
the PDR-M3, by providing a "zoom" function when in the playback mode.
To use this 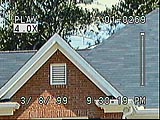 option, simply press the up-arrow on the
4-way rocker control when in playback mode. You can select display enlargement
levels from 1.0 to 4.0x, in 0.2x increments. Even better, once you're zoomed
to a given level, holding down the "Set" button turns the 4-way rocker
into a scrolling control, moving the zoomed window around the picture as a whole.
At the 4X setting, you can really see detail down pretty close to the pixel
level. (Note that the example at right is the same "house" shot from
other display examples in this article, only zoomed-in 4x!) Overall, this is
probably the best implementation of playback zoom we've seen to date. One big
grip though: Inexplicably, the view in zoom mode doesn't extend all the way
to the edges of the image frame! - This is unfortunate, as it reduces the usefulness
of an otherwise excellent feature.
option, simply press the up-arrow on the
4-way rocker control when in playback mode. You can select display enlargement
levels from 1.0 to 4.0x, in 0.2x increments. Even better, once you're zoomed
to a given level, holding down the "Set" button turns the 4-way rocker
into a scrolling control, moving the zoomed window around the picture as a whole.
At the 4X setting, you can really see detail down pretty close to the pixel
level. (Note that the example at right is the same "house" shot from
other display examples in this article, only zoomed-in 4x!) Overall, this is
probably the best implementation of playback zoom we've seen to date. One big
grip though: Inexplicably, the view in zoom mode doesn't extend all the way
to the edges of the image frame! - This is unfortunate, as it reduces the usefulness
of an otherwise excellent feature.![]()
Erase Mode
Image deletion is handled in the PDR-M3 through a separate setting of the function
wheel. Three functions are provided, to erase either one frame at a time, all
frames in the camera, or to reformat the card. In single-frame erase mode, you
can either step through full-size images, or switch to the 9-up "thumbnail"
display mentioned earlier, by pressing the "Disp" button twice in
rapid succession.![]()
Protect Mode
As you take pictures with a larger memory card, you'll sometimes want to snap
a number of exposures quickly, then "weed out" the ones you don't
want to keep. One way of doing this is to use the "protect" mode to
lock the images you want to keep, then go back to the Erase mode screen and
use the "erase all" option to delete all the unprotected pictures
in one fell swoop. Regardless of how you use it, the PDR-M3's ability to protect
selected images against accidental erasure is a useful option.![]()
Computer Connect Mode
The PDR-M3 has a built-in serial interface port that can be used to connect
it to a host computer for image downloading. This mode enables the port for
data transfers. (See below for more details.)![]()
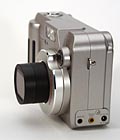
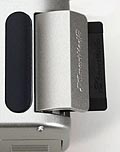
Image Storage and Interface
 The PDR-M3 stores its images
on the tiny SmartMedia removable memory cards. It ships with a 4MB card, and
supports cards as large as 32MB, the largest currently manufactured. SmartMedia
cards are slated to grow as large as 128MB over the next year, and we don't
know whether existing cameras will be compatible with those larger sizes or
not. Regardless, 32MB is a LOT of image storage, corresponding to probably 40-50
pictures at the PDR-M3's maximum image size and quality setting. (The furnished
4MB card stores anywhere from 5 to 80 images, depending on the image size and
quality setting.) We liked the fact that the card slot is accessible from the
side of the camera (as shown at left), which means you can load and unload the
card without taking the camera off a tripod.
The PDR-M3 stores its images
on the tiny SmartMedia removable memory cards. It ships with a 4MB card, and
supports cards as large as 32MB, the largest currently manufactured. SmartMedia
cards are slated to grow as large as 128MB over the next year, and we don't
know whether existing cameras will be compatible with those larger sizes or
not. Regardless, 32MB is a LOT of image storage, corresponding to probably 40-50
pictures at the PDR-M3's maximum image size and quality setting. (The furnished
4MB card stores anywhere from 5 to 80 images, depending on the image size and
quality setting.) We liked the fact that the card slot is accessible from the
side of the camera (as shown at left), which means you can load and unload the
card without taking the camera off a tripod.![]()
On our Pentium-II PC, we timed the transfer of a 689K image file at 2 minutes
and 34 seconds via the serial port, and 33 seconds via the FlashPath adapter.
This serial-transfer time is a bit on the slow side, more appropriate for a
57Kbaud connection than the 115K that we (thought we) had the connection running
at. (Even if the serial port had been a good bit faster, the FlashPath floppy
adapter would still have won hands-down, underscoring the value of this accessory.)![]()
Although not included with the PDR-M3 itself, a useful accessory is the "FlashPath"
floppy-disk adapter. This device accepts a SmartMedia card in a slot in its
side, and then plugs into a standard floppy drive on your computer. With appropriate
driver software installed on the host computer, the SmartMedia card can then
be read like a floppy of 4, 8, 16, or even 32 MB capacity, and files simply
copied off of it. The FlashPath adapter provides file transfers that are typically
about 5 times faster than those made with serial connections. Overall, we highly
recommend the FlashPath for owners of SmartMedia-based cameras, feeling that
the ~$80 "street" price is well worth it, when it comes to the increased
enjoyment and usage you'll get from your camera. (We found our own digital camera
usage at least doubled after getting a FlashPath adapter!)![]()
 Video Out
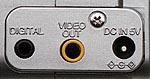
As mentioned earlier, the PDR-M3 has a jack for a video-out cable. When plugged
in, it turns off the internal LCD monitor, and routes all signals out through
the video port. We've found this a very handy function for grabbing screen shots
of whatever would normally appear on the LCD screen, and it makes for a great
way to share images with friends or colleagues. US and Canadian models of the
PDR-M3 will support the NTSC standard, while European models will support PAL.![]()
Power
The PDR-M3 is a bit of a departure from many inexpensive digital cameras, in
that it uses a rechargeable Lithium-Ion battery, rather than the 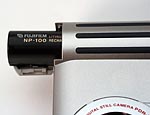 much more common AA cells. The
advantages of the LiIon battery pack are that it's very compact for the amount
of power it delivers (1350 mAh), and has no "memory effect" as is
suffered by NiCd batteries. The only drawback we see is that you can't get replacement
batteries in a pinch at the corner drugstore. Besides the battery pack, the
PDR-M3 includes an AC adapter, which will both power the camera and recharge
the battery pack. We don't know the official recharge time for a fully-discharged
battery pack, but would guess that it's on the order of 5-6 hours. An optional
external battery charger is available that cuts this time to 2.5 hours. (NOTE:
Because the AC adapter for the PDR-M3 also functions as an in-camera battery
charger, we STRONGLY advise against using any power source other than the official
AC adapter. Adapters not designed to charge the particular LiIon batteries used
by the PDR-M3 could cause severe damage and even a fire hazard!)
much more common AA cells. The
advantages of the LiIon battery pack are that it's very compact for the amount
of power it delivers (1350 mAh), and has no "memory effect" as is
suffered by NiCd batteries. The only drawback we see is that you can't get replacement
batteries in a pinch at the corner drugstore. Besides the battery pack, the
PDR-M3 includes an AC adapter, which will both power the camera and recharge
the battery pack. We don't know the official recharge time for a fully-discharged
battery pack, but would guess that it's on the order of 5-6 hours. An optional
external battery charger is available that cuts this time to 2.5 hours. (NOTE:
Because the AC adapter for the PDR-M3 also functions as an in-camera battery
charger, we STRONGLY advise against using any power source other than the official
AC adapter. Adapters not designed to charge the particular LiIon batteries used
by the PDR-M3 could cause severe damage and even a fire hazard!)![]()
Included Software
The PDR-M3 ships with a fairly complete complement of software, and to Toshiba's
credit, does a good job of supporting both the Mac and PC platforms. On the
PC, the primary interface is Sierra Imaging's excellent Image Expert package,
which provides for image import, organization, adjustment, and output. On the
Mac side, we didn't test the software directly, due to the particularly delicate
state of our Mac system at the time we had the camera in-house. (Our Mac for
once gave the PC a real run for the money in the realm of sheer cussedness!)
The Mac package consists of three components, Picture Shuttle, used for downloading
images, a TWAIN driver for interface to other programs, and EZ Touch for image
manipulation and adjustment. Overall, a very competent software package, if
not one of the "everything but the kitchen sink" bundles which now
seem to be falling out of favor.![]()
Test Results
In keeping with our standard policy, our comments here are rather condensed,
summarizing our key findings: For a full commentary on each of the test images,
see the PDR-M3's "pictures" page.![]()
As with all Imaging Resource camera tests, we encourage you to let your own
eyes be the judge of how well the devices performed: Explore the images on the
Pictures Page for the PDR-M3, to see how well
the camera performed, and how its images compare to those from other cameras
you may be considering buying.![]()
Overall, we felt the PDR-M3 took very good pictures, reflecting faithfully the
sterling qualities of its ancestor, the PDR-M1. Its exposures were consistently
accurate, doubtless thanks to the 64-segment matrix metering it employs. Color
and tonal rendition also were quite good, producing good saturation on strong
primaries, yet doing a very good job with delicate pastels and skin tones as
well. In most cases, with "daylight" lighting, we obtained the best
results using the "Sunny" white balance setting, the auto white balance
sometimes producing a slight magenta tone.![]()
Resolution was very good, with a visual resolution of 600-650 line widths/picture
height, in both vertical and horizontal directions. This puts it right at the
top of the current crop of 1.3 and 1.5-megapixel digicams, and even represents
a slight improvement over the earlier PDR-M1.![]()
Macro performance is good, but not in the "microscopic" realm that
some current cameras achieve. Nonetheless, with a minimum coverage area of 2.9
x 3.6 inches (73 x 91 mm), it should more than meet the needs of most users.![]()
See for Yourself!
Take a look at the test images from the PDR-M3
(with extensive comments), or jump to the Comparometer(tm)
page to compare its reference images with those from other digital cameras.![]()
Conclusion/Bottom Line
The PDR-M3 is a very strong offering, following in the footsteps of the highly
popular PDR-M1. That earlier camera set a benchmark for cost-effective performance
that few competing units could match. With the addition of a 3X optical zoom
lens, and the retention of all the exposure-control options of the previous
unit, the PDR-M3 is a great picture-taking machine at a very competitive price:
This is a camera that offers "point and shoot" ease of use, and great
pictures, yet provides the photographer with a greater degree of exposure control
than most products competing in its price range. - Looks like Toshiba has another
winner!![]()
Reader Sample Images!
Do you have a PDR-M3 camera? If you'll post an album of your samples
on one of the photo-sharing services and email us at [email protected],
we'll list the album here for others to see!
For More Info:
View the data sheet for the PDR-M3![]()
View the test images from the PDR-M3![]()

Follow Imaging Resource: