|
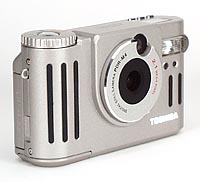
Toshiba PDR-M4 digital camera Tremendous processing power makes a speedy 2 megapixel camera! (Full Review posted 29 August, 1999) |
 |
|
2.14 Million pixel sensor |
|
|
1600 x 1200 resolution | |
|
|
Full-res shot-to-shot cycle time of 2 seconds! | |
|
|
Autofocus lens w/macro, 2x digital zoom | |
|
|
Built-in flash | |
|
|
Fast startup and cycle times |
Preface
Toshiba is one of the truly huge players in the world
of computers and electronics. When they moved into the digital
camera business a little over a year ago, they brought to bear
the full force of their engineering and systems-integration talent,
the effects of which are only now being fully seen. At the high
end of their line, they previously repackaged units designed
by other companies under the Toshiba logo, with only minor firmware
variations. With the 2 megapixel PDR-M4 though, they've stepped
out with a camera that is entirely "Toshiba inside"
(with the sole exception of the CCD itself). In the process,
they've incorporated some truly impressive processing power,
producing the fastest consumer-level digicam on the planet. (A
mere 2 seconds from shot to shot at full resolution, all day
long or until your memory card fills up!) Other camera attributes
are very strong as well, making a strong entry into the 2 megapixel
arena. (We're particularly looking forward to the forthcoming
PDR-M5, which will incorporate much of the same electronics as
the M4, but with the added inclusion of an optical zoom lens.)
Herewith is the story of the PDR-M4:![]()
High Points
- 2.14 megapixel CCD sensor offering 1600 x 1200 or 800 x 600 pixel resolution
- 1.8 inch color LCD for preview and image replay and an optical viewfinder for framing images with standard autofocus target mark
- Glass lens with fixed focal length at 7.4mm/F3.2/8 (35mm equivalent: 40mm) and digital zoom (not to be confused with true optical zoom)
- TTL autofocus
- ISO equivalent 100
- 1/4 to 1/1000 shutter speed
- Autofocus from .33 feet (.1 m) to infinity
- Macro mode allows captures from 4 inches to 20 inches (10 cm to 50 cm)
- Modes: single, burst, multi, self timer and bulb
- Burst mode allows 4 frames in 1 second
- Three image quality modes capture from 800 x 600 pixels at 1/16 compression to 1600 x 1200 pixels at 1/4 compression
- Built in flash with five settings: Auto, Red-Eye Reduction, Forced, Suppressed and Slow Synchro
- Flash range from 1.7 feet (0.5 m) to 8.2 feet (2.5 m)
- Five white balance settings: Auto, Outdoors, Bluish/Reddish Fluorescent Light and Incandescent Light
- TTL metering using CCD
- Exposure compensation from 1.5 EV to +1.5 EV in 11 settings
- Image capture in JPEG (EXIF Ver.2.1)
- 8MB SmartMedia card supplied with camera (expandable up to 32MB)
- Image transfer via USB, Serial and Video
- Small, easy to handle design
- Utilizes rechargeable lithium-ion batteries or AC adapter
- Lens cover interlocked with photography mode setting
EZ Print Link
Readers have requested free-formatted versions of our reviews
(without the graphical accouterments of our page design), to
make printing easier. We are accommodating this request with
special copies of each review, formatted to allow the text flow
to be dictated by the browser window. Click here
for a print-optimized page.
Executive Overview
The Toshiba PDR-M4 offers the convenience of a compact build
with the sophistication of 2.14 megapixel sensor resolution.
Weighing in at about 9.9 oz (280g) with the battery, the PDR-M4
is ready for action and could easily fit into a coat pocket or
purse, and with only a little squeezing, into a standard shirt
pocket. The design is relatively sleek, with smooth buttons,
few protrusions, and an overall somewhat "retro" appearance.
We really liked the retractable lens cover that slides back when
you turn the camera on. It's a nice way to avoid tricky mechanics
that could easily get fouled up and takes away the annoyance
of lost lens caps. The overall design of the camera has a compact
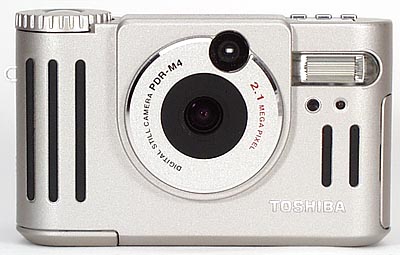
but sturdy feel, with a rugged all-metal body construction. ![]()
The PDR-M4's menus are all navigable by a rocker toggle
button reducing the number of buttons you need to push for camera
setup. In Manual capture mode though, the need to first press
the rocker up, even when you want to adjust a control down seems
a little awkward. For instance, if you want to decrease the exposure
compensation, you must navigate to the EV adjustment menu item,
press the toggle up to activate that control, and then press
it down the required number of times to get the adjustment you
needed. Why not just press the down arrow from the beginning?
![]()
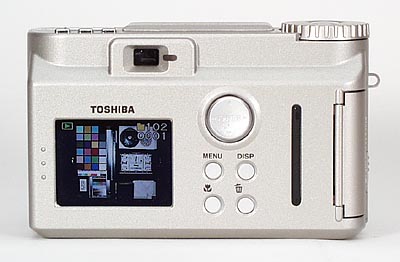
Both an optical viewfinder and color LCD display panel
on the back of the camera assist in composing shots. The optical
viewfinder features a multi-colored LED light that reports the
status of the camera (on, focus ready, self-timer, etc.). The
back LCD panel, in addition to the view, notes the settings of
the camera (mode, possible exposures, flash settings, etc.).
We found both viewfinders to be a bit looser than other digicams,
covering about 79.5% on the optical and 91% on the LCD. ![]()
The PDR-M4 features an optical-glass lens with a fixed
focal length of 7.4mm/F3.2 to 8, a 35mm equivalent of 40mm. The
Macro function captures objects from four to 20 inches (10cm
to 50cm) away and is activated by hitting a button on the back
panel identified by a flower symbol. The autofocus follows the
camera's movement pretty well and works from .33 feet (0.1m)
to infinity. A "digital" zoom feature on the camera
enlarges the image to twice its size but at the expense of image
resolution. ![]()
The most impressive feature on the camera is the extremely
fast shot to shot cycle time, achieved without reliance on buffer
memory. With an average of about two seconds between shots (depending
on the mode and settings), the overall camera speed is much closer
to that of a film camera than other digital cameras we've tested
(August 1999). This greatly-underrated feature keeps you from
having to do extensive planning for all of your shots and makes
it more likely you'll catch fast moving action. Somewhat at odds
with the exceptional cycle time was a slower autofocus response
of about 1.4 seconds. (We were surprised by this, as the high-speed
processor of the M4 should have allowed it to execute autofocus
operations more quickly.) A Burst capture mode allows from four
to 16 sequential exposures (depending on resolution) while holding
down the shutter button and a Multi capture mode fires 16 exposures
at 0.25 second intervals. The Multi exposures are saved as one
image and played back animation style like a short video. ![]()
The Bulb (time exposure) setting is noteworthy for its
ability to produce very low noise, long-exposure images by taking
a dark current calibration exposure after the shot itself. This
produces very good results and we won't be surprised to see it
duplicated by other manufacturers soon. We experienced overall
good exposure control but found the auto white balance a bit
weak, often obtaining better results with the manual white balance
settings. ![]()
The on-board flash is controlled by a button on top of
the camera and offers five settings: Auto, Red-Eye Reduction,
Forced, Suppressed and Slow Synchro. The Slow Synchro mode does
a good job of allowing more ambient light to influence the exposure
but strangely isn't responsive to manual white balance settings.
While in Slow Synchro or Suppressed flash modes, a shaking hand
symbol appears in the LCD panel, reminding you to use a tripod
for when the autoexposure system has selected a long exposure
time. ![]()
In our tests, the PDR-M4 showed a fairly high level of
power consumption, not surprising given the large 2 megapixel
CCD, LCD panel, and high-speed electronics. This led us to recommend
carrying some spare batteries around or utilizing the AC adapter
whenever convenient. A Display button on the back of the camera
turns the LCD display panel off, which aids in power conservation.
![]()
Images are stored on SmartMedia cards (an 8MB card is
included with the camera), and in-camera functions let you copy
images from one card to another, compress and reduce image sizes,
create storage folders and protect images. The SmartMedia card
itself can also be write protected with a one time use sticker.
![]()
A Video Out feature allows you to connect the PDR-M4 to
a television set, providing NTSC-compatible signals for USA,
Canada and Japan models. (We presume that PAL is available on
foreign models.) The LCD display must be on for television viewing
and a video cable comes with the camera. ![]()
Additionally, a software CD for Mac and PC (Image Expert
and USB driver), USB cable and a serial cable (RS-232C/RS422)
comes standard with the camera. The Image Expert software allows
you to create photo albums and make minor manipulations/corrections
to images (color correction, rotation, flip and resizing). ![]()
Overall, the PDR-M4 proved to be a very capable 2-megapixel
camera, with good picture quality, unusually flexible exposure
control, excellent low-light performance, and exceptional speed.
About the only quibble we could find with it was the somewhat
slow autofocus speed. ![]()
Design
The Toshiba PDR-M4 weighs in at 8.5 oz (240g) without the battery
and SmartMedia and holds the dimensions 4.4 x 2.66 x 1.66 inches
excluding its protrusions (112 x 68 x 42 mm). With the battery,
it goes up to 9.9 oz (280g). A silver metal case with thin, vertical
plastic grips in the front and plastic output and card slot covers
keeps the camera very compact and stowable. There's a wrist strap
and inset plastic tripod mount as well. ![]()
An added feature is the mechanically actuated lens cover
which slides over the lens when you turn the camera off and retracts
when you rotate the mode dial to a capture position. This clever
design avoids possible jams or failures which might accompany
a more delicate, automatic mechanism. It also relieves you from
lens cap duty. As usual, the battery compartment remains on the
bottom of the camera but the SmartMedia slot and the output plugs
are accessible on the sides of the camera through plastic flip
doors. The SmartMedia flap has a latch to protect the card. ![]()
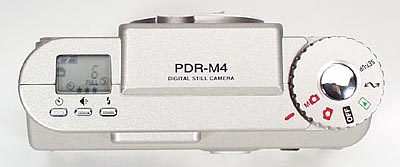
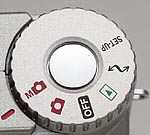
The control layout includes a ridged dial on the top right
hand side of the camera that controls the camera's operating
modes (Manual, Auto, Off position, Playback, Data Transfer and
Setup). The shutter button resides in the center of the mode
dial. ![]()
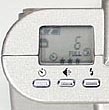
A black and white LCD status display on the top left hand
side of the camera displays a clock when the camera is off and
shows many of the camera settings when on. This status display
is useful when trying to conserve power by shutting down the
back LCD panel. The self timer, image quality and flash controls
rest just below the status display. Once the controls are set,
the camera can be operated with one hand but requires two to
change any settings. Particularly given the low-light capabilities
of the PDR-M4, we really appreciated a small design touch on
the LCD readout: A backlight! Whenever you press one of the three
buttons below the readout, a soft bluish backlight illuminates
for a few seconds, letting you change camera settings in pitch
darkness. ![]()
The 4-way rocker toggle control (Enter button), Menu,
Display, Macro and Erase buttons are on the back of the camera
to the right of the color LCD display (more detail on these later).
![]()
![]() Viewfinder
Viewfinder
As is typical, the Toshiba PDR-M4 offers both an optical viewfinder
and a color LCD display. While it can be turned off manually,
we wished for a default setting to turn the LCD off while in
the Auto capture mode. This would assist in conserving battery
power without having to remember to hit the Display button all
the time. The viewfinder is fairly bright and readable and the
brightness adjust feature truly changes the backlight brightness
(rather than just the contrast, as do some cameras). However,
we found that the color shown in the LCD couldn't always be trusted:
We shot some indoor photos with a particular white-balance setting
that looked beautiful on the LCD but were very yellowish once
viewed on the computer. On the other hand, the "preview"
of the white-balance in the LCD is still useful for picking the
white-balance setting that produces the *least* coloration of
the available options. (In other words, a relatively neutral
color balance on the LCD screen won't guarantee neutral color
in the file, but the least-colored image on the LCD from among
several white-balance options will indeed be the least-colored
in the file.) The optical viewfinder's image in our test unit
was rotated about one degree relative to the CCD's field of view,
but we don't know if this was an early-prototype problem or a
production issue. Both optical and LCD viewfinders feel somewhat
looser than those of other cameras, with coverage of 79.5% for
the optical and 91% for the LCD. The optical viewfinder does
not include a dioptric adjustment for eyeglass wearers, but does
have a relative high "eyepoint", making it relatively
easy to use with your glasses on. ![]()
The optical viewfinder features an LED which acts as a
visual cue to what state the camera is in determined by the colors
green, red and orange. Pay attention to it when composing your
shot for status on the autofocus and flash readiness (more on
that later). ![]()
Optics
As far as optics go, the Toshiba PDR-M4 offers a fixed focal
length of 7.4mm lens (equivalent to a 40mm lens on a 35mm camera),
with two aperture options of f/3.2 and f/8, both selected automatically
by the exposure system. A macro function allows captures from
4 to 20 inches (10 cm to 50 cm) and is turned on and off by a
button on the back panel. The autofocus on the lens normally
works from .33 feet (.1 m) to infinity and there's an option
that allows you to change the weighting of the focus area (normally
center weighted with options for top, bottom, right and left
exposure concentration). ![]()
Initially, we were perplexed in our macro shooting with
the PDR-M4: The manual specified a minimum macro distance of
4 inches (10cm), but we couldn't get closer than about 6 inches.
A quick check with Toshiba revealed that a small percentage of
their first production run (apparently 5 or 6 cameras out of
a set of 200) had a lens defect that resulted in this problem.
A full-production unit was shipped to us that didn't exhibit
this difficulty, although we were still obviously pushing the
limits at just a shade over 4 inches, since the brooch in our
test shot was out of focus. (It stands up above the background
by about 0.2 inches.) The minimum capture area measured 3.6 x
2.7 inches (91 x 68 mm). This is reasonably close, about middle-of-the-road
for digicams we've tested. The flash does a fairly good job of
throttling-down this close, although the perfectly perpendicular
subject reflected the flash quite strongly into the lens. While
sharpness was quite good, we noticed some softness toward the
right-hand edge of the frame. Normally, we'd attribute this to
a misalignment of the camera with the subject, but in this case
we adopted a trick suggested by a reader for squaring-up copystand
shots like this: Lay a mirror on the baseboard, and align the
camera so its image is perfectly centered in the mirror. (Handy
trick!) Overall macro performance is good, but not in the league
of some current cameras. ![]()
There is a "digital" zoom feature on this camera
which enlarges the image to twice its size (equivalent to 80mm
on a 35 mm camera) and is controlled by pressing up on the toggle
button. You simply press the down arrow to cancel zoom. Turning
the camera off automatically cancels the zoom as well. Like all
"digital" zoom functions, though, the image enlargement
occurs at the cost of resolution and as such shouldn't be compared
to true optical zoom lens. (Stay tuned for the forthcoming PDR-M5
for that.) The manual notes that the zoom image size is fixed
to 800 x 600 pixels and that the size on the LCD monitor does
not accurately reflect the change. The center of the screen is
enlarged so that the image quality of the LCD appears rougher
but you can see the sharp detail in the final image. We did find
it harder to accurately frame with the "digital" zoom
activated though, a problem common to many of the digicams we've
tested. As an interesting aside, we found "digital telephoto"
shots taken with the PDR-M4 were much sharper than those shot
normally in 800x600 resolution mode. ![]()
Exposure
We experienced good control over both ambient exposure compensation
and the flash settings on the PDR-M4. ISO is fixed at 100 and
the aperture range runs from f3.2 to f8 (automatically selected).
Shutter speed runs from 1/4 to 1/1000 of a second and is also
automatically selected, except in the Bulb (time exposure) setting
which allows exposure from one to eight seconds. EV value ranges
from +1.5 to 1.5 in 11 intervals, adjustable in the Manual
capture mode. The overall exposure range of the camera, as determined
by the specifications just listed is a range of EV 10-21 (in
our previous parlance), or from 8-16,000 foot-candles, or 88-175,000
lux. (It turns out we've been misusing the term EV, interpreting
it to indicate absolute exposure levels, rather than relative
ones. From now on, we'll specify usable light ranges in foot-candles
and lux.) In our own tests, we found this rating to be somewhat
conservative, with the camera performing quite well down to EV
9 (4 foot-candles, or 44 lux), and producing a very usable image
at an illumination level of half that. In Bulb exposure mode,
we obtained good pictures as low as EV 6 (0.5 foot-candles, or
roughly 5.5 lux), although there was a very strong reddish color
cast at that level. (Which turned out to be easy to remove using
an "auto levels" function in Photoshoptm.)
![]()
AE/AF (autoexposure/autofocus) system has five options
available for weighting the exposure and focus, adjustable in
the Manual capture mode as well. The default is to base focus
and exposure on the center of the picture, but you can optionally
bias the camera to look up or down, left or right when determining
focus. Four capture modes, One Shot, Burst, Multi and Bulb allow
for different shooting speeds but not all the camera functions
work with each mode. For example, the self-timer doesn't work
in the Burst or Multi modes and the flash settings only work
with the One Shot setting. The Burst exposure setting allows
you to take anywhere from four to 16 exposures while holding
down the shutter button (number of exposures depends on quality
setting and memory), and is good for fast moving action photography.
The Multi exposure setting allows you to take 16 shots continuously
at .25 second intervals and are saved as one 1600 x 1200 pixel
resolution image. Bulb provides for unusually long exposure times,
ranging from 1 to 8 seconds (more on this later). ![]()
Automatic Capture Mode
Automatic capture mode is indicated on the PDR-M4 by a small
red camera symbol on the mode dial (Manual is differentiated
by a small "M" next to the camera symbol). A small
LED beside the optical viewfinder lets you know the status of
the camera and if it's ready to take the exposure. The viewfinder
LED appears solid green once the focus is locked, letting you
know it's safe to take the picture. (Actually, the solid/blinking
green LED was a little confusing, and not well explained by the
owner's manual: On the one hand, a solid LED appears to indicate
focus lock, but a blinking LED could have indicated either a
slow shutter speed (just telling you to brace the camera well),
or a lack of focus lock. The only reference in the manual to
a blinking green LED is during self-timer operation...) ![]()
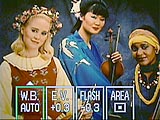
Manual Capture Mode
In the Manual capture mode, you get an extra menu by pressing
the center of the round toggle (Enter) button on the back. This
menu allows you to control the white balance settings, exposure
compensation (EV adjustments), flash intensity (four stages from
0 to 0.9) and AF/AE lock (default center, left, right, up
or down). To exit the menu, simply press the center of the toggle
switch again and the normal LCD display returns. A nice feature
is that while you're in the white balance menu, you can actually
see the effect of different white-balance settings in the LCD
display as you scroll through them. (As noted earlier though,
the actual color displayed on the LCD doesn't accurately portray
the final image coloration, so some interpretation is needed.)
Photography is possible in the Manual capture mode with the manual
setup screen displayed, however, size and quality cannot be set
and macro, self-timer and flash photography are not possible
while the screen is displayed. ![]()
Bulb Mode
The time-exposure (Bulb setting) capability is particularly noteworthy.
The camera actually takes about two times longer than the shutter
time to complete the exposure. Apparently, it's first snapping
the picture, then taking a "dark current" calibration
exposure of the same duration with the shutter closed, thereby
measuring image noise. It then subtracts the "dark current"
picture from that of the subject to produce very low noise images,
even with long time exposures. This is the first we've seen of
this approach in a digicam, but it makes excellent sense and
produces very good results. We expect to see the technique copied
by other digicam manufacturers in the future. Time exposures
from one to eight seconds can be set in the Record menu but flash
settings are unavailable in this mode. ![]()
Burst
In Burst mode (set in the Record menu), the shutter will open
and close between 4 and 16 times while holding down the shutter
button (depending on the quality settings and available memory).
You can cancel the exposure by letting up on the button midway.
Once the shutter button is released, the LCD panel automatically
displays a few choices. Small white frames line the bottom of
the screen, representing the number of exposures, and you're
asked to save or delete various frames. If you choose Select,
you can edit each frame separately. There's also All Select and
All Delete. Once you've made your decision, Execute (Exec) carries
out your commands and either saves or deletes the images. The
LCD then returns to its previous display. If you did cancel the
session midway, the photographs already taken can also be saved
or deleted. Self-timed and flash photography aren't available
in this mode and the camera automatically erases all images if
you don't select an option. ![]()
Multi
In the Multi capture mode (also settable in the Record menu),
the shutter opens and closes 16 times while the shutter button
is held down. The shots fire off at 0.25 second intervals and
the 16 low-resolution (400x300) images are saved as one full
image (1600 x 1200 pixels). The manual touts this mode as perfect
for continuously photographing moving subjects. As with Burst,
the self-timer and flash settings are not available. The images
can later be played back in animation style. (This was actually
a rather entertaining mode to play with. ![]()
Macro
To switch to Macro mode, just press the bottom left button on
the back panel, indicated by a flower symbol. The flower symbol
simultaneously appears on the LCD panel as well as an indicator
of the flash setting (with the only choices here being Suppressed
and Forced). If the scene is dark and the flash is in Suppressed
mode, the shaking hand symbol will also appear in the LCD to
imply that you need to either use the flash or a tripod. ![]()
Self-Timer
The self timer is activated while in Manual or Automatic record
mode by pushing the self timer button on the top left of the
camera. A corresponding symbol appears on both the status display
and back LCD panel. Compose the picture and press the shutter
button down half way to prefocus. When you're ready, fully press
the shutter button and you have either two or 10 seconds to get
into place (depending on the setting chosen in the Record menu).
The LED on the optical viewfinder will flash red and if you're
using the LCD monitor, a countdown is displayed. To cancel the
timer, press the down arrow on the toggle button. Note that the
Burst and Multi capture modes are not available with the self
timer. ![]()
Flash
Flash photography can be controlled from either the Manual or
Automatic capture modes by a button on the top left (next to
the self timer). Press the button until the setting you want
is indicated in the status display. You can choose between Auto,
Red-Eye Reduction, Forced, Suppressed and Slow Synchro. The Auto
setting lets the camera judge for itself based on the varying
conditions. Forced mode simply means that the flash always fires,
regardless of the ambient light. (This mode is also referred
to as "Fill" flash.) Suppressed flash is best when
the distance is too great for flash to be effective (concert
and theater type settings) and basically means that the flash
doesn't fire. The Slow Synchro mode fires the flash, but lets
the exposure system choose longer shutter times, to let more
of the ambient light into the picture: This most effective for
night shots, to brighten backgrounds. Slow Synchro does a good
job of letting more ambient light in to affect the exposure,
but it doesn't seem to respond to manual white balance settings.
On another note, if you take a photograph in the Slow Synchro
or Suppressed mode of a subject in front of a dark background,
the shutter speed slows down and the shaking hand warning appears
in the LCD panel. At this point, a tripod is highly recommended.
Turning the camera off and back on again does not affect the
flash setting and flash is not available for Burst, Multi or
Bulb photography modes. ![]()
White Balance
The automatic white balance proved to be a bit weak, leaving
a lot of the original coloration in the pictures. On the other
hand, the incandescent mode did much better at removing the strong
yellowish cast of the indoor portrait shot. (Like most cameras,
the PDR-M4's incandescent white balance mode appears to be set
for professional tungsten lighting, rather than household bulbs.)
There are actually five options for controlling white balance
of which automatic is the default. You can manually adjust between
Outdoors, Bluish Fluorescent Light, Reddish Fluorescent Light
and Incandescent Light. ![]()
Performance: Shutter Lag/Cycle Times
At startup the camera comes alive in about 2 seconds, but the
quickest we could get a shot off was about 2.8 seconds from power
up. (Still very fast.) It also took approximately 2 seconds
to switch between the capture and playback modes. ![]()
The shutter lag for full autofocus stayed around 1.4 seconds
but was shorter for the prefocus or half pressed shutter button
at 0.32 seconds. We found these times to be a bit on the slow
side, particularly the full autofocus time. (The long autofocus
time was surprising, given the amazingly fast shot-to-shot cycle
times: We'd have thought that the very high-speed signal processing
would have translated into a faster autofocus process.) ![]()
For shot to shot cycle times, high resolution images required
a minimum of ~1.85 seconds but was about 2.0 seconds on average
(very fast, especially for a 2 megapixel camera). The low resolution
measured a minimum of 1.7 seconds with an average also around
2.0 seconds. Burst mode allowed a whopping 4.3 frames per second.
![]()
User Interface and Controls
We've covered the PDR-M4's operation in passing earlier in this
review, as we discussed its various features. In this section,
we'll delve into the details of its controls and user interface,
walking through every control and menu option. ![]()
 Like most of today's digital
cameras, you control the PDR-M4 through a variety of operational
buttons and an easy-to-navigate LCD menu system. You select one
of six different operating modes of the camera by using the Mode
Dial positioned on the top, right-hand side. The Mode Dial allows
you to easily choose which picture-taking or set-up mode you
want, and also simplifies the LCD menu system, allowing only
those functions relevant to the chosen mode to be displayed.
The Shutter button is located in the center of the mode dial.
Depending on how you set up the camera, depressing the Shutter
button can capture a single shot, or a burst of up to 16 images.
Like most of today's digital
cameras, you control the PDR-M4 through a variety of operational
buttons and an easy-to-navigate LCD menu system. You select one
of six different operating modes of the camera by using the Mode
Dial positioned on the top, right-hand side. The Mode Dial allows
you to easily choose which picture-taking or set-up mode you
want, and also simplifies the LCD menu system, allowing only
those functions relevant to the chosen mode to be displayed.
The Shutter button is located in the center of the mode dial.
Depending on how you set up the camera, depressing the Shutter
button can capture a single shot, or a burst of up to 16 images.
![]()
 Other controls on the top
of the camera include the Self-Timer Button, and the Flash and
Image Quality Buttons. The latter two buttons allow you to quickly
change the camera settings without having to enter the LCD menu
system. The top of the camera also includes the Status Display,
which provides information on camera usage. The various text,
numbers, and icons appearing here reflect the camera settings
you've chosen. Information displayed includes battery level,
number of images that can be stored to the camera's SmartMedia
card, and icons representing different camera settings, like
the picture quality and resolution levels, and the flash settings.
Other controls on the top
of the camera include the Self-Timer Button, and the Flash and
Image Quality Buttons. The latter two buttons allow you to quickly
change the camera settings without having to enter the LCD menu
system. The top of the camera also includes the Status Display,
which provides information on camera usage. The various text,
numbers, and icons appearing here reflect the camera settings
you've chosen. Information displayed includes battery level,
number of images that can be stored to the camera's SmartMedia
card, and icons representing different camera settings, like
the picture quality and resolution levels, and the flash settings.
![]()
The back of the camera contains an optical viewfinder
and a 1.8-inch LCD Monitor, which you can set for either color
or black and white viewing. The LCD Monitor can be turned on
or off using the DISP button, also located on the back of the
camera to the right of the monitor. The PDR-M4 also has an LCD
menu option-one of the Record options-that lets you adjust the
LCD brightness to suit your picture-taking environment. ![]()
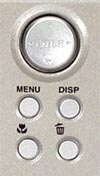 Grouped with the DISP button,
you'll find the Menu, Macro, and Delete buttons. Depending on
the mode to which the camera is currently set, pressing the Menu
button displays the LCD menu options specific to that mode. The
Macro button enables close-up picture taking, and the Delete
button, as one would expect, deletes pictures from the SmartMedia
card.
Grouped with the DISP button,
you'll find the Menu, Macro, and Delete buttons. Depending on
the mode to which the camera is currently set, pressing the Menu
button displays the LCD menu options specific to that mode. The
Macro button enables close-up picture taking, and the Delete
button, as one would expect, deletes pictures from the SmartMedia
card. ![]()
Also on the back of the camera, you'll find the Function
Button, a 4-way toggle control combined with a center-actuated
push-button. This control is used to navigate through the various
LCD menu options, and select and confirm options. Touching one
of the four arrows on the perimeter of the control (which has
a gentle toggle action), moves between the various menu options
and the available settings for those options. After you make
your selection, pressing the center of the Function button confirms
your selection. The Function button's combined rocker-toggle
and push-button operation makes navigating and selecting menu
options a breeze. ![]()
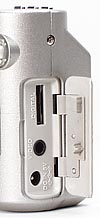 The left side of the camera
contains a digital port for connecting to a PC, a video port
for connecting to a television for viewing images, and a DC IN
port for connection to a standard AC power supply. The right-side
of the camera houses the slot for insertion of the camera's 8
MB, 3.3V SmartMedia card.
The left side of the camera
contains a digital port for connecting to a PC, a video port
for connecting to a television for viewing images, and a DC IN
port for connection to a standard AC power supply. The right-side
of the camera houses the slot for insertion of the camera's 8
MB, 3.3V SmartMedia card. ![]()
The PDR-M4 does not include a separate zoom button. to
actuate its "digital zoom" feature. Instead, you can
capture an image that is zoomed to twice its original size by
setting the mode to either Auto or Manual, and pressing the Up
arrow on the Function button.
![]()
Control Enumeration
In this section, we'll review the functions of each of the PDR-M4's
buttons, controls, and menu options. ![]()
Mode Dial
Sets the mode in which you want to operate the camera. The Mode
Dial has six positions, including the Off position. The remaining
five positions include:
- Manual: For images that require the manual setting of white balance, flash intensity, ambient exposure, and AF/AE (auto-focus/auto-exposure) positions.
- Auto Photography: For normal image capture with all exposure settings automatically determined.
- Playback: For reviewing images on the LCD Monitor or television, and setting individual image attributes like protection, size, compression, etc.
- PC: For transferring images to your computer.
- Set-Up: For choosing basic camera settings, like sound, time, language displayed, and so on.
![]()
Shutter Button
Two-stage shutter button positioned on top of the camera in the
center of the Mode Dial. Pressing the shutter button halfway
triggers the auto-focus and auto-exposure systems. Fully depressing
the shutter button captures the image and stores it to the SmartMedia
Card. As mentioned earlier, depressing the Shutter button can
capture a single shot, or a burst of up to 16 images, depending
on a Record-mode menu setting. ![]()
![]() Self-Timer Button
Self-Timer Button
- Provides either a 2 second or a 10 second delay between pressing the Shutter button and when the camera fires.
- The delay time is an option in the LCD Record menu.
- Operates only when capturing single shots, or when capturing images requiring longer exposures (Bulb photography).
- Disabled when using Burst or Multi Photography modes.
![]()
![]() Image Quality Button
Image Quality Button
Selects the size (number of pixels) and quality (compression
ratio) of the image to be captured. Choose from one of the following
six combinations:
- 1600 x 1200 pixels (Full); 4:1 JPEG compression (Fine).
- 1600 x 1200 pixels (Full); 8:1 JPEG compression (Normal) this is the default setting.
- 1600 x 1200 pixels (Full); 16:1 JPEG compression (Basic).
- 800 x 600 pixels (Half); 4:1 JPEG compression (Fine).
- 800 x 600 pixels (Half); 8:1 JPEG compression (Normal).
- 800 x 600 pixels (Half); 16:1 JPEG compression (Basic).
The higher the number of pixels (FULL) and the lower the compression
(FINE), the better the image quality; however, as the quality
increases, the number of images that you can store on the SmartMedia
card decreases.![]()
![]() Flash Button
Flash Button
Provides access to one of five different flash options:
- Auto: Fires automatically as needed depending on the light level the camera detects.
- Red-Eye Reduction: Emits a pre-flash just before the shutter fires to minimize the red-eye effect in the subject's eyes in low-light conditions.
- Forced Flash: fires with each shot regardless of the lighting conditions, even during Macro photography.
- Suppressed Flash: Disables the flash regardless of lighting conditions.
- Slow-Synchro: Selects a slower shutter speed to use in conjunction with the flash, allowing the ambient illumination to contribute more of the total lighting.
![]()
![]() Function Button
Function Button
Navigates through the various LCD menu options, and selects and
confirms options. The Function button itself consists of two
sets of buttons with separate and distinct functions:
- The Arrow (cross-pad) buttons-located on the perimeter of the Function button-highlight the different LCD menu options and the available selections.
- The Enter button-located in the center of the Function button-confirms
the currently highlighted selection.

![]() DISP Button
DISP Button
- Auto or Manual mode: turns the LCD Monitor on and off, and displays the camera settings in the LCD window.
- Playback mode: displays information about the image being
reviewed, including image size, the date and time the image was
captured, and the name of the folder on the SmartMedia card to
which the image is stored.
![]() Macro Button
Macro Button
Turns Macro mode on and off. Macro mode allows you to capture
sharp images of subjects within a range of 4 to 20 inches.![]()
![]() Menu Button
Menu Button
Displays available Menu options on the LCD Panel. The menu options
vary depending on the mode in which you have the camera set:
- In Auto or Manual Photography modes: displays the Record (REC) menu.
- In Playback mode: Displays the Play menu.
- In Set-Up mode: Displays the Set-Up menu.
![]() Delete Button
Delete Button
In Playback mode, deletes the image currently displayed, or lets
you delete all images when held down for two or more seconds.
"All Images" erases all images in the current folder,
while "Format" reformats the memory card, deleting
all images, regardless of folder or protection setting. In Record
mode, deletes the last picture captured, or optionally "All
Images" or "Format" as above.![]()
Camera Modes and Menus
Following is a description of the major camera modes, and the
LCD menu options associated with each mode. (These were mentioned
briefly above, while discussing the operation of the mode dial.)![]()
Auto Photography Mode
Used for taking pictures under normal conditions. In Auto mode,
the cameras chooses both ambient and flash exposure levels, and
white balance is automatically determined. ![]()
Zooming an Image
The PDR-M4 is not equipped with a zoom button. Rather, to zoom
an image, press the Up arrow button on the Function button on
the rear of the camera while in Auto Photography mode. Doing
so enlarges the center of the image on the LCD Monitor so that
the photographed image appears to be zoomed to twice its original
size (equivalent to an 80mm lens on a 35mm camera).![]()
 Auto Record Mode LCD
Menu Options
Auto Record Mode LCD
Menu Options
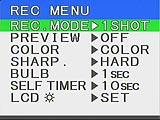
Pressing the Menu button in Auto Photography Mode displays the
REC menu, which contains the following options:
- REC Mode: Choose the capture mode you want to use.
Select from one of four modes:
- 1Shot: Captures 1 image at a time.
- Macro, self-timer, zoom, and flash options are all possible in 1Shot mode.
- Burst: Captures images continuously when the
shutter button is depressed.
- At the Full Size (1600 x 1200 pixels) image quality setting, 4 images are captured at .25 second intervals.
- At the Half Size (800 x 600 pixels) image quality setting, 16 images are captured.
- Self-timer and flash options are not possible in Burst mode.In Burst mode, the images are not immediately saved to the SmartMedia card. Rather, they are stored temporarily in an internal buffer memory. You can review each image captured and decide to save it or delete it, or you can save or delete all the images at once.
- Multi: Captures 16 low-resolution (400x300)
images continuously at .25 second intervals. The images are stored
in a mosaic as a single, 1600 x 1200 pixel image. This mode is
effective when capturing images of moving subjects. In Playback
mode, the up-toggle action that would normally "zoom in
on" the selected image will initiate a real-time playback
of the 16 images, producing the effect of a short video clip.
- Self-timer and flash options are not possible in Multi mode.
- Bulb: Allows long exposure times for subjects
like night scenes and fireworks displays. Shutter times of 1,
2, 4, or 8 seconds can be selected via the "Bulb" option
on the Setup menu, described below.
- The flash option is not possible in Bulb mode.
- The flash option is not possible in Bulb mode.
- · Preview: Turns the ability to preview an
image immediately after capture on and off. When enabled, each
captured image displays on the LCD for two seconds, during which
you can check the composition and brightness of the image.
- Color: Sets the mode in which the image will be captured:
- Color: Captures the image in full-color (default).
- B/W: Captures the image in black and white.
Note that the LCD viewfinder image also changes from color to black and white, in response to this setting.
- Sharpness: Sets the sharpness at which the image will
be captured:
- Norm: Normal sharpness (default).
- Soft: Softens the image.
- Hard: Sharpens the edges of objects in the image.
- Bulb: Sets the exposure time when capturing images
in bulb photography mode:
- 1sec: Opens the shutter for 1 seconds. (default)
- 2sec: Opens the shutter for 2 seconds.
- 4sec: Opens the shutter for 4 seconds.
- 8sec: Opens the shutter for 8 seconds.
- Self-Timer: Sets the delay time for taking a picture
in self-timer mode:
- 10sec: Waits 10 seconds before taking the picture.
- 2sec: Waits 2 seconds before taking the picture.
- LCD: Adjusts the brightness of the LCD Monitor in 1-step increments from -5 to +5. (arbitrary units)
![]()
 Manual Photography Mode
Used for taking pictures when you want to manually adjust the
following settings:
- White Balance
- Exposure Compensation
- Flash Intensity
- AF/AE area (auto-focus/auto-exposure)
Set these options by pressing the Enter button while in Manual Mode. The options appear at the bottom of the screen and you can use the Arrow (cross-pad) buttons and the Enter button to highlight and confirm the settings that you want. (In practice, we found this user interface a little awkward: To "activate" a particular menu, you had to first press the up-arrow side of the toggle control, even if you wanted to adjust the corresponding value down. Thus, a reduction in a setting required an up-press, followed by a down-press: Needlessly confusing, when we could discern no reason why the engineers couldn't have simply allowed the down-press in the first place.)
White Balance
Select from one of five white balance settings depending on the
environment in which you are capturing images:
- Auto: Automatically adjusts the white balance setting
based on the scene contents.
- Daylight: Adjusts the white balance for normal outdoor
lighting conditions.
- Fluorescent1: Adjusts the white balance for images
captured under fluorescent lighting to remove the bluish tint
that sometimes occurs. ("Cool White" bulbs.)
- Fluorescent2: Adjusts the white balance for images
captured under fluorescent lighting to remove the reddish tint
that sometimes occurs. ("Warm White" bulbs.)
- Incandescent: Adjusts the white balance for images captured under tungsten lighting.
![]()
Exposure Compensation
Allows you to vary the exposure from that selected by the camera,
over a range of +1.5 EV to -1.5 EV, in eleven steps of .3 EV
each, while viewing the image and monitoring changes on the LCD
monitor.![]()
Flash Intensity
Lets you reduce the intensity of the on-camera flash, to achieve
better balance with the ambient lighting, more subtle fill-flash
effects, or to compensate for a subject that is lighter than
the background. Choose from one of four settings from 0 (default)
to -.9, in .3 increments.![]()
Auto Focus/Auto Exposure Area
Allows you to choose which part of the subject to focus on when
the shutter button is depressed. Choose from the following:
- Center (default)
- Left
- Right
- Up (top of the scene)
- Down (bottom of the scene)
![]()
Manual Record Mode LCD Menu Options
Pressing the Menu button in Manual Photography Mode displays
the same REC menu outlined above in the Auto Photography section.
Playback Mode
In Playback mode you can review the images one at a time, or
in groups of nine "thumbnails" on the LCD monitor.
Besides viewing images on the camera's LCD Monitor, you can also
view them on your television by connecting the camera to the
T.V. using the video cable included with the camera.![]()
Viewing images
To view images one at a time, simply put the camera in Playback
mode and use the left/right Arrow buttons on the Function Button
to scroll through the pictures stored on the SmartMedia card.![]()
To view images in groups of nine, set the camera to Playback
mode and press the Enter button (press the center of the 4-way
toggle control). The images appear on the LCD. Use the Arrow
buttons to scroll through the images and then press the Enter
button after you have highlighted the image that you want.![]()
To view multi-image pictures, set the camera to Playback
mode, and use the Left/Right Arrow buttons until the multi-image
picture appears on the LCD. Press the Up Arrow button and automatic
playback begins.![]()
Enlarging images (Zoom Playback)
Besides viewing saved images, you can also zoom in on certain
parts of the images for a closer visual inspection. Simply put
the camera in Playback mode, use the Left/Right Arrow to choose
the picture you want to enlarge, and press the Up Arrow button.
The image appears enlarged in the LCD and you can pan through
the image using the arrow keys. Press the Enter button to return
to normal-sized viewing.![]()
 Playback Mode LCD Menu
Options
Playback Mode LCD Menu
Options
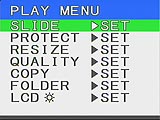
Pressing the Menu button displays the Play Menu which contains
the following options:
- Slide Show: Lets you view the captured images in an
automated sequence.
- Protect: Prevents an image from being accidentally
erased. To cancel protection, display the image, press the Menu
button, and choose Protect again. It's important to note that
if you format the SmartMedia card, all images-even protected
ones-are erased.
- Resize: Allows you to resize images previously captured
at the 1600 x 1200 pixel size to the 800 x 600 pixel size. Obviously,
you cannot scale a 800 x 600 image to a 1600 x 1200 image, nor
can you resize protected images, images captured with another
camera, or images captured in multi-photography mode. This helps
to free up space on the SmartMedia card if you have run out and
need additional space to store images.
- Quality: Allows you to compress images to half the
size at which they were captured. Images captured at the "Fine"
(4:1) compression setting can be changed to "Normal"
(8:1), and images at "Normal" (8:1) to "Basic"
(16:1). This also helps to free up space on the SmartMedia card
if you have run out and need more space for new images.
- Copy: Lets you copy images from one SmartMedia card
to another, and guides you through the process. The images that
you select are temporarily copied to a buffer in the camera's
internal memory so you can remove the current card and insert
the card to which you want to copy the pictures.
- Folder: Lets you select the folder containing the
pictures you want to view when more than one folder exists on
the SmartMedia card.
- LCD: Adjusts the brightness of the LCD Monitor in 1-step increments from -5 to +5.
![]()
PC Mode
When you want to connect the camera to a PC for downloading of
images, you first need to place the camera in PC mode. PC mode
enables the Digital port on the side of the camera for image
transfer to your PC. You can transfer images to an PC running
Windows '95/'98/NT 4.0, or to Apple Macintosh computers. Utility
software to access the images from the camera is included on
the CD bundled with the camera. ![]()
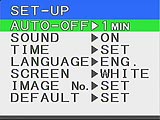 Set-Up Mode
Set-Up mode lets you customize the camera for your own picture-taking
needs. The Set-Up menu appears on the LCD when you rotate the
Mode dial to Set-Up mode. The following menu options are available:![]()
- Auto-Off: Sets the time interval for the camera's
power save function, which turns the camera off automatically
to conserve power when inactive. You can set the time interval
to be 1 (default), 2, or 3 minutes.
- Sound: Turns off the beep that you hear when focusing,
pressing the shutter button, and selecting a menu option. The
default value is On.
- Date and Time: Adjusts the camera's date and time
settings.
- Language: Lets you choose the language that you want
to appear on the screens. Current options are English and Japanese.
- Image No.: Optionally resets the image number when
you take photographs and store them to a folder on the SmartMedia
card. When you reset the Image No., the next image taken is assigned
the number 0001 and is stored to the smallest-numbered folder
on the media card currently inserted into the camera.
- Default: Resets all the camera set-up options to their factory default values
![]()
Image Storage and Interface
As we've stated, the Toshiba PDR-M4 utilizes removable SmartMedia
memory cards as the image storage medium. An 8MB card comes with
the camera, but you can purchase additional cards in 2, 4, 16
and 32 MB sizes. You can also purchase a PC card or floppy disk
adapter for image transfer to your computer. With the included
8 MB card, you can get about 8 Fine quality images at an average
file size of 960KB file size, 16 Normal quality at around 480KB
and about 33 Basic quality images at an average of 240KB. The
table below details these relationships in our now-standard format:
| Resolution/Quality vs Image Capacity |
|
|
||
| Images |
Compression |
Images |
Compression |
|
| Best Quality |
|
|
|
|
| Better Quality |
|
|
|
|
| Good Quality |
|
|
|
|
Remember to never remove the SmartMedia or switch the camera
off during data recording or erasing as these actions may damage
the media. Except in the case of copying media from one SmartMedia
card to another, you should only remove the card when the camera
is off. The card actually lives beneath the plastic flap on the
wrist strap side of the camera and is always positioned with
the electrodes facing inside. To remove the card, slide down
the release mechanism next to the cover. Push the card in slightly
and it will pop out for easy removal with your fingers.![]()
To write protect the memory card, place a write protect
sticker over the write protect area. Simply remove the sticker
to disable write protection. Write protection may fail if the
sticker becomes dirty and each sticker can only be used once.![]()
The PDR-M4 organizes images in storage folders. When the
SmartMedia card is formatted, it automatically creates a folder
entitled 100TOSHI. Data from the photographed images is recorded
to this folder and cannot be changed. Once the image numbers
reach 9999, a new folder (101TOSHI) is automatically created.
When there are two or more xxxTOSHI folders, the playback folder
default is the folder assigned the largest xxx value. ![]()
In-camera images resizingReducing image size saves memory
and allows you to continue taking more pictures. Half sized images
(800 x 600), images taken in the Multi mode, protected images
and images from another camera cannot be resized. While in Playback
mode you have the option of selecting which images you want to
resize and are given the option to reconsider before executing
the command.![]()
In-camera image recompression
Another option for space saving lies in compressing images (images
already in Basic quality, images from another camera and protected
images cannot be compressed, nor can you compress images on write
protected SmartMedia). Compressing images also occurs in Playback
mode with a similar setup to resizing. The quality setting will
be denoted under each image by the number of stars (three for
Fine, two for Normal, one for Basic). ![]()
The PDR-M4 allows you to copy an image from one SmartMedia
card to another, when in playback mode. Select the image to copy
and press Enter (you can cancel a selection by pressing Enter
again). Repeat the procedure to copy two or more images. When
you execute the copy, a Change Card message will appear, allowing
you to remove the old SmartMedia card and replace it with a new
one. Follow the menu prompts and select OK when finished. Don't
remove the SmartMedia card (except when indicated) or turn the
camera off during the copying procedure to avoid damaging the
card. You'll be prompted to press Enter once copying is complete
and can exit the Play menu by hitting the Menu button.![]()
You can erase images in either the Playback or the Automatic
and Manual photography modes. When in Playback, use the arrow
buttons to select the image and hit the trashcan button on the
back panel to erase. You'll be asked to confirm this decision.
Protected images cannot be erased, nor can images on write protected
SmartMedia. When in Automatic or Manual photography modes, hit
the trash can button and the last image taken will be selected
for deletion. Again, you are asked to confirm this decision.
![]()
You can also erase all the images in the current folder
in Playback, Manual or Automatic photography modes. Simply hold
down the trash can button for two seconds. The Erase menu appears
with the options of erasing a frame or all images or to format
the SmartMedia. But even if all the images in a folder are erased,
the folder itself cannot be erased. To erase the folder itself,
the SmartMedia card must be formatted. The "All Images"
erase option only applies to the folder you're currently in.
![]()
We've referred consistently in each function to "protected"
images. This feature basically prevents the images from being
erased or changed in any way. Protect images in Playback mode
through the Play menu. Protected images are denoted by a key
symbol beneath the image. Protection can be removed through the
same process. ![]()
The PDR-M4 supports either a conventional serial-port
interface (RS-232), or the much faster USB standard for connecting
to the host computer. In our tests, we found that even in USB
mode, it took the computer (a 350 MHz Pentium-II) about 27 seconds
to recognize the camera and be ready to download images. Once
past this delay though, USB data transfer was typically (incredibly)
speedy, pulling down a 936 KByte maximum-resolution file in only
2-3 seconds. By contrast, serial-port transfer was predictably
slow, requiring 92 seconds for the same 936K file. Still, this
was roughly 10 KBytes/second, faster than many cameras we've
tested using RS-232 connections. (Overall though, it's obvious
the huge advantage USB holds for image downloads from digital
cameras!)![]()
Video Out
This camera does have a Video Out feature but only in NTSC format
(usable in the USA, Canada and Japan). Foreign models presumably
support PAL. Before connecting the camera to any other equipment,
the equipment must be turned off. If the camera is connected
to a running television, the screen may flicker and the image
may not be displayed properly. A video cable comes with the camera
and plugs in the Video slot protected by the plastic flap on
the side of the camera opposite of the wrist strap. Once the
camera is connected to the television, you can take more photographs
or just display them. The LCD must be turned on to see images
on the television screen. Live images will be displayed at a
lower resolution on the television set and will appear less clear
than the recorded images.![]()
 Power
Power
The PDR-M4 uses a small LiIon rechargeable battery, providing
1100 mAh of capacity at 3.6 volts. As it turns out, this provides
less power than you'd think, based on the 1100 mAh rating. (Typical
NiMH AA cells provide about 1300 mAh.) The problem has to do
with the total amount of energy provided, taking into account
the lower cell voltage. Total energy in the PDR-M4's battery
is 1100 mAh x 3.6 volts, or 3.76 watt-hours. By contrast, a set
of 4 AA NiMH cells packs 1300 mAh x 4.8 volts, or 6.24 watt-hours,
roughly 65% more. This translates into somewhat shorter battery
life for the PDR-M4, so we strongly recommend buying a couple
of extra batteries to carry along with you. The LiIon rechargeables
have an advantage over NiMH cells, in that they don't "self-discharge."
This means you can keep a couple of them in your camera bag and
they won't lose significant charge for fairly long periods of
time. (Maybe a month or so?)![]()
Measured power consumption in the PDR-M4 is a bit higher
than average as well (these numbers measured while running on
5 volt external power: The current drain from the 3.6 volt battery
would almost certainly be higher.) Power consumption with the
LCD on in the capture modes is fairly typical of current digicams,
but capture mode without the LCD is quite a bit higher than some
recent models. Sleep-mode power consumption is VERY low though,
meaning you could comfortably leave the camera on all day without
fear of draining the battery. On the other hand, you could just
as easily shut the camera off, as the startup time of around
two seconds is the same, regardless of whether you're waking
it from "sleep," or just turning it on via the mode
dial. Here's the power ratings that we found:
|
|
|
| Capture Mode, w/LCD |
|
| Capture Mode, w/o LCD |
|
| Half-pressed shutter, no LCD |
|
| Memory Write (Transient) |
|
| Flash Recharge (Transient) |
|
| Image Playback |
|
| "Sleep" Mode (Auto power-down) |
|
Included Software
The PDR-M4 ships with a fairly complete complement of software,
and to Toshiba's credit, does a good job of supporting both the
Mac and PC platforms. On the PC, the primary interface is Sierra
Imaging's excellent Image Expert package, which provides for
image import, organization, adjustment, and output. The Mac package
consists of three components, Picture Shuttle, used for downloading
images, a TWAIN driver for interface to other programs, and EZ
Touch for image manipulation and adjustment. Overall, a very
competent software package, if not one of the "everything
but the kitchen sink" bundles which now seem to be falling
out of favor.![]()
Important note: We didn't have a chance to verify
this, but a reader wrote to tell us that Image Expert always
compresses the images when saving to JPEG format, using a higher
compression than the camera would in Fine mode. To preserve your
original images, use the Picture Shuttle application, or a card
reader to copy images to your computer.![]()
Test Results
In keeping with our standard policy, our comments here are rather
condensed, summarizing our key findings: For a full commentary
on each of the test images, see the PDR-M4's
"pictures" page.
As with all Imaging Resource camera tests, we encourage you to let your own eyes be the judge of how well the devices performed: Explore the images on the Pictures Page for the PDR-M4, to see how well the camera performed, and how its images compare to those from other cameras you may be considering buying.
Overall, we felt the PDR-M4 took good pictures, with accurate color, good saturation, and good resolution. Exposures were consistently accurate, although the flash tended to underexpose in most situations. (Not apparently due to a lack of power, as the amount of underexposure was pretty consistent, down to very short camera-subject distances. Under daylight lighting, either the "auto" or "daylight" white balance settings produced good results, but even the "incandescent" setting left a fair bit of warmth under the strong household incandescent lighting of our indoor portrait shot. (We did discover though, that wherever a color cast was left in the image, it was very consistent, and therefore easy to compensate for in an image-editing program, after the fact.)
The biggest news in the PDR-M4 (besides its blazing shot-to-shot
speed) is its exceptional low-light performance: Toshiba has
implemented a slick automatic dark-current calibration process
that effectively eliminates "stuck" CCD pixels, and
dramatically reduces CCD noise on long time exposures. The result
is a camera that takes unusually good low-light pictures, although
we found a strong reddish cast in our low-light tests. As with
the yellowish cast from incandescent lighting though, we found
this red tinge very easy to remove in Photoshop(tm). The result
was surprisingly good color and tonal range, at a light level
of only a half a footcandle (5.5 lux)!![]()
Resolution was good, although not as high as some 2-megapixel
cameras we've tested, with a visual resolution of roughly 700
lines per picture height. The normal 800x600 resolution mode
showed unusual amounts of color aliasing, but the "digital
tele" shots were very clean. (The conclusion being that
if you really want to shoot lower-resolution images, either shoot
at the higher resolution and resize on the computer afterward,
or use the digital tele function whenever possible.)![]()
Macro performance is good, but not in the "microscopic"
realm that some current cameras achieve. Nonetheless, with a
minimum coverage area of 3.6 x 2.7 inches (91 x 68 mm), it should
more than meet the needs of most users.![]()
Conclusion
Overall, we found the compact size, fast shot to shot exposure
intervals and retractable lens cover made the PDR-M4 a convenient
and user-friendly camera. It's low-light performance is world-class,
even when compared to other current (August 1999) models renowned
for this capability. We found it to be a workmanlike 2 megapixel
design, with standout features (fast cycle time and exceptional
low-light capability) that could make it a "must-have"
for people with those requirements.![]()
Reader Sample Images!
Do you have a PDR-M4 camera? If you'll post an album
of your samples on a photo-sharing
service and email us at [email protected],
we'll list the album link here for others to see!![]()
- T. Fowler's Sample Images (Where's yours?)

Follow Imaging Resource: