 Toshiba PDR-M5 digital camera (Review first posted 3 November, 1999) |
 |
|
2.14 megapixel sensor, 1600 x 1200 image resolution |
|
|
3x optical zoom lens | |
|
|
Unique movie-capture capability! | |
|
|
Exceptional low-light performance | |
|
|
Exceptional shot-to-shot speed, without "buffering" |
EZ Print Link Design
Readers have requested free-formatted versions of our reviews (without the graphical
accouterments of our page design), to make printing easier. We are accommodating
this request with special copies of each review, formatted to allow the text
flow to be dictated by the browser window. Click here
for a print-optimized page.
Manufacturer Overview
Toshiba is one of the truly huge players in the world of computers and electronics.
When they moved into the digital camera business a little over a year ago, they
brought to bear the full force of their engineering and systems-integration
talent, the effects of which are only now being fully seen. At the high end
of their line, they previously repackaged units designed by other companies
under the Toshiba logo, with only minor firmware variations. With the 2 megapixel
PDR-M4 though, they stepped out with a camera that WAS entirely "Toshiba
inside" (with the sole exception of the CCD itself). In the process, they
incorporated some truly impressive processing power, producing the fastest consumer-level
digicam on the planet. (A mere 2 seconds from shot to shot at full resolution,
all day long or until your memory card fills up!) Other camera attributes are
very strong as well, making a strong entry into the 2 megapixel arena. Now,
the PDR-M5 builds upon that same platform, adding a 3x optical zoom lens, more
camera-like styling, and a very slick "movie" mode that lets you capture
minutes-long (depending on the size of your memory card) silent movies that
can be played on essentially any computer, emailed, etc. Here's the story of
the PDR-M5:
High Points
![]()
![]()
![]()
![]()
![]()
![]()
![]()
![]()
![]()
![]()
![]()
Executive Overview
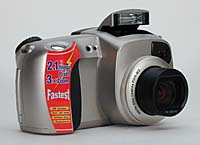
We enjoyed working with the PDR-M5. It's a pleasant camera that's
not too complicated for the average consumer, yet not too simplified for more
sophisticated users. You get a nice sprinkling of control options without too
much hassle, and a clean user interface. The PDR-M5 is relatively compact and
lightweight, although not as thin as the earlier PDR-M4 model. In fact, the
M5 looks nothing like the M4: Although the lens telescopes out when the camera
is turned on, even in the retracted condition the lens assembly protrudes somewhat,
requiring a protective lens cap when the camera's not in use. But Toshiba has
eased the lens cap hassle somewhat by thoughtfully providing a small strap that
ties onto the camera itself.
![]()
The large battery compartment makes a convenient hand grip and even features
a rubber finger rest on the front to prevent any slipping. Aesthetically, we
liked the addition of the pop-up flash and its single-shot operation method
that makes working with external strobes more feasible. All the buttons and
controls are well placed and we liked the layout of the bottom of the camera,
which allows you to remove batteries and SmartMedia while mounted to a tripod(!)
We were also happy to see the dioptric adjustment control on the optical viewfinder,
which makes life a little easier for eyeglass wearers. Our only ergonomic complaint
was over the rubber I/O jack cover, which is difficult to get back into place
correctly after use.
![]()
We found the optical viewfinder to be a little 'loose,' showing about 75 percent
of the actual image in wide angle mode and about 72.5 percent at the telephoto
end. The LCD viewfinder was pretty accurate, showing about 90 percent of the
final image at both wide angle and telephoto ends.
![]()
The 3x optical zoom 7.4 to 22mm lens, equivalent to a 40 to 120mm lens on a
standard 35mm camera, offers aperture ranges from F/3.5-5.0 and F/7.6-11. (The
variation is a function of zoom setting, the smaller apertures in each range
corresponding to the telephoto lens setting.) Focal range extends from approximately
35 inches (90 cm) to infinity for standard mode and from around 12 to 35 inches
(25 to 90 cm) in macro mode. We found the autofocus mechanism a bit noisy, which
could compromise some candid shooting conditions. The zoom mechanism seems pretty
accurate and controllable, not being constrained to a limited number of positions
as some are. It did tend to suffer from some "overshoot" when setting
it though, a quirk overcome through practice.
![]()
We experienced very good exposure control on the PDR-M5. Automatic capture mode
is pretty standard, with the camera making all the major exposure decisions.
Manual capture mode gives you more control over exposure compensation (+/-1.5
EV in 11 steps), white balance (Auto, Outdoors, Blue Fluorescent, Red Fluorescent
and Incandescent), aperture (F/3.5 and F/7.6) and AE/AF lock (top, bottom, left,
right and center). In both capture modes, you have control over the flash (Auto,
Red-Eye, Forced, Suppressed and Slow Synchro), access to the Bulb, Burst and
Multi exposure settings and the Self-Timer and Macro functions. There's also
a 2x digital zoom feature, although we recommend taking advantage of the optical
zoom for the best quality.
![]()
But the exciting and fun feature is the ability to make short movies! (Without
sound, of course.) Depending on the available SmartMedia space, the PDR-M5 allows
you to record short movies and play them back. Excellent for those times when
a simple still just won't capture everything, and a fairly unique feature among
digicams. (Also, the movie file format is standard AVI, not MPEG, so most recent-vintage
computers will be able to play them back easily.) We were surprised how much
fun this feature was: We're not at all the sorts to haul out the camcorder,
but the ability to grab short movies with the digicam and email them to friends
and relatives is definitely entertaining!
![]()
We were glad to see the return of the Bulb exposure mode that we first saw in
the PDR-M4, which actually takes two pictures when you release the shutter.
The first is your subject and the second exposure catches the back of the shutter,
which the camera then subtracts from the first image of the subject. This second
'dark calibration' shot eliminates the usual 'stuck pixel' problems you see
in most digital camera time exposures as well as a good deal of the noise usually
encountered with very long exposure times.
![]()
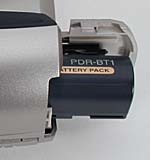
About the only shortcoming we saw with the PDR-M5 was battery consumption. While
it runs about the same as most two megapixel digicams when using the LCD, we
found the consumption higher than other digicams when the PDR-M5's LCD display
was turned off. The unit we received included a second battery in the box (a
nice touch), but we later heard that this was special promotional packaging,
and the standard unit will ship with a single battery. - We highly recommend
purchasing a second as backup for longer excursions.
![]()
Thank you, Toshiba, for the inclusion of a USB cable! (Now iMac users don't
have to purchase an additional adapter.) Other manufacturers have been very
slow to adopt this interface type. An accompanying CD includes Image Expert
for downloading and correcting your images, a USB driver and QuickTime for playing
back movies. You can also connect to your television set with the included cable,
where you can view and even compose images as the TV acts like an extension
of the LCD monitor.
![]()
With its 3x optical zoom, manageable exposure control and movie capability,
the PDR-M5 is an excellent camera for tooling around and capturing life's more
capricious moments. It has a nice combination of technical sophistication and
user friendly interfaces.
The silver, all plastic body of the PDR-M5 makes it a relatively portable unit,
weighing in at approximately 11.3 oz (320g) without the battery, accessories
and SmartMedia. It's not the slimmest, trimmest of the digicams, but is somewhat
compact at 5.1 x 3.1 x 2.76 inches (130 x 78 x 70mm). It could conceivably fit
into a large coat pocket or a medium sized purse. And the accompanying neck
strap gives you another carrying option. An advantage of the bulk is that its
contoured grip fits very comfortably into your hand, and a single-handed grip
feels very secure.
![]()
The front of the camera is pretty basic, with the lens taking up the majority
of the space. When the mode dial is placed on either of the capture modes, the
lens extends from its compartment, retracting again when the camera is turned.
The optical viewfinder window, flash control sensor and self-timer lamp are
also up front. As noted, the battery compartment makes a nice hand grip with
its soft rubber finger rest.
![]()

![]()
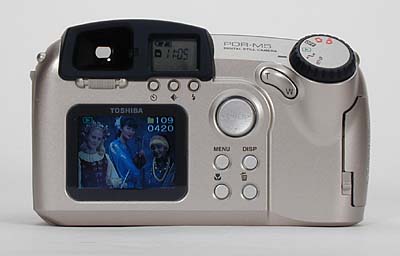
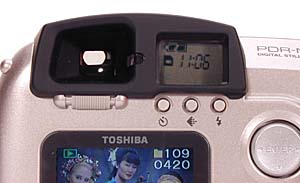
The back of the camera is where all the action is. The optical viewfinder is
deep-set in a black, plastic casing which also houses the status display panel.
A soft blue-green light illuminates the status display when any of the buttons
are pushed, great when shooting in dark conditions. A dioptric adjustment sliding
switch for the optical viewfinder and all the camera controls are on the back
panel as well as the LCD monitor. The mode dial slants down from the top, just
beside the optical zoom controls. More than most cameras, the control layout
makes it feasible to operate the PDR-M5 with one hand.
![]()
![]()
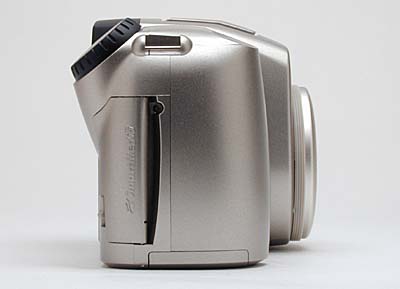
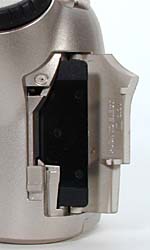
The SmartMedia slot lives on the side of the camera beneath the mode dial, with
an intricately shaped door that matches the smooth contours of the camera body
when it snaps shut. It also has a sliding lock that pops it open.
![]()
![]()
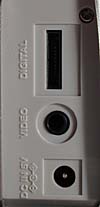
On the opposite side of the camera are the video, DC and digital jacks, protected
by a soft rubber cover that we found a little difficult to re-seat when closing.
It's a nice idea, because it provides a reasonably weather tight seal, but it
suffers in the implementation as you can spend a fair bit of time trying to
get it back in properly.
![]()

![]()
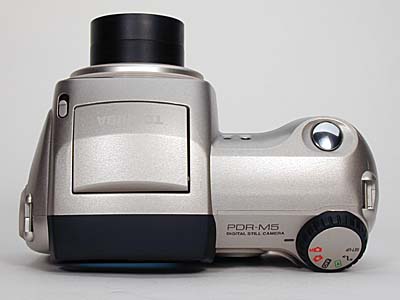
The top of the camera holds the pop-up flash and shutter button. There are also
two strap attachments for the neck and lens cap straps.
![]()
![]()
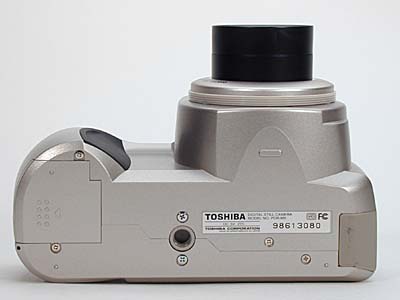
We greatly appreciated the design of the bottom of the camera as the positioning
of the battery compartment and tripod mount gives you the freedom to change
batteries while mounted to the tripod. The tripod mount is quite nice, despite
its plastic construction, and the camera has a good, flat bottom. Together with
the central location of the tripod socket, this produces a very stable tripod
mount. Also, the design is such that you can remove both the SmartMedia card
and the battery without disturbing your tripod setup. Very nice for studio work!
![]()
![]()
Viewfinder
The PDR-M5 offers both an optical viewfinder and an LCD monitor to
aid in image composition. Set into a large plastic mount, we found the real
image optical viewfinder to be rather 'loose,' one of the least accurate we've
tested. It actually shows 75 percent of the final image area at the wide angle
setting and 72.5 percent at the telephoto end. This means that the camera captures
quite a bit more image than what you can see in the viewfinder. The view is
biased toward the bottom of the frame, resulting in images that are off-center
by about 10 percent toward the top of the subject. The rather high eyepoint
of the viewfinder helps eyeglass wearers, but does remain somewhat sensitive
to lateral eye position, making centering a little problematic. The dioptric
correction for the optical viewfinder is a nice bonus for eyeglass wearers that
many manufacturers neglect.
![]()
![]()
We found the 1.8 inch amorphous silicon, 122,320 pixel TFT LCD finder to be
reasonably accurate, showing about 90 percent of the final image at both wide
angle and telephoto focal lengths. The view in the LCD is slightly off-center
vertically, a condition exacerbated by an outer bezel on the LCD display that
crops it top and bottom. For exact framing, we found ourselves peering up under
the silkscreened border on the Plexiglas bezel to try to see the very top of
the LCD display itself. This approach is somewhat limited though, because the
furthest reaches of the LCD end up at a pretty extreme viewing angle, causing
the display to largely gray out when viewed that way. We're really a bit baffled
on this one from a design standpoint. (We can't understand why the silkscreening
on the Plexiglas display cover wasn't simply kept further back from the edges
of the LCD frame.) The LCD monitor is easily disabled by hitting the Display
button (once for the information to disappear, twice for the image to disappear
and a third time brings back both).
![]()
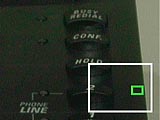
In Playback mode, the playback zoom mode works especially nicely, with smooth
scrolling around the image and a little position indicator in the lower right
hand corner to tell you where you are in the image. This is by far the best,
most intuitive implementation of "zoomed" playback we've seen to date.
![]()
Optics
The PDR-M5 offers a 3x optical zoom, 7.4 to 22mm lens, the equivalent
of a 40 to 120mm lens on a standard 35mm camera. Aperture ranges from F/3.5-5.0
and F/7.6-11 and the focal range extends from approximately 35 inches (90 cm)
to infinity for standard mode and from around 12 to 35 inches (25 to 90 cm)
in macro mode. (The variation is a function of zoom setting, the smaller apertures
in each range corresponding to the telephoto lens setting.)
![]()

![]()
The PDR-M5 has a rather noisy autofocus mechanism, making a sort of rattling
noise as it focuses. Although we didn't comment on it in the earlier review,
it is somewhat reminiscent of the lens on the PDR-M3 in this respect. This isn't
an issue in most shooting conditions, but could blow your cover if you're trying
to shoot candids. The zoom mechanism seems pretty accurate and controllable,
not being constrained to a limited number of positions as some are. It did tend
to suffer from some "overshoot" when setting it though, a quirk overcome
through practice. (If you're trying for precise framing, the trick is to get
close to your desired focal length, and then "nudge" the lens to the
right setting by pressing the zoom control very briefly.)
![]()
We found optical distortion to be about average, with the lens showing 0.9 percent
barrel distortion at wide angle and 0.65 percent at telephoto setting. Chromatic
aberration is almost non-existent, but there is a noticeable lens flare at the
edges of the frame in the blue channel only. Some might confuse this with chromatic
aberration, but strictly speaking, it isn't, although the effect is much the
same. (Chromatic aberration is visible as a bluish fringe on dark objects at
the edges of the frame in the resolution test images).
![]()
While Toshiba hasn't advertised the feature, the PDR-M5 is equipped to accept
auxiliary lenses, by virtue of a largish set of body threads at the base of
the lens. These are very large diameter external threads, which we view as being
a little bit of good news/bad news. The good news is that there will undoubtedly
be macro, telephoto and wide angle adapters available for the camera and the
large thread diameter should make for a pretty sturdy mounting. The bad news
is that because the threads are external (that is, exposed to the outside world),
they could be prone to damage if the camera is bumped against anything. Then
again, any bump hard enough to damage the threads is also likely to cause problems
for the rest of the camera as. Also, the large lens cap grips these threads
when it's in place, thus protecting both the lens and the threads.
![]()
Exposure
The PDR-M5 has good exposure control. In both auto and manual capture
mode, you have the option of Standard (ISO 100), +1 (ISO 200), +2 (ISO 400)
and Black & White, giving you a variety of exposure options both for lower
light settings, or for increasing shutter speeds for action shooting. The shutter
speed is automatically controlled from 1/2 to 1/1,000 seconds but manually controlled
under the Bulb setting from one to eight seconds. Combined with the previously-mentioned
lens apertures, these specifications should translate into a usable lighting
range of 3.5EV to 22 EV, using our previous terminology, or 0.1 to 32,000 foot-candles
(1 to 350,000 lux).
![]()
In our own tests, we found the PDR-M5 very functional down to about EV 6, or
more properly, 0.5 foot-candles or 5.5 lux. It even managed marginal exposures
down to EV 5 (0.25 foot-candles, 2.8 lux). At the 0.25 foot-candle level, however,
images showed a strong color shift to magenta. This is really dark though! -
At 0.25 foot-candles, we're literally having a hard time finding our way around
the studio, and usually turn the room lights on, rather than risk stumbling
into things! For comparison, a well-lit night street scene is generally about
1 foot-candle overall, about two full EV units (f-stops for us old-timers) brighter.
- This camera will do a *very* good job capturing images of typical night scenes
populated by people. (If the people can see, the PDR-M5 should be able to see
them.)
![]()
The PDR-M5's low light performance is helped considerably by the dark noise
calibration feature we first noted in the PDR-M4. In Bulb exposure mode, the
camera actually takes two pictures each time you snap the shutter. The first
is a picture of your subject, while the second is a picture of the back of the
shutter, which the camera then subtracts from the image of the subject. This
second 'dark calibration' shot pretty much eliminates the usual 'stuck pixel'
problems you see in most digital camera time exposures as well as a good deal
of the noise usually encountered with very long exposure times. The net result
is that the PDR-M5 does well with extremely dim lighting. (This is such a slick
and seemingly obvious approach that we're surprised someone hasn't implemented
it before now. Perhaps one clue as to why it took te PDR-M4 and -M5 to do this
is hinted at by their very fast shot-to-shot cycle times: They have much more
powerful processing chips in them than are common in digicams, giving them the
horsepower to handle the level of processing such dark-current calibration requires.)
However, the PDR-M5 isn't completely perfect in this respect. We found that
the lowest light shots showed a very pronounced magenta cast and it didn't seem
that the camera was actuating its autofocus mechanism at levels of 0.5 foot-candles
or below. (The studio images were reasonably focused, but we didn't actually
hear the autofocus mechanism operating).
![]()
Finally, the camera will refuse to take Bulb exposures in light levels below
about 1 foot-candle unless the variable ISO control is boosted to its +2 setting
(ISO 400). Overall though, the PDR-M5 probably takes the crown among the current
(October, 1999) crop of digicams, when it comes to low light operation!
![]()
Flash
The PDR-M5's pop-up flash is easily released by sliding the flash release
lever on top of the camera. The 'single pop' design of the on-board strobe emits
only a single flash in its normal (non red-eye) modes. This is nice in that
it makes it more feasible to use the PDR-M5 with external strobes, triggered
by a standard 'slave trigger.' (Cameras that emit a pre-flash for metering require
special slave units that can trigger off the second, main flash of the strobe,
rather than the metering pre-flash.)
![]()
You control the flash mode via the Flash button on the back panel, just above
the LCD monitor. Five modes are available: Auto, Red-Eye Reduction, Forced,
Suppressed and Slow Synchro. Auto puts the camera in control of judging light
conditions, Red-Eye Reduction emits a pre-flash before firing the full flash,
Forced means the flash always fires, Suppressed means it never fires and Slow
Synchro combines the flash with slow shutter speeds. (Slow Synchro is perfect
for night or backlit subjects, as it lets more of the ambient light into the
picture, brightening backgrounds, and giving a more natural appearance.)
![]()
Digital Zoom
The PDR-M5 does feature a 2x digital zoom function in addition to the 3x
optical zoom. Just press the up or down arrows on the rocker toggle button to
activate it in either capture mode. Note that the image size is fixed at 800
x 600 pixels - Like all digital zooms, the one on the PDR-M5 gains magnification
by trading away resolution, cropping into the central portion of the CCD's image.
This mode will be very useful for lower-resolution images destined for the web
or other electronic display, but the results will be less usable for printing.
![]()
Macro
You can access the PDR-M5's macro function by pressing the Macro button
on the back panel (marked with the standard flower symbol). In this mode, the
camera can focus on subjects from 12 to 35 inches (25 to 90 cm) and the LCD
monitor automatically turns on. Forced and Suppressed are the only flash modes
available with macro photography. (There's really no need for red-eye, unless
you're photographing leprechauns, and slow-synchro is also not likely to be
needed.)
![]()
Self-Timer
The PDR-M5's self-timer function (accessed via the Self-Timer button) gives
you an option of either two or 10 seconds before firing the shutter. Depending
on the amount of time selected, the self-timer LED (on the front of the camera)
lights red and then flashes as the shutter release nears. If the LCD monitor
is on, a countdown will be displayed. The timer can also be used in conjunction
with the Movie exposure setting, so you can get in on that action too. Besides
allowing time to get yourself into the picture, we've always found self-timer
mode very useful for reducing camera shake with the camera mounted on a tripod.
On the PDR-M5, because Macro is an entirely separate mode (selected by a separate
button), you can use self-timer in conjunction with the Macro setting, avoiding
jiggling your tripod or copy stand when making macro photos.
![]()
Burst
This mode lets you take continuous photographs at a maximum of 0.25 second
intervals. Depending on the photographic conditions, you can take up to four
1600 x 1200 pixel images or up to 16 800 x 600 images continuously. The images
aren't immediately stored to the SmartMedia. Instead, once you've completed
shooting, the camera lets you review the images and select which ones to save.
(Golf/tennis swing analysis, anyone')
![]()
Multi
This exposure mode opens and closes the shutter 16 times at approximately 0.25
second intervals and saves the images as a single 1600 x 1200 image. Note that
the flash is not available in Multi exposure mode and photographs cannot be
taken at Half size (800 x 600), although you can select from any of the three
image-quality (compression) settings. As in Burst mode, the photography conditions
determine the timing intervals between exposures. The neat thing with "multi"
images is that they'll play back as little mini-movies on the PDR-M5's LCD screen
in playback mode. To activate this "mini movie" playback, just get
the frame containing the small 16-up images in it, and hit the telephoto end
of the Zoom control. This normally activates zoomed playback, but on Multi-mode
images, it'll play back the 16-frame sequence in real time, at full size on
the LCD screen.
![]()
Bulb
The PDR-M5's Bulb exposure mode is great for taking very long exposures
in dark situations. You can choose from one, two, four and eight second exposure
times, controlled through the settings menu. As we mentioned earlier, the camera
actually takes two pictures each time you snap the shutter in the Bulb exposure
mode. The first captures the subject, and the second takes a picture with the
shutter closed. Since the image should be completely black when the shutter
is closed, the camera assumes that anything it "sees" there is noise,
which then subtracts from the image of the subject. This greatly reduces image
noise and "stuck" pixels.
![]()
Movies
A fun feature of the PDR-M5 is the ability to make small movies of a few
seconds duration (without sound, of course). As soon as you set this option,
the maximum record time for your chosen image size and quality level appears
on the status display. If the 8MB card provided with the PDR-M5 is empty, you'll
be able to record movies anywhere from 30 to 120 seconds in length, depending
on the size and quality level you choose. The operation is simple. Just press
the shutter button to start recording, and press it again to stop. The movies
playback pretty seamlessly in Playback mode and they can be downloaded as standard
AVI files to your computer for playback there. The same image-quality button
that selects high or low resolution and low, medium, or high quality in still
photography mode has the same effect on captured movies. The only difference
is that a "large" movie is only 320x240 pixels in size, while a "small"
movie is 160x120. Large-size movies play back on the PDR-M5's LCD screen full-frame
(completely filling the LCD), while small-size ones display in a cropped window.
![]()
To start recording a movie, we found you need to hold down the shutter button
long enough for the lens to autofocus. Once the movie is recording, the available-time
indicator turns red and starts decrementing, showing the time left. When you
switch to playback mode, a movie file appears as a thumbnail-sized images of
its first frame. NOTE that movies are stored in a separate "movies"
folder on the memory card! When you have "Movie" selected in the record
setup menu, you'll automatically end up viewing the contents of the "Movie"
folder on the SmartMedia card. When you're set to any other capture mode though,
you'll see the contents of the default folder instead. This stumped us at first,
making us think we'd lost our movie files when we switched back to "Still"
recording mode. The "Folder" option in the Playback mode setup menu
lets you switch between memory card folders at any time, regardless of the current
record-mode settings.
![]()
To play back a movie, use the rocker toggle control to position the animated
green/white border over the thumbnail for the movie you want to view. Press
the center of the rocker to view it full screen. The up-arrow starts the movie
playing, while the down-arrow stops it. The right and left arrows let you step
forward and back a frame at a time, or play normally if they're held down.
![]()
Overall, we were surprised by the new dimension motion added to our enjoyment
of the camera. While it certainly won't turn you into a cinematographer, the
PDR-M5's mini-movies are a great addition to the digital picture-taking experience.
We particularly appreciated the standard AVI file format, which made the resulting
movies readily viewable on either Macs or PCs. We've reviewed cameras in the
past that had "movie" capabilities, but they generally were much more
limited in the length of the movies they could record. Definitely a fun feature!
![]()
White Balance
The PDR-M5 gives you five options for white balance: Auto, Outdoors, Blue
Fluorescent, Red Fluorescent and Incandescent. These are only selectable in
Manual capture mode. (Auto capture mode always uses auto white balance.)
![]()
Exposure Compensation (EV)
In Manual capture mode, the PDR-M5 gives you 11 EV increments to adjust
the exposure from +1.5 to -1.5. For special situations such as spotlit subjects
or copying printed text, the manual provides some guidelines for adjusting the
EV value. (This is a bit wider range than other Toshiba cameras we've tested,
which generally only went down to -0.9EV in the downward direction. - A welcome
enhancement.)
![]()
AF / AE Area
Finally, the PDR-M5 gives you some options for shifting the AE and AF evaluation
target area in Manual capture mode. With the default at center, you can move
the target up, down, to the right and to the left. This is really helpful for
off center subjects, and absolutely unique among all the digicams we've tested
to date (October, 1999).
![]()
Shutter Lag / Cycle Times
When you press the shutter release on a camera, there's usually a
lag time before the shutter actually fires. This time allows the autofocus and
autoexposure mechanisms time to do their work and can amount to a fairly long
delay in some situations. Since this number is almost never reported, and can
significantly affect the picture taking experience, we now routinely measure
it. (Using an electronic timebase, digital counter, and a pressure-switch trigger
on the camera's shutter button.)
![]()
Shutter lag time with full auto focus ranges from 0.9 - 1.2 seconds, a bit slower
than much of the field, while shutter lag with prefocus (half press of shutter
button before the actual exposure itself) is 0.3 seconds, about average. The
PDR-M5 (like the PDR-M4 before it) is very fast shot-to-shot, thanks to an exceptionally
fast processor chip. Our measured shot-to-shot cycle times varied somewhat,
depending on how hard the autofocus system was having to work, but was in the
range of 1.5 - 3.0 seconds, and frequently 2.0 seconds or under. This is very
impressive! Cycle times were not measurably affected by image resolution, as
we obtained virtually identical numbers for full res/maximum quality as for
half res/minimum quality. In Burst and Multi exposure modes, the camera grabbed
successive frames at a rate of four frames per second, while the Movie mode
produced a frame rate of roughly 11 frames per second.
![]()
From a "cold start" (camera turned off), it takes about 5.6 seconds
to take the first picture. Switching from record to playback takes about 2.5
seconds, while the change from playback to the first picture about 2.2 seconds.
![]()
User Interface
The PDR-M5 has a pretty uncomplicated user interface, with all the
controls clearly labeled and well placed. One handed operation is a bit of a
stretch but could conceivably be done. Menus are well navigable and laid out
sensibly, so there's no guesswork. Let's look at each button individually:
![]()
Shutter Button
Located on the top right of the camera, very smooth and silver. When halfway
pressed, sets focus and/or exposure (depending on capture mode) and fires the
shutter when fully pressed.
![]()
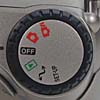
Mode Dial
Located on top of the camera, slanting somewhat towards the back panel.
The dial features a notched rubber bezel, giving fingertips a good grip. The
dial controls the mode of the camera with these options:
![]()
 Manual:
puts camera into Manual capture mode, giving you some exposure control.
Manual:
puts camera into Manual capture mode, giving you some exposure control.

 Automatic:
puts camera into Automatic capture mode, letting the camera set exposure.
Automatic:
puts camera into Automatic capture mode, letting the camera set exposure.
 Off:
turns the camera off.
Off:
turns the camera off.
 Playback:
allows you to view recorded images.
Playback:
allows you to view recorded images.
 PC:
allows the camera to download images to a computer.
PC:
allows the camera to download images to a computer.
 Setup:
allows you to change the camera's setup options.
Setup:
allows you to change the camera's setup options.

Zoom Button
Located just beside the Mode Dial, marked with a 'T' for telephoto and 'W'
for wide angle. In Manual and Automatic capture modes, controls the optical
zoom.
![]()
![]()
Flash Button
Located directly beneath the status display panel and marked with a black
flash symbol. In both Automatic and Manual capture modes, this button controls
the flash mode (Auto, Red-Eye Reduction, Forced, Suppressed and Slow Synchro).
![]()
![]()
Image Quality Button
Located just to the left of the Flash button and marked with a "dissolving
square" icon. In either capture mode, this button selects between Full
(1600 x 1200) and Half (800 x 600) pixel sizes for each quality setting (Fine,
Normal and Basic). You cycle through all available resolution/quality settings
by pressing the button multiple times.
![]()
![]()
Self-Timer Button
Located directly to the left of the Quality button and indicated by a black
self-timer symbol. In either capture mode, this button activates the self-timer
function and cancels it as well.
![]()
Dioptric Adjustment Switch
Located directly beneath the optical viewfinder. This adjusts the optical
viewfinder to accommodate eyeglass wearers, or others who are either near- or
far-sighted.
![]()

Rocker Toggle Button
Located to the right of the LCD monitor, this button is marked with four
arrows (one in each direction) and the word 'Enter' engraved in the center.
- In Automatic, Manual, Playback and Setup modes, the arrow buttons navigate
through menus and the Enter function confirms menu options.
- In Automatic and Manual capture modes, the up and down arrows control the
2x digital zoom.
- In Playback mode, the right and left buttons scroll through recorded images.
![]()
![]()
Menu Button
Located beneath the rocker toggle button and marked with the word 'Menu.'
- In Automatic, Manual and Playback modes, accesses and dismisses the settings menu.
![]()
![]()
Display Button
Located to the right of the Menu button and marked 'Disp.'
- In Automatic and Manual capture modes, controls the LCD monitor display
(hit once eliminates the information display, hit twice eliminates the image
and a third time recalls both).
- In Playback mode, displays the pixel size, date and time of the image on
the screen.
![]()
![]()
Macro Button
Located underneath the Menu button and marked with a black flower symbol.
- In Automatic and Manual capture modes, activates or cancels the Macro exposure mode.
![]()
![]()
Erase Button
Located beside the Macro button and marked with a black trash can symbol.
- In Automatic and Manual capture modes, gives you the option of deleting
the last image captured.
- In Playback mode, erases the currently displayed image. If held down for two seconds, gives the option to erase one image, all or to format the SmartMedia.
![]()
Flash Release Button
Located on top of the camera, right beside the pop-up flash. This releases
the flash from its compartment.
![]()
Camera Modes and Menus
![]()
Manual Capture Mode
Accessed by turning the mode dial to the red camera symbol accented by a
red 'M.' This mode gives you control over the exposure settings. Pressing the
Menu button in this mode gives you the following options:
![]()
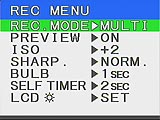
- Record Mode: selects between One Shot, Burst, Multi, Bulb and Movie
exposures.
- Preview: turns image preview on and off.
- ISO: selects ISO variables from Standard (100), +1 (200), +2 (400)
and Black & White.
- Sharpness: selects image sharpness between Normal, Soft and Hard.
- Bulb: sets the Bulb exposure time at one, two, four or eight seconds.
- Self-Timer: sets the self-timer at either two or 10 seconds.
- LCD: sets the LCD brightness.
![]()
Automatic Capture Mode
Accessed by turning the mode dial to the lone red camera symbol. This mode
puts the camera in control of exposure settings. Hitting the Menu button in
this mode pulls up the same record settings menu as in Manual mode.
![]()
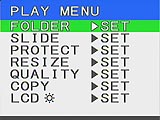
Playback Mode
Accessed by turning the mode dial to the green playback symbol. This mode
lets you play back saved images as well as erase them. Here, you can also format
the SmartMedia. Pressing the Menu button in this mode brings up the following
options:
- Folder: selects the folder to play back.
- Slide: activates the slide show player.
- Protect: write protects individual images.
- Resize: changes image size from 1600 x 1200 to 800 x 600.
- Quality: compresses an individual image to half its size (increases
JPEG compression).
- Copy: copies images from one SmartMedia card to another.
- LCD: adjusts the LCD brightness.
![]()
PC Mode
Accessed by turning the mode dial to the black transfer symbol. This mode
allows you to connect to a computer and transfer images.
![]()
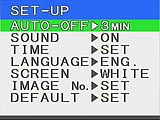
Setup Mode
When the mode dial is turned to the Setup position, the settings menu immediately
appears on the LCD display with the following options:
- Auto-off: sets the auto-off time at one, two or three minutes.
- Sound: turns camera sound on and off.
- Time: sets the camera date and time.
- Language: sets the menu language to English or Japanese.
- Screen: sets the screen background to white or green.
- Image Number: resets image numbering.
- Default: returns all camera setup options to factory defaults.
![]()
Image Storage and Interface
The PDR-M5 utilizes SmartMedia as its image storage medium, a format
which can be repeatedly read and written to. An 8MB card comes with the camera,
but you can purchase additional cards in 2, 4, 16 and 32 MB sizes. You can also
purchase a PC card or floppy disk adapter for quick image transferal.
![]()
![]()
SmartMedia is easily write protected by placing a write protection sticker over
the designated area on the card. Likewise, removing the sticker disables write
protection. Remember that these stickers can only be used once and write protection
may fail if the sticker gets dirty. To protect individual images, the settings
menu in Playback mode gives you an image protect option. Protected images are
denoted by a key symbol beneath the image. Protection can be removed through
the same process.
![]()
The PDR-M5 organizes captured images into storage folders. When the SmartMedia
card is formatted, it automatically creates a folder entitled 100TOSHI. Data
from photographed still images is recorded to this folder and cannot be changed.
Movies are recorded to a separate folder indicated by a movie camera symbol.
Once the image number reaches 9999, a new folder (101TOSHI) is automatically
created. When there are two or more xxxTOSHI folders, the playback folder default
is the folder assigned the largest xxx value. You can change the playback folder
through the settings menu in Playback mode.
![]()
Reducing image size saves memory and allows you to continue taking more pictures.
Half sized images (800 x 600 pixels), images taken in the Multi mode, protected
images and images from another camera cannot be resized. While in Playback mode
you have the option of selecting which 1600 x 1200 images you want to resize
and are given the option to reconsider before executing the command.
![]()
Another option for space saving lies in compressing images (images already in
Basic quality, images from another camera and protected images cannot be compressed,
nor can you compress images on write protected SmartMedia). Compress images
in Playback mode, also through the settings menu. The quality setting will be
noted under each image by the number of stars (three for Fine, two for Normal,
one for Basic).
![]()
The PDR-M5 allows you to copy an image from one SmartMedia card to another.
The Copy function is also selectable in the Playback menu while in Playback
mode. Select the image to copy and press Enter (you can cancel a selection here
as well). Repeat the procedure to copy two or more images. If you execute the
copy, a Change Card message will appear, allowing you to remove the old SmartMedia
card and replace it with a new one. Follow the menu prompts and select OK when
finished. Don't remove the SmartMedia card (except when indicated) or turn the
camera off during the copying procedure to avoid damaging the card. You'll be
prompted to press Enter once copying is complete and can exit the Playback menu
by hitting the Menu button.
![]()
You can erase images in either Playback or Automatic and Manual photography
modes. When in Playback, use the arrow buttons to select the image and hit the
Erase button on the back panel. You'll be asked to confirm this decision. Protected
images cannot be erased, nor can images on write protected SmartMedia. When
in Automatic or Manual photography modes, hit the Erase button and it selects
the last image taken. Again, you are asked to confirm this decision.
![]()
In addition to erasing individual images with the Erase button, you can also
erase an entire folder in either Automatic, Manual or Playback mode. Simply
hold down the trash can button for two seconds. The Erase menu appears with
the options of erasing one frame or all images or to format the SmartMedia.
But even if all the images in a folder are erased, the folder itself cannot
be erased unless you format the SmartMedia.
![]()
Still Image 8MB Card Capacity, Compression Ratios
| Resolution/Quality vs Image Capacity |
|
|
||
| Images |
Compression |
Images |
Compression |
|
| Fine Quality |
|
|
|
|
| Normal Quality |
|
|
|
|
| Basic Quality |
|
|
|
|
Movie Image 8MB Card Capacity, Compression Ratios
| Resolution/Quality vs Image Capacity |
|
|
||
|
|
Compression |
|
Compression |
|
| Fine Quality |
|
|
|
|
| Normal Quality |
|
|
|
|
| Basic Quality |
|
|
|
|
![]()
 For its computer interface, the PDR-M5 uses the very fast USB (universal serial
bus) connection. Like all the USB devices we've tested thus far, connection
and software installation was a breeze. The one odd note that we encountered
is that it takes the computer an appreciable period of time (about 25-30 seconds)
to recognize the camera once it is connected to the USB port and switched to
"connect" mode. Once recognized though, it shows up in Windows Explorer
as just another disk drive, and you can copy file from it as you would any other
disk device. Transfer times are very fast: We clocked a 3.6 megabyte multi-file
transfer at only 7 seconds, a data-transfer rate of a bit over 500 Kbytes per
second. This is 50 to 100 times faster than we commonly measure for digicams
connected via serial ports, a very welcome speed increase indeed!
For its computer interface, the PDR-M5 uses the very fast USB (universal serial
bus) connection. Like all the USB devices we've tested thus far, connection
and software installation was a breeze. The one odd note that we encountered
is that it takes the computer an appreciable period of time (about 25-30 seconds)
to recognize the camera once it is connected to the USB port and switched to
"connect" mode. Once recognized though, it shows up in Windows Explorer
as just another disk drive, and you can copy file from it as you would any other
disk device. Transfer times are very fast: We clocked a 3.6 megabyte multi-file
transfer at only 7 seconds, a data-transfer rate of a bit over 500 Kbytes per
second. This is 50 to 100 times faster than we commonly measure for digicams
connected via serial ports, a very welcome speed increase indeed!
![]()
Video Out
The PDR-M5 comes with an NTSC video cable for connecting to a television
set. You can view recorded images as well as compose new ones, using the television
set as an extension of the LCD monitor. Note that live images will appear less
clear than playback images because they are displayed at a lower resolution.
![]()
Power
 The PDR-M5's power consumption is about typical of most two megapixel digicams
when using the LCD, but we found the consumption higher than other digicams
when the PDR-M5's LCD display was turned off. If you're on an extended excursion,
you'll be able to increase battery life considerably by turning the camera completely
off between shots. (Interestingly enough, the power drain of the PDR-M5 is actually
noticeably reduced, relative to that of the earlier PDR-M4-Technology marches
on!) The PDR-M5 uses a small LiIon rechargeable battery, providing 1100 mAh
of capacity at 3.6 volts. As it turns out, this provides less power than you'd
think, based on the 1100 mAh rating. (Typical NiMH AA cells provide about 1300
mAh). The problem has to do with the total amount of energy provided, taking
into account the lower cell voltage. Total energy in the PDR-M5's battery is
1100 mAh x 3.6 volts, or 3.76 watt-hours.
The PDR-M5's power consumption is about typical of most two megapixel digicams
when using the LCD, but we found the consumption higher than other digicams
when the PDR-M5's LCD display was turned off. If you're on an extended excursion,
you'll be able to increase battery life considerably by turning the camera completely
off between shots. (Interestingly enough, the power drain of the PDR-M5 is actually
noticeably reduced, relative to that of the earlier PDR-M4-Technology marches
on!) The PDR-M5 uses a small LiIon rechargeable battery, providing 1100 mAh
of capacity at 3.6 volts. As it turns out, this provides less power than you'd
think, based on the 1100 mAh rating. (Typical NiMH AA cells provide about 1300
mAh). The problem has to do with the total amount of energy provided, taking
into account the lower cell voltage. Total energy in the PDR-M5's battery is
1100 mAh x 3.6 volts, or 3.76 watt-hours.
![]()
By contrast, a set of 4 AA NiMH cells packs 1300 mAh x 4.8 volts, or 6.24 watt-hours,
roughly 65 percent more. Combined with its moderately high power drain, this
translates into a somewhat shorter battery life for the PDR-M5, so we strongly
recommend buying a couple of extra batteries to carry along with you. The LiIon
rechargeables have an advantage over NiMH cells, in that they don't 'self-discharge.'
This means you can keep a couple of them in your camera bag and they won't lose
significant charge for fairly long periods of time. (Maybe a month or so').
Our evaluation unit arrived in packaging containing an extra battery, but we've
been told this was a special promotional bundle, and the standard will be one
battery per camera. We strongly recommend you purchase a second. (A good idea
with ANY digicam to have more than one set of batteries, regardless of the type
used!)
![]()
The PDR-M5's power consumption is as follows:
|
|
|
| Capture Mode, w/LCD |
|
| Capture Mode, no LCD |
|
| Half-pressed shutter w/LCD |
|
| Half-pressed w/o LCD |
|
| Memory Write (transient) |
|
| Flash Recharge (transient) |
1750 mA with LCD(!) |
| Image Playback |
|
| "Sleep" Mode |
|
![]()
Included Software
The PDR-M5 comes with a serial cable, USB cable, Macintosh adapter and software
CD which includes a USB driver, Image Expert and QuickTime. All software is
compatible with both Windows 98, 95 and NT 4.0 as well as Macintosh OS 8.1 and
higher. The Image Expert software downloads the images from the camera and allows
you to perform some minor image corrections (brightness, color, saturation,
sharpness, etc.). QuickTime gives you the medium to play back the movies you
recorded.![]()
Test Results
In keeping with our standard policy, our comments here are rather condensed,
summarizing our key findings: For a full commentary on each of the test images,
see the PDR-M5's "pictures" page.![]()
As with all Imaging Resource camera tests, we encourage you to let your own
eyes be the judge of how well the devices performed: Explore the images on the
pictures page, to see how well the PDR-M5 performed,
and how its images compare to other cameras you may be considering buying![]()
Overall, the PDR-M5 is a competent performer, with resolution, color, and tonal
range about in the middle of the 2 megapixel field. It's greatest strengths
all derive from its unusually powerful processor, which makes possible such
features as its incredible 2 second shot-to-shot cycle time, movie recording
mode, and its exceptional low-light performance. If your application requires
it, any one of these features could be enough to justify the camera all by itself:
The cycle time is the fastest of any camera we've tested to date (October, 1999),
and isn't limited by buffer memory concerns: You can shoot at that rate until
the memory card is full. Likewise, the movie feature is unique among cameras
we've tested. Finally, its low-light capability is about the best we've found,
with no "stuck pixels" at any exposure time, thanks to Toshiba's clever
processing.![]()
The PDR-M5's resolution tested out at 700 line per picture height in the horizontal
direction, and ~600-625 lines in the vertical, levels we'd consider "average"
for 2 megapixel digicams. The lens shows some barrel distortion at the wide
angle end of its setting, decreasing at the telephoto end. Chromatic aberration
was essentially non-existent at the telephoto end of the lens range, and there
was only slight blue-channel flare at the wide angle end.![]()
The optical viewfinder is rather "loose", showing only 73-75% of the
final image area, but the LCD finder is much better, at about 90% of the final
area.![]()
Conclusion
The PDR-M5 isn’t an extremely complicated camera but it’s not overly
simplified either. Its strongest point is probably its exceptional shot-to-shot
speed, which frees you from worrying about whether the camera will be ready
for the next shot or not. (This is a seemingly subtle point that makes a huge
difference in how "cameralike" a digicam feels.) The combination of
a 3x optical zoom lens, good exposure control, and movie capability makes it
an excellent choice for vacations, documentary photography, or just plain fun.
(Kids really get a kick out of the movie thing. :-) Also, if you're looking
for a camera with excellent low-light capture ability, the unique "no bad
pixels" technology of the PDR-M5 can't be beat.
Reader Sample Images!
Do you have a PDR-M5 camera? If you'll post an album of your samples
on one of the photo-sharing services and email us at [email protected],
we'll list the album here for others to see!
For More Info:
View the data sheet for the PDR-M5![]()
View the test images from the PDR-M5![]()

Follow Imaging Resource: