 Casio QV-2000UX Casio delivers 2 million pixels, and "real camera" features (including full-manual exposure!) (Review first posted 1/12/00) |
 |
|
True 2 megapixel sensor for 1600x1200 images |
|
|
3x f/2.0 optical zoom lens | |
|
|
Manual focus, full-manual exposure options | |
|
|
Movie capture | |
|
|
Coolest user interface in the west! |
EZ Print Link
Readers have requested free-formatted versions of our reviews (without the graphical
accouterments of our page design), to make printing easier. We are accommodating
this request with special copies of each review, formatted to allow the text
flow to be dictated by the browser window. Click here
for a print-optimized page. ![]()
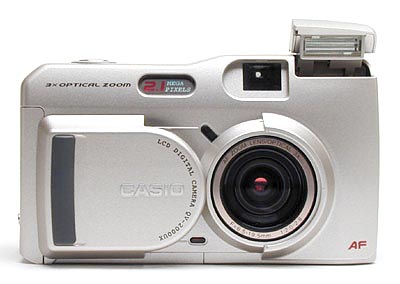
Manufacturer Overview
Casio was one of the very first companies to produce digital cameras for consumers,
and their original QV-10 digicam introduced digicam users to the wonders of
LCD viewscreens. What a concept! It's become almost mandatory these days, but
back when the QV-10 was first introduced, the feature was a real eye-opener.![]()
Casio has continued to innovate, with each generation of cameras becoming more
"camera like", while still reflecting their consumer-electronics roots
in their style and functional user interfaces. The QV-2000UX is one of Casio's
latest, and their first 2 megapixel design. It provides more photographic controls
than many of the higher-priced competition, and the resolution you'd expect
from a 2 megapixel CCD. It also boasts what is arguably the most attractive
user interface of any camera we've tested to date. (December, 1999)![]()
Highlights
- 2.11 megapixel CCD delivering 1600 x 1200 and 800 x 600 images

- 1.8 inch, TFT, low-glare color HAST LCD (122,100 pixels)
- F/2.0 to F/2.8, 6.5 to 19.5mm, 3x zoom lens (equivalent to a 35mm 36 to
108mm lens)
- Multi-pattern, center point and spot metering modes
- Shutter and aperture priority exposure modes
- Exposure compensation from -2 to +2 EV
- Shutter speeds from one to 1/800 seconds
- F/2.0 to F/11 apertures available in auto and manual
- White balance with six modes: (Auto, Daylight, Shade, Tungsten, Fluorescent
and Manual)
- Two and 10 second self-timer
- Built-in flash with four modes (Auto, On, Off and Red-Eye Reduction)
- Movie, panorama, continuous, quick, landscape, night scene and portrait
photography modes
- Serial and USB cables
- DPOF (Digital Print Order Format) compatibility for printing images
- Image capture in JPEG (Exif.Ver.2.1) for still images and AVI files for movie images
![]()
Executive Overview
We really did enjoy working with the QV-2000UX. Its lightweight construction
and compact shape make it relatively 'pocketable' for medium sized pockets and
purses. We particularly liked the level of control it gave us over exposure
parameters. Our biggest complaint on the physical design is probably the somewhat
sticky sliding lens cover (which also controls the camera's power) and the pop-up
flash that you can't close unless the lens cover is closed. But the "way
cool" 3D function menus make up for these points. The QV-2000UX was built
to accept both Type I and II CompactFlash cards, allowing it to work with high-capacity
Type II storage devices like the 340 megabyte IBM Microdrive. It also features
a nice, flat bottom, although the placement of the tripod mount and battery
compartment make it impossible to change batteries while mounted to a tripod.
![]()
As far as viewfinders go, the QV-2000UX's optical and LCD viewfinders feature
the same accuracy when in wide angle, at 88 percent. They diverge slightly towards
the telephoto end of things (86 percent for the optical and 89.5 percent on
the LCD monitor). This close agreement between LCD and optical viewfinders is
an interesting phenomenon, unusual among digicams. A beneficial function on
the LCD viewfinder is its gridline feature, which helps you line up shots with
a light gray grid when activated. (VERY handy!) The 6.5 to 19.5mm 3x zoom lens
gives you the digital equivalent to a 36 to 108mm lens on a 35mm camera. Throw
in the 2x Digital Telephoto feature and you have magnification up to 6x (albeit
at the expense of image quality). The QV-2000UX offers a manually and automatically
adjustable aperture ranging from F/2.0 to F/11. We appreciated the time saving
Infinity focus function for far away subjects as well as the manual focus feature,
good for macro or hard to focus subjects. ![]()
An exciting feature on the QV-2000UX is the range of capture modes (Program,
Movie, Panorama, Aperture Priority, Shutter Speed Priority, Landscape, Portrait
and Night Scene). The Movie mode is interesting, with options for Past and Normal
recording. Past means that the camera actually starts recording into a buffer
memory upon entering the mode, even though you haven't pressed the shutter button
yet. Once you do press the shutter button, it adds the following images to the
already recorded ones. This has the almost-magical effect of recording events
that happened before you pressed the shutter: Very useful when taking snapshots
of kids and other quick-moving subjects! It even has a full manual exposure
mode, albeit one that's carefully hidden in the user interface, and not mentioned
in the documentation. ![]()
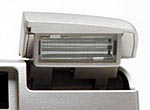
The pop-up flash on the QV-2000UX offers four modes: Auto, On, Off and Red-Eye
Reduction (On and Off meaning that the flash is either always on or always off).
You also have the ability to set the flash intensity to Strong, Normal or Weak,
depending on the light situation. Three metering options (Multi, Center and
Spot) and six white balance options (Auto, Daylight, Shade, Tungsten, Fluorescent
and Manual) give you flexibility with exposure control. Additionally, the exposure
compensation can be adjusted in all capture modes except Panorama in 1/3 EV
increments from -2 to +2. ![]()
The Quick Shutter and Continuous Recording functions give you fast recording
abilities at intervals as low as 0.5 seconds, depending on the amount of CompactFlash
space. Both are useful for fast action shots. You have some flexibility with
the self-timer as well, with the QV-2000UX giving a choice between two or 10
second countdowns. ![]()
An NTSC video cable comes with the camera, allowing you to utilize a television
set as the LCD monitor for composing and playing back images. Hooray for Casio,
since they included a USB cable in addition to the standard serial cable for
image downloading. It's nice to see more manufacturers finally including this
widely available high-speed computer interface. A software CD comes with Photo
Loader, which transfers the images from the camera to the computer. There's
also some panorama stitching software and QuickTime, in addition to Microsoft's
Internet Explorer just in case you need that too (the QV-2000UX automatically
creates HTML files when recording the images so you're web ready right the start).
![]()
Despite a few minor glitches with the camera body, we liked the QV-2000UX. It
was nice to have such a variety of exposure controls and modes at our fingertips.
This is a camera perfect for the consumer who wants the intrigue of full exposure
control and the ease of a full program mode combined in one unit.![]()
Design
The QV-2000 features a relatively compact design with only minor protrusions.
Size wise, it measures 5.1 x 2.9 x 2.4 inches (129.5 x 75 x 61mm). The all plastic
body keeps the camera from being too heavy at 11.1 ounces (315g) without the
batteries. Casio has eliminated the worry over a lens cap by placing a sliding
cover over the lens which also works as an on/off switch. We found it a little
confusing at first though, as we thought we'd slid the cover back all the way
(the flash popped up), but the camera didn't turn on. You have to keep pulling
until you can pull no more (there's a final click). This sliding lens cover
has a dual purpose, as it also prevents you from opening the CompactFlash compartment
while the camera is on. While we like the way the sliding cover protects the
lens when closed, we weren't keen on the design of the track that the cover
slides on: It's made of plastic, and the metal finger that holds the cover to
it can abrade the relatively soft track material. We noticed some wear on our
test unit, until we adopted the practice of applying some inward pressure on
the cover while we slid it. This took the strain off the track and ended the
wear problems, but we don't think users should have to worry about such things.
The pop-up flash also seems a little pointless since you can't close it until
the lens cover is closed which makes it more prone to breakage. We'd rather
have an exposed built-in flash like so many other digicams these days, although
the flip-up design admittedly should help some with red eye reduction, given
its greater separation from the lens.![]()
![]()
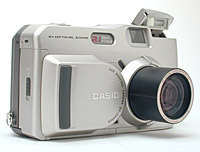
The shot above shows the front of the camera, with the cover retracted and the
lens extended. The small slots to the left of the lens hold the flash exposure
sensor and a LED that blinks during self-timer operation.![]()
![]()
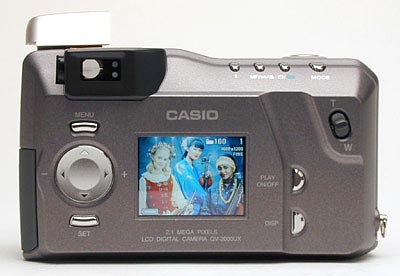
The back of the QV-2000UX features all the camera controls, the LCD monitor
and the optical viewfinder. A big plus is the addition of a dioptric adjustment
knob for eyeglass wearers. Everything is well marked and reasonably well placed,
although one-handed operation would be a bit of a stretch. That said, we've
always found Casio's user interface designs highly functional, and felt that
the QV-2000's controls were faster to navigate for common functions than many
cameras we've tested.![]()
![]()
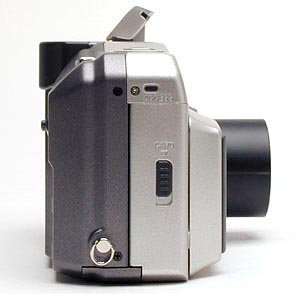
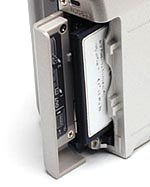
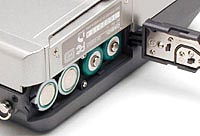
The right-hand side of the camera (as viewed from the back) is home to the Type
II CompactFlash memory slot, hidden behind a latching door.![]()
![]()
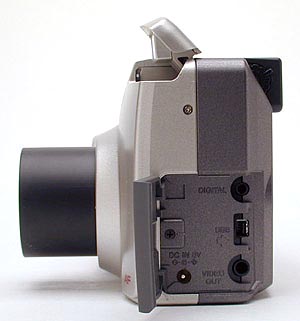
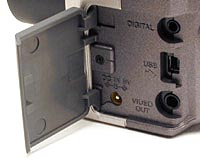
The I/O jacks live on the flash side of the camera, beneath a plastic cover
that slide locks into place. Most iMac users will be grateful for the inclusion
of a USB port and we're also glad to see many of the digicam producers finally
recognizing this interface. I/O jacks seem to be a problem for digicam designers
to deal with, since they need to be protected, yet readily accessible. We liked
the small rigid cover Casio used more than most solutions we've seen: It opens
easily, yet latches securely when closed.![]()
![]()
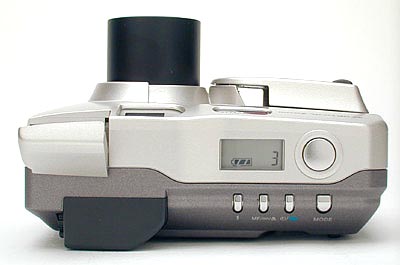
The shutter button and a small status display panel occupy the top of the camera.
The status display is a nice bonus when you're working without the LCD monitor
to save battery power. The row of buttons along the rear edge of the top panel
provide quick access to the most-used camera functions.![]()
![]()
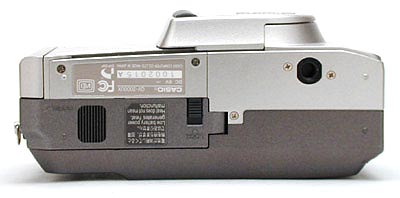
The bottom of the QV-2000UX is nice and flat, featuring a plastic tripod mount
and the battery compartment which locks with a small, sliding switch. Unfortunately,
depending on the size of your tripod mount, you can't quite change the batteries
while mounted to the tripod. This is always a nuisance for studio work.![]()
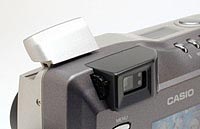
Viewfinder
 The QV-2000UX's
real image optical viewfinder has center autofocus crosshairs to remind you
where the camera is focusing. The neighboring dioptric adjustment dial is a
welcome feature for eyeglass wearers. Additionally, the orange and green LEDs
beside the optical viewfinder assist by letting you know the status of the camera
(focusing, flash charging, etc.).
The QV-2000UX's
real image optical viewfinder has center autofocus crosshairs to remind you
where the camera is focusing. The neighboring dioptric adjustment dial is a
welcome feature for eyeglass wearers. Additionally, the orange and green LEDs
beside the optical viewfinder assist by letting you know the status of the camera
(focusing, flash charging, etc.).![]()
Alternatively, the 1.8 inch, TFT, low-glare, color, HAST LCD monitor (122,100
pixels at 555 x 220) agrees quite closely with the view seen through the optical
viewfinder. We enjoyed the gridline feature which puts a grid of light gray
lines on the LCD monitor to help you line up a shot. An optional information
display on the LCD monitor reminds you how many exposures are available, the
image size and image quality of each shot, in addition to flash and setting
information.![]()
We measured the viewfinder accuracy as being the same for both the optical and
LCD monitor in wide angle mode at 88 percent. On the telephoto end, the optical
viewfinder was about 86 percent accurate and the LCD monitor 89.5 percent. Digital
telephoto on the LCD monitor was 84 percent accurate. It's pretty unusual for
a camera's optical and LCD viewfinder to agree so closely. While we generally
like to see the LCD be as close to 100 percent accuracy as possible for our
own work (which requires very precise framing), we recognize that the QV-2000's
consistency probably makes it easier for most users to estimate what's in the
frame and what isn't.![]()
Optics
The QV-2000UX sports a 6.5 to 19.5mm 3x zoom lens (the 35mm equivalent being
a 36 to 108mm lens). By combining the optical zoom with the 2x Digital Telephoto
feature, you get magnification up to 6x. But remember, digital zoom visibly
decreases the quality of the image because it achieves its magnification by
chopping out all but the central portion of the CCD array. Aperture ranges from
F/2.0 to F/11 and can be either automatically or manually controlled in 1/3-stop
increments. We really like digicams that give you true aperture control like
this, which makes them much easier to use with slave flashes, and allows true
shutter-priority operation as well. Additionally, a time saving Infinity focus
feature sets the camera focus at infinity for far away subjects, eliminating
the shutter lag due to autofocus operation.![]()
The contrast-detect autofocus ranges from 1.6 feet (0.5m) to infinity when shooting
in normal mode and from 7.9 to 19.7 inches (20 to 50cm) in macro mode. A manual
focus option is available as well, giving you a focus range from approximately
7.9 inches (20cm) to infinity in normal mode. But you have to be quick on your
feet in manual focus mode. If you don't perform a focusing function within two
seconds, the 'MF' indicator stops flashing and you have to start over. (Manual
focus makes use of the rocker toggle to control lens focusing. The left and
right arrows of the toggle (- and +) will control manual focus for two seconds
after the MF button is pushed, after which they return to their normal exposure-compensation
control function.)![]()
Our macro shooting tests revealed that the QV-2000 can capture a minimum area
of 2.25 x 3.0 inches (57 x 75mm) at closest focus. This minimum coverage is
about in the middle of the current range of two megapixel cameras. (December,
1999).![]()
Overall, lens distortion was pretty good with only moderate barrel distortion
(0.73 percent) at the wide angle end, tapering to an essentially imperceptible
pincushion distortion (0.06 percent) at the telephoto end. Chromatic aberration
was quite low also, only about one pixel (0.06 percent) in wide angle, and not
visible at all in telephoto mode.![]()
Exposure
The QV-2000UX gives you a lot of options when it comes to exposure. First of
all, there are eight modes to choose from: Program, Movie, Panorama, Aperture
Priority, Shutter Speed Priority, Landscape, Portrait and Night Scene. Program
mode is the traditional, let-the-camera-do-everything mode. Panorama mode supports
panorama shooting by locking exposure and white balance on the first picture
of a series, and by providing alignment guides to help you align successive
shots. You can easily guess what the other modes are set up for, based on their
names. An interesting feature on the QV-2000UX is that the camera allows you
to program certain settings that it recalls when powered on. For example, if
you don't want the flash to revert to Auto each time the camera is turned off,
you can program it otherwise.![]()
Casio doesn't specify an equivalent ISO sensitivity for the QV-2000, but our
tests indicate that it normally responds at an ISO rating of 125 in "normal"
mode, and ~200 in "High" sensitivity mode.![]()
Flash
As we mentioned earlier, the flash on the QV-2000UX pops up automatically when
the lens cover is slid open. You have four modes to choose from, all available
by pressing the flash button on the back of the camera: Auto, On, Off and Red-Eye
Reduction. Auto means that the camera decides when to use the flash, based on
existing light levels. The On setting means that the flash always fires and
Off means that the flash never fires. Red-Eye Reduction mode emits a small pre-flash
before the camera fires the full flash, reducing the occurrence of the Red-Eye
Effect. In normal flash mode, the QV-2000 emits only a single flash when the
shutter is triggered, making it compatible with conventional slave-flash triggers.![]()
Flash range is from 1.6 to 13.1 feet (0.5 to 4 m), a rating that agreed with
our own test results. Depending on lighting conditions, the camera shake warning
will appear on the LCD when the zoom is all the way at the telephoto end or
if a slow shutter speed is being used, regardless of the flash setting. You
can set the flash intensity to either Strong, Normal or Weak, a nice control
feature.![]()
AF Lock
The QV-2000UX doesn't have a menu option for changing the AF lock, although
you can of course use manual focus for those times when you want to keep the
focus set at some particular distance. You can lock the focus manually when
shooting off center subjects by framing the main area you want focused and halfway
pressing the shutter button. Then, keeping the shutter button halfway pressed,
shift back over to your original composition and snap the image. (This procedure
locks the exposure and white balance settings as well.)![]()
Metering
The QV-2000UX gives you three metering options: Multi, Center and Spot. Multi
takes readings from across the entire image and provides a balanced exposure
setting. Center takes readings from the center area of the image and judges
exposure based on those readings. Spot takes a reading from a very limited spot
at the center of the image and judges exposure purely for the subject. Spot
metering is very useful for those times when the subject is much darker or much
lighter than the background. (People shots with the sun behind the subjects
is a common situation calling for spot metering.)![]()
White Balance
You have six options available for white balance on the QV-2000UX: Auto, Daylight,
Shade, Tungsten, Fluorescent and Manual. Manual white balance lets you set the
white balance to exactly match the specific lighting conditions, by holding
a white piece of paper in front of the camera and pressing the Display button.
Pressing the Set button returns the setting to the last one saved. (We really
like manual white balance options like this, because you can create subtle color
effects by using off-white pieces of paper to set the balance with. For instance,
a slightly bluish piece of paper will produce images with a warm cast, while
a yellowish sheet will produce cooler tones in the subsequent pictures. Very
handy when you're trying for a deliberate color cast to achieve a mood or creative
effect, and want to "fake out" the camera's normal white balance processing!)
Although we didn't experiment with it to any great extent, it appears that both
Night mode and the high ISO sensitivity setting affect white balance significantly,
seemingly disabling the function in our tests, and reverting to a "daylight"
color balance when either option is selected.![]()
Exposure Compensation (EV)
You can manually adjust the exposure of an image to compensate for bright white
objects, backlit subjects, dark backgrounds, etc. To adjust, simply press the
right and left arrows on the rocker toggle button and the EV increments will
appear on the LCD monitor as small arrows beneath a +/- sign. You can adjust
the exposure in 1/3 EV steps from -2 to +2. This value automatically reverts
back to zero once the shutter button is pressed, which means you have to remember
to set it after each exposure. (We have mixed feelings about this. The immediate
reset is good in that you don't have to worry about spoiling subsequent pictures
by forgetting that you have an EV adjustment dialed-in. On the other hand, if
you're shooting a series of pictures under the same lighting conditions, it's
a nuisance to have to set the exposure before each shot.) EV adjustments can
be made in all exposure modes except for Panorama.![]()
Quick Shutter
The QV-2000UX features a Quick Shutter option which lets you record up to six
images at intervals of approximately 1.8 seconds with successive actuations
of the shutter button. (These numbers based on our measurements, the manual
states up to 5 shots at 1.5 second intervals.) This function is available in
all modes except for Panorama and the shutter interval depends on the amount
of CompactFlash space and image content. Quick Shutter will disable itself when
the flash is charging, when a slow shutter speed is being used and when conditions
cause the autofocus to take too long. Also, if the battery level is at its last
third, the Quick Shutter option is not available.![]()
This "Quick Shutter" mode apparently writes image data to a buffer
memory before copying it to the memory card. When it isn't activated, the camera
will make you wait for each image to be written to the memory card before letting
you take the next one. We were surprised to find though, that the Quick Shutter
mode apparently isn't available when using an IBM Microdrive for the camera's
storage. It's disabled when battery power is low, to avoid situations where
data could still be being copied from the buffer memory when the battery gives
out. (Interrupting data-copy operations to a CompactFlash card is a Bad Thing
that could cause the card to become corrupted and all data lost. - DON'T remove
a card while the little "access" LED above the card slot is blinking!)![]()
Continuous Recording
The Continuous Recording function allows you to record up to six images at intervals
of around 0.5 seconds while holding down the shutter (available in every mode
except Panorama). As with the Quick Shutter feature, the time interval depends
on battery power, CompactFlash space and the amount of image information. Flash
is not available in this mode and Casio notes that when using the Night Scene
mode or a fixed or slow shutter speed, the camera may only record five images.![]()
Movie Recording
The QV-2000UX lets you record silent movies of about 30 seconds in length in
a 320 x 240 pixel AVI format. An interesting feature here is that you have the
option of Past or Normal movie record modes. Past allows you to record events
occurring before the shutter button was pressed. Apparently, immediately after
the Past selection is made, the camera begins continuously recording images
into a buffer memory. Once you press the shutter button, the camera tells you
to standby while it writes the images and then it lets you add new images to
the buffer. You stop recording by hitting the shutter button a second time and
the camera writes it to the media. Normal mode is pretty straightforward, the
camera simply starts recording once the shutter button is pressed. Note that
the flash is disabled during movie recording and the Past selection gives you
only about 10 seconds of record time (times vary, of course, depending on CompactFlash
space).![]()
Self-Timer
The Self-Timer button on the back of the QV-2000UX accesses the self-timer mode,
which gives you either 10 or two seconds before the shutter fires. (You can
choose either time delay via an option in the LCD menu system.) The self-timer
light on the front of the camera flashes until the end of the countdown and
the LCD monitor goes blank until the operation is complete. We like the provision
of a 2 second self-timer option, which is very handy for avoiding camera shake
when working with long exposures on a tripod, especially in macro shooting situations.![]()
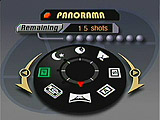
Panorama Mode
The Panorama capture mode lets you record a series of images to be put together
into a panoramic shot. Once in the mode, you fire the shutter on the first image
and a ghostly copy of the right edge of the image remains on the screen to assist
in lining up the next one. End the series by pressing the Menu button. Up to
nine images can be grouped together into one panoramic image in the camera.
To link more than nine, Casio suggests taking successive images and then piecing
them together in the computer later. You can also view the entire panoramic
image in Playback mode. (This in-camera panorama viewing is unique to Casio,
as far as we know, and a lot of fun to play with. - The "stitching"
is only valid for in-camera viewing, as the original image files aren't modified,
but it's neat to be able to see a preview of your panorama without having to
go to the computer.)![]()
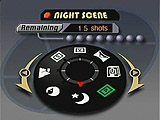
Night Scene Mode
The Night Scene mode sets up the camera for recording twilight or night subjects
with slow shutter speeds, apparently also incorporating a "dark calibration"
post-exposure shot of the back of the shutter (a reference black frame) to drastically
reduce image noise. You can use the flash for a slow synchro recording effect.
Note that the slow shutter speed also causes the LCD monitor to refresh very
slowly, meaning that the image you see may not be the same as the image recorded.
You can use the Quick Shutter setting in this mode, but it records four shots
instead of five before making you wait. Also note that the contrast adjustment
setting is not effective in this mode.![]()
Landscape Mode
Landscape mode allows you to record clear images in telephoto and wide angle
settings, where the entire image is in focus from foreground to background.
(This mode apparently just biases the exposure system toward smaller apertures,
increasing depth of field. The short focal lengths of digicam lenses means that
depth of field is generally much greater than that of 35mm cameras at similar
aperture values...)![]()
Portrait Mode
Portrait mode adjusts the focus so that the background is slightly blurred while
the subject remains in tight focus (by using a larger lens aperture).![]()
Aperture Priority Mode
This mode simply gives you direct control over the aperture, with a range in
1/3 f-stop increments from F/2.0 to F/11. The camera automatically adjusts the
shutter speed to correspond with the aperture.![]()
Shutter Speed Priority Mode
This mode offers direct control over the shutter speed, with a range of 1/2
to 1/800 seconds. The camera automatically adjusts the aperture to correspond
with the shutter speed. (The 1/3 f-stop aperture resolution on the QV-2000UX
means the camera can set exposure accurately in shutter priority mode, without
having to tweak the shutter time you've asked for.)![]()

Special Bonus - Full Manual Mode!
A special hidden bonus for QV-2000 owners, but one Casio apparently was going
to keep to itself! - We owe this one to Steve's Digicams and one of their Japanese
readers: From Shutter Priority mode, if you press the Set button and either
the left or right arrows of the rocker toggle simultaneously, the LCD will switch
to display both aperture and shutter speed values at the same time. You can
control the shutter speed with the up/down arrows of the rocker toggle, and
the aperture values with the left/right arrows. VERY cool! - Very few digicams
have this capability as of this writing (December, 1999).![]()
There is one quirk in the user interface for this mode though: The camera will
only enter the mode if there's an aperture value available to change to when
you hit the + or - arrow. A little difficult to explain, but here's what happens:
If for some reason the aperture is already wide open, and you try to enter full
manual mode by pressing Set and "-", nothing will happen (the aperture
is already wide open). If you press Set and "+" though, it will work
fine. Likewise, if the aperture is already stopped-down all the way to f/11,
pressing Set and "+" will have no effect, but Set and "-"
will. A minor quirk, but perhaps why Casio left it out of the manual. You can
exit manual mode either by pressing the Mode button again, or by shutting off
the camera. (It always powers up in Program mode.)![]()
Shutter Lag/Cycle Times
When you press the shutter release on a camera, there's usually a lag time before
the shutter actually fires. This time allows the autofocus and autoexposure
mechanisms time to do their work and can amount to a fairly long delay in some
situations. Since this number is almost never reported on, and can significantly
affect the picture taking experience, we now routinely measure it using an electronic
test setup, accurate to ~0.01 seconds.![]()
Shutter delay on the QV-2000 varied from 1.15 seconds for full autofocus, through
0.43 seconds when using the manual focus option, down to 0.17 seconds when the
camera was prefocused by half-pressing the shutter button prior to the exposure
itself. The 1.15 seconds is a little on the slow side for current digicams,
many of which run about 0.8 seconds in that mode. On the other hand, the 0.17
seconds for prefocused shots is faster than most digicams we've tested (December,
1999). Shot to shot cycle time in "Quick" shutter mode was quite fast,
running about 2.57 seconds between shots with full autofocus, or 1.83 seconds
when manual focus was used. Cycle time increased to about 4.7 seconds if we
shot quickly enough to fill the buffer memory, but this was pretty rare, given
how quickly it emptied the moment we stopped hitting the shutter button. (In
autofocus mode, we hardly ever could shoot quickly enough to fill the buffer.
Using manual focus, it took about 8 shots at maximum resolution and quality
to fill the buffer memory, and the camera was still ready to take the next shot
in only 4.7 seconds after that.) In continuous mode, the camera shot at exactly
2.0 frames per second until the buffer filled (6 shots at either high or low
resolution).![]()
User Interface
We were really impressed with the user interface on the QV-2000UX, especially
with its very cool 3D menu system, as we've already shown above. Although the
placement of the controls doesn't allow for one handed operation, the buttons
are well laid out and marked. We also really appreciated the ability to instantly
enter Playback without changing the camera's mode simply by pressing the Play
On/Off button. Commonly-used camera functions navigate very quickly and easily,
via the external control buttons. The sheer number of options available in the
LCD menu system can make the process of adjusting multiple selections somewhat
tedious. Still, we found the user interface very clear in its functioning, and
had no trouble navigating it. (At least we didn't once we developed a sense
of which options were located on which menu screen.)![]()

Shutter Button
Located on top of the camera, with a smooth silver finish. In all capture modes,
sets focus and/or exposure when halfway pressed and fires the shutter when fully
pressed.![]()

Mode Button
Located on top of the camera, marked by the word 'mode' in light gray. In all
camera modes, pulls up the (unusually attractive) 3D exposure mode menu which
has the following options:![]()
 Program:
puts the camera in charge of exposure decisions.
Program:
puts the camera in charge of exposure decisions.
 Movie:
records up to 30 second movies without sound.
Movie:
records up to 30 second movies without sound.
 Panorama:
records up to nine images as one panoramic image.
Panorama:
records up to nine images as one panoramic image.
 Aperture
Priority: the camera controls shutter speed in accordance with user set
aperture.
Aperture
Priority: the camera controls shutter speed in accordance with user set
aperture.
 Shutter
Speed Priority: the camera selects aperture in accordance with user set
shutter speed.
Shutter
Speed Priority: the camera selects aperture in accordance with user set
shutter speed.
 Landscape:
fixes the aperture and focus for far away subjects so that all foreground
and background are in focus. (That is, sets a small aperture value, and the
focus to the "hyperfocal" distance.)
Landscape:
fixes the aperture and focus for far away subjects so that all foreground
and background are in focus. (That is, sets a small aperture value, and the
focus to the "hyperfocal" distance.)
 Portrait:
sets the aperture so that the subject is in focus while the background is
blurred. (That is, forces a large lens aperture for shallow depth of field.)
Portrait:
sets the aperture so that the subject is in focus while the background is
blurred. (That is, forces a large lens aperture for shallow depth of field.)
 Night
Scene: utilizes slow shutter speeds to capture night and backlit subjects.
Night
Scene: utilizes slow shutter speeds to capture night and backlit subjects.

Self-Timer / Folder Button
Located on top of the camera, to the left of the Mode button, this button is
marked with a gray self-timer symbol and a green folder icon.![]()
- In all capture modes, activates the self-timer for either 2 or 10 seconds.
- In Playback mode, selects which folder you would like to play back.

Manual Focus / Infinity / Macro Button
Located on top of the camera, to the left of the Self-Timer / Folder button,
this button is marked with a gray MF, an infinity symbol, and a macro flower
symbol.![]()
- In all capture modes, accesses the manual, infinity and macro focusing options.
- In manual focus mode, briefly activates the rocker toggle +/- buttons to
control focus.

Flash Button
Located on top of the camera, to the left of the Manual Focus / Infinity / Macro
button, this button is marked with a gray flash symbol.![]()
In all capture modes except for Movie and Panorama, selects the flash operating
mode from any of the following:
- Auto: camera chooses when to fire flash based on existing light conditions.
- On: flash always fires, regardless of lighting conditions.
- Off: flash never fires, regardless of lighting conditions.
- Red-Eye Reduction: camera emits a small pre-flash before firing the
full flash.

Dioptric Adjustment Dial
Small, black, notched dial located on the left side of the optical viewfinder
which adjusts the viewfinder to accommodate eyeglass wearers.![]()

T/W Zoom Lever
Located on the top right hand side of the QV-2000UX back panel, the lever is
marked with a gray 'T' and 'W.'![]()
In all capture modes, this lever controls the optical zoom. Once the end of
the telephoto range is reached, one more press of the 'T' end digitally zooms
in 2x if the digital telephoto option is enabled.![]()

Play On/Off Button
Located on the right side of the LCD monitor on the camera's back panel, this
button is simply marked 'Play On/Off.'![]()
In any capture mode, this button accesses the Playback mode for viewing recorded
images and movies. If the camera is turned off, pressing this button both turns
the camera on and begins image playback. Pressing it again with the front cover
closed turns the camera off again.![]()
![]()
Display Button
Located beneath the Play On/Off button, this button is marked 'Disp' in gray
letters.![]()
- In all capture modes, turns the LCD monitor and information display on and
off.
- In Playback mode, turns the information display on and off.
![]()
Menu Button
Located on the top left hand side of the camera's back panel, this button is
marked with the word 'Menu' in gray.![]()
In all capture modes and in Playback mode, this button calls up the settings
menus for that mode. It also serves as the "back" button for backing
out of menu selections.![]()
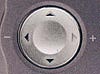
Rocker Toggle Button
Located on the back panel of the camera, on the left side of the LCD monitor,
this button features four raised arrows.![]()
- In all capture modes and in Playback mode, navigates the settings menus.
- In all capture modes except for Panorama, the left and right arrow buttons
control the exposure compensation (EV).
- In Playback mode, the left and right arrows scroll through recorded images.
When using the playback zoom feature, all four arrows allow you to scroll
around within the magnified view.
![]()
Set Button
Located beneath the rocker toggle button and marked with the word 'Set' in gray
letters.![]()
- In all capture and Playback mode settings menus, selects menu options.
Camera Modes and Menus
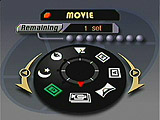
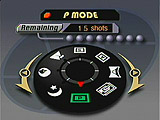
The QV-2000's menu system is definitely one of its more distinctive features!
It looks more like a video game or a set piece from a science-fiction movie
than the user interfaces we're accustomed to seeing on other digicam menus.
This effect is strongest in the Mode menu, reached by hitting the Mode button
on the right hand side of the top panel. You're presented with the 3D dial design
shown above right. As you press the left or right arrow keys, the dial rotates
to allow selection of major camera modes. It thus mimics the operation of a
conventional mode dial, only on the LCD screen, rather than as an external control
knob. Very attractive, and the icons are clearer than would typically be the
case on an external control.![]()
![]()
Program Mode
Accessed by hitting the Mode button and scrolling around to the 'P' for Program
mode. Program gives the camera full control over exposure settings like aperture
and shutter speed, although you can make exposure adjustments using the left
and right arrow buttons as described above. Pressing the Menu button in this
mode brings up the following menus (selected by using the up and down arrow
keys):![]()
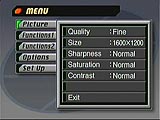
Picture Menu:
- Quality: selects between Fine, Normal and Economy image quality settings.
- Size: selects between 1600 x 1200 and 800 x 600 image sizes.
- Sharpness: selects between Hard, Normal and Soft image sharpness
settings.
- Saturation: selects between High, Normal and Low color saturation
settings.
- Contrast: selects between High, Normal and Low contrast settings.
![]()
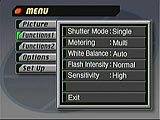
Functions 1 Menu:
- Shutter Mode: selects between Single, Quick and Continuous shutter
settings.
- Metering: selects between the following metering modes:
- Multi: camera reads across the entire image.
- Center: camera reads from an area in the center of the image.
- Spot: camera reads from a very limited spot at the center of the
image.
- White Balance: selects between the following white balance settings:
- Auto: the camera chooses white balance setting based on light conditions.
- Daylight: white balance for sunny, outdoor settings.
- Shade: for shade or blue tinted sunlight.
- Tungsten: white balance for red tinted incandescent light.
- Fluorescent: white balance for green tinted fluorescent light.
- Manual: allows you to set white balance for special lighting.
- Flash Intensity: selects between Strong, Normal and Weak flash intensity.
- Sensitivity: Selects between High and Normal sensitivity settings.
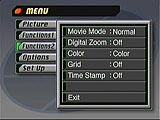
Functions 2 Menu:
- Movie Mode: chooses between Past and Normal movie modes.
- Digital Zoom: turns the digital zoom function off and on.
- Color: selects between Color, B/W and Sepia exposure modes.
- Grid: turns on or off an on-screen grid to help compose images.
- Time Stamp: turns the image time stamp function on and off.
![]()
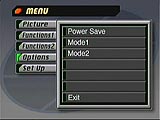
Options Menu:
- Power Save: alters the time setting for Sleep and Auto Power Off
features.
- Mode 1: specifies which settings are retained when the camera is
powered off (record mode, focus, flash and digital zoom settings only).
- Mode 2: specifies which settings are retained when the camera is
powered off (metering, white balance and flash intensity only) (We're not
sure why these functions are split into two separate "modes", as
they are all individually controllable.
![]()
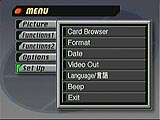
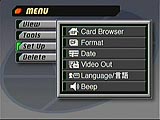
Setup Menu:
- Card Browser: selects the card browser file type from the following:
- Off
- Type 1: provides detailed information about each image and also includes a Slide Show feature.
- Type 2: viewer format with a Slide Show feature.
- Type 3: shows information about each image, useable with any browser.
- Type 4: provides basic image viewing which should be useable with any browser.
- Off
- Format: formats the memory card.
- Date: changes the date setting and format.
- Video Out: specifies the format of the video output signal at NTSC
(United States and Japan) or PAL (Europe).
- Language: selects display language from English or Japanese.
- Beep: turns the camera beep sound on or off.
![]()
Movie Mode
Accessed by hitting the Mode button and scrolling around to the movie symbol,
this mode allows you to make up to 30 second, silent movies depending on the
amount of CompactFlash space available. Pressing the Menu button in this mode
pulls up the same menus as in Program mode.![]()
![]()
Panorama Mode
Accessed by hitting the Mode button and scrolling around to the Panorama symbol,
this mode allows you to take up to nine successive images which the camera puts
together as one panoramic image. Pressing the Menu button in this mode pulls
up the same menus as in Program mode.![]()
![]()
Aperture Priority Mode
Accessed by hitting the Mode button and scrolling around to the 'A,' this mode
puts you in control of aperture while the camera selects the shutter speed automatically.
Pressing the Menu button in this mode pulls up the same menus as in Program
mode.![]()
![]()
Shutter Speed Priority Mode
Accessed by hitting the Mode button and scrolling around to the 'S,' this mode
puts you in control of shutter speed while the camera selects the aperture automatically.
Pressing the Menu button in this mode pulls up the same menus as in Program
mode. (As noted earlier, this mode includes a full-manual option.)![]()
![]()
Landscape Mode
Accessed by hitting the Mode button and scrolling around to the landscape symbol,
this mode records images that have both the foreground and background in focus
in both wide angle and telephoto modes. Pressing the Menu button in this mode
pulls up the same menus as in Program mode.![]()
![]()
Portrait Mode
Accessed by hitting the Mode button and scrolling around to the portrait symbol,
this mode sets the aperture so that the subject is in focus and the background
is blurred. Pressing the Menu button in this mode pulls up the same menus as
in Program mode.![]()
![]()
Night Scene Mode
Accessed by hitting the Mode button and scrolling around to the night symbol,
this mode utilizes a slow shutter speed to record images in dark areas. Pressing
the Menu button in this mode pulls up the same menus as in Program mode (with
the exception of the Contrast option, which is not available in this mode).![]()
Playback Mode
Accessed in any capture mode by pressing the Play On/Off button on the back
panel of the camera, this mode lets you view or delete recorded images. Pressing
the Menu button in this mode pulls up the following menus:![]()
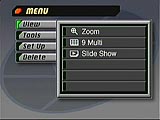
View Menu:
- Zoom: enlarges the image on the LCD monitor for close-up viewing.
- 9 Multi: displays stored images nine at a time as small thumbnails
on the monitor screen.
- Slide Show: automatically scrolls through the images one by one.
![]()
Tools Menu:
- Protect: protects images against deletion with the following options:
- Select: protects an individual image.
- Folder: protects all images in a specified folder.
- All: protects all images on the CompactFlash.
- DPOF: specifies images for printing on a DPOF printer (individual,
folder or all).
- Screen Saver: turns the screen save on and off.
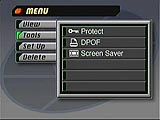
![]()
Setup Menu:
- Card Browser: As noted earlier, the QV-2000 writes HTML files to
the memory card, allowing you to browse through your images with a standard
internet 'web browser (like Netscape Navigator or Microsoft Internet Explorer).
This option selects the card browser file type from the following:
- Off
- Type 1: provides detailed information about each image and also includes
a Slide Show feature.
- Type 2: viewer format with a Slide Show feature.
- Type 3: shows information about each image, useable with any browser.
- Type 4: provides basic image viewing which should be useable with
any browser.
- Format: formats the memory card.
- Date: changes the date setting and format.
- Video Out: specifies the format of the video output signal at NTSC
(United States and Japan) or PAL (Europe).
- Language: selects display language from English or Japanese.
- Beep: turns the camera beep sound on or off.
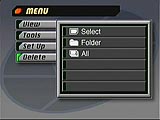
Delete Menu:
- Select: deletes a specific image.
- Folder: deletes all unprotected images in a specific folder.
- All: deletes all unprotected images.
![]()
Image Storage and Interface
 The
QV-2000UX utilizes CompactFlash (Type I and II) as its image storage medium,
which should never be removed from the camera while in use. An 8MB card comes
with the camera, but upgrades are available to 15MB, 30MB, 48MB and 64MB. An
interesting feature is that the QV-2000UX creates an HTML image-index file with
four card browser options available (compatible with Microsoft Internet Explorer
4.01 or later and Netscape Communicator 4.5 or later). QuickTime 3 is required
to play back movie images. The four different card browser formats let you choose
how much information is recorded with each image (a very detailed chart in the
manual explains the settings). Click here to see
an example of a picture index created by the QV-2000UX.
The
QV-2000UX utilizes CompactFlash (Type I and II) as its image storage medium,
which should never be removed from the camera while in use. An 8MB card comes
with the camera, but upgrades are available to 15MB, 30MB, 48MB and 64MB. An
interesting feature is that the QV-2000UX creates an HTML image-index file with
four card browser options available (compatible with Microsoft Internet Explorer
4.01 or later and Netscape Communicator 4.5 or later). QuickTime 3 is required
to play back movie images. The four different card browser formats let you choose
how much information is recorded with each image (a very detailed chart in the
manual explains the settings). Click here to see
an example of a picture index created by the QV-2000UX.![]()
We mentioned briefly that the QV-2000 supports the Type II CompactFlash standard:
These cards are slightly thicker than ordinary CF cards, allowing higher storage
capacities, and even the use of tiny hard drives, like the IBM Microdrive(tm).
While few users will need more than 128 megabytes of memory (the current limit
of Type I CF cards), there's really no reason not to design cameras to support
Type II cards, since it's just a matter of adding an extra millimeter or two
to the card socket. In our own tests, the Microdrive worked fine with the Q-2000,
although the "Quick Shutter" option didn't appear to be operative
when a Microdrive was being used. On the plus side though, the Microdrive can
accept data quite a bit faster than most CF cards, so cycle times with the Microdrive
are quite short.![]()
The QV-2000UX organizes images into storage folders, assigned numbers from 100
to 998. Within each folder, images are numbered from 0001 to 9900 and each folder
contains up to 100 files. An extremely detailed directory tree in the manual
shows exactly how information is encoded on the CompactFlash card.![]()
The QV-2000UX is one of the relatively few current (December, 1999) digicams
that support the USB interface standard. This way of connecting to the host
computer is enormously faster than the older serial-port method, and really
makes the issue of a separate card reader superfluous. We clocked the QV-2000
at only 2.74 seconds, in transferring a 921,600 byte file. That's a transfer
speed of 336 Kbytes per second! While standalone USB card readers can go almost
three times as fast, the speed of the QV-2000 should be sufficient for anyone.
(At this speed, you could empty the entire 8 MB card in under 25 seconds.![]()
You can protect individual images on the CompactFlash card through the Playback
menu in Playback mode, preventing accidental deletion of images. If you want
to erase images, the Delete menu in Playback mode gives you the option of deleting
individual images, a folder or all images that aren't protected.![]()
Below are the approximate numbers of still images that will fit on the provided
8MB card and their compression ratios:![]()
Still Images:![]()
| Resolution/Quality vs Image Capacity |
|
|
||
|
|
Compression |
|
Compression |
|
| Fine Quality |
|
|
|
|
| Normal Quality |
|
|
|
|
| Economy Quality |
|
|
|
|
![]()
Video Out
U.S. models of the QV-2000UX come packaged with an NTSC video cable for connecting
to a television set. As soon as the camera is connected to the television, the
LCD monitor shuts off and the television set takes its place, displaying information
for image recording and playback.![]()
![]()
Power
The QV-2000UX runs on four AA alkaline, lithium or nickel-hydrogen rechargeable
batteries. Casio estimates that you should get around 380 shots when using average
alkaline batteries and around 920 with average lithium batteries. An AC adapter
comes with the camera also, useful for saving battery power when playing back
images or downloading.![]()
Here's how the QV-2000's actual power consumption measured up:![]()
![]()
|
|
|
| Capture Mode, w/LCD |
|
| Capture Mode, no LCD |
|
| Half-pressed shutter w/LCD |
|
| Half-pressed w/o LCD |
|
| Memory Write (transient) |
|
| Flash Recharge (transient) |
|
| Image Playback |
|
![]()
These power consumption numbers are fairly low relative to those we've measured
for most competing cameras. Subjectively, it did seem that batteries lasted
quite a bit longer in the QV-2000 than we're accustomed to.![]()
Included Software
The QV-2000UX comes with a USB cable (yeah!) and standard RS-232C serial cable,
allowing image transfer to systems running Windows 95, 98 or NT 4.0 or Macintosh
OS 8.1 and higher. An accompanying CD features the Photo Loader 1.0 software,
which downloads images from the camera to the computer. It also includes Panorama
Editor, which creates and plays back panoramic images, and QuickTime 3 for viewing
movies. Casio also throws in a copy of Microsoft Internet Explorer 5.0 for good
measure. All the software included in the box is for Windows systems (95/98/NT),
but the box says "Macintosh versions available," so the Mac software
is presumably available as an option.![]()
Test Results
In keeping with our standard policy, our comments here are rather condensed,
summarizing our key findings: For a full commentary on each of the test images,
see the QV-2000's "pictures" page.![]()
As with all Imaging Resource camera tests, we encourage you to let your own
eyes be the judge of how well the devices performed: Explore the images on the
pictures page, to see how well the QV-2000
performed, and how its images compare to other cameras you may be considering
buying.![]()
Overall, the QV-2000UX's performance was about average for 2 megapixel cameras,
but the aggressive pricing of the camera in the sales channels could make it
an excellent deal. (As of this writing in late December, 1999, the camera is
selling "on the street" for just over $500, a great deal for a 2 megapixel
camera with 3x optical zoom lens & good exposure controls.)![]()
The one overall issue we had with the QV-2000's pictures was a tendency to produce
a slight magenta coloration, especially in bright scenes. (This is yet another
situation where a camera's performance could be significantly improved by using
our favorite image-correction program, the $30 PhotoGenetics!) Other than this
magenta cast, color was generally good, and the camera avoids the all-too-common
digicam problem of producing purplish colors for blue objects.![]()
We felt the QV-2000's images of "natural" objects produced sharper
results than the "laboratory" resolution test target indicated, where
the visual resolution was only about 600-650 lines per picture height in the
vertical direction, and 650-700 in the horizontal. The camera will certainly
produce good-looking 8x10 prints, along with the rest of the 2 megapixel digicam
field, but it's sharpness and resolution aren't up to those of the top-end cameras.
(We did observe though, that we could get significantly sharper images by shooting
with the camera's sharpness setting in the "soft" mode, and then applying
aggressive sharpening in Photoshop(tm) with the unsharp masking operator.)![]()
Overall, the QV-2000's strongest point is the unusual level of control it provides
over exposure parameters, offering unusually fine aperture resolution, full-program,
aperture-priority, and shutter-priority metering, and even a "hidden"
full-manual exposure mode. Other options include control over contrast, color
saturation, flash intensity, and camera light sensitivity. This is perhaps the
most exposure-control flexibility we've seen yet at this price point!![]()
The QV-2000's viewfinder systems are interesting in that the optical and LCD
viewfinders agree very closely with each other: Often, there are large differences
between the field of view shown by a camera's optical and LCD finders, but the
QV-2000 is very consistent in this respect, showing between 86 and 89.5% of
the final image area at all focal lengths, in both the optical and LCD viewfinders.
While we would like to see the overall accuracy a bit higher, these figures
are better than most optical finders, and the close agreement between the two
means you won't have to perform as many mental gymnastics to keep track of the
relationship between what you're seeing and what will eventually end up in the
file.![]()
The QV-2000 performed quite well in Macro mode, with a minimum area coverage
of only 2.25 x 3.0 inches (57 x 76 mm). While not reaching the microscopic level
of some recent cameras, the QV-2000's macro coverage is clearly better than
most.![]()
For a bottom line to our tests, we feel that the QV-2000 provides good image
quality, but a really excels in the range of exposure control it provides. -
A good choice for someone interested in exercising more photographic control
than most digicams allow, without breaking their budget.![]()
Conclusion
The QV-2000UX packs a lot into a small package: It offers 2 megapixel resolution,
a great user interface that's both highly functional in actual shooting, and
very attractive as well. Exposure control is second to none, with 1/3 f-stop
control over both aperture or shutter speed, and even a full manual mode for
simultaneous control over both. The sliding cover is a good idea, but needs
a better implementation, and the camera's tendency to produce a magenta color
shift in high-brightness situations cries out for a custom "genotype"
in our favorite PhotoGenetics (http://www.q-res.com) image-correction program
to allow automatic correction of the problem post-capture. Despite these shortcomings,
the QV-2000 provides more real picture-taking control than probably any other
camera currently on the market (December, 1999), making it a solid contender
in the 2 megapixel marketplace. With its aggressive pricing, it's a great bargain
for serious amateurs looking for the same level of exposure control in a digicam
that they're accustomed to in the film world.
Reader Sample Images!
Do you have a QV-2000UXcamera? If you'll post an album of your samples
on one of the photo-sharing services and email us at [email protected],
we'll list the album here for others to see!
- Get Outdoors New England Sample Photos - These photos were actually taken by Ken Leonard. Please note that all the images are compressed, and most have been edited down using Microsoft's PhotoDraw.
For More Info:
View the data sheet for the QV-2000UX![]()
View the test images from the QV-2000UX![]()

Follow Imaging Resource: