Sony Cyber-shot DSC-R1Sony "breaks the mold" with a unique SLR/all-in-one hybrid design.<<Optics & Lens Tests (!) :(Previous) | (Next): Timing>> Page 7:Exposure and FlashReview First Posted: 09/20/2005, Updated: 11/18/2005 |
Exposure
| Free Photo Lessons | |
|
In straight Auto mode, the camera controls everything about the exposure, except for flash, zoom, and focus. Program AE mode keeps the camera in charge of the exposure, while you have control over all other exposure options. A Program Shift option lets you cycle through a range of equivalent exposures, placing emphasis on shutter speed or aperture, simply by turning the Main Command dial in Program AE mode. Aperture Priority mode lets you select the lens aperture setting, from f/2.8-f/4.8 to f/16 depending on the zoom setting, while the camera selects the most appropriate corresponding shutter speed. In Shutter Priority mode, the user selects the shutter speed, from 1/2,000 to 30 seconds, while the camera chooses the best corresponding aperture setting. (Available shutter speeds also depend on the current ISO setting.) Switching to Manual mode gives you control over both shutter speed and aperture, with a Time setting available for longer exposures. The Time setting is identical to a traditional Bulb mode, where you can keep the shutter open for as long as you need to, up to the 30 second maximum time. Like many other higher-end digital cameras, the R1 also offers a "program shift" capability, where you can step through a series of equivalent aperture/shutter speed combinations by rotating the Main Command dial. This is often more useful than shutter- or aperture-priority mode, as you can still let the camera decide all the exposure variables, but simply tell it to bias its decision toward larger or smaller apertures, slower or faster shutter speeds. This avoids the problem of inadvertently selecting a shutter speed or aperture that would result in an over- or underexposure, but still gives you good control over depth of field and motion blur.
As described above, the R1 also offers four preset scene modes, accessed via the Exposure Mode dial. Portrait mode produces better-looking people shots by enhancing skin tones and using larger lens apertures to reduce the depth of field (creating a slightly blurred background). Landscape mode focuses on distant subjects, and is best for broad vistas of scenery. In Twilight Portrait mode, the camera uses a slower shutter speed to allow more ambient light into the image, however it also records true black values and preserves the bright colors of artificial lighting. In standard Twilight mode, the camera uses a slower shutter speed as well, but disables the flash to preserve the color and ambiance of the scene.
The R1's default metering mode is a Multi evaluative system, which takes readings throughout the image to determine exposure. Center-Weighted and Spot metering options are also available. Spot metering is useful for high-contrast subjects, as it bases the exposure reading on the very center of the image, letting you set the exposure based on a small portion of your subject. Center-Weighted metering also bases the exposure on the center of the image, but the camera takes its readings from a much larger area in the middle of the frame. You can also hold or lock the exposure reading for a particular part of the image (without also locking the focus) by pressing the AE Lock button on the back panel.
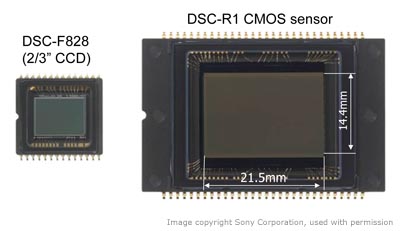
As we mentioned earlier, the Sony DSC-R1 has a much larger sensor than any other "all in one" digital camera, the chip dimensions approaching those of the "APS-C" size sensors used in many digital SLRs. Larger sensor pixels naturally convey greater light sensitivity, and lower noise levels than do smaller ones, so the R1's ISO capability approaches that of many digital SLRs currently on the market. The R1's light sensitivity can be set to Auto, or to ISO equivalents of 160, 200, 400, 800, 1,600, or 3,200. While the camera lets you set its ISO as high as 3,200, we found little value in doing so: Images shot at that sensitivity level were pretty much unusable due to high image noise and noticeable color shifts. Exposure compensation is adjustable from -2 to +2 exposure equivalents (EV) in one-third-step increments, and an auto-bracketing option can snap three shots in rapid succession, varying the exposure between each in steps of 0.3, 0.7, or 1.0 EV units. If you have the histogram display enabled on either viewfinder, you can see the effect of the exposure compensation adjustment on the live image area. Exposure compensation is adjusted by turning the Sub Command dial on the rear panel. The Auto Exposure Bracketing option is enabled through the Drive button, and you can set the bracketing parameters once you've selected Bracketing mode.
The R1's white balance system offers a total of seven options, including Auto, Daylight, Cloudy, Fluorescent, Incandescent, Flash, and One Push, which is the manual setting. The One Push mode determines white balance by snapping a picture of a white card. The camera then adjusts its color balance to render the white card with a neutral hue, and saves the setting as the One Push option. Three color modes are also available, and include Adobe RGB, Vivid, and Standard. You can also adjust image contrast, sharpness, and saturation, or record images in black and white or sepia tones.
A new offering under the R1's contrast setting is an option for A.G.C.S. (Advanced Gradation Control System). Because the range of brightness in the natural world is so much greater than can be properly shown on a CRT or a print, a perpetual challenge for photographic systems has been how to make the best use of the limited tonal range they have to work with. This problem can be particularly acute with digital cameras, most of which tend to expose like slide film, easily losing highlight detail, and plugging shadows. Many digital cameras have contrast adjustments that let you make fairly coarse adjustments to their tone curves, but the results are often hit or miss, as they're made without reference to the actual image itself.
More than just a contrast adjustment, AGCS analyzes the tonal distribution of the scene (the intensity histogram), and then stretches or compresses the tonal scale as needed to make best use of the total tonal range. The action taken depends on the particular scene being shot: A low contrast subject will have its tonal scale stretched (increasing contrast), while a subject with a very wide tonal range (such as a backlit subject) will have its tonal range compressed. Because it's histogram based, AGCS should do better dealing with different parts of the tonal scale in the same image: Duller highlights may be pushed higher up the tone scale and somewhat compressed, while dark shadows will also be pulled up the tonal scale, but have their tonal range expanded.
In our own test shooting with the DSC-R1, the effects of AGCS were very subtle, to the point that we could only see its operation clearly on one or two images. We'd hoped that the final production version of the camera's firmware would cause AGCS to have a broader impact, but it doesn't appear to have been the case. The concept of AGCS is an excellent one, if it can just be tweaked a little to have a greater impact on typical subjects.
Continuous Shooting
The R1 features a Continuous Shooting mode, accessed through the Drive button on the rear panel. The camera can capture a rapid series of up to three images without pausing. The three-frame limit applies regardless of the resolution images you're shooting, it seems to be a buffer memory limit involving the handling of the image data as it comes off the CMOS image sensor. The frame rate during the three frame burst is a very respectable 3.23 frames/second, but the camera has to pause between three and four seconds between bursts, to copy the data to the memory card, before it can continue. - The three-frame limit is one rather disappointing characteristic of the R1 relative to some of its competition, but is adequate for most situations other than sports shooting. (And even there, a well-practiced trigger finger is more valuable than almost any continuous shooting mode.)
A 10-second Self-Timer mode is also available, by pressing the Self-Timer/Index button on the rear panel.
Reader Comments! --> Visit our discussion forum for the Sony Cyber-shot DSC-R1!

Follow Imaging Resource: